transmission MERCEDES-BENZ C-Class 2011 W204 Service Manual
[x] Cancel search | Manufacturer: MERCEDES-BENZ, Model Year: 2011, Model line: C-Class, Model: MERCEDES-BENZ C-Class 2011 W204Pages: 320, PDF Size: 13.17 MB
Page 235 of 320
of the garage door. People could otherwise be
injured by the movement of the door.
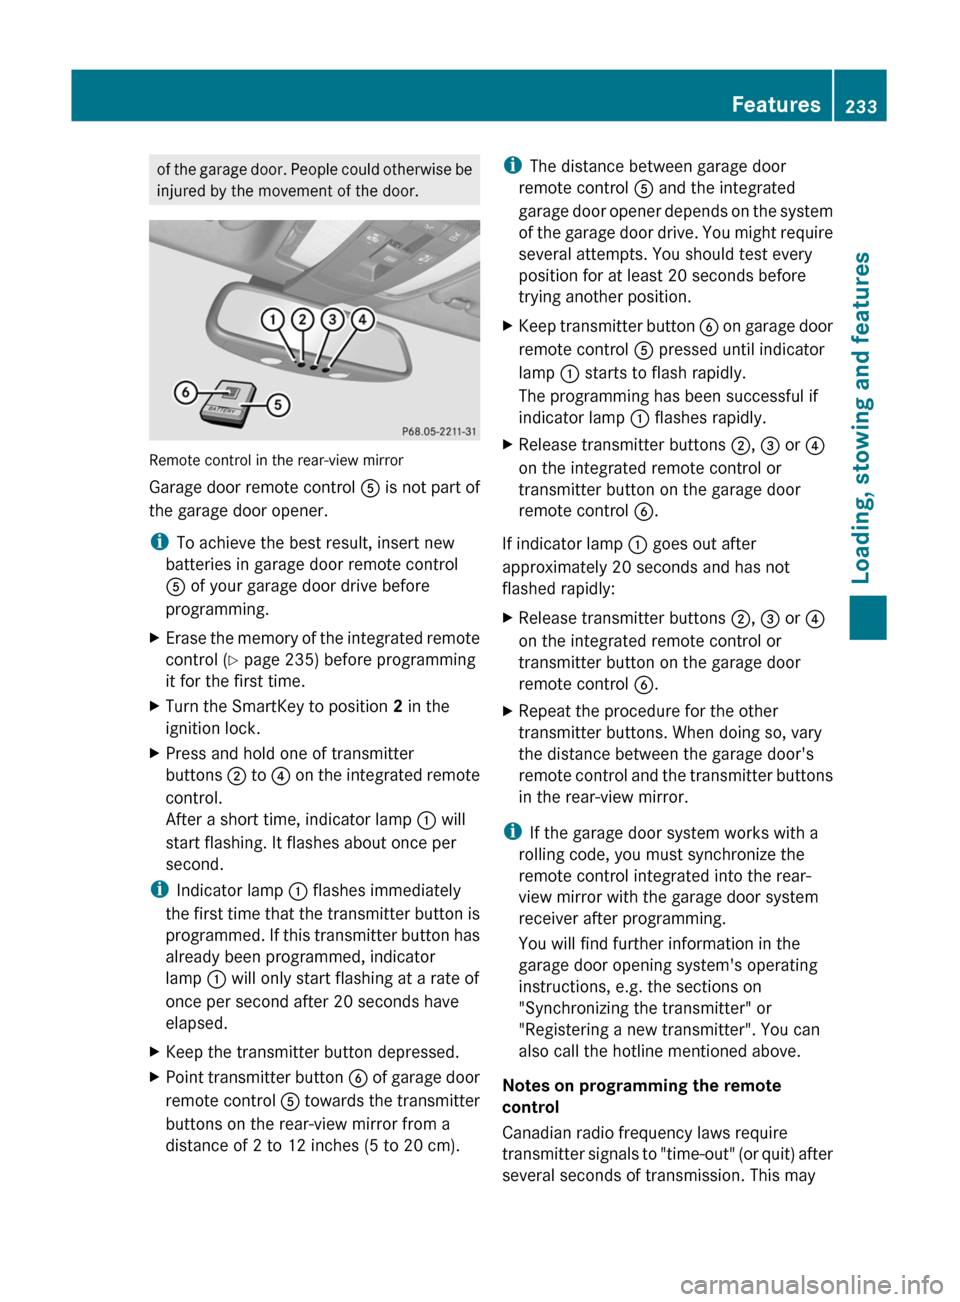
Remote control in the rear-view mirror
Garage door remote control A is not part of
the garage door opener.
i To achieve the best result, insert new
batteries in garage door remote control
A of your garage door drive before
programming.
XErase the memory of the integrated remote
control ( Y page 235) before programming
it for the first time.XTurn the SmartKey to position 2 in the
ignition lock.XPress and hold one of transmitter
buttons ; to ? on the integrated remote
control.
After a short time, indicator lamp : will
start flashing. It flashes about once per
second.
i Indicator lamp : flashes immediately
the first time that the transmitter button is
programmed. If this transmitter button has
already been programmed, indicator
lamp : will only start flashing at a rate of
once per second after 20 seconds have
elapsed.
XKeep the transmitter button depressed.XPoint transmitter button B of garage door
remote control A towards the transmitter
buttons on the rear-view mirror from a
distance of 2 to 12 inches (5 to 20 cm).i The distance between garage door
remote control A and the integrated
garage door opener depends on the system
of the garage door drive. You might require
several attempts. You should test every
position for at least 20 seconds before
trying another position.XKeep transmitter button B on garage door
remote control A pressed until indicator
lamp : starts to flash rapidly.
The programming has been successful if
indicator lamp : flashes rapidly.XRelease transmitter buttons ;, = or ?
on the integrated remote control or
transmitter button on the garage door
remote control B.
If indicator lamp : goes out after
approximately 20 seconds and has not
flashed rapidly:
XRelease transmitter buttons ;, = or ?
on the integrated remote control or
transmitter button on the garage door
remote control B.XRepeat the procedure for the other
transmitter buttons. When doing so, vary
the distance between the garage door's
remote control and the transmitter buttons
in the rear-view mirror.
i If the garage door system works with a
rolling code, you must synchronize the
remote control integrated into the rear-
view mirror with the garage door system
receiver after programming.
You will find further information in the
garage door opening system's operating
instructions, e.g. the sections on
"Synchronizing the transmitter" or
"Registering a new transmitter". You can
also call the hotline mentioned above.
Notes on programming the remote
control
Canadian radio frequency laws require
transmitter signals to "time-out" (or quit) after
several seconds of transmission. This may
Features233Loading, stowing and featuresBA 204 USA, CA Edition A 2011; 1; 5, en-UShereepeVersion: 3.0.3.62010-05-20T09:17:30+02:00 - Seite 233Z
Page 236 of 320
not be long enough for the integrated signal
transmitter to pick up the signal during
programming. Similar to this Canadian law,
some U.S. gate operators are designed to
"time-out" in the same manner.
If you live in Canada or have difficulties
programming the garage door opener
(regardless of where you live) when using the
programming steps (see above), proceed as
follows:XPress transmitter button ( ;, = or ?) and
hold it down during the following steps until
the setup has been completed
successfully.XAt the same time, press transmitter button
B of the garage door remote control for
two seconds, then release it for two
seconds, then press it again for two
seconds.XRepeat this sequence on transmitter
button B of the garage door remote
control until the frequency signal has been
learned.XIf the setup procedure is successful,
indicator lamp : flashes once slowly and
goes out after a few seconds.XContinue with the other programming
steps (see above).
Problems when programming
If you have problems when programming the
integrated remote control, please note the
following:
R check the transmitter frequency of garage
door remote control A (which can usually
be found on the rear of the remote control).
The integrated remote control is
compatible with equipment that operates
in the frequency range 280 to 390 MHz.
R replace the batteries in garage door remote
control A. This increases the likelihood of
garage door remote control A sending a
strong and precise signal to the integrated
remote control on the rear-view mirror.
R When aiming the garage door remote
control at the transmitter buttons on the
rear-view mirror, hold garage door remote
control A at differing distances and angles
from the transmitter button that you are
programming. Try different angles from a
distance of 2 to 12 inches (5 to 30 cm) or
the same angle from differing distances.
R If there is another garage door remote
control for the same device, perform the
programming steps again using the remote
control. Before performing these steps,
make sure that new batteries have been
installed in the garage door remote control.
R Align the antenna cable of the garage door
opener unit. This can improve signal
reception/transmission.
Opening or closing the garage door
Once programmed, the integrated remote
control will assume the function of the garage
door system's remote control. Please also
read the operating instructions for the garage
door system.
XTurn the SmartKey to position 2 in the
ignition lock.XPress transmitter button ;, = or ? in the
overhead control panel that you have
programmed to operate the garage door.
Garage door system with fixed code:
indicator lamp : lights up continuously.
Garage door system with rolling code:
indicator lamp : flashes briefly and then
lights up for approximately two seconds.
This is repeated for up to 20 seconds.
i The transmitter will transmit a signal for
as long as the transmitter button is being
pressed. The transmission will be halted
after a maximum of 20 seconds and
indicator lamp : will flash. Press the
transmitter button again, if necessary.
234FeaturesLoading, stowing and features
BA 204 USA, CA Edition A 2011; 1; 5, en-UShereepeVersion: 3.0.3.62010-05-20T09:17:30+02:00 - Seite 234
Page 246 of 320
brake pads/linings. Generally, park the
vehicle at operating temperature after
cleaning.
Exterior care
Automatic car wash
GWarning!
Braking efficiency is reduced after washing
the vehicle. This could cause an accident. For
this reason, you must drive particularly
carefully after washing the vehicle until the
brakes have dried.
You can wash the vehicle in an automatic car
wash from the very start.
! Never clean your vehicle in a Touchless
Automatic Car Wash as these use special
cleaning agents. These cleaning agents can
damage the paintwork or plastic parts.
If the vehicle is very dirty, pre-wash it before
cleaning it in an automatic car wash.
! In car washes with a towing mechanism,
make sure that the automatic transmission
is in transmission position N, otherwise the
vehicle could be damaged.
! Make sure that the side windows are
completely closed, that the ventilation/
heating is switched off and that the
windshield wiper switch is set to 0.
Otherwise, the rain/light sensor could be
activated, triggering unintended wiper
movements. This can cause damage to the
vehicle.
After using an automatic car wash, wipe off
wax from the windshield and the wiper
blades. This will prevent smears and reduce
wiping noises caused by residue on the
windshield.
Washing by hand
Carefully remove all deposits of road salt as
soon as possible when driving in winter.
Also, clean the insides of the wheels when
washing the underbody of the vehicle.XDo not use hot water and do not wash the
vehicle in direct sunlight.XUse a soft car sponge for cleaning.XUse a gentle cleaning agent, e.g. a
Mercedes-Benz approved car shampoo.XWash down the vehicle with a gentle water
jet.XDo not point the water jet directly at the air
inlets.XUse plenty of water and rinse the sponge
frequently.XRinse the vehicle with clean water and dry
it thoroughly with a chamois.XDo not allow the cleaning agent to dry on
the paintwork.
Power washers
GWarning!
Do not use power washers with circular-jet
nozzles (dirt grinders) to clean your vehicle, in
particular the tires. You could otherwise
damage the tires and cause an accident.
! Keep the distance between the vehicle
and the nozzle of the power washer at
11.8 in (30 cm). Information about the
correct distance is available from the
equipment manufacturer.
Move the power washer nozzle around
when cleaning your vehicle.
Do not aim directly at any of the following:
R tires
R door joint
R electrical components
R battery
R connectors
R lights
R seals
R trim elements
R ventilation slots
244CareMaintenance and care
BA 204 USA, CA Edition A 2011; 1; 5, en-UShereepeVersion: 3.0.3.62010-05-20T09:17:30+02:00 - Seite 244
Page 256 of 320
a qualified specialist workshop, e.g. an
authorized Mercedes-Benz Center.
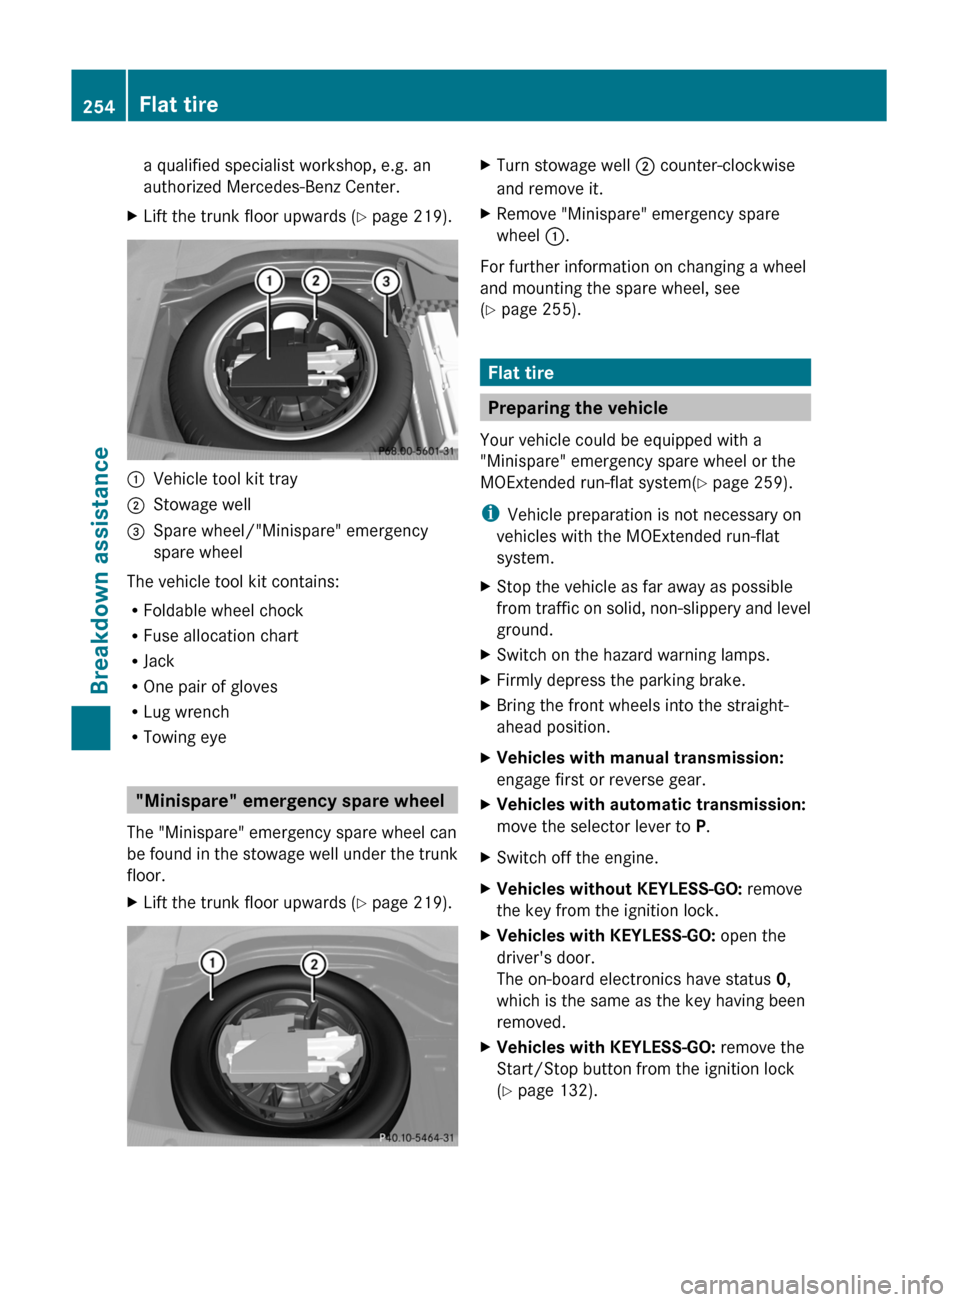
XLift the trunk floor upwards (Y page 219).:Vehicle tool kit tray;Stowage well=Spare wheel/"Minispare" emergency
spare wheel
The vehicle tool kit contains:
RFoldable wheel chock
RFuse allocation chart
RJack
ROne pair of gloves
RLug wrench
RTowing eye
"Minispare" emergency spare wheel
The "Minispare" emergency spare wheel can
be found in the stowage well under the trunk
floor.
XLift the trunk floor upwards (Y page 219).XTurn stowage well ; counter-clockwise
and remove it.
XRemove "Minispare" emergency spare
wheel :.
For further information on changing a wheel
and mounting the spare wheel, see
(Y page 255).
Flat tire
Preparing the vehicle
Your vehicle could be equipped with a
"Minispare" emergency spare wheel or the
MOExtended run-flat system(Y page 259).
iVehicle preparation is not necessary on
vehicles with the MOExtended run-flat
system.
XStop the vehicle as far away as possible
from traffic on solid, non-slippery and level
ground.
XSwitch on the hazard warning lamps.XFirmly depress the parking brake.XBring the front wheels into the straight-
ahead position.
XVehicles with manual transmission:
engage first or reverse gear.
XVehicles with automatic transmission:
move the selector lever to P.
XSwitch off the engine.XVehicles without KEYLESS-GO: remove
the key from the ignition lock.
XVehicles with KEYLESS-GO: open the
driver's door.
The on-board electronics have status 0,
which is the same as the key having been
removed.
XVehicles with KEYLESS-GO: remove the
Start/Stop button from the ignition lock
(Y page 132).
254Flat tireBreakdown assistance
BA 204 USA, CA Edition A 2011; 1; 5, en-UShereepeVersion: 3.0.3.62010-05-20T09:17:30+02:00 - Seite 254
Page 265 of 320
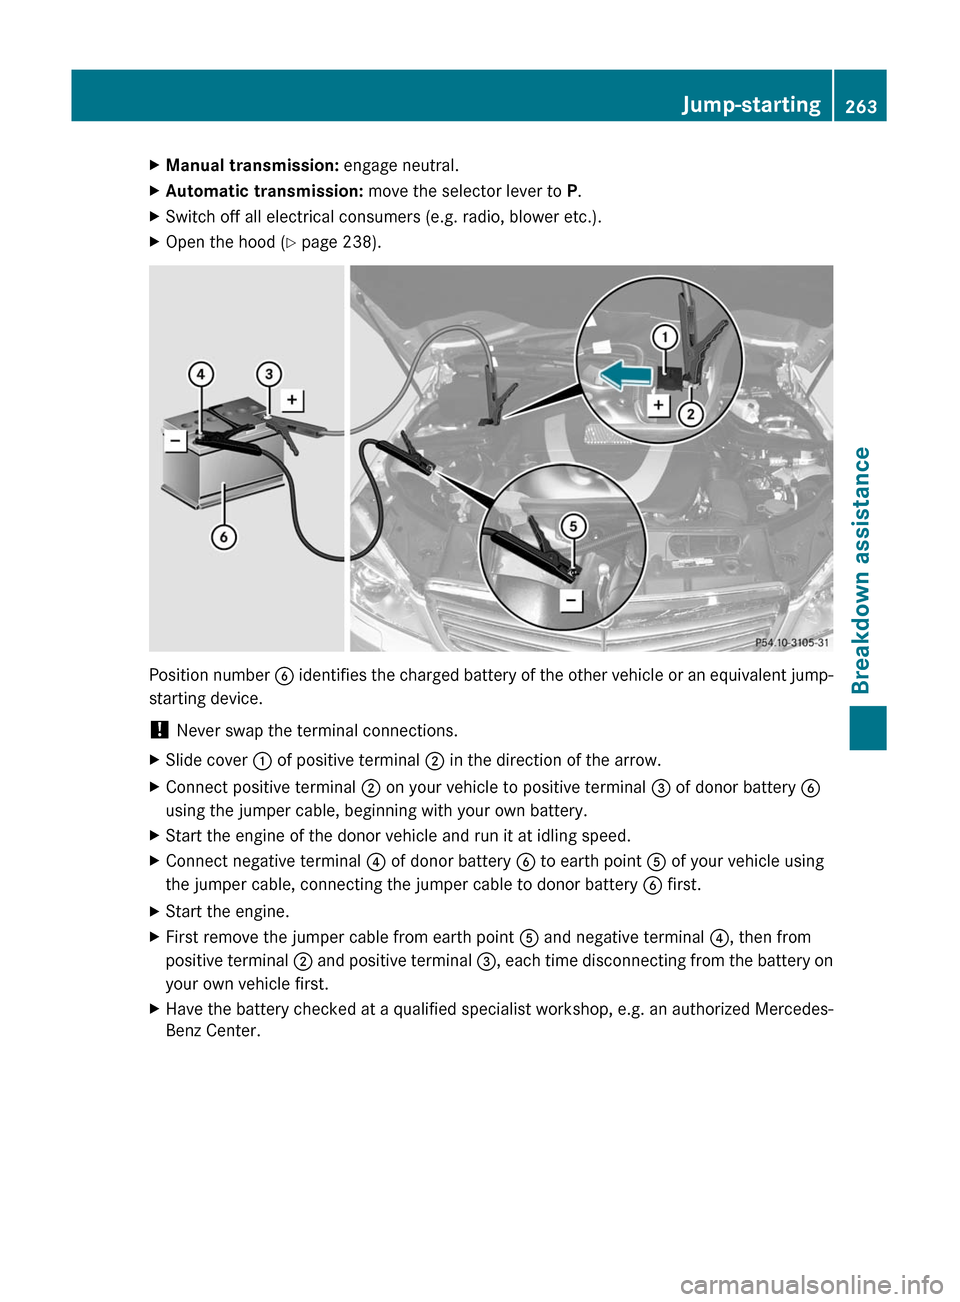
XManual transmission: engage neutral.XAutomatic transmission: move the selector lever to P.XSwitch off all electrical consumers (e.g. radio, blower etc.).XOpen the hood ( Y page 238).
Position number B identifies the charged battery of the other vehicle or an equivalent jump-
starting device.
! Never swap the terminal connections.
XSlide cover : of positive terminal ; in the direction of the arrow.XConnect positive terminal ; on your vehicle to positive terminal = of donor battery B
using the jumper cable, beginning with your own battery.XStart the engine of the donor vehicle and run it at idling speed.XConnect negative terminal ? of donor battery B to earth point A of your vehicle using
the jumper cable, connecting the jumper cable to donor battery B first.XStart the engine.XFirst remove the jumper cable from earth point A and negative terminal ?, then from
positive terminal ; and positive terminal =, each time disconnecting from the battery on
your own vehicle first.XHave the battery checked at a qualified specialist workshop, e.g. an authorized Mercedes-
Benz Center.Jump-starting263Breakdown assistanceBA 204 USA, CA Edition A 2011; 1; 5, en-UShereepeVersion: 3.0.3.62010-05-20T09:17:30+02:00 - Seite 263Z
Page 266 of 320
Towing and tow-starting
Important safety notes
GWarning
If you tow the vehicle, you must use a rigid
towing bar if:
R the engine will not run.
R there is a malfunction in the brake system.
R there is a malfunction in the power supply
or the vehicle's electrical system.
With the engine not running, there is no power
assistance for the brake and steering
systems. You will then need considerably
more force to steer and to brake and the
brake pedal travel will be longer. If necessary,
depress the brake pedal with maximum force.
Before towing away, make sure that the
steering can be moved and is not locked.
If you tow or tow-start another vehicle, its
weight must not exceed the maximum
permissible gross vehicle weight of your
vehicle.
It is better to have the vehicle transported
than to have it towed.
! You may only tow the vehicle a maximum
distance of 30 miles (50 km). A towing
speed of 30 mph (50 km/h) must not be
exceeded.
For towing distances over 30 miles
(50 km), the vehicle must loaded onto a
transporter.
! Only secure the tow rope or tow bar at the
towing eyes. Otherwise, the vehicle could
be damaged.
! Do not use the towing eye for recovery,
as this could damage the vehicle. If in
doubt, recover the vehicle with a crane.
! Drive slowly and smoothly when towing.
Excessive tractive power could otherwise
damage the vehicles.
! Do not tow with sling-type equipment.
This could damage the vehicle.
! On vehicles with KEYLESS-GO, use the
SmartKey instead of the Start/Stop
button. Turn the SmartKey to position 2 in
the ignition lock and shift the automatic
transmission to N. Then, turn the SmartKey
back to 0 and leave it in the ignition lock.
! Vehicles with automatic transmission
must not be started by tow-starting. This
could otherwise damage the transmission.
! Vehicles with 4MATIC must not be towed
with the front or rear axle raised. This could
otherwise damage the transmission.
The automatic transmission must be in
position N while the vehicle is being towed.
The battery must be connected and charged.
Otherwise:
R you will not be able to turn the SmartKey to
position 2 in the ignition lock.
R you will not be able to shift the automatic
transmission to position N.
Vehicles with automatic transmission:
manually release the selector lever lock in
position P(Y page 144).
i Switch the automatic lock ( Y page 181)
off before towing. Otherwise, you could
lock yourself out of the vehicle when
pushing or towing the vehicle.
Installing/removing the towing eye
Installing the towing eye
XRemove the towing eye from the vehicle
tool kit ( Y page 253).GWarning
The exhaust tail pipe may be hot. You could
burn yourself if you touch the tail pipe. Be
particularly careful when removing the rear
cover.
The mountings for the removable towing eyes
are located in the bumpers. They are at the
front and at the rear, behind the covers.
264Towing and tow-startingBreakdown assistance
BA 204 USA, CA Edition A 2011; 1; 5, en-UShereepeVersion: 3.0.3.62010-05-20T09:17:30+02:00 - Seite 264
Page 267 of 320
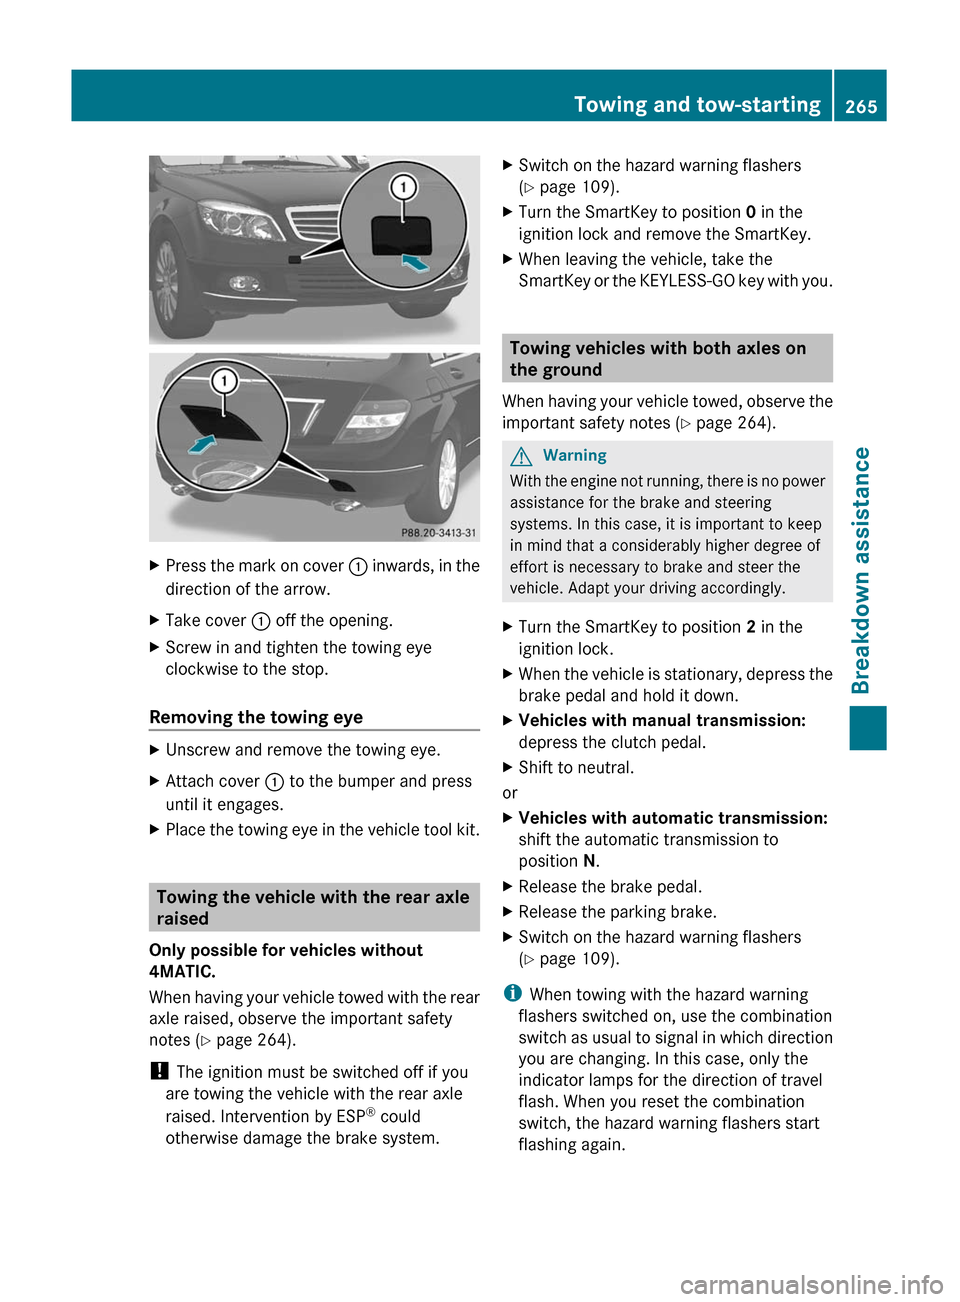
XPress the mark on cover : inwards, in the
direction of the arrow.
XTake cover : off the opening.XScrew in and tighten the towing eye
clockwise to the stop.
Removing the towing eye
XUnscrew and remove the towing eye.XAttach cover : to the bumper and press
until it engages.
XPlace the towing eye in the vehicle tool kit.
Towing the vehicle with the rear axle
raised
Only possible for vehicles without
4MATIC.
When having your vehicle towed with the rear
axle raised, observe the important safety
notes (Y page 264).
! The ignition must be switched off if you
are towing the vehicle with the rear axle
raised. Intervention by ESP® could
otherwise damage the brake system.
XSwitch on the hazard warning flashers
(Y page 109).
XTurn the SmartKey to position 0 in the
ignition lock and remove the SmartKey.
XWhen leaving the vehicle, take the
SmartKey or the KEYLESS-GO key with you.
Towing vehicles with both axles on
the ground
When having your vehicle towed, observe the
important safety notes (Y page 264).
GWarning
With the engine not running, there is no power
assistance for the brake and steering
systems. In this case, it is important to keep
in mind that a considerably higher degree of
effort is necessary to brake and steer the
vehicle. Adapt your driving accordingly.
XTurn the SmartKey to position 2 in the
ignition lock.
XWhen the vehicle is stationary, depress the
brake pedal and hold it down.
XVehicles with manual transmission:
depress the clutch pedal.
XShift to neutral.
or
XVehicles with automatic transmission:
shift the automatic transmission to
position N.
XRelease the brake pedal.XRelease the parking brake.XSwitch on the hazard warning flashers
(Y page 109).
iWhen towing with the hazard warning
flashers switched on, use the combination
switch as usual to signal in which direction
you are changing. In this case, only the
indicator lamps for the direction of travel
flash. When you reset the combination
switch, the hazard warning flashers start
flashing again.
Towing and tow-starting265Breakdown assistanceBA 204 USA, CA Edition A 2011; 1; 5, en-UShereepeVersion: 3.0.3.62010-05-20T09:17:30+02:00 - Seite 265Z
Page 268 of 320
Transporting the vehicle
The towing eye can be used to pull the vehicle
onto a trailer or transporter for transporting
purposes.XVehicles with manual transmission:
shift to neutral.XVehicles with automatic transmission:
turn the SmartKey to position 2 in the
ignition lock.XShift the selector lever to N.
As soon as the vehicle has been loaded:
XPrevent the vehicle from rolling away by
applying the parking brake.XVehicles with manual transmission:
shift to first gear or reverse gear.XVehicles with automatic transmission:
move the selector lever to P.XTurn the SmartKey to position 0 in the
ignition lock and remove the SmartKey.XSecure the vehicle.
! Only lash the vehicle down by the wheels
or wheel rims, not by parts of the vehicle
such as axle or steering components.
Otherwise, the vehicle could be damaged.
Tow-starting (emergency engine
starting)
When tow-starting, observe the important
safety notes ( Y page 264).
! Vehicles with an automatic transmission
must not be tow-started. You could
otherwise damage the automatic
transmission.
Before tow-starting:
R the battery must be connected
R the engine must be cold
R the catalytic converter must be cold
XSwitch on the hazard warning
lamps( Y page 109).XInstall the towing eye ( Y page 264).XDepress and hold the brake pedal.XTurn the SmartKey to position 2 in the
ignition lock.XDepress and hold the clutch pedal.XShift to neutral.XRelease the brake pedal.XShift to second gear.XTow-start the vehicle.XRelease the clutch pedal slowly and do not
depress the accelerator pedal when doing
so.
The engine is started.XDepress the clutch pedal and shift to
neutral.XEngage the parking brake.XStop the vehicle in a suitable location to
remove the tow bar or the tow rope.XRemove the towing eye ( Y page 265).XSwitch off the hazard warning lamps.
Fuses
Important safety notes
The fuses in your vehicle serve to close down
faulty circuits. If a fuse blows, all the
components on the circuit and their functions
will fail.
GWarning
Only use fuses approved by Mercedes-Benz
with the specified amperage for the system in
question and do not attempt to repair or
bridge a blown fuse. Using other than
approved fuses or using repaired or bridged
fuses may cause an overload leading to a fire,
and/or cause damage to electrical
components and/or systems. Have the cause
determined and remedied by an authorized
Mercedes-Benz Center.
Blown fuses must be replaced with fuses of
the same rating, which you can recognize by
the color and value. The fuse ratings are listed
in the fuse allocation chart. An authorized
266FusesBreakdown assistance
BA 204 USA, CA Edition A 2011; 1; 5, en-UShereepeVersion: 3.0.3.62010-05-20T09:17:30+02:00 - Seite 266
Page 306 of 320

Engine number:Emissions control information label,
including the certification of both federal
and Californian emissions reference
values;Engine number (stamped into the
crankcase)=VIN (on the lower edge of the windshield)
Service products and capacities
Important safety notes
Service products include the following:
R fuels (e.g. gasoline, diesel)
R lubricants (e.g. engine oil, transmission oil)
R coolant
R brake fluid
R windshield washer fluid
Vehicle components and their respective
lubricants must match. You should therefore
only use products that have been tested and
approved by Mercedes-Benz.
Information on tested and approved products
can be obtained at an authorized Mercedes-
Benz Center or on the Internet at http://
www.mbusa.com (USA only).
GWarning
Comply with all valid regulations with respect
to handling, storing and disposing of service
fluids. Otherwise, you could endanger
persons or the environment.
Keep service fluids out of the reach of
children.
For health reasons, you should prevent
service fluids from coming into direct contact
with your skin or clothing.
If a service fluid is swallowed, contact a
physician immediately.304Service products and capacitiesTechnical data
BA 204 USA, CA Edition A 2011; 1; 5, en-UShereepeVersion: 3.0.3.62010-05-20T09:17:30+02:00 - Seite 304
Page 308 of 320

Vehicle modelCapacityFuel, coolant,
lubricants etc.Windshield/
headlamp
cleaning
systemC 250 45
C 250 4MATIC 45
C 300 4MATIC
C 350 4MATIC 45
C 63 AMG6.3 US qt (6.0 l)MB windshield
washer
concentrate 47
( Y page 310)
Mixing ratio for
washer fluid
( Y page 310)C 300
C 3503.7 US qt (3.5 l)Fuel
Important safety notesGWarning
Gasoline is highly flammable and poisonous.
It burns violently and can cause serious
personal injury.
Never allow sparks, flames or smoking
materials near gasoline.
Turn off the engine before refueling.
Whenever you are around gasoline, avoid
inhaling fumes and any skin or clothing
contact.
Direct skin contact with fuels and the
inhalation of fuel vapors are damaging to your
health.
Premium-grade unleaded gasoline
! To ensure the longevity and full
performance of the engine, only premium-
grade unleaded gasoline must be used.
If premium-grade unleaded gasoline is
unavailable and regular gasoline is used,
observe the following precautions:
R only fill the fuel tank to half full with
regular unleaded gasoline and add the
rest as soon as possible with premium-
grade unleaded gasoline.
R do not drive at the maximum speed.
Ravoid sudden acceleration.
R when the vehicle is carrying a light cargo,
e.g. two passengers without luggage, do
not allow the engine to rev above
3000 rpm.
R when the vehicle is fully loaded or being
operated in mountainous terrain, do not
depress the accelerator pedal further
than 2
/ 3 of the pedal travel.
Flexible fuel vehicles
Important safety notes
All C 300 models with automatic
transmission are flexible fuel vehicles.
Flexible fuel vehicles are identified by a label
reading Premium gasoline or E85 only on
the inside of the fuel filler flap.
Flexible fuel vehicles are designed to operate
on premium unleaded gasoline and ethanol
fuel (E85) or a mixture of these two. Ethanol
fuel (E85) is a mixture of approximately 85%
ethanol and 15% unleaded gasoline.
GWarning
Ethanol fuel (E85) and its vapors are highly
flammable, poisonous and highly
combustible. Ethanol fuel causes serious
injury if it ignites, if it comes into contact with
your skin or if you inhale the vapors. Avoid
inhaling ethanol vapors and ethanol coming
45 Canada only.
47 Mixed with water or premixed washer fluid with antifreeze protection.306Service products and capacitiesTechnical data
BA 204 USA, CA Edition A 2011; 1; 5, en-UShereepeVersion: 3.0.3.62010-05-20T09:17:30+02:00 - Seite 306