spare tire MERCEDES-BENZ C-Class 2011 W204 Owner's Manual
[x] Cancel search | Manufacturer: MERCEDES-BENZ, Model Year: 2011, Model line: C-Class, Model: MERCEDES-BENZ C-Class 2011 W204Pages: 320, PDF Size: 13.17 MB
Page 10 of 320
Emergency spare wheelStorage location ............................ 254
Emergency starting ........................... 266
Emergency tensioning device Function ........................................... 54
Safety guidelines ............................. 35
Emissions purification
Service and warranty information ....18
Engine
Irregular running ............................ 136
Starting problems ..........................136
Starting the engine with the key ....133
Starting with KEYLESS-GO .............133
Switching off .................................. 149
Warning lamp Check Engine ..........210
Engine electronics
Malfunction .................................... 136
Engine number .................................. 304
Engine oil Adding ........................................... 240
Checking the oil level ..................... 239
Display message ............................ 196
Lubricant additives ........................309
Notes about oil grades ................... 308
Temperature (on-board computer) . 171
Viscosity ........................................ 309
ESC (Electronic Stability Control)
see ESP ®
ESP ®
(Electronic Stability
Program) Activating/deactivating (AMG
vehicles) .......................................... 65
Activating/deactivating (except
AMG vehicles) .................................. 64
Activating/deactivating (on-
board computer) ............................ 178
AMG menu (on-board computer) ...171
Display message ............................ 184
ETS/4ETS ........................................ 63
Important safety information ...........63
Warning lamp ................................. 207
ETS/4ETS (Electronic Traction
System) ................................................ 63
Exhaust check ................................... 151
Exhaust tail pipe (cleaning
instructions) ...................................... 247Exterior lighting
see Lights
Exterior mirrors
Adjusting ....................................... 100
Dipping (automatic) .......................101
Folding in/out (automatically) .......101
Folding in/out (electrically) ...........100
Folding in when locking (on-board
computer) ...................................... 182
Out of position ............................... 101
Setting ........................................... 100
Storing settings (memory
function) ........................................ 102
Storing the parking position ..........101
Exterior view ........................................ 24
F
First-aid kit ......................................... 253
Flat tire Changing a wheel/mounting the
spare wheel ................................... 255
MOExtended run-flat system .........259
Preparing the vehicle .....................254
Raising the vehicle .........................256
Floormat ............................................. 236
Front fog lamp (display message) ... 193
Fuel Additives ........................................ 308
Notes ............................................. 306
Premium-grade unleaded gasoline . 306
Refueling ........................................ 145
Specifications ................................ 307
Troubleshooting ............................. 148
Fuel consumption
Current (on-board computer) .........170
Notes ............................................. 150
Fuel filler cap (display message) ..... 197
Fuel filler flap Emergency release ........................146
Opening/closing ............................ 146
Fuel level
Calling up the range (on-board
computer) ...................................... 170
Fuses
Dashboard fuse box .......................267
Fuse allocation chart .....................267
8IndexBA 204 USA, CA Edition A 2011; 1; 5, en-UShereepeVersion: 3.0.3.62010-05-20T09:17:30+02:00 - Seite 8
Page 65 of 320
ESP®
(Electronic Stability Program)
Important safety notesGWarning
Observe "Important safety notes"
( Y page 61).
If ESP ®
detects that the vehicle is deviating
from the direction desired by the driver, one
or more wheels are braked to stabilize the
vehicle. If necessary, the engine output is also
modified to keep the vehicle on the desired
course within physical limits. ESP ®
assists
the driver when pulling away on wet or
slippery roads. ESP ®
can also stabilize the
vehicle during braking.
If ESP ®
intervenes, the ä warning lamp
flashes in the instrument cluster.
GWarning!
Never switch off the ESP when you see the
ESP warning lamp ä flashing in the
instrument cluster. In this case proceed as
follows:
R When driving off, apply as little throttle as
possible.
R While driving, ease up on the accelerator
pedal.
R Adapt your speed and driving style to the
prevailing road conditions.
Failure to observe these guidelines could
cause the vehicle to skid. The ESP cannot
prevent accidents resulting from excessive
speed.
! Vehicles without 4MATIC: switch the
ignition off when:
R the parking brake is being tested using a
dynamometer
R the vehicle is being towed with the front
axle raised
Application of the brakes by ESP ®
may
otherwise destroy the brake system.
! Vehicles with 4MATIC: switch off the
ignition when the parking brake is being
tested on a brake dynamometer.
Application of the brakes by ESP ®
may
otherwise destroy the brake system.
! Vehicles with 4MATIC: function or
performance tests may only be carried out
on a 2-axle dynamometer. If you wish to
operate the vehicle on such a
dynamometer, please consult an
authorized Mercedes-Benz Center in
advance. You could otherwise damage the
drive train or the brake system.
i Only use wheels with the recommended
tire sizes. Only then will ESP ®
function
properly.
ETS/4ETS (Electronic Traction System)GWarning
Observe "Important safety notes"
( Y page 61).
Traction control is part of ESP ®
.
Traction control brakes the drive wheels
individually if they spin. This enables you to
pull away and accelerate on slippery surfaces,
for example if the road surface is slippery on
one side. On vehicles with 4MATIC, more
drive torque is also transferred to the wheel
or wheels with traction.
Traction control remains active if you
deactivate ESP ®
.
Deactivating/activating ESP ®
(except
AMG vehicles)
GWarning
The ESP ®
should not be switched off during
normal driving other than in the
circumstances described below. Disabling
the system will reduce vehicle stability in
driving maneuvers.
Do not switch off the ESP ®
when a spare
wheel is mounted.
Driving safety systems63SafetyBA 204 USA, CA Edition A 2011; 1; 5, en-UShereepeVersion: 3.0.3.62010-05-20T09:17:30+02:00 - Seite 63Z
Page 156 of 320
Driving on wet roads
Hydroplaning
If water has accumulated to a certain depth
on the road surface, there is a danger of
hydroplaning occurring, even if:
R you drive at low speeds
R the tires have adequate tread depth
For this reason, in the event of heavy rain or
in conditions in which hydroplaning can occur
you must drive in the following manner:
R Lower your speed
R Avoid ruts
R Brake carefully
Driving on flooded roads
! Do not drive through flooded areas.
Check the depth of any water before driving
through it. Drive slowly through standing
water. Otherwise, water may enter the
vehicle interior or the engine compartment.
This can damage the electronic
components in the engine or the automatic
transmission. Water can also be drawn in
by the engine's air suction nozzles and this
can cause engine damage.
Winter driving
General information
Have your vehicle winterproofed at a qualified
specialist workshop, e.g. at an authorized
Mercedes-Benz Center, at the onset of
winter.
Observe the notes in the "Winter operation"
section ( Y page 155).
Winter tires
At temperatures below 45 ‡(+7 †), use
winter tires or all-season tires. Both types of
tire are identified by the M+S marking.
Only winter tires also bearing the i
snowflake symbol next to the M+S marking
provide the best possible grip in wintry road
conditions. Only these tires will allow driving
safety systems such as ABS and ESP ®
to
function optimally in winter, as these tires
have been designed specifically for driving on
snow.
Use M+S tires of the same make and tread on
all wheels to maintain safe handling
characteristics.GWarning
M+S tires with a tread depth of less than 1
/ 6
inch (4 mm) must be replaced. They are no
longer suitable for winter operation.
Always observe the maximum permissible
speed specified for the M+S tires you have
mounted.
Once you have installed the winter tires:
XCheck the tire pressures ( Y page 275).XRestart the tire pressure monitor
( Y page 277).GWarning
If you use your spare wheel when M+S tires
are fitted on the other wheels, be aware that
the difference in tire characteristics may very
well impair turning stability and that overall
driving stability may be reduced. Adapt your
driving style accordingly.
Have the spare wheel replaced by a regular
road wheel with an M+S tire at the nearest
authorized Mercedes-Benz Center.
Snow chains
For safety reasons, Mercedes-Benz
recommends that you only use snow chains
which have been specially approved for your
vehicle by Mercedes-Benz, or are of a
corresponding standard of quality.
! There is not enough space for snow
chains on some wheel sizes. Observe the
information under "Tires and wheels" in the
"Technical Data" section to avoid damage
to the vehicle or the wheels.
154Driving tipsDriving and parking
BA 204 USA, CA Edition A 2011; 1; 5, en-UShereepeVersion: 3.0.3.62010-05-20T09:17:30+02:00 - Seite 154
Page 157 of 320
ROnly use snow chains when driving on an
area completely covered by snow. Do not
exceed the maximum permissible speed of
30 mph (50 km/h). Remove the snow
chains as soon as possible when you are no
longer driving on snow-covered roads.
R Local regulations may restrict the use of
snow chains. Applicable regulations must
be observed if you wish to mount snow
chains.
R Snow chains must not be mounted on
emergency spare wheels.
If you intend to mount snow chains, please
bear the following points in mind:
R you may not attach snow chains to all
wheel-tire combinations; see the "Tires and
wheels" section in the "Technical data"
chapter.
R mount snow chains only in pairs and only
on the rear wheels. Observe the
manufacturer's installation instructions.
! If snow chains are mounted on the front
wheels, the snow chains could grind
against the bodywork or components of the
chassis. This could result in damage to the
vehicle or the tires.
! Vehicles with steel wheels
If you wish to mount snow chains to steel
wheels, make sure that you remove the
respective wheels' hubcaps first. The
hubcaps may otherwise be damaged.
i You may wish to deactivate
ESP ®
(Y page 63) when pulling away with
snow chains installed. This way you can
allow the wheels to spin in a controlled
manner, achieving an increased driving
force (cutting action).
Slippery road surfacesGWarning
If the vehicle becomes stuck in snow, make
sure snow is kept clear of the exhaust pipe
and from around the vehicle with the engine
running. Otherwise, deadly carbon monoxide
(CO) gases may enter vehicle interior
resulting in unconsciousness and death.
To assure sufficient fresh air ventilation, open
a window slightly on the side of the vehicle
not facing the wind.GWarning!
The outside temperature indicator is not
designed to serve as an ice-warning device
and is therefore unsuitable for that purpose.
Indicated temperatures just above the
freezing point do not guarantee that the road
surface is free of ice. The road may still be icy,
especially in wooded areas or on bridges.
GWarning
On slippery road surfaces, never downshift in
order to obtain braking action. This could
result in drive wheel slip and reduced vehicle
control. Your vehicle's ABS will not prevent
this type of loss of control.
You should drive particularly carefully on
slippery road surfaces. Avoid sudden
acceleration, steering and braking
maneuvers. Do not use cruise control.
If the vehicle threatens to skid or cannot be
stopped when moving at low speed:
XVehicles with manual transmission: engage
neutral.XVehicles with automatic transmission: shift
the transmission to position N.
i
For more information on driving with
snow chains, see ( Y page 154).
GWarning
Make sure that you do not endanger other
road users when you apply the brakes.
Driving abroad
An extensive Mercedes-Benz Service network
is also available in other countries. The
Service Hotline's current telephone numbers
for use when you are abroad are to be found
Driving tips155Driving and parkingBA 204 USA, CA Edition A 2011; 1; 5, en-UShereepeVersion: 3.0.3.62010-05-20T09:17:30+02:00 - Seite 155Z
Page 214 of 320
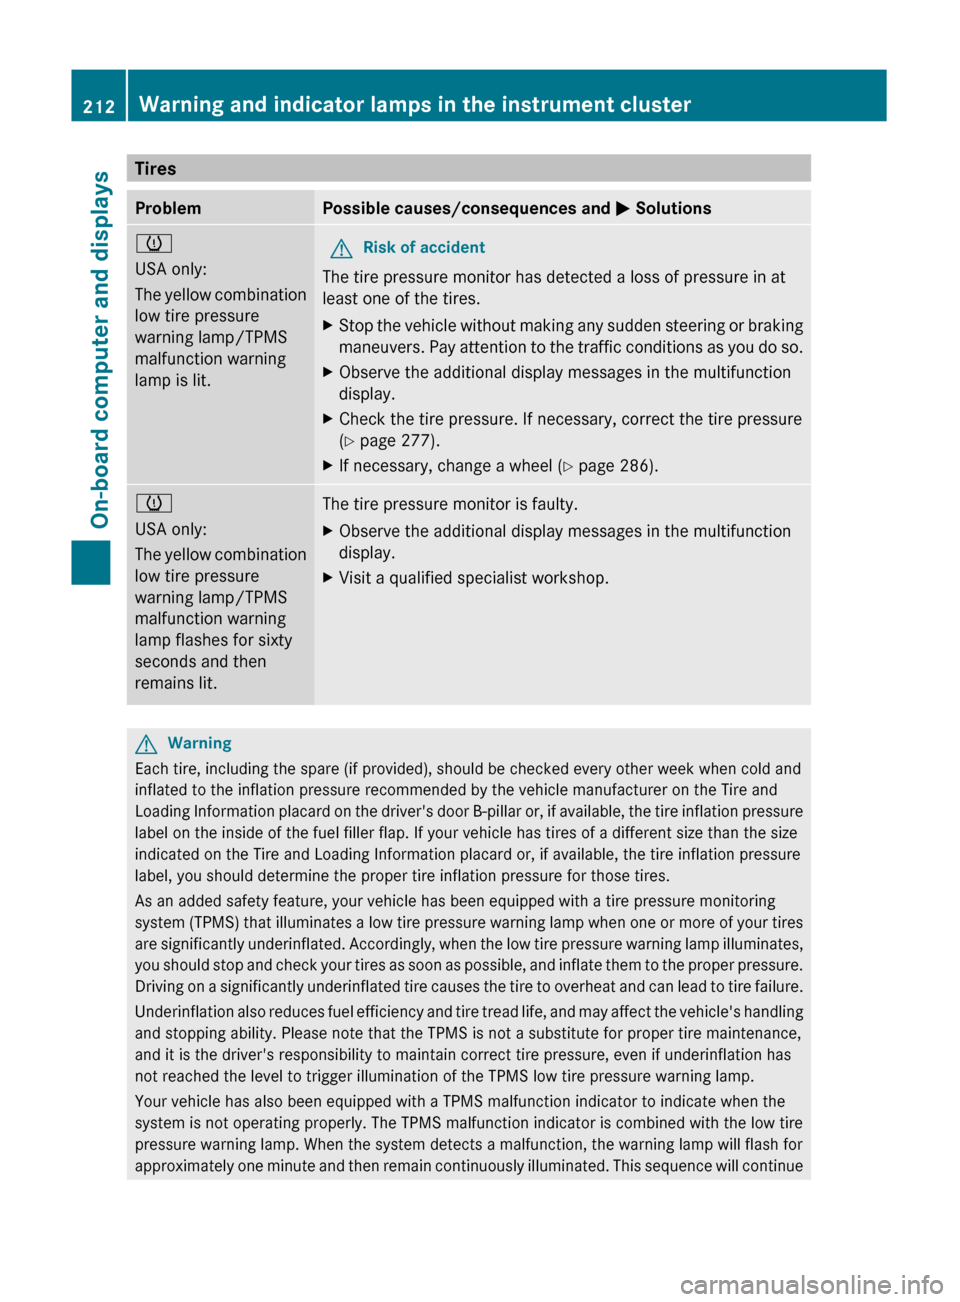
TiresProblemPossible causes/consequences and M Solutionsh
USA only:
The yellow combination
low tire pressure
warning lamp/TPMS
malfunction warning
lamp is lit.GRisk of accident
The tire pressure monitor has detected a loss of pressure in at
least one of the tires.
XStop the vehicle without making any sudden steering or braking
maneuvers. Pay attention to the traffic conditions as you do so.XObserve the additional display messages in the multifunction
display.XCheck the tire pressure. If necessary, correct the tire pressure
( Y page 277).XIf necessary, change a wheel ( Y page 286).h
USA only:
The yellow combination
low tire pressure
warning lamp/TPMS
malfunction warning
lamp flashes for sixty
seconds and then
remains lit.The tire pressure monitor is faulty.XObserve the additional display messages in the multifunction
display.XVisit a qualified specialist workshop.GWarning
Each tire, including the spare (if provided), should be checked every other week when cold and
inflated to the inflation pressure recommended by the vehicle manufacturer on the Tire and
Loading Information placard on the driver's door B-pillar or, if available, the tire inflation pressure
label on the inside of the fuel filler flap. If your vehicle has tires of a different size than the size
indicated on the Tire and Loading Information placard or, if available, the tire inflation pressure
label, you should determine the proper tire inflation pressure for those tires.
As an added safety feature, your vehicle has been equipped with a tire pressure monitoring
system (TPMS) that illuminates a low tire pressure warning lamp when one or more of your tires
are significantly underinflated. Accordingly, when the low tire pressure warning lamp illuminates,
you should stop and check your tires as soon as possible, and inflate them to the proper pressure.
Driving on a significantly underinflated tire causes the tire to overheat and can lead to tire failure.
Underinflation also reduces fuel efficiency and tire tread life, and may affect the vehicle's handling
and stopping ability. Please note that the TPMS is not a substitute for proper tire maintenance,
and it is the driver's responsibility to maintain correct tire pressure, even if underinflation has
not reached the level to trigger illumination of the TPMS low tire pressure warning lamp.
Your vehicle has also been equipped with a TPMS malfunction indicator to indicate when the
system is not operating properly. The TPMS malfunction indicator is combined with the low tire
pressure warning lamp. When the system detects a malfunction, the warning lamp will flash for
approximately one minute and then remain continuously illuminated. This sequence will continue
212Warning and indicator lamps in the instrument clusterOn-board computer and displays
BA 204 USA, CA Edition A 2011; 1; 5, en-UShereepeVersion: 3.0.3.62010-05-20T09:17:30+02:00 - Seite 212
Page 231 of 320
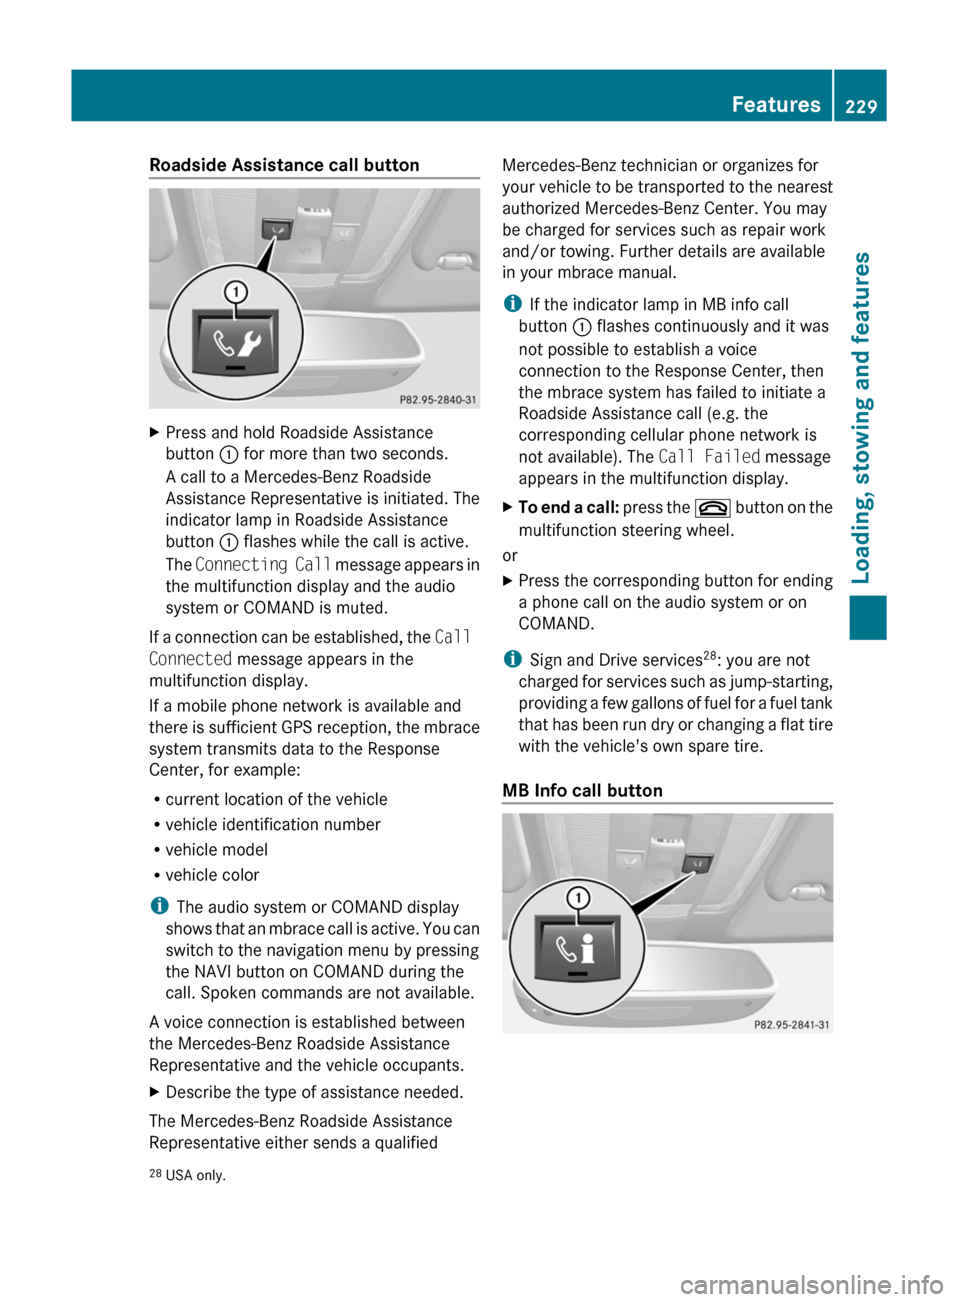
Roadside Assistance call buttonXPress and hold Roadside Assistance
button : for more than two seconds.
A call to a Mercedes-Benz Roadside
Assistance Representative is initiated. The
indicator lamp in Roadside Assistance
button : flashes while the call is active.
The Connecting Call message appears in
the multifunction display and the audio
system or COMAND is muted.
If a connection can be established, the Call
Connected message appears in the
multifunction display.
If a mobile phone network is available and
there is sufficient GPS reception, the mbrace
system transmits data to the Response
Center, for example:
R current location of the vehicle
R vehicle identification number
R vehicle model
R vehicle color
i The audio system or COMAND display
shows that an mbrace call is active. You can
switch to the navigation menu by pressing
the NAVI button on COMAND during the
call. Spoken commands are not available.
A voice connection is established between
the Mercedes-Benz Roadside Assistance
Representative and the vehicle occupants.
XDescribe the type of assistance needed.
The Mercedes-Benz Roadside Assistance
Representative either sends a qualified
Mercedes-Benz technician or organizes for
your vehicle to be transported to the nearest
authorized Mercedes-Benz Center. You may
be charged for services such as repair work
and/or towing. Further details are available
in your mbrace manual.
i If the indicator lamp in MB info call
button : flashes continuously and it was
not possible to establish a voice
connection to the Response Center, then
the mbrace system has failed to initiate a
Roadside Assistance call (e.g. the
corresponding cellular phone network is
not available). The Call Failed message
appears in the multifunction display.XTo end a call: press the ~ button on the
multifunction steering wheel.
or
XPress the corresponding button for ending
a phone call on the audio system or on
COMAND.
i Sign and Drive services 28
: you are not
charged for services such as jump-starting,
providing a few gallons of fuel for a fuel tank
that has been run dry or changing a flat tire
with the vehicle's own spare tire.
MB Info call button
28 USA only.Features229Loading, stowing and featuresBA 204 USA, CA Edition A 2011; 1; 5, en-UShereepeVersion: 3.0.3.62010-05-20T09:17:30+02:00 - Seite 229Z
Page 256 of 320
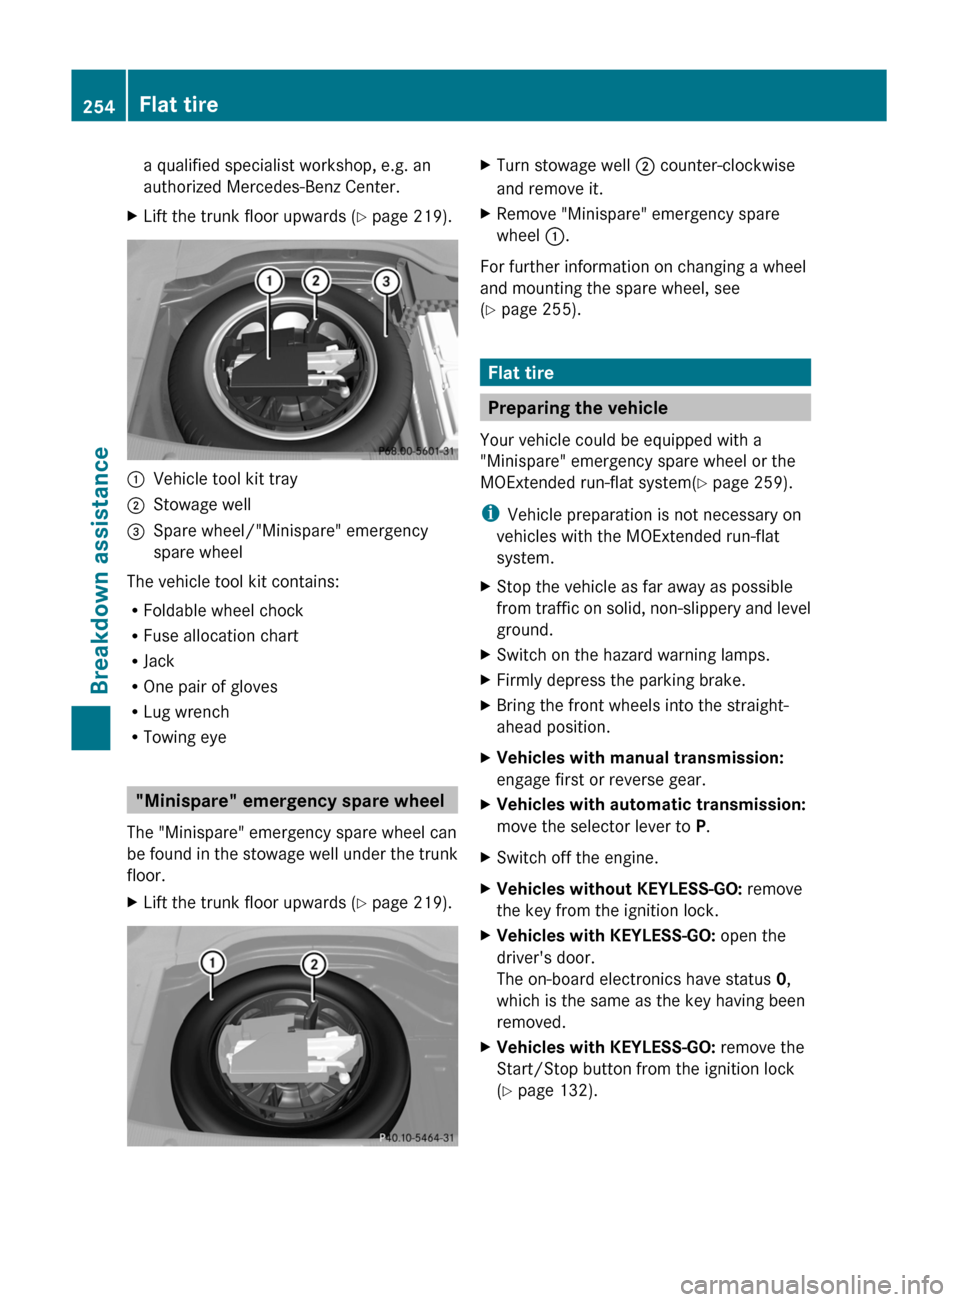
a qualified specialist workshop, e.g. an
authorized Mercedes-Benz Center.
XLift the trunk floor upwards (Y page 219).:Vehicle tool kit tray;Stowage well=Spare wheel/"Minispare" emergency
spare wheel
The vehicle tool kit contains:
RFoldable wheel chock
RFuse allocation chart
RJack
ROne pair of gloves
RLug wrench
RTowing eye
"Minispare" emergency spare wheel
The "Minispare" emergency spare wheel can
be found in the stowage well under the trunk
floor.
XLift the trunk floor upwards (Y page 219).XTurn stowage well ; counter-clockwise
and remove it.
XRemove "Minispare" emergency spare
wheel :.
For further information on changing a wheel
and mounting the spare wheel, see
(Y page 255).
Flat tire
Preparing the vehicle
Your vehicle could be equipped with a
"Minispare" emergency spare wheel or the
MOExtended run-flat system(Y page 259).
iVehicle preparation is not necessary on
vehicles with the MOExtended run-flat
system.
XStop the vehicle as far away as possible
from traffic on solid, non-slippery and level
ground.
XSwitch on the hazard warning lamps.XFirmly depress the parking brake.XBring the front wheels into the straight-
ahead position.
XVehicles with manual transmission:
engage first or reverse gear.
XVehicles with automatic transmission:
move the selector lever to P.
XSwitch off the engine.XVehicles without KEYLESS-GO: remove
the key from the ignition lock.
XVehicles with KEYLESS-GO: open the
driver's door.
The on-board electronics have status 0,
which is the same as the key having been
removed.
XVehicles with KEYLESS-GO: remove the
Start/Stop button from the ignition lock
(Y page 132).
254Flat tireBreakdown assistance
BA 204 USA, CA Edition A 2011; 1; 5, en-UShereepeVersion: 3.0.3.62010-05-20T09:17:30+02:00 - Seite 254
Page 257 of 320
XAll occupants must get out of the vehicle.
Make sure that they are not endangered as
they get out of the vehicle.XMake sure that no one is near the danger
area whilst a wheel is being changed.
Anyone who is not directly assisting in the
wheel change should, for example, stand
behind the barrier.XGet out of the vehicle. Pay attention to
traffic conditions when doing so.XClose the driver's door.
Changing a wheel and mounting the
spare wheel
Preparing the vehicle
GWarning!
The wheel and tire size of the emergency
spare wheel/spare wheel may differ to that of
the damaged wheel. When using an
emergency spare wheel/spare wheel the
handling characteristics of the vehicle may
change.
Adapt your style of driving accordingly.
Never operate the vehicle with more than one
emergency spare wheel/spare wheel that
differs in size.
Only use an emergency spare wheel/spare
wheel of a differing size briefly and do not
switch off ESP ®
.
When using an emergency spare wheel, you
must not exceed a maximum speed of 50 mph
(80 km/h).
GWarning!
Have the emergency spare wheel/spare
wheel replaced with a new wheel as soon as
possible at a qualified specialist workshop
which has the necessary specialist knowledge
and tools to carry out the work required.
Mercedes-Benz recommends that you use an
authorized Mercedes-Benz Center for this
purpose. In particular, work relevant to safety
or on safety-related systems must be carried
out at a qualified specialist workshop.
i Vehicles without an emergency spare
wheel/spare wheel are not equipped with
wheel-changing tools at the factory. For
more information on which tools are
required to perform a wheel change on your
vehicle, e.g. wheel chock, alignment bolt or
lug wrench, consult an authorized
Mercedes-Benz Center.XPrepare the vehicle as described
( Y page 254).XRemove the following items from the
stowage well under the trunk/cargo
compartment floor:
R the emergency spare wheel
R the vehicle tool kit
R the folding wheel chock
R the jackXSecure the vehicle to prevent it from rolling
away.
Securing the vehicle to prevent it from
rolling away
GWarning
Only jack up the vehicle on level ground or on
slight inclines/declines. The vehicle could
otherwise fall off the jack and injure you or
others.
If your vehicle is equipped with a wheel chock,
it can be found in the vehicle tool kit
( Y page 253).
The folding wheel chock is an additional
securing measure to prevent the vehicle from
rolling away, for example when changing a
wheel.
Flat tire255Breakdown assistanceBA 204 USA, CA Edition A 2011; 1; 5, en-UShereepeVersion: 3.0.3.62010-05-20T09:17:30+02:00 - Seite 255Z
Page 260 of 320
Mounting a new wheelGWarning!
Always replace wheel bolts that are damaged
or rusted.
Never apply oil or grease to wheel bolts.
Damaged wheel hub threads should be
repaired immediately. Do not continue to
drive under these circumstances! Contact an
authorized Mercedes-Benz Center or call
Roadside Assistance.
Incorrect wheel bolts or improperly tightened
wheel bolts can cause the wheel to come off.
This could cause an accident. Make sure to
use the correct wheel bolts.
GWarning
Only use genuine Mercedes-Benz wheel bolts.
Other wheel bolts may come loose.
Do not tighten the wheel bolts when the
vehicle is raised. Otherwise, the vehicle could
fall off the jack.
GWarning
Make sure to use the original length wheel
bolts when remounting the original wheel
after it has been repaired.
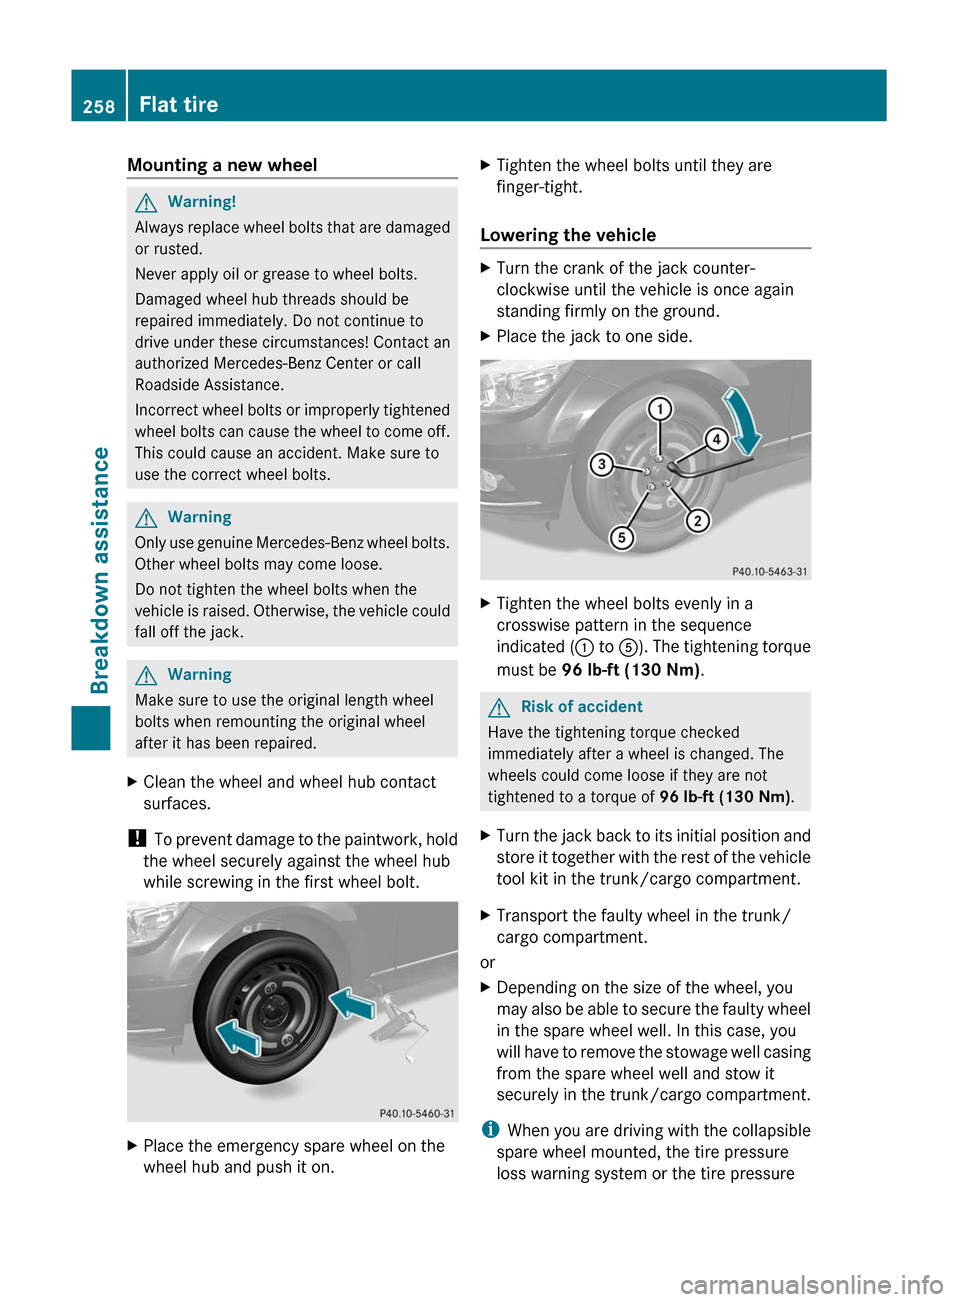
XClean the wheel and wheel hub contact
surfaces.
! To prevent damage to the paintwork, hold
the wheel securely against the wheel hub
while screwing in the first wheel bolt.
XPlace the emergency spare wheel on the
wheel hub and push it on.XTighten the wheel bolts until they are
finger-tight.
Lowering the vehicle
XTurn the crank of the jack counter-
clockwise until the vehicle is once again
standing firmly on the ground.XPlace the jack to one side.XTighten the wheel bolts evenly in a
crosswise pattern in the sequence
indicated ( : to A). The tightening torque
must be 96 lb-ft (130 Nm) .GRisk of accident
Have the tightening torque checked
immediately after a wheel is changed. The
wheels could come loose if they are not
tightened to a torque of 96 lb-ft (130 Nm).
XTurn the jack back to its initial position and
store it together with the rest of the vehicle
tool kit in the trunk/cargo compartment.XTransport the faulty wheel in the trunk/
cargo compartment.
or
XDepending on the size of the wheel, you
may also be able to secure the faulty wheel
in the spare wheel well. In this case, you
will have to remove the stowage well casing
from the spare wheel well and stow it
securely in the trunk/cargo compartment.
i When you are driving with the collapsible
spare wheel mounted, the tire pressure
loss warning system or the tire pressure
258Flat tireBreakdown assistance
BA 204 USA, CA Edition A 2011; 1; 5, en-UShereepeVersion: 3.0.3.62010-05-20T09:17:30+02:00 - Seite 258
Page 273 of 320
Directives to be observed
R Only mount tires and wheels of the same
type and make.
R Only mount tires of the correct size onto
the wheels.
R After mounting new tires, run them in at
moderate speeds for the first 60 miles
(100 km) as they only reach their full
performance after this distance.
R Do not use tires until they are excessively
worn as the tire traction on wet road
surfaces decreases significantly when the
tread depth is less than 1
/ 8 in (3 mm).
R If the vehicle is heavily laden, check the tire
pressure and adjust it if necessary.
R When parking your vehicle, make sure that
the tires do not get deformed by the curb
or other obstacles. If it is necessary to drive
over curbs, speed humps or similar
elevations, try to do so slowly and at an
obtuse angle. Otherwise, the tires,
particularly the sidewalls, can get
damaged.
Maintenance and care of wheels and
tires
Checking wheels and tires
GWarning
Regularly check the tires for damage.
Damaged tires can cause tire inflation
pressure loss. As a result, you could lose
control of your vehicle.
Worn, old tires can cause accidents. If the tire
tread is worn to minimum tread depth, or if
the tires have sustained damage, replace
them.
R Regularly check the wheels and tires of
your vehicle for damage (e.g. cuts,
punctures, tears, bulges on tires and
deformation or cracks or severe corrosion
on wheels), at least once a month, as well
as after driving off-road or on rough roads.
Damaged wheels can cause a loss of tire
pressure.
R Regularly check the tire tread depth and
the condition of the tread across the whole
width of the tire (Y page 271). If necessary,
turn the front wheels to full lock in order to
inspect the inner side of the tire surface.
R All wheels must have a valve cap to protect
the valve against dirt and moisture. Do not
install anything on the valve (such as tire
pressure monitoring systems) other than
the standard valve cap or other valve caps
approved by Mercedes-Benz for your
vehicle.
R Regularly check the pressure of all the tires
including the emergency spare wheel or the
spare wheel, particularly prior to long trips,
and correct the pressure as necessary
( Y page 272).
Service life of tires
The service life of tires depends on the
following factors amongst other things:
R driving style
R tire pressure
R mileage
Replace the tires after six years at the latest,
regardless of wear. This also applies to the
emergency spare wheel/spare wheel.
Tire tread
GWarning
Although the applicable federal motor vehicle
safety laws consider a tire to be worn when
the tread wear indicators (TWI) become
visible at approximately 1
/ 16 in (1.6 mm), we
recommend that you do not allow your tires
to wear down to that level. As tread depth
approaches 1
/ 8 in (3 mm), the adhesion
properties on a wet road are sharply reduced.
Maintenance and care of wheels and tires271Tires and wheelsBA 204 USA, CA Edition A 2011; 1; 5, en-UShereepeVersion: 3.0.3.62010-05-20T09:17:30+02:00 - Seite 271Z