wheel MERCEDES-BENZ C CLASS 2016 Owners Manual
[x] Cancel search | Manufacturer: MERCEDES-BENZ, Model Year: 2016, Model line: C CLASS, Model: MERCEDES-BENZ C CLASS 2016Pages: 398, PDF Size: 11.64 MB
Page 342 of 398
Cleaning the exhaust pipes
G WARNING
The exhaust tail pipe and tail pipe trim can
become very hot. If you come into contact
with these parts of the vehicle, you could burn
yourself. There is a risk of injury.
Always be particularly careful around the
exhaust tail pipe and the tail pipe trim. Allow
these components to cool down before touch-
ing them.
! Do not clean the exhaust pipe with acid-
based cleaning agents, such as bathroom
cleaner or wheel cleaner.
! Mercedes-AMG vehicles with black exhaust
pipes: the black-chrome tailpipe finishers
should not be polished with a chrome polish.
They will otherwise lose their black sheen. For
optimal care, the faceplates should be rubbed
with a lightly oiled cloth after every car wash.
Commercially available engine and care oils
are suitable for this.
For heavier soiling, you can apply a fine paint-
work polish with a microfiber cloth. Remove
the excess polish residue after polishing.
Impurities combined with the effects of road grit
and corrosive environmental factors may cause
flash rust to form on the surface. You can
restore the original shine of the exhaust pipe by
cleaning it regularly, especially in winter and
after washing. X
Clean the exhaust pipe with a care product
tested and approved by Mercedes-Benz.
Interior care
Cleaning the display
! For cleaning, do not use any of the following: R
alcohol-based thinner or gasoline R
abrasive cleaning agents R
commercially-available household cleaning
agents
These may damage the display surface. Do
not put pressure on the display surface when
cleaning. This could lead to irreparable dam-
age to the display. X
Before cleaning the display, make sure that it
is switched off and has cooled down. X
Clean the display surface using a commer-
cially available microfiber cloth and TFT/LCD
display cleaner. X
Dry the display surface using a dry microfiber
cloth.
Cleaning the plastic trim
G WARNING
Care products and cleaning agents containing
solvents cause surfaces in the cockpit to
become porous. As a result, plastic parts may
come loose in the event of air bag deploy-
ment. There is a risk of injury.
Do not use any care products and cleaning
agents to clean the cockpit.
! Do not affix the following to plastic surfaces: R
stickers R
films R
scented oil bottles or similar items
You can otherwise damage the plastic.
! Do not allow cosmetics, insect repellent or
sunscreen to come into contact with the plas-
tic trim. This maintains the high-quality look of
the surfaces. X
Wipe the plastic trim with a damp, lint-free
cloth, e.g. a microfiber cloth. X
Heavy soiling: use care and cleaning prod-
ucts recommended and approved by
Mercedes-Benz.
The surface may change color temporarily.
Wait until the surface is dry again.
Cleaning the steering wheel and gear or
selector lever X
Thoroughly wipe with a damp cloth or use
leather care agents that have been recom-
mended and approved by Mercedes-Benz.
Cleaning genuine wood and trim ele-
ments
! Do not use solvent-based cleaning agents
such as tar remover, wheel cleaners, polishes340
Care
Maintenance and care
Page 345 of 398
Vehicle tool kit
General notes In vehicles with MOExtended tires (tires with
run-flat characteristics) and on PLUG-IN HYBRID
vehicles, the towing eye is in a bracket under the
parcel shelf.
Apart from certain country-specific variations,
the vehicles are not equipped with a tire-change
tool kit.
Some tools for changing a wheel are specific to
the vehicle. For more information on which tire
changing tools are required and approved to
perform a wheel change on your vehicle, consult
a qualified specialist workshop.
Tools required for changing a wheel may
include, for example: R
Jack R
Wheel chock R
Lug wrench R
Ratchet wrench R
Alignment bolt
Vehicles with a TIREFIT kit
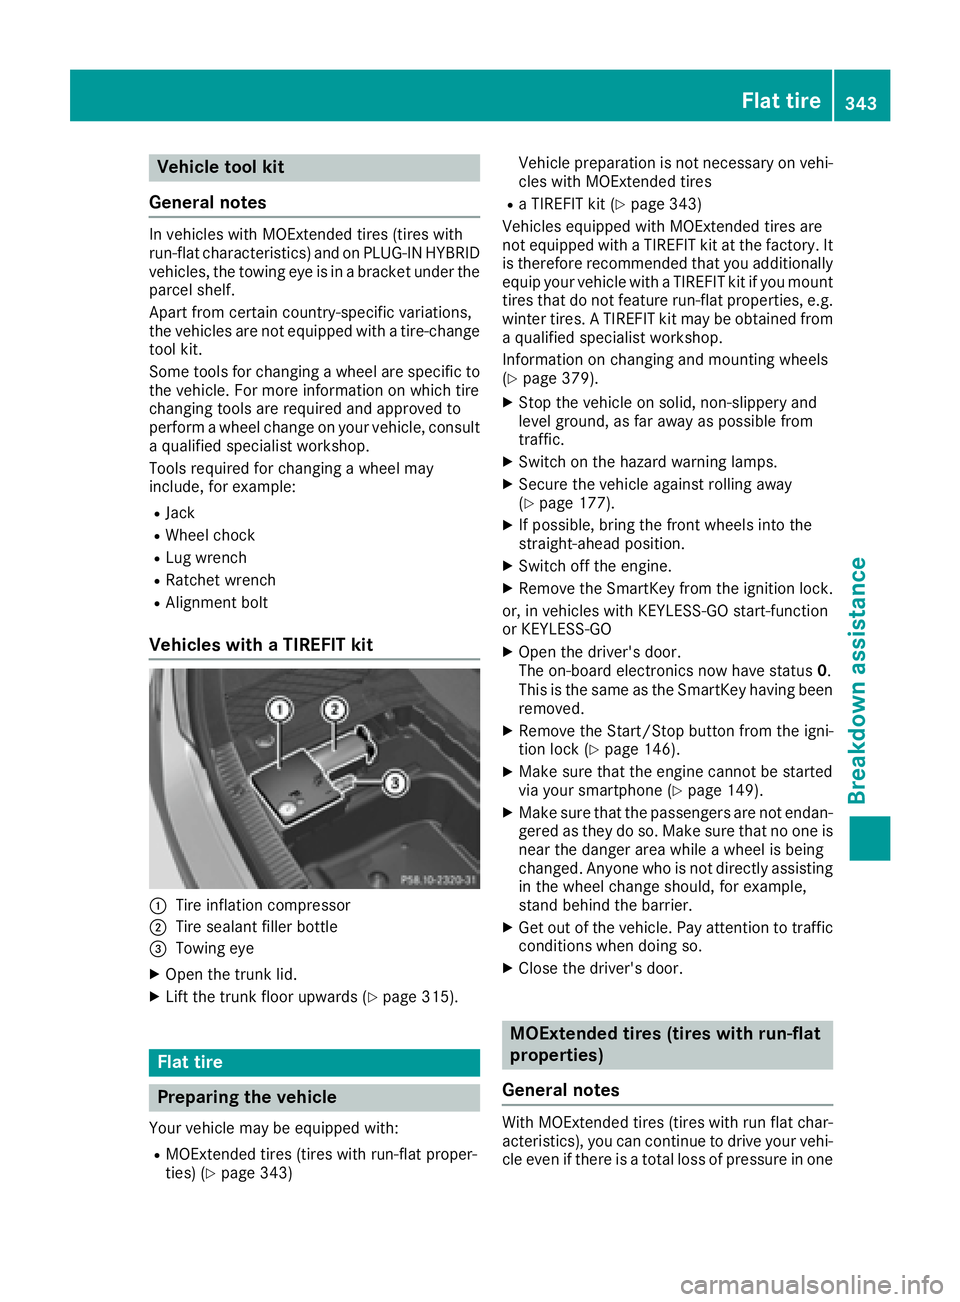
C
Tire inflation compressorD
Tire sealant filler bottle
Page 346 of 398
or more tires. The affected tire must not show
any clearly visible damage.
You can recognize MOExtended tires by the
MOExtended marking which appears on the
sidewall of the tire. You will find this marking
next to the tire size designation, the load-bear-
ing capacity and the speed index ( Y
page 374).
MOExtended tires may only be used in conjunc-
tion with an active tire pressure loss warning
system or with an active tire pressure monitor.
If a pressure loss warning message appears
in the multifunction display: R
observe the instructions in the display mes-
sages ( Y
page 280).R
check the tire for damage. R
if driving on, observe the following notes.
The driving distance possible in run-flat mode is
approximately 50 miles (80 km) when the vehi-
cle is partially laden. When the vehicle is fully
laden it is approximately 19 miles (30 km).
In addition to the vehicle load, the driving dis-
tance possible depends upon: R
vehicle speed R
road condition R
outside temperature
The driving distance possible in run-flat mode
may be reduced by extreme driving conditions
or maneuvers, or it can be increased through a
moderate style of driving.
The driving distance possible in run-flat mode is
counted from the moment the tire pressure loss
warning appears in the multifunction display.
You must not exceed a maximum speed of
50 mph (80 km/h).
When replacing one or all tires, please observe
the following specifications for your vehicle's
tires: R
size R
the type and R
the "MOExtended" mark
If a tire has gone flat and cannot be replaced
with a MOExtended tire, a standard tire may be
used as a temporary measure. Make sure that
you use the proper size and type (summer or
winter tire).
Vehicles equipped with MOExtended tires are
not equipped with a TIREFIT kit at the factory. It
is therefore recommended that you additionally
equip your vehicle with a TIREFIT kit if you mount
tires that do not feature run-flat properties, e.g. winter tires. A TIREFIT kit may be obtained from
a qualified specialist workshop.
Important safety notes
G WARNING
When driving in emergency mode, the driving
characteristics deteriorate, e.g. when corner-
ing, accelerating quickly and when braking.
There is a risk of an accident.
Do not exceed the stated maximum speed.
Avoid abrupt steering and driving maneuvers,
and driving over obstacles (curbs, potholes,
off-road). This applies in particular to a laden
vehicle.
Stop driving in emergency mode if: R
you hear banging noises. R
the vehicle starts to shake. R
you see smoke and smell rubber. R
ESP ®
is intervening constantly. R
there are tears in the sidewalls of the tire.
After driving in emergency mode, have the
wheel rims checked at a qualified specialist
workshop with regard to their further use. The
defective tire must be replaced in every case.
TIREFIT kit
Important safety notes TIREFIT is a tire sealant.
You can use TIREFIT to seal punctures of up to
0.16 in (4 mm), particularly those in the tire
tread. You can use TIREFIT at outside tempera-
tures down to
Page 347 of 398
Do not drive the vehicle. Contact a qualified
specialist workshop.
G WARNING
The tire sealant is harmful and causes irrita-
tion. It must not come into contact with your
skin, eyes or clothing or be swallowed. Do not
inhale TIREFIT fumes. Keep tire sealant away
from children. There is a risk of injury.
If you come into contact with the tire sealant,
observe the following: R
Rinse off the tire sealant from your skin
immediately with water. R
If the tire sealant comes into contact with
your eyes, immediately rinse them thor-
oughly with clean water. R
If tire sealant is swallowed, immediately
rinse your mouth out thoroughly and drink
plenty of water. Do not induce vomiting,
and seek medical attention immediately. R
Immediately change out of clothing which
has come into contact with tire sealant. R
If an allergic reaction occurs, seek medical
attention immediately.
! Do not operate the tire inflation compressor
for longer than ten minutes at a time without
a break. It may otherwise overheat.
The tire inflation compressor can be operated
again once it has cooled down.
Comply with the manufacturer’s safety instruc-
tions on the sticker on the tire inflation com-
pressor.
Using the TIREFIT kit X
Do not remove any foreign objects which have
penetrated the tire, e.g. screws or nails. X
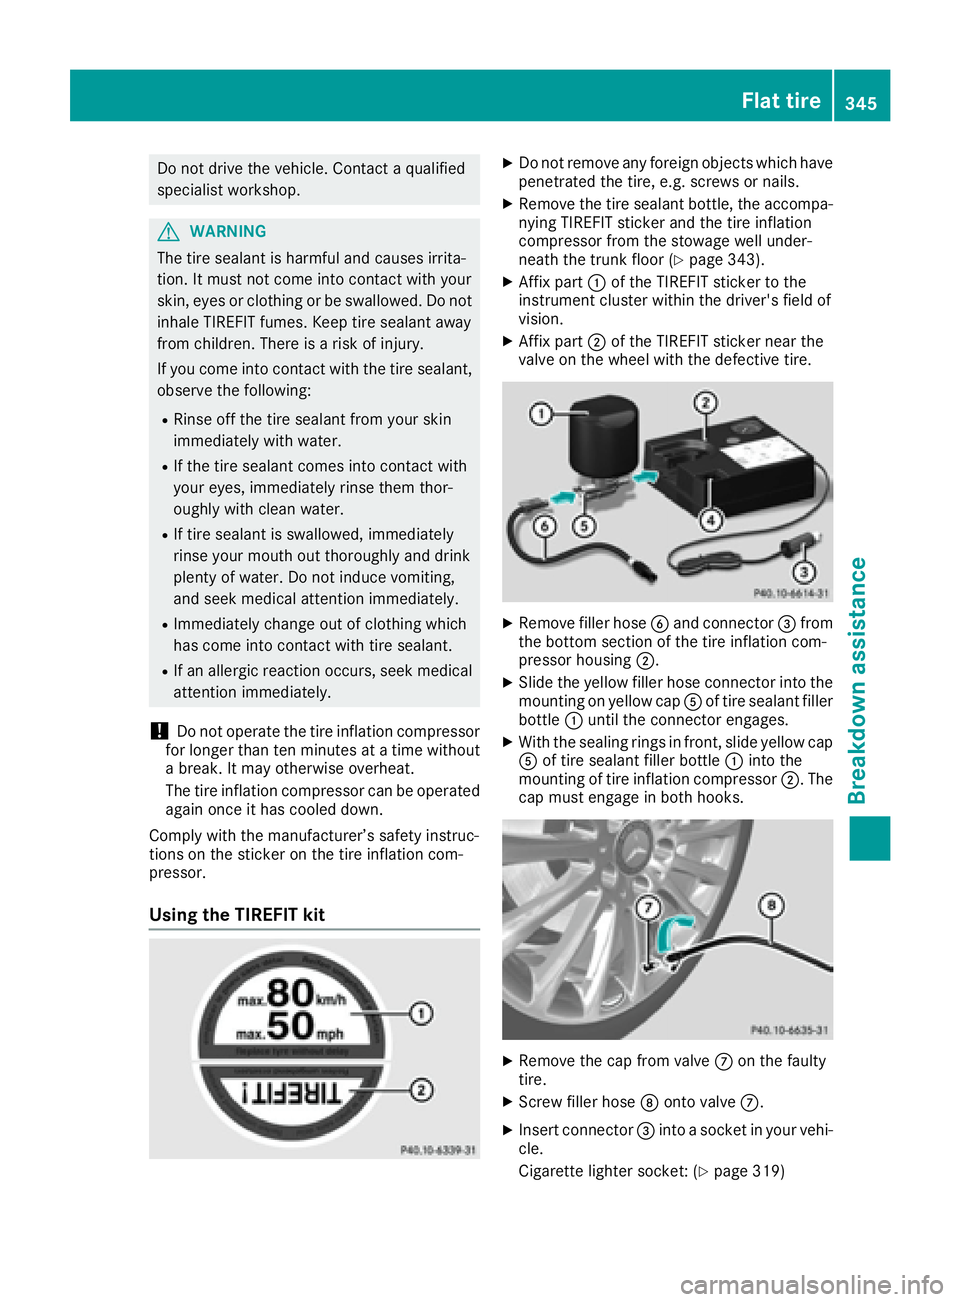
Remove the tire sealant bottle, the accompa-
nying TIREFIT sticker and the tire inflation
compressor from the stowage well under-
neath the trunk floor ( Y
page 343).X
Affix part C of the TIREFIT sticker to the
instrument cluster within the driver's field of
vision. X
Affix part D of the TIREFIT sticker near the
valve on the wheel with the defective tire.
X
Remove filler hose
Page 358 of 398
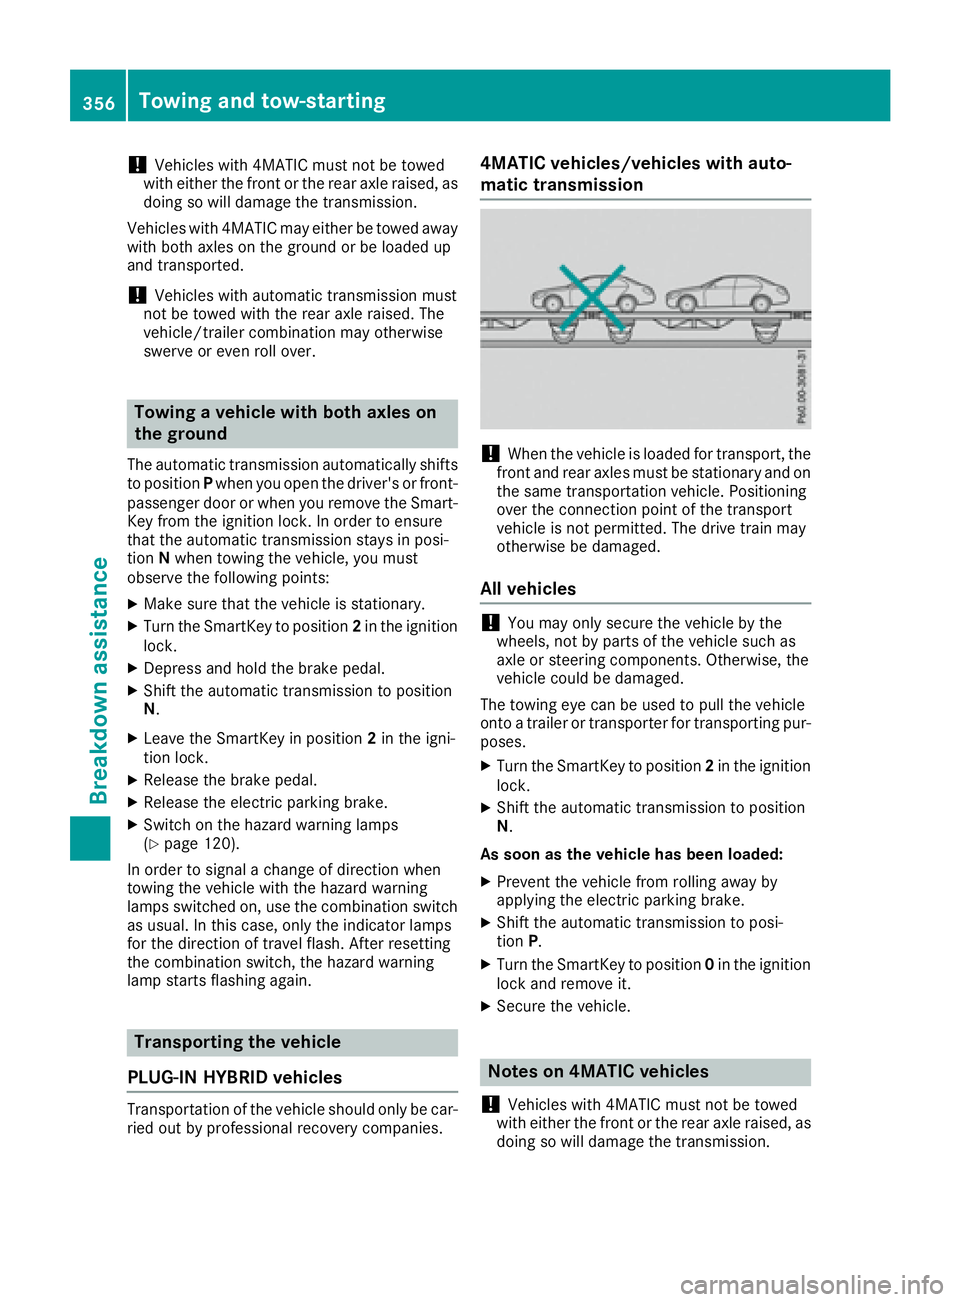
! Vehicles with 4MATIC must not be towed
with either the front or the rear axle raised, as
doing so will damage the transmission.
Vehicles with 4MATIC may either be towed away
with both axles on the ground or be loaded up
and transported.
! Vehicles with automatic transmission must
not be towed with the rear axle raised. The
vehicle/trailer combination may otherwise
swerve or even roll over.
Towing a vehicle with both axles on
the ground The automatic transmission automatically shifts
to position P when you open the driver's or front-
passenger door or when you remove the Smart-
Key from the ignition lock. In order to ensure
that the automatic transmission stays in posi-
tion N when towing the vehicle, you must
observe the following points: X
Make sure that the vehicle is stationary. X
Turn the SmartKey to position 2 in the ignition
lock. X
Depress and hold the brake pedal. X
Shift the automatic transmission to position
N . X
Leave the SmartKey in position 2 in the igni-
tion lock. X
Release the brake pedal. X
Release the electric parking brake. X
Switch on the hazard warning lamps
( Y
page 120).
In order to signal a change of direction when
towing the vehicle with the hazard warning
lamps switched on, use the combination switch
as usual. In this case, only the indicator lamps
for the direction of travel flash. After resetting
the combination switch, the hazard warning
lamp starts flashing again.
Transporting the vehicle
PLUG-IN HYBRID vehicles
Transportation of the vehicle should only be car-
ried out by professional recovery companies. 4MATIC vehicles/vehicles with auto-
matic transmission
! When the vehicle is loaded for transport, the
front and rear axles must be stationary and on
the same transportation vehicle. Positioning
over the connection point of the transport
vehicle is not permitted. The drive train may
otherwise be damaged.
All vehicles
! You may only secure the vehicle by the
wheels, not by parts of the vehicle such as
axle or steering components. Otherwise, the
vehicle could be damaged.
The towing eye can be used to pull the vehicle
onto a trailer or transporter for transporting pur-
poses. X
Turn the SmartKey to position 2 in the ignition
lock. X
Shift the automatic transmission to position
N .
As soon as the vehicle has been loaded: X
Prevent the vehicle from rolling away by
applying the electric parking brake. X
Shift the automatic transmission to posi-
tion P . X
Turn the SmartKey to position 0 in the ignition
lock and remove it. X
Secure the vehicle.
Notes on 4MATIC vehicles
! Vehicles with 4MATIC must not be towed
with either the front or the rear axle raised, as
doing so will damage the transmission.356
Towing and tow-starting
Breakdown assistance
Page 362 of 398
Important safety notes
G WARNIN G
If wheels and tires of th e wrong siz e are used,
th e whee l brakes or suspension component s
may be damaged. Ther e is a ris k of an acci-
dent.
Always replace wheels and tires wit h those
that fulfill th e specification s of th e original
part .
When replacing wheels, mak e sur e to use th e
correct: R
designation R
model
When replacing tires , mak e sur e to use th e
correct: R
designation R
manufacturer R
model
G WARNIN G
A flat tire severely impairs th e driving , steer -
ing and braking characteristics of th e vehicle.
Ther e is a ris k of accident.
Tires without run-flat characteristics :R
do no t driv e wit h a flat tire.R
immediately replace th e flat tire wit h your
emergenc y spar e whee l or spar e wheel, or
consult a qualified specialist workshop.
Tires wit h run-flat characteristics :R
pay attention to th e information and warn -
ing notice s on MOExtended tires (tire s wit h
run-flat characteristics).
Accessories that are no t approve d for your vehi-
cle by Mercedes-Ben z or are no t bein g used cor-
rectl y can impair th e operating safety.
Before purchasing and usin g non-approve d
accessories, visit a qualified specialist work-
sho p and inquire about :R
suitabilit yR
legal stipulation sR
factory recommendation s Further information regarding wheels and tires
can be foun d under "Wheel/tire combinations"
( Y
page 384).
You can ask for information regarding permitte d
wheel-tire combination s at an authorize d
Mercedes-Ben z Center.
Information on tire pressur e can be found:R
on th e Tir e and Loading Information placard
on th e B-pillar on th e driver' s side
( Y
page 370) R
in th e tire pressur e table in th e fuel filler flap
( Y
page 165) R
under "Tir e pressure" ( Y
page 363)
Operation
Information on driving Chec k th e tire pressur e when th e vehicl e is
heavily laden and adjust prio r to a trip.
While driving , pay attention to vibrations, noises
and unusual handlin g characteristics , e.g. pull-
ing to on e side . This may indicat e that th e
wheels or tires are damaged. If you suspec t that
a tire is defective, reduce your spee d immedi-
ately. Stop th e vehicl e as soo n as possible to
chec k th e wheels and tires for damage. Hidden
tire damag e could also be causing th e unusual
handlin g characteristics . If you fin d no sign s of
damage, hav e th e tires and wheels checke d at a
qualified specialist workshop.
When parking your vehicle, mak e sur e that th e
tires do no t get deformed by th e cur b or other
obstacles. If they canno t be avoided, driv e ove r
obstacles suc h as curbs slowly and at an obtuse
angle. Otherwise, you may damag e th e wheels
or tires .
Notes on high performance tires
G WARNIN G
Due to th e special tire tread in combination
wit h th e optimized rubber compound , there is
an increased ris k of hydroplaning and skid-
din g on a damp or wet road surface. tire gri p is
also noticeably reduce d at low outside tem-
peratures and low tire operating tempera-
tures. Ther e is a ris k of an accident.360
Operation
Wheels and tires
Page 363 of 398
Turn on ESP ®
and adapt your driving style
accordingly. When the outside temperature
falls below 10 †, use M+S tires.
i Different driving styles may lead to high tire
wear and the tires may reach the minimum
tire tread depth after only a short time.
Regular checking of wheels and tires
G WARNING
Damaged tires can cause tire inflation pres-
sure loss. As a result, you could lose control of
your vehicle. There is a risk of accident.
Check the tires regularly for signs of damage
and replace any damaged tires immediately.
Check wheels and tires for damage at least once
a month. Check wheels and tires after driving
off-road or on rough roads. Damaged wheels
can cause a loss of tire pressure. Pay particular
attention to damage such as: R
cuts in the tires R
punctures R
tears in the tires R
bulges on tires R
deformation or severe corrosion on wheels
Regularly check the tire tread depth and the
condition of the tread across the whole width of
the tire ( Y
page 361). If necessary, turn the
front wheels to full lock in order to inspect the
inner side of the tire surface.
All wheels must have a valve cap to protect the
valve against dirt and moisture. Do not mount
anything onto the valve other than the standard
valve cap or other valve caps approved by
Mercedes-Benz for your vehicle. Do not use any
other valve caps or systems, e.g. tire pressure
monitoring systems.
Regularly check the pressure of all the tires par-
ticularly prior to long trips. Adjust the tire pres-
sure as necessary ( Y
page 363).
The service life of tires depends, among other
things, on the following factors: R
driving style R
tire pressure R
distance covered Notes on tire tread
G WARNING
Insufficient tire tread will reduce tire traction.
The tire is no longer able to dissipate water.
This means that on wet road surfaces, the risk
of hydroplaning increases, in particular where
speed is not adapted to suit the driving con-
ditions. There is a risk of accident.
If the tire pressure is too high or too low, tires
may exhibit different levels of wear at differ-
ent locations on the tire tread. Thus, you
should regularly check the tread depth and
the condition of the tread across the entire
width of all tires.
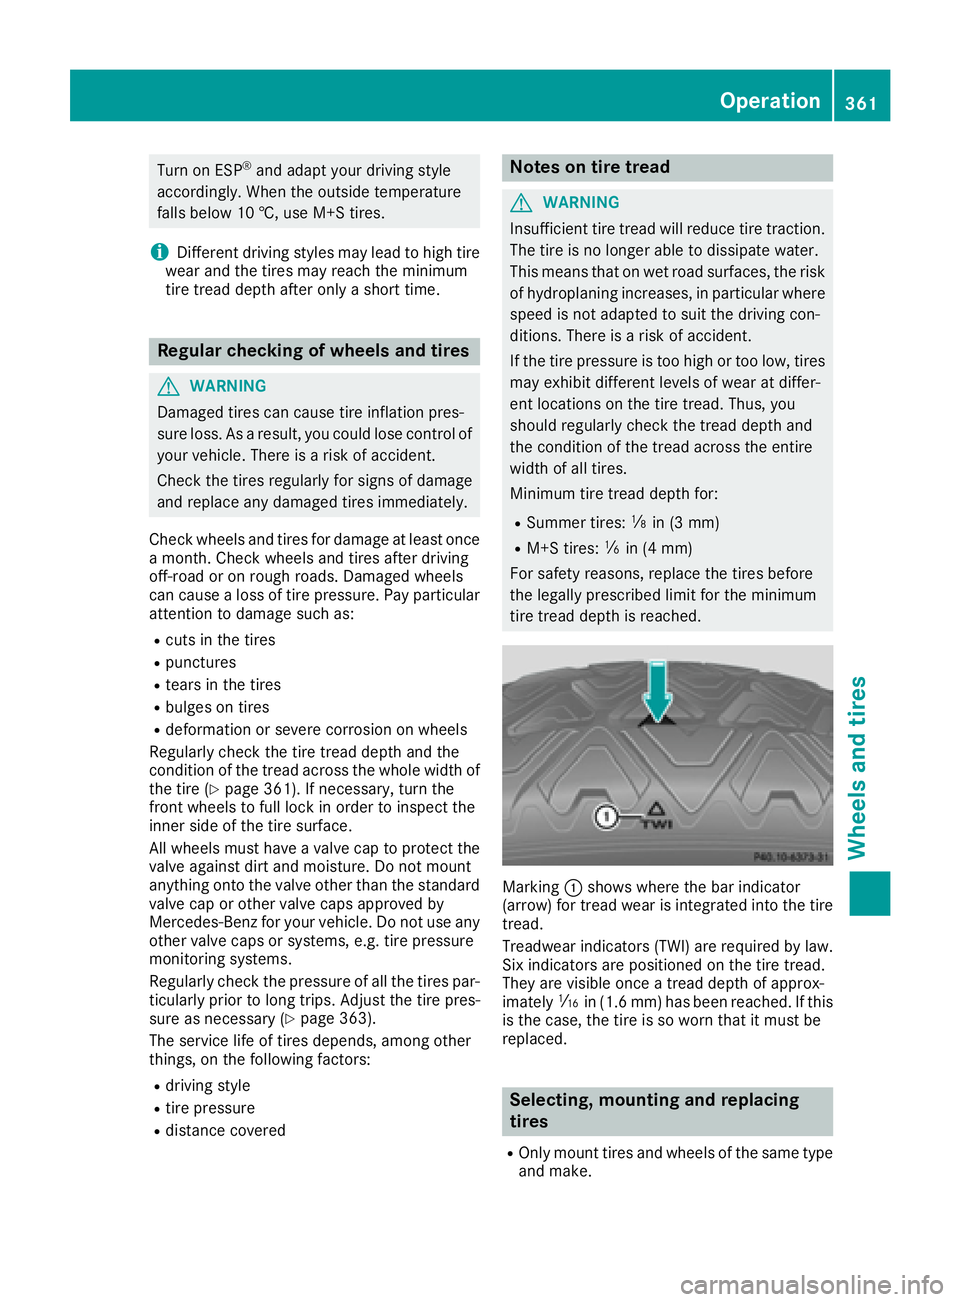
Minimum tire tread depth for: R
Summer tires:
Page 364 of 398
Exception: it is permissible to install a differ-
ent type or make in the event of a flat tire.
Observe the "MOExtended tires (tires with
run-flat characteristics" section ( Y
page 343).R
Only mount tires of the correct size onto the
wheels. R
Break in new tires at moderate speeds for the
first 60 miles (100 km). They only reach their
full performance after this distance. R
Do not drive with tires which have too little
tread depth, as this significantly reduces the
traction on wet roads (hydroplaning). R
Replace the tires after six years at the latest,
regardless of wear.
MOExtended tires (tires with run-flat
properties) With MOExtended tires (tires with run flat char-
acteristics), you can continue to drive your vehi-
cle even if there is a total loss of pressure in one
or more tires.
MOExtended tires may only be used in conjunc-
tion with an active tire pressure loss warning
system or with an active tire pressure monitor
and on wheels specifically tested by Mercedes-
Benz.
Notes on driving with MOExtended tires with a
flat tire ( Y
page 343).
Vehicles equipped with MOExtended tires are
not equipped with a TIREFIT kit at the factory. It
is therefore recommended that you additionally
equip your vehicle with a TIREFIT kit if you mount
tires that do not feature run-flat properties, e.g.
winter tires. A TIREFIT kit can be obtained from
a qualified specialist workshop.
Winter operation
General notes Have your vehicle winter-proofed at a qualified
specialist workshop at the onset of winter.
Observe the notes in the "Changing a wheel"
section ( Y
page 379).
Driving with summer tires
At temperatures below 45 ‡ (+7 †), summer
tires lose elasticity and therefore traction and
braking power. Change the tires on your vehicle to M+S tire s. Usin g su mmer tires at very cold
temperatures could cause cracks to form,
thereby damaging the tires permanently.
Mercedes-Benz cannot accept responsibility for
this type of damage.
G WARNING
Damaged tires can cause tire inflation pres-
sure loss. As a result, you could lose control of
your vehicle. There is a risk of accident.
Check the tires regularly for signs of damage
and replace any damaged tires immediately.
M+S tires
G WARNING
M+S tires with a tire tread depth of less than
Page 365 of 398
Snow chains
G WARNING
If snow chains are installed to the front
wheels, they may drag against the vehicle
body or chassis components. This could
cause damage to the vehicle or the tires.
There is a risk of an accident.
To avoid hazardous situations: R
never install snow chains to the front
wheels R
always install snow chains in pairs to the
rear wheels.
! Vehicles with steel wheels: if you mount
snow chains on steel wheels, you may dam-
age the hub caps. Remove the hub caps from
the relevant wheels before mounting the
snow chains.
For safety reasons, Mercedes-Benz recom-
mends that you only use snow chains that have
been specially approved for your vehicle by
Mercedes-Benz, or are of a corresponding
standard of quality. For more information,
please contact a qualified specialist workshop.
If you intend to mount snow chains, please bear
the following points in mind: R
Snow chains may not be mounted on all
wheel/tire combinations. Permissible wheel-
tire combinations ( Y
page 384).R
Only use snow chains when driving on roads
completely covered by snow. Remove the
snow chains as soon as possible when you
come to a road that is not snow-covered. R
Local regulations may restrict the use of snow
chains. Observe the appropriate regulations if
you wish to mount snow chains. R
Do not exceed the maximum permissible
speed of 30 mph (50 km/h). R
On vehicles with AIRMATIC, you must drive at
raised vehicle level if snow chains have been
installed ( Y
page 196).R
When snow chains are installed, never use
Active Parking Assist ( Y
page 202).
You may wish to deactivate ESP ®
when pulling
away with snow chains installed: R
All vehicles (except Mercedes ‑ AMG vehicles)
( Y
page 74) R
Mercedes ‑ AMG vehicles ( Y
page 74) You can thereby allow the wheels to spin in a
controlled manner, achieving an increased driv-
ing force (cutting action).
Tire pressure
Tire pressure specifications
Important safety notes
G WARNING
Underinflated or overinflated tires pose the
following risks: R
the tires may burst, especially as the load
and vehicle speed increase. R
the tires may wear excessively and/or
unevenly, which may greatly impair tire
traction. R
the driving characteristics, as well as steer-
ing and braking, may be greatly impaired.
There is a risk of an accident.
Follow recommended tire inflation pressures
and check the pressure of all the tires includ-
ing the spare wheel: R
monthly, at least R
if the load changes R
before beginning a long journey R
under different operating conditions, e.g.
off-road driving
If necessary, correct the tire pressure.
The data on the Tire and Loading Information
placard and tire pressure table shown here are
examples. Tire pressure specifications are vehi-
cle-specific and may deviate from the data
shown here. The tire pressure specifications
that are valid for your vehicle can be found on
the Tire and Loading Information placard and
tire pressure table on the vehicle.
General notes
The recommended tire pressures for the tires
mounted at the factory can be found on the
labels described here.
Further information on tire pressures can be
obtained at a qualified specialist workshop. Tire pressure 363
Wheels and tires Z
Page 366 of 398
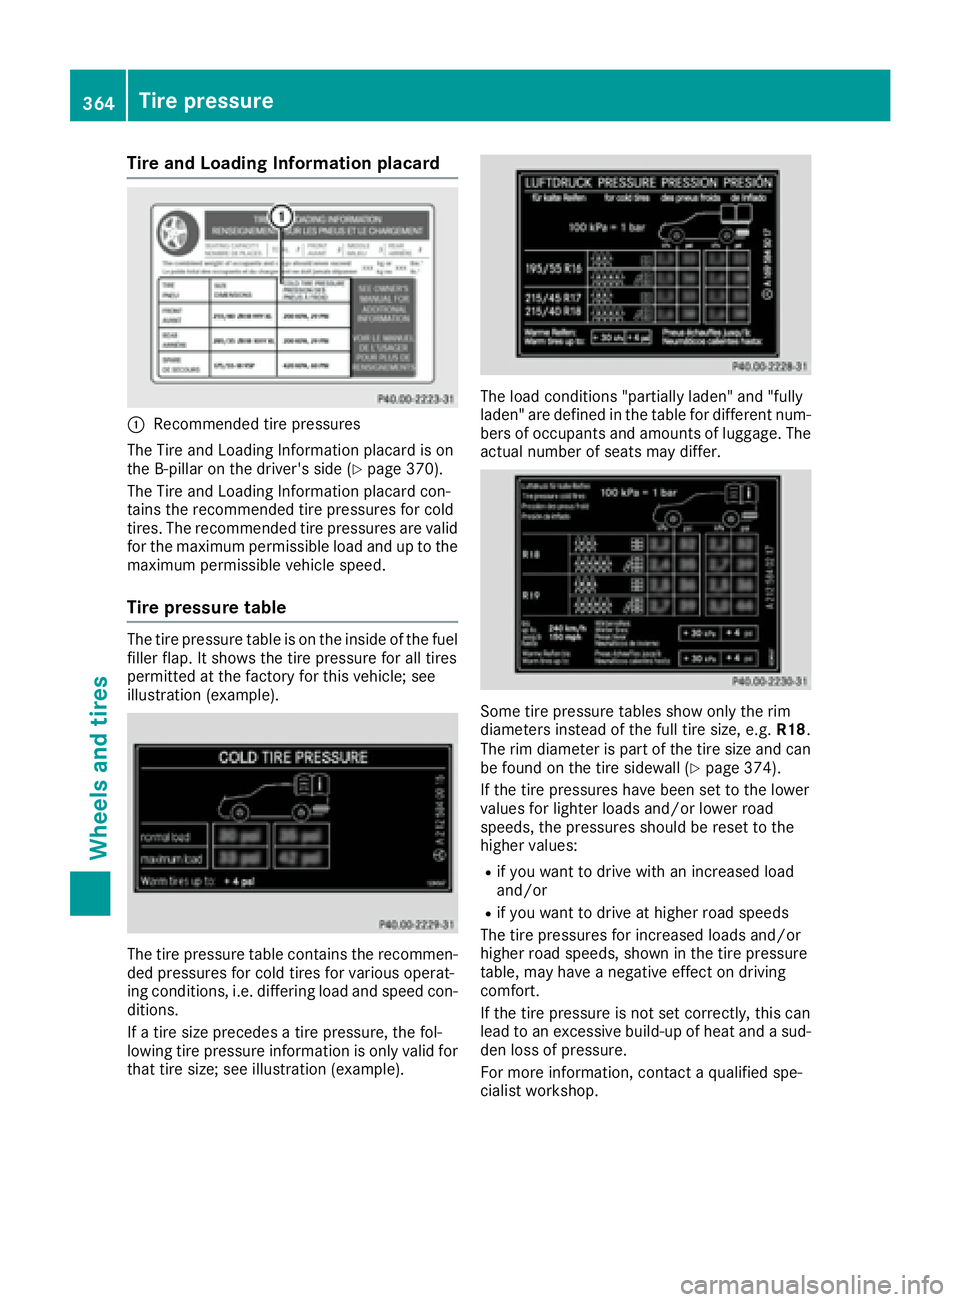
Tire and Loading Information placard
C
Recommended tire pressures
The Tire and Loading Information placard is on
the B-pillar on the driver's side ( Y
page 370).
The Tire and Loading Information placard con-
tains the recommended tire pressures for cold
tires. The recommended tire pressures are valid
for the maximum permissible load and up to the
maximum permissible vehicle speed.
Tire pressure table The tire pressure table is on the inside of the fuel
filler flap. It shows the tire pressure for all tires
permitted at the factory for this vehicle; see
illustration (example).
The tire pressure table contains the recommen-
ded pressures for cold tires for various operat-
ing conditions, i.e. differing load and speed con-
ditions.
If a tire size precedes a tire pressure, the fol-
lowing tire pressure information is only valid for
that tire size; see illustration (example). The load conditions "partially laden" and "fully
laden" are defined in the table for different num-
bers of occupants and amounts of luggage. The
actual number of seats may differ.
Some tire pressure tables show only the rim
diameters instead of the full tire size, e.g. R18 .
The rim diameter is part of the tire size and can
be found on the tire sidewall ( Y
page 374).
If the tire pressures have been set to the lower
values for lighter loads and/or lower road
speeds, the pressures should be reset to the
higher values: R
if you want to drive with an increased load
and/or R
if you want to drive at higher road speeds
The tire pressures for increased loads and/or
higher road speeds, shown in the tire pressure
table, may have a negative effect on driving
comfort.
If the tire pressure is not set correctly, this can
lead to an excessive build-up of heat and a sud-
den loss of pressure.
For more information, contact a qualified spe-
cialist workshop.364
Tire pressure
Wheels and tires