door lock MERCEDES-BENZ C CLASS 2016 Owners Manual
[x] Cancel search | Manufacturer: MERCEDES-BENZ, Model Year: 2016, Model line: C CLASS, Model: MERCEDES-BENZ C CLASS 2016Pages: 398, PDF Size: 11.64 MB
Page 8 of 398
Steering wheel ............................... 340
Trim pieces .................................... 340
Washing by hand ........................... 336
Wheels ........................................... 338
Windows ........................................ 338
Wiper blades .................................. 338
Wooden trim .................................. 340
Cargo tie down rings ......................... 313
CD
see also Digital Operator's Man-
ual .................................................. 298
CD player (on-board computer) ........ 244
Center console
Lower section ............................ 40, 41
Upper section .................................. 39
Central locking
Locking/unlocking (SmartKey) ........ 81
Changing bulbs
High-beam headlamps ................... 124
Low-beam headlamps .................... 123
Opening and closing the side trim
panels ............................................ 124
Reversing lamps ............................ 124
Turn signals (front) ......................... 124
Turn signals (rear) .......................... 124
Changing the media source ............. 243
Charge-air pressure (on-board
computer, Mercedes-AMG vehi-
cles) .................................................... 252
Charging
see Charging the high-voltage bat-
tery (important safety notes)
Charging cable
Connecting .................................... 173
Controls ......................................... 171
Important safety notes .................. 171
Indicator lamp ................................ 172
Removing ....................................... 173
Storing ........................................... 171
Warming up ................................... 170
Charging the high-voltage battery
(important safety notes) ................... 168
Child
Restraint system .............................. 63
Child seat
Forward-facing restraint system ...... 66 LATCH-type (ISOFIX) child seat
anchors ............................................ 64
On the front-passenger seat ............ 65
Rearward-facing restraint system .... 65
Top Tether ....................................... 64
Child-proof locks
Important safety notes .................... 66
Rear doors ....................................... 67
Children
Special seat belt retractor ............... 62
Cigarette lighter ................................ 319
Cle aning
Mirro r turn signal ........................... 339
Climate control
3-zone automatic control panel ..... 131
Control panel for automatic cli-
mate control (1 zone) .................... 130
Control panel for dual-zone auto-
matic climate control ..................... 130
Controlling automatically ............... 133
Cooling with air dehumidification .. 133
Cooling with air dehumidification
(multimedia system) ...................... 303
Defrosting the windows ................. 136
Defrosting the windshield .............. 135
ECO start/stop function (3-zone
automatic climate control) ............. 132
General notes ................................ 129
Immediate pre-entry climate con-
trol ................................................. 143
Indicator lamp ................................ 133
Ionization ....................................... 140
Ionization (multimedia system) ...... 303
Notes on using the automatic cli-
mate control .................................. 132
Overview ........................................ 302
Overview of systems ...................... 129
Perfume atomizer .......................... 138
Perfume atomizer (multimedia
system) .......................................... 303
Pre-entry climate control (via key)
(multimedia system) ...................... 303
Pre-entry climate control at
departure time ............................... 142
Pre-entry climate control at
departure time (multimedia sys-
tem) ............................................... 303
Pre-entry climate control via key ... 1416
Index
Page 10 of 398
Switching on/off (on-board com-
puter) ............................................. 250
Declarations of conformity ................. 31
Diagnostics connection ...................... 31
Digital Operator's Manual
Help ................................................. 25
Introduction ..................................... 25
Digital speedometer ......................... 241
DIRECT SELECT lever
Automatic transmission ................. 156
Display
see Display messages
see Warning and indicator lamps
Display message
Hybrid drive system ....................... 272
Display messages
ASSYST PLUS ................................ 333
Calling up (on-board computer) ..... 255
Driving systems ............................. 274
Engine ............................................ 268
General notes ................................ 255
Hiding (on-board computer) ........... 255
Introduction ................................... 255
Lights ............................................. 267
Safety systems .............................. 256
SmartKey ....................................... 285
Tires ............................................... 280
Vehicle ........................................... 282
Distance recorder ............................. 239
Distance warning (warning lamp) .... 295
Distance warning function
Function/notes ................................ 71
DISTRONIC PLUS
Activating ....................................... 188
Activation conditions ..................... 188
Cruise control lever ....................... 188
Deactivating ................................... 191
Display message ............................ 277
Displays in the instrument cluster .. 191
Driving tips .................................... 192
Driving with DISTRONIC PLUS ....... 189
Function/notes ............................. 186
Important safety notes .................. 187
Setting a speed .............................. 190
Setting the specified minimum
distance ......................................... 190
Stopping ........................................ 189 with Steering Assist and Stop&Go
Pilot ............................................... 192
Doors
Automatic locking (switch) ............... 89
Central locking/unlocking
(SmartKey) ....................................... 81
Control panel ................................... 43
Display message ............................ 284
Emergency locking ........................... 89
Emergency unlocking ....................... 89
Important safety notes .................... 87
Opening (from inside) ...................... 88
Drinki ng an d driving ......................... 180
Drive program
Automatic transmission ................. 159
SETUP (on-board computer) .......... 253
Drive programs
Display (DIRECT SELECT lever) ...... 157
Driver's door
see Doors
Driving abroad
Mercedes-Benz Service ................. 335
Driving Assistance PLUS package ... 219
Driving on flooded roads .................. 184
Driving safety systems
ABS (Anti-lock Braking System) ....... 68
ADAPTIVE BRAKE ............................. 76
Adaptive Brake Assist ...................... 72
BAS (Brake Assist System) .............. 68
BAS PLUS with Cross-Traffic
Assist ............................................... 69
COLLISION PREVENTION ASSIST
PLUS ................................................ 70
Distance warning function ............... 71
EBD (electronic brake force distri-
bution) ............................................. 76
ESP ®
(Electronic Stability Pro-
gram) ............................................... 73
Important safety information ........... 68
Overview .......................................... 67
PRE-SAFE ®
Brake ............................. 77
Recuperative Brake System ............. 45
STEER CONTROL ............................. 78
Driving system
RACE START (Mercedes-AMG
vehicles) ........................................ 1958
Index
Page 15 of 398
Lane Tracking package .................... .2 16
Lap time (RACETIMER) ..................... .2 53
LATCH-type (ISOFIX) child seat
anchors ................................................ 64
License plate lamp (display mes-
sage) ................................................... 267
Light function, active
Display message ............................ 267
Light sensor (display message) ....... 267
Lights
Adaptive Highbeam Assist ............. 120
Automatic headlamp mode ............ 118
Cornering light function ................. 120
Fogged up headlamps .................... 121
General notes ................................ 118
Hazard warning lamps ................... 120
High beam flasher .......................... 119
High-beam headlamps ................... 119
Light switch ................................... 118
Low-beam headlamps .................... 119
Parking lamps ................................ 119
Rear fog lamp ................................ 119
Setting exterior lighting ................. 118
Standing lamps .............................. 119
Switching the daytime running
lamps on/off (on-board com-
puter) ............................................. 250
Turn signals ................................... 119
see Interior lighting
Loading guidelines ............................ 308
Locking
see Central locking
Locking (doors)
Automatic ........................................ 89
Emergency locking ........................... 89
From inside (central locking but-
ton) ................................................. .8 8
Locking centrally
see Central locking
Low-beam headlamps
Changing bulbs .............................. 123
Display message ............................ 267
Switching on/off .......................... .1 19
Lumbar support
Adjusting the 4-way lumbar sup-
port ....... ......................................... 108 M M+S tires ............................................ 362
Malfunction message
see Display messages
Matte finish (cleaning instruc-
tions) ................................................. .3 37
Maximum charge current
Setting (charging cable) ................. 172
Setting (on-board computer) .......... 248
mbrace
Call priority ................................... .3 23
Display message ............................ 261
Downloading destinations
(COMAND) ..................................... 323
Downloading routes ....................... 326
Emergency call .............................. 320
General notes ................................ 320
Geo fencing ................................... 326
Locating a stolen vehicle .............. .3 25
MB info call button ........................ 322
Remote fault diagnosis .................. 325
Remote vehicle locking .................. 324
Roadside Assistance button .......... 321
Search & Send ............................... 323
Self-test ......................................... 320
Speed alert ................................... .3 26
System .......................................... 320
Triggering the vehicle alarm ........... 326
Vehicle remote unlocking .............. 324
Mechanical key
Function/notes ................................ 83
General notes .................................. 83
Inserting .......................................... 83
Locking vehicle ................................ 89
Removing ......................................... 83
Unlocking the driver's door .............. 89
Memory card (audio) ......................... 244
Memory function
Seats, steering wheel, exterior
mirrors .......................................... .1 16
Mercedes-Benz Intelligent Drive
360°camera .................................. 210
Active Blind Spot Assist ................. 219
Active Lane Keeping Assist ............ 222
Active Parking Assist ..................... 202
ATTENTION ASSIST ........................ 214
Blind Spot Assist ............................ 216 Index 13
Page 21 of 398
Storing settings (memory func-
tion) ............................................... 116
Switching seat heating on/off ....... 108
Switching seat ventilation on/
off .................................................. 109
Securing a load
see Securing cargo
Securing cargo .................................. 313
Selector lever
Cleaning ......................................... 340
see Automatic transmission
Sensors (cleaning instructions) ....... 339
Service menu (on-board com-
puter) .................................................. 246
Service message
see ASSYST PLUS
Service products
Brake fluid ..................................... 392
Coolant (engine) ............................ 392
Engine oil ....................................... 391
Fuel ................................................ 388
Important safety notes .................. 388
Refrigerant (air-conditioning sys-
tem) ............................................... 393
Washer fluid ................................... 393
Setting the charge current (on-
board computer) ............................... 248
Setting the date/time format
see also Digital Operator's Man-
ual .................................................. 298
Setting the departure time (on-
board computer) ............................... 249
Setting the language
see also Digital Operator's Man-
ual .................................................. 298
Setting the time
see also Digital Operator's Man-
ual .................................................. 298
Settings
Factory (on-board computer) ......... 252
On-board computer ....................... 247
SETUP (on-board computer) ............. 253
Side impact air bag ............................. 53
Side marker lamp (display mes-
sage) ................................................... 267
Side windows
Cleaning ......................................... 338 Convenience closing feature ............ 96
Convenience opening feature .......... 96
Important safety information ........... 94
Opening/closing .............................. 95
Problem (malfunction) ..................... 98
Resetting ......................................... 97
Reversing feature ............................. 95
SIRIUS services
see also Digital Operator's Man-
ual .................................................. 298
Ski and snowboard bag .................... 310
Sliding sunroof
Opening/ closi ng .............................. 99
R
esetting ....................................... 100
see Panorama roof with power
tilt/sliding panel
SmartKey
Changing the battery ....................... 84
Changing the programming ............. 83
Checking the battery ....................... 84
Convenience closing feature ............ 96
Convenience opening feature .......... 96
Display message ............................ 285
Door central locking/unlocking ....... 81
Important safety notes .................... 81
KEYLESS-GO start function .............. 83
Loss ................................................. 86
Mechanical key ................................ 83
Overview .......................................... 81
Positions (ignition lock) ................. 146
Problem (malfunction) ..................... 86
Starting the engine ........................ 148
Smartphone
Starting the engine ........................ 149
SMS
see also Digital Operator's Man-
ual .................................................. 298
Snow chains ...................................... 363
Socket (12 V)
Center console .............................. 319
General notes ................................ 319
Rear compartment ......................... 319
Sound
Switching on/off ........................... 299
Special seat belt retractor .................. 62
Specialist workshop ............................ 31
Speed, controlling
see Cruise control Index 19
Page 63 of 398
PRE-SAFE ®
takes the following measures
depending on the hazardous situation detected: R
the front seat belts are pre-tensioned. R
if the vehicle skids, the side windows and the
sliding sunroof are closed. R
vehicles with the memory function for the
front-passenger seat: the front-passenger
seat is adjusted if it is in an unfavorable posi-
tion.
If the hazardous situation passes without result-
ing in an accident, PRE-SAFE ®
slackens the belt
pre-tensioning. All settings made by PRE-SAFE ®
can then be reversed.
If the seat belt pre-tensioning is not reduced: X
Move the seat backrest or seat back slightly
when the vehicle is stationary.
The seat belt pre-tensioning is reduced and
the locking mechanism is released.
The seat-belt adjustment is an integral part of
the PRE-SAFE ®
convenience function. You will
find information on the convenience function
under "Belt adjustment" ( Y
page 51).
PRE-SAFE ®
PLUS (anticipatory occu-
pant protection system PLUS)
Introduction PRE-SAFE ®
PLUS is only available in vehicles
with the Driving Assistance package.
Using the radar sensor system, PRE-SAFE ®
PLUS is able to detect that a head-on or rear-end
collision is imminent. In certain hazardous sit-
uations, PRE-SAFE ®
PLUS takes pre-emptive
measures to protect the vehicle occupants.
Important safety notes The intervention of PRE-SAFE ®
PLUS cannot
prevent an imminent collision.
The driver is not warned about the intervention
of PRE-SAFE ®
PLUS.
PRE-SAFE ®
PLUS does not intervene if the vehi-
cle is backing up.
When driving, or when parking or exiting a park-
ing space with assistance from Active Parking
Assist, PRE-SAFE ®
PLUS will not apply the
brakes. Function PRE-SAFE ®
PLUS intervenes in certain situa-
tions if the radar sensor system detects an
imminent head-on or rear-end collision.
PRE-SAFE ®
PLUS takes the following measures
depending on the hazardous situation detected: R
if the radar sensor system detects that a
head-on collision is imminent, the seat belts
are pre-tensioned. R
if the radar sensor system detects that a rear-
end collision is imminent: -
the brake pressure is increased if the driver
applies the brakes when the vehicle is sta-
tionary. -
the seat belts are pre-tensioned.
The PRE-SAFE ®
PLUS braking application is can-
celed: R
if the accelerator pedal is depressed when a
gear is engaged R
if the risk of a collision passes or is no longer
detected R
if DISTRONIC PLUS indicates an intention to
pull away
If the hazardous situation passes without result-
ing in an accident, the original settings are
restored.
Automatic measures after an acci-
dent Immediately after an accident, the following
measures are implemented, depending on the
type and severity of the impact: R
the hazard warning lamps are activated R
the emergency lighting is activated R
the vehicle doors are unlocked R
the front side windows are lowered R
vehicles with a memory function: the electri-
cally adjustable steering wheel is raised R
the engine is switched off and the fuel supply
is cut off R
vehicles with mbrace: automatic emergency
call R
vehicles with the hybrid drive system: the
hybrid system and the high-voltage electrical
system are deactivatedOccupant safety 61
Safety Z
Page 68 of 398
Always observe the child restraint system man-
ufacturer's installation and operating instruc-
tions.
Forward-facing child restraint system If it is absolutely necessary to install a forward-
facing child restraint system on the front-
passenger seat, always move the front-
passenger seat as far back as possible. Fully
retract the seat cushion length. The entire base
of the child restraint system must always rest on
the seat cushion of the front-passenger seat.
The backrest of the child restraint system must
lie as flat as possible against the backrest of the
front-passenger seat. The child restraint system
must not touch the roof or be subjected to a load
by the head restraint. Adjust the angle of the
seat backrest and the head restraint position
accordingly. Always make sure that the shoul-
der belt strap is correctly routed from the vehi-
cle belt outlet to the shoulder belt guide on the
child restraint system. The shoulder belt strap
must be routed forwards and downwards from
the vehicle belt outlet. If necessary, adjust the
vehicle belt outlet and the front-passenger seat
accordingly.
Always observe the child restraint system man-
ufacturer's installation and operating instruc-
tions.
Child-proof locks
Important safety notes
G WARNING
If children are traveling in the vehicle, they
could: R
open doors, thus endangering other people
or road users R
exit the vehicle and be caught by oncoming
traffic R
operate vehicle equipment and become
trapped
There is a risk of an accident and injury.
Always activate the child-proof locks and
override feature if children are traveling in the
vehicle. When leaving the vehicle, always take
the key with you and lock the vehicle. Never
leave children unattended in the vehicle. Override feature for: R
the rear doors ( Y
page 67)R
the rear side windows ( Y
page 67)
G WARNING
If you leave children unsupervised in the vehi-
cle, they could set it in motion by, for example: R
release the parking brake. R
shift the automatic transmission out of the
parking position P .R
start the engine.
In addition, they may operate vehicle equip-
ment and become trapped. There is a risk of
an accident and injury.
When leaving the vehicle, always take the
SmartKey with you and lock the vehicle. Never
leave children unsupervised in the vehicle.
G WARNING
If persons, particularly children are subjected
to prolonged exposure to extreme heat or
cold, there is a risk of injury, possibly even
fatal. Never leave children unattended in the
vehicle.
G WARNING
If the child restraint system is subjected to
direct sunlight, parts may get very hot. Chil-
dren may burn themselves on these parts,
particularly on the metal parts of the child
restraint system. There is a risk of injury.
If you leave the vehicle, taking the child with
you, always ensure that the child restraint
system is not exposed to direct sunlight. Pro-
tect it with a blanket, for example. If the child
restraint system has been exposed to direct
sunlight, let it cool down before securing the
child in it. Never leave children unattended in
the vehicle.66
Children in the vehicle
Safety
Page 69 of 398
Child-proof locks for the rear doors
You secure each door individually with the child-
proof locks on the rear doors. A door secured
with a child-proof lock cannot be opened from
inside the vehicle. When the vehicle is unlocked,
the door can be opened from the outside. X
To activate: press the child-proof lock lever
up in the direction of arrow �C .X
Make sure that the child-proof locks are work-
ing properly. X
To deactivate: press the child-proof lock
lever down in the direction of arrow �D .
Override feature for the rear side win-
dows
X
To activate/deactivate: press button �D .
If indicator lamp �C is lit, operation of the rear
side windows is disabled. Operation is only
possible using the switches in the driver's
door. If indicator lamp �C is off, operation is
possible using the switches in the rear com-
partment. Pets in the vehicle
G WARNING
If you leave animals unattended or unsecured
in the vehicle, they could press buttons or
switches, for example.
As a result, they could: R
activate vehicle equipment and become
trapped, for example R
activate or deactivate systems, thereby
endangering other road users
Unsecured animals could also be flung around
the vehicle in the event of an accident or sud-
den steering or braking, thereby injuring vehi-
cle occupants. There is a risk of an accident
and injury.
Never leave animals unattended in the vehi-
cle. Always secure animals properly during
the journey, e.g. use a suitable animal trans-
port box.
Driving safety systems
Overview of driving safety systems In this section, you will find information about
the following driving safety systems: R
ABS ( A nti-lock B raking S ystem)
( Y
page 68) R
BAS ( B rake A ssist S ystem) ( Y
page 68)R
BAS PLUS with Cross-Traffic Assist ( B rake
A ssist S ystem PLUS with Cross-Traffic Assist)
( Y
page 69) R
COLLISION PREVENTION ASSIST PLUS
( Y
page 70) R
ESP ®
( E lectronic S tability P rogram)
( Y
page 73) R
EBD ( E lectronic B rake force D istribution)
( Y
page 76) R
ADAPTIVE BRAKE ( Y
page 76)R
PRE-SAFE ®
Brake ( Y
page 77)R
STEER CONTROL ( Y
page 78)Driving safety systems 67
Safety Z
Page 81 of 398
This steering assistance is provided in particular
if: R
both right wheels or both left wheels are on a
wet or slippery road surface when you brake. R
the vehicle starts to skid.
Important safety notes
i Observe the "Important safety notes" sec-
tion ( Y
page 68).
No steering support is provided from STEER
CONTROL, if: R
ESP ®
is deactivatedR
ESP ®
is malfunctioning.R
the lighting is faulty.
If ESP ®
is malfunctioning, you will be assisted
further by the electrical power steering.
Protection against theft
Immobilizer The immobilizer prevents your vehicle from
being started without the correct SmartKey. X
To activate with the SmartKey: remove the
SmartKey from the ignition lock. X
To activate with KEYLESS-GO start-func-
tion or KEYLESS-GO: switch the ignition off
and open the driver's door. X
To deactivate: switch on the ignition.
When leaving the vehicle, always take the
SmartKey with you and lock the vehicle. Anyone
can start the engine if a valid SmartKey has been
left inside the vehicle.
i The immobilizer is always deactivated when
you start the engine.
In the event that the engine cannot be started
(yet the vehicle's battery is charged), the sys-
tem is not operational. Contact an authorized
Mercedes-Benz Center or call
1-800-FOR-MERCedes (in the USA) or
1-800-387-0100 (in Canada). ATA (anti-theft alarm system) X
To arm: lock the vehicle with the SmartKey or
KEYLESS-GO.
Indicator lamp �C flashes. The alarm system
is armed after approximately 10 seconds. X
To disarm: unlock the vehicle with the Smart-
Key or KEYLESS-GO.
or X
Insert the SmartKey into the ignition lock.
A visual and audible alarm is triggered if the
alarm system is armed and you open: R
a door R
the vehicle with the mechanical key R
the trunk lid R
the hood X
To turn the alarm off with the SmartKey:
press the �6 or �7 button on the Smart-
Key.
The alarm is switched off.
or X
Vehicles with KEYLESS-GO start-function
or KEYLESS-GO: remove the Start/Stop but-
ton from the ignition lock ( Y
page 146).X
Insert the SmartKey into the ignition lock.
The alarm is switched off. X
To stop the alarm using KEYLESS-GO:
grasp the outside door handle. The SmartKey
must be outside the vehicle.
The alarm is switched off.
or X
Press the Start/Stop button on the dash-
board. The SmartKey must be inside the vehi-
cle.
The alarm is switched off.
The alarm is not switched off, even if you close
the open door that triggered it, for example.Protection against theft 79
Safety Z
Page 83 of 398
SmartKey
Important safety notes
G WARNING
If children are left unsupervised in the vehicle,
they could: R
open the doors, thus endangering other
people or road users. R
get out and disrupt traffic. R
operate the vehicle's equipment.
Additionally, children could set the vehicle in
motion if, for example, they: R
release the parking brake. R
shifting the automatic transmission out of
park position PR
Start the engine.
There is a risk of an accident and injury.
When leaving the vehicle, always take the
SmartKey with you and lock the vehicle. Never
leave children or animals unattended in the
vehicle. Always keep the SmartKey out of
reach of children.
G WARNING
If you attach heavy or large objects to the
SmartKey, the SmartKey could be uninten-
tionally turned in the ignition lock. This could
cause the engine to be switched off. There is a
risk of an accident.
Do not attach any heavy or large objects to the
SmartKey. Remove any bulky key rings before
inserting the SmartKey into the ignition lock.
! Keep the SmartKey away from strong mag-
netic fields. Otherwise, the remote control
function could be affected.
Strong magnetic fields can occur in the vicin-
ity of powerful electrical installations.
Do not keep the SmartKey: R
with electronic devices, e.g. a mobile phone
or another SmartKey. R
with metallic objects, e.g. coins or metal foil. R
inside metallic objects, e.g. a metal case.
This can affect the functionality of the Smart-
Key. Vehicles with KEYLESS-GO start function: do
not keep the SmartKey on the parcel shelf or in
the trunk. Otherwise, the SmartKey may not be
detected, e.g. when starting the engine using
the Start/Stop button.
A check which periodically establishes a radio
connection between the vehicle and the Smart-
Key determines whether a valid SmartKey is in
the vehicle. This occurs, for example: R
when starting the engine R
while driving R
when the external door handles are touched R
during convenience closing
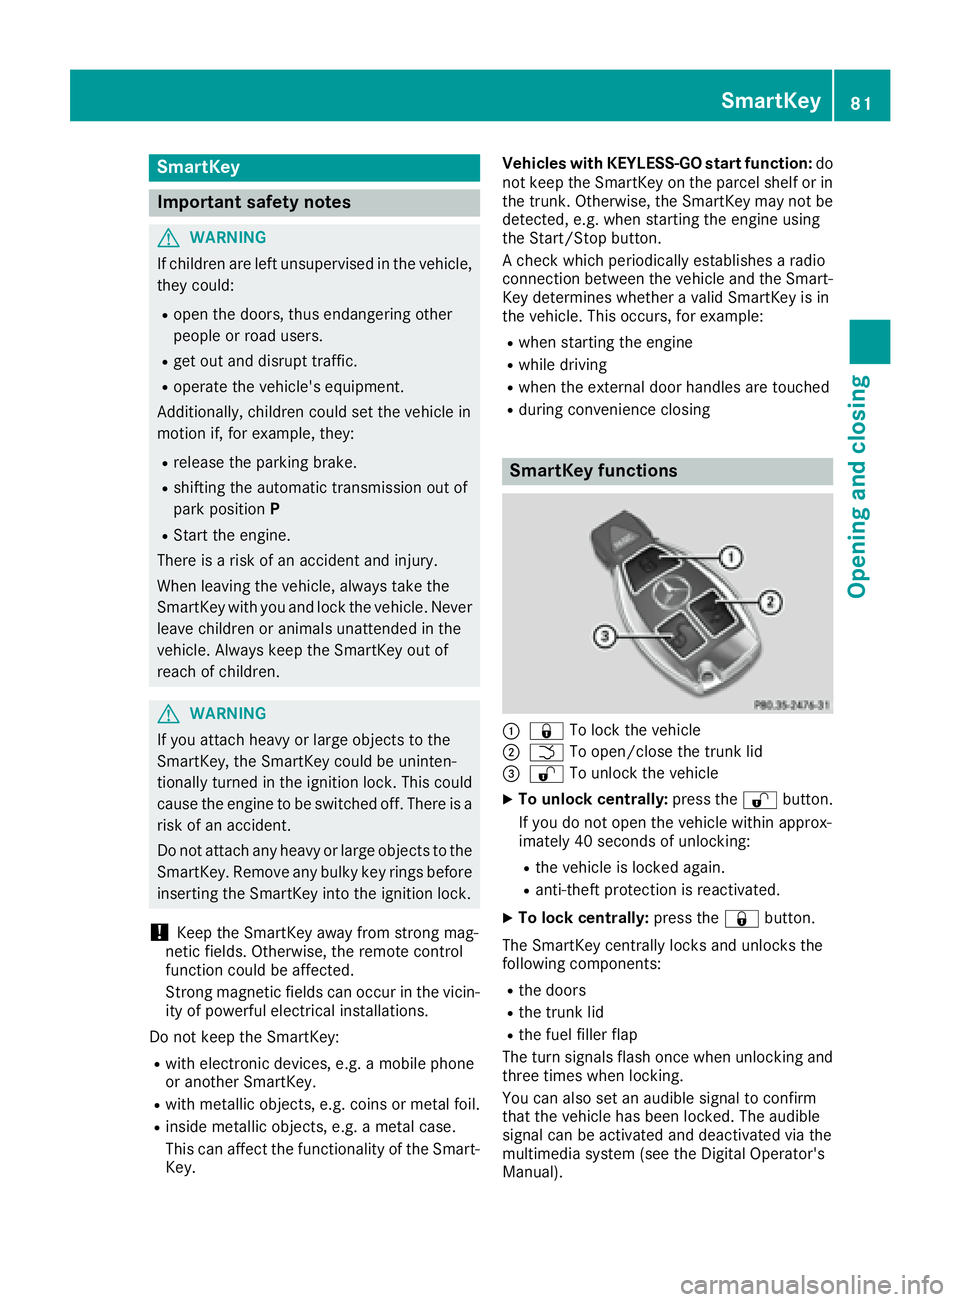
SmartKey functions
�C
�7 To lock the vehicle�D
�T To open/close the trunk lid�
Page 84 of 398
You will receive visual and acoustic locking con-
firmation if all components were able to be
locked.
When the locator lighting is activated via the
multimedia system, it lights up when it is dark
after the vehicle is unlocked with the SmartKey
(see the Digital Operator's Manual). X
To open the trunk lid automatically from
outside the vehicle: press and hold the �T
button until the trunk lid opens. X
To open the trunk lid automatically from
outside the vehicle: if the SmartKey is loca-
ted in the immediate vicinity of the vehicle,
press the �T button on the SmartKey.
When the trunk lid closes you can then
release the button.
KEYLESS-GO
General notes Bear in mind that the engine can be started by
any of the vehicle occupants if there is a Smart-
Key in the vehicle.
Locking/unlocking centrally You can start, lock or unlock the vehicle using
KEYLESS-GO. To do this, you only need carry the
SmartKey with you. You can combine the func-
tions of KEYLESS-GO with those of a conven-
tional SmartKey. Unlock the vehicle by using
KEYLESS-GO, for instance, and lock it using the
�7 button on the SmartKey.
The driver's door and the door at which the han-
dle is used, must both be closed. The SmartKey
must be outside the vehicle. When locking or
unlocking with KEYLESS-GO, the distance
between the SmartKey and the corresponding
door handle must not be greater than 3 ft (1 m).
A brief radio connection between the vehicle
and the key determines whether a valid Smart-
Key is in, or in the direct vicinity of, the vehicle.
This occurs, for example: R
when starting the engine R
while driving R
when using HANDS-FREE ACCESS R
when the external door handles are touched R
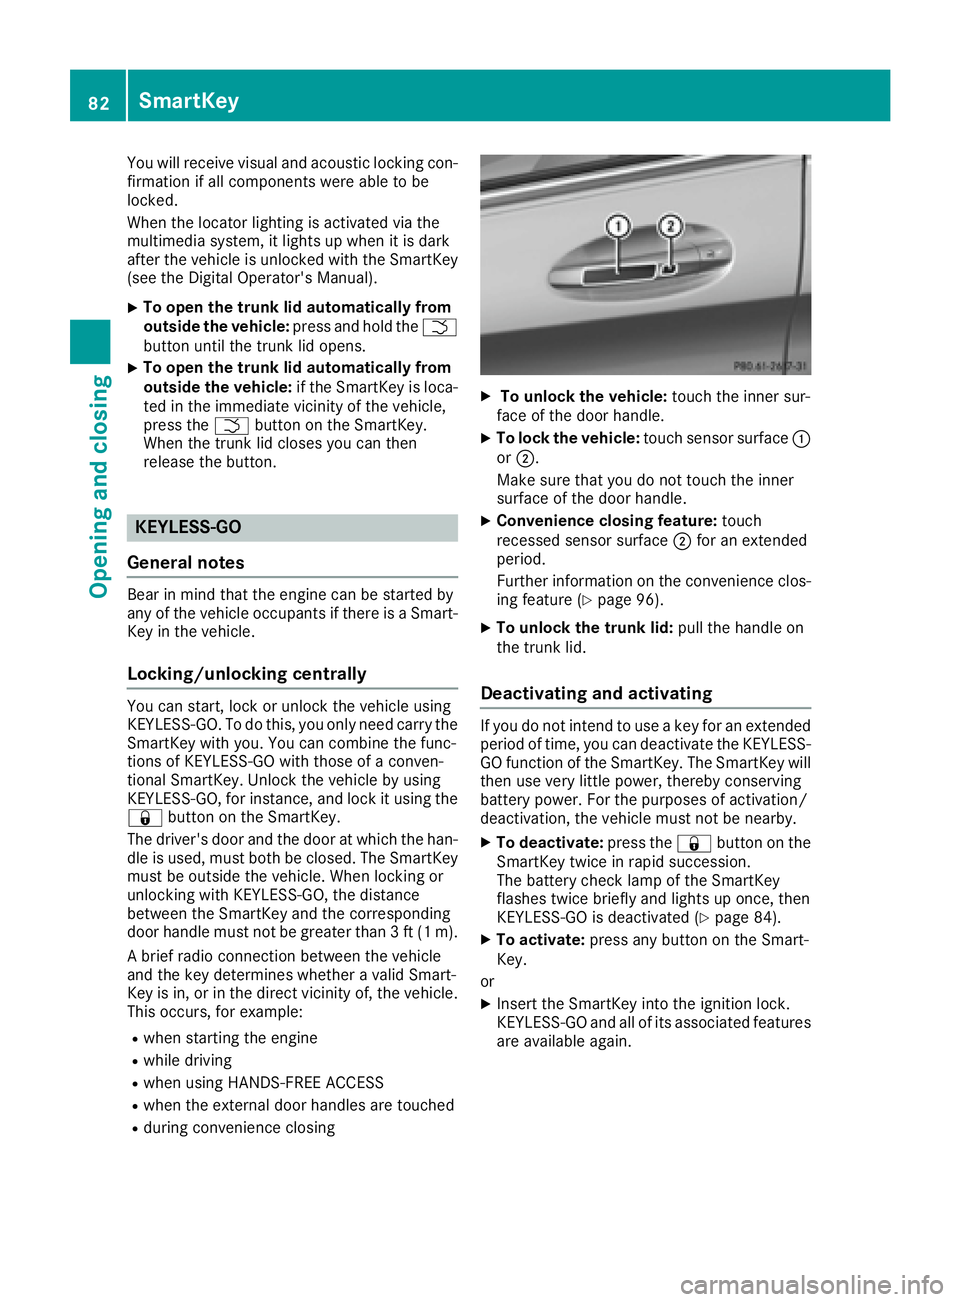
during convenience closing X
To unlock the vehicle: touch the inner sur-
face of the door handle. X
To lock the vehicle: touch sensor surface �C
or �D .
Make sure that you do not touch the inner
surface of the door handle. X
Convenience closing feature: touch
recessed sensor surface �D for an extended
period.
Further information on the convenience clos-
ing feature ( Y
page 96). X
To unlock the trunk lid: pull the handle on
the trunk lid.
Deactivating and activating If you do not intend to use a key for an extended
period of time, you can deactivate the KEYLESS-
GO function of the SmartKey. The SmartKey will
then use very little power, thereby conserving
battery power. For the purposes of activation/
deactivation, the vehicle must not be nearby. X
To deactivate: press the �7 button on the
SmartKey twice in rapid succession.
The battery check lamp of the SmartKey
flashes twice briefly and lights up once, then
KEYLESS-GO is deactivated ( Y
page 84).X
To activate: press any button on the Smart-
Key.
or X
Insert the SmartKey into the ignition lock.
KEYLESS-GO and all of its associated features
are available again.82
SmartKey
Opening and closing