height MERCEDES-BENZ C CLASS 2018 User Guide
[x] Cancel search | Manufacturer: MERCEDES-BENZ, Model Year: 2018, Model line: C CLASS, Model: MERCEDES-BENZ C CLASS 2018Pages: 370, PDF Size: 6.25 MB
Page 226 of 370

XConfirmbypressing aon the steering
wheel.
XPress :or9 to select the DriveAs‐sistsubmenu.
XPressato confirm.
XPress :or9 to select LaneKeepingAssist.
XPressato confirm.
The current selection StandardorAdaptiveappears.
XTo change the setting: pressaagain.
For further information about Lane Keeping
Assist, see (
Ypage 202).
For further information about Active Lane Keep-
ing Assist, see (
Ypage 207).
Head-up display submenu
Selecting other displays
:Vehicle speeddisplay
;Vehicle speed and navigation instruction
displ ay
=Vehicle speeddisplay and Traffic Sign Assist
Using the Display Content
function, you can
choose from up to four display options depend-
ing on the veh icle'sequipm ent. The selected
contents appear inthe head-up display.
In Mercedes-AMG veh icles, you can also choose
between two AMG displays.Ifyou select an
AMG display, the head-up display shows AMG-
specific contents.
If you select a displaywit h traff icsigns, detected
traff icsigns from Traffic Sign Assist appear in
the head-up display.
XPress the òbutton on the steering wheel
to open the menu list.
XPress :or9 on the steering wheel to
select the Settingsmenu.
XConfirmbypressing aon the steering
wheel.
XPress :or9 to select the Head-upDisplaysubmenu.
XPressato confirm.
XSelect DisplayContentbypressing :or
9.
XPress ato confirm.
A graphic selection list appears.
XPress :or9 to select the desired dis-
play.
XPress the abutton to confirm the selec-
tion.
You can find more information on the navigation
displays inthe multimedia system (see Digital
Operator's Manual).
In formation on displays of Traffic Sign Assist
(
Ypage 200).
Setting the position
You can adjust the position of the head-up dis-
play on the windshield. You can compensate for
height differences ifthe seat positions are
changed, for example.
XSwit ch on the head-up display (Ypage 213).
XPress the òbutton on the steering wheel
to open the menu list.
XPress the :or9 button on the steering
wheel to select the Settingsmenu.
XConfirm by pressing aon the steering
wheel.
XUse : or9 to select the Head-upDisplaysubmenu.
XPressato confirm.
XPress :or9 to select the Positionfunction.
XPress theabutton to save the setting.
XPress :or9 to adjust the position to a
leve l from Level+5(up) to Level-5(down).
XPress the aor% button to save the
setting.
Using the Memory function, you can save and
call up the set position of the head-up display as
a single memory preset (
Ypage 111).
Setting the brightness
The brightness of the head-up display is auto-
matically adjusted to the surrounding ambient
light. You can also ind ividually adjust the bright-
ness of the head-up display.
224Menus and submenus
On-board computer and displays
Page 289 of 370

!If you exceed the maximum permitted load
of the EASY-PACK trunk box, objects may be
thrown out of the EASY-PACK trunk box and
strike vehicle occupants. There is a risk of
injury, particularly in the event of sudden
braking or a sudden change in direction.
Always observe the maximum permitted load
of the EASY-PACK trunk box. Always store
and secure heavy objects in the trunk outside
the EASY-PACK trunk box.
The maximum permitted load of the EASY-PACK
trunk box is 22 lbs (10 kg). With a load of above
approximately 11 lbs (5 kg), the bottom of the
box moves down until it rests on the mat of the
trunk floor. Thus, overloading of the box is avoi-
ded.
Adjusting the height to any position
Example: EASY-PACK trunk box
XPull the box out by handle :in the direction
of the arrow as far as it will go.
XTo lower the load surface: push down with
your hand in the center of load surface ;in
the direction of the arrow until load sur-
face ;has reached the desired position.
XTo raise the load surface: press switch=.
Load surface ;of the box moves up auto-
matically.
XTo stow the box: push the box in by han-
dle :as far as it will go.
Removing and installing
XTo install: insert retainer ;of box :into
slots =
XRaise box :and press hooks Ainto anchor-
age ?as far as they will go.
XTurn left-hand rotating catch Bcounter-
clockwise and right-hand rotating catch B
clockwise by 90°.
XTo remove: turn left-hand rotating catch B
clockwise and right-hand rotating catch B
counter-clockwise by 90°.
XMove box :downwards and pull it out from
anchorages ?.
Store the EASY-PACK trunk box in a horizontal
position after removal, e.g. on a suitable shelf.
Stowage well under the trunk floor
The following items are located beneath the
trunk floor, for example:
Rthe folding box
Rtire-change tool kit
RTIREFIT kit
!Unhook the handle before again before clos-
ing the trunk lid and clip it in securely to pre-
Stowage areas287
Stowage and features
Z
Page 306 of 370
, th ehoo dis opened and held open
automatically by th egas-filled strut .
Closing")
XReachint oth egap, pull hoo dcatch handle ;
up and lift th ehood.
If you lift th ehoo dby approximately 15 in
(40 cm), th ehoo dis opened and held open
automatically by th egas-filled strut .
Closing the hood
XLowerth ehoo dand let it fall from aheight of
approximately 8in (20 cm).
XChec kthat th ehoo dhas engage dproperly.
If th ehoo dcan be raised slightly, it is no t
properly engaged. Open it again and close it
wit h a littlemor eforce .
Radiator
Do no tcover up th eradiator, suc has wit h a
thermal mat or insec tprotection cover .Other -
wise, th evalue sof th eEuropean on-board diag-
nostics may be affected. Some of these read -
ing sare require dby law and mus tbe accurat eat
all times .
Engine oil
Important safety notes
GWARNIN G
Certain component sin th eengin ecompart-
ment, suc has th eengine, radiato rand part s
of th eexhaust system, can become ver yhot .
Workin gin th eengin ecompartmen tposes a
ris kof injury.
Wher epossible, let th eengin ecool down and
touch only th ecomponent sdescribe din th e
following.
GWARNIN G
The engin ecompartmen tcontain smoving
components. Certain components, suc has
th eradiato rfan ,may continu eto run or start
again suddenly when th eignition is off .There
is aris kof injury.
If you need to do any wor kinside th eengin e
compartment:
Rswitch off th eignition
Rnever reac hint oth earea wher ethere is a
ris kof danger from moving components,
suc has th efan rotation area
Rremove jewelr yand watches
Rkeep items of clothing and hair ,for exam-
ple, away from moving part s
GWARNING
If engin eoil comes int ocontact wit hhot com-
ponents in th eengin ecompartment, it may
ignite. There is aris kof fir eand injury.
Mak esur ethat engin eoil is no tspilled next to
th efiller neck .Let th eengin ecool down and
thoroughly clean th eengin eoil off th ecom-
ponents before starting th eengine.
GWARNIN G
Opening th ehoo dwhen th eengin eis over-
heated or when there is afir ein th eengin e
compartmen tcould expos eyou to hot gase s
or other servic eproducts .There is aris kof
injury.
Let an overheate dengin ecool down before
opening th ehood. If there is afir ein th e
engin ecompartment, keep th ehoo dclosed
and contact th efir edepartment.
Hybrid vehicles: be sureto observ eth enote s
in th esupplementary instructions. Otherwise,
you may no trecogniz edangers.
General notes
Dependin gon your driving style, th evehicl e
consumes up to 0. 9US qt (0. 8l) of oil per
60 0mile s(1000 km). The oil consumption may
be higher than this when the vehicle is new or if
you frequently drive at high engine speeds.
304Engine compartment
Maintenance and care
Page 350 of 370
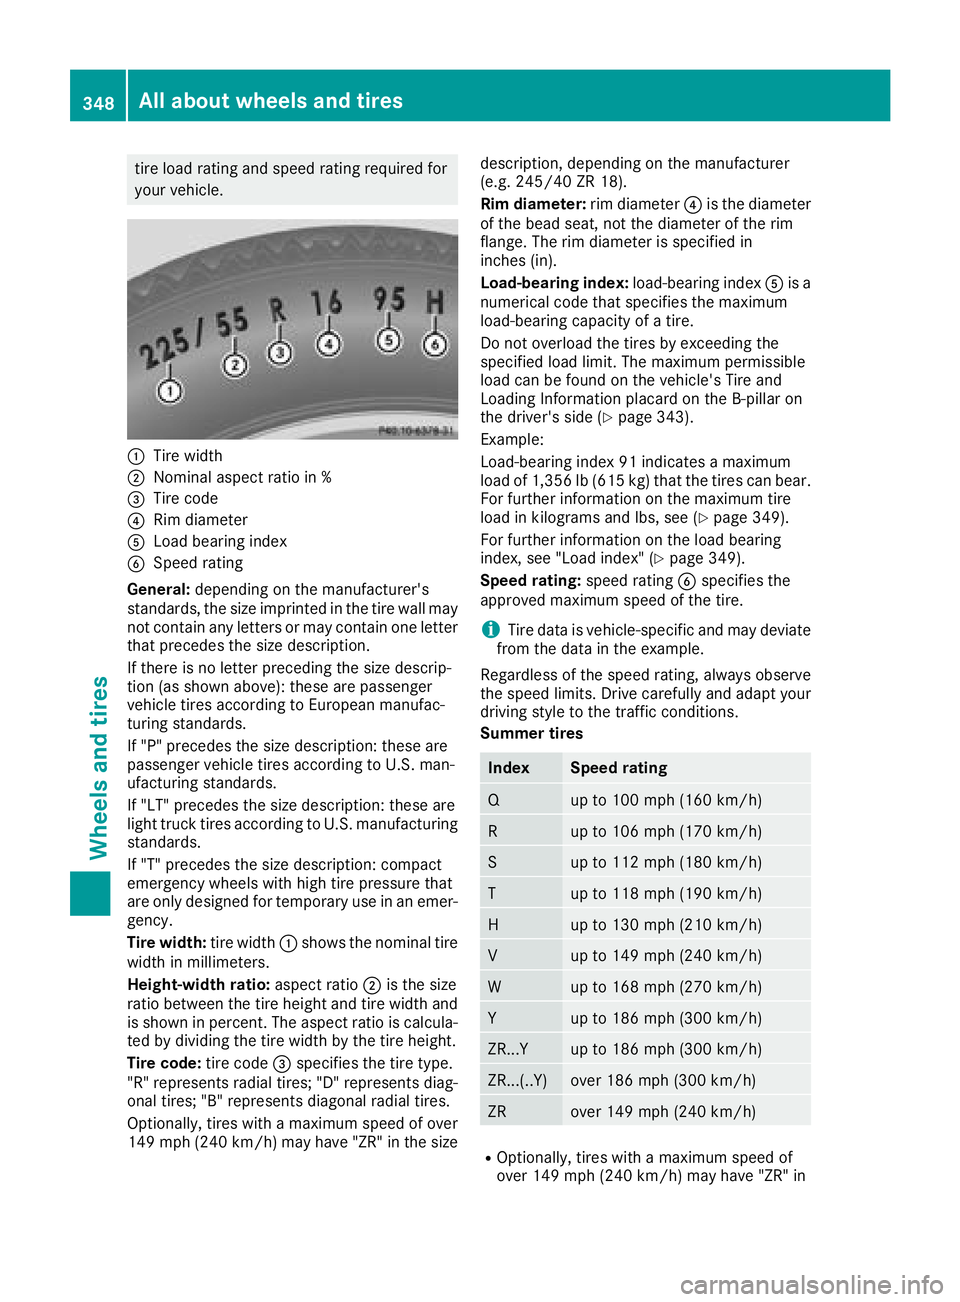
tire load rating and speed rating required for
your vehicle.
:Tire width
;Nominal aspect ratio in %
=Tire code
?Rim diameter
ALoad bearing index
BSpeed rating
General: depending on the manufacturer's
standards, the size imprinted in the tire wall may
not contain any letters or may contain one letter
that precedes the size description.
If there is no letter preceding the size descrip-
tion (as shown above): these are passenger
vehicle tires according to European manufac-
turing standards.
If "P" precedes the size description: these are
passenger vehicle tires according to U.S. man-
ufacturing standards.
If "LT" precedes the size description: these are
light truck tires according to U.S. manufacturing
standards.
If "T" precedes the size description: compact
emergency wheels with high tire pressure that
are only designed for temporary use in an emer-
gency.
Tire width: tire width:shows the nominal tire
width in millimeters.
Height-width ratio: aspect ratio;is the size
ratio between the tire height and tire width and
is shown in percent. The aspect ratio is calcula-
ted by dividing the tire width by the tire height.
Tire code: tire code=specifies the tire type.
"R" represents radial tires; "D" represents diag-
ona l ti
res; "B" represents diagonal radial tires.
Optionally, tires with a maximum speed of over
149 mph (240 km/h) may have "ZR" in the size description, depending on the manufacturer
(e.g. 245/40 ZR 18).
Rim diameter:
rim diameter?is the diameter
of the bead seat, not the diameter of the rim
flange. The rim diameter is specified in
inches (in).
Load-bearing index: load-bearing indexAis a
numerical code that specifies the maximum
load-bearing capacity of a tire.
Do not overload the tires by exceeding the
specified load limit. The maximum permissible
load can be found on the vehicle's Tire and
Loading Information placard on the B-pillar on
the driver's side (
Ypage 343).
Example:
Load-bearing index 91 indicates a maximum
load of 1,356 lb (615 kg) that the tires can bear.
For further information on the maximum tire
load in kilograms and lbs, see (
Ypage 349).
For further information on the load bearing
index, see "Load index" (
Ypage 349).
Speed rating: speed ratingBspecifies the
approved maximum speed of the tire.
iTire data is vehicle-specific and may deviate
from the data in the example.
Rega rdle
ss of the speed rating, always observe
the speed limits. Drive carefully and adapt your
driving style to the traffic conditions.
Summer tires
IndexSpeed rating
Qup to 100 mph (160 km/h)
Rup to 106 mph (170 km/h)
Sup to 112 mph (180 km/h)
Tup to 118 mph (190 km/h)
Hup to 130 mph (210 km/h)
Vup to 149 mph (240 km/h)
Wup to 168 mph (270 km/h)
Yup to 186 mph (300 km/h)
ZR...Yup to 186 mph (300 km/h)
ZR...(..Y)over 186 mph (300 km/h)
ZRover 149 mph (240 km/h)
ROptionally, tires with a maximum speed of
over 149 mph (240 km/h) may have "ZR" in
348All about wheels an d tires
Wheels and tires
Page 354 of 370

A standard unit of measure for tire pressure.
Aspect ratio
Relationship between tire height and tire width
in percent.
Tire pressure
This is pressure inside the tire apply")
PSI (pounds per square inch)
A standard unit of measure for tire pressure.
Aspect ratio
Relationship between tire height and tire width
in percent.
Tire pressure
This is pressure inside the tire applying an out-
ward force to each square inch of the tire's sur-
face. The tire pressure is specified in pounds per
square inch (psi), in kilopascal (kPa) or in bar.
The tire pressure should only be corrected when
the tires are cold.
Cold tire pressure
The tires are cold:
Rif the vehicle has been parked with the tires
out of direct sunlight for at least three hours
and
Rif the vehicle has not been driven further than
1 mile (1.6 km)
Tread
The part of the tire that comes into contact with
the road.
Bead
The tire bead ensures that the tire sits securely
on the wheel. There are several steel wires in the
bead to prevent the tire from coming loose fromthe wheel rim.
Sidewall
The part of the tire between the tread and the
bead.
Weight of optional extras
The combined weight of those optional extras
that weigh more than the replaced standard
parts and more than 5 lbs (2.3 kg). These
optional extras, such as high-performance
brakes, level control, a roof rack or a high-per-
formance battery, are not included in the curb
weight and the weight of the accessories.
TIN (Tire Identification Number)
This is a unique identifier which can be used by
a tire manufacturer to identify tires, for example
for a product recall, and thus identify the pur-
chasers. The TIN is made up of the manufactur-
er's identity code, tire size, tire type code and
the manufacturing date.
Load bearing index
The load bearing index (also load index) is a code
that contains the maximum load bearing capa-
city of a tire.
Traction
Traction is the result of friction between the tires
and the road surface.
Treadwear indicators
Narrow bars (tread wear bars) that are distrib-
uted over the tire tread. If the tire tread is level
with the bars, the wear limit of áin (1.6 mm)
has been reached.
Occupant distribution
The distribution of occupants in a vehicle at their
designated seating positions.
Total load limit
Nominal load and luggage load plus 68 kg
(150 lbs) multiplied by the number of seats in
the vehicle.
Changing a wheel
Flat tire
The "Breakdown assistance" section
(Ypage 317) contains information and notes on
how to deal with a flat tire. Information on driv-
ing with MOExtended tires in the event of a flat
tire can be found under "MOExtended tires (tires
with run-flat characteristics" (
Ypage 318).
Rotating the wheels
GWARNING
Interchanging the front and rear wheels may
severely impair the driving characteristics if
the wheels or tires have different dimensions. The wheel brakes or suspension components
may also be damaged. There is a risk of acci-
dent.
Rotate front and rear wheels only if the wheels and tires are of the same dimensions.
!On vehicles equipped with a tire pressure
monitor, electronic components are located
in the wheel.
352Changing a wheel
Wheels and tires
Page 356 of 370

XFold both plates upwards:.
XFold out lower plate;.
XGuide the lugs on the lower plate fully into the
openings in base plate =.
XPlace chocks or other suitable items under
the front and rear of the wheel that is diago-
nally opposite the wheel you wish to change.
Raising the vehicle
GWARNING
If you do not position the jack correctly at the
appropriate jacking point of the vehicle, the
jack could tip over with the vehicle raised.
There is a risk of injury.
Only position the jack at the appropriate jack-
ing point of the vehicle. The base of the jack
must be positioned vertically, directly under
the jacking point of the vehicle.
!Only position the jack at the appropriate
jacking point of the vehicle. Otherwise, you
could damage the vehicle.
Observe the following when raising the vehi-
cle:
RTo raise the vehicle, only use the vehicle-spe-
cific jack that has been tested and approved
by Mercedes-Benz. If used incorrectly, the
jack could tip over with the vehicle raised.
RThe jack is designed only to raise and hold the
vehicle for a short time while a wheel is being
changed. It must not be used for performing
maintenance work under the vehicle.
RAvoid changing the wheel on uphill and down- hill slopes.
RBefore raising the vehicle, secure it from roll-
ing away by applying the parking brake and inserting wheel chocks. Do not disengage the
parking brake while the vehicle is raised.
RThe jack must be placed on a firm, flat and
non-slip surface. On a loose surface, a large,
flat, load-bearing underlay must be used. On a
slippery surface, a non-slip underlay must be
used, e.g. rubber mats.
RDo not use wooden blocks or similar objects
as a
jack underlay. Otherwise, the jack will not
be able to achieve its load-bearing capacity
due to the restricted height.
RMake sure that the distance between the
underside of the tires and the ground does not
exceed 1.2 in (3 cm).
RDo not place your hands or feet under the
raised vehicle.
RDo not lie under the vehicle.
RDo not start the engine when the vehicle is
raised.
RDo not open or close a door or the trunk lid
when the vehicle is raised.
RMake sure that no persons are present in the
vehicle when the vehicle is raised.
Vehicles with alloy wheels and hub caps: the
wheel bolts are covered by a hub cap. Before you
can unscrew the wheel bolts, you must remove
the hub cap. Two different variants can be instal- led.
Vehicles with plastic hub cap:
XTo remove: turn the center cover of hub
cap :counter-clockwise and remove.
XTo install: before installing, ensure that hub
cap :is in the open position. To do this, turn
the center cover counter-clockwise.
XPosition hub cap :and turn the center cover
clockwise until hub cap :engages physically
and audibly.
XMake sure that hub cap :is installed
securely.
354Changing a wheel
Wheels and tires
Page 369 of 370

For the correct mixing ratio refer to the infor-
mation on the antifreeze reservoir.
iAdd windshield washer fluid, e.g. MB Sum-
merFit or MB WinterFit, to the washer fluid all
year round.
Climate control system refrigerant
Important safety notes
The climate control system of your vehicle is fil-
led with refrigerant R ‑134a.
The instruction label regarding the refrigerant
type used can be found on the radiator cross
member.
!Only the refrigerant R ‑134a and the PAG oil
approved by Mercedes-Benz may be used.
The approved PAG oil may not be mixed with
any other PAG oil that is not approved for
R-134a refrigerant. Otherwise, the climate
control system may be damaged.
Service work, such as refilling with refrigerant or
replacing component parts, may only be carried
out by a qualified specialist workshop. All appli-
cable regulations, as well as SAE standard J639,
must be adhered to.
Always have work on the climate control system
carried out at a qualified specialist workshop.
Refrigerant instruction label
Example: refrigerant instruction label
:Warning symbol
;Refrigerant filling capacity
=Applicable standards
?PAG oil part number
AType of refrigerant Warning symbol
:advises you about:
RPossible dangers
RHaving service work carried out at a qualified
specialist workshop
Filling capacities
ModelRefrigerant
Mercedes-AMG
C 63
Mercedes-AMG
C 63 S21.5 ± 0.4 oz
(610 ± 10 g)
Allot her models22.2 ± 0.4 oz
(630 ± 10 g)
ModelPAG oil
Mercedes-AMG
C 63
Mercedes-AMG
C 63 S4.2 oz
(120 g)
All other models2.8 oz (80 g)
Vehicle data
General notes
Please note that for the specified vehicle data:
RThe heights specified may vary as a result of:
-Tires
-Load
-Condition of the suspension
-Optional equipment
ROptional equipment reduces the maximum
payload
Vehicle data367
Technical data
Z
Page 370 of 370

Mercedes-AMG
C43 4MATIC
Mercedes-AMG
C63
Mercedes-AMG
C 63 S68.8 in (1748")
Dimensions andweights
Missin gvalues wer eno tavailable at time of
going to print .
Model:Openingheight
C 30069.6 in (1768 mm)
Mercedes-AMG
C43 4MATIC
Mercedes-AMG
C63
Mercedes-AMG
C 63 S68.8 in (1748 mm)
All other model s69.8 in (1774 mm)
Mercedes-AMG C43
4MATIC
Vehicle length185. 1in (4702 mm )
Vehicle width
including exterior
mirrors79.5 in (2020 mm)
Vehicle height56.3 in (1429 mm)
Wheelbase111.8 in (2840 mm )
Turning radiu s38.4 ft (11.70 m)
Maximum roof load165 lb (75 kg)
Mercedes-AMG C 63
Mercedes AMG C 63
S
Vehicle length187.2 in (4756 mm)
Vehicle width
including exterior
mirrors79.5 in (2020 mm)
Vehicle height56.1 in (1426 mm)
Wheelbase111.8 in (2840 mm)
Turning radius37.1 ft (11.3 m)
Maximum roof load165 lb (75 kg)
All other models
Vehicle length184.5 in (4686 mm)
Vehicle width
including exterior
mirrors79.5 in (2020 mm)
Vehicle height,
C 30056.9 in (1445 mm)
Vehicle height,
C 300 4MATIC,
C 300 d 4MATIC57.2 in (1452 mm)
Wheelbase111.8 in (2840 mm)
Turning circle, C 30036.8 ft (11.22m)
Turning circle,
C 300 4MATIC,
C 300 d 4MATIC37.6 ft (11.45m)
Maximum roof load165 lb (75 kg)
368Vehicle data
Technical data