ESP MERCEDES-BENZ C-CLASS CABRIOLET 2016 Owner's Guide
[x] Cancel search | Manufacturer: MERCEDES-BENZ, Model Year: 2016, Model line: C-CLASS CABRIOLET, Model: MERCEDES-BENZ C-CLASS CABRIOLET 2016Pages: 377, PDF Size: 6.9 MB
Page 112 of 377
The most recent driving position of the steering
wheel is stored if:
R the ignition is switched off
R the setting is stored using the memory func-
tion (Y page 112)
i The steering wheel moves upwards only if it
has not already reached the upper steering
limiter.
Position of the steering wheel for driv-
ing The steering wheel is moved to the previously
set position if:
R the driver's door is closed and you insert the
key into the ignition lock
R you close the driver's door when the ignition
is switched on
R you press the Start/Stop button once in vehi-
cles with KEYLESS-GO or the KEYLESS-GO
start function
i The steering wheel returns to the last set
position only if the driving position is stored
after the seat or steering column has been
adjusted (Y page 112).
The most recent driving position of the steering
wheel is stored if:
R the ignition is switched off
R the setting is stored using the memory func-
tion (Y page 112)
Crash-responsive EASY-EXIT feature If the crash-responsive EASY-EXIT feature is trig-
gered in an accident, the steering column will
move upwards when the driver's door is opened
or the key is removed from the ignition lock. This
makes it easier to exit the vehicle and rescue the
occupants.
The crash-responsive EASY-EXIT feature is
operational only if the EASY-EXIT/ENTRY fea-
ture is activated in the multimedia system (see
Digital Operating Instructions). Mirrors
Rear-view mirror
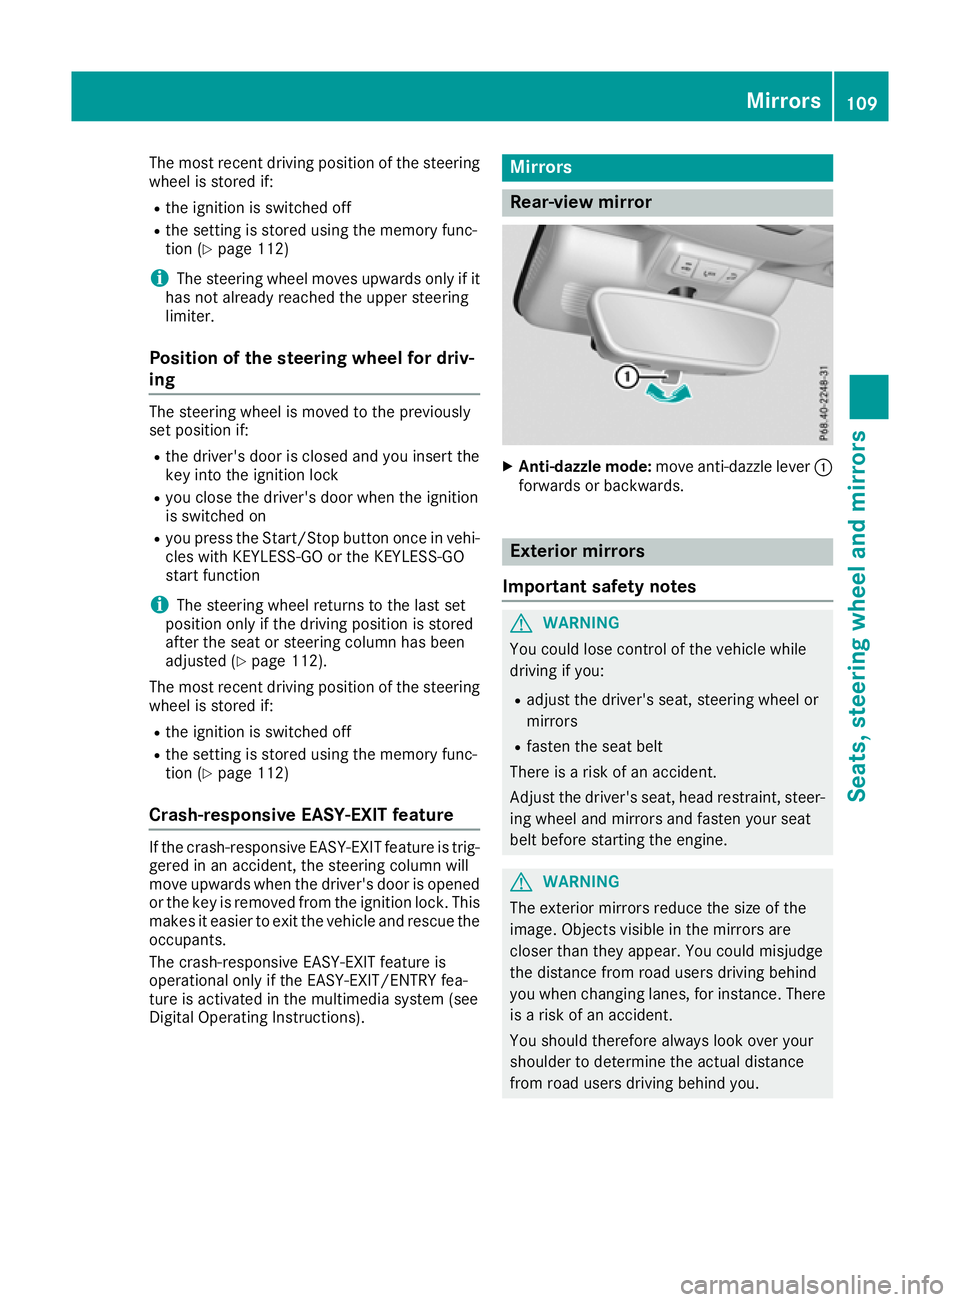
X
Anti-dazzle mode: move anti-dazzle lever :
forwards or backwards. Exterior mirrors
Important safety notes G
WARNING
You could lose control of the vehicle while
driving if you:
R adjust the driver's seat, steering wheel or
mirrors
R fasten the seat belt
There is a risk of an accident.
Adjust the driver's seat, head restraint, steer-
ing wheel and mirrors and fasten your seat
belt before starting the engine. G
WARNING
The exterior mirrors reduce the size of the
image. Objects visible in the mirrors are
closer than they appear. You could misjudge
the distance from road users driving behind
you when changing lanes, for instance. There is a risk of an accident.
You should therefore always look over your
shoulder to determine the actual distance
from road users driving behind you. Mirrors
109Seats, steering wheel and mirrors Z
Page 115 of 377

X
If the exterior mirror moves out of position,
repeat the steps.
X After successfully storing, reset the driving
position of the exterior mirror.
Calling up a stored parking position X
Turn the key to position 2in the ignition lock
(Y page 133).
X Select the front-passenger-side exterior mir-
ror using button =.
X Engage reverse gear.
The exterior mirror on the front-passenger
side moves to the stored parking position.
The exterior mirror on the front-passenger side
moves back to its original position:
R as soon as you exceed a speed of 15 km/h
R about ten seconds after you have disengaged
reverse gear
R when you press button ?to select the exte-
rior mirror on the driver's side Memory function
Important safety notes
G
WARNING
If you use the memory function on the driver's side while driving, the adjustments could
cause you to lose control of the vehicle. There
is a risk of an accident.
Only use the memory function on the driver's
side while the vehicle is stationary. G
WARNING
When the memory function adjusts the seat or steering wheel, you and other vehicle occu-
pants – particularly children – could become
trapped. There is a risk of injury.
While the memory function is making adjust-
ments, make sure that no one has any body
parts in the sweep of the seat or steering
wheel. If somebody becomes trapped, imme-
diately release the memory function position
button. The adjustment process is stopped. G
WARNING
If children activate the memory function, they
could become trapped, especially if they are
unattended. There is a risk of injury.
When leaving the vehicle, always take the key with you and lock the vehicle. Never leave
children unattended in the vehicle.
The memory function can be used at any time,
e.g. even when the key is not in the ignition lock. Storing settings
Using the memory function, you can store up to three different settings, e.g. for three different
people.
The following settings are stored as a single
memory preset:
R position of the seat, backrest and head
restraint
R driver's side: position of the exterior mirrors
on the driver's and front-passenger sides
R position of the head-up display X
Adjust the seat accordingly (Y page 102).
X On the driver's side, adjust the steering wheel
(Y page 108) and the exterior mirrors
(Y page 110).
X Press memory button Mand then press one of
the memory position buttons 1,2or 3within
three seconds.
The settings are stored in the selected mem-
ory position. A tone sounds when the settings have been completed. 112
Memory functionSeats, steering wheel and mirrors
Page 117 of 377

Exterior lighting
General notes
For reasons of safety, Mercedes-Benz recom-
mends that you drive with lights switched on
even during the daytime. In some countries,
operation of the headlamps varies due to legal
requirements and voluntary recommendations. Driving abroad
Vehicles with halogen or static LED
headlamps It is not necessary to switch your headlamps to
symmetrical dipped beam when driving in coun- tries where vehicles are driven on the opposite
side of the road to the country in which the vehi-
cle is registered. Legal requirements are fulfilled
without switching the headlamps to symmetri-
cal dipped beam.
Vehicles with Intelligent Light System It is necessary to switch your headlamps to sym-
metrical dipped beam before crossing the bor-
der into countries where vehicles are driven on
the opposite side of the road. This prevents
oncoming traffic from being dazzled.
You can switch the headlamps to symmetrical or
asymmetrical dipped beam using the "dipped-
beam headlamps for driving on the right/left"
function via the on-board computer
(Y page 236). This must be switched back to
asymmetrical dipped beam upon your return.
Symmetrical lights do not illuminate as large an
area of the edge of the carriageway. In this case,
"highway mode" and "extended-range fog
lamps" are not available. Setting the exterior lighting
Setting options Exterior lighting can be set using the:
R light switch (Y page 114)
R combination switch (Y page 116)
R headlamp range control for vehicles with hal-
ogen headlamps (Y page 116)
R on-board computer (Y page 235) Light switch Operation
1
W
Left-hand parking lamps
2 X
Right-hand parking lamps
3 T
Side lamps, licence plate and instru-
ment cluster lighting
4 Ã
Automatic headlamp mode, controlled
by the light sensor
5 L
Dipped-beam/main-beam headlamps
B R
Rear fog lamp
If you hear a warning tone when you leave the
vehicle, the lights may still be switched on.
X Turn the light switch to the Ãposition.
The exterior lighting, except the side/parking
lamps, switches off automatically if you: R remove the key from the ignition lock
R open the driver's door with the key in posi-
tion 0in the ignition lock
Automatic headlamp mode G
WARNING
When the light switch is set to Ã, the
dipped-beam headlamps may not be switched on automatically if there is fog, snow or othercauses of poor visibility due to the weather
conditions such as spray. There is a risk of an
accident.
In such situations, turn the light switch to
L.
The automatic headlamp feature is only an aid.
The driver is responsible for the vehicle lighting at all times.
à is the preferred light switch position. 114
Exterior lightingLights and windscreen wipers
Page 118 of 377
The light setting is automatically selected
according to the brightness of the ambient light,
but not in the event of poor visibility due to
weather conditions such as fog, snow or spray.
R With the key in position 1in the ignition lock,
the side lamps are switched on or off auto-
matically depending on the brightness of the
ambient light.
R The daytime driving lights or the side lamps
and dipped-beam headlamps are switched on or off automatically while the engine is run-
ning depending on the ambient light condi-
tions.
X To switch on the automatic headlamps:
turn the light switch to the
Ãposition.
The daytime driving lights improve the visibility
of your vehicle during the day.
When the side lamps and dipped-beam head-
lamps are switched on, the green Tside
lamps and Ldipped-beam headlamps indi-
cator lamps on the instrument cluster light up.
Dipped-beam headlamps G
WARNING
When the light switch is set to Ã, the
dipped-beam headlamps may not be switched on automatically if there is fog, snow or othercauses of poor visibility due to the weather
conditions such as spray. There is a risk of an
accident.
In such situations, turn the light switch to
L.
When the ignition is switched on and the light
switch is in the Lposition, the side lamps
and dipped-beam headlamps are switched on
even if the light sensor does not sense dark
ambient light conditions. This is advantageous
when there is fog or rain.
X To switch on the dipped-beam headlamps:
turn the key in the ignition lock to position 2
or start the engine.
X Turn the light switch to the Lposition.
The green Lindicator lamp on the instru-
ment cluster lights up.
Rear fog lamp The rear fog lamp improves the visibility of your
vehicle for the traffic behind in the event of
heavy fog. You must observe the legal require- ments for the country in which you are currently
driving when operating the rear fog lamp.
X To switch on the rear fog lamp: turn the key
in the ignition lock to position 2or start the
engine.
X Turn the light switch to the LorÃ
position.
X Press the Rbutton.
The yellow Rindicator lamp on the instru-
ment cluster lights up.
Side lamps
! When the battery is discharged heavily, the
side lamps or parking lamps are automatically
switched off to facilitate an engine start.
Always park your vehicle safely and in a well lit area, in accordance with the relevant legal
stipulations. Avoid using the Tside lamps
for periods lasting several hours. Where pos-
sible, switch on the right Xor left W
parking lamp.
X To switch on the side lamp: turn the light
switch to the Tposition.
The green Tindicator lamp on the instru-
ment cluster lights up.
Parking lamps Switching on the parking lamps ensures that the
corresponding side of the vehicle is illuminated.
X To switch on the parking lamp: turn the key
to position 0in the ignition lock or remove the
key.
X Turn the light switch to the W(left-hand
side of the vehicle) or X(right-hand side of
the vehicle) position. Exterior lighting
115Lights and windscreen wipers Z
Page 119 of 377
Adjusting the headlamp range (vehicles
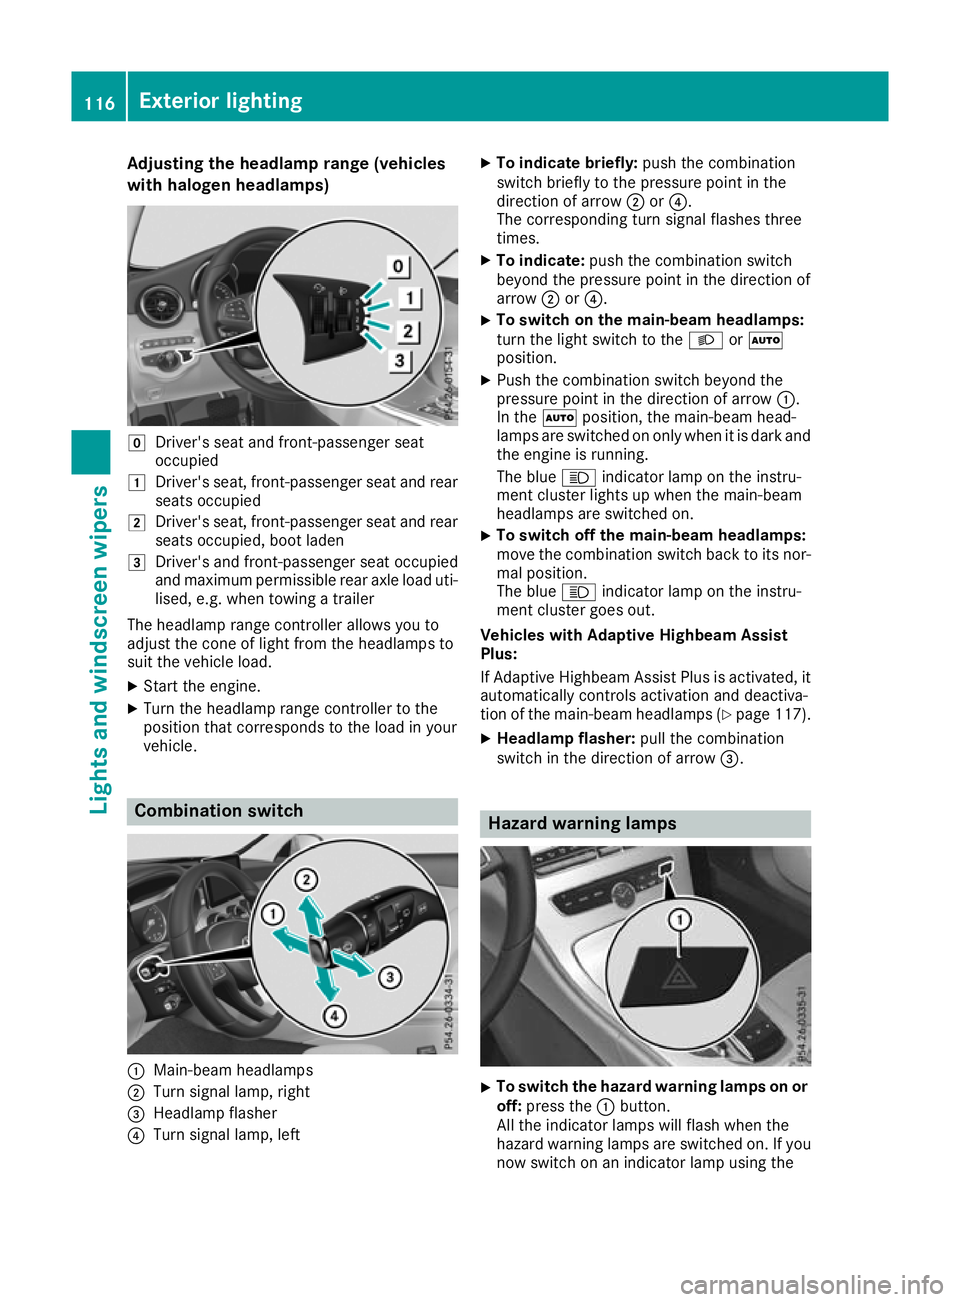
with halogen headlamps) g
Driver's seat and front-passenger seat
occupied
1 Driver's seat, front-passenger seat and rear
seats occupied
2 Driver's seat, front-passenger seat and rear
seats occupied, boot laden
3 Driver's and front-passenger seat occupied
and maximum permissible rear axle load uti- lised, e.g. when towing a trailer
The headlamp range controller allows you to
adjust the cone of light from the headlamps to
suit the vehicle load.
X Start the engine.
X Turn the headlamp range controller to the
position that corresponds to the load in your
vehicle. Combination switch
:
Main-beam headlamps
; Turn signal lamp, right
= Headlamp flasher
? Turn signal lamp, left X
To indicate briefly: push the combination
switch briefly to the pressure point in the
direction of arrow ;or?.
The corresponding turn signal flashes three
times.
X To indicate: push the combination switch
beyond the pressure point in the direction of
arrow ;or?.
X To switch on the main-beam headlamps:
turn the light switch to the
LorÃ
position.
X Push the combination switch beyond the
pressure point in the direction of arrow :.
In the Ãposition, the main-beam head-
lamps are switched on only when it is dark and
the engine is running.
The blue Kindicator lamp on the instru-
ment cluster lights up when the main-beam
headlamps are switched on.
X To switch off the main-beam headlamps:
move the combination switch back to its nor-
mal position.
The blue Kindicator lamp on the instru-
ment cluster goes out.
Vehicles with Adaptive Highbeam Assist
Plus:
If Adaptive Highbeam Assist Plus is activated, it
automatically controls activation and deactiva-
tion of the main-beam headlamps (Y page 117).
X Headlamp flasher: pull the combination
switch in the direction of arrow =. Hazard warning lamps
X
To switch the hazard warning lamps on or
off: press the :button.
All the indicator lamps will flash when the
hazard warning lamps are switched on. If you
now switch on an indicator lamp using the 116
Exterior lightingLights and windscreen wipers
Page 120 of 377
combination switch, only the indicator lamp
on the corresponding side of the vehicle will
flash.
The hazard warning lamps switch on automati-
cally if:
R an airbag has been triggered or
R the vehicle decelerates rapidly from a speed
of above 70 km/h and comes to a standstill
The hazard warning lamps switch off automati-
cally if the vehicle reaches a speed of above
10 km/h again after a full brake application.
The hazard warning lamps continue to operate
even if the ignition is switched off. Intelligent Light System
General notes The Intelligent Light System is a system that
adjusts the headlamps to suit the prevailing
driving and weather conditions. It offers
advanced functions for improved illumination of
the road surface, e.g. depending on the vehicle
speed or weather conditions. The system
includes the active light function, cornering light
function, motorway mode and extended-range
fog lamps. The system is active only when it is
dark.
You can activate/deactivate the Intelligent Intelligent
Light System
Light System function using the on-board
computer (Y page 235).
Active light function The active light function is a system that moves
the headlamps according to the steering move- ments of the front wheels. In this way, relevant
areas remain illuminated while you are driving.
This allows you to recognise pedestrians,
cyclists and animals sooner.
Active: when the lights are switched on.
Cornering light function The cornering light function improves the illu-
mination of the road over a wide angle in the
direction you are turning, enabling better visi-
bility in tight bends, for example. It can be acti-
vated only when the dipped-beam headlamps
are switched on. Active:
R if you are driving at speeds below 40 km/h
and switch on the turn signal or turn the steer-
ing wheel
R if you are driving at speeds between 40 km/h
and 70 km/h and turn the steering wheel
The cornering light function may remain lit for a short time, but is automatically switched off
after no more than three minutes.
Motorway mode Motorway mode increases the range of the
beam.
Active:if you are driving at a speed above
110 km/h and do not make any large steering
movements for at least 1000 m or if you are
driving at a speed above 130 km/h.
Not active: if you are driving at speeds below
80 km/h following activation.
Extended range fog lamps The extended-range fog lamps reduce the glare
experienced by the driver and improve the illu-
mination of the edge of the carriageway.
Active: if you are driving at speeds below
70 km/h and you switch on the rear fog lamp.
Not active: if, following activation, you are driv-
ing at speeds above 100 km/h or if you switch
off the rear fog lamp. Adaptive Highbeam Assist Plus
General notes With Adaptive Highbeam Assist Plus, you can
automatically switch between dipped-beam,
partial main-beam and main-beam headlamps.
Partial main-beam illumination is a form of illu-
mination whereby the main beam is directed
past other road users. Other road users are kept
out of the main beam. This prevents glare. If
there is a vehicle in front, for example, the main-
beam headlamps illuminate the areas to its right
and left, and the vehicle in front is illuminated by the dipped-beam headlamps.
The system automatically adapts the dipped-
beam headlamp range depending on the dis-
tance to the other vehicle. Once the system no
longer detects any other vehicles, it switches on the main-beam headlamps again. Exterior lighting
117Lights andwindscreen wipers Z
Page 121 of 377
If the main-beam or partial main-beam head-
lamps are causing too much reflection from traf- fic signs, the lights are automatically dimmed
and glare for the driver caused by the reflectionsis thus avoided.
The system's optical sensor is located behind
the windscreen near the overhead control
panel.
Important safety notes G
WARNING
Adaptive Highbeam Assist Plus does not rec-
ognise road users:
R who have no lights, e.g. pedestrians
R who have poor lighting, e.g. cyclists
R whose lighting is blocked, e.g. by a barrier
In very rare cases, Adaptive Highbeam Assist
Plus may not recognise road users who do
have lights, or may recognise them too late. In this, or in similar situations, the automatic
main-beam headlamps will not be deactivated
or will be activated despite the presence of
other road users. There is a risk of an acci-
dent.
Always carefully observe the traffic conditions and switch off the main-beam headlamps in
good time.
Adaptive Highbeam Assist Plus cannot take into
account road, weather or traffic conditions.
Adaptive Highbeam Assist Plus is only an aid.
You are responsible for adjusting the vehicle's
lighting to the prevailing light, visibility and traf-
fic conditions.
In particular, the detection of obstacles can be
impaired in the case of:
R poor visibility, e.g. due to fog, heavy rain or
snow
R dirt on the sensors or obscured sensors Switching Adaptive Highbeam Assist
Plus on/off X
To switch on: turn the light switch to the
à position.
X Press the combination switch forwards
beyond the pressure point (Y page 116).
The indicator lamp _on the multifunction
display lights up when it is dark and the light
sensor switches on the dipped-beam head-
lamps.
At speeds above approx. 25 km/h: the head- lamp range is automatically controlled
according to the distance to other road users.
At speeds above approximately 30 km/h:
R if no other road users are detected, the
main-beam headlamps are automatically
switched on
R if other road users are detected, the partial
main-beam headlamps are automatically
switched on
The K indicator lamp on the instrument
cluster also lights up.
At speeds below approx. 25 km/h or when
there is sufficient street lighting:
R the partial main-beam headlamps are
switched off automatically
R the main-beam headlamps are switched off
automatically
The K indicator lamp on the instrument
cluster goes out. The _indicator lamp on
the multifunction display remains lit.
X To switch off:move the combination switch
back to its normal position or move the light
switch to another position.
The _ indicator lamp on the multifunction
display goes out. Headlamps misted up on the inside
Certain climatic and physical conditions may
cause moisture to form in the headlamp. This
moisture does not affect the functionality of the headlamp. 118
Exterior lightingLights and windscreen wipers
Page 136 of 377
for example, the power steering and the brake
boosting effect. You will require considerably
more effort to steer and brake. There is a risk of an accident.
Do not switch off the ignition while driving. G
WARNING
If the parking brake has not been fully
released when driving, the parking brake can:
R overheat and cause a fire
R lose its hold function.
There is a risk of fire and an accident. Release
the parking brake fully before driving off.
! Do not warm up the engine when the vehicle
is stationary. Drive off immediately. Avoid
high engine speeds and driving at full throttle
until the engine has reached its operating
temperature.
Only shift the automatic transmission to the
desired drive position when the vehicle is sta-
tionary.
Where possible, avoid spinning the drive
wheels when pulling away on slippery roads.
You could otherwise damage the drive train. Key positions
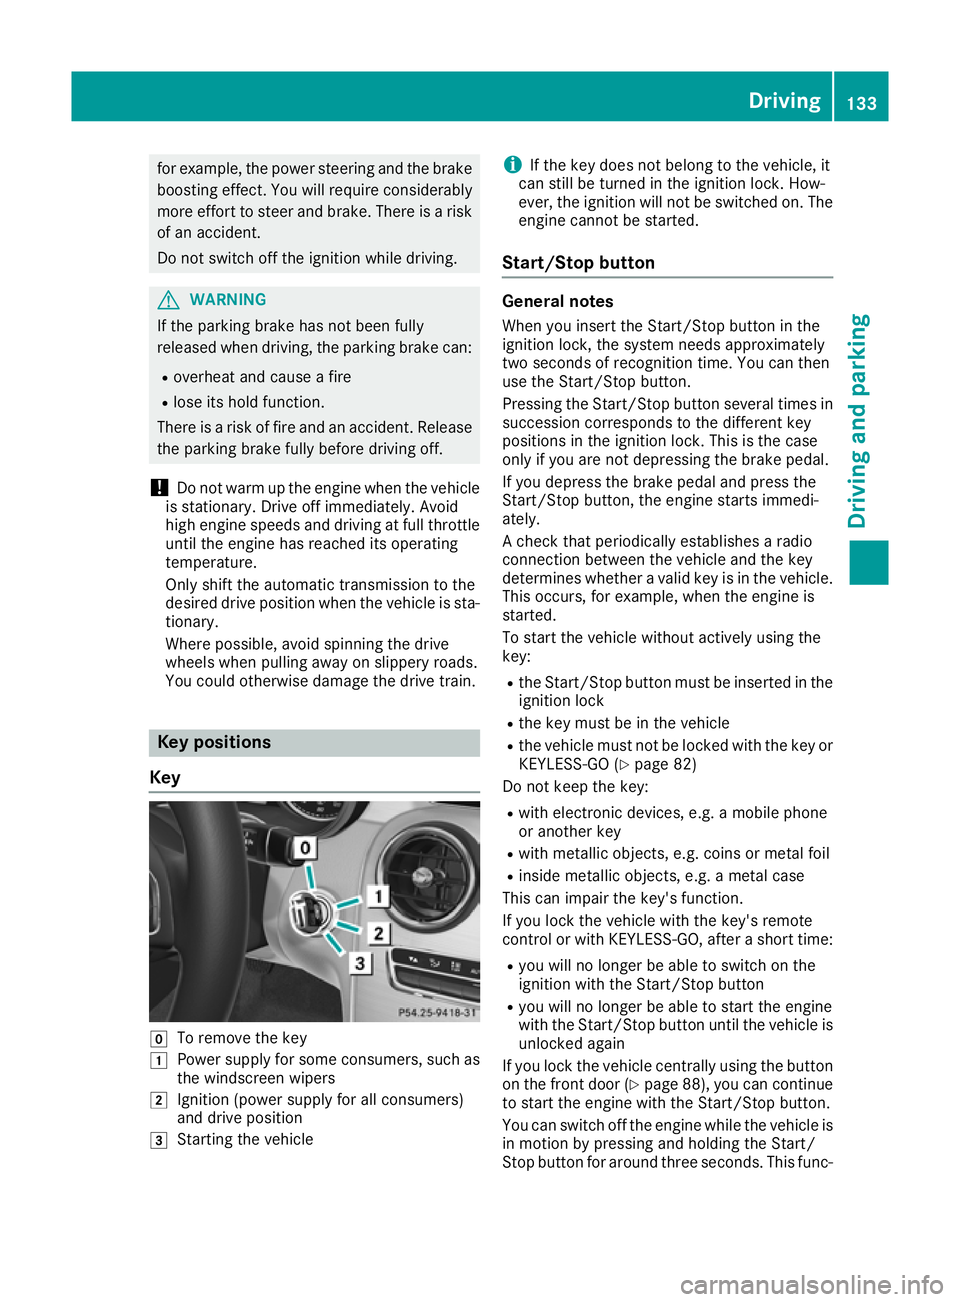
Key g
To remove the key
1 Power supply for some consumers, such as
the windscreen wipers
2 Ignition (power supply for all consumers)
and drive position
3 Starting the vehicle i
If the key does not belong to the vehicle, it
can still be turned in the ignition lock. How-
ever, the ignition will not be switched on. The
engine cannot be started.
Start/Stop button General notes
When you insert the Start/Stop button in the
ignition lock, the system needs approximately
two seconds of recognition time. You can then
use the Start/Stop button.
Pressing the Start/Stop button several times in succession corresponds to the different key
positions in the ignition lock. This is the case
only if you are not depressing the brake pedal.
If you depress the brake pedal and press the
Start/Stop button, the engine starts immedi-
ately.
A check that periodically establishes a radio
connection between the vehicle and the key
determines whether a valid key is in the vehicle.
This occurs, for example, when the engine is
started.
To start the vehicle without actively using the
key:
R the Start/Stop button must be inserted in the
ignition lock
R the key must be in the vehicle
R the vehicle must not be locked with the key or
KEYLESS-GO (Y page 82)
Do not keep the key:
R with electronic devices, e.g. a mobile phone
or another key
R with metallic objects, e.g. coins or metal foil
R inside metallic objects, e.g. a metal case
This can impair the key's function.
If you lock the vehicle with the key's remote
control or with KEYLESS-GO, after a short time:
R you will no longer be able to switch on the
ignition with the Start/Stop button
R you will no longer be able to start the engine
with the Start/Stop button until the vehicle is
unlocked again
If you lock the vehicle centrally using the button
on the front door (Y page 88), you can continue
to start the engine with the Start/Stop button.
You can switch off the engine while the vehicle is
in motion by pressing and holding the Start/
Stop button for around three seconds. This func- Driving
133Driving and parking Z
Page 139 of 377

If the engine speed is above the engine idling
speed and you then engage transmission
position Dor R, the vehicle may accelerate
suddenly. There is a risk of an accident.
When engaging transmission position Dor R,
always keep the brake pedal firmly depressed
and do not depress the accelerator pedal at
the same time.
! Vehicles with manual transmission:
change gear in good time and avoid spinning
the wheels. You could otherwise damage the
vehicle.
Depress the accelerator carefully when pulling
away.
The vehicle automatically locks centrally once
you have pulled away. The locking knobs in the
doors drop down.
You can open the doors from the inside at any
time.
You can also deactivate the automatic door
locking system; see the Digital Owner's Manual.
Vehicles with automatic transmission: it is
possible to shift the transmission from position j to the desired position only if you depress
the brake pedal. If you do not depress the brake pedal, the DIRECT SELECT lever can still be
moved but the parking lock remains engaged.
i Vehicles with automatic transmission:
upshifts take place at higher engine speeds
after a cold start. This helps the catalytic con- verter to reach its operating temperature
more quickly.
Information on automatically releasing the elec- trical parking brake (Y page 162).
Pulling away with a trailer To ensure that you do not roll backwards when
pulling away on an uphill slope, apply the electric
parking brake.
X Press and hold handle :.
The electric parking brake continues to brake
and prevent the vehicle from rolling back-
wards.
The red !indicator lamp in the instrument
cluster remains lit.
X Depress the accelerator pedal.
X As soon as the car/trailer combination is held
by the driving force of the engine, release
lever :.
the electric parking brake is released
The red !indicator lamp in the instrument
cluster goes out.
For further information on the electric parking
brake, see (Y page 161).
Hill start assist Hill start assist helps you when pulling away for-
wards or in reverse on an uphill gradient. It holds the vehicle for a short time after you have
removed your foot from the brake pedal. This
gives you enough time to move your foot from
the brake pedal to the accelerator pedal and
depress it before the vehicle begins to roll. G
WARNING
After a while, hill start assist no longer holds
the vehicle and it may roll away. There is a risk of an accident and injury.
Therefore, quickly move your foot from the
brake pedal to the accelerator pedal. Never
leave the vehicle when it is held by hill start
assist.
Hill start assist is not active if:
R you are pulling away on a level road or a
downhill gradient
R the transmission is in position ion vehicles
with automatic transmissions
R the electric parking brake is applied
R ESP ®
is malfunctioning. 136
DrivingDriving and parking
Page 143 of 377
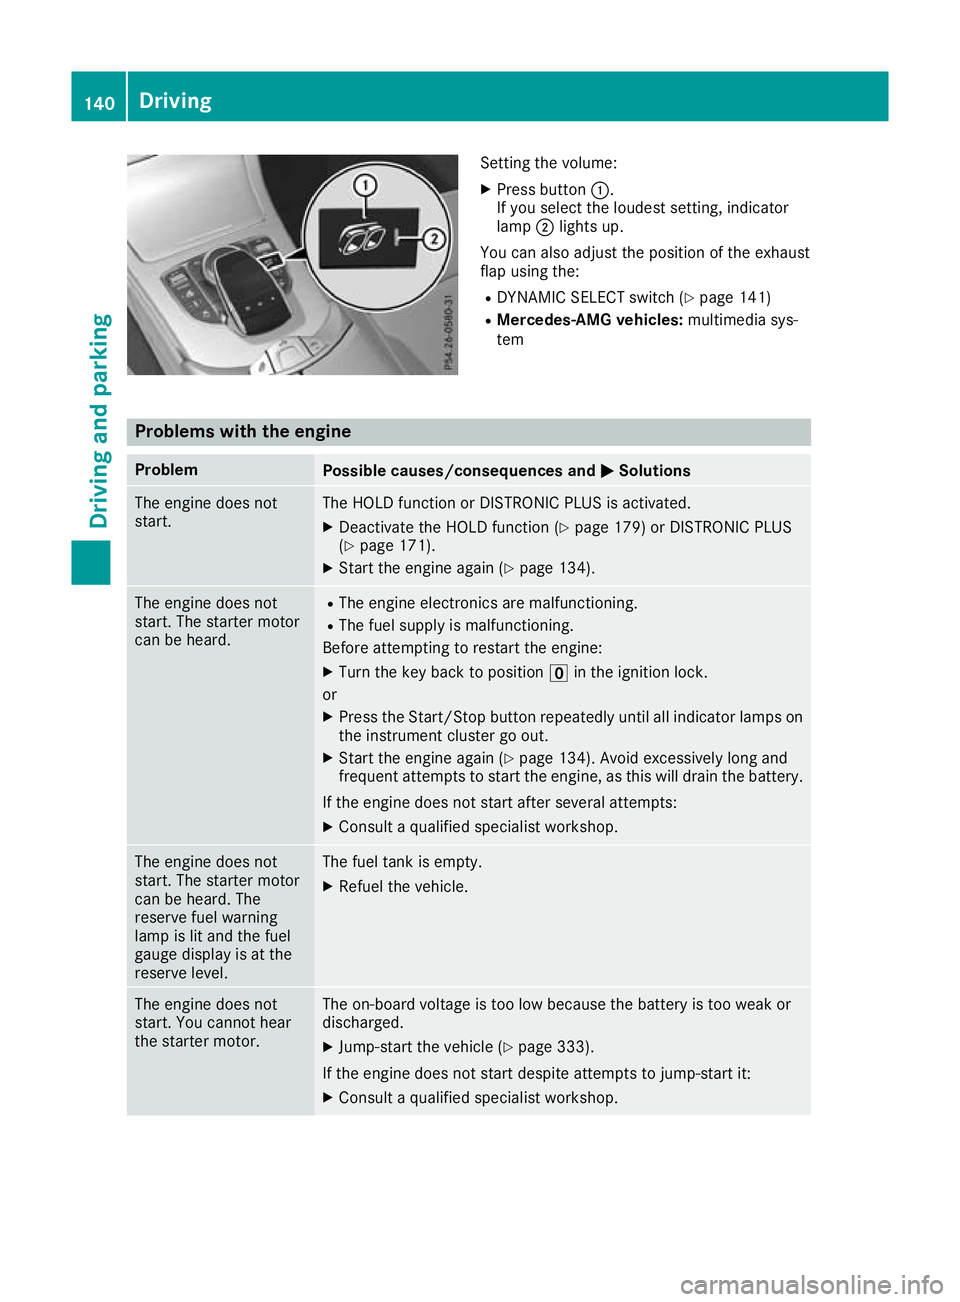
Setting the volume:
X Press button :.
If you select the loudest setting, indicator
lamp ;lights up.
You can also adjust the position of the exhaust
flap using the: R DYNAMIC SELECT switch (Y page 141)
R Mercedes-AMG vehicles: multimedia sys-
tem Problems with the engine
Problem
Possible causes/consequences and
M MSolutions The engine does not
start. The HOLD function or DISTRONIC PLUS is activated.
X Deactivate the HOLD function (Y page 179) or DISTRONIC PLUS
(Y page 171).
X Start the engine again (Y page 134).The engine does not
start. The starter motor
can be heard. R
The engine electronics are malfunctioning.
R The fuel supply is malfunctioning.
Before attempting to restart the engine:
X Turn the key back to position uin the ignition lock.
or X Press the Start/Stop button repeatedly until all indicator lamps on
the instrument cluster go out.
X Start the engine again (Y page 134). Avoid excessively long and
frequent attempts to start the engine, as this will drain the battery.
If the engine does not start after several attempts: X Consult a qualified specialist workshop. The engine does not
start. The starter motor
can be heard. The
reserve fuel warning
lamp is lit and the fuel
gauge display is at the
reserve level. The fuel tank is empty.
X Refuel the vehicle. The engine does not
start. You cannot hear
the starter motor. The on-board voltage is too low because the battery is too weak or
discharged.
X Jump-start the vehicle (Y page 333).
If the engine does not start despite attempts to jump-start it:
X Consult a qualified specialist workshop. 140
DrivingDriving and parking