ESP MERCEDES-BENZ C-CLASS CABRIOLET 2016 Manual Online
[x] Cancel search | Manufacturer: MERCEDES-BENZ, Model Year: 2016, Model line: C-CLASS CABRIOLET, Model: MERCEDES-BENZ C-CLASS CABRIOLET 2016Pages: 377, PDF Size: 6.9 MB
Page 215 of 377
R
you have switched on the turn signal
R a driving safety system engages, such as
ESP ®
, PRE-SAFE ®
Brake or Active Blind Spot
Assist
R you have adopted a sporty driving style with
high cornering speeds or high rates of accel-
eration
R ESP ®
is deactivated
R the transmission is not in position D
R on vehicles with a trailer tow hitch, the elec-
trical connection to the trailer has been cor-
rectly established
R a loss of tyre pressure or a defective tyre has
been detected and displayed
R an obstacle has been detected in the lane in
which you are driving
Active Lane Keeping Assist may not detect other road users or traffic situations. An inappropriate
brake application may be interrupted at any time
in the following situations:
R you steer slightly in the opposite direction
R you switch on the turn signal
R you brake or accelerate significantly
A lane-correcting brake application is interrup-
ted automatically in the following situations:
R a driving safety system engages, such as
ESP ®
, PRE-SAFE ®
Brake or Active Blind Spot
Assist
R lane markings are no longer detected
Activating/deactivating Active Lane
Keeping Assist X
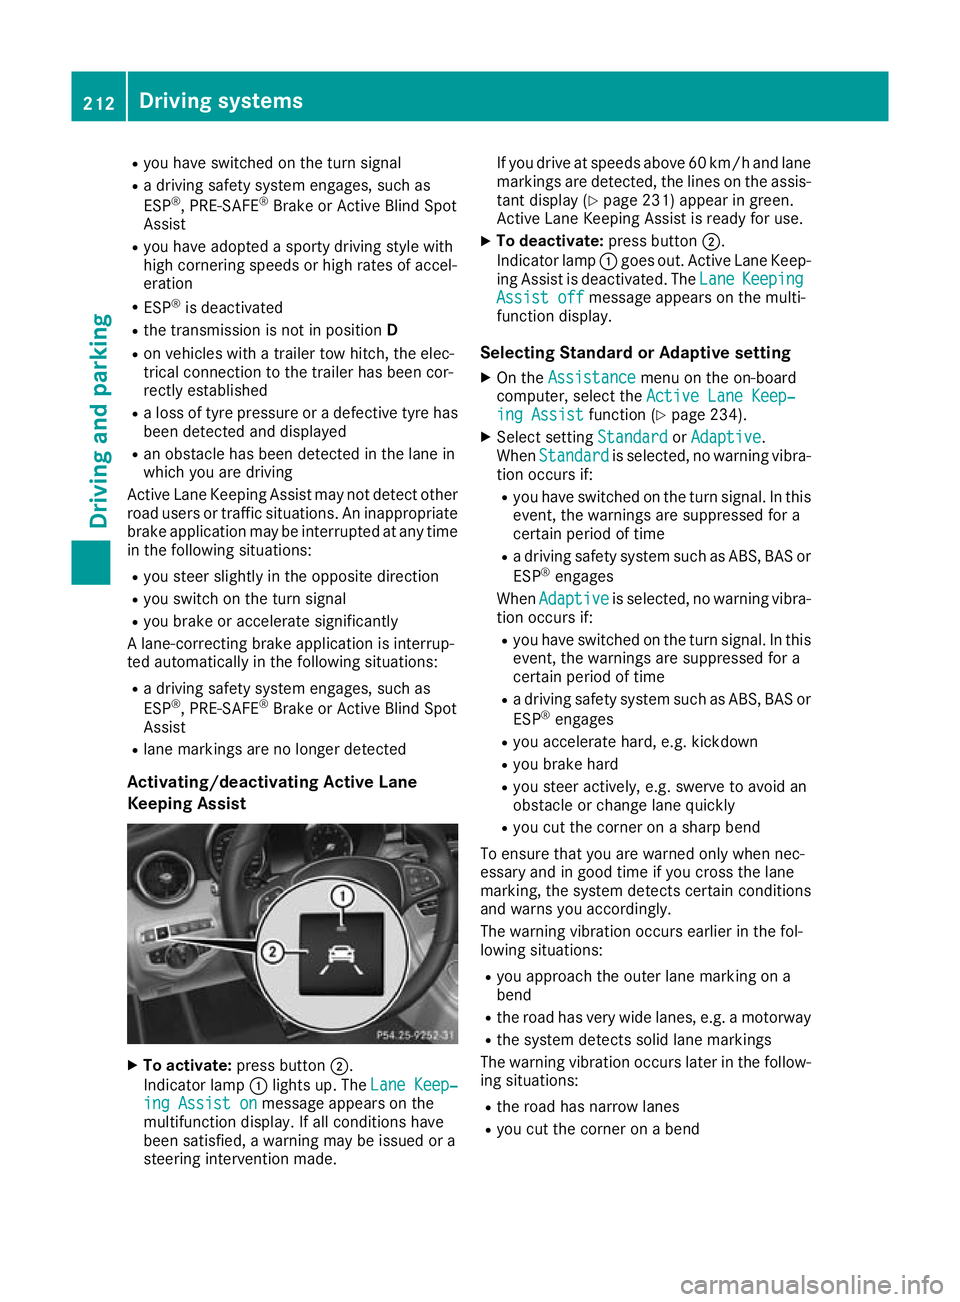
To activate: press button ;.
Indicator lamp :lights up. The Lane Keep‐ Lane Keep‐
ing Assist on
ing Assist on message appears on the
multifunction display. If all conditions have
been satisfied, a warning may be issued or a
steering intervention made. If you drive at speeds above 60 km/h and lane
markings are detected, the lines on the assis-
tant display (Y page 231) appear in green.
Active Lane Keeping Assist is ready for use.
X To deactivate: press button;.
Indicator lamp :goes out. Active Lane Keep-
ing Assist is deactivated. The Lane LaneKeeping Keeping
Assist off
Assist off message appears on the multi-
function display.
Selecting Standard or Adaptive setting X On the Assistance
Assistance menu on the on-board
computer, select the Active Lane Keep‐
Active Lane Keep‐
ing Assist
ing Assist function (Ypage 234).
X Select setting Standard
StandardorAdaptive
Adaptive.
When Standard
Standard is selected, no warning vibra-
tion occurs if:
R you have switched on the turn signal. In this
event, the warnings are suppressed for a
certain period of time
R a driving safety system such as ABS, BAS or
ESP ®
engages
When Adaptive Adaptive is selected, no warning vibra-
tion occurs if:
R you have switched on the turn signal. In this
event, the warnings are suppressed for a
certain period of time
R a driving safety system such as ABS, BAS or
ESP ®
engages
R you accelerate hard, e.g. kickdown
R you brake hard
R you steer actively, e.g. swerve to avoid an
obstacle or change lane quickly
R you cut the corner on a sharp bend
To ensure that you are warned only when nec-
essary and in good time if you cross the lane
marking, the system detects certain conditions
and warns you accordingly.
The warning vibration occurs earlier in the fol-
lowing situations:
R you approach the outer lane marking on a
bend
R the road has very wide lanes, e.g. a motorway
R the system detects solid lane markings
The warning vibration occurs later in the follow- ing situations:
R the road has narrow lanes
R you cut the corner on a bend 212
Driving systemsDriving and pa
rking
Page 217 of 377
Couple and uncouple the trailer carefully. If you
do not couple the trailer to the towing vehicle
correctly, the trailer could become detached.
When towing a trailer, your vehicle's handling
characteristics will be different to when driving
without a trailer.
The vehicle/trailer combination:
R is heavier
R is restricted in its acceleration and gradient-
climbing capability
R has an increased braking distance
R is affected more by strong crosswinds
R demands more sensitive steering
R has a larger turning circle
This can impair the vehicle's handling charac-
teristics. Adapt your driving style accordingly.
Maintain a safe distance. Drive carefully.
When towing a trailer, always adjust your speed to the current road and weather conditions. Do
not exceed the maximum permissible speed for
your vehicle/trailer combination. Notes on towing a trailer
General notes Towing a trailer is not possible with
Mercedes
‑AMG vehicles.
When towing a trailer, set the tyre pressure on
the rear axle of the towing vehicle for a maxi-
mum load. Further information on the tyre pres-
sure table in the fuel filler flap (Y page 345).
You will find permissible trailer loads under
"Technical data" (Y page 369).
Driving tips Observe the information on ESP
®
trailer stabili-
sation (Y page 75).
The maximum permissible speed for vehicle/
trailer combinations depends on the type of
trailer. Before beginning the journey, check the
trailer's documents to see what the maximum
permitted speed is. Observe the maximum per-
missible speed in the relevant country.
For certain Mercedes-Benz vehicles, the maxi-
mum permissible rear axle load is increased
when towing a trailer. See the "Technical data"
section to find out whether this applies to your
vehicle (Y page 369). In the event of increased
rear axle load, the car/trailer combination may not exceed a maximum speed of 100 km/h for
reasons concerning the operating permit. This
also applies in countries in which the maximum
permissible speed for car/trailer combinations
is greater than 100 km/h.
When towing a trailer, your vehicle's handling
characteristics will be different to when driving
without a trailer and the vehicle will consume
more fuel.
Shift to a lower gear in good time on long and
steep downhill gradients.
This also applies in the case of:
R activated DISTRONIC PLUS
R activated cruise control
This will use the braking effect of the engine, so
less braking will be required to maintain the
vehicle speed. This relieves the load on the
brake system and prevents the brakes from
overheating and wearing too quickly. If you need
additional braking, depress the brake pedal
repeatedly rather than continuously.
Driving tips R
Maintain a greater distance to the vehicle in
front than when driving without a trailer.
R Avoid braking abruptly. If possible, brake gen-
tly at first to allow the trailer to run on. Then,
increase the braking force rapidly.
R The values given for gradient-climbing capa-
bilities from a standstill refer to sea level.
When driving in mountainous areas, note that
the power output of the engine, and conse-
quently the vehicle's gradient-climbing capa-
bility from a standstill, decrease with increas- ing altitude.
If the trailer swings from side to side:
X Do not accelerate under any circumstances.
X Do not countersteer.
X Brake, if necessary. Folding the ball coupling in/out
Folding out the ball coupling G
WARNING
If the ball coupling is not correctly engaged,
the trailer can detach. There is a risk of an
accident. 214
Towing a trailerDriving and parking
Page 219 of 377
A connected trailer is only detected when the
electrical connection is established correctly
and the lighting system is working properly. The
function of other systems also depends on this, for example:
R ESP ®
R PARKTRONIC
R Active Parking Assist
R Active Blind Spot Assist
R Active Lane Keeping Assist Uncoupling a trailer
G
WARNING
If you uncouple a trailer with an engaged over- run brake, you could trap your hand between
the vehicle and the trailer drawbar. This poses a risk of injury.
Do not uncouple a trailer with an engaged
overrun brake. G
WARNING
Vehicles with level control:
If you disconnect the trailer cable, the vehicle is lowered. This can cause you or others to
become trapped between the vehicle body
and tyres, or underneath the vehicle. This
poses a risk of injury.
Make sure that no-one is in the immediate
vicinity of the wheel arch or underneath the
vehicle when disconnecting the trailer cable.
! Do not disconnect a trailer with an engaged
overrun brake. Otherwise, your vehicle could
be damaged by the rebounding of the overrun
brake.
! Remove the installed adapter cable before
folding in the ball coupling. Otherwise, dam-
age may occur to the rear bumper and the
adapter cable.
X Apply the electric parking brake manually.
X Vehicles with manual transmission:
depress the clutch pedal fully and engage first
or reverse gear.
X Vehicles with automatic transmission:
shift the transmission to position P.
X Switch off the engine. X
Secure the vehicle and trailer against rolling
away.
X Remove the trailer cable and uncouple the
trailer. Trailer power supply
! You can connect accessories to the perma-
nent power supply up to a maximum of 240 W.
You cannot charge a trailer battery using the
power supply.
When it leaves the factory, your vehicle's trailer
socket is equipped with a permanent power
supply and a power supply that is switched on
via the ignition lock.
The permanent power supply is supplied via
trailer socket pin 9.
The power supply that is switched on via the
ignition lock is supplied via trailer socket pin 10.
The trailer's permanent power supply is
switched off in the event of low on-board voltage and after six hours at the latest.
You can find more information about installing
the trailer electrics at a qualified specialist work- shop.
To activate the switched power supply:
X Turn the key to position 2in the ignition lock
(Y page 133).
or X Press the Start/Stop button twice on vehicles
with KEYLESS-GO or the KEYLESS-GO start
function (Y page 133).
To deactivate the switched power supply: X Turn the key to position 0in the ignition lock
(Y page 133).
or X Press the Start/Stop button once on vehicles
with KEYLESS-GO or the KEYLESS-GO start
function (Y page 133). Failure check for LEDs
If LED lamps are fitted in the trailer, a malfunc-
tion message may appear in the multifunction
display even if there is no fault. The reason for
the error message may be that the current has
fallen below the minimum of 50 mA. 216
Towing a trailerDriving an
d parking
Page 232 of 377
X
Confirm by pressing aon the steering
wheel.
X To open the media sources list: pressa
briefly.
The list shows the following media sources,
for example:
R CD or DVD (DVD only in the COMAND
Online multimedia system)
R SD card
R Media Register (only in the COMAND
Online multimedia system)
R USB storage device
R Bluetooth ®
-capable audio device
Please observe further information on media
support and media operation in the multimedia
system (see Digital Owner's Manual).
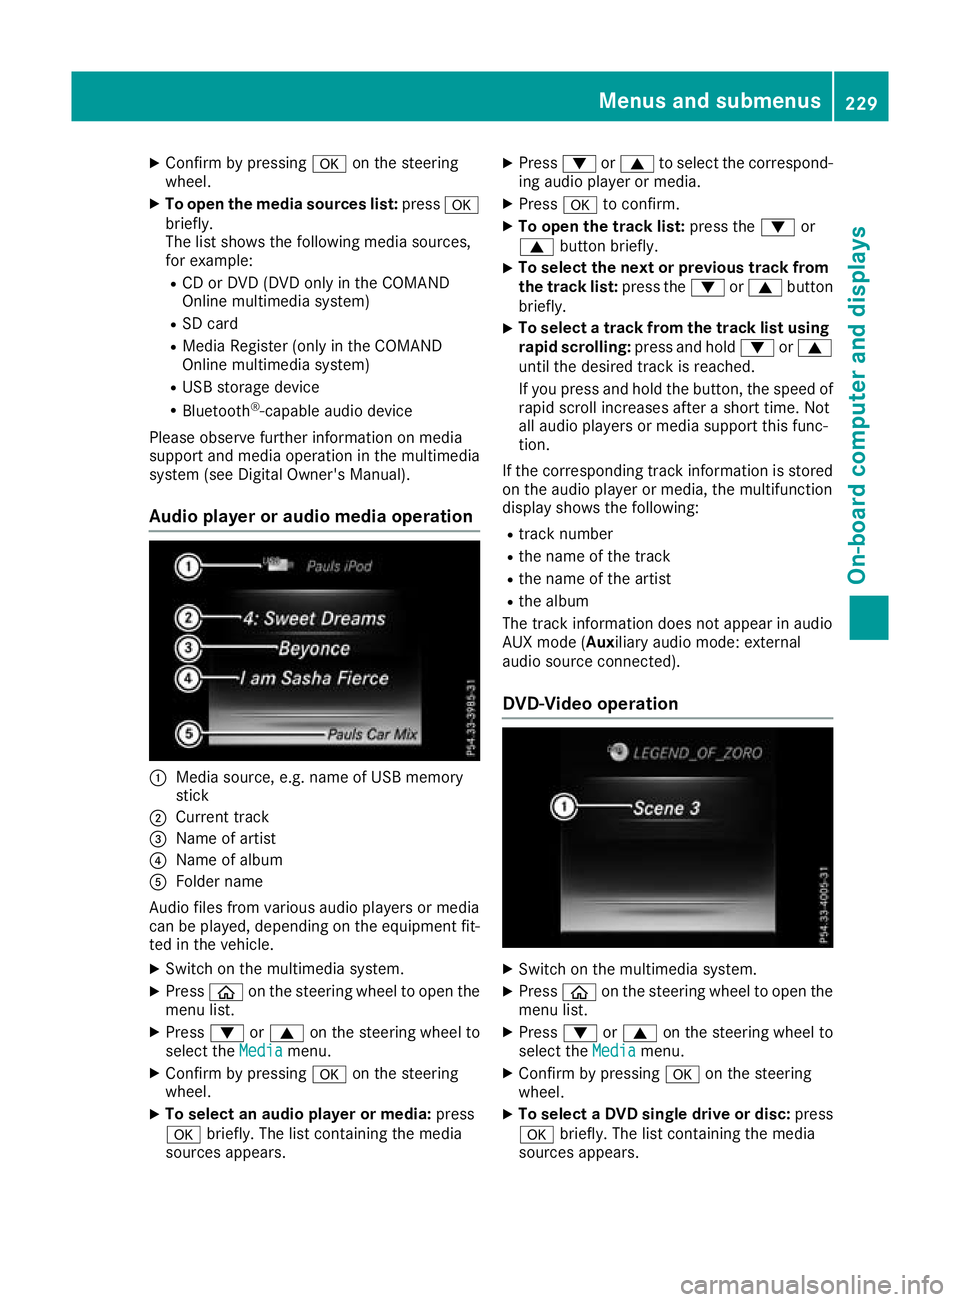
Audio player or audio media operation :
Media source, e.g. name of USB memory
stick
; Current track
= Name of artist
? Name of album
A Folder name
Audio files from various audio players or media
can be played, depending on the equipment fit- ted in the vehicle.
X Switch on the multimedia system.
X Press òon the steering wheel to open the
menu list.
X Press :or9 on the steering wheel to
select the Media
Media menu.
X Confirm by pressing aon the steering
wheel.
X To select an audio player or media: press
a briefly. The list containing the media
sources appears. X
Press :or9 to select the correspond-
ing audio player or media.
X Press ato confirm.
X To open the track list: press the:or
9 button briefly.
X To select the next or previous track from
the track list: press the:or9 button
briefly.
X To select a track from the track list using
rapid scrolling: press and hold:or9
until the desired track is reached.
If you press and hold the button, the speed of rapid scroll increases after a short time. Not
all audio players or media support this func-
tion.
If the corresponding track information is stored on the audio player or media, the multifunction
display shows the following:
R track number
R the name of the track
R the name of the artist
R the album
The track information does not appear in audio
AUX mode (Aux iliary audio mode: external
audio source connected).
DVD-Video operation X
Switch on the multimedia system.
X Press òon the steering wheel to open the
menu list.
X Press :or9 on the steering wheel to
select the Media Mediamenu.
X Confirm by pressing aon the steering
wheel.
X To select a DVD single drive or disc: press
a briefly. The list containing the media
sources appears. Menus and submenus
229On-board computer and displays Z
Page 233 of 377
X
Press :or9 to select the correspond-
ing DVD single drive or disc.
X Press ato confirm.
X To open the scene list: press the:or
9 button briefly.
X To select the next or previous scene in the
scene list: press the:or9 button
briefly.
X To select a scene from the scene list using
rapid scrolling: press and hold:or9
until desired scene :is reached.
X Press ato confirm your selection.
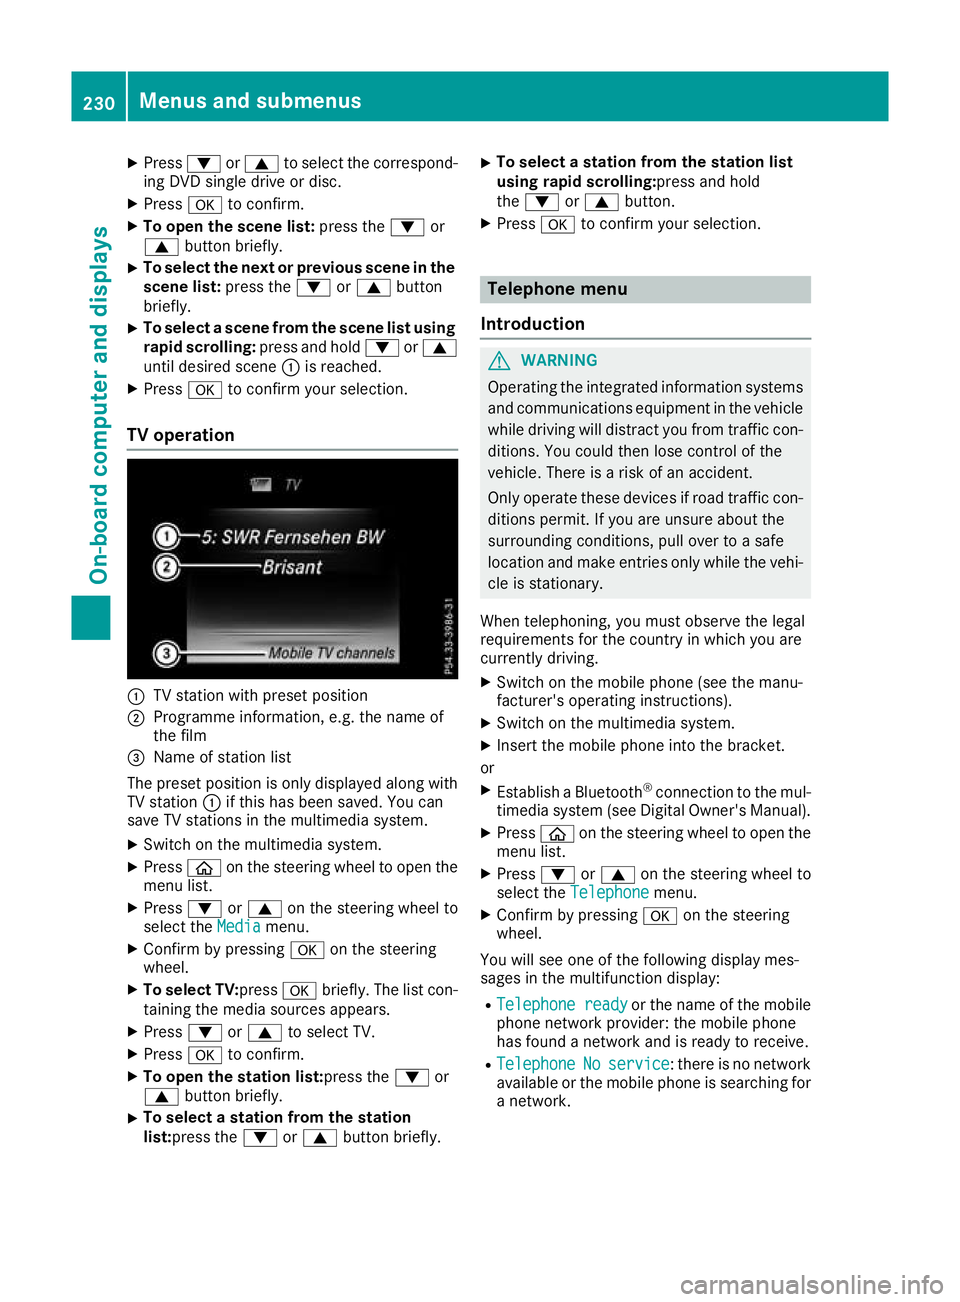
TV operation :
TV station with preset position
; Programme information, e.g. the name of
the film
= Name of station list
The preset position is only displayed along with TV station :if this has been saved. You can
save TV stations in the multimedia system.
X Switch on the multimedia system.
X Press òon the steering wheel to open the
menu list.
X Press :or9 on the steering wheel to
select the Media
Mediamenu.
X Confirm by pressing aon the steering
wheel.
X To select TV: pressabriefly. The list con-
taining the media sources appears.
X Press :or9 to select TV.
X Press ato confirm.
X To open the station list:press the :or
9 button briefly.
X To select a station from the station
list:press the
:or9 button briefly. X
To select a station from the station list
using rapid scrolling:press and hold
the
: or9 button.
X Press ato confirm your selection. Telephone menu
Introduction G
WARNING
Operating the integrated information systems and communications equipment in the vehicle
while driving will distract you from traffic con-
ditions. You could then lose control of the
vehicle. There is a risk of an accident.
Only operate these devices if road traffic con-
ditions permit. If you are unsure about the
surrounding conditions, pull over to a safe
location and make entries only while the vehi-
cle is stationary.
When telephoning, you must observe the legal
requirements for the country in which you are
currently driving. X Switch on the mobile phone (see the manu-
facturer's operating instructions).
X Switch on the multimedia system.
X Insert the mobile phone into the bracket.
or X Establish a Bluetooth ®
connection to the mul-
timedia system (see Digital Owner's Manual).
X Press òon the steering wheel to open the
menu list.
X Press :or9 on the steering wheel to
select the Telephone Telephone menu.
X Confirm by pressing aon the steering
wheel.
You will see one of the following display mes-
sages in the multifunction display:
R Telephone ready Telephone ready or the name of the mobile
phone network provider: the mobile phone
has found a network and is ready to receive.
R Telephone
Telephone No
Noservice
service: there is no network
available or the mobile phone is searching for
a network. 230
Menus and submenusOn-board computer and displays
Page 234 of 377
i
You can obtain further information about
suitable mobile phones and connecting
mobile phones via Bluetooth ®
:
R on the Internet at http://www.mercedes-
benz.com/connect
R at any Mercedes-Benz Service Centre
Accepting a call If someone calls you when you are in the
Tele‐ Tele‐
phone
phone menu, a display message appears in the
multifunction display.
You can accept a call at any time irrespective of
the selected menu.
X Press the 6button on the steering wheel
to accept the call.
Rejects or ends a call X
Press the ~button on the steering wheel
to reject or end the call.
Selecting an entry in the phone book X
Press òon the steering wheel to open the
menu list.
X Press :or9 on the steering wheel to
select the Telephone
Telephone menu.
X Confirm by pressing aon the steering
wheel.
X Press :, 9ora to switch to the
phone book.
X Press :or9 to select the names one
after the other.
or X To start rapid scrolling: press and hold:
or 9 for longer than one second.
The names are displayed quickly one after the
other in the phone book.
If you press and hold the :or9 button
for longer than five seconds, the name with
the next or previous initial letter in the alpha-
bet appears.
Rapid scrolling stops when you release the
button or reach the end of the list.
X If only one telephone number is stored for
a name: press the 6ora button to
start dialling.
or X
If there is more than one number for a
name: press the 6ora button to dis-
play the numbers.
X Press :or9 to select the number you
want to dial.
X Press the 6ora button to start dial-
ling.
or
X To exit the telephone book: press the~
or % button briefly.
Redialling The on-board computer saves the last names or
numbers dialled in the redial memory.
X Press òon the steering wheel to open the
menu list.
X Press :or9 on the steering wheel to
select the Telephone Telephone menu.
X Confirm by pressing aon the steering
wheel.
X Press the 6button to switch to the redial
memory.
X Press :or9 to select the desired
name or number.
X Press the 6ora button to start dial-
ling.
or X To exit the redial memory: press the~
or % button briefly. Assistance graphic menu
X
Press òon the steering wheel to open the
menu list.
X Press :or9 on the steering wheel to
select the Assistance graphic Assistance graphic menu. Menus and submenus
231On-board computer and displays Z
Page 235 of 377
X
Confirm by pressing aon the steering
wheel.
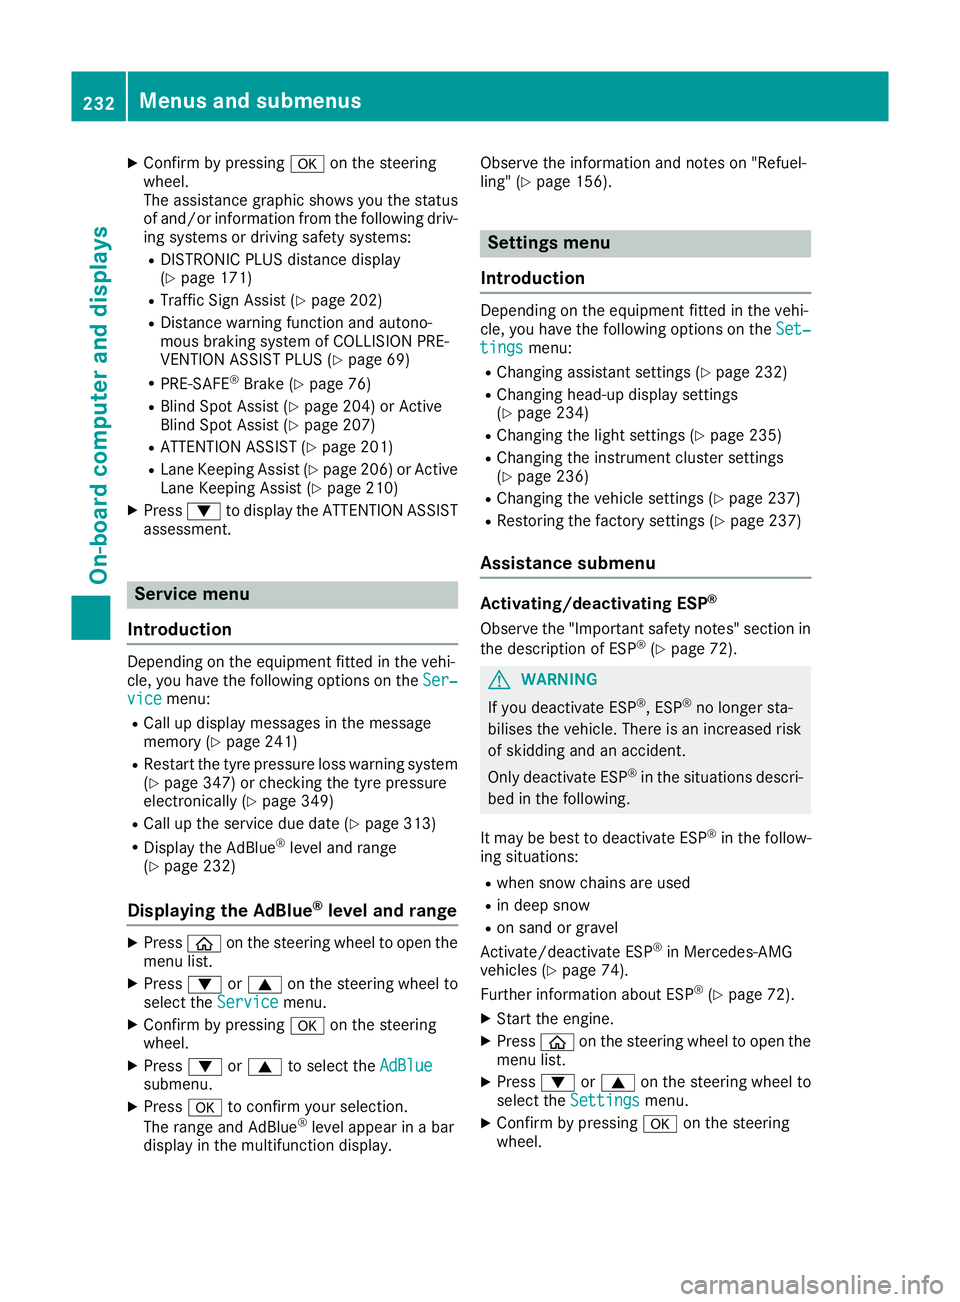
The assistance graphic shows you the status
of and/or information from the following driv-
ing systems or driving safety systems:
R DISTRONIC PLUS distance display
(Y page 171)
R Traffic Sign Assist (Y page 202)
R Distance warning function and autono-
mous braking system of COLLISION PRE-
VENTION ASSIST PLUS (Y page 69)
R PRE-SAFE ®
Brake (Y page 76)
R Blind Spot Assist (Y page 204) or Active
Blind Spot Assist (Y page 207)
R ATTENTION ASSIST (Y page 201)
R Lane Keeping Assist (Y page 206) or Active
Lane Keeping Assist (Y page 210)
X Press :to display the ATTENTION ASSIST
assessment. Service menu
Introduction Depending on the equipment fitted in the vehi-
cle, you have the following options on the Ser‐ Ser‐
vice
vice menu:
R Call up display messages in the message
memory (Y page 241)
R Restart the tyre pressure loss warning system
(Y page 347) or checking the tyre pressure
electronically (Y page 349)
R Call up the service due date (Y page 313)
R Display the AdBlue ®
level and range
(Y page 232)
Displaying the AdBlue ®
level and range X
Press òon the steering wheel to open the
menu list.
X Press :or9 on the steering wheel to
select the Service
Service menu.
X Confirm by pressing aon the steering
wheel.
X Press :or9 to select the AdBlue
AdBlue
submenu.
X Press ato confirm your selection.
The range and AdBlue ®
level appear in a bar
display in the multifunction display. Observe the information and notes on "Refuel-
ling" (Y page 156). Settings menu
Introduction Depending on the equipment fitted in the vehi-
cle, you have the following options on the Set‐ Set‐
tings
tings menu:
R Changing assistant settings (Y page 232)
R Changing head-up display settings
(Y page 234)
R Changing the light settings (Y page 235)
R Changing the instrument cluster settings
(Y page 236)
R Changing the vehicle settings (Y page 237)
R Restoring the factory settings (Y page 237)
Assistance submenu Activating/deactivating ESP
®
Observe the "Important safety notes" section in the description of ESP ®
(Y page 72). G
WARNING
If you deactivate ESP ®
, ESP ®
no longer sta-
bilises the vehicle. There is an increased risk
of skidding and an accident.
Only deactivate ESP ®
in the situations descri-
bed in the following.
It may be best to deactivate ESP ®
in the follow-
ing situations:
R when snow chains are used
R in deep snow
R on sand or gravel
Activate/deactivate ESP ®
in Mercedes-AMG
vehicles (Y page 74).
Further information about ESP ®
(Y page 72).
X Start the engine.
X Press òon the steering wheel to open the
menu list.
X Press :or9 on the steering wheel to
select the Settings
Settings menu.
X Confirm by pressing aon the steering
wheel. 232
Menus and submenusOn-board computer and displays
Page 236 of 377
X
Press :or9 to select the Assistance Assistance
submenu.
X Press ato confirm.
X Select ESP ESPwith : or9.
X Press ato confirm.
The current selection appears.
X To activate/deactivate: pressaagain.
If warning lamp åon the instrument clus-
ter lights up when the vehicle is ready to drive,
ESP ®
is deactivated.
If warning lamps ÷andå light up con-
tinuously, ESP ®
is not available due to a mal-
function.
Observe the information on warning lamps
(Y page 275).
Observe the information on display messages
(Y page 242).
Traffic Sign Assist
You can activate or deactivate the warning func-
tion of Traffic Sign Assist in the Traffic TrafficSign
Sign
Assist
Assist menu. When the message function is
activated, detected traffic signs and information
appear in the multifunction display for five sec-
onds.
X Press òon the steering wheel to open the
menu list.
X Press the :or9 button on the steering
wheel to select the Settings
Settings menu.
X Confirm by pressing aon the steering
wheel.
X Press :or9 to select the Assistance
Assistance
submenu.
X Press ato confirm.
X Select Traffic Sign Assist
Traffic Sign Assist with: or
9.
X Press ato confirm.
The current selection appears.
X Activate or deactivate the warning func-
tion: press aagain.
For further information about Traffic Sign Assist, see (Y page 202).
Activating/deactivating COLLISION PRE-
VENTION ASSIST PLUS
X Press òon the steering wheel to open the
menu list.
X Press :or9 on the steering wheel to
select the Settings
Settings menu. X
Confirm by pressing aon the steering
wheel.
X Press :or9 to select the Assistance Assistance
submenu.
X Press ato confirm.
X Select Collision Prevention Collision Prevention with9
or :.
X Press ato confirm.
The current selection appears.
X To activate/deactivate: pressaagain.
When COLLISION PREVENTION ASSIST PLUS
is deactivated, the æsymbol appears in
the multifunction display in the Assistance
Assistance
graphic
graphic menu.
Further information about COLLISION PREVEN- TION ASSIST PLUS (Y page 69).
Activating/deactivating PRE-SAFE ®
Brake
PRE‑SAFE ®
Brake is only available for vehicles
with the Driving Assistance package.
X Press òon the steering wheel to open the
menu list.
X Press :or9 on the steering wheel to
select the Settings
Settings menu.
X Confirm by pressing aon the steering
wheel.
X Press :or9 to select the Assistance
Assistance
submenu.
X Press ato confirm.
X Select with :or9 PRE-SAFE Brake
PRE-SAFE Brake.
X Press ato confirm.
The current selection appears.
X To activate/deactivate: pressaagain.
When PRE-SAFE ®
Brake is deactivated, the
æ symbol appears in the multifunction dis-
play in the Assistance graphic
Assistance graphic menu.
Further information on PRE‑ SAFE®
Brake
(Y page 76).
Activating/deactivating Blind Spot Assist
X Press òon the steering wheel to open the
menu list.
X Press :or9 on the steering wheel to
select the Settings
Settings menu.
X Confirm by pressing aon the steering
wheel.
X Press :or9 to select the Assistance
Assistance
submenu. Menus and submenus
233On-board computer and displays Z
Page 238 of 377
X
Press ato confirm.
A graphical selection list appears.
X Press :or9 to select the desired dis-
play.
X Press the abutton to confirm the selec-
tion.
You can find more information on the navigation
displays in the multimedia system (see Digital
Owner's Manual).
Information on Traffic Sign Assist displays
(Y page 202).
Setting the position You can adjust the position of the head-up dis-
play on the windscreen. You can compensate for
height differences if the seat positions are
changed, for example.
X Switch on the head-up display (Y page 223).
X Press òon the steering wheel to open the
menu list.
X Press :or9 on the steering wheel to
select the Settings
Settings menu.
X Confirm by pressing aon the steering
wheel.
X Press :or9 to select the Head-up Head-up
display
display submenu.
X Press ato confirm.
X Press :or9 to select the Position
Position
function.
X Press ato change the setting.
X Press :or9 to adjust the position to a
level from Level
Level +5
+5(up) to Level
Level -5
-5(down).
X Press aor% to save the setting.
Using the Memory function, you can save and
call up the set position of the head-up display as
a preset position (Y page 112).
Adjusting the brightness
The brightness of the head-up display is auto-
matically adjusted to the surrounding light con- ditions. You can also individually adjust the
brightness of the head-up display.
X Switch on the head-up display (Y page 223).
X Press òon the steering wheel to open the
menu list.
X Press :or9 on the steering wheel to
select the Settings
Settings menu.
X Confirm by pressing aon the steering
wheel. X
Use : or9 to select the Head-up Head-up
display display submenu.
X Press ato confirm.
X Press :or9 to select the Brightness
Brightness
function.
X Press the abutton to change the setting.
X Press :or9 to adjust the brightness
to a level from Level
Level+5
+5(bright) to Level
Level-5
-5
(dark).
X Press the aor% button to save the
setting.
Light submenu Switching the Intelligent Light System
on/off
X Press òon the steering wheel to open the
menu list.
X Press :or9 on the steering wheel to
select the Settings
Settings menu.
X Confirm by pressing aon the steering
wheel.
X Press :or9 to select the Lights
Lights
submenu.
X Press ato confirm.
X Press :or9 to select the Intelli‐ Intelli‐
gent Light System
gent Light System function.
If the Intelligent Light System
Intelligent Light System function
has been switched on, the cone of light and
the L symbol are shown in white and yel-
low respectively in the multifunction display.
X Press the abutton to change the setting.
If you switch on the Intelligent
IntelligentLight
LightSys‐
Sys‐
tem
tem function, the following functions are activa-
ted:
R Motorway mode
R Active light function
R Cornering light function
R Extended range foglamps
If you set the dipped-beam headlamps for driv-
ing on the right/left, the multifunction display
shows the Inactive Inactive for
forleft-side
left-side traffic
traffic
or Inactive for right-side traffic
Inactive for right-side traffic dis-
play message in the Lights
Lightssubmenu instead of
the Intelligent Light System
Intelligent Light System function
(Y page 236). This display message will only
appear if the setting for driving on the left/right is set opposite to your vehicle's country version.
Further information on the Intelligent Light Sys-
tem (Y page 117). Menus and submenus
235On-board computer and displays Z
Page 241 of 377
X
Switch on the display function for notes and
traffic signs (Y page 233).
X Press òon the steering wheel to open the
menu list.
X Press :or9 on the steering wheel to
select the AMG AMGmenu.
X Confirm by pressing aon the steering
wheel.
X Press the 9button repeatedly until the
Traffic Sign Assist display appears.
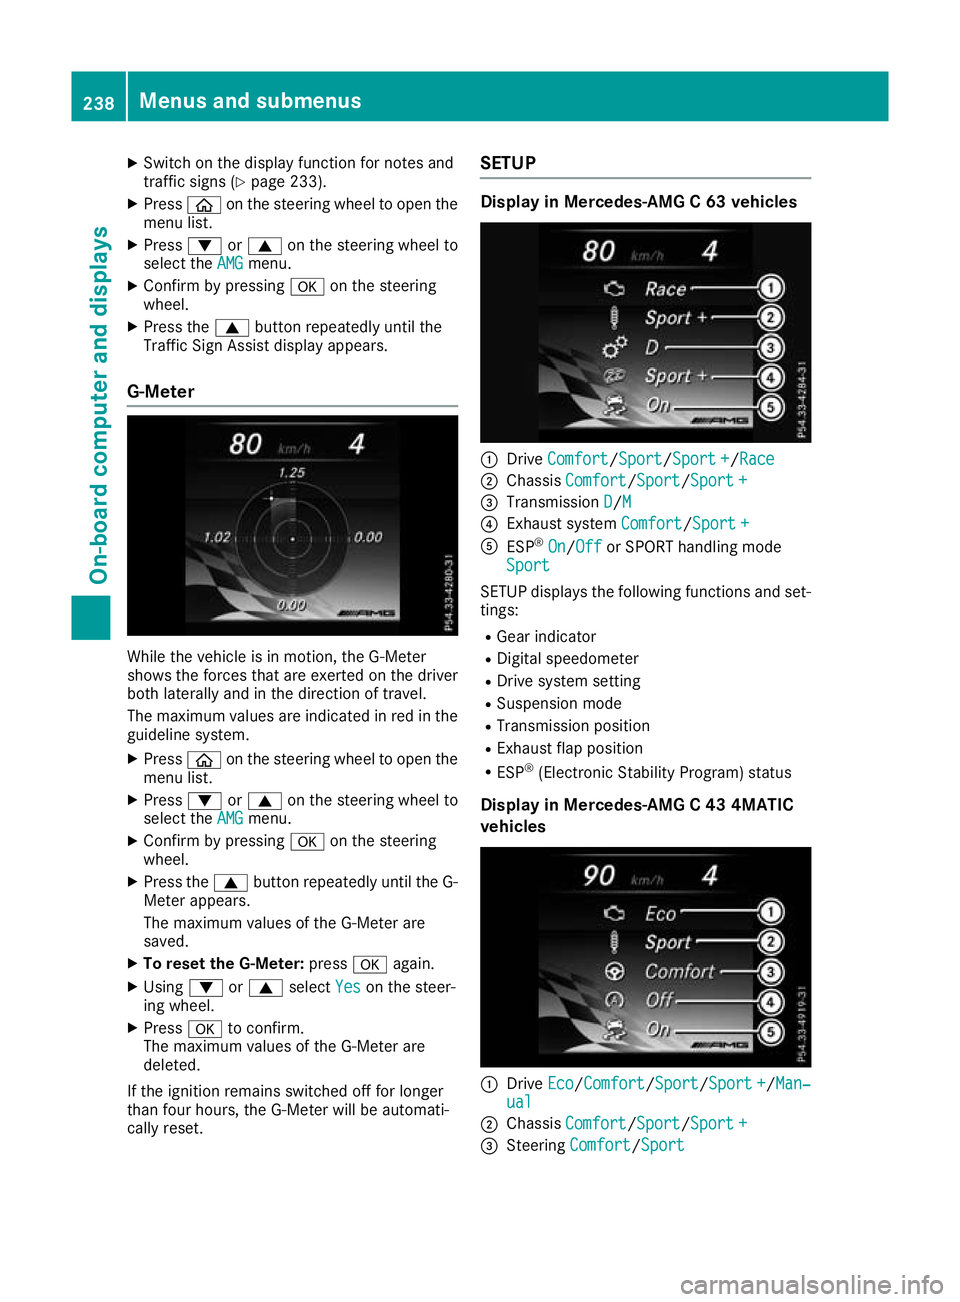
G-Meter While the vehicle is in motion, the G-Meter
shows the forces that are exerted on the driver
both laterally and in the direction of travel.
The maximum values are indicated in red in the
guideline system.
X Press òon the steering wheel to open the
menu list.
X Press :or9 on the steering wheel to
select the AMG
AMG menu.
X Confirm by pressing aon the steering
wheel.
X Press the 9button repeatedly until the G-
Meter appears.
The maximum values of the G-Meter are
saved.
X To reset the G-Meter: pressaagain.
X Using :or9 select Yes
Yes on the steer-
ing wheel.
X Press ato confirm.
The maximum values of the G-Meter are
deleted.
If the ignition remains switched off for longer
than four hours, the G-Meter will be automati-
cally reset. SETUP Display in Mercedes-AMG C 63 vehicles
:
Drive Comfort Comfort/ Sport Sport/Sport +Sport+/Race
Race
; Chassis Comfort
Comfort/Sport Sport/Sport +Sport +
= Transmission D
D/MM
? Exhaust system Comfort
Comfort/Sport +Sport +
A ESP ®
On
On/Off Off or SPORT handling mode
Sport
Sport
SETUP displays the following functions and set- tings:
R Gear indicator
R Digital speedometer
R Drive system setting
R Suspension mode
R Transmission position
R Exhaust flap position
R ESP ®
(Electronic Stability Program) status
Display in Mercedes-AMG C 43 4MATIC
vehicles :
Drive Eco Eco/ComfortComfort/Sport Sport/Sport +Sport +/Man‐ Man‐
ual
ual
; Chassis Comfort
Comfort/Sport Sport/Sport +Sport +
= Steering Comfort
Comfort/Sport Sport 238
Menus and submenusOn-board computer and displays