Boot release MERCEDES-BENZ C-CLASS CABRIOLET 2016 Owners Manual
[x] Cancel search | Manufacturer: MERCEDES-BENZ, Model Year: 2016, Model line: C-CLASS CABRIOLET, Model: MERCEDES-BENZ C-CLASS CABRIOLET 2016Pages: 377, PDF Size: 6.9 MB
Page 84 of 377
Key
Important safety notes
United Kingdom only: G
WARNING
When the double locks are activated, the
doors can no longer be opened from the
inside. People in the vehicle can no longer get out, e.g. in hazardous situations. There is a
risk of injury.
Therefore, do not leave any people unsuper-
vised in the vehicle, particularly children, eld-
erly people or people in need of special assis-
tance. Do not activate the double lock when
people are in the vehicle.
If the vehicle has been locked from the outside, the double lock function is activated as stand-
ard. It is then not possible to open the doors
from inside the vehicle. You can deactivate the
double lock function by deactivating the interior
motion sensor (see Digital Owner's Manual).
The doors can then be opened from the inside
after the vehicle has been locked from the out-
side. The anti-theft alarm system is triggered if
the door is opened from the inside. Switch off
the alarm (Y page 78).
All countries: G
WARNING
If children are left unsupervised in the vehicle, they could:
R open doors, thereby endangering other per-
sons or road users
R get out and be struck by oncoming traffic
R operate vehicle equipment and become
trapped, for example
In addition, the children could also set the
vehicle in motion, for example, if they:
R release the parking brake
R shift the automatic transmission out of park
position P or shift manual transmission into
neutral
R start the engine
There is a risk of an accident and injury. When leaving the vehicle, always take the key
with you and lock the vehicle. Never leave
children and animals unattended in the vehi-
cle. Keep the keys out of the reach of children. G
WARNING
If you attach heavy or large objects to the key, the key could be unintentionally turned in the
ignition lock. This could cause the engine to
be switched off. There is a risk of an accident.
Do not attach any heavy or large objects to the
key. Remove any bulky keyrings before insert-
ing the key into the ignition lock.
! Keep the key away from strong magnetic
fields. Otherwise, the remote control function could be affected.
Strong magnetic fields can occur in the vicin-
ity of powerful electrical installations.
Do not keep the key: R with electronic devices, e.g. a mobile phone
or another key
R with metallic objects, e.g. coins or metal foil
R inside metallic objects, e.g. a metal case
This can impair the key's function.
Vehicles with KEYLESS-GO start function: do
not keep the key in the boot. Otherwise, the key
may not be detected, e.g. when starting the
engine using the Start/Stop button.
A check that periodically establishes a radio
connection between the vehicle and the key
determines whether a valid key is in or in the
direct vicinity of the vehicle. This occurs, for
example:
R during engine start
R during driving
R when the external door handles are touched
R during convenience closing Key
81Opening and closing Z
Page 92 of 377

Therefore, you could be locked out if:
R the vehicle is being pushed
R the vehicle is being towed
R the vehicle is being tested on a dynamometer
You can also switch the automatic locking func- tion on and off using the multimedia system (see
the Digital Owner's Manual). Locking/unlocking the driver's door
with the emergency key element
i In order to lock all of the vehicle's locks,
begin by pressing the button for locking the
vehicle from the inside while the driver's door is open. Then proceed to lock the driver's
door using the emergency key element. X
Insert the emergency key element into open-
ing :in the protective cap.
X Pull and hold the door handle.
X Pull the protective cap on the emergency key
as straight as possible away from the vehicle until it releases.
X Release the door handle. X
To lock: turn the emergency key element
clockwise as far as it will go to position 1.
X To unlock: turn the emergency key element
anti-clockwise as far as it will go to position
1.
Right-hand-drive vehicle: turn the emergency
key element in the opposite direction in both
cases.
If you use the emergency key element to unlock
and open the driver's door, the anti-theft alarm
system will be triggered. Switch off the alarm
(Y page 78). Boot
Important safety notes
G
WARNING
Combustion engines emit poisonous exhaust
gases such as carbon monoxide. Exhaust
gases can enter the vehicle interior if the boot
lid is open when the engine is running, espe-
cially if the vehicle is in motion. There is a risk of poisoning.
Always switch off the engine before opening
the boot lid. Never drive with the boot lid
open. G
WARNING
If objects, luggage or loads are not secured or not secured sufficiently, they could slip, tip
over or be flung around and thereby hit vehicle
occupants. There is a risk of injury, especially when braking or abruptly changing directions.
Always store objects so that they cannot be
flung around. Secure objects, luggage or
loads against slipping or tipping before the
journey.
! The boot lid swings upwards when opened.
Therefore, make sure that there is sufficient
clearance above the boot lid.
The opening dimensions of the boot lid can be
found in the "Vehicle data" section
(Y page 367).
Do not leave the key in the boot. If you do so, you could lock yourself out. Boot
89Opening and closing Z
Page 94 of 377

Locking the boot separately
The "separate boot locking" function is available
only in certain countries.
You can lock the boot separately. If you then
unlock the vehicle centrally, the boot remains
locked and cannot be opened. X
To activate: close the boot lid.
X Open the glove compartment.
X Push the switch to position :.
If the vehicle is unlocked centrally, the boot
remains locked.
i You can also lock the glove compartment
(Y page 297).
X To deactivate: open the glove compartment.
X Push the switch to position ;.
If the vehicle is unlocked centrally, the boot
will also be unlocked. Side windows
Important safety notes
G
WARNING
While opening the side windows, body parts
could become trapped between the side win- dow and the door frame as the side window
moves. There is a risk of injury.
Make sure that nobody touches the side win-
dow during the opening procedure. If some-
body becomes trapped, release the switch or pull the switch to close the side window again. G
WARNING
While closing the side windows, body parts in the closing area could become trapped. There is a risk of injury.
When closing make sure that no parts of the
body are in the closing area. If somebody
becomes trapped, release the switch or press
the switch to open the side window again. Side window reversing feature
The side windows are equipped with an auto-
matic reversing feature. If a solid object blocks
or restricts a side window from travelling
upwards during the automatic closing process,
the side window opens again automatically. Dur-
ing the manual closing process, the side window
only opens again automatically after the corre-
sponding switch is released. The automatic
reversing feature is only an aid and is no substi- tute for your attention when closing a side win-
dow. G
WARNING
The reversing function does not react:
R to soft, light and thin objects, e.g. small fin-
gers
R while resetting
This means that the reversing feature cannot
prevent someone being trapped in these sit-
uations. There is a risk of injury.
When closing, make sure that no parts of the
body are in the closing area. If someone
becomes trapped, press the switch to open
the side window again. Opening and closing the side win-
dows
The switches for the side windows are located
on the driver's door. There is also a switch for
the front-passenger side window on the front-
passenger door.
The switches on the driver's door take prece-
dence. Side windows
91Opening and closing Z
Page 98 of 377

Opening/closing with the convertible
top switch
Important safety notes G
WARNING
When opening or closing the soft top, there is a risk that parts of the body could become
trapped by moving parts such as the roof
mechanism, the boot lid, or the side windows.
There is a risk of injury.
When opening or closing the roof, make sure
that no parts of the body are in the vicinity of moving parts. Release the switch if somebody
becomes trapped. G
WARNING
If the vehicle speed exceeds 60 km/h, the
soft top stops during the opening or closing
process. This impairs your view to the rear.
There is a risk of an accident.
Reduce your speed to below 60 km/ho r stop
the vehicle in accordance with the traffic con-
ditions. Operate the soft-top switch again in
order to open or close the soft top fully.
Opening and closing X
Make sure that the boot separator is closed
(Y page 96).
X Close the boot lid.
X Turn the key to position 2in the ignition lock.
X When the vehicle is stationary, depress the
brake pedal and keep it depressed. X
To open: pull and hold soft-top switch :until
the entire soft top is stowed away in the boot.
The multifunction display shows the opening
process of the soft top.
If, when opening, you drive at speeds above
60 km/h, the opening process is stopped.
The Open/close
Open/close top topcompletely
completely message
is shown on the multifunction display. In order
to open the soft top fully, reduce your speed
again to below 60 km/h and pull the soft-top switch again.
X To close: pull and hold soft top switch :until
the soft top is completely closed.
The multifunction display shows the closing
process of the soft top.
If, when closing, you drive at speeds above
60 km/h, the closing process is stopped. The
Open/close top completely Open/close top completely message is
shown on the multifunction display. In order
to close the soft top fully, reduce your speed
to below 60 km/h and push the soft-top
switch again. Opening/closing with the key
Important safety notes G
WARNING
When opening or closing the soft top, there is a risk that parts of the body could become
trapped by moving parts such as the roof
mechanism, the boot lid, or the side windows.
There is a risk of injury.
When opening or closing the roof, make sure
that no parts of the body are in the vicinity of moving parts. Release the switch if somebody
becomes trapped.
Opening and closing The key must be in close proximity to the vehi-
cle. Convertible top
95Opening and closing Z
Page 165 of 377

In addition, at least one of the following condi-
tions must be fulfilled:
R the engine is switched off
R the driver is not wearing a seat belt and the
driver's door is opened
R there is a system malfunction
R the power supply is insufficient
R the vehicle is stationary for a lengthy period
Red indicator lamp !on the instrument clus-
ter lights up.
The electric parking brake is not automatically
applied if the engine is switched off by the ECO
start/stop function.
Applying automatically (vehicles with
manual transmission) The electric parking brake is applied automati-
cally when the vehicle is being kept stationary by
the HOLD function.
In addition, at least one of the following condi-
tions must be fulfilled:
R the engine is switched off
R the driver is not wearing a seat belt and the
driver's door is open
R there is a system malfunction
R the power supply is insufficient
R the vehicle is stationary for a lengthy period
Red indicator lamp !on the instrument clus-
ter lights up.
The electric parking brake is not automatically
applied if the engine is switched off by the ECO
start/stop function.
Releasing automatically The electric parking brake of your vehicle is
released automatically when all the following
conditions are fulfilled:
R the seat belt is fastened
R the engine is running
R vehicles with automatic transmission: you
accelerate and the transmission is in position
D or R
or you shift the transmission position from
Pto
position Dor R. You will need to accelerate
more on steeper gradients
R vehicles with manual transmission: a gear
has been selected and you depress the accel-
erator pedal
Vehicles with automatic transmission: if the
transmission is in position R, the boot lid must
be closed.
Vehicles with manual transmission: when
reverse gear Ris engaged, the boot lid must be
closed.
If your seat belt is not fastened, the following
conditions must be fulfilled for the electric park- ing brake to be released automatically:
R the driver's door is closed
R vehicles with automatic transmission: you
are shifting from transmission position Por
have previously driven at speeds greater than 3 km/h
R vehicles with manual transmission: you
have previously driven at speeds greater than 3 km/h
Ensure that you do not depress the accelerator
pedal unintentionally. Otherwise, the parking
brake will be released and the vehicle will start
to move.
Emergency braking The vehicle can also be braked during an emer-
gency by using the electric parking brake.
X While driving, press handle :of the electric
parking brake (Y page 161).
The vehicle is braked as long as you keep
handle :of the electric parking brake
depressed. The longer electric parking brake
handle :is depressed, the greater the brak-
ing force.
During braking:
R a warning tone sounds
R the Release parking brake Release parking brake display mes-
sage appears
R red indicator lamp !on the instrument
cluster flashes
When the vehicle has been braked to a stand-
still, the electric parking brake is applied. 162
ParkingDriving and parking
Page 218 of 377
Always engage the ball coupling as described.
G
WARNING
If you release the ball coupling or it does not
engage correctly when folding in, it will swing out. Within pivoting range of the ball coupling,
there is an increased risk of an accident and
injury.
Only release the ball coupling if the pivoting
range is unobstructed. Always make sure that the ball coupling engages when folding in.
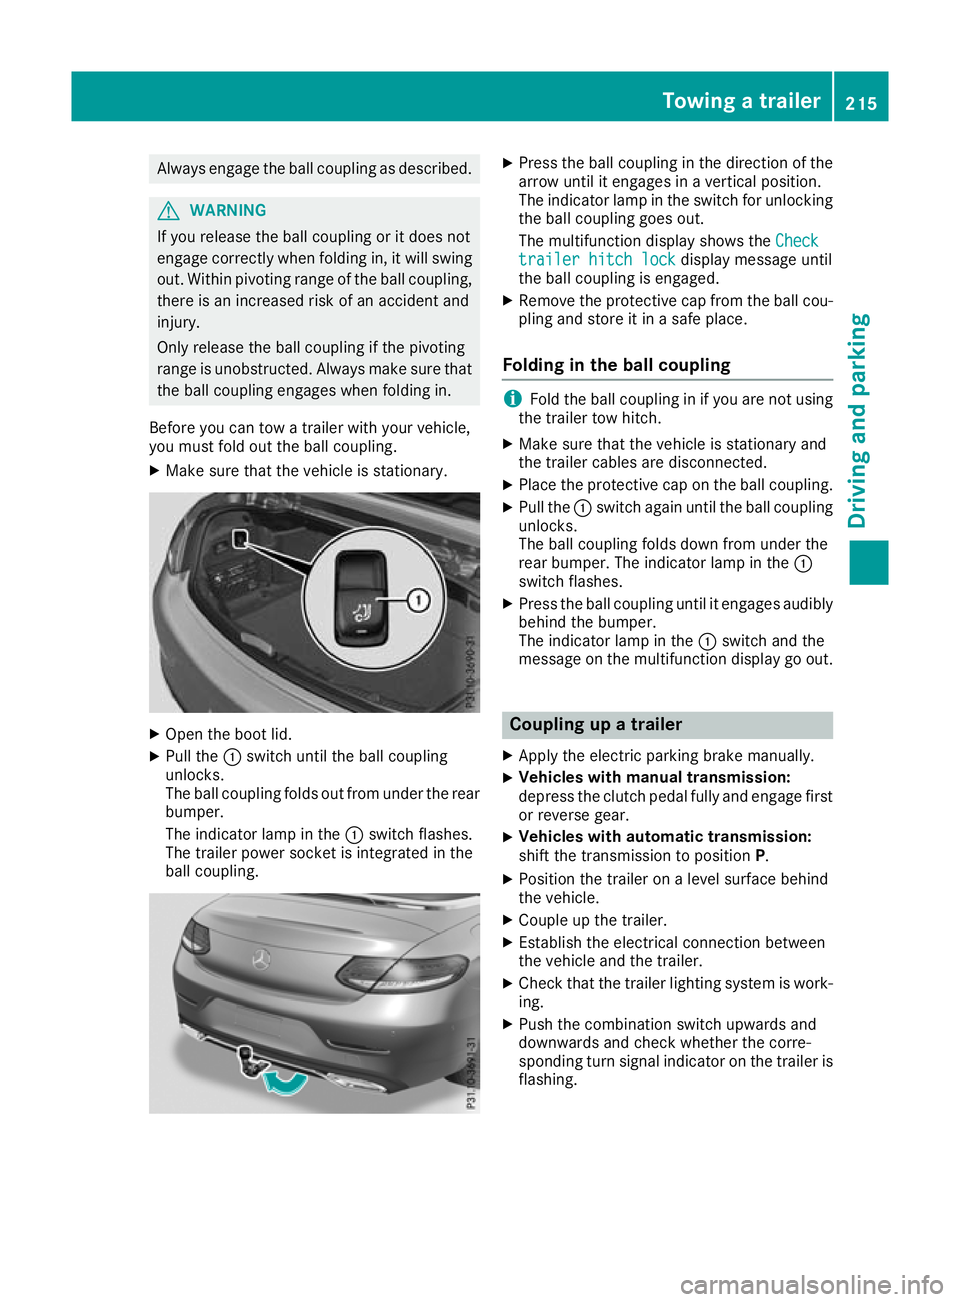
Before you can tow a trailer with your vehicle,
you must fold out the ball coupling.
X Make sure that the vehicle is stationary. X
Open the boot lid.
X Pull the :switch until the ball coupling
unlocks.
The ball coupling folds out from under the rear
bumper.
The indicator lamp in the :switch flashes.
The trailer power socket is integrated in the
ball coupling. X
Press the ball coupling in the direction of the
arrow until it engages in a vertical position.
The indicator lamp in the switch for unlocking
the ball coupling goes out.
The multifunction display shows the Check Check
trailer hitch lock
trailer hitch lock display message until
the ball coupling is engaged.
X Remove the protective cap from the ball cou-
pling and store it in a safe place.
Folding in the ball coupling i
Fold the ball coupling in if you are not using
the trailer tow hitch.
X Make sure that the vehicle is stationary and
the trailer cables are disconnected.
X Place the protective cap on the ball coupling.
X Pull the :switch again until the ball coupling
unlocks.
The ball coupling folds down from under the
rear bumper. The indicator lamp in the :
switch flashes.
X Press the ball coupling until it engages audibly
behind the bumper.
The indicator lamp in the :switch and the
message on the multifunction display go out. Coupling up a trailer
X Apply the electric parking brake manually.
X Vehicles with manual transmission:
depress the clutch pedal fully and engage first
or reverse gear.
X Vehicles with automatic transmission:
shift the transmission to position
P.
X Position the trailer on a level surface behind
the vehicle.
X Couple up the trailer.
X Establish the electrical connection between
the vehicle and the trailer.
X Check that the trailer lighting system is work-
ing.
X Push the combination switch upwards and
downwards and check whether the corre-
sponding turn signal indicator on the trailer is
flashing. Towing a trailer
215Driving and parking Z
Page 302 of 377
Folding the rear seat backrest forwards
X
Vehicles without memory function: if neces-
sary, move the driver's or front-passenger
seat forwards.
X Vehicles with memory function: when one or
both parts of the rear seat backrest are folded forwards, the respective front seat moves
forward slightly, when necessary, in order to
avoid contact.
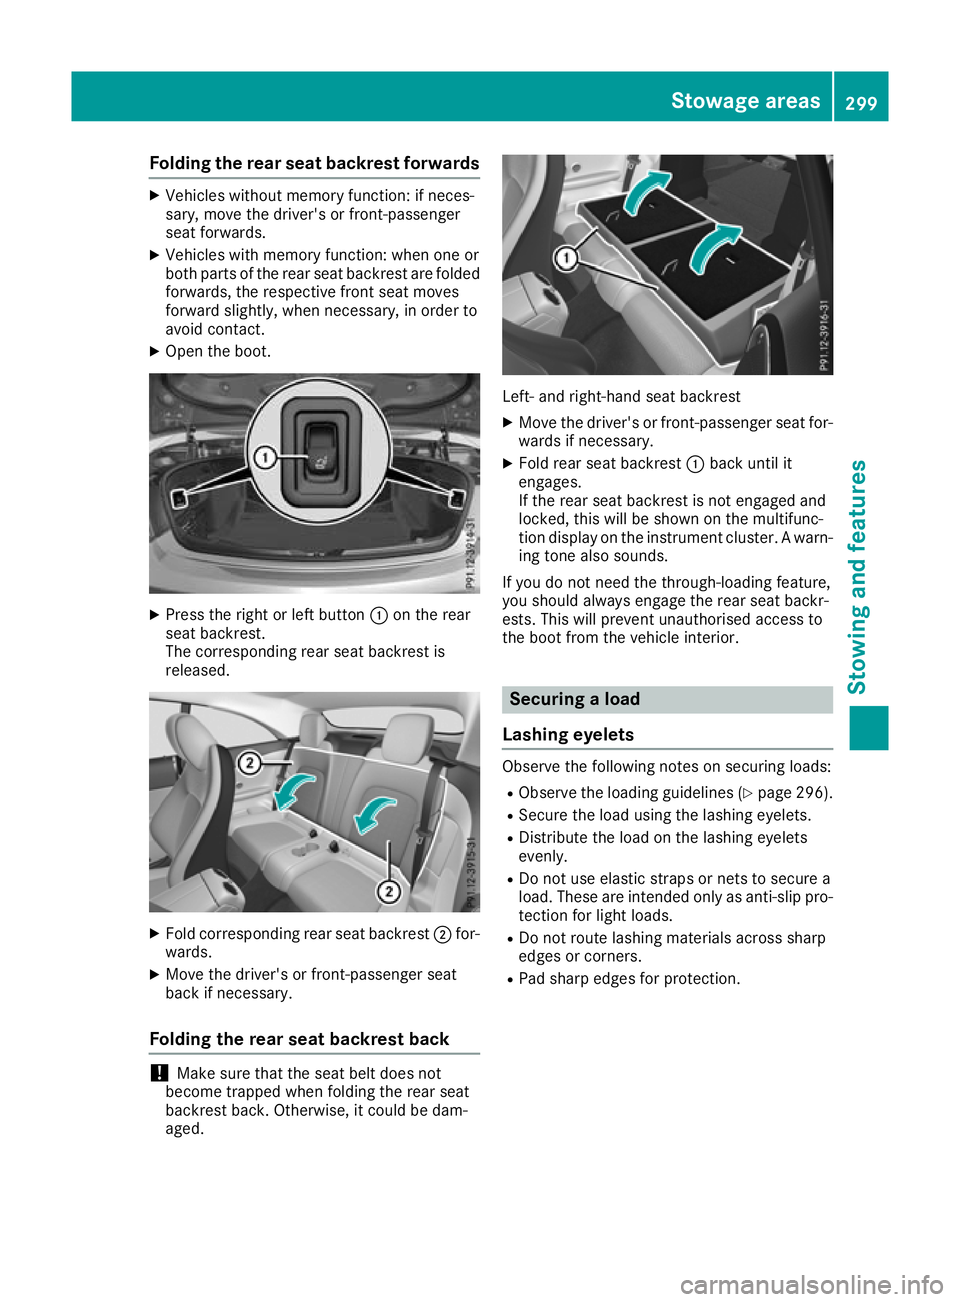
X Open the boot. X
Press the right or left button :on the rear
seat backrest.
The corresponding rear seat backrest is
released. X
Fold corresponding rear seat backrest ;for-
wards.
X Move the driver's or front-passenger seat
back if necessary.
Folding the rear seat backrest back !
Make sure that the seat belt does not
become trapped when folding the rear seat
backrest back. Otherwise, it could be dam-
aged. Left- and right-hand seat backrest
X Move the driver's or front-passenger seat for-
wards if necessary.
X Fold rear seat backrest :back until it
engages.
If the rear seat backrest is not engaged and
locked, this will be shown on the multifunc-
tion display on the instrument cluster. A warn- ing tone also sounds.
If you do not need the through-loading feature,
you should always engage the rear seat backr-
ests. This will prevent unauthorised access to
the boot from the vehicle interior. Securing a load
Lashing eyelets Observe the following notes on securing loads:
R Observe the loading guidelines (Y page 296).
R Secure the load using the lashing eyelets.
R Distribute the load on the lashing eyelets
evenly.
R Do not use elastic straps or nets to secure a
load. These are intended only as anti-slip pro-
tection for light loads.
R Do not route lashing materials across sharp
edges or corners.
R Pad sharp edges for protection. Stowage areas
299Stowing and featu res Z
Page 304 of 377
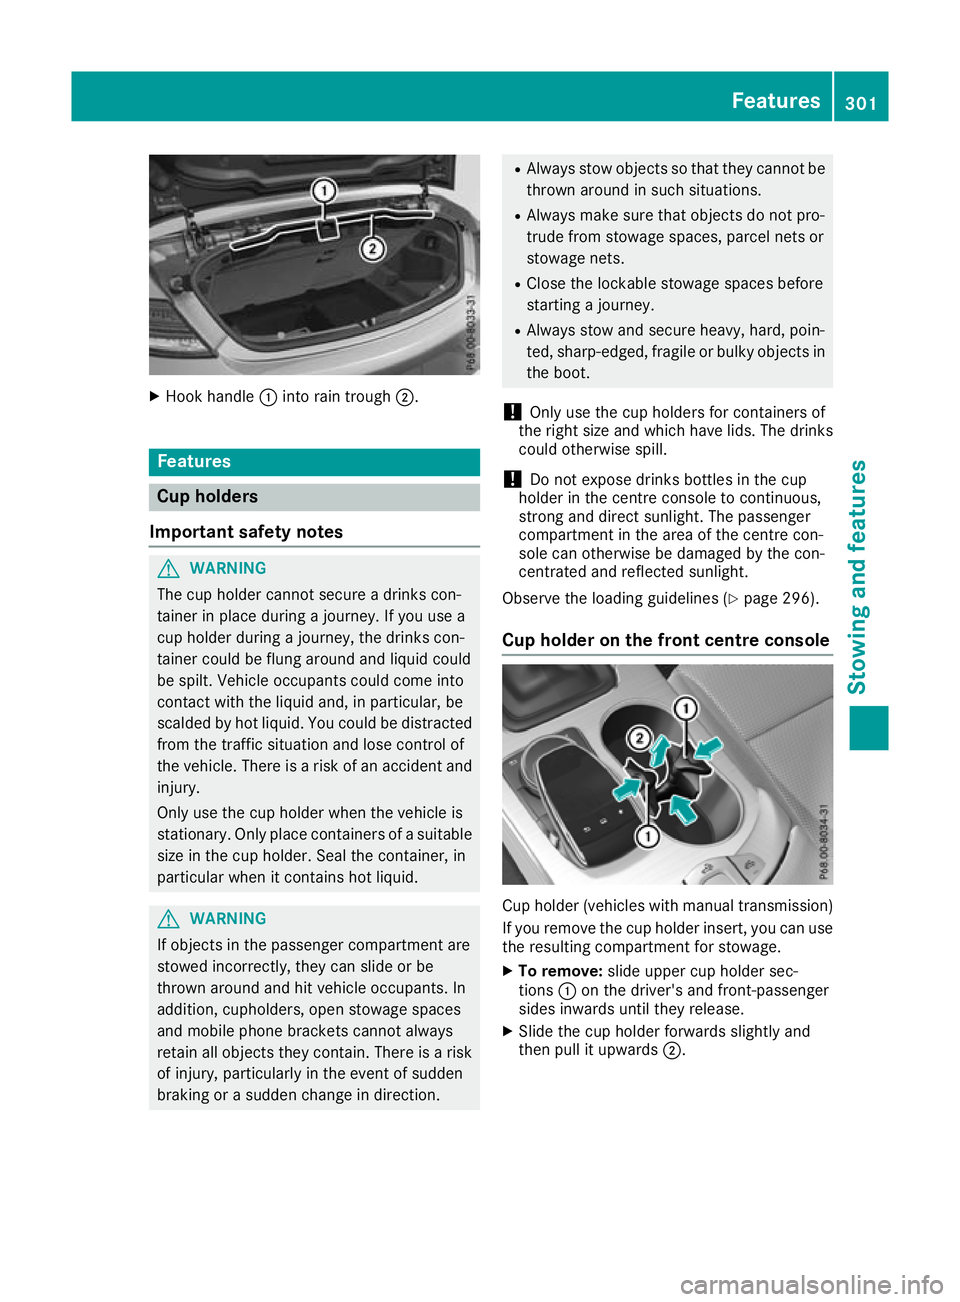
X
Hook handle :into rain trough ;. Features
Cup holders
Important safety notes G
WARNING
The cup holder cannot secure a drinks con-
tainer in place during a journey. If you use a
cup holder during a journey, the drinks con-
tainer could be flung around and liquid could
be spilt. Vehicle occupants could come into
contact with the liquid and, in particular, be
scalded by hot liquid. You could be distracted
from the traffic situation and lose control of
the vehicle. There is a risk of an accident and
injury.
Only use the cup holder when the vehicle is
stationary. Only place containers of a suitable size in the cup holder. Seal the container, in
particular when it contains hot liquid. G
WARNING
If objects in the passenger compartment are
stowed incorrectly, they can slide or be
thrown around and hit vehicle occupants. In
addition, cupholders, open stowage spaces
and mobile phone brackets cannot always
retain all objects they contain. There is a risk of injury, particularly in the event of sudden
braking or a sudden change in direction. R
Always stow objects so that they cannot be
thrown around in such situations.
R Always make sure that objects do not pro-
trude from stowage spaces, parcel nets or
stowage nets.
R Close the lockable stowage spaces before
starting a journey.
R Always stow and secure heavy, hard, poin-
ted, sharp-edged, fragile or bulky objects in
the boot.
! Only use the cup holders for containers of
the right size and which have lids. The drinks could otherwise spill.
! Do not expose drinks bottles in the cup
holder in the centre console to continuous,
strong and direct sunlight. The passenger
compartment in the area of the centre con-
sole can otherwise be damaged by the con-
centrated and reflected sunlight.
Observe the loading guidelines (Y page 296).
Cup holder on the front centre console Cup holder (vehicles with manual transmission)
If you remove the cup holder insert, you can use
the resulting compartment for stowage.
X To remove: slide upper cup holder sec-
tions :on the driver's and front-passenger
sides inwards until they release.
X Slide the cup holder forwards slightly and
then pull it upwards ;. Features
301Stowing and features Z
Page 318 of 377
R
the side windows and soft top are closed
completely.
R the blower is switched off
R the windscreen wiper switch is at position
0
R the 360° camera or the reversing camera is
switched off.
The vehicle could otherwise be damaged.
! If the key is within the rear detection range
of KEYLESS-GO, the following situations, for
example, could lead to the boot lid opening
unintentionally:
R using a car wash
R using a high-pressure cleaner
Make sure that the key is at least 3 m away
from the vehicle.
! Make sure that the automatic transmission
is in neutral position Nwhen washing your
vehicle in a tow-through car wash. The vehicle
may otherwise be damaged.
R Operating with the key:
Do not remove the key from the ignition
lock. Do not open the driver's door when
the engine is switched off or at very low
speeds. Otherwise, when in transmission
position Dor Rthe automatic transmission
will automatically switch to park position P
and block the wheels.
R Operating with the Start/Stop button:
Do not open the driver's door when the
engine is switched off or at very low
speeds. Otherwise, when in transmission
position Dor Rthe automatic transmission
will automatically switch to park position P
and block the wheels.
Observe the following to make sure that the
automatic transmission stays in neutral position N:
Operating with the key and Start/Stop button:
X Make sure that the ignition is switched on.
X Make sure that the vehicle is stationary.
X Depress the brake pedal and keep it
depressed.
Operating with the Start/Stop button only: X Engage parking position P.
X Release the brake pedal.
X Remove the Start/Stop button from the igni-
tion lock (Y page 133). X
Insert the key into the ignition lock.
X Switch on the ignition.
X Depress the brake pedal and keep it
depressed.
Operating with the key and Start/Stop button:
X Engage neutral N.
X Release the brake pedal.
X Release the electric parking brake, if neces-
sary.
X Switch off the ignition and leave the key in the
ignition lock.
You can wash the vehicle in an automatic car
wash from the very start.
If the vehicle is very dirty, wash off excess dirt
before cleaning the vehicle in an automatic car
wash.
After using an automatic car wash, wipe off the wax from the windscreen and the windscreen
wiper blades. This will prevent smears and
reduce wiping noises caused by residue on the
windscreen.
Washing by hand In some countries, washing by hand is only
allowed at specially equipped washing bays.
Observe the legal requirements for each indi-
vidual country.
X Do not use hot water and do not wash the
vehicle in direct sunlight.
X Use a soft sponge to clean.
X Use a mild cleaning agent, such as a car
shampoo approved by Mercedes-Benz.
X Thoroughly hose down the vehicle with a gen-
tle jet of water.
X Do not point the water jet directly towards the
air inlet.
X Use plenty of water and rinse out the sponge
frequently.
X Rinse the vehicle with clean water and dry
thoroughly with a chamois.
X Do not let the cleaning agent dry on the paint-
work.
When using the vehicle in winter, remove all
traces of road salt deposits carefully and as
soon as possible. Care
315Maintenance and care Z
Page 342 of 377
As soon as the vehicle is loaded:
X Secure the vehicle against rolling away by
applying the electric parking brake.
X Vehicles with manual transmission: fully
depress the clutch pedal and engage first or
reverse gear.
X Vehicles with automatic transmission:
shift the automatic transmission to position
P.
X Turn the key to position 0in the ignition lock
and remove it.
X Secure the vehicle. Notes for 4MATIC vehicles
! Vehicles with 4MATIC must not be towed
with the front or rear axle raised; otherwise,
the transmission may be damaged.
Vehicles with 4MATIC may either be towed away
with both axles on the ground or be loaded up
and transported.
If the vehicle has transmission damage or dam- age to the front or rear axle, have it transportedon a transporter or trailer.
In the event of damage to the electrical sys-
tem: if the battery is defective, the automatic
transmission will be locked in position P. To shift
the automatic transmission to position N, you
must provide power to the vehicle's electrical
system in the same way as when jump-starting
(Y page 333).
Have the vehicle transported on a transporter or
trailer. Tow-starting (emergency engine
starting)
! Do not tow-start vehicles with automatic
transmission. You could otherwise damage
the automatic transmission.
i You can find information on "Jump-starting"
under (Y page 333).
Before tow-starting, the following conditions
must be fulfilled:
R the battery is connected
R the engine has cooled down
R the exhaust system has cooled down When tow-starting, it is important that you
observe the safety notes (Y
page 336) and the
legal requirements in each respective country.
X Switch on the hazard warning lamps
(Y page 116).
X Fit the towing eye (Y page 337).
X Secure the rigid towing bar or the towing
rope.
X Depress the brake pedal and keep it
depressed.
X Turn the key to position 2in the ignition lock.
X Depress the clutch pedal fully, engage 2nd
gear and continue to keep the clutch pedal
fully depressed.
X Release the brake pedal.
X Tow-start the vehicle.
X Release the clutch pedal slowly; do not
depress the accelerator pedal while doing so.
X When the engine has been started, immedi-
ately depress the clutch pedal fully and shift
to neutral.
X Pull over at a suitable place and stop the vehi-
cle safely, paying attention to road and traffic
conditions.
X Use the electric parking brake to secure the
vehicle and prevent it from rolling away.
X Remove the rigid towing bar or towing rope.
X Remove the towing eye (Y page 337).
X Switch off the hazard warning lamps. Fuses
Important safety notes
G
WARNING
If you manipulate, bridge or replace a faulty
fuse with a fuse of a higher amperage, the
electric cables could be overloaded. This may result in a fire. There is a risk of an accident
and injury.
Always replace faulty fuses with specified newfuses of the correct amperage.
Blown fuses must be replaced with fuses of the same rating, which you can recognise by the
colour and fuse rating. The fuse ratings are listed
in the fuse allocation chart.
The fuse allocation chart is on the fuse box in the boot (Y page 341). Fuses
339Breakdown assistance Z