MERCEDES-BENZ C-CLASS CABRIOLET 2018 COMAND Manual
Manufacturer: MERCEDES-BENZ, Model Year: 2018, Model line: C-CLASS CABRIOLET, Model: MERCEDES-BENZ C-CLASS CABRIOLET 2018Pages: 174, PDF Size: 4.1 MB
Page 141 of 174
Activating media using the device list
XIn media mode, slide6 thecontroller .
The media men ubar is shown.
XTo select Devices:tur nand press th econ-
troller .
The available media source swill be shown.
The #dot indicates th ecurren tsetting .
XSelectth emedia source .
If th emedia source contain smusic or video
files, these will be played .The corresponding
media men uis shown.
Switching onautomatically
Afte rinserting aCD or DVD, th ecorresponding
media mod eis automatically switched on by th e
multimedia system.
If playable music file sare found, they will be
played by th emultimedia system.
If amedia playbac kfunction is already switched
on in th emultimedia system, this will be inter-
rupted and th eCD or DV Dmod emen uwill
appear .If another function ,suc has navigation ,
is bein goperated, th emedia men udoes no t
change. Only th emusic from th elast inserted
CD or DV Dwill be played .
Audio/video mode
Import ant safety notes
GWARNIN G
The CD/DV Ddrive is aclas s 1laser product.
If you open th ehousing of th eCD/DV Ddrive,
there is aris kof exposure to invisible laser
radiation .This laser radiation could damag e
your retina .There is aris kof injury.
Never open th ehousing .Always hav emain -
tenance and repair wor kcarrie dout at aquali-
fie dspecialis tworkshop .
GWARNING
If you handle adisc while driving, you may be
distracte dfrom th etraffic situation .You could
also lose control of th evehicle. There is aris k
of an accident.
Only handle adisc when th evehicl eis sta-
tionary.
Bear in min dthat at aspee dof only 30 mph
(approximately 50 km/h), th evehicl ecover s a
distanc eof 44 ft (approximately 14 m)per sec-
ond.
Notes on audio/video mode
Permissible data carriers
RCD audio, CD-R and CD-RW
RDVD-R, DVD-V and DVD-RW
RSD card
RUSB storage device
Permissible file systems
RISO 9660/Joliet standard for CDs
RUDF for video DVDs
RFAT16, FAT32, exFAT and NTFS for SD card
and USB storage media
Multisession CDs
For multisession CDs, the content of the first
session determines how the multimedia system
processes the CD. The multimedia system plays
only one CD session and gives priority to CD
sessions with audio files.
File structure of a data carrier
When you create a disc with compressed music files, the tracks can be organized in folders. A
folder may also contain subfolders. The disc
may contain no more than eight directory levels.
Files beyond the eighth level will not be recog-
nized by the system.
iThe multimedia system supports data carri-
ers with up to 50,000 files.
In the case of a data carrier with more than
64 GB of stored data, only files in folders with the following names are supported: Music,
Pictures, Video.
Track and file names
When you create a disc with compressed music
files, you can assign names to the tracks and
folders.
Audio/video mode139
Media
Z
Page 142 of 174
If MP3 or WMA files are stored in the root direc-
tory itself, the root directory will also be treatedas a folder.
You should observe the following when assign-
ing track names:
Rtrack names must have at least one character
Rtrack names must have an extension of a sup-
ported audio or video format, e.g. mp3, aac orm4v
Rthere must be a dot between the track name
and the extension
Example of a correct track name:
"Track1.mp3".
Permissible formats
The multimedia system supports the following
audio and video formats:
Audio for-
matsMP3, WMA, CDA, AAC for-
mats (.aac, .mp4, .m4a
and .m4b)
Video for-
matsDVD-V, MPEG, WMV, M4V,
AVI up to 720p
Copy-protected iTunes®music files with
the .m4p file extension are not supported.
Permissible sampling and data rates
The multimedia system supports MP3 and WMA
files of the following type:
FormatData rate
[kbit/s]Sampling
rates [kHz]
MP332-320
(fixed and varia-
ble data rates)8-48
WMA5-384
(fixed and varia-
ble data rates)8-48
The multimedia system does not support WMA
files of the following type:
RDRM (Digital Rights Management) encrypted
files
RWMA Pro
R5.1 surround sound
iOnly use tracks with a data rate of at least
128 kbit/s and a sampling rate of at least
44.1 kHz. Lower rates can cause a noticeable
deterioration in quality. This is especially the
case if you have activated a surround sound
function.
Selecting an active partition (USB mass
storage devices only)
You can select this function for USB storage
devices when the storage device is partitioned.
Up to 9 partitions (primary or logical, FAT, FAT32
and NTFS) are supported.
Selecting an active partition
XSelect a USB storage device (Ypage 138).
XSlide 6the controller.
The media menu bar is shown.
XTo select Options: turn and press the con-
troller.
XSelect Select Active Partition.
Notes on copyright
Audio or video files that you create or reproduce
yourself for playback are generally subject to
copyright protection.
In many countries, reproductions, even for pri-
vate use, are not permitted without the prior
consent of the copyright holder.
Make sure that you know about the applicable
copyright regulations and that you comply with
these.
Notes on CDs/DVDs
!Do not affix stickers or labels to the discs.
They could peel off and damage the drive.
The drive is designed to receive EN 60908 standard discs. Therefore, you can
only use discs with a maximum thickness of
1.3 mm.
If you insert thicker discs, e.g. those that con-
tain data on both sides (DVD on one side and
audio data on the other), they cannot be ejec-
ted and can damage the drive.
Do not use discs with an 8 cm diameter, even
when using an adapter. Only use round discs
with a 12 cm diameter.
Discs with copy protection are not compatible
with the audio CD standard and therefore may
not be able to be played.
140Audio/video mode
Media
Page 143 of 174
Playback problems may occur when playing
copied discs.
There may be playback problems if you play CDs
that you have copied yourself with a storage
capacity of more than 700 MB.
iThe multimedia system is able to play back
audio CDs in multichannel audio format.
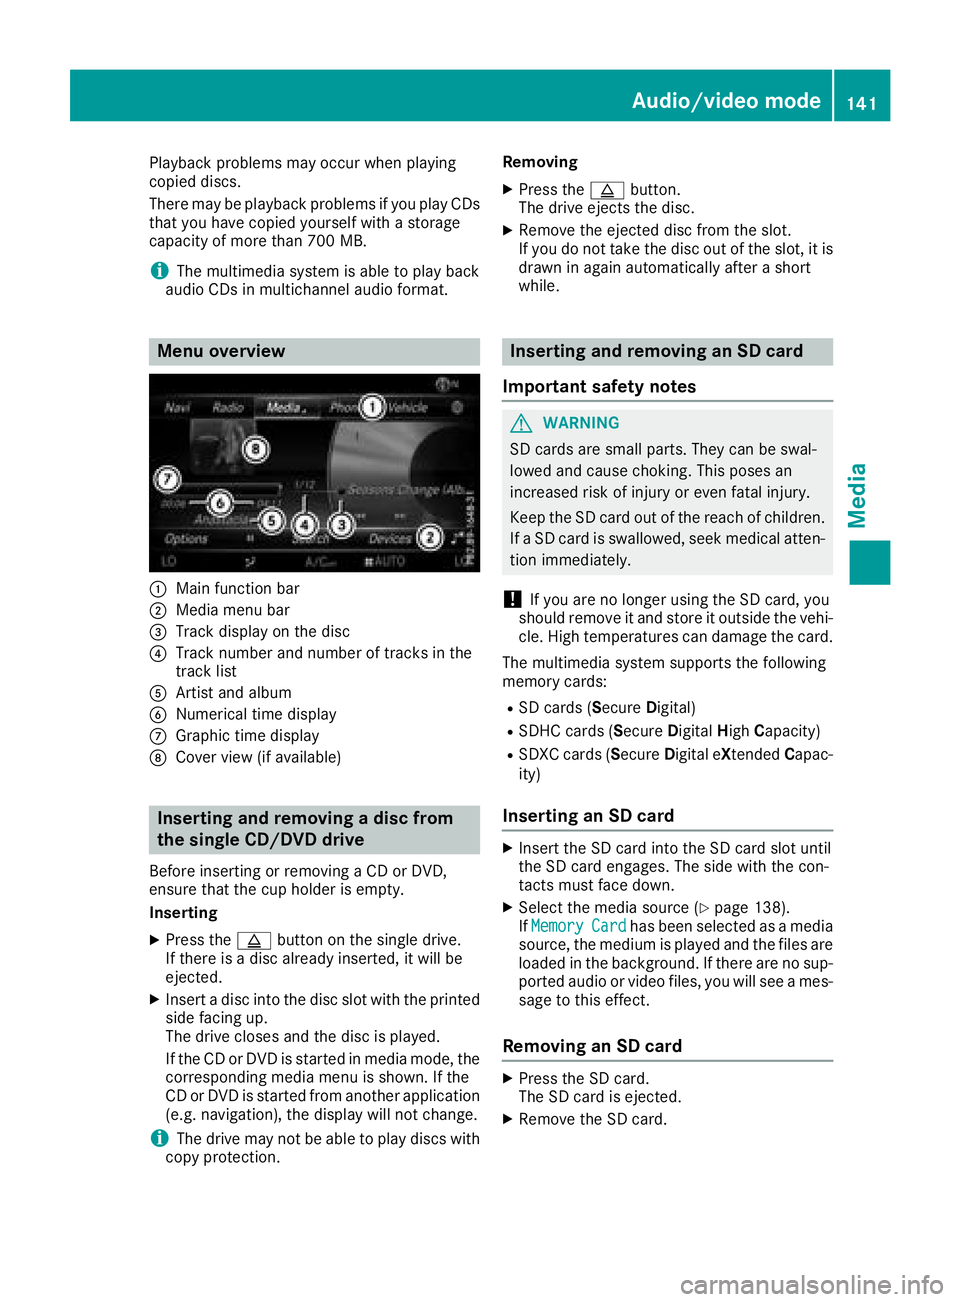
Menu overview
:Main function bar
;Media menu bar
=Track display on the disc
?Track number and number of tracks in the
track list
AArtist and album
BNumerical time display
CGraphic time display
DCover view (if available)
Inserting and removing a disc from
the single CD/DVD drive
Before inserting or removing a CD or DVD,
ensure that the cup holder is empty.
Inserting
XPress the þbutton on the single drive.
If there is a disc already inserted, it will be
ejected.
XInsert a disc into the disc slot with the printed
side facing up.
The drive closes and the disc is played.
If the CD or DVD is started in media mode, the
corresponding media menu is shown. If the
CD or DVD is started from another application
(e.g. navigation), the display will not change.
iThe drive may not be able to play discs with
copy protection. Removing
XPress the
þbutton.
The drive ejects the disc.
XRemove the ejected disc from the slot.
If you do not take the disc out of the slot, it is
drawn in again automatically after a short
while.
Inserting and removing an SD card
Important safety notes
GWARNING
SD cards are small parts. They can be swal-
lowed and cause choking. This poses an
increased risk of injury or even fatal injury.
Keep the SD card out of the reach of children. If a SD card is swallowed, seek medical atten-
tion immediately.
!If you are no longer using the SD card, you
should remove it and store it outside the vehi-
cle. High temperatures can damage the card.
The multimedia system supports the following
memory cards:
RSD cards ( SecureDigital)
RSDHC cards (Secure DigitalHighCapacity)
RSDXC cards (Secure Digital eXtendedCapac-
ity)
Inserting an SD card
XInsert the SD card into the SD card slot until
the SD card engages. The side with the con-
tacts must face down.
XSelect the media source (Ypage 138).
If MemoryCardhas been selected as a media
source, the medium is played and the files are
loaded in the background. If there are no sup-
ported audio or video files, you will see a mes-
sage to this effect.
Removing an SD card
XPress the SD card.
The SD card is ejected.
XRemove the SD card.
Audio/video mode141
Media
Z
Page 144 of 174
Connecting USB devices
There are two USB ports in the stowage space
under the armrest (Ypage 138).
XConnect the USB device to the USB port.
If the corresponding media menu is visible,
the medium is played and the files are loaded
in the background. If there are no supported
audio or video files, you will see a message to
this effect.
iMP3 players must support Media Transfer
Protocol (MTP).
Selecting the playback option
Playing similar tracks
XIn media mode, slide 6the controller.
XTo select Options: turn and press the con-
troller.
XTo select Play More Like This: turn and
press the controller.
The multimedia system automatically creates
and plays a track list with similar tracks. If
there are no similar tracks on the data
medium then the function cannot be selec-
ted.
XSelect the required track.
Selecting Play mode
XIn media mode, slide 6the controller.
XTo select Options: turn and press the con-
troller.
XTo select PlaybackMode: turn and press the
controller.
XSelect Normal Track Sequence.
The current track list is played in the order it is
stored on the data medium.
XSelect Random Track List.
The current track list is played in random
order.
XSelect Random Medium.
All tracks on the data medium are played in
random order.
Skipping to time
XIn media mode, slide 6the controller.
XTo select Options: turn and press the con-
troller.
XTo select Skip to Time: turn and press the
controller.
A menu appears.
XTo set the time: turn the controller.
Selecting an active partition
XIn media mode, slide 6the controller.
XTo select Options: turn and press the con-
troller.
XTo select Select Active Partition: turn
and press the controller.
You can select a partition on the USB data
carrier.
Showing track information
XIn media mode, slide 6the controller.
XTo select Options: turn and press the con-
troller.
XTo switch Show Track InformationonO
or off ª: turn and press the controller.
You display or hide information for Track,
Artist and Album in the main display field.
Saving files to Media Register
iWith the SaveFilestoMediaRegisteroption, you can transfer supported audio,
image or video files to the multimedia system
hard drive.
XIn media mode, slide 6the controller.
XTo select Options: turn and press the con-
troller.
XTo select the Save Files to Media Reg‐isteroption: turn and press the controller.
A menu appears (Ypage 146).
Managing Media Register
XIn media mode, slide 6the controller.
XTo select Options: turn and press the con-
troller.
XDelete or rename individual files in the Media
Register (Ypage 147).
142Audio/video mode
Media
Page 145 of 174
XDelete all files in the Media Register
(Ypage 147).
XCall up information on the preset
(Ypage 147).
Pausing/continuing playback
XTo pause playback:in audio or video mode,
slide 6the controller.
The media menu bar is shown.
XTo select Ëin the media menu bar: turn
and press the controller.
Playback is interrupted. The display changes
to Ì.
XTo continue playback: in audio or video
mode, slide 6the controller.
The media menu bar is shown.
XTo select Ìin the media menu bar: turn
and press the controller.
Playback is continued from the point of inter- ruption. The symbol changes to Ë.
Selecting a track
Selecting a track using the current
track list
XTo display the current track list: press the
controller in the media mode menu.
The category list appears.
XSelect Current Tracklist.
XTo select a track: turn the controller and press
to confirm.
Selecting a track by skipping to a track
XTo skip forwards or backwards to a track: in
the media mode menu, turn or briefly slide
9or8 the controller.
Entering a track number directly
XIn media mode, slide 6the controller.
XTo select Options: turn and press the con-
troller.
XTo select TrackNumber:: turn and press the
controller.
A menu appears.
XEnter the desired track number.
Searching for a track
XIn the media mode menu, slide 6the con-
troller.
The media menu bar is shown.
XTo select Search: turn and press the control-
ler.
The category list is shown.
XSelect a category, e.g. Genres.
Sub-categories appear with the selection of
the main category (depends on the multime-
dia system default settings and the music
tracks available).
XSelect a sub-category, for example Rock.
If the selected sub-category contains music
tracks, these will be displayed.
Gracenote®Media Database
General notes
This function is available in CD mode.
There is a version of Gracenote®music recog-
nition technology, Emeryville, California, USA on
the multimedia system hard disk. In media
mode, you will recognize this by the logo in the
bottom right-hand corner of the display.
If the audio CD does not contain any CD text
information, the multimedia system can use the
Gracenote
®Media Database to identify
unknown audio tracks when in CD mode.
Carrying out an Internet update of met-
adata
The Updating Metadata Via Internetoption allows any missing metadata for an audio
CD (e.g. cover, track, album, artist) to be uploa-
ded retrospectively to the internal Gracenote
®
database.
An Internet connection is required for this
(
Ypage 124).
Audio/video mode143
Media
Z
Page 146 of 174
Selecting Internet update of metadata
XIn media mode, slide6the controller.
The media menu bar is shown.
XTo select Options: turn and press the con-
troller.
XSelect Updating Metadata Via Internetin the selection list.
A connection with the Gracenote®server is
established. The missing data is loaded,
saved and displayed in the main display field.
If there is no data found or there is no Internet
connection, a corresponding error message
will appear.
Switching the Gracenote®data display
on/off
XActivate CD mode (Ypage 138).
XTo select Gracenote Media Database: turn
and press the controller.
XTo switch the display off: select None.
In the CD mode menu, Track 1is shown, for
example, instead of the Gracenote®data.
XTo switch on the display: press the controller.
Media search
General notes
The multimedia system plays back files from the following data media:
RDisc (audio CD or DVD)
RMemory card
RMedia Register
RUSB storage device
RApple®devices (folder, year and photos are
not available)
The categories are displayed according to the
data available.
Starting the media search
XIn the media mode menu, slide 6the con-
troller.
The media menu bar is shown.
XTo select Search: turn and press the control-
ler.
The category list appears.
Category list
XIn the media mode menu, slide 6the con-
troller.
The media menu bar is shown.
XTo select Search: turn and press the control-
ler.
The category list is shown.
Depending on the connected media sources and
files, the following categories are listed:
RCurrent Tracklist
RFolder
RSelect By Cover
RKeyword Search
RPlaylists
RArtists
RAlbums
RTrack
RGenres
RYear
RComposers
RVideos
RPhotos
RPodcasts
RAudiobooks
iThe categories are available as soon as the
entire media content has been read and ana-
lyzed.
If the same device is reconnected with
unchanged media content, these categories
are available more quickly.
When connecting Apple
®devices, the cate-
gories “Folder”, “Year” and “Photos” are not
available.
Searching a track using the current
track list
XSelect Current Tracklistfrom the cate-
gory list (Ypage 144).
The selection list appears.
XSelect the required track.
Searching for a track via a folder
Playable files can be searched for in the active
data medium's directories.
144Media search
Media
Page 147 of 174
XTo selectFolderin the category list
(Ypage 144): turn and press the controller.
The folder list appears.
XSelect the required folder.
The track list appears.
XSelect the required track.
Searching for a track via cover view
XTo select Select By Coverin the category
list (Ypage 144): turn and press the control-
ler.
A menu with cover views appears.
XSelect the required cover.
The track list appears.
XSelect the required track.
Searching for a track via music genre
XTo select Genresin the category list: turn and
press the controller.
The multimedia system searches in all media
sources. A selection list with Genre and media
sources appears.
XSelect the desired music genre.
A selection list with music tracks from the
selected genre appears.
XSelect a music track.
The track is played. The menu for the active
media source is shown.
XTo exit the selection list: press the %but-
ton.
Searching for a track via a keyword
XTo select KeywordSearchin the category list
(Ypage 144): turn and press the controller.
The input field appears.
XTo select the required characters: turn and
press the controller for each one (Ypage 30).
Entering just part of the name of a track or
artist is enough. The search result then dis-
plays the entire text.
XSelect ¬.
The search results are displayed.
The numbers behind the results, for example
Tracks
(5/0), mean: 5 results that contain
the exact keyword searched for and 0 results
that are similar.
XSelect one of the results.
Keywords that have already been searched
for are displayed in the "Search history" with-
out having to enter them completely. They
can be accepted directly and displayed in the
search result.
XSelect an entry.
Albums and covers (if available) are shown.
The multimedia system searches in all media
sources.
XSelect an album.
The tracks are listed.
XSelect a track.
The media mode menu appears and playback
begins.
Media Register
General notes
You can store music files, photos or video files in the Media Register. The memory has a capacity
of 10.8 GB.
iKeep your original music files, photos and
video files in a secure location. An error in the multimedia system may result in the loss of
files stored in the Media Register. Mercedes-
Benz is not liable for any loss of data.
Switching on the Media Register
XIn media mode press the Õbutton.
A menu appears with the available media
sources.
XTo select Media Register: turn and press
the controller.
Playback begins at the point last listened to.
If there are no files, you will see a message to
this effect.
Further options for switching on:
Rusing the main function bar: (Ypage 138)
Rusing the device list: (Ypage 139)
Rusing the Õbutton: (Ypage 138)
Media Register145
Media
Z
Page 148 of 174
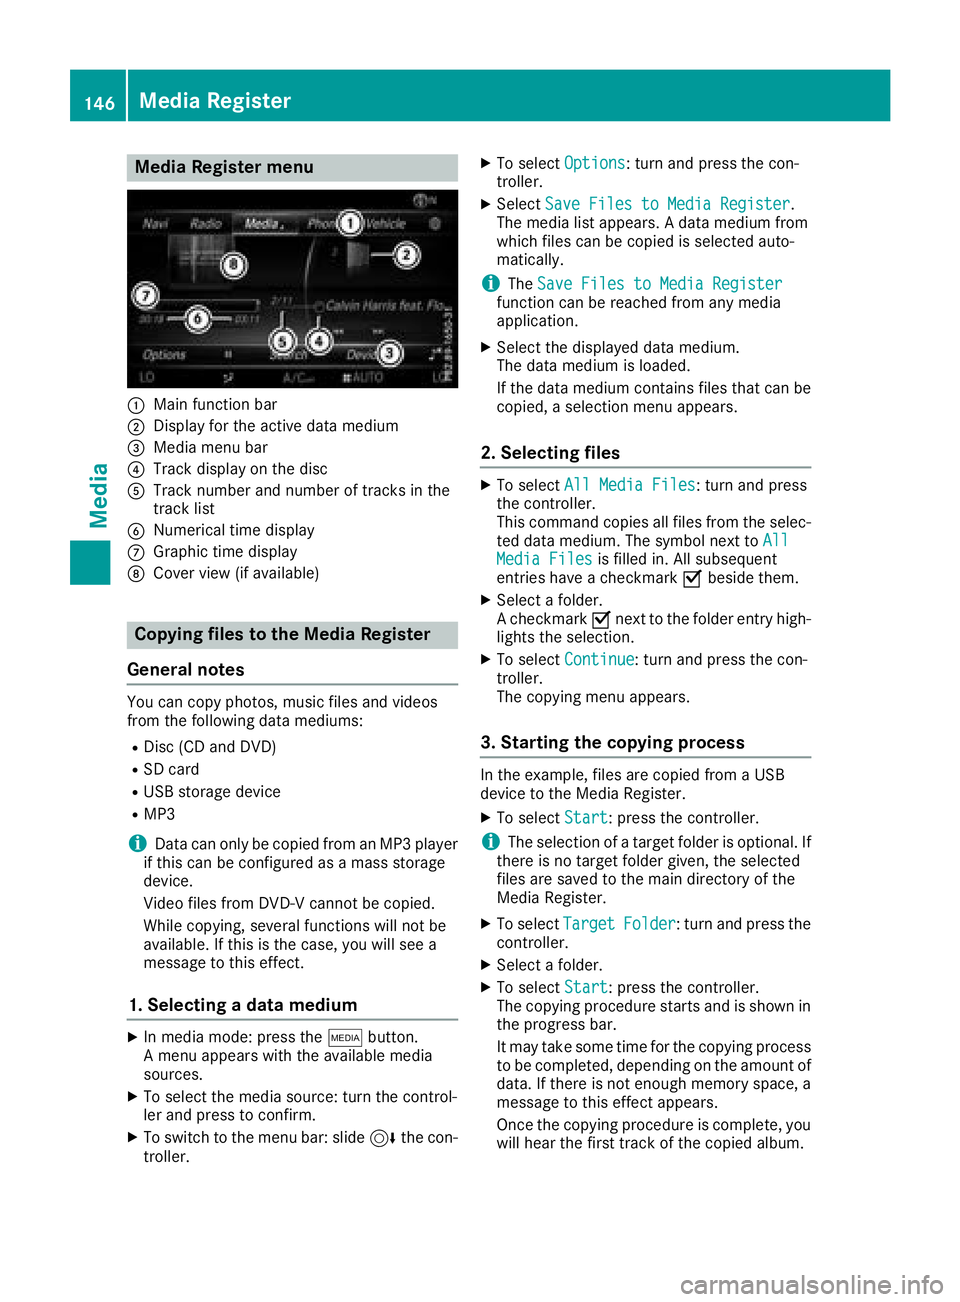
Media Register menu
:Main function bar
;Display for the active data medium
=Media menu bar
?Track display on the disc
ATrack number and number of tracks in the
track list
BNumerical time display
CGraphic time display
DCover view (if available)
Copying files to the Media Register
General notes
You can copy photos, music files and videos
from the following data mediums:
RDisc (CD and DVD)
RSD card
RUSB storage device
RMP3
iData can only be copied from an MP3 player
if this can be configured as a mass storage
device.
Video files from DVD-V cannot be copied.
While copying, several functions will not be
available. If this is the case, you will see a
message to this effect.
1. Selecting a data medium
XIn media mode: press the Õbutton.
A menu appears with the available media
sources.
XTo select the media source: turn the control-
ler and press to confirm.
XTo switch to the menu bar: slide 6the con-
troller.
XTo select Options: turn and press the con-
troller.
XSelect Save Files to Media Register.
The media list appears. A data medium from
which files can be copied is selected auto-
matically.
iThe Save Files to Media Registerfunction can be reached from any media
application.
XSelect the displayed data medium.
The data medium is loaded.
If the data medium contains files that can be
copied, a selection menu appears.
2. Selecting files
XTo select All Media Files: turn and press
the controller.
This command copies all files from the selec-
ted data medium. The symbol next to All
Media Filesis filled in. All subsequent
entries have a checkmark Obeside them.
XSelect a folder.
A checkmark Onext to the folder entry high-
lights the selection.
XTo select Continue: turn and press the con-
troller.
The copying menu appears.
3. Starting the copying process
In the example, files are copied from a USB
device to the Media Register.
XTo select Start: press the controller.
iThe selection of a target folder is optional. If
there is no target folder given, the selected
files are saved to the main directory of the
Media Register.
XTo select TargetFolder: turn and press the
controller.
XSelect a folder.
XTo select Start: press the controller.
The copying procedure starts and is shown in
the progress bar.
It may take some time for the copying process
to be completed, depending on the amount of
data. If there is not enough memory space, a
message to this effect appears.
Once the copying procedure is complete, you
will hear the first track of the copied album.
146Media Register
Media
Page 149 of 174
You can now copy more files to the Media
Register.
XTo cancel copying:selectCancel.
Files are stored in the Media Register up until the point of cancellation.
iIt is possible to change to a different func-
tion (e.g. radio) during the copying procedure.
The copying procedure continues in the back-
ground. While the copying procedure is taking
place, this is shown by a symbol in the status bar.
Renaming/deleting files
XIn media mode: press the Õbutton.
A menu appears with the available media
sources.
XTo select the media source: turn the control-
ler and press to confirm.
XTo switch to the menu bar: slide 6the con-
troller.
XTo select Options: turn and press the con-
troller.
XSelect Manage Media Register.
XSelectRename / Delete Files.
The file list is displayed.
XTo highlight the file: turn and press the con-
troller.
XSlide 9the controller.
You can select between EditandDelete.
Renaming a file
XTo select Edit: turn and press the controller.
An input field appears.
XRename folder.
XTo save changes with ¬: turn and press
the controller.
Renaming a folder only changes the file name.
Depending on whether or not the Show
Track Informationoption has been selec-
ted, this change may not be visible in the main
display field.
iOnly folders can be renamed.
Deleting a file
XTo select Delete: turn and press the control-
ler.
Deleting all files
!
In order to prevent malfunctions, do not use
COMAND during this time.
This function deletes all files from the Media
Register.
XIn media mode: press the Õbutton.
A menu appears with the available media
sources.
XTo select the media source: turn the control-
ler and press to confirm.
XTo switch to the menu bar: slide 6the con-
troller.
XTo select Options: turn and press the con-
troller.
XSelect Manage Media Register.
XSelectDelete All Media Files.
A prompt appears.
XTo select Yes: turn and press the controller.
All files are deleted.
Calling up memory space info
XIn media mode: press the Õbutton.
A menu appears with the available media
sources.
XTo select the media source: turn the control-
ler and press to confirm.
XTo switch to the menu bar: slide 6the con-
troller.
XTo select Options: turn and press the con-
troller.
XSelect Manage Media Register.
XSelectMemory Info.
Selecting a playback mode
The following options are available:
RNormal Track Sequence: the tracks are
played in the normal order (e.g. track 1, 2, 3
etc.).
RRandom Medium: all tracks on the data
medium are played in random order (e.g.
track 3, 8, 5 etc.).
RRandomTrackList: the current track list is
played in random order (e.g. 3, 8, 5 etc.).
Media Register147
Media
Z
Page 150 of 174
XIn media mode: press theÕbutton.
A menu appears with the available media
sources.
XTo select the media source: turn the control-
ler and press to confirm.
XTo switch to the menu bar: slide 6the con-
troller.
XTo select Options: turn and press the con-
troller.
XSelect Playback Mode.
The options list appears. The #dot indicates
the current setting.
XSelect the desired option.
The option is switched on. For all options
except Normal Track Sequence
, you will
see a corresponding icon in the main display.
iThe Normal Track Sequenceoption is
automatically selected when you change the
disc you are currently listening to or when you
select a different medium. If an option is
selected, it remains selected after the multi-
media system is switched on or off.
Bluetooth®audio mode
Requirements
The Bluetooth®function must be activated in
the multimedia system (Ypage 40).
Bluetooth®audio mode requires a Bluetooth®-
capable audio device.
Check your Bluetooth
®audio device for the fol-
lowing; see the manufacturer's operating
instructions:
RBluetooth®audio profile
The Bluetooth®audio device must support
the A2DP and AVRCP Bluetooth®audio pro-
files.
RBluetooth®visibility
Certain Bluetooth®audio devices do not just
require activation of the Bluetooth®function.
In addition, your device must be made "visi-
ble" to other devices.
RBluetooth®device name
This device name is predetermined but can
usually be changed. For a clear selection of
the Bluetooth
®device, Mercedes-Benz rec-
ommends that you customize the device
name.
iA2DP (Advanced Audio Distribution Profile):
Bluetooth®audio profile for audio data trans-
mission
AVRCP (A udioVideo Remote ControlProfile):
Bluetooth
®audio profile for audio data play-
back
iThe Bluetooth®device must be visible to the
multimedia system for authorization. After
authorization, the multimedia system even
finds the Bluetooth
®device when it is not
visible.
General notes
Before using your Bluetooth®audio device with
the multimedia system for the first time, you will
need to authorize it. When you authorize a new
Bluetooth
®audio device, it is connected auto-
matically. Connection involves first searching
for a Bluetooth
®audio device and then author-
izing it. You can authorize up to 15 Bluetooth®
devices.
iIf you authorize a mobile phone that sup-
ports Bluetooth®audio, the A2DP and AVRCP
Bluetooth®audio profiles are connected
automatically.
The mobile phone is then entered:
Rin the Bluetooth®telephone list
(Ypage 94)
Rin the Bluetooth®device list
(Ypage 149)
Mercedes-Benz recommends authorizing a
mobile phone in Bluetooth
®telephony
(Ypage 94).
148Bluetooth®audio mode
Media