bluetooth MERCEDES-BENZ C-CLASS CABRIOLET 2018 COMAND Manual
[x] Cancel search | Manufacturer: MERCEDES-BENZ, Model Year: 2018, Model line: C-CLASS CABRIOLET, Model: MERCEDES-BENZ C-CLASS CABRIOLET 2018Pages: 174, PDF Size: 4.1 MB
Page 111 of 174
Importing contacts
Information and requirements
Contacts can be imported as vCards (vc ffiles). A
vCar dis an electronic business card. Amemory
card, US Bdevice or aBluetoot h
®connection
can be used for importing .
iUp to 2000 entries can be imported int oth e
address book . Amessage notifie syou when
th emaximum number is reached. In order to
be able to then import ne wcontacts, you have
to delet eexisting contact s (
Ypage 108).
SourceRequirements
Memory cardThe SD cardis inserted. It
contain simportable contact
details.
US BdeviceThe US Bdevice is inserted
int oth eUS Bport. It contain s
importable contact details.
Bluetoot h®
connection
If thesendin gof vCards is
supported via Bluetoot h®,
vCards can be received on
mobile phones or netbooks,
for example.
Bluetoot h
®must be activa-
te din th emultimedia system
and on th erespective device ;
see th emanufacturer' soper -
ating instructions.
iIf automatic calling up of th econtact sis
deactivated (Ypage 108), th eImportfro mPhoneoption is available.
Importing from the memory card or USB
device
Contacts imported from th ememory car dor
from aUS Bdevice are identifie dby th e¯
symbol.
The followin gcondition smust be fulfilled in
order to import vCards:
RvCards (vc ffiles) may be locate din th emain
directory or in folders. The multimedia system
allows for atargeted selection of th ecorre-
sponding directories.
RvCards must have th efile extension "vcf".
iThe multimedia system support svCards in
version s2. 1and 3.0.
XTo switch to th emen ubar in th etelephon e
men uor th eaddress book :slide 6thecon-
troller .
XTo select Options:tur nand press th econ-
troller .
XTo select Download Contacts:tur nand
press th econtroller .
XTo select FromMemory Car dorFro mUSBdevice:tur nand press th econtroller .
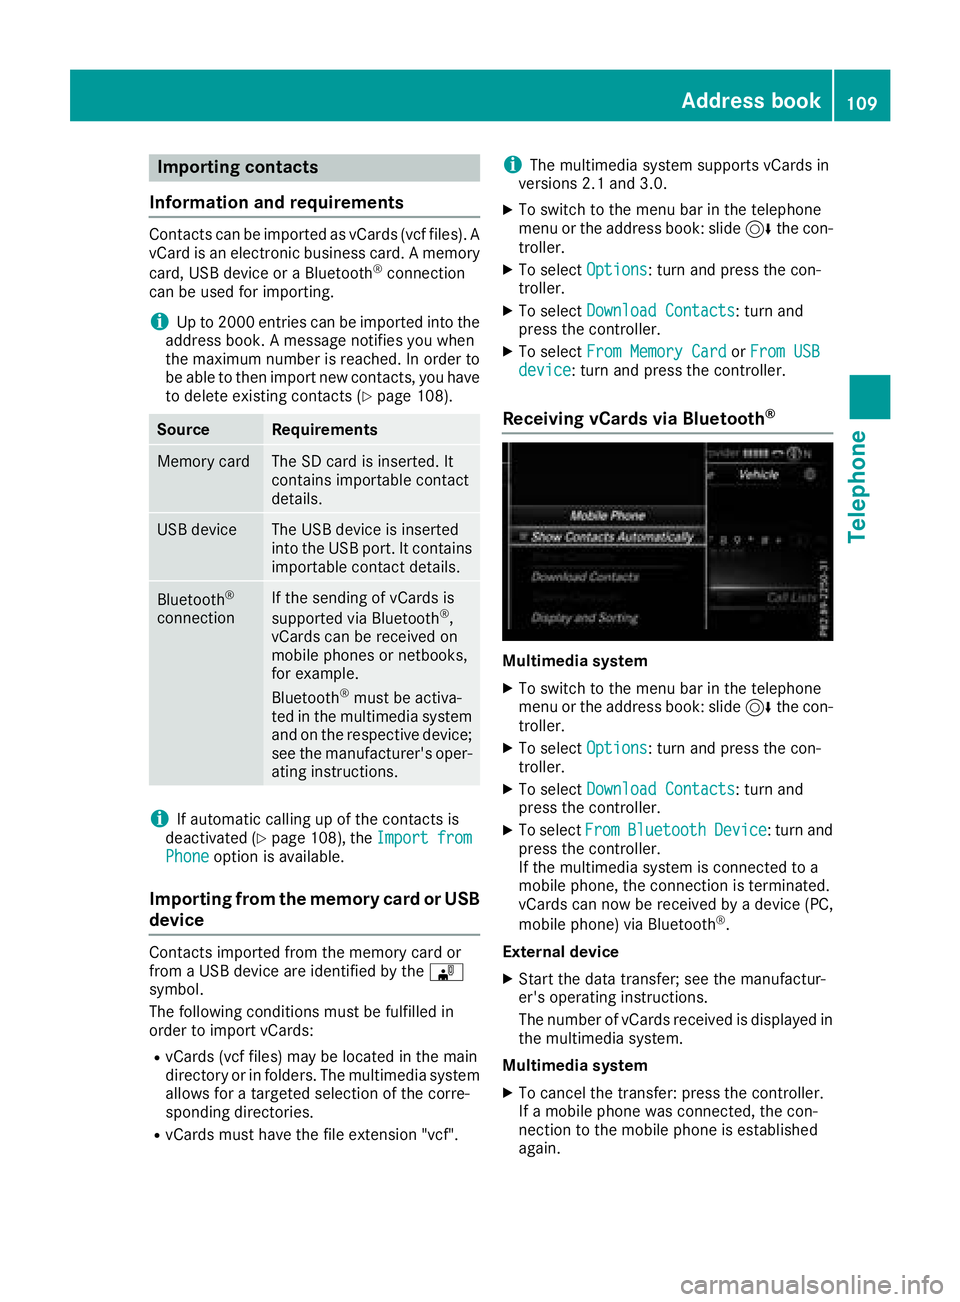
Receiving vCards via Bluetooth®
Multimedi asystem
XTo switch to th emen ubar in th etelephon e
men uor th eaddress book :slide 6thecon-
troller .
XTo select Options:tur nand press th econ-
troller .
XTo select Download Contacts:tur nand
press th econtroller .
XTo selectFromBluetoothDevice:tur nand
press th econtroller .
If th emultimedia system is connecte dto a
mobile phone, th econnection is terminated.
vCards can no wbe received by adevice (PC,
mobile phone) via Bluetoot h
®.
External device
XStart th edat atransfer ;see th emanufactur -
er' soperating instructions.
The number of vCards received is displayed in th emultimedia system.
Multimedi asystem
XTo cance lth etransfer :press th econtroller .
If amobile phon ewas connected, th econ-
nection to th emobile phon eis established
again .
Address book109
Telephone
Z
Page 112 of 174
Received vCards are identifiedby th e®
symbol in th eaddress book .
iIf you switch to another main function ,e.g.
navigation ,while receiving vCards, th erecep-
tion of vCards will be terminated.
Deleting imported contacts
XTo chang eto th emen ubar when in th e
address book or th etelephon emenu: slid e
6 thecontroller .
XTo select Options:tur nand press th econ-
troller .
XTo select Delete Contacts:tur nand press
th econtroller .
XSelecton eof th efollowin goptions:
RInternal Contacts
RImported fro mStorag eDevice
RImported fro mBluetooth Device s
RDownloadedfro mPhone
Turn and press th econtroller .
XTo select Yes:tur nand press th econtroller .
The contact sare deleted.
Closing the address book
XPress th e% buttonon eor mor etimes .
Call lists
Introduction
If your mobile phon esupport sth ePBAP Blue -
toot h®profile ,th ecall list sfrom th emobile
phon eare displayed in th emultimedia system.
When connecting th emobile phone, you may
hav eto confirm th econnection for th ePBAP
Bluetoot h
®profile.
If your mobile phon edoes no tsupport th ePBAP
Bluetoot h
®profile,th emultimedia system gen -
erates it sown call lists. These are no tth esam e
as th ecall list sin your mobile phone.
The call list soption is no tavailable unless a
mobile phon eis connecte dto th emultimedia
system.
If th econtact for an incoming call is no tsaved in
th eaddress book ,you can use th ecall list to
sav eth etelephon enumber .You can sav ethis telephon
enumber as ane wcontact in th e
address book or add it to an existing contact
(
Ypage 111).
iIf you connec t adifferen tmobile phon eto
th emultimedia system, th ecall list sfrom th e
ne wmobile phon eare displayed.
Opening the call list and selecting an
entry
Example: list of selected phone number s
:
Dat eand time (if available)
;Telephon enumber of th ehighlighte dentr y
and symbols (if assigned)
XTo call up th etelephon emenu: press th e
% button.
XTo switch to th emen ubar: slid e6 thecon-
troller .
XTo select CallLists:tur nand press th e
controller .
XTo selectCallsReceivedorCallsDialed:
tur nand press th econtroller .
The relevan tlist is displayed.
XTo select an entr yand mak e acall:tur nand
press th econtroller .
Closin gth ecall list
XTo select &to th elef tof th elist :slid e8
th econtroller and press to confirm .
or
XPress th e% button.
The list is closed.
Displaying details from a list entry
Abbreviated list entries can also be shown in full.
110Call lists
Telephone
Page 114 of 174
Overwriting an entry
XTo selectYes: turn and press the controller.
A list of the existing five numbers is displayed.
XTo select the number to be overwritten from
the list: turn the controller and press to con-
firm.
The entry is overwritten with the new tele-
phone number.
Canceling the overwriting of an entry
XTo select No: turn and press the controller.
The process is canceled.
Deleting call lists
Call lists which are generated and managed by
the multimedia system can be deleted in the
multimedia system.
You cannot delete call lists from the multimedia
system which are displayed on a mobile phone
that supports the PBAP Bluetooth
®.
XTo call up the telephone menu: press the
% button.
XTo switch to the menu bar: slide 6the con-
troller.
XTo select Call Lists: turn and press the
controller.
XSelect Delete Call Lists.
A prompt appears asking whether you wish to
delete all call lists.
XTo select Yes: turn and press the controller.
The call lists are deleted.
iIf you delete call lists from the mobile phone
(see the manufacturer's operating instruc-
tions), the multimedia system updates the
call list display the next time it connects.
Speed dial lists
Setting up
XTo call up the telephone menu: press the
% button.
XTo call up the menu bar: slide 6the con-
troller.
XTo select Call Lists: turn and press the
controller.
XSelect Speed Dial Preset List.
The speed dial list is displayed.
XTo highlight a memory position for the speed
dial: turn the controller.
If you highlight an entry that already exists in the speed dial list, this is overwritten with the
new entry.
XTo select G: slide 9the controller.
XSelect Assign Speed Dial Preset.
The phone book is displayed.
XSearch for a contact (Ypage 101).
XTo select a contact: turn and press the con-
troller.
The phone number has been saved as a speed
dial.
Deleting
Deleting a speed dial preset
XTo call up the telephone menu: press the
% button.
XTo call up the menu bar: slide 6the con-
troller.
XTo select Call Lists: turn and press the
controller.
XSelect Speed Dial Preset List.
The speed dial list is displayed.
XTo highlight the memory position you want to
delete: turn the controller.
XTo select G: slide 9the controller.
XTo select DeleteSpeedDialPreset: turn
and press the controller.
XTo select Yes: turn and press the controller.
The speed dial preset has been deleted.
Deleting all speed dial presets
XTo call up the telephone menu: press the
% button.
XTo call up the menu bar: slide 6the con-
troller.
XTo select Call Lists: turn and press the
controller.
XSelect Speed Dial Preset List.
The speed dial list is displayed.
XTo select G: slide 9the controller.
XTo select Delete All Speed Dial Pre‐sets: turn and press the controller.
XTo selectYes: turn and press the controller.
All speed dials are deleted.
112Speed dial lists
Telephone
Page 115 of 174
Messages
General notes
New messages are identified by the/sym-
bol in the display of the multimedia system and
an audible signal. Once you have read all the
messages, the symbol is no longer displayed.
The multimedia system displays the 100 newest
text messages and e-mails.
The ú symbol is displayed when the mobile
phone's message memory is full. The symbol is
no longer displayed if you delete messages on
the mobile phone.
Function restrictions
Text messages cannot be written while the vehi-
cle is in motion.
Requirements
To use the message functions, the connected
mobile phone must support the MAP Bluetooth®
profile. The prompt for the MAP Bluetooth®pro-
file may have to be confirmed on the mobile
phone.
With some mobile phones, some settings still
have to be made after connecting to the multi-
media system (see the manufacturer's operat-
ing instructions). The messages are then dis-
played the next time you connect to the multi-
media system.
An e-mail account must be set up on the mobile
phone for the e-mail function (see the manufac-
turer’s operating instructions).
To read and write e-mails in the multimedia sys- tem, the e-mail account first needs to be con-
figured (
Ypage 114).
Some mobile phones with the MAP Bluetooth®
profile:
Ronly show new text messages
Rdo not support the deleting or editing of text
messages
Rdo not support the drafts folder for text mes- sages
Rdo not support the sending of text messages
Rdo not support the e-mail function
Rdo not send messages when in a locked sta-
tus Not all mobile phones available on the market
are equally suitable. Further information about
settings and supported functions of Bluetooth
®-
capable mobile phones can be found on the
Internet at
http://www.mercedes-benz.com/connect .
Or call the Mercedes-Benz Customer Assistance
Center at 1-800-FOR-MERCedes
(1-800-367-6372) (for the USA) or Customer
Relations at 1-800-387-0100 (for Canada).
Settings
Calling up the settings menu for mes-
sages
XTo call up the telephone menu: press the
% button.
XTo switch to the menu bar: slide 6the con-
troller.
XTo select 1: turn and press the controller.
The message menu is displayed.
XTo switch to the menu bar: slide 6the con-
troller.
XTo select Settings: turn and press the con-
troller.
The text message settings and the available e-
mail accounts of the connected mobile phone
will be displayed.
Configuring the text messages dis-
played
XCall up the settings menu for messages
(Ypage 113).
XTo highlight Text Message: turn the control-
ler.
XTo select G: slide 9the controller.
A menu with the following options is shown:
RAll Messages
RNew Messages
ROff
The messages are not displayed automati-
cally. You can display the 100 newest text
messages from the mobile phone using the
Download
option in the message menu.
XTo select the required option: turn and press
the controller.
Messages113
Telephone
Z
Page 123 of 174
option, which is used to calculate the associated
connection costs.
Conditions for a Bluetooth
®connection
RThe mobile phone supports at least one of the
Bluetooth®profiles DUN (Dial- UpNetwork-
ing) or PAN (Personal AreaNetwork).
The Bluetooth
®profiles DUN and PAN enable
the Internet connection of the mobile phone
to be made available to the system.
Conditions for a USB connection
RThe mobile phone supports at least one of the
USB classes:
-RNDIS (Remote Network DriverInterface
Specification)
-CDC/NCM (Network ControlModel)
-CDC/ECM (Ethernet ControlModel)
-CDC/ACM (Access ControlModel)
The USB classes enable the mobile phone
Internet connection to be made available to
the system.
The terms of use are shown when the system is
used for the first time and then once a year
thereafter. Only read and accept the terms of
use when the vehicle is stationary.
The driver is not permitted to call up websites
while driving and use of the Mercedes-Benz
Apps is restricted.
iThe availability of individual Mercedes-Benz
Apps may vary depending on the country.
Setting up an Internet connection
(Canada)
Procedure and general information
In order to set up a mobile phone for Internet
access, your mobile phone must be connected
to the multimedia system via Bluetooth
®
(Ypage 92) or USB (Ypage 142).
If you are using Internet access for the first time,
you must enable the connected mobile phone
for Internet access (
Ypage 121). If the con-
nected mobile phone supports the Bluetooth®
PAN profile or the USB classes RNDIS,
CDC/NCM or CDC/ECM, you do not need to
make additional settings. The Internet connec-
tion is established. If the connected mobile
phone does not support the named Bluetooth
®
profile or the named USB classes, predefined (
Ypage 121) or manual access data
(Ypage 122) must be set.
While initializing the mobile phone for the Inter-
net connection, access data which is already on
the mobile phone may be overwritten. You
should therefore check the settings on the
mobile phone (see the manufacturer's operating
instructions).
Enabling the mobile phone for Inter-
net access
XCall up Internet functions (Ypage 124).
XTo switch to the menu bar: slide 6the con-
troller.
XTo select Settings: turn and press the con-
troller.
XTo select Configure Internet Settings:
turn and press the controller.
If a mobile phone has already been enabled,
the device list is displayed.
XTo select Start Search: turn and press the
controller.
Mobile phones are displayed that:
Rare connected to the multimedia system
Rfulfill the conditions for the Internet func-
tions
Rhave not yet been set up for the Internet
function
XTo select a mobile phone from the device list: turn the controller and press to confirm.
If the mobile phone supports the Bluetooth
®
PAN profile or the USB classes RNDIS, CDC/
NCM or CDC/ECM, Internet access is set up.
You can use the Internet functions.
If the connected mobile phone does not sup-
port the named Bluetooth
®profile or the
named USB classes, predefined (Ypage 121)
or manual access data (Ypage 122) must be
set.
Setting access data of the mobile
phone network provider
Selecting the predefined access data of
the mobile phone network provider
XTo select Predefined Settings: turn and
press the controller.
A list of countries appears.
Setting up an Internet connection (Canada)121
Online and Internet functions
Z
Page 140 of 174
Your multimediasyste mequipment
These operatin ginstruction sdescribe all th e
standar dan doptional equipment of your multi-
media system, as available at th etime of going
to press. Country-specifi cdifference sare pos -
sible. Bear in min dthat your vehicle may no t
feature all function sdescribed here. Thi salso
applies to safety-relevan tsystems an dfunc-
tions.
Read th einformation on qualifie dspecialis t
workshop sin th evehicle Operator's Manual.
Activating medi amode
General notes
There are severa lways to activat emedia sour-
ce susin gth emultimedia system. The relevant
section sof th eOperator's Manual describe th e
simples tway to activat e amedia source. Thi s
section describes all option sfo ractivatin g
media sources. If you wish to play external
media sources, th eassociated media men u
mus talready be turned on .
Connections for externa lmedi asour-
ces
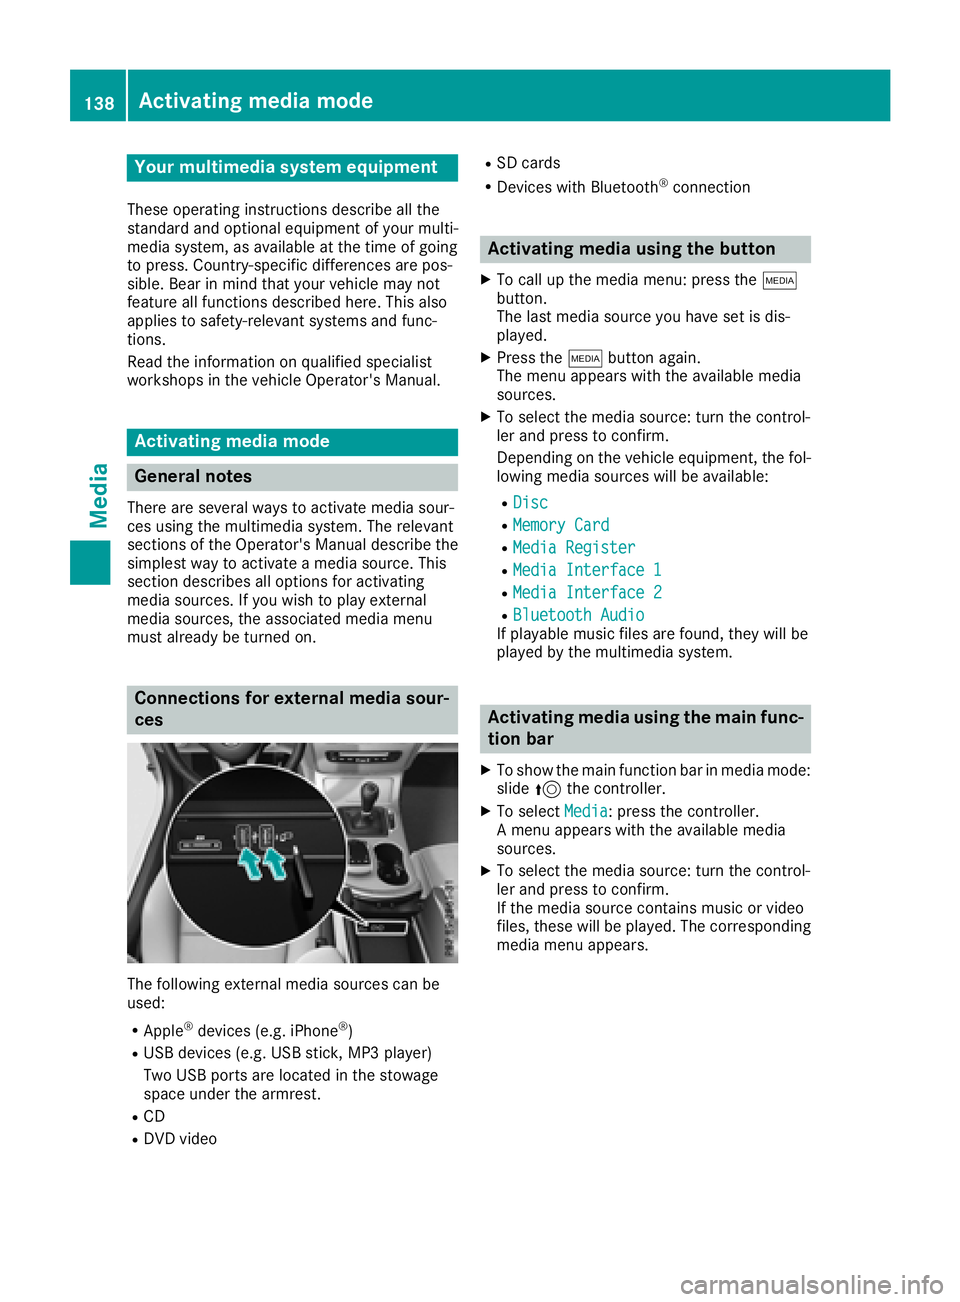
The followin gexternal media sources can be
used :
RApple®devices (e.g. iPhon e®)
RUSBdevices (e.g. US Bstick, MP3 player)
Two US Bports are located in th estowag e
spac eunder th earmrest.
RCD
RDV Dvideo
RSD cards
RDevices wit hBluetoot h®connection
Activating medi ausing th ebutton
XTo cal lup th emedia menu: press th eÕ
button.
The last media sourc eyou hav eset is dis -
played.
XPress th eÕ buttonagain .
The men uappears wit hth eavailable media
sources.
XTo selec tth emedia source: turn th econtrol-
ler an dpress to confirm .
Dependin gon th evehicle equipment ,th efol-
lowing media sources will be available :
RDisc
RMemory Card
RMediaRegister
RMedi aInterfac e 1
RMediaInterfac e 2
RBluetoothAudi oIf playable music files are found ,they will be
playe dby th emultimedia system.
Activating medi ausing th emain func-
tion ba r
XTo showthemain function bar in media mode:
slid e5 thecontroller .
XTo selectMedi a:press th econtroller .
A men uappears wit hth eavailable media
sources.
XTo selec tth emedia source: turn th econtrol-
ler an dpress to confirm .
If th emedia sourc econtain smusic or video
files, these will be played. The correspondin g
media men uappears .
138Activating media mode
Media
Page 150 of 174
XIn media mode: press theÕbutton.
A menu appears with the available media
sources.
XTo select the media source: turn the control-
ler and press to confirm.
XTo switch to the menu bar: slide 6the con-
troller.
XTo select Options: turn and press the con-
troller.
XSelect Playback Mode.
The options list appears. The #dot indicates
the current setting.
XSelect the desired option.
The option is switched on. For all options
except Normal Track Sequence
, you will
see a corresponding icon in the main display.
iThe Normal Track Sequenceoption is
automatically selected when you change the
disc you are currently listening to or when you
select a different medium. If an option is
selected, it remains selected after the multi-
media system is switched on or off.
Bluetooth®audio mode
Requirements
The Bluetooth®function must be activated in
the multimedia system (Ypage 40).
Bluetooth®audio mode requires a Bluetooth®-
capable audio device.
Check your Bluetooth
®audio device for the fol-
lowing; see the manufacturer's operating
instructions:
RBluetooth®audio profile
The Bluetooth®audio device must support
the A2DP and AVRCP Bluetooth®audio pro-
files.
RBluetooth®visibility
Certain Bluetooth®audio devices do not just
require activation of the Bluetooth®function.
In addition, your device must be made "visi-
ble" to other devices.
RBluetooth®device name
This device name is predetermined but can
usually be changed. For a clear selection of
the Bluetooth
®device, Mercedes-Benz rec-
ommends that you customize the device
name.
iA2DP (Advanced Audio Distribution Profile):
Bluetooth®audio profile for audio data trans-
mission
AVRCP (A udioVideo Remote ControlProfile):
Bluetooth
®audio profile for audio data play-
back
iThe Bluetooth®device must be visible to the
multimedia system for authorization. After
authorization, the multimedia system even
finds the Bluetooth
®device when it is not
visible.
General notes
Before using your Bluetooth®audio device with
the multimedia system for the first time, you will
need to authorize it. When you authorize a new
Bluetooth
®audio device, it is connected auto-
matically. Connection involves first searching
for a Bluetooth
®audio device and then author-
izing it. You can authorize up to 15 Bluetooth®
devices.
iIf you authorize a mobile phone that sup-
ports Bluetooth®audio, the A2DP and AVRCP
Bluetooth®audio profiles are connected
automatically.
The mobile phone is then entered:
Rin the Bluetooth®telephone list
(Ypage 94)
Rin the Bluetooth®device list
(Ypage 149)
Mercedes-Benz recommends authorizing a
mobile phone in Bluetooth
®telephony
(Ypage 94).
148Bluetooth®audio mode
Media
Page 151 of 174
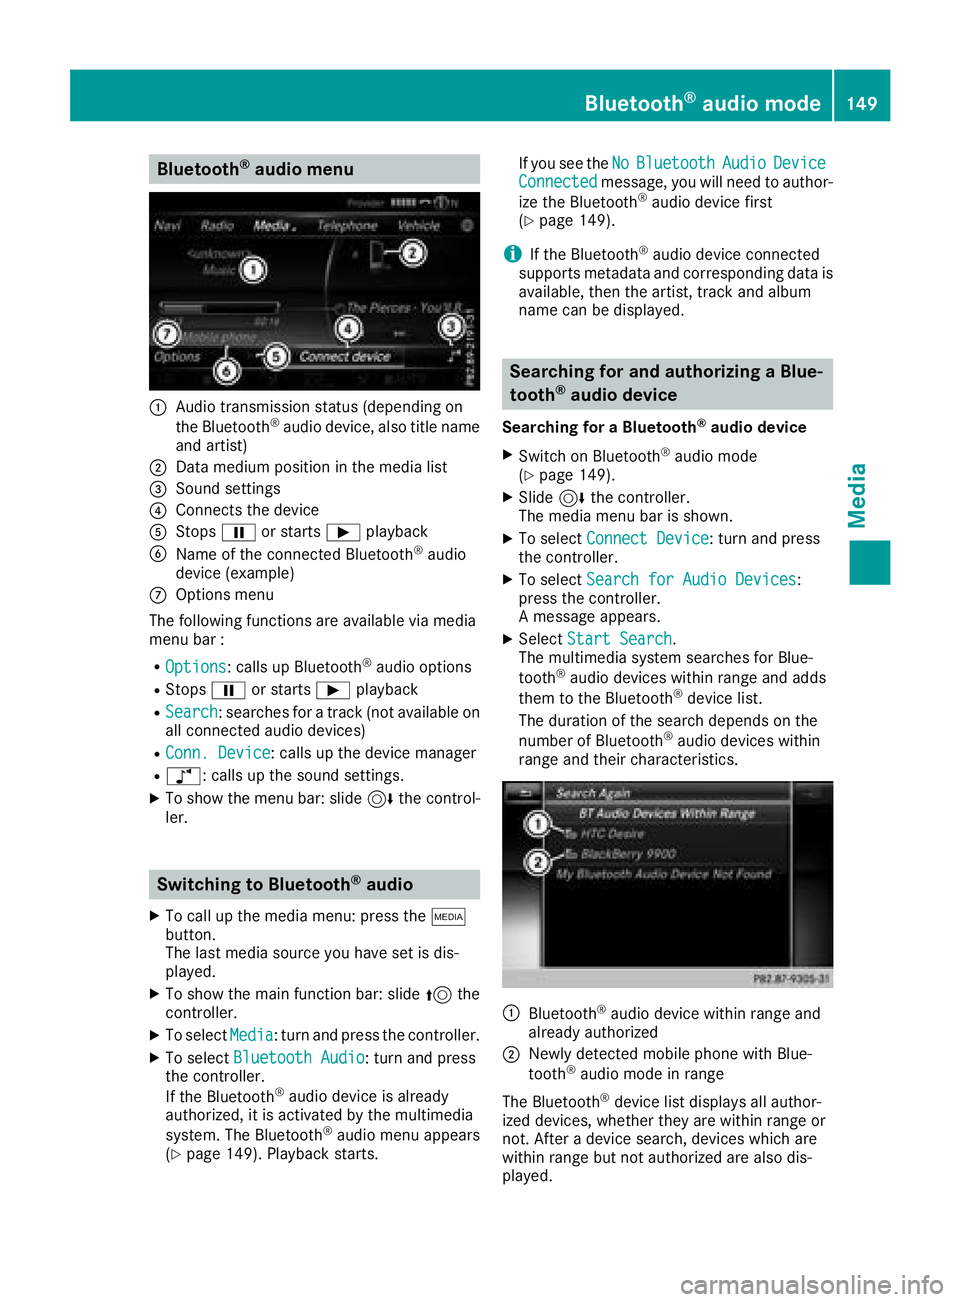
Bluetooth®audio menu
:Audio transmission status (depending on
the Bluetooth®audio device, also title name
and artist)
;Data medium position in the media list
=Sound settings
?Connects the device
AStops Ëor starts Ìplayback
BName of the connected Bluetooth®audio
device (example)
COptions menu
The following functions are available via media
menu bar :
ROptions: calls up Bluetooth®audio options
RStops Ëor starts Ìplayback
RSearch: searches for a track (not available on
all connected audio devices)
RConn. Device: calls up the device manager
Rà: calls up the sound settings.
XTo show the menu bar: slide 6the control-
ler.
Switching to Bluetooth®audio
XTo call up the media menu: press the Õ
button.
The last media source you have set is dis-
played.
XTo show the main function bar: slide 5the
controller.
XTo select Media: turn and press the controller.
XTo select Bluetooth Audio: turn and press
the controller.
If the Bluetooth
®audio device is already
authorized, it is activated by the multimedia
system. The Bluetooth
®audio menu appears
(Ypage 149). Playback starts. If you see the
No
BluetoothAudioDeviceConnectedmessage, you will need to author-
ize the Bluetooth®audio device first
(Ypage 149).
iIf the Bluetooth®audio device connected
supports metadata and corresponding data is
available, then the artist, track and album
name can be displayed.
Searching for and authorizing a Blue-
tooth®audio device
Searching for a Bluetooth®audio device
XSwitch on Bluetooth®audio mode
(Ypage 149).
XSlide 6the controller.
The media menu bar is shown.
XTo select Connect Device: turn and press
the controller.
XTo select Search for Audio Devices:
press the controller.
A message appears.
XSelect Start Search.
The multimedia system searches for Blue-
tooth
®audio devices within range and adds
them to the Bluetooth®device list.
The duration of the search depends on the
number of Bluetooth
®audio devices within
range and their characteristics.
:Bluetooth®audio device within range and
already authorized
;Newly detected mobile phone with Blue-
tooth®audio mode in range
The Bluetooth
®device list displays all author-
ized devices, whether they are within range or
not. After a device search, devices which are
within range but not authorized are also dis-
played.
Bluetooth®audio mode149
Media
Z
Page 152 of 174
If the multimedia system cannot find your Blue-
tooth®audio device, external authorization may
follow (Ypage 150).
Authorizing a Bluetooth
®audio device
XIn the Bluetooth®device list, select a Blue-
tooth®audio device that has not yet been
authorized: turn and press the controller.
Authorization starts.
Depending on which Bluetooth
®audio device
is being used, the device can be authorized
either by entering a passkey or by Secure
Simple Pairing. You can find information on
this in the "Authorizing (connecting) a mobile
phone" section (
Ypage 94). After successful
authorization, the Bluetooth®audio device is
connected and starts playing.
iWith some Bluetooth®audio devices, play-
back must initially be started on the device
itself, so that the multimedia system can play
the audio data. For the audio device used, the
output of the audio files has to be specified via
Bluetooth
®.
iThe Bluetooth®audio device must support
Bluetooth®version 2.1 for connection via
Secure Simple Pairing. The multimedia sys-
tem creates a six-digit code which is dis-
played simultaneously on both devices that
are to be connected.
For some Bluetooth
®audio devices, the pair-
ing must also be confirmed within 10 sec-
onds.
External authorization
If the multimedia system does not find your
Bluetooth®audio device (Ypage 149), this may
be due to particular security settings on your
Bluetooth
®audio device. In this case, check
whether your Bluetooth®audio device can
locate the multimedia system.
The Bluetooth
®device name of the multimedia
system is MB Bluetooth.
XSwitch on Bluetooth®audio mode
(Ypage 149).
XSlide 6the controller.
The media menu bar is shown.
XTo select Connect Device: turn and press
the controller.
XTo select ConnectviaAudioDevice: turn
and press the controller.
XStart the authorization on your Bluetooth®
audio device (see the manufacturer's operat- ing instructions).
After successful authorization, the Blue-
tooth
®audio device is connected and starts
playing.
iWith some Bluetooth®audio devices, play-
back must initially be started on the device
itself, so that the multimedia system can play
the audio data.
Device-specific information on authorizing
and connecting Bluetooth
®-capable mobile
phones can be found on the Internet at
http://www.mercedes-benz.com/connect.
Displaying details
XTo select a Bluetooth®audio device from the
Bluetooth®device list: turn the controller
(Ypage 149).
XTo select G: slide 9the controller.
XTo select Details: turn and press the con-
troller.
The following information concerning the
selected mobile phone is shown:
RBluetooth®name
RBluetooth®address
RAvailability status (shown after an update)
RAuthorization status
XTo close the detailed display: press the
% button.
Starting/stopping playback
Requirement: the Bluetooth®audio menu
(Ypage 149) is shown.
Starting playback
XTo select Ì: turn and press the controller.
Playback starts. Ëis selected.
Stopping playback
XSelect Ë.
A message appears. Ìis selected.
Continuing playback
XSelect Ì.
A message appears. Ëis selected.
150Bluetooth®audio mode
Media
Page 153 of 174
Starting playback if the Bluetooth®
audio device has been stopped
During the search for mobile phones
(
Ypage 94), the connection with the Bluetooth®
audio device is terminated. TheNoBluetoothAudioDeviceConnectedmessage appears in
the Bluetooth®audio menu (Ypage 149). When
the search is finished, the Bluetooth®audio
device can be reconnected.
XTo confirm the ConnectLastUsedPlayer
message in the Bluetooth®audio menu: press
the controller.
Depending on the Bluetooth
®audio device
used, playback starts immediately or you
must start playback manually.
In this case, you will see the Bluetooth
Audio Device Pausedmessage.
XTo start playback:To selectÌ: slide 6
and press the controller.
Playback resumes from the beginning.
Selecting a track
The function is not supported by all Bluetooth®
audio devices.
Some mobile phones impair function with
regard to the following criteria:
Rthe number of tracks that can be selected
Rthe time period until the next or previous track is played
XUse the multifunction steering wheel to
switch to the media menu in the on-board
computer; see the vehicle Operator's Manual.
XTo skip forward or back to a track: press
the 9 or: button on the multifunction
steering wheel.
XTo rapid scroll: press and hold the 9
or : button on the multifunction steering
wheel until the desired track is reached.
If you press and hold the 9or: but-
tons, the rapid scrolling speed increases after
a short time.
iDuring rapid scrolling, track names are not
displayed but only Track+1, Track+2, etc. (or
Track-1, Track-2, etc.). There are no playback
times shown for tracks that have been played.
This is available as an optional function start-
ing with AVRCP Version 1.3.
Playback options
General notes
If the Bluetooth®audio device supports the cor-
responding function, the following options are
available:
RNormal Track Sequence: the tracks are
played in the normal order (e.g. track 1, 2, 3
etc.).
Audio data playback is determined by the
order in which the tracks are written to the
data medium. Alphabetical order is the most
common. Once all the tracks in a folder have
been played, the tracks in the next folder are
played.
RRandomTrackList: the current track list is
played in random order (e.g. 3, 8, 5 etc.).
RRandom Medium: all tracks on the data
medium are played in random order (e.g.
track 3, 8, 5 etc.).
Playback options are optional functions and
are not, or only partially, supported by Blue-
tooth
®audio devices.
Selecting the playback option
XIn the Bluetooth®audio menu, slide 6the
controller (Ypage 149).
XTo select Options: turn and press the con-
troller.
XSelect Playback Mode.
A # dot indicates the current setting.
XSelect the desired option.
Increasing the volume in the multime-
dia system
XIn the Bluetooth®audio menu, slide 6the
controller (Ypage 149).
XTo select Options: turn and press the con-
troller.
XTo select Volume: turn and press the control-
ler.
A menu appears. The #dot indicates the cur-
rent setting.
XSelect StandardorBoost.
iIf playback on the Bluetooth®audio player is
too quiet, the Boostfunction may be used. It
is recommended, however, that you increase
Bluetooth®audio mode151
Media
Z