tire type MERCEDES-BENZ C-CLASS CABRIOLET 2018 Owner's Manual
[x] Cancel search | Manufacturer: MERCEDES-BENZ, Model Year: 2018, Model line: C-CLASS CABRIOLET, Model: MERCEDES-BENZ C-CLASS CABRIOLET 2018Pages: 350, PDF Size: 5.73 MB
Page 9 of 350
see Flat tire
see Towing away
Brightness control (instrument
cluster lighting) ................................... 35
Buttons on the steering wheel ......... 193
C
California
Important notice for retail cus-
tomers and lessees .......................... 28
Calling up a malfunction
see Display messages
Calling up the climate control bar
Multimedia system ........................ 258
Calling up the climate control
menu
Multimedia system ........................ 258
Camera
see 360° camera
see Rear view camera
Car
see Vehicle
Car wash
see Care
Care
360° camera ................................. 292
AIRCAP .......................................... 289
Car wash ........................................2 86
Carpets .......................................... 294
Display ...........................................2 93
Exhaust pipe .................................. 292
Exterior lights ................................ 291
General notes ................................ 286
Interior ...........................................2 93
Matte finish ................................... 289
Paint .............................................. 288
Plastic trim ....................................2 93
Power washer ................................ 288
Rear view camera .......................... 292
Roof lining ...................................... 294
Seat belt ........................................ 294
Seat cover ..................................... 294
Selector lever ................................ 293
Sensors ......................................... 292
Soft top .......................................... 289
Steering wheel ............................... 293
Trim pieces .................................... 293 Washing by hand ........................... 287
Wheels ........................................... 291
Wind deflector ............................... 289
Wind screen ................................... 290
Windows ........................................ 291
Wiper blades .................................. 291
Wooden trim .................................. 293
Cargo tie down rings ......................... 266
CD
see also Digital Operator's Man-
ual .................................................. 253
CD player (on-board computer) ........ 201
Center console
Lower section .................................. 39
Lower section (Mercedes-AMG
vehicles) .......................................... 40
Upper section .................................. 38
Central locking
Locking/u
nlocking (SmartKey) ........ 76
Change of address .............................. 29
Change of ownership .......................... 29
Changing the media source ............. 200
Charge-air pressure (on-board
computer, Mercedes-AMG vehi-
cles) .................................................... 208
Child
Restraint system .............................. 60
Child seat
Forward-facing restraint system ...... 63
LATCH-type (ISOFIX) child seat
anchors ............................................ 61
On the front-passenger seat ............ 63
Rearward-facing restraint system .... 63
Top Tether ....................................... 62
Children
Special seat belt retractor ............... 60
Children in the vehicle
Important safety notes .................... 59
Cigarette lighter ................................ 270
Cleaning
Mirror turn signal ........................... 292
Climate control
Control panel for dual-zone auto-
matic climate control ..................... 115
Controlling automatically ............... 117
Cooling with air dehumidification .. 117
Index7
Page 16 of 350
Activating/deactivating (on-
board computer) ............................ 205
Display message ............................ 229
Function/information .................... 184
see Active Lane Keeping Assist
Lane Tracking package ..................... 182
Lap time (RACETIMER) ...................... 210
LATCH-type (ISOFIX) child seat
anchors ................................................ 61
License plate lamp (display mes-
sage) ................................................... 224
Light function, active
Display message ............................ 224
Light switch
Operation ....................................... 107
Lights
Adaptive Highbeam Assist ............. 109
Automatic headlamp mode ............ 107
Cornering light function ................. 109
Fogged up headlamps .................... 110
General notes ................................ 107
Hazard warning lamps ...................1 09
High beam flasher .......................... 108
High-beam headlamps ................... 108
Light switch ................................... 107
Low-beam headlamps .................... 108
Parking lamps ................................ 108
Rear fog lamp ................................ 108
Setting exterior lighting ................. 107
Standing lamps .............................. 108
Switching the daytime running
lamps on/off (on-board com-
puter) ............................................. 207
Turn signals ................................... 108
see Interior lighting
see Replacing bulbs
Loading guidelines ............................ 263
Locking
see Central locking
Locking (doors)
Automatic ........................................ 82
Emergency locking ........................... 83
From inside (central locking but-
ton) ..................................................8 2
Locking centrally
see Central locking Low-beam headlamps
Display message ............................ 224
Switc
hing on/off .......................... .108
Lubricant additives
see Additives (engine oil)
Luggage cover
see Trunk partition
Lumbar support
Adjusting the 4-way lumbar sup-
port ..................................................9 8
M
M+S tires............................................ 314
Malfunction message
see Display messages
Matte finish (cleaning instruc-
tions) .................................................. 289
mbrace
Call priority ....................................2 74
Display message ............................ 218
Downloading destinations
(COMAND) ..................................... 274
Downloading routes ....................... 277
Emergency call .............................. 272
General notes ................................ 271
Geo fencing ................................... 277
Info call button .............................. 273
Locating a stolen vehicle ...............2 76
Remote fault diagnosis .................. 276
Remote vehicle locking .................. 275
Roadside assistance button ........... 273
Search & Send ............................... 275
Self-test ......................................... 271
Speed alert .................................... 277
System .......................................... 271
Triggering the vehicle alarm ........... 277
Vehicle remote unlocking .............. 275
Mechanical key
Function/notes ................................ 78
General notes .................................. 78
Inserting .......................................... 78
Locking vehicle ................................ 83
Removing ......................................... 78
Unlocking the driver's door .............. 83
Media Interface
see Digital Operator's Manual
Memory card (audio) ......................... 201
14Index
Page 17 of 350
Memory functionSeats, steering wheel, exterior
mirrors ........................................... 105
Mercedes-Benz Intelligent Drive
360°camera .................................. 176
Active Blind Spot Assist ................. 186
Active Lane Keeping Assist ............ 189
ATTENTION ASSIST ........................ 180
Blind Spot Assist ............................ 182
Distance Pilot DISTRONIC ............. 153
Distance Pilot DISTRONIC with
Steering Pilot ................................. 159
General notes ................................ 151
Lane Keeping Assist ...................... 184
Parking Assist PARKTRONIC .......... 170
Parking Pilot .................................. 166
PRE-SAFE
®(anticipatory occu-
pant protection) ...............................5 8
PRE-SAFE
®PLUS (anticipatory
occupant protection PLUS) .............. 58
Rear view camera .......................... 173
Traffic Sign Assist .......................... 182
Message memory (on-board com-
puter) .................................................. 212
Messages
see Display messages
see Warning and indicator lamps
Mirror turn signal
Cleaning ......................................... 292
Mirrors
see Exterior mirrors
see Vanity mirror (in the sun visor)
Mobile phone
Connecting (Bluetooth
®inter-
face) ..............................................2 60
Connecting another mobile
phone ............................................ 261
Frequencies ................................... 338
Installation ..................................... 338
Menu (on-board computer) ............ 202
Transmission output (maximum) .... 338
Model type
see Vehicle identification plate
Modifying the programming
(SmartKey) ...........................................7 8
MOExtended tires .............................. 297 Mounting wheels
Lowering the vehicle ...................... 336
Mounting a new wheel ................... 335
Preparing the vehicle ..... ................3
32
R
aising the vehicle ......................... 333
Removing a wheel .......................... 335
Securing the vehicle against roll-
ing away ........................................ 332
MP3
Operation ....................................... 201
see also Digital Operator's Man-
ual ..................................................2 53
Multifunction display
Function/notes .............................1 94
Multifunction steering wheel
Operating the on-board computer .. 193
Overview .......................................... 37
Multimedia system
Switching on and off ......................2 54
Music files
see also Digital Operator's Man-
ual ..................................................2 53
N
Navigation
Displaying (on-board computer) ..... 198
Menu (on-board computer) ............ 198
see also Digital Operator's Man-
ual ..................................................2 53
Notes on breaking-in a new vehi-
cle ....................................................... 122
O
Occupant Classification System
(OCS)
Conditions ....................................... 51
Faults ............................................... 55
Operation ......................................... 52
System self-test ............................... 54
Occupant safety
Air bags ...........................................4 8
Automatic measures after an acci-
dent ................................................. 59
Belt warning ..................................... 48
Children in the vehicle ..................... 59
Important safety notes .................... 43
Index15
Page 23 of 350
Suspension tuningSETUP (on-board computer,
Mercedes-AMG vehicles) ............... 209
Switching air-recirculation mode
on/off .................................................1 20
Switching on media mode
Via the device list .......................... 261
T
Tachometer ........................................ 193
Tail lamps
Display message ............................ 224
Tank
see Fuel tank
Tank content
Fuel gauge ....................................... 36
Technical data
Capacities ...................................... 340
Information .................................... 338
Vehicle data ................................... 345
Telephone
Accepting a call (multifunction
steering wheel) .............................. 202
Authorizing a mobile phone (con-
necting) ......................................... 260
Connecting a mobile phone (gen-
eral information) ............................ 260
Display message ............................ 239
Introduction ................................... 202
Menu (on-board computer) ............ 202
Number from the phone book ........ 202
Redialing ........................................ 203
Rejecting/ending a call ................. 202
see also Digital Operator's Man-
ual .................................................. 253
Switching between mobile
phones ........................................... 261
see Mobile phone
Temperature
Coolant (display in the instrument
cluster) .......................................... 193
Engine oil (on-board computer,
Mercedes-AMG vehicles) ............... 208
Outside temperature ...................... 193
Setting (climate control) ................ 118
Transmission oil (on-board com-
puter, Mercedes-AMG vehicles) ..... 208 Through-loading feature
................... 265
Timing (RACETIMER) ......................... 210
Tire pressure
Calling up (on-board computer) ..... 319
Checking manually ........................ 318
Display message ............................ 234
Maximum ....................................... 318
Not reached (TIREFIT) .................... 299
Notes ............................................. 316
Reached (TIREFIT) .......................... 300
Recommended ............................... 315
Using the TIREFIT kit ...................... 298
Tire pressure loss warning system
General notes ................................ 318
Important safety notes .................. 318
Restarting ...................................... 319
Tire pressure monitor
Checking the tire pressure elec-
tronically ........................................ 321
Function/notes ............................. 319
Genera l note
s ................................ 319
Important safety notes .................. 319
Radio type approval for the tire
pressure monitor ........................... 322
Restarting ...................................... 321
Warning lamp ................................. 251
Warning message .......................... 321
Tire pressure sensors
Display message ............................ 235
Tire-change tool kit ........................... 296
TIREFIT kit
Important safety notes .................. 298
Storage location ............................ 296
Tire pressure not reached .............. 299
Tire pressure reached .................... 300
Using ............................................. 298
Tires
Aspect ratio (definition) ................. 331
Average weight of the vehicle
occupants (definition) .................... 329
Bar (definition) ............................... 329
Changing a wheel .......................... 331
Characteristics .............................. 329
Checking ........................................ 313
Curb weight (definition) ................. 330
Definition of terms ......................... 329
Direction of rotation ...................... 332
Display message ............................ 234
Index21
Page 26 of 350
Vehicle batterysee Battery (vehicle)
Vehicle dimensions ........................... 345
Vehicle emergency locking ................ 83
Vehicle identification number
see VIN
Vehicle identification plate .............. 339
Vehicle level
AIRMATIC ...................................... 164
Display message ............................ 228
Video
Operating the DVD ......................... 201
see also Digital Operator's Man-
ual .................................................. 253
VIN
Seat ............................................... 340
Type plate ...................................... 339
W
Warning and indicator lampsABS ................................................ 244
Active Brake Assist ........................ 250
Airbag ............................................ 247
Brakes ........................................... 243
Coolant .......................................... 248
Distance warning ........................... 250
Engine diagnostics ......................... 247
ESP
®.............................................. 244
ESP®OFF ....................................... 246
Fuel tank ........................................ 247
General notes ................................ 241
Overview .......................................... 36
Parking brake ................................ 247
PASSENGER AIR BAG ...................... 44
Reserve fuel ................................... 247
Restraint system ............................ 247
Seat belt ........................................ 241
SPORT handling mode ................... 246
Steering ......................................... 252
Tire pressure monitor .................... 251
Warranty .............................................. 28
Washer fluid
Display message ............................ 239
Weather display (COMAND)
see also Digital Operator's Man-
ual .................................................. 253 Wheel and tire combinations
Tires ............................................... 336
Wheel bolt tightening torque ........... 336
Wheel chock ...................................... 332
Wheels
Changing a wheel .......................... 331
Checking ........................................ 313
Cleaning ......................................... 291
Important safety notes .................. 312
Information on driving .................... 312
Interchanging/changing ................ 331
Mounting a new wheel ................... 335
Mounting a wheel .......................... 332
Removing a wheel .......................... 335
Snow chains .................................. 315
Storing ........................................... 332
Tightening torque ........................... 336
Wheel size/tire size ....................... 336
Wind deflector (cleaning instruc-
tions) .................................................. 289
Wind screen ......................................... 91
Wind screen (cleaning instruc-
tions) .................................................. 290
Windows
see Side windows
Windshield
Defrosting ...................................... 118
Windshield washer fluid
see Windshield washer system
Windshield washer system
Adding washer fluid ....................... 285
Important safety notes .................. 344
Windshield wipers
Problem (malfunction) ................... 114
Repl acing the w
iper blades ............ 112
Switching on/off ........................... 111
Winter driving
Important safety notes .................. 314
Slippery road surfaces ................... 151
Snow chains .................................. 315
Winter operation
Radiator cover ............................... 282
Summer tires ................................. 314
Winter tires
M+S tires ....................................... 314
Wiper arm
Moving to a vertical position .......... 112
24Index
Page 65 of 350
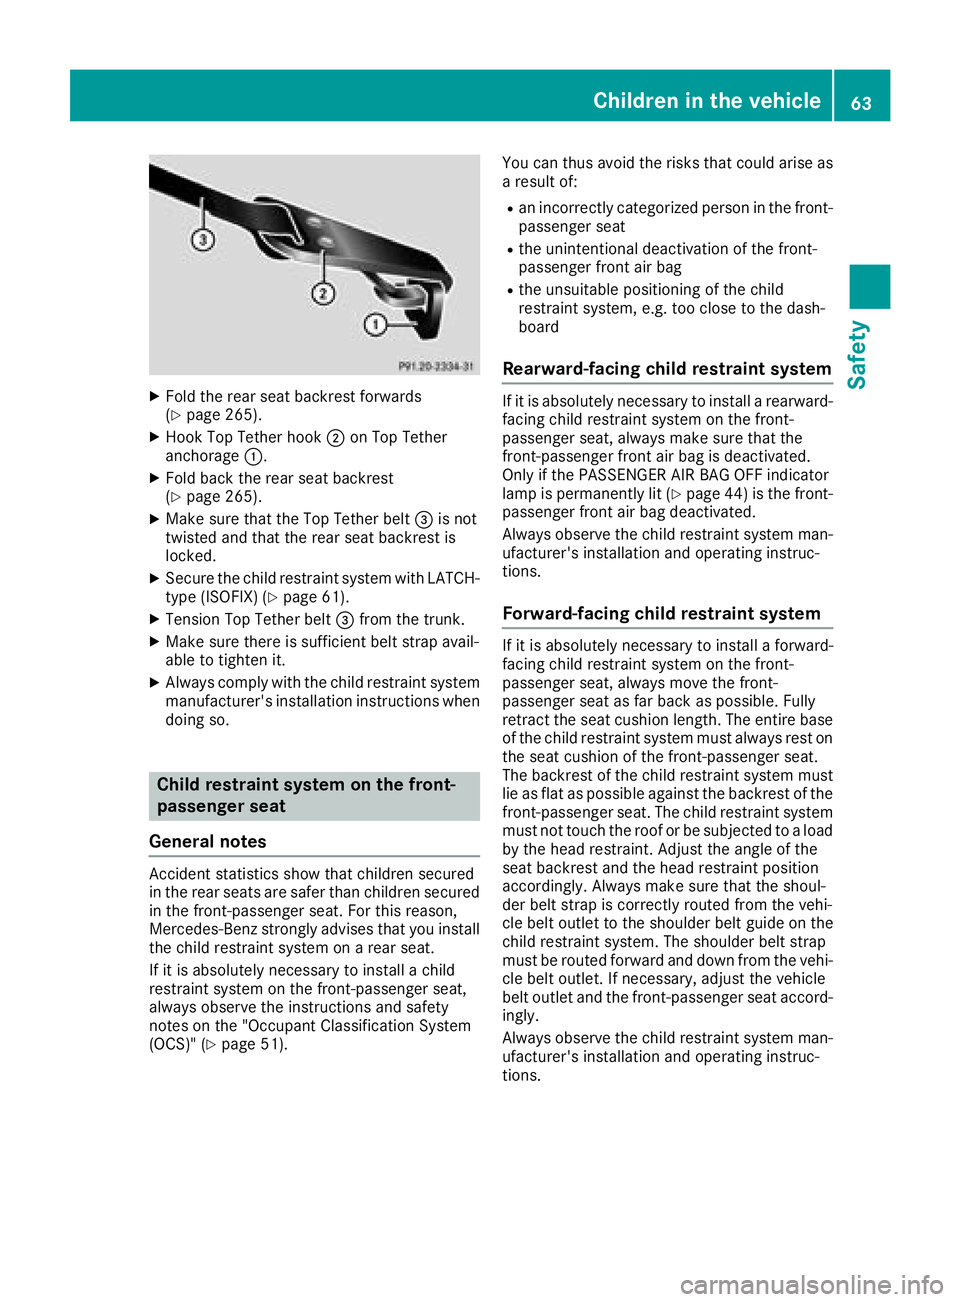
XFold the rear seat backrest forwards
(Ypage 265).
XHook Top Tether hook;on Top Tether
anchorage :.
XFold back the rear seat backrest
(Ypage 265).
XMake sure that the Top Tether belt =is not
twisted and that the rear seat backrest is
locked.
XSecure the child restraint system with LATCH-
type (ISOFIX) (Ypage 61).
XTension Top Tether belt =from the trunk.
XMake sure there is sufficient belt strap avail-
able to tighten it.
XAlways comply with the child restraint system
manufacturer's installation instructions when
doing so.
Child restraint system on the front-
passenger seat
General notes
Accident statistics show that children secured
in the rear seats are safer than children secured
in the front-passenger seat. For this reason,
Mercedes-Benz strongly advises that you install
the child restraint system on a rear seat.
If it is absolutely necessary to install a child
restraint system on the front-passenger seat,
always observe the instructions and safety
notes on the "Occupant Classification System
(OCS)" (
Ypage 51). You can thus avoid the risks that could arise as
a result of:
Ran incorrectly categorized person in the front-
passenger seat
Rthe unintentional deactivation of the front-
passenger front air bag
Rthe unsuitable positioning of the child
restraint system, e.g. too close to the dash-
board
Rearward-facing child restraint system
If it is absolutely necessary to install a rearward-
facing child restraint system on the front-
passenger seat, always make sure that the
front-passenger front air bag is deactivated.
Only if the PASSENGER AIR BAG OFF indicator
lamp is permanently lit (
Ypage 44 )is the front-
passenger front air bag deactivated.
Always observe the child restraint system man-
ufacturer's installation and operating instruc-
tions.
Forward-facing child restraint system
If it is absolutely necessary to install a forward-
facing child restraint system on the front-
passenger seat, always move the front-
passenger seat as far back as possible. Fully
retract the seat cushion length. The entire base of the child restraint system must always rest on
the seat cushion of the front-passenger seat.
The backrest of the child restraint system must
lie as flat as possible against the backrest of thefront-passenger seat. The child restraint system
must not touch the roof or be subjected to a load
by the head restraint. Adjust the angle of the
seat backrest and the head restraint position
accordingly. Always make sure that the shoul-
der belt strap is correctly routed from the vehi-
cle belt outlet to the shoulder belt guide on the
child restraint system. The shoulder belt strap
must be routed forward and down from the vehi-
cle belt outlet. If necessary, adjust the vehicle
belt outlet and the front-passenger seat accord-
ingly.
Always observe the child restraint system man-
ufacturer's installation and operating instruc-
tions.
Children in the vehicle63
Safety
Z
Page 144 of 350
GWARNING
Fuel is poisonous and hazardous to health.
There is a risk of injury.
You must make sure that fuel does not come into contact with your skin, eyes or clothing
and that it is not swallowed. Do not inhale fuel
vapors. Keep fuel away from children.
If you or others come into contact with fuel,
observe the following:
RWash away fuel from skin immediately
using soap and water.
RIf fuel comes into contact with your eyes,
immediately rinse them thoroughly with
clean water. Seek medical assistance with-
out delay.
RIf fuel is swallowed, seek medical assis-
tance without delay. Do not induce vomit-
ing.
RImmediately change out of clothing which
has come into contact with fuel.
GWARNING
Electrostatic buildup can create sparks and
ignite fuel vapors. There is a risk of fire and
explosion.
Always touch the vehicle body before opening
the fuel filler flap or touching the fuel pump
nozzle. Any existing electrostatic buildup is
thereby discharged.
Do not get into the vehicle again during the refu-
eling process. otherwise electrostatic charge
could build up again.
!Do not use diesel to refuel vehicles with a
gasoline engine. Do not switch on the ignition
if you accidentally refuel with the wrong fuel.
Otherwise, the fuel will enter the fuel system. Even small amounts of the wrong fuel could
result in damage to the fuel system and the
engine. Notify a qualified specialist workshop
and have the fuel tank and fuel lines drained
completely.
!Overfilling the fuel tank could damage the
fuel system.
!Take care not to spill any fuel on painted
surfaces. You could otherwise damage the
paintwork.
!Use a filter when adding fuel from a fuel can.
The fuel lines and/or the fuel injection system
could otherwise be blocked by particles from
the fuel can.
If you overfill the fuel tank, fuel could spray out
when the fuel pump nozzle is removed.
For further information on fuel and fuel quality
(
Ypage 340).
Refueling
General information
Pay attention to the important safety notes
(Ypage 141).
If you unlock/lock the vehicle from the outside,
the fuel filler flap also unlocks/locks.
The position of the 8fuel filler cap is dis-
played on the instrument cluster. The arrow next
to the filling pump indicates the side of the vehi-
cle.
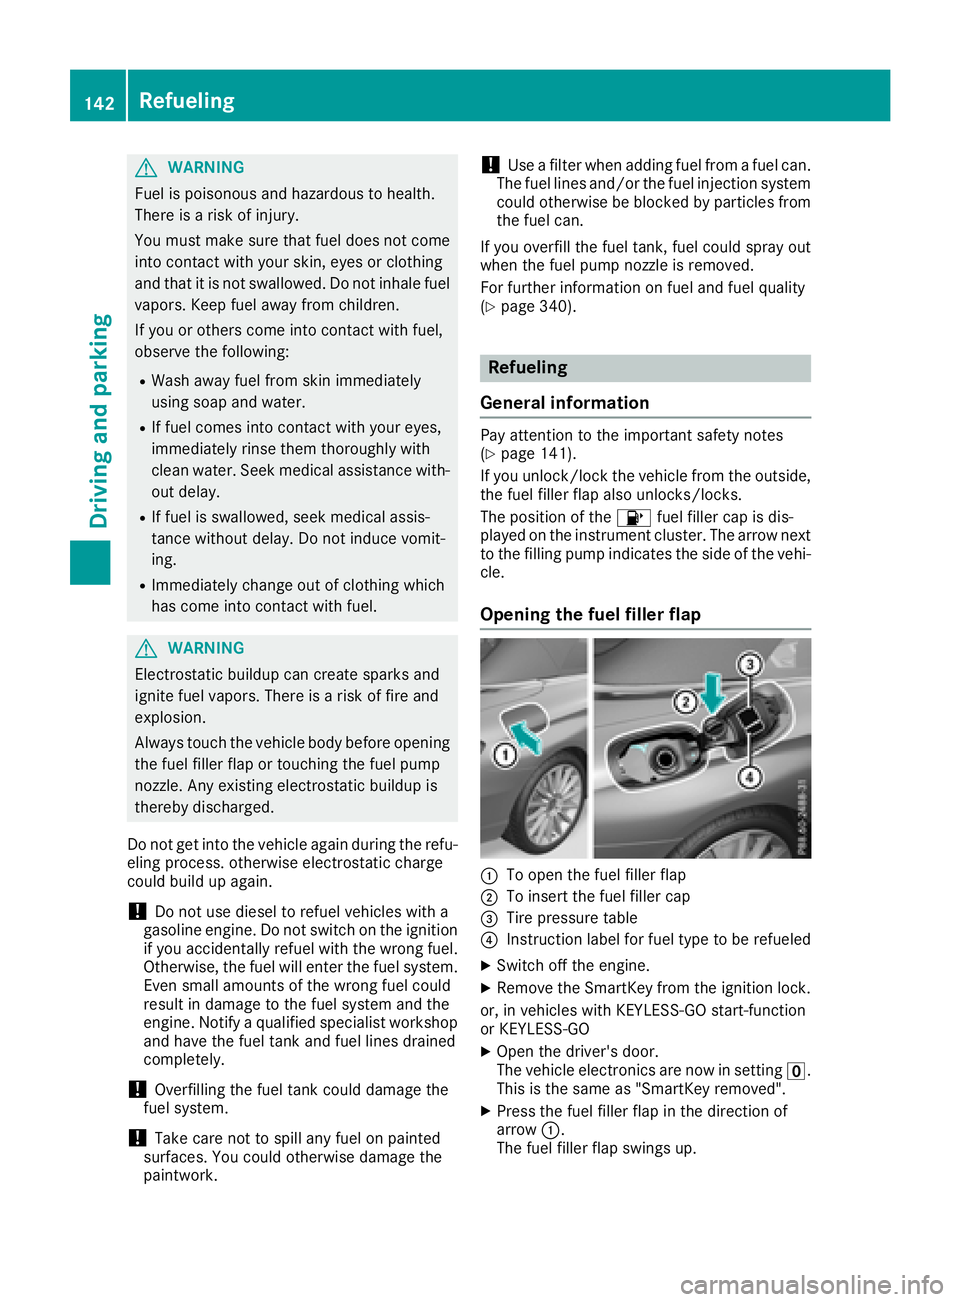
Opening the fuel filler flap
:To open the fuel filler flap
;To insert the fuel filler cap
=Tire pressure table
?Instruction label for fuel type to be refueled
XSwitch off the engine.
XRemove the SmartKey from the ignition lock.
or, in vehicles with KEYLESS-GO start-function
or KEYLESS ‑GO
XOpen the driver's door.
The vehicle electronics are now in setting u.
This is the same as "SmartKey removed".
XPress the fuel filler flap in the direction of
arrow :.
The fuel filler flap swings up.
142Refueling
Driving and parking
Page 152 of 350

For safety reasons, Mercedes-Benz recom-
mends only installing the following brake disks
and brake pads/linings:
Rbrake disks that have been approved by
Mercedes-Benz
Rbrake pads/linings that have been approved
by Mercedes-Benz or that are of an equivalent
standard of quality
Other brake disks or brake pads/linings can
compromise the safety of your vehicle.
Always replace all brake disks and brake pads/
linings on an axle at the same time. Always
install new brake pads/linings when replacing
brake disks.
The vehicle is equipped with lightweight brake
disks to which the wheel assembly with rim and
threaded connection is matched.
The use of brake disks other than those
approved by Mercedes-Benz can change the
track width and is subject to approval, if appli-
cable.
Shock-type loads when handling the brake
discs, such as when changing wheels, can lead
to a reduction in comfort when driving with light-
weight brake discs. Avoid shock-type loads on
the lightweight brake disks, particularly on the
brake plate.
Mercedes-Benz recommends that you only use
brake fluid that has been specially approved for
your vehicle by Mercedes-Benz, or which corre-
sponds to an equivalent quality standard. Brake
fluid which has not been approved for
Mercedes-Benz vehicles or which is not of an
equivalent quality could affect your vehicle's
operating safety.
High-performance and ceramic brakes
(Mercedes-AMG vehicles)
The AMG brake systems are designed for heavy
loads. This may lead to noise when braking. This
will depend on:
RSpeed
RBraking force
REnvironmental conditions, such as tempera-
ture and humidity
The wear of individual components of the brake
system, such as the brake pads/linings or brake
discs, depends on the individual driving style
and operating conditions.
For this reason, it is impossible to state a mile-
age that will be valid under all circumstances. An aggressive driving style will lead to high wear.
You can obtain more information on this from a
qualified specialist workshop.
New and replaced brake pads and discs only
reach their optimum braking effect after several
hundred kilometers of driving. Compensate for
this by applying greater force to the brake pedal.
Keep this in mind, and adapt your driving and
braking accordingly during this break-in period.
Excessive heavy braking results in correspond-
ingly high brake wear. If the brake pads/linings
have reached their wear limit, the multifunction
display shows a corresponding message. Espe-
cially for high performance driving, it is impor-
tant to maintain and have the brake system
checked regularly.
Driving on wet roads
Hydroplaning
If water has accumulated to a certain depth on
the road surface, there is a danger of hydro-
planing occurring, even if:
Ryou drive at low speeds
Rthe tires have adequate tread depth
For this reason, in the event of heavy rain or in
conditions in which hydroplaning may occur,
you must drive in the following manner:
Rlower your speed
Ravoid ruts
Ravoid sudden steering movements
Rbrake carefully
Driving on flooded roads
!Bear in mind that vehicles traveling in front
or in the opposite direction create waves. This
may cause the maximum permissible water
depth to be exceeded.
Failure to observe these notes may result in
damage to the engine, electrical systems and
transmission.
If you have to drive on stretches of road on which
water has collected, please bear in mind that:
Rin the case of standing water, the water level may be no higher than the lower edge of the
vehicle body
Ryou should drive no faster than walking pace
150Driving tips
Driving and parking
Page 253 of 350
Tires
Warning/
indicator
lampNSignal type
Possible causes/consequences and M
Solutions
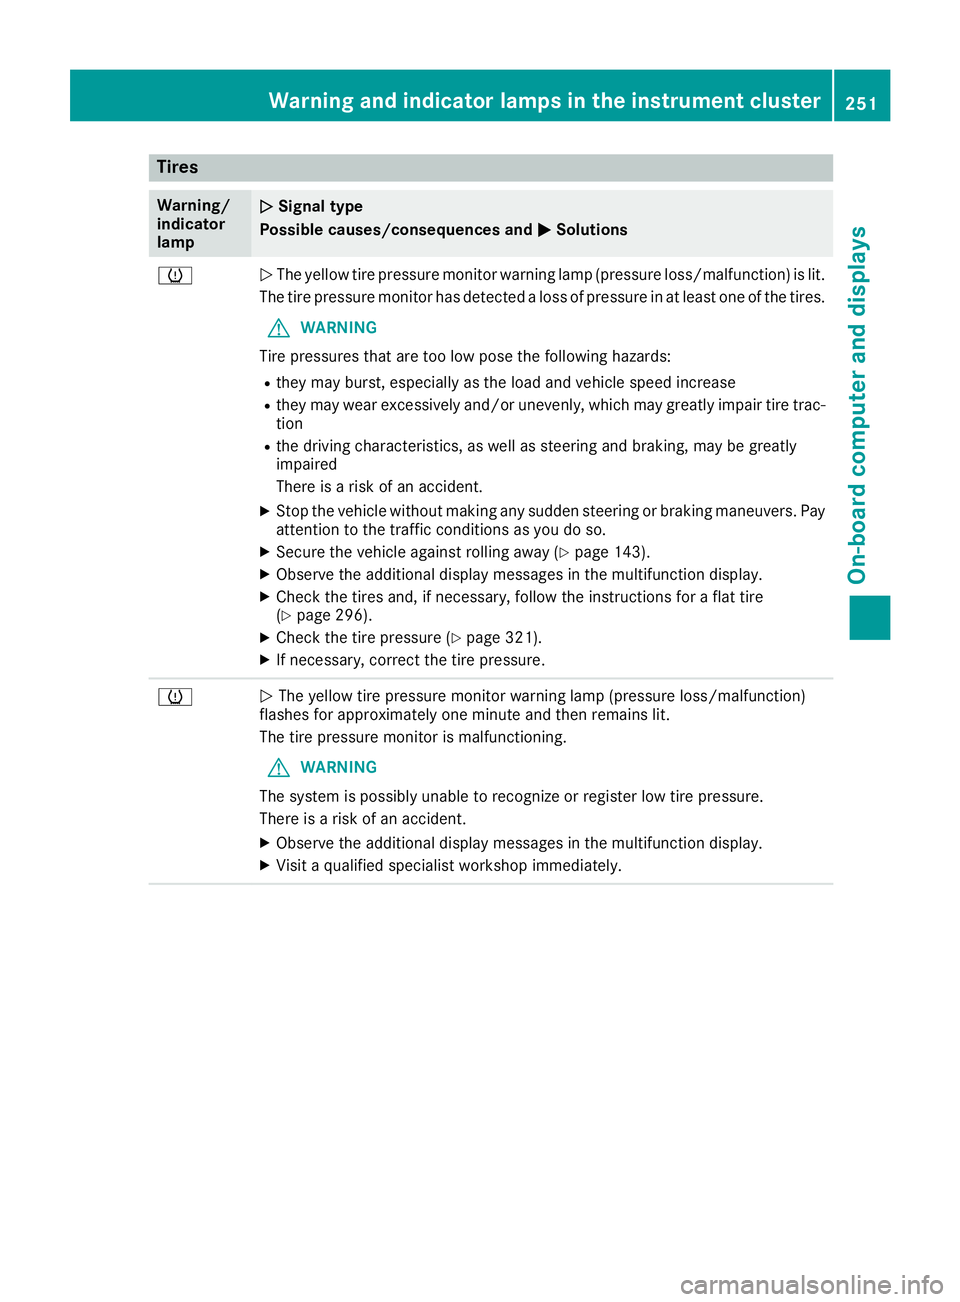
hNThe yellow tire pressure monitor warning lamp (pressure loss/malfunction) is lit.
The tire pressure monitor has detected a loss of pressure in at least one of the tires.
GWARNING
Tire pressures that are too low pose the following hazards:
Rthey may burst, especially as the load and vehicle speed increase
Rthey may wear excessively and/or unevenly, which may greatly impair tire trac-
tion
Rthe driving characteristics, as well as steering and braking, may be greatly
impaired
There is a risk of an accident.
XStop the vehicle without making any sudden steering or braking maneuvers. Pay
attention to the traffic conditions as you do so.
XSecure the vehicle against rolling away (Ypage 143).
XObserve the additional display messages in the multifunction display.
XCheck the tires and, if necessary, follow the instructions for a flat tire
(Ypage 296).
XCheck the tire pressure (Ypage 321).
XIf necessary, correct the tire pressure.
hN The yellow tire pressure monitor warning lamp (pressure loss/malfunction)
flashes for approximately one minute and then remains lit.
The tire pressure monitor is malfunctioning.
GWARNING
The system is possibly unable to recognize or register low tire pressure.
There is a risk of an accident.
XObserve the additional display messages in the multifunction display.
XVisit a qualified specialist workshop immediately.
Warning and indicator lamps in the instrument cluster251
On-board computer and displays
Z
Page 296 of 350
XWipe the wooden trim and trim pieces with a
damp, lint-free cloth, e.g. a microfiber cloth.
XTrim elements with piano black finish:
wipe with a soft, damp cotton cloth. Use clean
water.
XHeavy soiling:use care and cleaning prod-
ucts recommended and approved by
Mercedes-Benz.
Cleaning the seat covers
General notes
!Do not use a microfiber cloth to clean covers
made out of real leather, artificial leather or
DINAMICA. If used often, these can damage
the cover.
Note that regular care is essential to ensure that
the appearance and comfort of the covers is
retained over time.
Genuine leather seat covers
!To retain the natural appearance of the
leather, observe the following cleaning
instructions:
RClean genuine leather covers carefully with a damp cloth and then wipe the covers
down with a dry cloth.
RMake sure that the leather does not
become soaked. It may otherwise become
rough and cracked.
ROnly use leather care agents that have
been tested and approved by Mercedes-
Benz. You can obtain these from a qualified
specialist workshop.
Leather is a natural product.
It exhibits natural surface characteristics, for
example:
Rdifferences in the texture
Rmarks caused by growth and injury
Rslight nuances of color
These are characteristics of leather and not
material defects.
Seat covers of other materials
!Observe the following when cleaning:
Rclean artificial leather covers with a cloth
moistened with a solution containing 1%
detergent (e.g. dish washing liquid).
Rclean cloth covers with a microfiber cloth
moistened with a solution containing 1% detergent (e.g. dish washing liquid). Rub
carefully and always wipe entire seat sec-
tions to avoid leaving visible lines. Leave
the seat to dry afterwards. Cleaning results
depend on the type of dirt and how long it
has been there.
Rclean DINAMICA covers with a damp cloth.
Make sure that you wipe entire seat sec-
tions to avoid leaving visible lines.
Cleaning the seat belts
GWARNING
Seat belts can become severely weakened if
bleached or dyed. This could cause the seat
belts to tear or fail, for instance, in the event of an accident. This poses an increased risk of
injury or fatal injury.
Never bleach or dye the seat belts.
!Do not clean the seat belts using chemical
cleaning agents. Do not dry the seat belts by
heating at temperatures above 176 ‡(80 †)
or in direct sunlight.
XUse clean, lukewarm water and soap solution.
Cleaning the headliner and carpets
XHeadliner: if it is very dirty, use a soft brush or
dry shampoo.
XCarpets: use the carpet and textile cleaning
agents recommended and approved by
Mercedes-Benz.
294Care
Maintenance and care