set clock MERCEDES-BENZ C-CLASS CABRIOLET 2021 Owners Manual
[x] Cancel search | Manufacturer: MERCEDES-BENZ, Model Year: 2021, Model line: C-CLASS CABRIOLET, Model: MERCEDES-BENZ C-CLASS CABRIOLET 2021Pages: 545, PDF Size: 9.48 MB
Page 164 of 545

Ad
Blue ®
re fill canis ter4 can be remo ved
when it has been only partially em ptied. #
Unscr ew and close disposable hose 3and
Ad Blue ®
re fill canis ter4 inreve rse order. #
Replace AdBlue ®
filler cap 2and turn it
clockwise until it audibly engages. #
Close fuel filler flap 1. #
Swit chon the ignition for at least 60 sec‐
onds.
% Ifth e engine could not be star ted due tothe
Ad Blue ®
tan k being empty, it can take up to
60 seconds forth eto p up tobe de tected. #
Start theve hicle.
% Avoid storing AdBlue ®
re fill con tainers per‐
manently in theve hicle. Pa
rking Pa
rking theve hicle &
WARNING Risk of accident and inju ry
caused byan insuf ficiently secu redve hi‐
cle rolling away
If th eve hicle is not securely par ked suf fi‐
ciently, it can rollaw ay in an uncont rolled
wa yev en at a slight downhill gradient. #
On uphill or downhill gradients, turn the
front wheels so that theve hicle rolls
to wa rdsth eke rb if it starts moving. #
apply the parking brake. #
Switch the transmission toposition j. &
WARNING Risk offire caused byhot
ex haust sy stem parts
Flammable materials such as lea ves, grass or
twigs may ignite. #
Park theve hicle so that no flammable
material can come into con tact wi thhot
ve hicle components. #
In particular, do not park on dry grass‐
land or har vested grain fields. &
WARNING Risk of accident and inju ry
due toleaving children unat tended in the
ve hicle
If ch ildren are left unat tended in theve hicle,
th ey could, in pa rticular:
R open doors, thereby endangering other
persons or road users.
R get out and be stru ck byoncoming traf‐
fi c.
R ope rate ve hicle equipment and become
trapped, forex ample.
In addition, thech ildren could also set the
ve hicle in motion by,fo rex ample:
R releasing the parking brake.
R changing the transmission position.
R starting theve hicle. #
Never lea vechildren unat tended in the
ve hicle. Driving and parking
161
Page 252 of 545

#
Swipe down on Touch Control 2.
Opening and closing a list #
Toopen: pressTouch Control 2. #
Toclose: press button 3.
or #
Swipe right on Touch Control 2.
Selecting a menu item #
Swipe up, down, left or right on Touch Con‐
trol 2. #
Press Touch Control 2.
Moving the digital map #
Swipe in any direction.
Setting the sensitivity for the Touch Control
Multimedia sy stem:
4 System 5
w Input
5 Touch Control sensitivity #
Select Fast,Medium orSlow . Operating
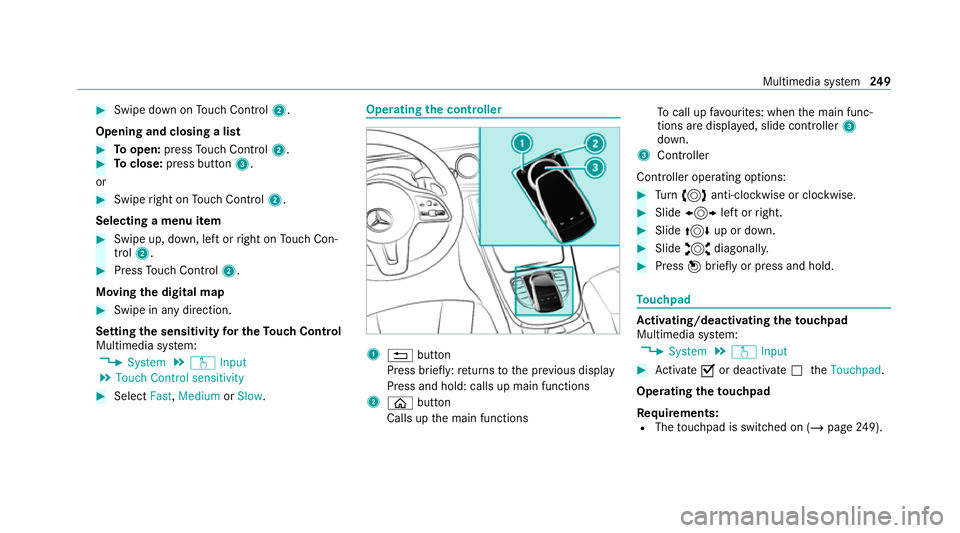
the controller 1
% button
Press brief ly:re turns tothe pr evious display
Press and hold: calls up main functions
2 ò button
Calls up the main functions To
call up favo urites: when the main func‐
tions are displa yed, slide controller 3
down.
3 Controller
Controller operating options: #
Turn 3 anti-clockwise or clo ckwise. #
Slide 1 left orright. #
Slide 4 up or down. #
Slide 2 diagonally. #
Press 7brief lyor press and hold. To
uchpad Ac
tivating/deactivating the touchpad
Multimedia sy stem:
4 System 5
w Input #
Activate Oor deacti vate ª theTouchpad .
Operating theto uchpad
Re quirements:
R The touchpad is swit ched on (/ page249). Multimedia sy
stem 249
Page 293 of 545

%
Requirements:
R Mercedes me connect is available.
R You ha vea user account forthe
Mercedes me Portal.
R The service has been activated at a
Mercedes-Benz service centre.
Fu rther information can be found at:
https://www.mercedes.me
% The online information is not available in all
countries.
If Display in COMAND is activated inTraf fic Sign
Assi st (/ page 195), speed limits and overtak‐
ing restrictions are displ ayed on the map.
% Company logos displa yed on the map are
trademar ksofthere spective companies and
used solely forth e purpose of indicating the
locations of these companies. The use of
such logos on the map does not indicate
appr oval of, suppo rtof or advertising by
th ese companies forth e navigation sy stem
itself. Setting
the map scale
Re quirements:
R The map is shown.
Multimedia sy stem:
4 Navigation #
Tozoom in: swipe down on theTo uch Con‐
trol.
or #
Turn the controller anti-clockwise.
or #
Movetwo fingers apart on theto uchpad. #
Tozoom out: swipe up on theTo uch Control.
or #
Turn the controller clockwise.
or #
Movetwo fingers toge ther on theto uchpad. Moving
the map
Multimedia sy stem:
4 Navigation 5
Z Options
5 Map menu #
Alternatively, if the map is displa yed in full
screen mode, press the cent ral control ele‐
ment.
The map menu appears. #
Select "Mo vemap" in map menu 2
(/ page 289). #
Swipe in any direction on theTo uch Control
or touchpad.
or #
Slide the controller in any direction.
The map mo ves in the cor responding direc‐
tion under the crosshair. The fur ther you
mo veyour finger away from thest arting posi‐
tion on theto uchpad, thefast erthe map
mo ves. 290
Multimedia sy stem
Page 408 of 545

The
tool bag contains:
R Jack
R Gloves
R Wheel wrench
R Centring pin
R Folding chock
R Ratchet for jack Preparing
theve hicle for a wheel change Requ
irements:
R The requ ired tyre-change tool kit is available.
If yo ur vehicle is not equipped with the tyre- ch
ange tool kit, consult a qualified specialist
wo rkshop tofind out about suitable tools.
R The vehicle is not on a slope.
R The vehicle is on solid, non-slippery and le vel
ground. #
Apply the electric parking brake manually. #
Movethe front wheels tothest ra ight-ahead
position. #
Vehicles with automatic transmission:
shift toposition j. #
Vehicles with le vel control sy stem: setthe
normal vehicle le vel (/ page 202). #
Swit choff the engine. #
Make sure that the engine cann otbe star ted. #
Place choc ks orother suitable items under
th e front and rear of the wheel that is diago‐
nally opposite the wheel you wish tochange. #
If necessar y,remo vethe wheel trim/hub
caps (/ page 405). #
Raise theve hicle (/ page 406). Re
moving and fitting the wheel trim/hub
caps Re
quirements:
R The vehicle is prepared for a wheel change
(/ page 405).
Pla stic hub cap #
Toremo ve:turn the cent recover of the hub
cap anti-clockwise and remo vethe hub cap. #
Tofit: make sure that the cent recover of the
hub cap is turned anti-clockwise. #
Position the hub cap and turn the cent re
co ver clockwise until the hub cap engages
ph ysically and audibly. Wheels and tyres
405