Start MERCEDES-BENZ C CLASS COUPE 2002 Owner's Guide
[x] Cancel search | Manufacturer: MERCEDES-BENZ, Model Year: 2002, Model line: C CLASS COUPE, Model: MERCEDES-BENZ C CLASS COUPE 2002Pages: 399, PDF Size: 16.59 MB
Page 100 of 399

97
Instrument cluster
Te ch n i c a l
data
Instruments
and controls Operation
DrivingInstrument
cluster display Practical hints Car care Index
1
Knob for instrument cluster illumination,
seepage99
Reset knob for trip odometer, see page 101 and
individual settings, see page 121
2 Tachometer
3 Speedometer
4 Left turn signal indicator lamp, see combination
switch on page 148
5 Electronic stability program (ESP) warning lamp,
see page 288
6 Indicator lamp without function. It illuminates with
the electronic key in starter switch position 2. It
should go out when the engine is running.
7 Right turn signal indicator lamp, see combination
switch on page 148
8 Indicator lamp without function. It illuminates with
the electronic key in starter switch position 2. It
should go out when the engine is running. 9
Multifunction display, see page 102
Malfunction and warning messages in the
multifunction display, see page 290
10 Trip odometer, see page 101 and 106
11 Main odometer, see page 106
12 Display for program mode and gear range
indicators, page 249
13 Malfunction/warning message memory,
seepage119
14 Outside temperature indicator, see page 100
15 Digital clock
To set the time, see individual settings on page 121
16 Fuel gauge with reserve warning lamp, see page 286
Page 102 of 399

99
Instrument cluster
Te ch n i c a l
data
Instruments
and controls Operation
DrivingInstrument
cluster display Practical hints Car care Index
Activating instrument cluster display
The instrument cluster is activated by:
• Opening the door
1.
• Pressing button (1) on the instrument cluster
1.
• Turning the electronic key in starter switch to
position 1 or 2.
• Switching on the exterior lamps.
Instrument cluster illumination
The instrument cluster illumination is dimmed or
brightened automatically to suit daylight lighting
conditions.
The instrument cluster illumination will also be
adjusted when the vehicle’s exterior lamps are switched
on.
1 The instrument cluster is activated for approximately 30 seconds.
Display illumination, changing basic settings for driving
at dusk or in darkness:
Rotate adjusting knob (1) clockwise – instrument lamp
intensity increases.
Rotate adjusting knob (1) counterclockwise –
instrument lamp intensity decreases.
Note:
It is not possible to select a basic brightness setting in
daylight – the intensity is adjusted automatically.
Page 106 of 399

103
Multifunction steering wheel, multifunction display
Te ch n i c a l
data
Instruments
and controls Operation
DrivingInstrument
cluster display Practical hints Car care Index
Depending on your vehicle’s equipment, you may use
the buttons on the multifunction steering wheel to call
up, control and set the following systems in the
multifunction display:
1 Trip odometer and main odometer, see page 101 and
page 106
Flexible service system (FSS), see page 138
Vehicle speed, see page 106
Coolant temperature gauge, see page 137
Engine oil level indicator, see page 141
2 Audio systems, see page 108
Radio, seepage108
CD player, see page 109
Cassette player, see page 110 3
Navigation system, see page 116
4 Malfunction message memory, see page 119
5 Individual settings, see page 121
6 Trip computer, see page 117
After start
After reset
Fuel tank content
7 Telephone, see page 111
Press the è or ÿ button repeatedly until the
required system is displayed.
The display advances by one system each time the
button is pressed.
You may call up additional displays within some of these
categories by pressing the j or k button.
Page 108 of 399

105
Multifunction steering wheel, multifunction display
Te ch n i c a l
data
Instruments
and controls Operation
DrivingInstrument
cluster display Practical hints Car care Index
1
Multifunction display
2 Multifunction steering wheel
Turn the electronic key in starter switch to position 1
or 2. Press button:
3 è for next system
4 ÿ for previous system
5 j for next display in system
6 k for previous display in system
7 æ to increase the volume, see page 136
8 ç to decrease the volume, see page 136
9 í to dial a telephone number, see page 111
10 ì to end a call
See page 111 for telephone and page 115 for
instructions on answering an incoming call.
11 Horn pad
Press the è or ÿ button repeatedly until the
required system is displayed.
The display advances by one system each time the
button is pressed.
You may call up additional displays in some systems by
pressing the j or k button.
Page 120 of 399

117
Multifunction steering wheel, multifunction display
Te ch n i c a l
data
Instruments
and controls Operation
DrivingInstrument
cluster display Practical hints Car care Index
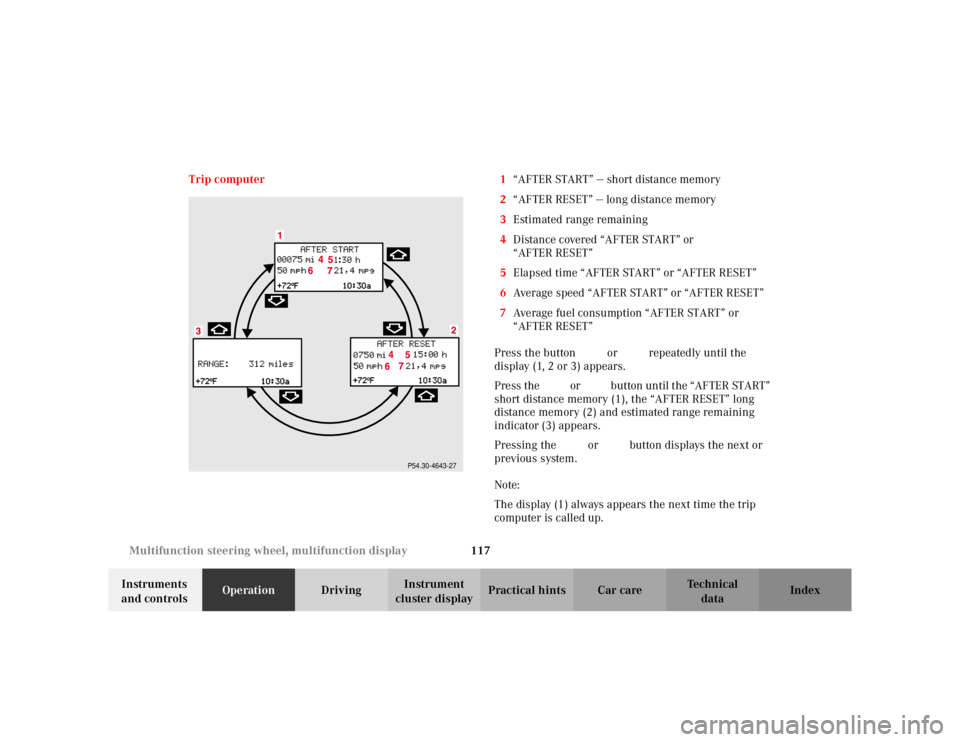
Trip computer 1
“AFTER START” — short distance memory
2 “AFTER RESET” — long distance memory
3 Estimated range remaining
4 Distance covered “AFTER START” or
“AFTER RESET”
5 Elapsed time “AFTER START” or “AFTER RESET”
6 Average speed “AFTER START” or “AFTER RESET”
7 Average fuel consumption “AFTER START” or
“AFTER RESET”
Press the button è or ÿ repeatedly until the
display (1, 2 or 3) appears.
Press the j or k button until the “AFTER START”
short distance memory (1), the “AFTER RESET” long
distance memory (2) and estimated range remaining
indicator (3) appears.
Pressing the è or ÿ button displays the next or
previous system.
Note:
The display (1) always appears the next time the trip
computer is called up.
P54.30-4643-27
Page 121 of 399

118
Multifunction steering wheel, multifunction display
Te ch n i c a l
data
Instruments
and controls Operation
DrivingInstrument
cluster display Practical hints Car care Index
To reset the short “AFTER START” (1) or long
“AFTER RESET” distance memory (2):
Call up the relevant display (1 or 2) using the j or
k button and press the reset knob on the instrument
cluster, see page 96, until the values are reset to “0”. Note:
The “AFTER START” trip odometer reading is
automatically reset after four hours of electronic key not
being in starter switch position 1 or 2.
Page 122 of 399

119
Multifunction steering wheel, multifunction display
Te ch n i c a l
data
Instruments
and controls Operation
DrivingInstrument
cluster display Practical hints Car care Index
Malfunction / warning message memory 1
There are no messages stored in the system.
2 Number of messages stored in the system.
3 There are messages stored in the system.
Press the è or ÿ button repeatedly until the
message memory (1 or 2) is displayed.
Press the j or k button if display (2) appears.
The stored messages will now be displayed in order.
See page 290 for malfunction and warning messages.
Display (2) will reappear after you have scanned all the
malfunction and warning messages.
Should any malfunction or warning messages be stored
while driving, they will reappear in the display (2) when
the electronic key is in starter switch position 0 or
removed from the starter switch.
The malfunction or warning messages will now be
displayed for approximately 5 seconds each.
Pressing the reset knob on the instrument cluster
(see page 96) displays the malfunction and warning
messages once more.
P54.30-4644-27
Page 123 of 399

120
Multifunction steering wheel, multifunction display
Te ch n i c a l
data
Instruments
and controls Operation
DrivingInstrument
cluster display Practical hints Car care Index
The message memory will be cleared when the
electronic key is turned in the starter switch to
position 1 or 2. Should any subsequent faults occur,
they will be displayed in the message memory.
Pressing the è or ÿ button displays the next or
previous system. Important!
Malfunction and warning messages are only indicated
for certain systems and displayed to a low level of detail.
The malfunction and warning messages are simply a
reminder with respect to the operation of certain
systems and do not replace the driver’s responsibility to
maintain the vehicle’s operating safety by having all
required maintenance and safety checks performed on
the vehicle and by bringing the vehicle to an authorized
Mercedes-Benz Center to address the malfunction and
warning messages. See page 290, for malfunction and
warning messages.
Page 125 of 399

122
Multifunction steering wheel, multifunction display
Te ch n i c a l
data
Instruments
and controls Operation
DrivingInstrument
cluster display Practical hints Car care Index
Press the è or ÿ button repeatedly until the
individual setting preliminary display (1) appears.
Press the j or k button until the setting menu
“SETTINGS” (2) is displayed.
Pressing the æ or ç button controls the selection
marker in the setting menu.
“INSTRUMENT CLUSTER”, see page 124.
“LIGHTING”, see page 128.
“VEHICLE”, see page 132.
“CONVENIENCE”, see page 134
Pressing the è or ÿ button displays the next or
previous system. Note:
These settings may only be performed with the
electronic key in starter switch position 1 or 2.
Page 140 of 399

137
Coolant temperature gauge
Te ch n i c a l
data
Instruments
and controls Operation
DrivingInstrument
cluster display Practical hints Car care Index
Coolant temperature gauge
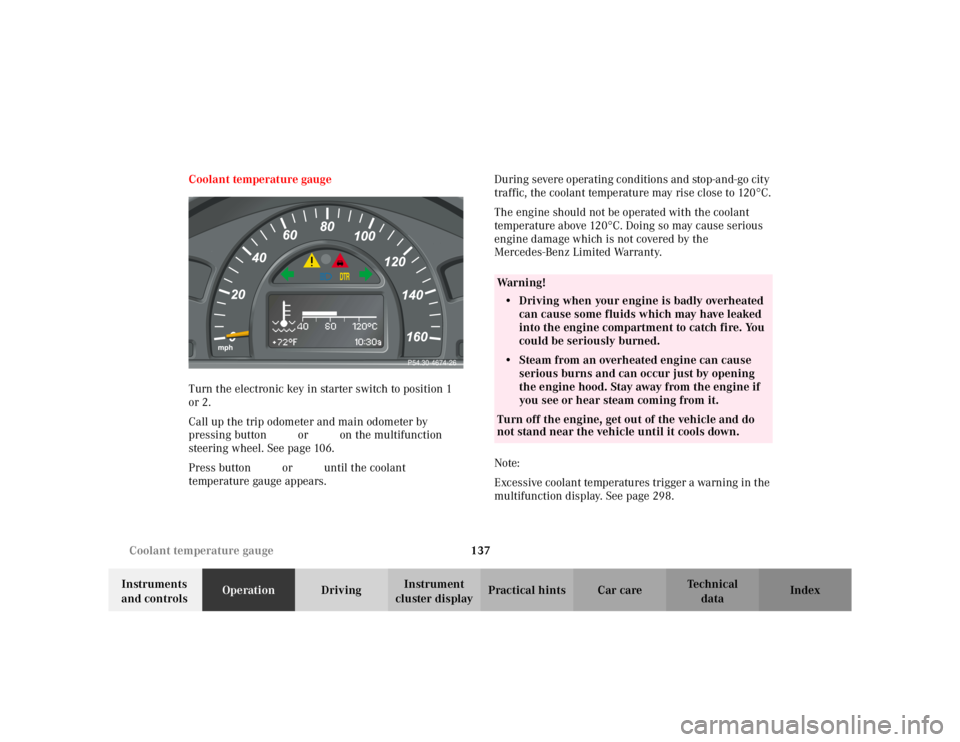
Turn the electronic key in starter switch to position 1
or 2.
Call up the trip odometer and main odometer by
pressing button
è or ÿ on the multifunction
steering wheel. See page 106.
Press button j or k until the coolant
temperature gauge appears. During severe operating conditions and stop-and-go city
traffic, the coolant temperature may rise close to 120
°C.
The engine should not be operated with the coolant
temperature above 120
°C. Doing so may cause serious
engine damage which is not covered by the
Mercedes-Benz Limited Warranty.
Note:
Excessive coolant temperatures trigger a warning in the
multifunction display. See page 298.
P54.30-4674-26
Wa r n i n g !
• Driving when your engine is badly overheated can cause some fluids which may have leaked
into the engine compartment to catch fire. You
could be seriously burned.• Steam from an overheated engine can cause
serious burns and can occur just by opening
the engine hood. Stay away from the engine if
you see or hear steam coming from it.Turn off the engine, get out of the vehicle and do
not stand near the vehicle until it cools down.