buttons MERCEDES-BENZ C-CLASS COUPE 2011 Owners Manual
[x] Cancel search | Manufacturer: MERCEDES-BENZ, Model Year: 2011, Model line: C-CLASS COUPE, Model: MERCEDES-BENZ C-CLASS COUPE 2011Pages: 373, PDF Size: 8.17 MB
Page 16 of 373
H
Handbrake see Parking brake
Hazard warning lamps ......................111
Headlamp Cleaning system (function) ............110
Headlamps
Misting up ...................................... 113
Topping up the cleaning system ....304
see Automatic headlamp mode
Head restraints
Adjusting ......................................... 98
Adjusting (electrically). ....................99
Adjusting (manually). .......................98
see NECK-PR Ohead restraints
Heating
see Climate control
High-pressure cleaners ....................307
Hill start assist .................................. 140
HOLD function Display message (12-button mul-
tifunctio nsteering wheel) ..............257
Display message (4-button multi-
function steering wheel) ................256
Function/notes ............................. 177 I
Ignition lock see Key positions
Immobiliser .......................................... 73
Indicator and warning lamps Coolant .......................................... 280
DISTRONI CPLUS ........................... 282
Engine diagnostics .........................280
Fuel tank ........................................ 280
Overview (12-button multifunc-
tion steering wheel) .........................37
Overview (4-button multifunction
steering wheel) ................................ 34
SPORT handling mode ...................278
Indicator lamps
see Warning and indicator lamps
Indicators
see Turn signals Instrument cluster (12-button mul-
tifunction steering wheel)
Indicator and warning lamps ............37
Overview .......................................... 35
Settings ......................................... 223
Instrument cluster (4-button mul-
tifunction steering wheel) Indicator and warning lamps ............34
Overview .......................................... 32
Instrument cluster lighting
Multifunctio nsteering wheel with
12 buttons ....................................... 35
Multifunctio nsteering wheel with
4b utton s......................................... 32
Instrument lighting
see Instrument cluster lighting
Intelligen tLight System
Activating/deactivatin g(12-but-
ton multifunctio nsteering wheel) ..224
Display message (12-button mul-
tifunctio nsteering wheel) ..............250
Setting the dipped-bea mhead-
lamps for driving on the right/left .224
Interior lighting
Automatic control system ..............114
Delayed switch-off (12-button
multifunctio nsteering wheel) ........225
Emergency lighting ........................114
Manual control ............................... 114
Overview ........................................ 114
Reading lamp ................................. 114
see Interior lighting
Interior motion sensor ........................74
ISOFIX child seat securing system ....58 J
Jack Storage location ............................ 315
Using ............................................. 322
Jump starting (engine) ......................329 K
Key Changing the battery .......................81
Checking the battery .......................81
Convenience closing feature ............89 Index
13
Page 19 of 373

Multifunction steering wheel (4
buttons)
see 4-button multifunction steer-
ing wheel N
Navigation Menu (on-board computer) ............216
On-board computer (12-button
multifunctio nsteering wheel) ........216
see separate operating instructions
NECK-PRO head restraints
Operation ........................................ .50
Resetting after being triggered ........51
Notes on running in anew vehicle ..136 O
Occupant safety Childre ninthe vehicle ..................... 55
Important safety notes ....................44
Odometer
4-button multifunction steering
wheel ............................................. 209
see Total distance recorder
see Trip meter
Oil
see Engine oil
On-board computer
RACETIMER ................................... 229
On-board computer (12-button
multifunction steering wheel)
AMG menu ..................................... 229
Assist menu ................................... 220
Audi omenu ................................... 217
Convenience submenu ..................228
DISTRONI CPLUS ........................... 171
Important safety notes ..................206
Instrument cluster submenu ..........223
Lights submenu ............................. 224
Menu overview .............................. 214
Navigation menu ............................ 216
Operating ...................................... .211
Operating the vide oDVD ............... 218
Range ............................................ 215
Service menu ................................. 222
Standard display submenu ............215 Telephone menu
............................ 219
Trip menu ...................................... 215
On-board computer (12-button
multifunction steering wheel)
Displaying service messages .........305
Display messages ..........................232
Heating submenu ........................... 227
Message memory .......................... 233
Vehicle submenu ........................... 225
On-board computer (12-button
multifunction steering wheel)Set-
tings menu ......................................... 223
On-board computer (12-button
multifunction steering wheel) sub-
menu
Factory setting ............................... 228
On-board computer (4-button mul-
tifunction steering wheel)
Important safety notes ..................206
Menu overview .............................. 209
Switching daytime driving lights
on/off ............................................ 210
On-board computer (4-button mul-
tifunction steering wheel)
Displaying service messages .........305
Display messages ..........................232
Individual vehicle settings ..............207
Message memory .......................... 232
Operating ...................................... .207
Range ............................................ 210
Standard displa y............................ 209
Trip computer ................................ 210
Opening and closing the side trim
panels ................................................. 117
Operating system see On-board computer
Outside temperature
Display (12-button multifunction
steering wheel) .............................. 211
Display (4-button multifunction
steering wheel) .............................. 207
Overhead control panel ......................41 P
Pain tcode .......................................... 352
Paintwork (cleaning instructions) ...307 16
Index
Page 23 of 373
Speed Limit Assist
Activating/deactivating the warn-
ing function .................................... 220
Displaying ...................................... 220
Display message (12-button mul-
tifunctio nsteering wheel) ..............257
Display message in the multifunc-
tion displa y.................................... 189
Important safety notes ..................189
Speedometer
Activating/deactivating the addi-
tional speedometer ........................223
Digita l............................................ 215
In the instrument cluster (12-but-
ton multifunctio nsteering wheel) ....35
In the instrument cluster (4-but-
ton multifunctio nsteering wheel) ....32
Segments ...................................... 211
Selecting the unit of measure-
ment .............................................. 223
see Instrument cluster
SPEEDTRONIC
Deactivating variabl e..................... 175
Display message (12-button mul-
tifunctio nsteering wheel) ..............261
Display message (4-button multi-
function steering wheel) ................256
Function/notes ............................. 173
Important safety notes ..................173
LIM indicator lamp .........................174
Permanent ..................................... 176
Selecting ........................................ 174
Storing the current spee d.............. 175
Variabl e......................................... 174
SPORT handling mode
Activating/deactivating (AMG
vehicles) .......................................... 69
Warning lamp ................................. 278
SRS (Supplemental Restraint Sys-
tem)
Display message (12-button mul-
tifunctio nsteering wheel) ..............243
Display message (4-button multi-
function steering wheel) ................237
Introduction ..................................... 45
Warning lamp ................................. 279
Warning lamp (function) ................... 45
Starting (engine) ................................ 138 Station
see Radio
Steering
Display message (12-button mul-
tifunctio nsteering wheel) ..............269
Display message (4-button multi-
function steering wheel) ................267
Steering wheel
Adjusting (electrically). ..................102
Adjusting (manually). .....................101
Buttons (12-button multifunction
steering wheel) .............................. 211
Buttons (4-button multifunction
steering wheel) .............................. 207
Gearshift paddles ........................... 148
Important safety notes ..................101
Storing settings (memory func-
tion) ............................................... 105
Steering wheel gearshift paddles ....148
Stopwatch (RACETIMER) ................... 229
Stowage compartments Armrest (under) ............................. 285
Centre console .............................. 285
Cuph older..................................... 289
Glove compartment .......................285
Important safety information .........284
Luggage net ................................... 285
Stowage well beneath the boot
floor .................................................... 288
Summer opening see Convenience opening feature
Summer tyres .................................... 337
Sun visor ............................................ 290
Supplement Restraint System see SRS (Supplemental Restraint
System)
Surround lighting (12-button mul-
tifunction steering wheel) ................225
Switching off the alarm (ATA) ............73 20
Index
Page 56 of 373
Fastening seat belts
X
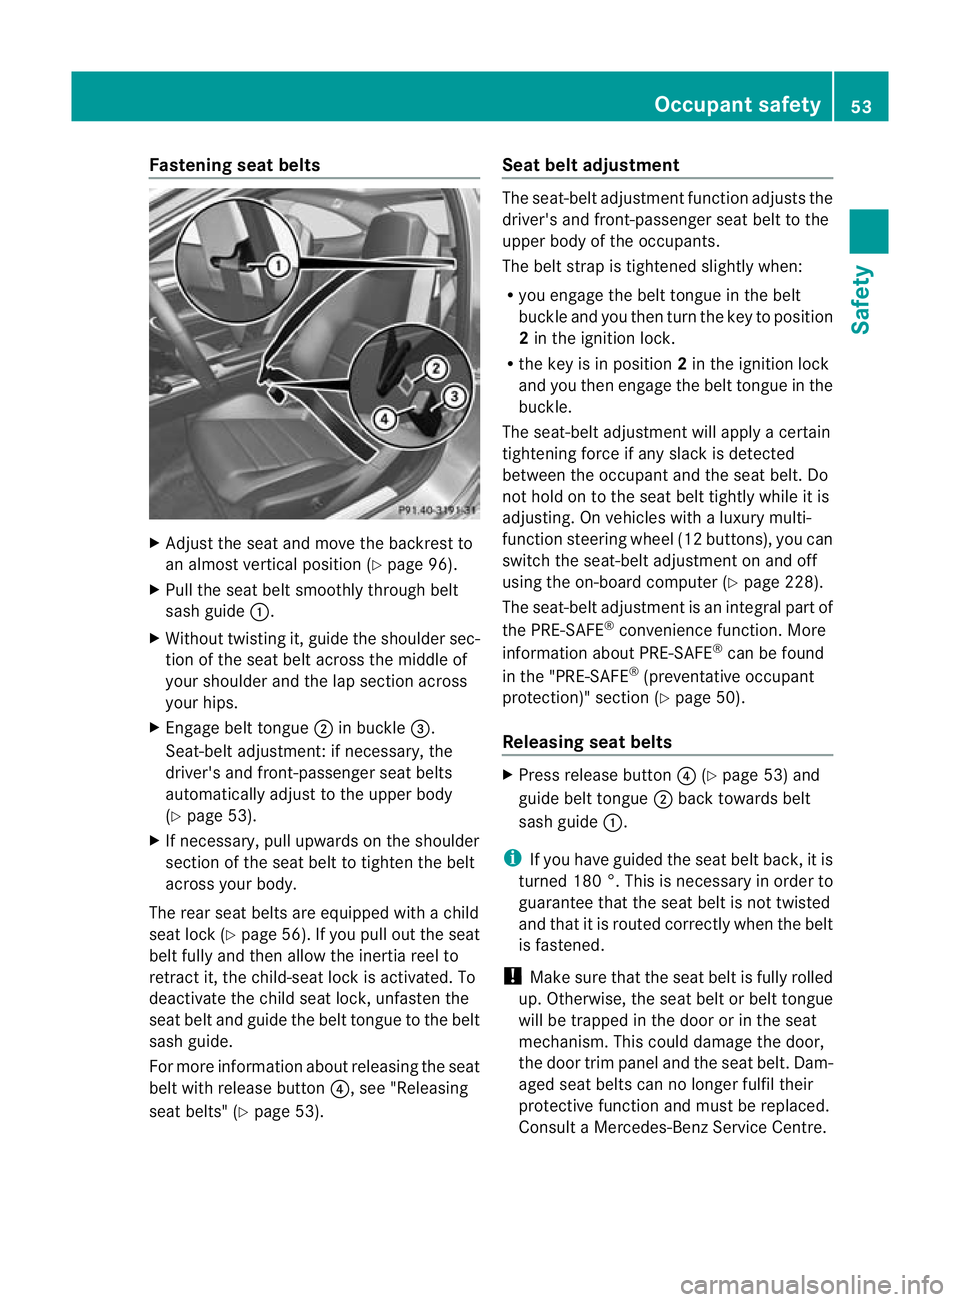
Adjust the seat and move the backrest to
an almost vertical position (Y page 96).
X Pull the seat belt smoothly through belt
sash guide :.
X Without twisting it, guide the shoulder sec-
tion of the seat belt across the middle of
your shoulder and the lap section across
your hips.
X Engage belt tongue ;in buckle =.
Seat-belt adjustment: if necessary, the
driver's and front-passenger seat belts
automatically adjust to th eupper body
(Y page 53).
X If necessary, pull upwards on the shoulder
section of the seat belt to tighten the belt
across your body.
The rear seat belts are equipped with a child
seat lock (Y page 56). If you pull out the seat
belt fully and then allow the inertia reel to
retract it, the child-seat lock is activated. To
deactivate the child seat lock, unfasten the
seat belt and guide the belt tongue to the belt
sash guide.
For more information about releasing the seat
belt with release button ?, see "Releasing
seat belts" (Y page 53). Seat belt adjustment The seat-belt adjustment function adjusts the
driver's and front-passenger seat belt to the
upper body of the occupants.
The belt strap is tightened slightly when:
R
you engage the belt tongue in the belt
buckle and you then turn the key to position
2in the ignition lock.
R the key is in position 2in the ignition lock
and you then engage the belt tongue in the
buckle.
The seat-belt adjustment will apply a certain
tightening force if any slack is detected
between the occupant and the seat belt. Do
not hold on to the seat belt tightly while it is
adjusting. On vehicles with a luxury multi-
function steering wheel (12 buttons), you can
switch the seat-belt adjustment on and off
using the on-board computer (Y page 228).
The seat-belt adjustment is an integral part of
the PRE-SAFE ®
convenience function. More
information about PRE-SAFE ®
can be found
in the "PRE-SAFE ®
(preventative occupant
protection)" section (Y page 50).
Releasing seat belts X
Press release button ?(Ypage 53) and
guide belt tongue ;back towards belt
sash guide :.
i If you have guided the seat belt back, it is
turned 180 °. This is necessary in order to
guarantee that the seat belt is not twisted
and that it is routed correctly when the belt
is fastened.
! Make sure that the seat belt is fully rolled
up. Otherwise, the seat belt or belt tongue
will be trapped in the door or in the seat
mechanism. This could damage the door,
the door trim panel and the seat belt. Dam-
aged seat belts can no longer fulfil their
protective function and must be replaced.
Consult a Mercedes-Benz Service Centre. Occupant safety
53Safety Z
Page 82 of 373
You can also set an audible signal to confirm
that the vehicle has been locked or unlocked.
The audible signal can be activated and deac-
tivated using the on-board computer
(Y page 226).
X To unlock centrally: press the%but-
ton.
If you do not open the vehicle within approx-
imately 40 seconds of unlocking:
R the vehicle is locked again.
R the anti-theft system is primed again.
X To lock centrally: press the&button. KEYLESS-GO
You can start, lock or unloc kthe vehicle using
KEYLESS-GO. To do this, you only need carry
the key with you. When you touch the surface
of the sensors on the vehicle's outside door
handles, KEYLESS-GO establishes a radio
connection between the vehicle and the key.
When the engine is started and whilst you are
driving, KEYLESS-GO also checks whether a
valid key is in the vehicle by periodically
establishing radio contact.
When locking or unlocking with KEYLESS-GO,
the distance between the key and the door
handle you wish to lock or unlock must not
be greater than 1 m. X
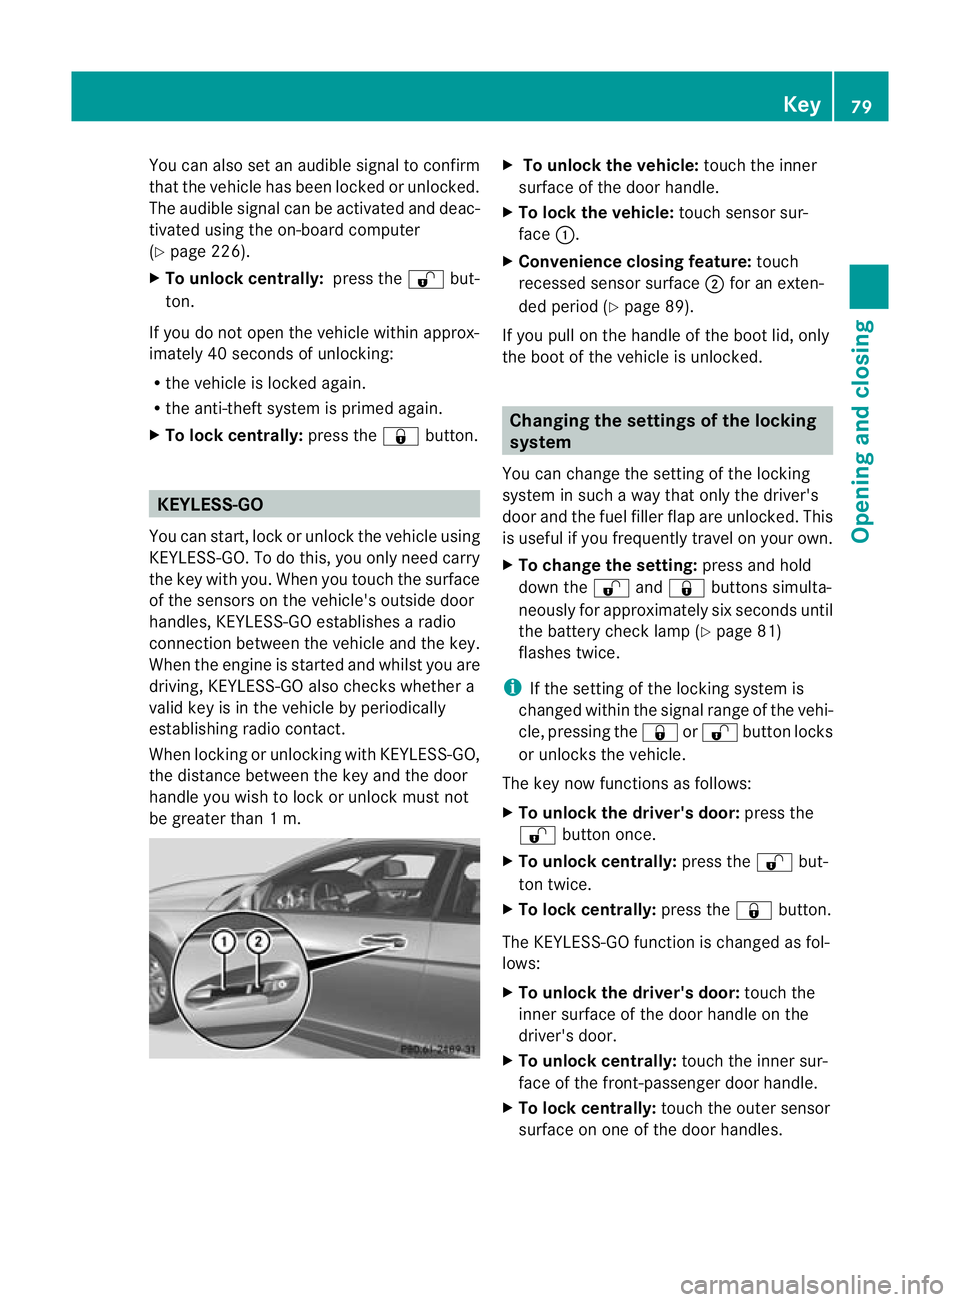
To unlock the vehicle: touch the inner
surface of the door handle.
X To lock the vehicle: touch sensor sur-
face :.
X Convenience closing feature: touch
recessed sensor surface ;for an exten-
ded period (Y page 89).
If you pull on the handle of the boot lid, only
the boot of the vehicle is unlocked. Changing the settings of the locking
system
You can change the settingoft he locking
system in such a way that only the driver's
door and the fuel filler flap are unlocked. This
is useful if you frequently travel on your own.
X To change the setting: press and hold
down the %and& buttons simulta-
neously for approximately six seconds until
the battery check lamp (Y page 81)
flashes twice.
i If the setting of the locking system is
changed within the signal range of the vehi-
cle, pressing the &or% button locks
or unlocks the vehicle.
The key now functions as follows:
X To unlock the driver's door: press the
% button once.
X To unlock centrally: press the%but-
ton twice.
X To lock centrally: press the&button.
The KEYLESS-GO function is changed as fol-
lows:
X To unlock the driver's door: touch the
inner surface of the door handle on the
driver's door.
X To unlock centrally: touch the inner sur-
face of the front-passenger door handle.
X To lock centrally: touch the outer sensor
surface on one of the door handles. Key
79Opening and closing Z
Page 83 of 373
Restoring the factory settings
X Press the %and& buttons simulta-
neously for approximately six seconds until
the battery check lamp flashes twice. Emergenc
ykey element
General notes If the vehicle can no longer be locked or
unlocked with the key, use the emergency
key element.
If you use the emergency key element to
unlock and open the driver's door or the boot
lid, the anti-thef talarm system will be trig-
gered (Y page 73).
There are several ways to tur noff the alarm:
X To turn the alarm off with the key: press
the % or& button on the key.
or
X Insert the key into the ignition lock.
or
X To deactivate the alarm with KEYLESS-
GO: press the Start/Stop button in the igni-
tion lock. The key must be in the vehicle.
or
X Lock or unlock the vehicle using KEYLESS-
GO. The key must be outside the vehicle.
If you unlock the vehicle using the emergency
key element, the fuel filler flap will not be
unlocked automatically.
X To unlock the fuel filler flap: insert the
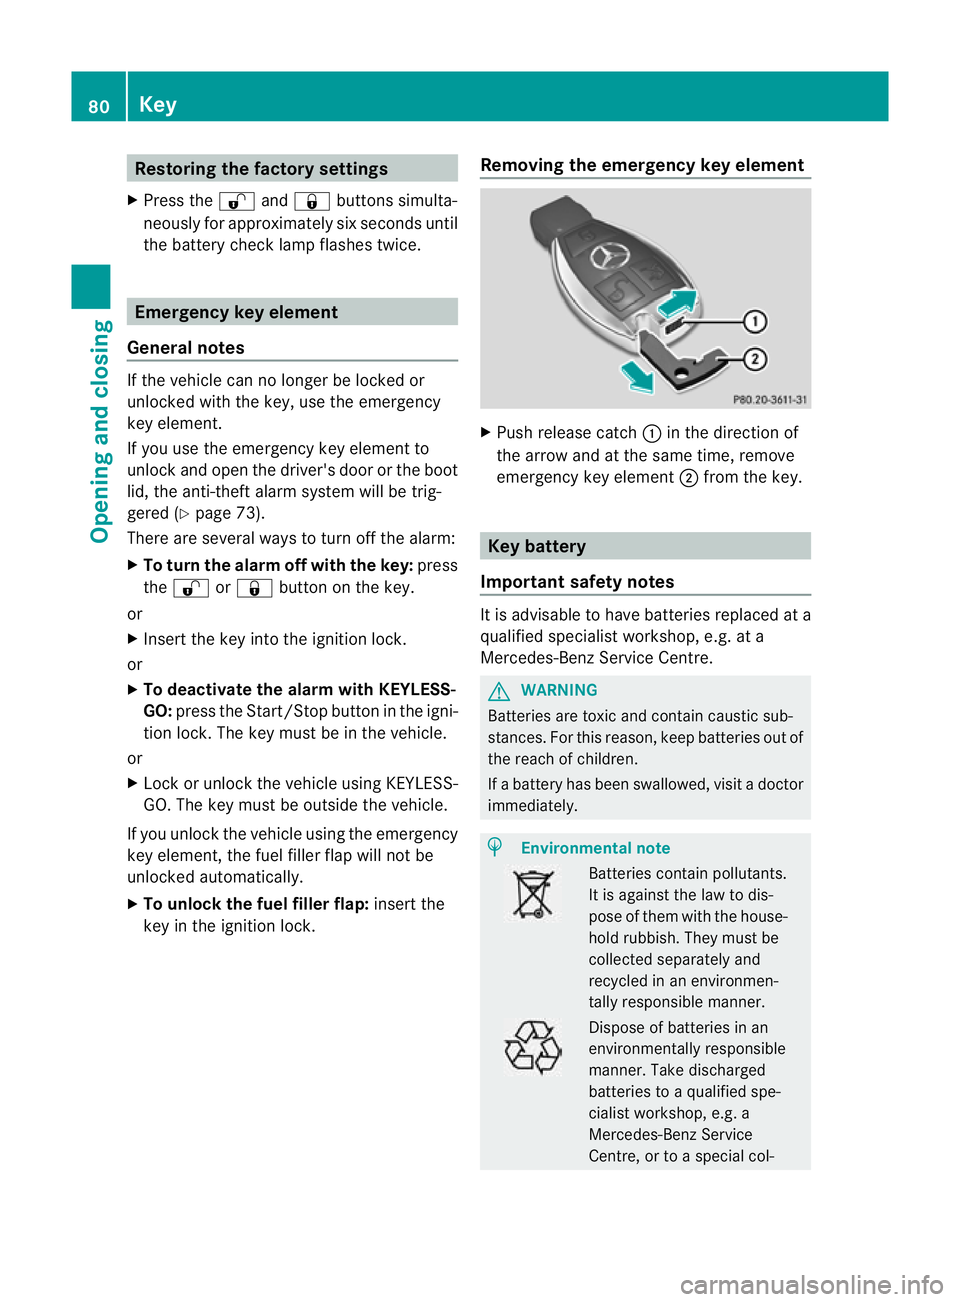
key in the ignition lock. Removing the emergency key element X
Push release catch :in the direction of
the arrow and at the same time, remove
emergency key element ;from the key. Key battery
Important safety notes It is advisable to have batteries replaced at a
qualified specialist workshop, e.g. at a
Mercedes-Benz Service Centre.
G
WARNING
Batteries are toxic and contain caustic sub-
stances. For this reason, keep batteries out of
the reach of children.
If a battery has been swallowed, visi tadoctor
immediately. H
Environmental note Batteries contain pollutants.
It is against the law to dis-
pose of them with the house-
hold rubbish. They must be
collected separately and
recycled in an environmen-
tally responsible manner. Dispose of batteries in an
environmentally responsible
manner. Take discharged
batteries to a qualified spe-
cialist workshop, e.g. a
Mercedes-Benz Service
Centre, or to a special col-80
KeyOpening and closing
Page 84 of 373
lection point for old batter-
ies.
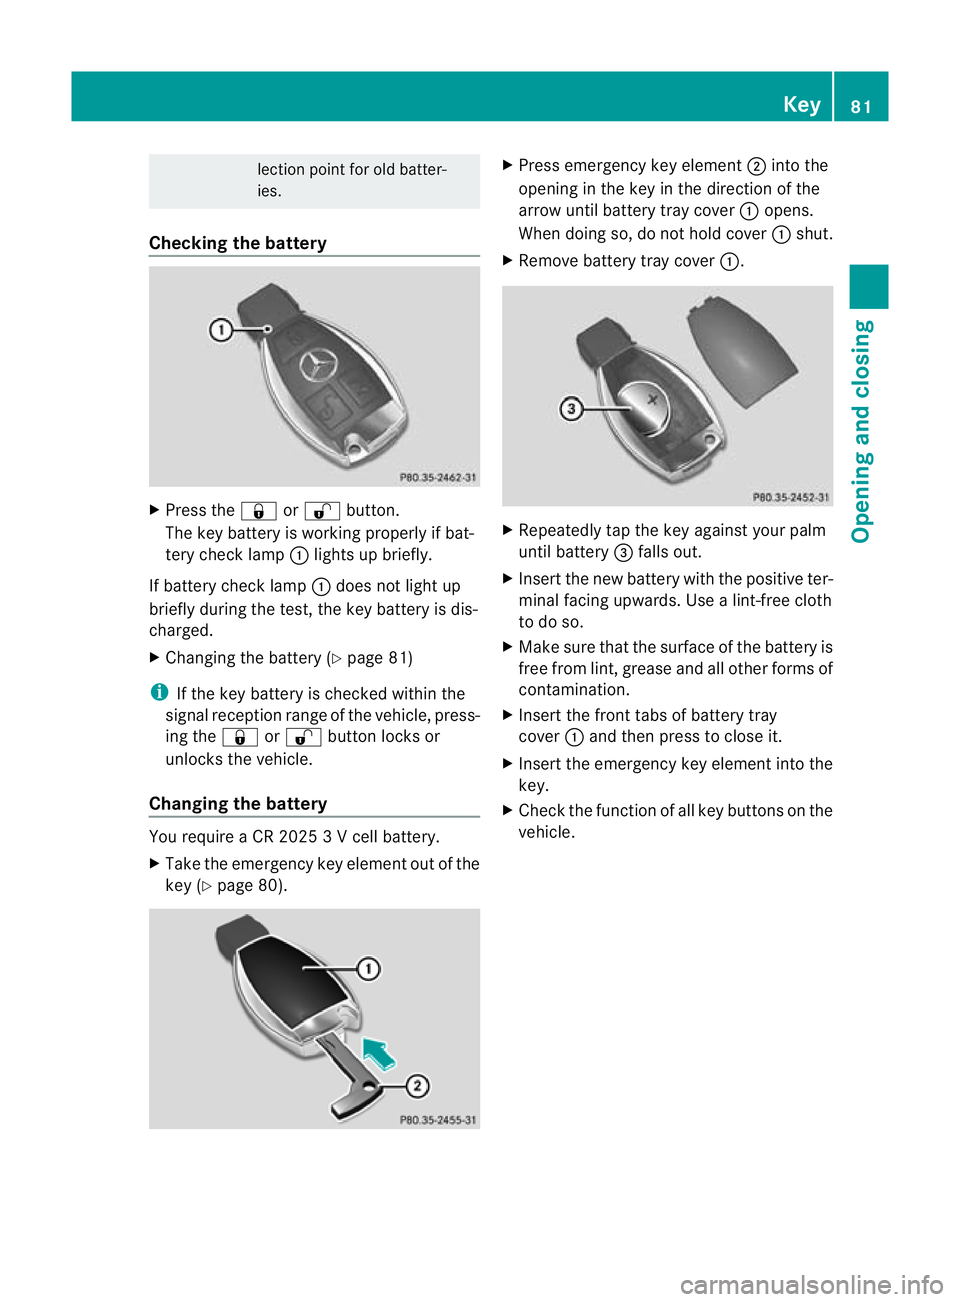
Checking the battery X
Press the &or% button.
The key battery is working properly if bat-
tery check lamp :lights up briefly.
If battery check lamp :does not light up
briefly during the test, the key battery is dis-
charged.
X Changing the battery (Y page 81)
i If the key battery is checked within the
signal receptio nrange of the vehicle, press-
ing the &or% button locks or
unlocks the vehicle.
Changing the battery You require a CR 2025 3 V cell battery.
X Take the emergency key elemen tout of the
key (Y page 80). X
Press emergency key element ;into the
opening in the key in the direction of the
arrow until battery tray cover :opens.
When doing so, do no thold cover :shut.
X Remove battery tray cover :. X
Repeatedly tap the key against your palm
until battery =falls out.
X Insert the new battery with the positive ter-
minal facing upwards. Use a lint-free cloth
to do so.
X Make sure that the surface of the battery is
free from lint, grease and all other forms of
contamination.
X Insert the front tabs of battery tray
cover :and then press to close it.
X Insert the emergency key element into the
key.
X Check the function of all key buttons on the
vehicle. Key
81Opening and closing Z
Page 100 of 373
in such a way that you have a good view of
road and traffic conditions.
X Vehicles with a memory function: save
the seat, steering wheel and exterior mirror
settings (Y page 105). Seats
Important safety notes
G
WARNING
The seats can still be adjusted when there is
no key in the ignition lock. For this reason,
children should never be left unsupervised in
the vehicle. They could adjust the seats and
become trapped. G
WARNING
Only adjust the driver's seat when the vehicle
is stationary. You will otherwise be distracted
from the road and traffic conditions and you
could lose control of the vehicle as a result of
the seat moving. This could cause an acci-
dent. G
WARNING
If you adjust the seat height carelessly, you or
others could be trapped and thereby injured.
Children in particular could unintentionally
press the buttons to electrically adjust the
seats and become trapped.
Take care that:
R while moving the seats, your hands do not
get under the lever assembly of the seat
adjustmen tsystem.
R children in the vehicle do no tslide their
hands under the levers. G
WARNING
Make sure that nobody can become trapped
when adjusting the seats.
Observe the notes on airbags.
Secure children as recommended; see the
"Children in the vehicle" section. G
WARNING
Make sure that the back of your head is sup-
ported at eye level by the central area of the
head restraint .Ifyour head is not supported
correctly by the head restraint, you could suf-
fer a severe neck injury in the event of an
accident .Never drive if the head restraints are
not engaged and set correctly. G
WARNING
As eat belt can only offer its intended degree
of protection when the backrest is almost ver-
tical and the occupant is sitting upright. Avoid
seat positions that do not allow the seat belt
to be routed correctly. Adjust the backrest so
that it is as upright as possible. Never travel
with the backrest reclined too far backwards.
You could otherwise be seriously or even
fatally injured in the event of an accident or
sudden braking.
! To avoid damage to the seats and the seat
heating, observe the following information:
R do not spill any liquids on the seats. If
liquid is spilled on the seats, dry them as
soon as possible.
R if the seat covers are damp or wet, do not
switch on the seat heating. The seat
heating should also not be used to dry
the seats.
R clean the seat covers as recommended;
see the "Interior care" section.
R do not transport heavy loads on the
seats. Do not place sharp objects on the
seat cushions, e.g. knives, nails or tools.
The seats should only be occupied by
passengers, if possible.
R when the seat heating is in operation, do
not cover the seats with insulating mate-
rials, e.g. blankets, coats, bags, seat cov-
ers, child seats or booster seats.
! When you move the seats, make sure that
there are no objects in the footwell or
behind the seats. Otherwise, you could
damage the seats and the objects. Seats
97Seats, steering wheel and mirrors Z
Page 103 of 373
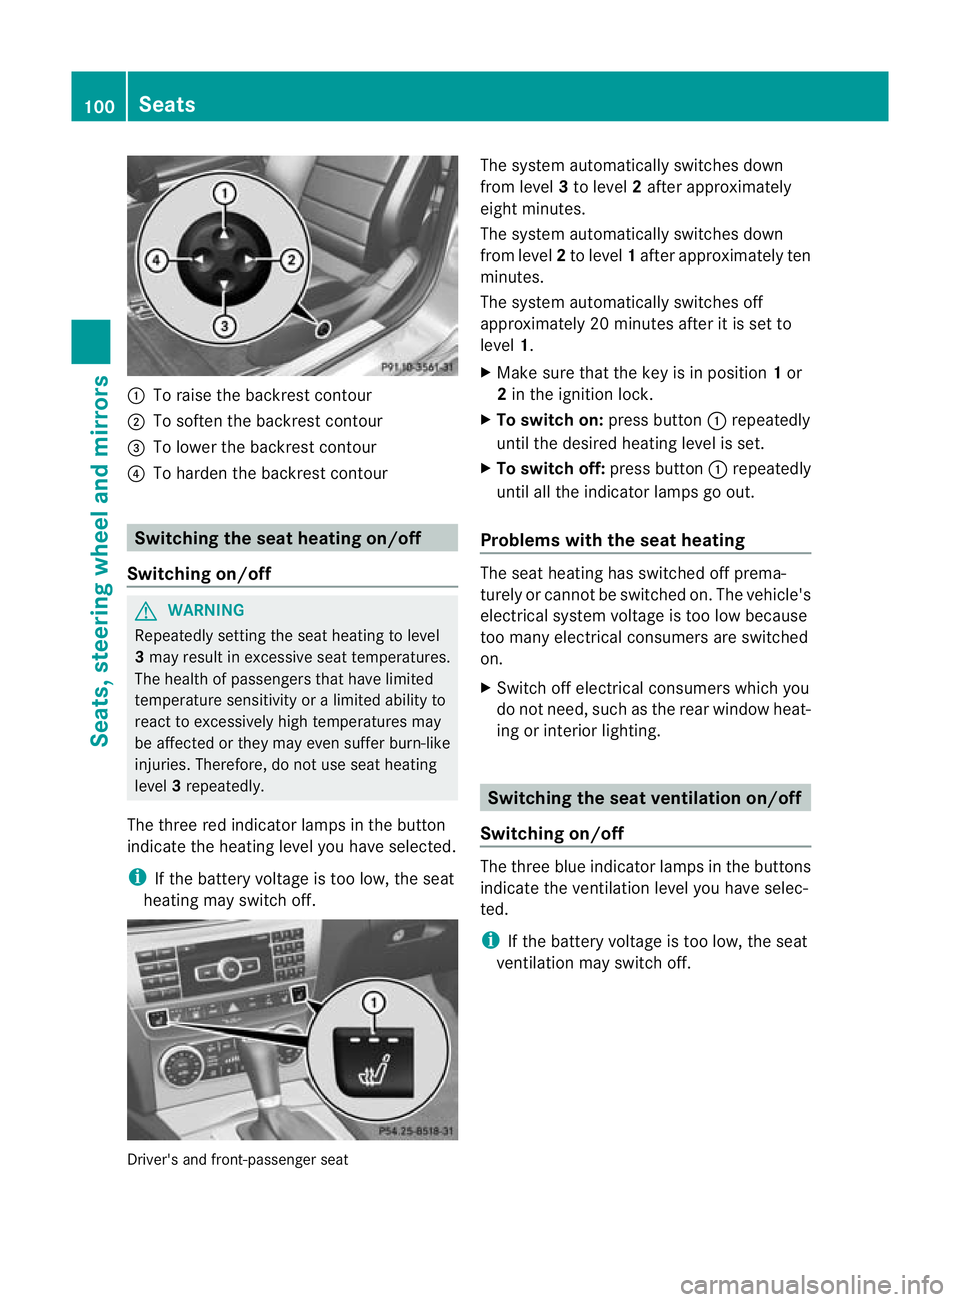
:
To raise the backrest contour
; To soften the backrest contour
= To lower the backrest contour
? To harden the backrest contour Switching the seat heating on/off
Switching on/off G
WARNING
Repeatedly setting the seat heating to level
3 may result in excessiv eseat temperatures.
The health of passengers that have limited
temperature sensitivity or a limited ability to
react to excessively high temperatures may
be affected or they may even suffer burn-like
injuries. Therefore, do not use seat heating
level 3repeatedly.
The three red indicator lamps in the button
indicate the heating level you have selected.
i If the battery voltage is too low, the seat
heating may switch off. Driver's and front-passenger seat The system automatically switches down
from level
3to level 2after approximately
eight minutes.
The system automatically switches down
from level 2to level 1after approximately ten
minutes.
The system automatically switches off
approximately 20 minutes after it is set to
level 1.
X Make sure that the key is in position 1or
2 in the ignition lock.
X To switch on: press button:repeatedly
until the desired heating level is set.
X To switch off: press button:repeatedly
until all the indicator lamps go out.
Problems with the seat heating The seat heating has switched off prema-
turely or cannot be switched on. The vehicle's
electrical system voltage is too low because
too many electrical consumers are switched
on.
X Switch off electrical consumers which you
do not need, such as the rear window heat-
ing or interior lighting. Switching the seat ventilation on/off
Switching on/off The three blue indicator lamps in the buttons
indicate the ventilation level you have selec-
ted.
i
If the battery voltage is too low, the seat
ventilation may switch off. 100
SeatsSeats, steering wheel and mirrors
Page 105 of 373
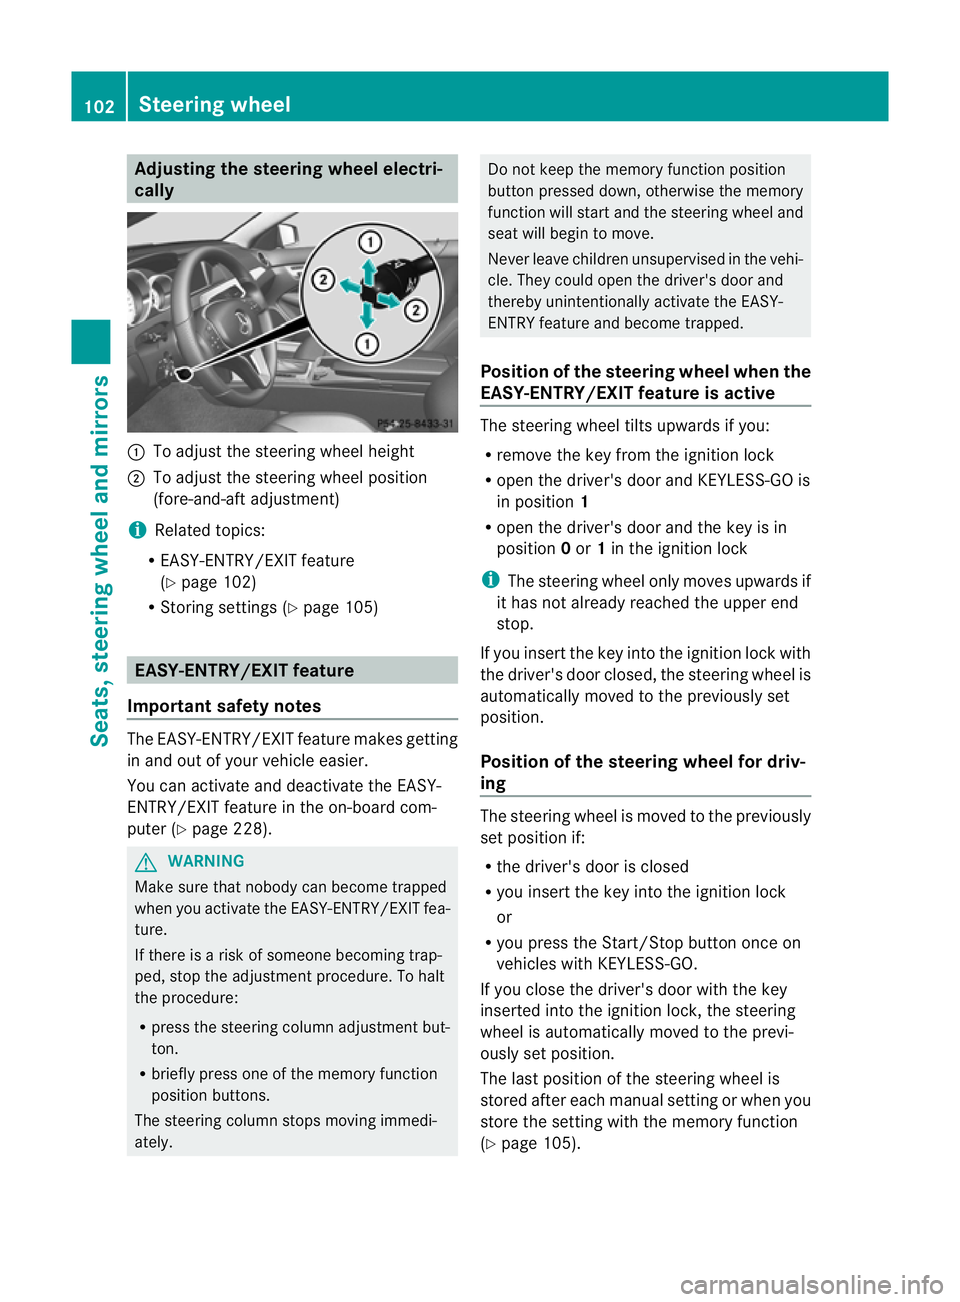
Adjusting the steering wheel electri-
cally
:
To adjust the steering wheel height
; To adjust the steering wheel position
(fore-and-aft adjustment)
i Related topics:
R EASY-ENTRY/EXIT feature
(Y page 102)
R Storing settings (Y page 105)EASY-ENTRY/EXIT feature
Important safety notes The EASY-ENTRY/EXIT feature makes getting
in and out of your vehicle easier.
You can activate and deactivate the EASY-
ENTRY/EXIT feature in the on-board com-
puter (Y page 228). G
WARNING
Make sure that nobody can become trapped
when you activate the EASY-ENTRY/EXIT fea-
ture.
If there is a risk of someone becoming trap-
ped, stop the adjustmen tprocedure. To halt
the procedure:
R press the steering column adjustment but-
ton.
R briefly press one of the memory function
position buttons.
The steering column stops moving immedi-
ately. Do not keep the memory function position
button pressed down, otherwise the memory
function will start and the steering wheel and
seat will begi nto move.
Never leave children unsupervised in the vehi-
cle. They could open the driver's door and
thereby unintentionally activate the EASY-
ENTRY feature and become trapped.
Position of the steering wheel when the
EASY-ENTRY/EXIT feature is active The steering wheel tilts upwards if you:
R
remove the key from the ignition lock
R open the driver's door and KEYLESS-GO is
in position 1
R open the driver's door and the key is in
position 0or 1in the ignition lock
i The steering wheel only moves upwards if
it has not already reached the upper end
stop.
If you insert the key into the ignition lock with
the driver's door closed, the steering wheel is
automatically moved to the previously set
position.
Position of the steering wheel for driv-
ing The steering wheel is moved to the previously
set position if:
R the driver's door is closed
R you insert the key into the ignition lock
or
R you press the Start/Stop button once on
vehicles with KEYLESS-GO.
If you close the driver's door with the key
inserted into the ignition lock, the steering
wheel is automatically moved to the previ-
ously set position.
The last position of the steering wheel is
stored after each manual setting or when you
store the setting with the memory function
(Y page 105). 102
Steering wheelSeats, steering wheel and mirrors