clock MERCEDES-BENZ C-Class COUPE 2012 CL204 Owner's Manual
[x] Cancel search | Manufacturer: MERCEDES-BENZ, Model Year: 2012, Model line: C-Class COUPE, Model: MERCEDES-BENZ C-Class COUPE 2012 CL204Pages: 336, PDF Size: 12.67 MB
Page 31 of 336
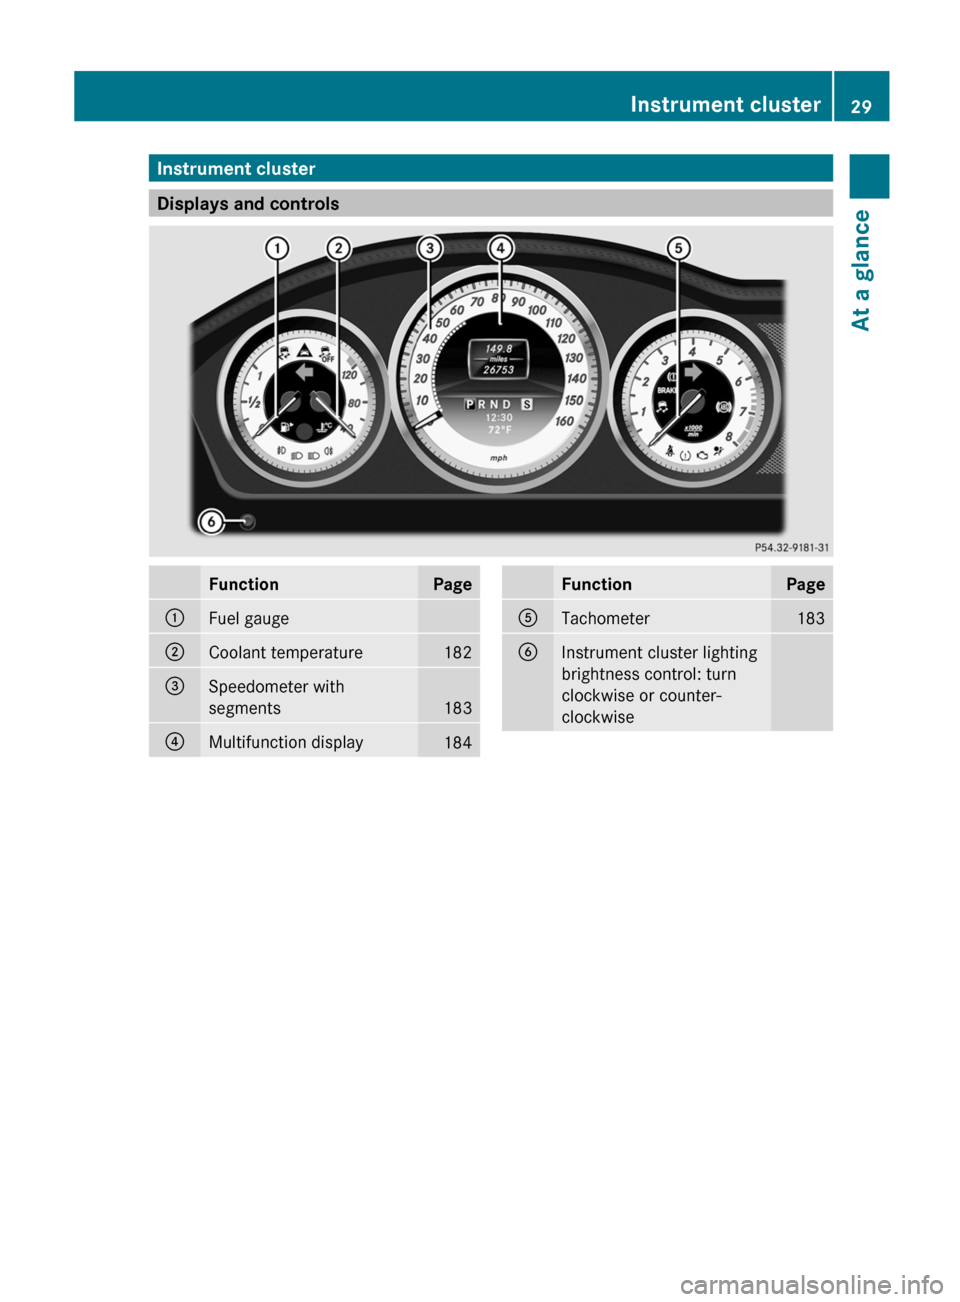
Instrument cluster
Displays and controls
FunctionPage:Fuel gauge;Coolant temperature182=Speedometer with
segments
183
?Multifunction display184FunctionPageATachometer183BInstrument cluster lighting
brightness control: turn
clockwise or counter-
clockwiseInstrument cluster29At a glance
Page 79 of 336
You could therefore be locked out when:
R the vehicle is being pushed.
R the vehicle is being towed.
R the vehicle is being tested on a
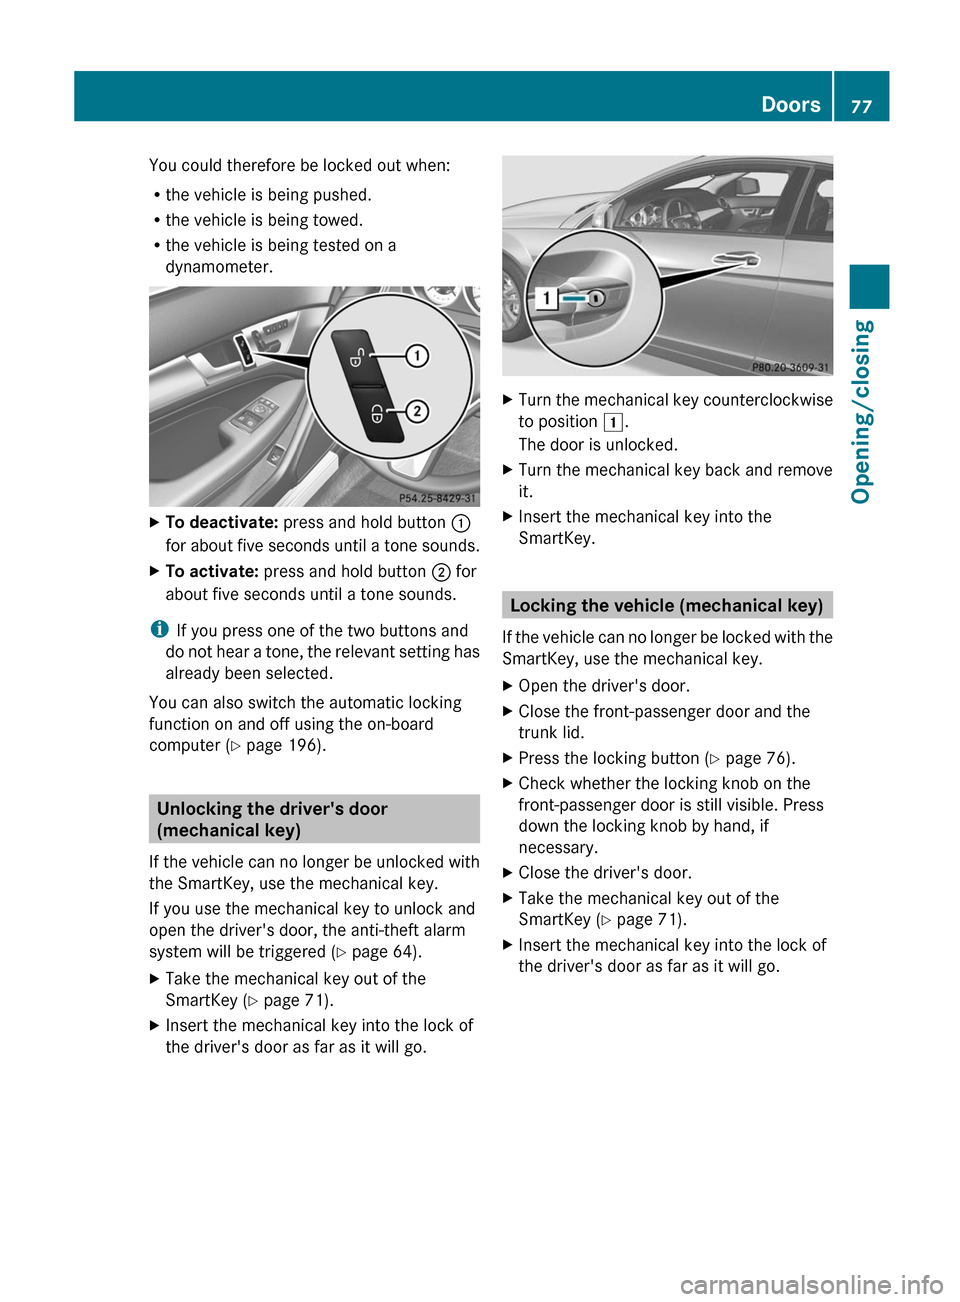
dynamometer.XTo deactivate: press and hold button :
for about five seconds until a tone sounds.XTo activate: press and hold button ; for
about five seconds until a tone sounds.
i If you press one of the two buttons and
do not hear a tone, the relevant setting has
already been selected.
You can also switch the automatic locking
function on and off using the on-board
computer ( Y page 196).
Unlocking the driver's door
(mechanical key)
If the vehicle can no longer be unlocked with
the SmartKey, use the mechanical key.
If you use the mechanical key to unlock and
open the driver's door, the anti-theft alarm
system will be triggered ( Y page 64).
XTake the mechanical key out of the
SmartKey ( Y page 71).XInsert the mechanical key into the lock of
the driver's door as far as it will go.XTurn the mechanical key counterclockwise
to position 1.
The door is unlocked.XTurn the mechanical key back and remove
it.XInsert the mechanical key into the
SmartKey.
Locking the vehicle (mechanical key)
If the vehicle can no longer be locked with the
SmartKey, use the mechanical key.
XOpen the driver's door.XClose the front-passenger door and the
trunk lid.XPress the locking button ( Y page 76).XCheck whether the locking knob on the
front-passenger door is still visible. Press
down the locking knob by hand, if
necessary.XClose the driver's door.XTake the mechanical key out of the
SmartKey ( Y page 71).XInsert the mechanical key into the lock of
the driver's door as far as it will go.Doors77Opening/closingZ
Page 80 of 336
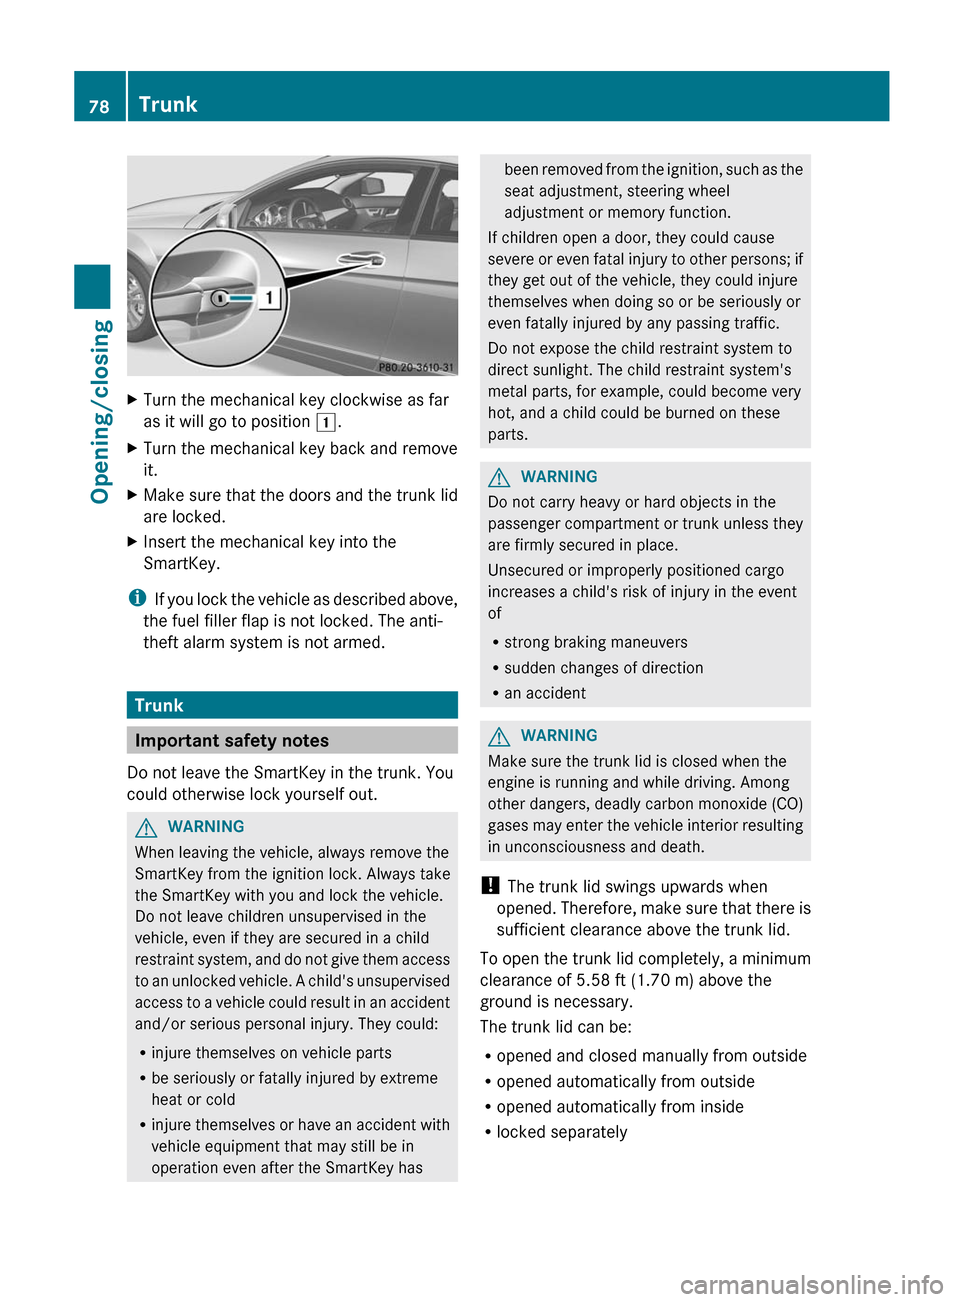
XTurn the mechanical key clockwise as far
as it will go to position 1.XTurn the mechanical key back and remove
it.XMake sure that the doors and the trunk lid
are locked.XInsert the mechanical key into the
SmartKey.
i If you lock the vehicle as described above,
the fuel filler flap is not locked. The anti-
theft alarm system is not armed.
Trunk
Important safety notes
Do not leave the SmartKey in the trunk. You
could otherwise lock yourself out.
GWARNING
When leaving the vehicle, always remove the
SmartKey from the ignition lock. Always take
the SmartKey with you and lock the vehicle.
Do not leave children unsupervised in the
vehicle, even if they are secured in a child
restraint system, and do not give them access
to an unlocked vehicle. A child's unsupervised
access to a vehicle could result in an accident
and/or serious personal injury. They could:
R injure themselves on vehicle parts
R be seriously or fatally injured by extreme
heat or cold
R injure themselves or have an accident with
vehicle equipment that may still be in
operation even after the SmartKey has
been removed from the ignition, such as the
seat adjustment, steering wheel
adjustment or memory function.
If children open a door, they could cause
severe or even fatal injury to other persons; if
they get out of the vehicle, they could injure
themselves when doing so or be seriously or
even fatally injured by any passing traffic.
Do not expose the child restraint system to
direct sunlight. The child restraint system's
metal parts, for example, could become very
hot, and a child could be burned on these
parts.GWARNING
Do not carry heavy or hard objects in the
passenger compartment or trunk unless they
are firmly secured in place.
Unsecured or improperly positioned cargo
increases a child's risk of injury in the event
of
R strong braking maneuvers
R sudden changes of direction
R an accident
GWARNING
Make sure the trunk lid is closed when the
engine is running and while driving. Among
other dangers, deadly carbon monoxide (CO)
gases may enter the vehicle interior resulting
in unconsciousness and death.
! The trunk lid swings upwards when
opened. Therefore, make sure that there is
sufficient clearance above the trunk lid.
To open the trunk lid completely, a minimum
clearance of 5.58 ft (1.70 m) above the
ground is necessary.
The trunk lid can be:
R opened and closed manually from outside
R opened automatically from outside
R opened automatically from inside
R locked separately
78TrunkOpening/closing
Page 82 of 336
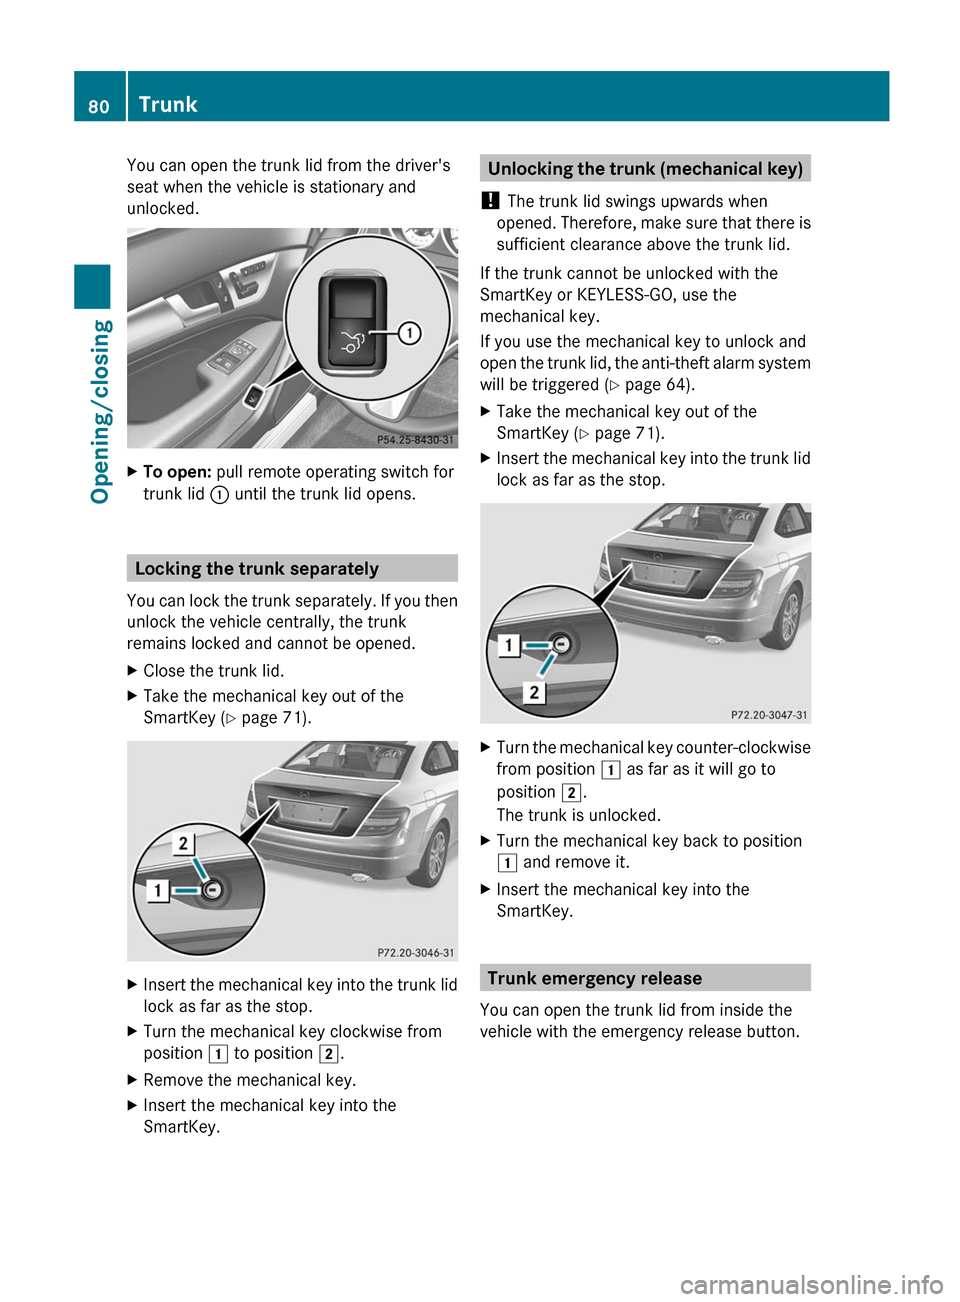
You can open the trunk lid from the driver's
seat when the vehicle is stationary and
unlocked.XTo open: pull remote operating switch for
trunk lid : until the trunk lid opens.
Locking the trunk separately
You can lock the trunk separately. If you then
unlock the vehicle centrally, the trunk
remains locked and cannot be opened.
XClose the trunk lid.XTake the mechanical key out of the
SmartKey ( Y page 71).XInsert the mechanical key into the trunk lid
lock as far as the stop.XTurn the mechanical key clockwise from
position 1 to position 2.XRemove the mechanical key.XInsert the mechanical key into the
SmartKey.Unlocking the trunk (mechanical key)
! The trunk lid swings upwards when
opened. Therefore, make sure that there is
sufficient clearance above the trunk lid.
If the trunk cannot be unlocked with the
SmartKey or KEYLESS-GO, use the
mechanical key.
If you use the mechanical key to unlock and
open the trunk lid, the anti-theft alarm system
will be triggered ( Y page 64).XTake the mechanical key out of the
SmartKey ( Y page 71).XInsert the mechanical key into the trunk lid
lock as far as the stop.XTurn the mechanical key counter-clockwise
from position 1 as far as it will go to
position 2.
The trunk is unlocked.XTurn the mechanical key back to position
1 and remove it.XInsert the mechanical key into the
SmartKey.
Trunk emergency release
You can open the trunk lid from inside the
vehicle with the emergency release button.
80TrunkOpening/closing
Page 110 of 336
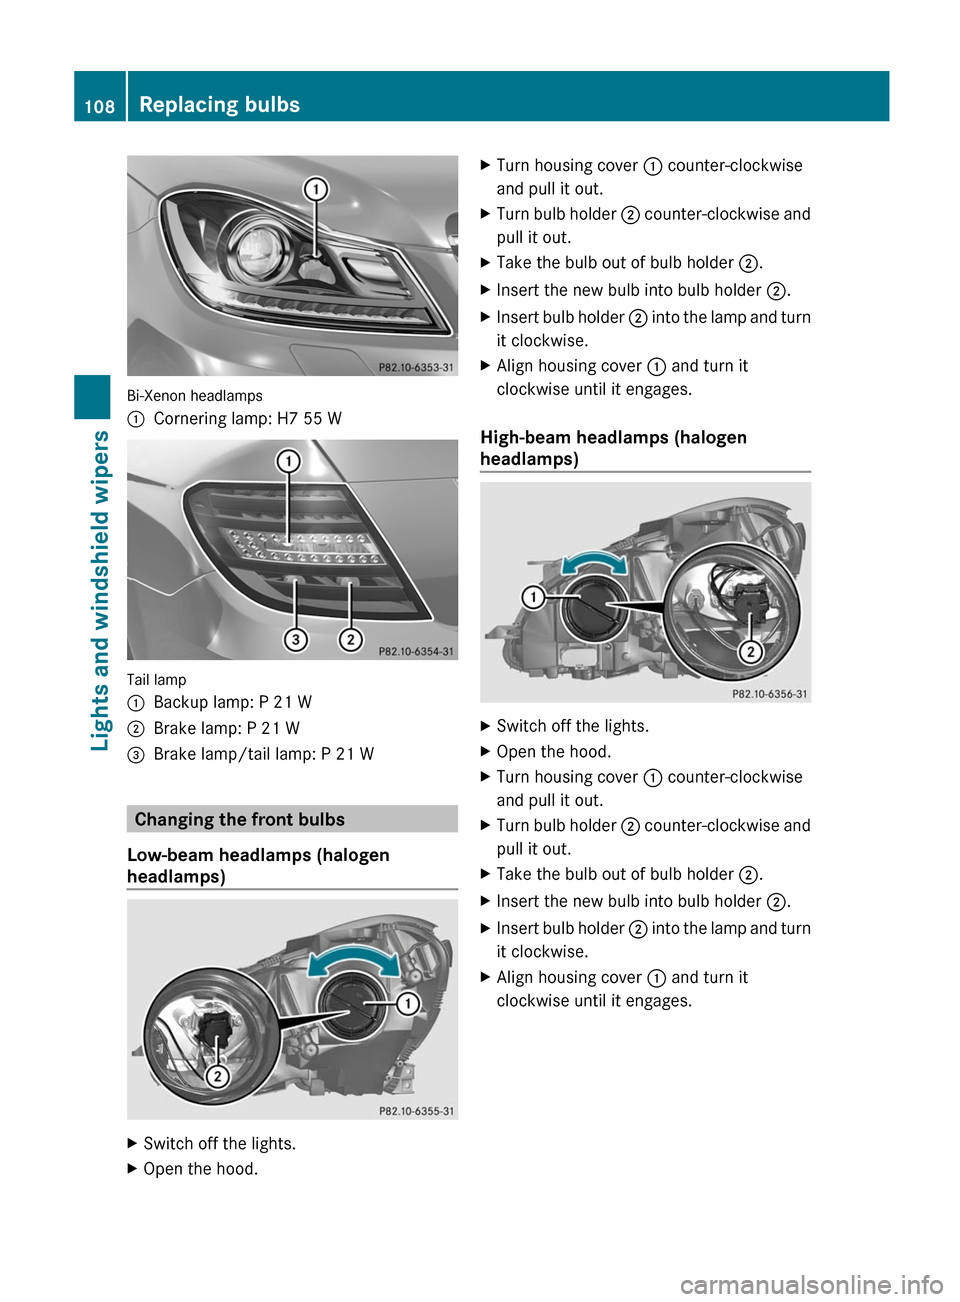
Bi-Xenon headlamps
:Cornering lamp: H7 55 W
Tail lamp
:Backup lamp: P 21 W;Brake lamp: P 21 W=Brake lamp/tail lamp: P 21 W
Changing the front bulbs
Low-beam headlamps (halogen
headlamps)
XSwitch off the lights.XOpen the hood.XTurn housing cover : counter-clockwise
and pull it out.XTurn bulb holder ; counter-clockwise and
pull it out.XTake the bulb out of bulb holder ;.XInsert the new bulb into bulb holder ;.XInsert bulb holder ; into the lamp and turn
it clockwise.XAlign housing cover : and turn it
clockwise until it engages.
High-beam headlamps (halogen
headlamps)
XSwitch off the lights.XOpen the hood.XTurn housing cover : counter-clockwise
and pull it out.XTurn bulb holder ; counter-clockwise and
pull it out.XTake the bulb out of bulb holder ;.XInsert the new bulb into bulb holder ;.XInsert bulb holder ; into the lamp and turn
it clockwise.XAlign housing cover : and turn it
clockwise until it engages.108Replacing bulbsLights and windshield wipers
Page 111 of 336
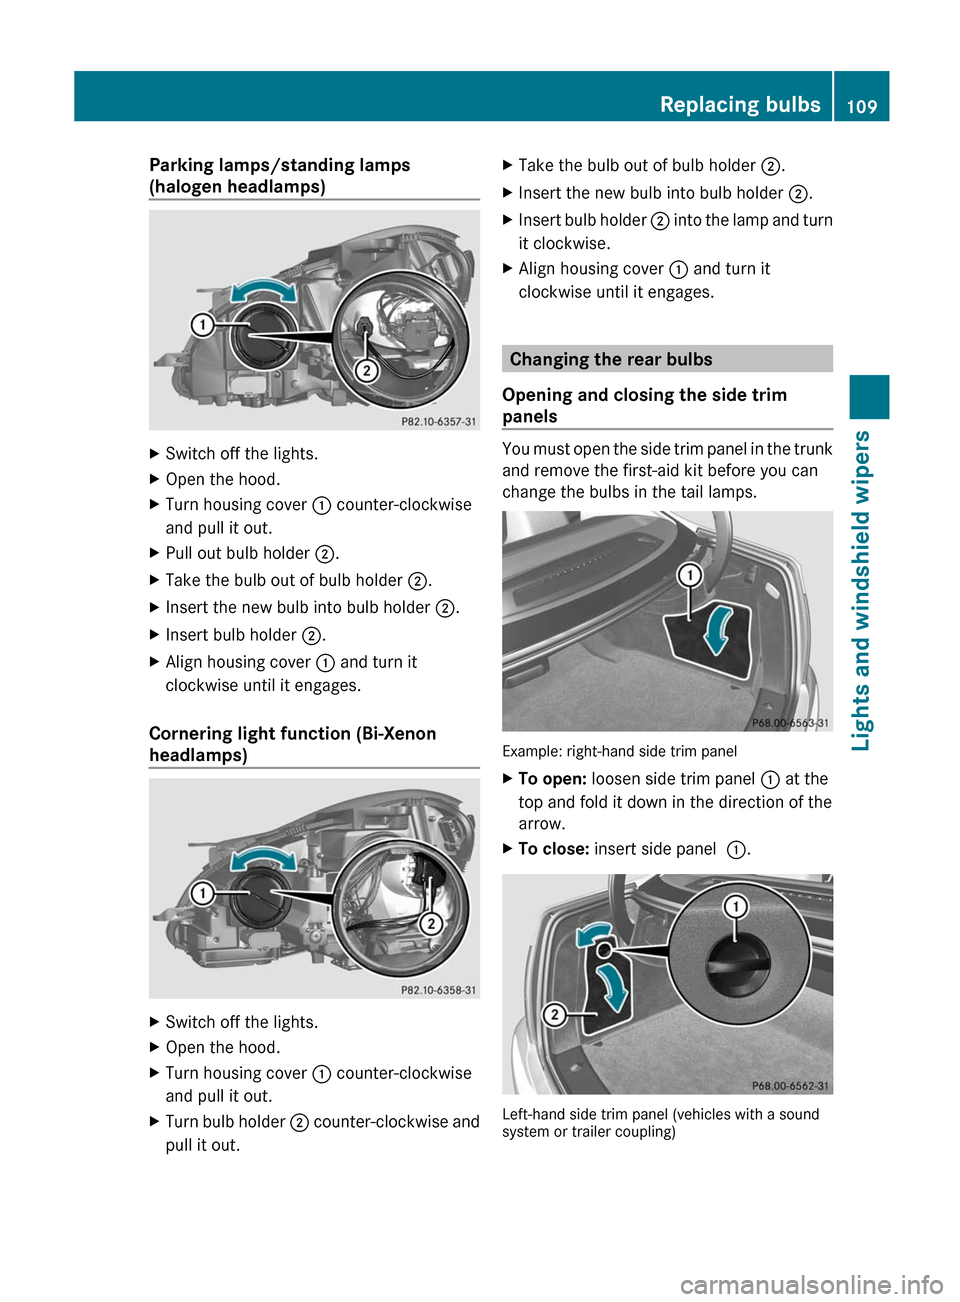
Parking lamps/standing lamps
(halogen headlamps)XSwitch off the lights.XOpen the hood.XTurn housing cover : counter-clockwise
and pull it out.XPull out bulb holder ;.XTake the bulb out of bulb holder ;.XInsert the new bulb into bulb holder ;.XInsert bulb holder ;.XAlign housing cover : and turn it
clockwise until it engages.
Cornering light function (Bi-Xenon
headlamps)
XSwitch off the lights.XOpen the hood.XTurn housing cover : counter-clockwise
and pull it out.XTurn bulb holder ; counter-clockwise and
pull it out.XTake the bulb out of bulb holder ;.XInsert the new bulb into bulb holder ;.XInsert bulb holder ; into the lamp and turn
it clockwise.XAlign housing cover : and turn it
clockwise until it engages.
Changing the rear bulbs
Opening and closing the side trim
panels
You must open the side trim panel in the trunk
and remove the first-aid kit before you can
change the bulbs in the tail lamps.
Example: right-hand side trim panel
XTo open: loosen side trim panel : at the
top and fold it down in the direction of the
arrow.XTo close: insert side panel :.
Left-hand side trim panel (vehicles with a sound
system or trailer coupling)
Replacing bulbs109Lights and windshield wipersZ
Page 112 of 336
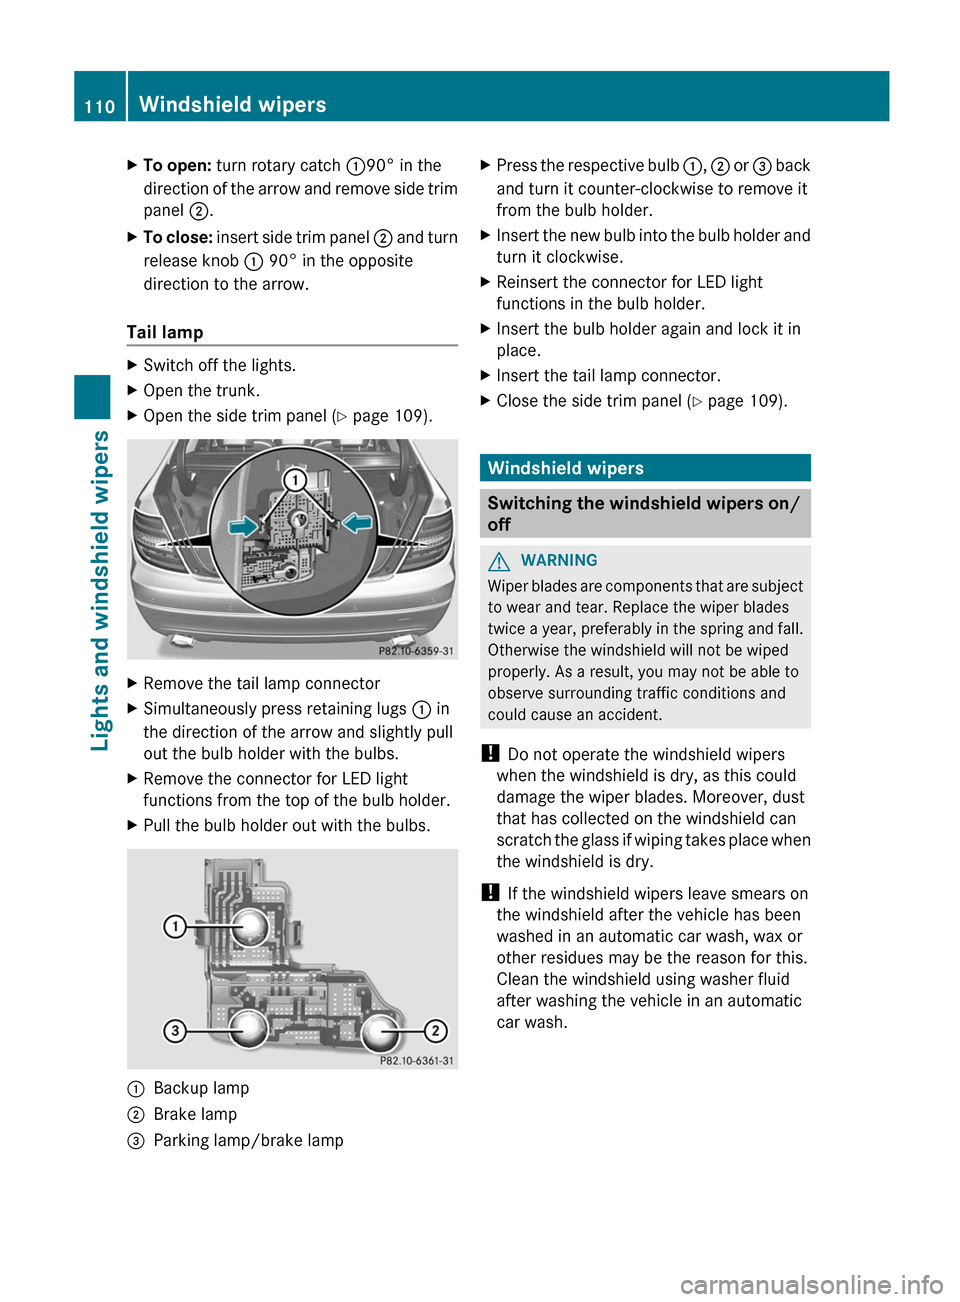
XTo open: turn rotary catch :90° in the
direction of the arrow and remove side trim
panel ;.XTo close: insert side trim panel ; and turn
release knob : 90° in the opposite
direction to the arrow.
Tail lamp
XSwitch off the lights.XOpen the trunk.XOpen the side trim panel ( Y page 109).XRemove the tail lamp connectorXSimultaneously press retaining lugs : in
the direction of the arrow and slightly pull
out the bulb holder with the bulbs.XRemove the connector for LED light
functions from the top of the bulb holder.XPull the bulb holder out with the bulbs.:Backup lamp;Brake lamp=Parking lamp/brake lampXPress the respective bulb :, ; or = back
and turn it counter-clockwise to remove it
from the bulb holder.XInsert the new bulb into the bulb holder and
turn it clockwise.XReinsert the connector for LED light
functions in the bulb holder.XInsert the bulb holder again and lock it in
place.XInsert the tail lamp connector.XClose the side trim panel ( Y page 109).
Windshield wipers
Switching the windshield wipers on/
off
GWARNING
Wiper blades are components that are subject
to wear and tear. Replace the wiper blades
twice a year, preferably in the spring and fall.
Otherwise the windshield will not be wiped
properly. As a result, you may not be able to
observe surrounding traffic conditions and
could cause an accident.
! Do not operate the windshield wipers
when the windshield is dry, as this could
damage the wiper blades. Moreover, dust
that has collected on the windshield can
scratch the glass if wiping takes place when
the windshield is dry.
! If the windshield wipers leave smears on
the windshield after the vehicle has been
washed in an automatic car wash, wax or
other residues may be the reason for this.
Clean the windshield using washer fluid
after washing the vehicle in an automatic
car wash.
110Windshield wipersLights and windshield wipers
Page 120 of 336
In automatic mode, the set temperature is
maintained automatically at a constant level.
The system automatically regulates the
temperature of the dispensed air, the airflow
and the air distribution.
Automatic mode will achieve optimal
operation if cooling with air dehumidification
is also activated. If desired, cooling with air
dehumidification can be deactivated.XTurn the SmartKey to position 2 in the
ignition lock.XSet the desired temperature.XTo activate: press the à button.
The indicator lamp in the à button lights
up. Automatic air distribution and airflow
are activated.XTo switch off: press the _ button.
or
XPress the K or I button.
The indicator lamp in the à button goes
out. Automatic air distribution and airflow
are deactivated.
Setting the temperature
Different temperatures can be set for the
driver's and front-passenger sides.
XTurn the SmartKey to position 2 in the
ignition lock.XTo increase/reduce: turn controls : and
B clockwise or counter-clockwise
( Y page 115).
Only change the temperature setting in
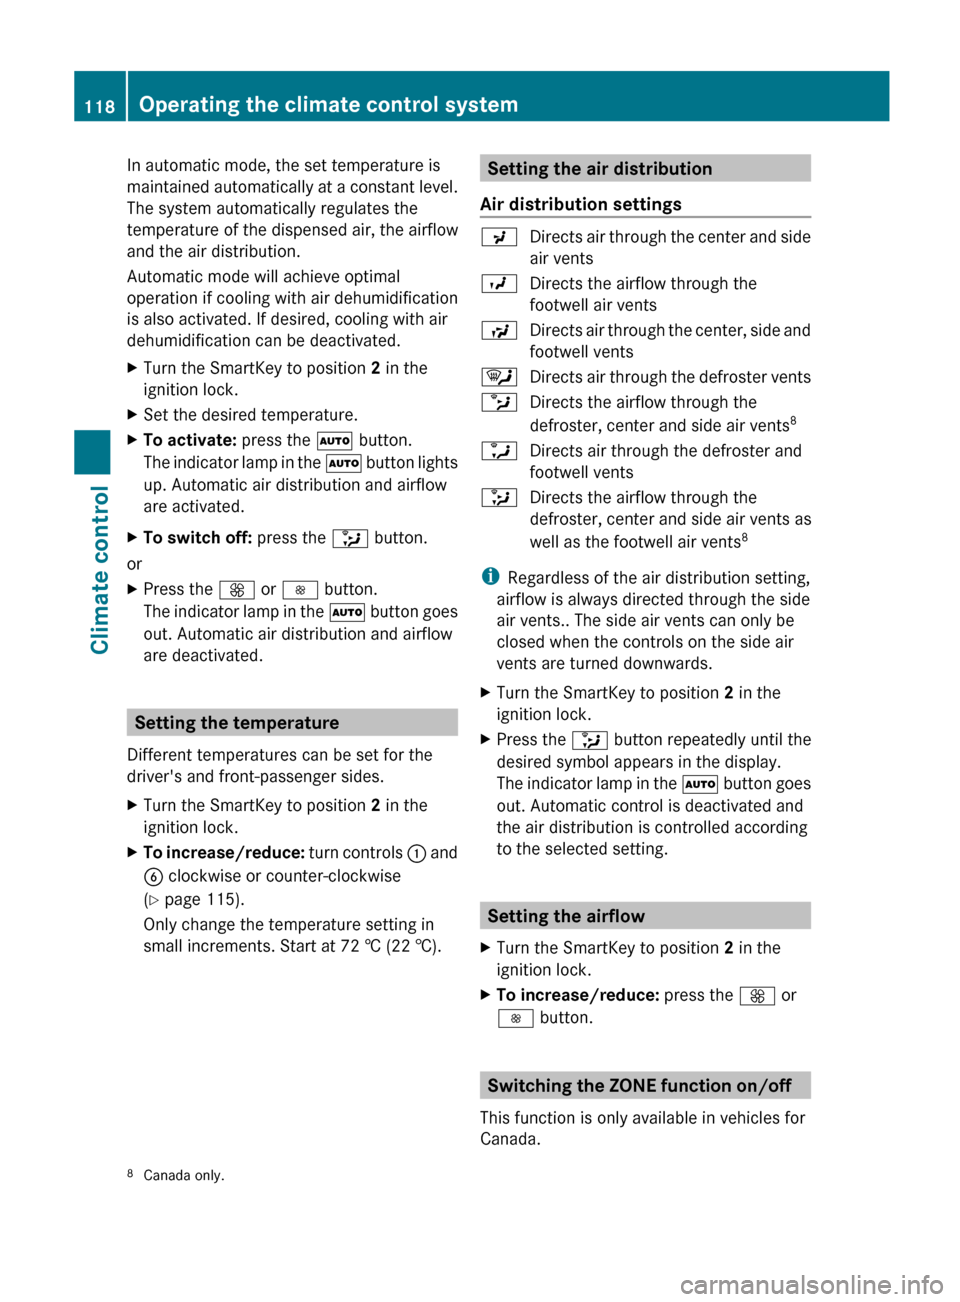
small increments. Start at 72 † (22 †).Setting the air distribution
Air distribution settingsPDirects air through the center and side
air ventsODirects the airflow through the
footwell air ventsSDirects air through the center, side and
footwell vents¯Directs air through the defroster ventsbDirects the airflow through the
defroster, center and side air vents 8aDirects air through the defroster and
footwell vents_Directs the airflow through the
defroster, center and side air vents as
well as the footwell air vents 8
i
Regardless of the air distribution setting,
airflow is always directed through the side
air vents.. The side air vents can only be
closed when the controls on the side air
vents are turned downwards.
XTurn the SmartKey to position 2 in the
ignition lock.XPress the _ button repeatedly until the
desired symbol appears in the display.
The indicator lamp in the à button goes
out. Automatic control is deactivated and
the air distribution is controlled according
to the selected setting.
Setting the airflow
XTurn the SmartKey to position 2 in the
ignition lock.XTo increase/reduce: press the K or
I button.
Switching the ZONE function on/off
This function is only available in vehicles for
Canada.
8 Canada only.118Operating the climate control systemClimate control
Page 121 of 336
XTo switch on: press the á button.
The indicator lamp in the á button lights
up.
The temperature setting for the driver's
side is not adopted for the front-passenger
side.
When the buttons for temperature, airflow or
air distribution are activated, the temperature
setting for the driver's side is not adopted for
the other climate control zones.
XTo switch off: press the á button.
The indicator lamp in the á button goes
out.
The temperature setting for the driver's
side is adopted for the front-passenger
side.
Defrosting the windshield
You can use this function to defrost the
windshield or to defrost the inside of the
windshield and the side windows.
i You should only select the defrosting
function until the windshield is clear again.
XTurn the SmartKey to position 2 in the
ignition lock.XTo activate: press the ¬ button.
The indicator lamp in the ¬ button lights
up.
The climate control system switches to the
following functions:
R cooling with air dehumidification on
R high airflow 9
R high temperature 9
R air distribution to the windshield and
front side windows
R air-recirculation mode offXTo switch off: press the ¬ button.
The indicator lamp in the ¬ button goes
out. The previously selected settings come
into effect again. The cooling with airdehumidification function remains on. Air-
recirculation mode remains deactivated.
or
XPress the à button.
The indicator lamp in the ¬ button goes
out. Airflow and air distribution are set to
automatic mode.
or
XTurn temperature control : or B
clockwise or counter-clockwise
( Y page 115).
or
XPress the K or I button.
MAX COOL maximum cooling
The MAX COOL function is only available in
vehicles for the USA.
MAX COOL is only operational when the
engine is running.
When you activate MAX COOL, climate
control switches to the following functions:
R maximum cooling
R maximum airflow
R air-recirculation mode on
XTo activate: press the Ù button.
The indicator lamp in the button lights up.XTo deactivate: press the Ù button
again.
The indicator lamp goes out. The previously
selected settings come into effect again.
Defrosting the windows
Windows fogged up on the inside
XActivate the cooling with air
dehumidification function ¿.XActivate automatic mode Ã.XIf the windows continue to fog up, activate
the defrosting function ( Y page 119).9
Depending on the outside temperature.Operating the climate control system119Climate controlZ
Page 124 of 336
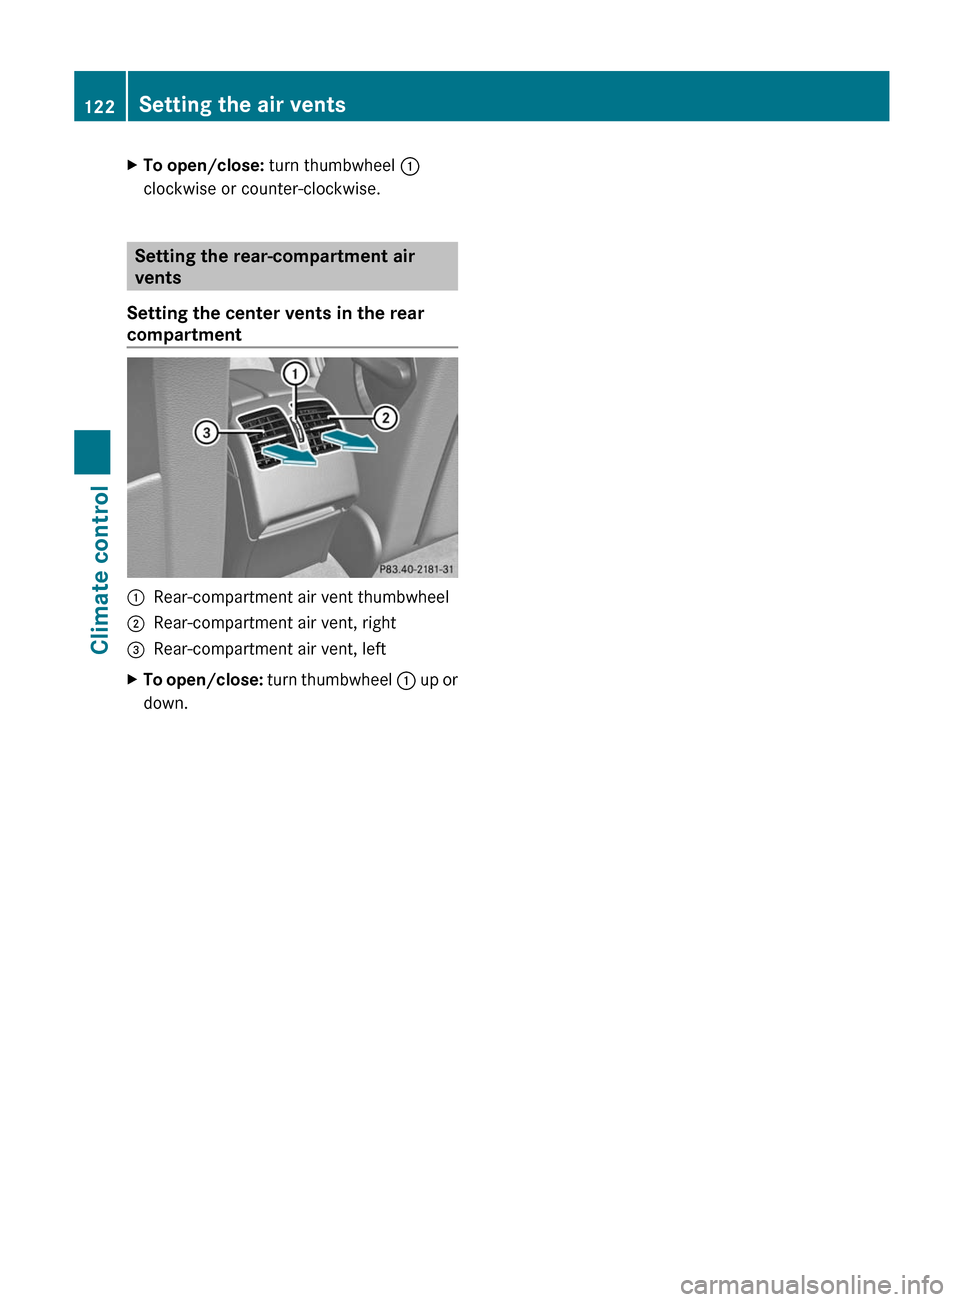
XTo open/close: turn thumbwheel :
clockwise or counter-clockwise.
Setting the rear-compartment air
vents
Setting the center vents in the rear
compartment
:Rear-compartment air vent thumbwheel;Rear-compartment air vent, right=Rear-compartment air vent, leftXTo open/close: turn thumbwheel : up or
down.122Setting the air ventsClimate control