buttons MERCEDES-BENZ C-Class COUPE 2013 CL204 Owner's Manual
[x] Cancel search | Manufacturer: MERCEDES-BENZ, Model Year: 2013, Model line: C-Class COUPE, Model: MERCEDES-BENZ C-Class COUPE 2013 CL204Pages: 350, PDF Size: 4.81 MB
Page 18 of 350
Problem (malfunction)
.....................86
Resetting ......................................... 86
Sliding sunroof
see Panorama roof with power
tilt/sliding panel
SmartKey
Changing the battery .......................75
Changing the programming .............73
Checking the battery .......................75
Convenience closing feature ............85
Convenience opening feature ..........84
Display message ............................ 232
Door central locking/unlocking .......72
Important safety notes ....................72
Loss ................................................. 76
Mechanical key ................................ 74
Positions (ignition lock) .................133
Problem (malfunction) .....................76
Starting the engine ........................135
Snow chains ...................................... 303
Sockets General notes ................................ 255
Rea rcompartmen t......................... 255
Spare wheel
Storage location ............................ 332
Specialist workshop ............................ 25
Special seat bel tretractor .................. 60
Speed ,controlling
see Cruise control
Speedometer
Digital ............................................ 194
In the Instrument cluster .................31
Segments ...................................... 191
Selecting the unit of measurement 201
see Instrument cluster
SPORT handling mode
Activating/deactivating (AMG
vehicles) .......................................... 66
Warning lamp ................................. 239
SRS
see SRS (Supplemental Restraint
System)
SRS (Supplemental Restraint
System)
Display message ............................ 212
Introduction ..................................... 41
Warning lamp ................................. 241
Warning lamp (function) ................... 41 Standing lamps
Changing bulbs .............................. 114
Display message ............................ 218
Switching on/off ........................... 108
Start/stop function
see ECO start/stop function
Starting (engine) ................................ 135
Steering (display message) ..............232
Steering wheel Adjusting (electrically). ....................98
Adjusting (manually )........................ 97
Button overview ............................... 33
Buttons (on-board computer) ......... 191
Cleaning ......................................... 282
Important safety notes ....................97
Paddle shifters ............................... 143
Storing settings (memory function) 102
Steering wheel paddle shifters ........143
Stopwatch (RACETIMER) ................... 205
Stowage areas ................................... 248
Stowage compartments Armrest (under) ............................. 249
Cuph olders ................................... 253
Glove box ...................................... .249
Important safety information .........248
Stowage net ................................... 249
Stowage net ....................................... 249
Stowage well beneath the trunk
floor .................................................... 251
Summer opening see Convenience opening feature
Summer tires ..................................... 302
Sun visor ............................................ 253
Surround lighting (on-board
computer) .......................................... 202
Switching air-recirculation mode
on/off ................................................. 129
Switching off the alarm (ATA) ............70 T
Tachometer ........................................ 191
Tail lamps Display message ............................ 217
Tank content
Fuel gauge ....................................... 3116
Index
Page 38 of 350
Overhea
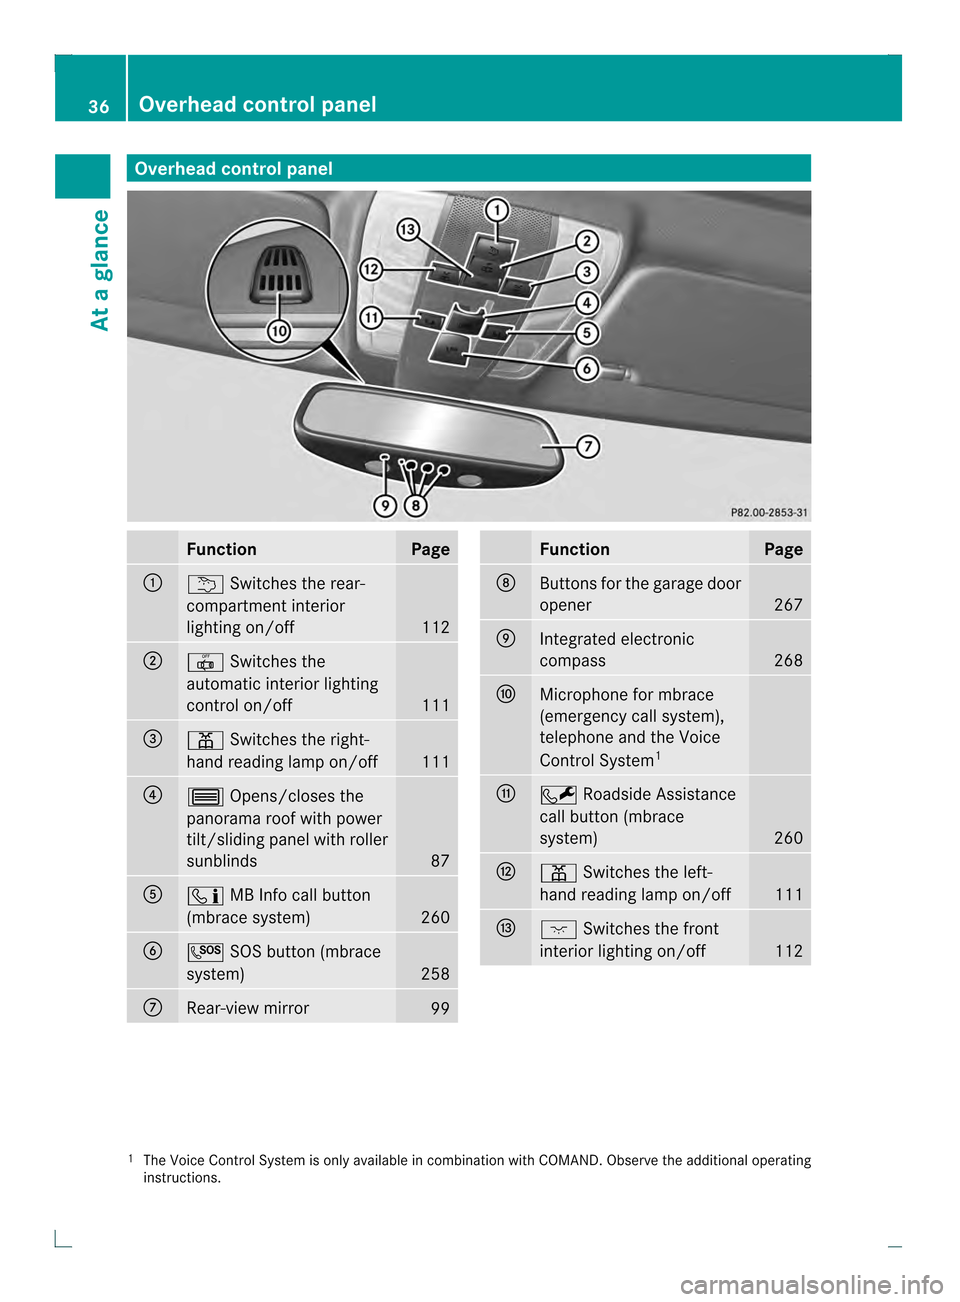
dcontrol panel Function Page
0002
0001
Switches the rear-
compartment interior
lighting on/off 112
0003
001C
Switches the
automatic interio rlighting
control on/off 111
0022
0013
Switches the right-
hand reading lamp on/off 111
0021
0002
Opens/closes the
panorama roof with power
tilt/sliding panel with roller
sunblinds 87
001F
0009
MB Info call button
(mbrace system) 260
0020
0008
SOS button (mbrace
system) 258
0012
Rear-view mirror
99 Function Page
0013
Buttons for the garage door
opener 267
0014
Integrated electronic
compass 268
0015
Microphone for mbrace
(emergency call system),
telephone and the Voice
Control System 1 0016
0007
Roadside Assistance
call button (mbrace
system) 260
0018
0013
Switches the left-
hand reading lamp on/off 111
0019
0004
Switches the front
interior lighting on/off 112
1
The Voice Control System is only available in combination with COMAND. Observe the additional operating
instructions. 36
Overhead control panelAt a glance
Page 76 of 350

vehicle is unlocked
.This is useful if you
frequently travel on your own.
X To change the setting: press and hold
down the 000Band000A buttons
simultaneously for approximately six
seconds until the battery check lamp
(Y page 75) flashes twice.
i If the setting of the locking system is
changed within the signal range of the
vehicle, pressing the 000Aor000B button:
R locks or
R unlocks the vehicle
The SmartKey now functions as follows:
X To unlock the driver's door: press the
000B button once.
X To unlock centrally: press the000B
button twice.
X To lock centrally: press the000Abutton.
The KEYLESS-GO function is changed as
follows:
X To unlock the driver's door: touch the
inner surface of the door handle on the
driver's door.
X To unlock centrally: touch the inner
surface of the front-passenger door handle.
X To lock centrally: touch the outer sensor
surface on one of the door handles
(Y page 73).
X To restore the factory settings: press
and hold down the 000Band000A buttons
simultaneously for approximately six
seconds until the battery check lamp
flashes twice. Mechanical key
General notes If the vehicle can no longer be locked or
unlocked with the SmartKey or the KEYLESS-
GO key, use the mechanical key.
If you use the mechanical key to unlock and
open the driver's door or the trunk lid, the anti-theft alarm system will be triggered
(Y
page 70).
X To end the alarm: insert the SmartKey into
the ignition lock.
i With KEYLESS-GO: remove the Start/
Stop button from the ignition lock
beforehand.
If you unlock the vehicle using the mechanical
key, the fuel filler flap will not be unlocked
automatically.
X To unlock the fuel filler flap: insert the
SmartKey into the ignition lock.
Removing the mechanical key X
Push release catch 0002in the direction of
the arrow and at the same time remove
mechanical key 0003from the SmartKey. SmartKey battery
Important safety notes Mercedes-Ben
zrecommends that you have
the batteries replaced at a qualified specialist
workshop. G
WARNING
Batteries contain toxic and corrosive
substances. If batteries are swallowed, it can
result in severe health problems. There is a
risk of fatal injury.
Keep batteries out of the reach of children .If
a battery is swallowed, seek medical attention
immediately. 74
SmartKeyOpening and closing
Page 77 of 350

Checking the battery
X
Press the 000Aor000B button.
The battery is working properly if battery
check lamp 0002lights up briefly.
If battery check lamp 0002does no tlight up
briefly during the test, the battery is
discharged.
i If the SmartKey battery is checked within
the signal receptio nrange of the vehicle,
pressing the 000Aor000B button:
R locks or
R unlocks the vehicle
X Change the battery (Y page 75).
i You can get a battery at a qualified
specialist workshop.
Replacing the battery You require a CR 2025 3 V cell battery.
X Take the mechanical key out of the
SmartKey (Y page 74). X
Press mechanical key 0003intothe SmartKey
opening in the direction of the arrow until
battery compartment cover 0002opens. Do
not hold battery compartment cover 0002
closed while doing so.
X Remove battery compartment cover 0002. X
Repeatedly tap the SmartKey against your
palm until battery 0022falls out.
X Insert the new battery with the positive
terminal facing upwards. Use a lint-free
cloth to do so.
X Make sure that the surface of the battery is
free from lint, grease and all other forms of
contamination.
X Insert the front tabs of battery
compartment cover 0002into the housing
first and then press to close it.
X Insert mechanical key 0003into the
SmartKey.
X Check the function of all SmartKey buttons
on the vehicle. SmartKey
75Opening and closing Z
Page 81 of 350

wheels are turning at a speed in excess of
9 mph (15 km/h).
You could therefore be locked out if:
R the vehicle is being pushed.
R the vehicle is being towed.
R the vehicle is on a rolle rdynamometer. X
To deactivate: press and hold button 0002
fo ra bout five seconds until a tone sounds.
X To activate: press and hold button 0003for
about five seconds until a tone sounds.
i If you press one of the two buttons and
do not hear a tone, the relevant setting has
already been selected.
You can also switch the automatic locking
function on and off using the on-board
computer (Y page 203). Unlocking the driver's door
(mechanical key)
If the vehicle can no longer be unlocked with
the SmartKey, use the mechanical key.
If you use the mechanical key to unlock and
open the driver's door, the anti-thef talarm
system will be triggered ( Ypage 70).
X Take the mechanical key out of the
SmartKey (Y page 74).
X Insert the mechanical key into the lock of
the driver's door as far as it will go. X
Turn the mechanical key counter-clockwise
to position 0005.
The door is unlocked.
X Turn the mechanical key back and remove
it.
X Insert the mechanical key into the
SmartKey. Locking the vehicle (mechanical key)
If the vehicle can no longer be locked with the
SmartKey, use the mechanical key.
X Open the driver's door.
X Close the front-passenger door and the
trunk lid.
X Press the locking button (Y page 78).
X Check whether the locking knob on the
front-passenger door is still visible. Press
the locking knob down by hand, if
necessary (Y page 77).
X Close the driver's door.
X Take the mechanical key out of the
SmartKey (Y page 74).
X Insert the mechanical key into the lock of
the driver's door as far as it will go. Doors
79Opening and closing Z
Page 99 of 350
Switching the seat ventilation on/off
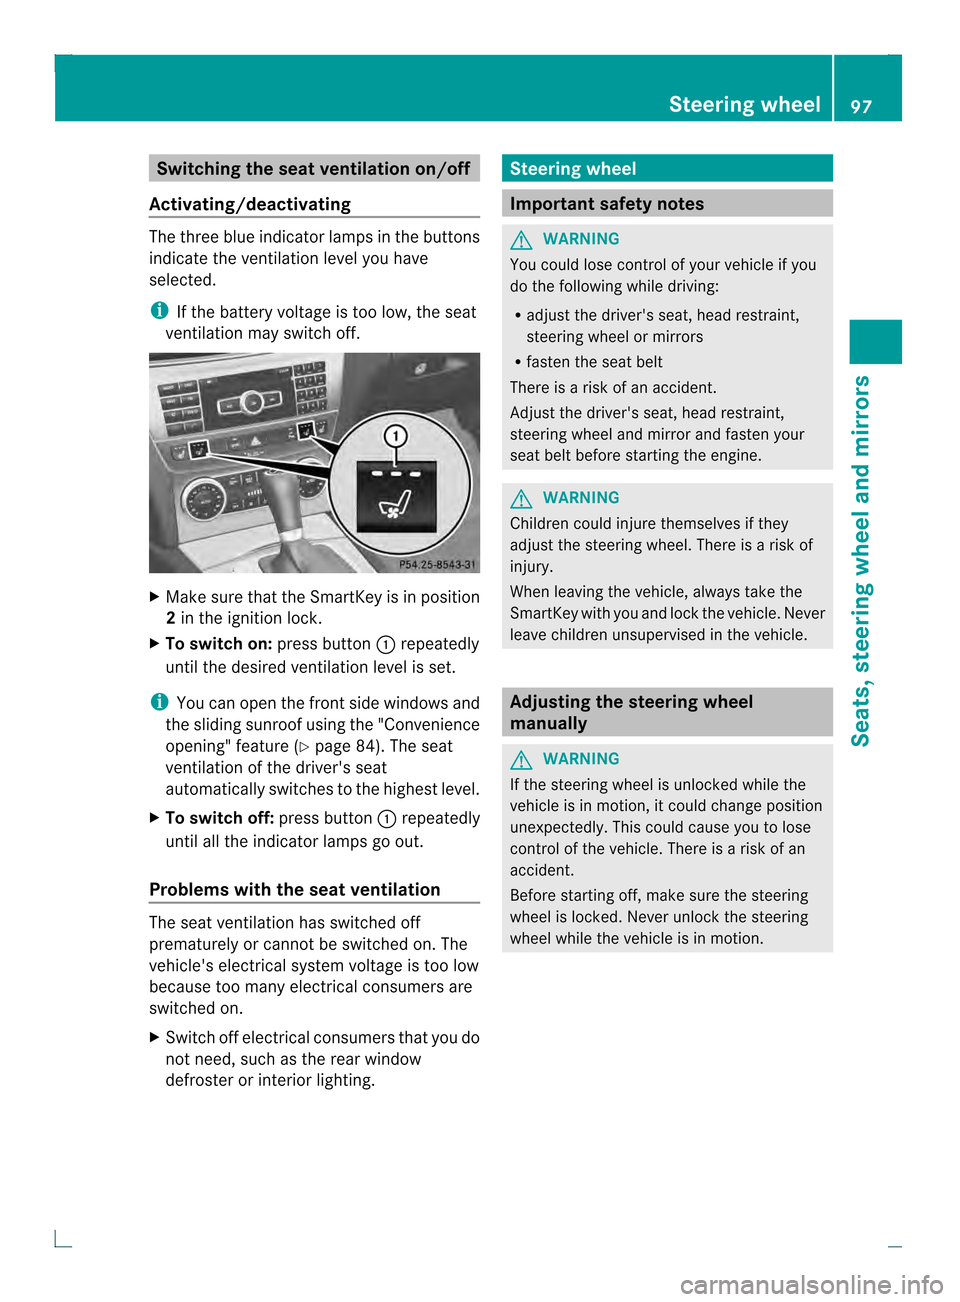
Activating/deactivating The three blue indicator lamps in the buttons
indicate the ventilation level you have
selected.
i If the battery voltage is too low, the seat
ventilation may switch off. X
Make sure that the SmartKey is in position
2 in the ignition lock.
X To switch on: press button0002repeatedly
until the desired ventilation level is set.
i You can open the front side windows and
the sliding sunroof using the "Convenience
opening" feature (Y page 84). The seat
ventilation of the driver's seat
automatically switches to the highest level.
X To switch off: press button0002repeatedly
until all the indicator lamps go out.
Problems with the seat ventilation The seat ventilation has switched off
prematurely or cannot be switched on. The
vehicle's electrical system voltage is too low
because too many electrical consumers are
switched on.
X Switch off electrical consumers that you do
not need, such as the rear window
defroster or interior lighting. Steering wheel
Important safety notes
G
WARNING
You could lose control of your vehicle if you
do the following while driving:
R adjust the driver's seat, head restraint,
steering wheel or mirrors
R fasten the seat belt
There is a risk of an accident.
Adjust the driver's seat, head restraint,
steering wheel and mirror and fasten your
seat belt before starting the engine. G
WARNING
Children could injure themselves if they
adjust the steering wheel. There is a risk of
injury.
When leaving the vehicle, always take the
SmartKey with you and lock the vehicle. Never
leave children unsupervised in the vehicle. Adjusting the steering wheel
manually
G
WARNING
If the steering wheel is unlocked while the
vehicle is in motion, it could change position
unexpectedly. This could cause you to lose
control of the vehicle. There is a risk of an
accident.
Before starting off, make sure the steering
wheel is locked. Never unlock the steering
wheel while the vehicle is in motion. Steering wheel
97Seats, steering wheel and mirrors Z
Page 100 of 350

0002
Release lever
0003 To adjust the steering wheel height
0022 To adjust the steering wheel position
(fore-and-aft adjustment)
X Push release lever 0002down completely.
The steering column is unlocked.
X Adjus tthe steering wheel to the desired
position.
X Push release lever 0002up completely.
The steering column is locked.
X Check if the steering column is locked.
When doing so, try to push the steering
wheel up or down or try to move it in the
fore-and-aft direction. Adjusting the steering wheel
electrically
0002
To adjust the steering wheel height
0003 To adjust the steering wheel position
(fore-and-aft adjustment)
The steering wheel can also be adjusted when
the SmartKey is removed from the ignition
lock. i
Further related subjects:
R EASY-ENTRY/EXIT feature
(Y page 98)
R Storing settings (Y page 102) EASY-ENTRY/EXIT feature
Important safety notes G
WARNING
When the EASY-ENTRY/EXIT feature adjusts
the steering wheel, you and other vehicle
occupants –particularly childre n–could
become trapped. There is a risk of injury.
While the EASY-ENTRY/EXIT feature is
making adjustments, make sure that no one
has any body parts in the sweep of the
steering wheel.
If somebody becomes trapped:
R press one of the memory function position
buttons, or
R move the switch for steering wheel
adjustmen tinthe opposite direction to that
in which the steering wheel is moving.
The adjustment process is stopped. G
WARNING
If you drive off while the EASY-ENTRY/EXIT
feature is making adjustments, you could lose
control of the vehicle. There is a risk of an
accident.
Always wait until the adjustment process is
complete before driving off.
The EASY-ENTRY/EXIT feature makes getting
in and out of your vehicle easier.
You can activate and deactivate the EASY-
ENTRY/EXIT feature in the on-board
computer (Y page 203).98
Steering wheelSeats, steering wheel and mirrors
Page 126 of 350
USA only
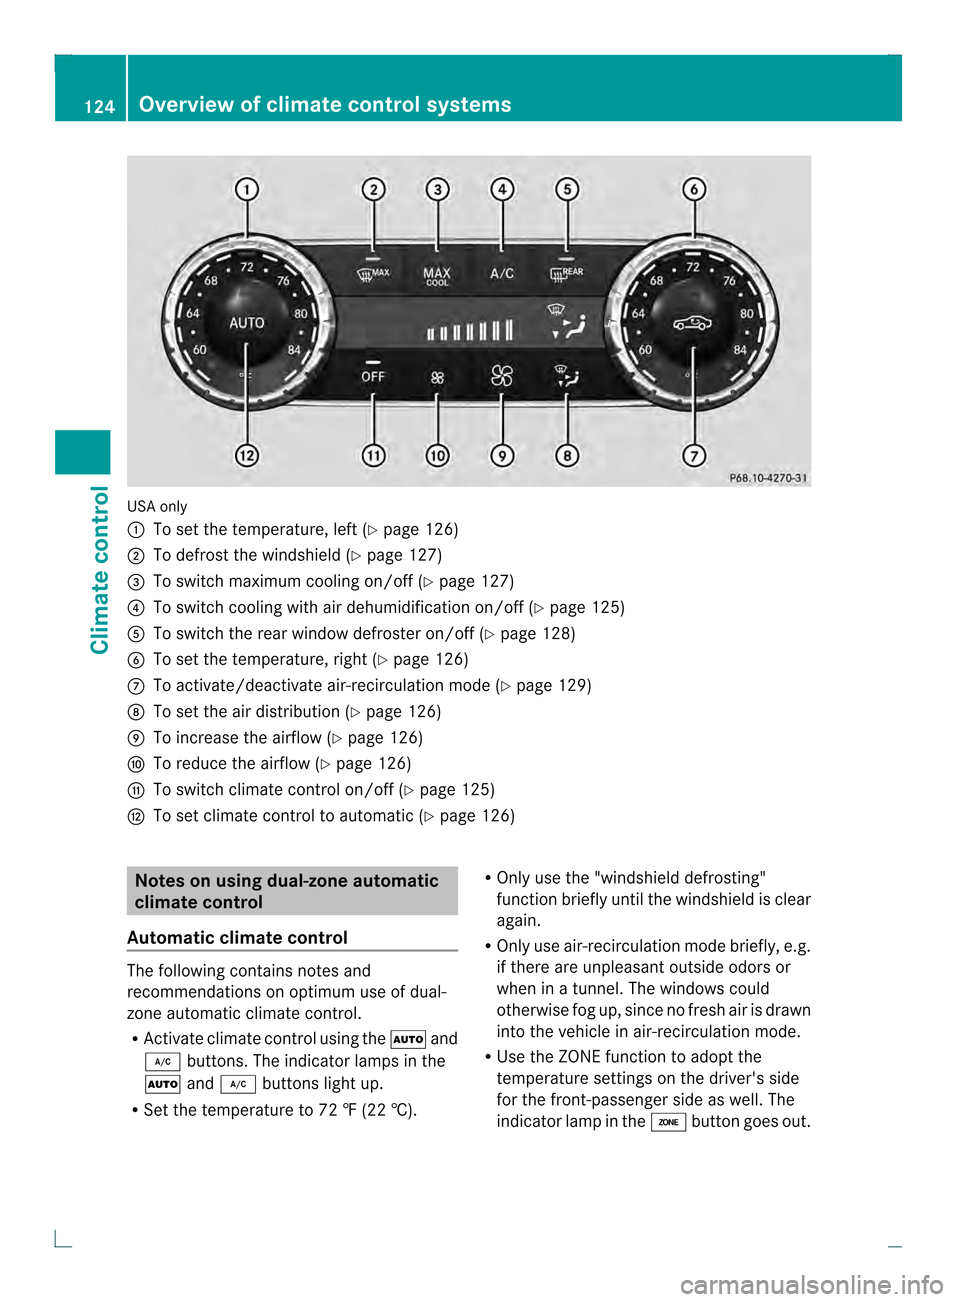
0002
To set the temperature, left (Y page 126)
0003 To defrost the windshield (Y page 127)
0022 To switch maximum cooling on/off (Y page 127)
0021 To switch cooling with air dehumidification on/off (Y page 125)
001F To switch the rear window defroster on/off (Y page 128)
0020 To set the temperature, right (Y page 126)
0012 To activate/deactivate air-recirculation mode (Y page 129)
0013 To set the air distribution (Y page 126)
0014 To increase the airflow (Y page 126)
0015 To reduce the airflow (Y page 126)
0016 To switch climate control on/off (Y page 125)
0018 To set climate control to automatic (Y page 126)Notes on using dual-zone automatic
climate control
Automatic climate control The following contains notes and
recommendations on optimum use of dual-
zone automatic climate control.
R
Activate climate control using the 0003and
0004 buttons. The indicator lamps in the
0003 and0004 buttons light up.
R Set the temperature to 72 ‡ (22 †). R
Only use the "windshield defrosting"
function briefly until the windshield is clear
again.
R Only use air-recirculation mode briefly, e.g.
if there are unpleasant outside odors or
when in a tunnel. The windows could
otherwise fog up, since no fresh air is drawn
into the vehicle in air-recirculation mode.
R Use the ZONE function to adopt the
temperature settings on the driver's side
for the front-passenger side as well.T he
indicator lamp in the 0002button goes out. 124
Overview of climate control systemsClimate control
Page 129 of 350
Switching the ZONE function on/off
This function is only available in vehicles for
Canada.
X To activate: press the0002button.
The indicator lamp in the 0002button lights
up.
The temperature setting for the driver's
side is not adopted for the front-passenger
side.
When the buttons for temperature, airflow or
air distribution are activated, the temperature
setting for the driver's side is not adopted for
the other climate control zones.
X To deactivate: press the0002button.
The indicator lamp in the 0002button goes
out.
The temperature setting for the driver's
side is adopted for the front-passenger
side. Defrosting the windshield
You can use this function to defrost the
windshield or to defrost the inside of the
windshield and the side windows.
i You should only select the "windshield
defrosting" function until the windshield is
clear again.
X Turn the SmartKey to position 2in the
ignition lock (Y page 133).
X To activate: press the0006button.
The indicator lamp in the 0006button lights
up.
The climate control system switches to the
following functions:
R high airflow
R high temperature
R air distribution to the windshield and
front side windows
R air-recirculation mode off
If the battery is not sufficiently charged,
blower output may be reduced. As soon as the battery is sufficiently charged, full blower
output will be available.
X
To deactivate: press the0006button.
The indicator lamp in the 0006button goes
out. The previously selected settings are
restored. Air-recirculation mode remains
deactivated.
or
X Press the 0003button.
The indicator lamp in the 0006button goes
out. Airflow and air distribution are set to
automatic mode.
or
X Turn temperature control 0002or0020
clockwise or counter-clockwise
(Y page 123).
or
X Press the 0015or0014 button. MAX COOL maximum cooling
The MAX COOL function is only available in
vehicles for the USA.
MAX COOL is only operational when the
engine is running.
When you activate MAX COOL, climate
control switches to the following functions:
R maximum cooling
R maximum airflow
R air-recirculation mode on
X To activate: press the0001button.
The indicator lamp in the button lights up.
X To activate: press the0001button again.
The indicator lamp goes out. The previously
selected settings are restored. Defrosting the windows
Windows fogged up on the inside X
Activate the 0004cooling with air
dehumidification function.
X Activate automatic mode 0003. Operating the climate control systems
127Climate control
Page 193 of 350
Under normal operating conditions and with
the specified coolant level, the coolant
temperature may rise to 248 ‡ (120 †).
!
Adisplay message is shown if the coolant
temperature is too high.
If the coolant temperature is over
248 ‡(120 †), do not continue driving. The
engine will otherwise be damaged. Tachometer
The red band in the tachometer indicates the
engine's overrevving range.
! Do not drive in the overrevving range, as
this could damage the engine.
The fuel supply is interrupted to protect the
engine when the red band is reached. Outside temperature display
You should pay special attention to road
conditions when temperatures are around
freezing point.
The outside temperature display is in the
multifunction display (Y page 192).
Changes in the outside temperature are
displayed after a shor tdelay. Speedometer with segments
The segments in the speedometer indicate
which speed range is available.
R Cruise control activated (Y page 157):
The segments light up from the stored
speed to the maximum speed.
R DISTRONIC PLUS activated (Y page 159):
One or two segments in the set speed
range light up.
R DISTRONIC PLUS detects avehicle in front:
The segments between the speed of the
vehicle in fron tand the stored speed light
up. Operating the on-board computer
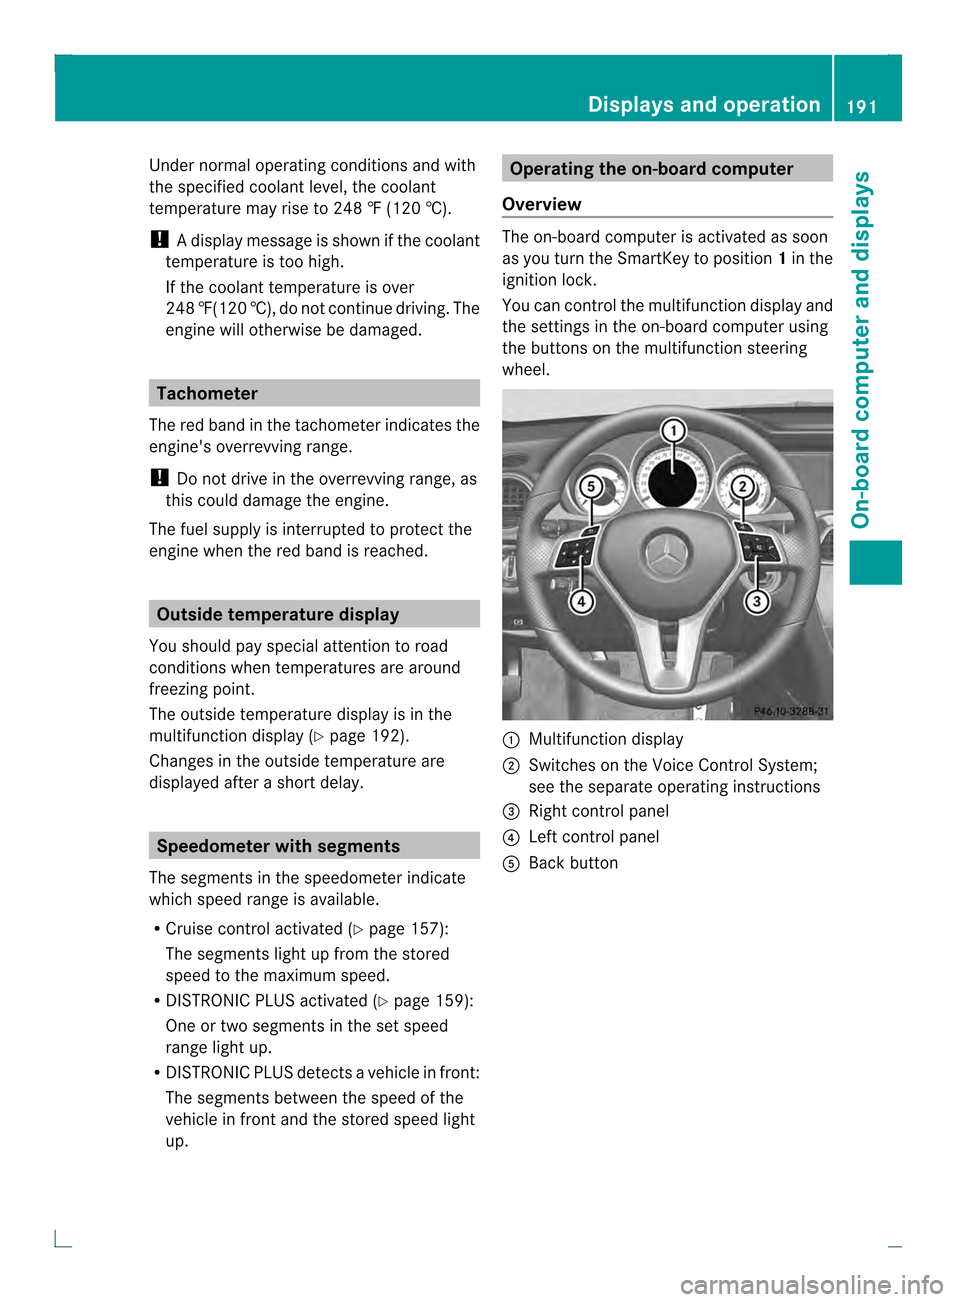
Overview The on-board compute
ris activated as soon
as you turn the SmartKey to position 1in the
ignition lock.
You can control the multifunction display and
the settings in the on-board computer using
the buttons on the multifunction steering
wheel. 0002
Multifunction display
0003 Switches on the Voice Control System;
see the separate operating instructions
0022 Right control panel
0021 Left control panel
001F Back button Displays and operation
191On-board computer and displays Z