reset MERCEDES-BENZ C-Class COUPE 2017 CL205 User Guide
[x] Cancel search | Manufacturer: MERCEDES-BENZ, Model Year: 2017, Model line: C-Class COUPE, Model: MERCEDES-BENZ C-Class COUPE 2017 CL205Pages: 354, PDF Size: 8.66 MB
Page 97 of 354
Problems with the sliding sunroof
Your vehicle may be equippedwithasliding sunroof or apanorama roof with power tilt/sliding
panel. In the following section ,the term "sliding sunroof" refers to both sliding sunroof variants.
GWARNING
If you close the sliding sunroof again immediately after it has been blocked or reset, the sliding
sunroof closes with increased or maximum force. The reversing feature is then not active. Parts
of the body could be trapped in the closing area in the process. This poses an increased risk of
injury or even fatal injury.
Make sure that no parts of the body are in the closing area.
If somebody becomes trapped:
Rrelease the switch immediately, or
Rpress the switch in any direction during the automatic closing process
The closing process is stopped.
!If the sliding sunroof still cannot be opened or closed as aresult of amalfunction ,contact a
qualified specialist workshop.
ProblemPossible causes/consequences and MSolutions
The sliding sunroof or
panorama roof with
power tilt/sliding panel
cannot be closed and
you cannot see the
cause.If the sliding sunroof or panorama roof with power tilt/sliding panel is
obstructed during closing and reopens again slightly:
XImmediately after it blocks, pull the3switch down again to the
point of resistance until the sliding sunroof or panorama roof with
power tilt/sliding panel is closed.
The sliding sunroof or panorama roof with power tilt/sliding panel is
closed with more force.
If the sliding sunroof or panorama roof with power tilt/sliding panel is
obstructed again during closing and reopens again slightly:
XImmediately after it blocks, pull the 3switch down again to the
point of resistance until the sliding sunroof or panorama roof with
power tilt/sliding panel is closed.
The sliding sunroof or panorama roof with power tilt/sliding panel is
closed without the automatic reversing feature.
Sliding sunroof95
Opening and closing
Z
Page 109 of 354

dow defroster is switched on and the outside
temperature is low.
Folding the exterior mirrorsinorout
electrically
XTurn the SmartKey to position 1or 2in the
ignition lock (Ypage 131).
XBriefly press :.
Bothe xterior mirrorsf old in or out.
iMake sure that the exterior mirrorsa re
always folded out fully while driving .They
could otherwise vibrate.
iIf you are driving faster than 30 mph
(47 km/h), you can no longer fold in the exte-
rior mirrors.
Setting the exterior mirrors
If the battery has been disconnected or com-
pletely discharged, the exterior mirrorsm ust be
reset.T he exterior mirrorsw ill otherwise not
fold in when you select the Automatic
MirrorFoldingfunction in the multimedia system.
XTurn the SmartKey to position 1or 2in the
ignition lock (Ypage 131).
XBriefly press :.
Folding the exterior mirror sinorout
automatically
When the Automatic Mirror Foldingfunc-
tion is activated in the multimedia system (see
the separate operatin ginstructions):
Rthe exterior mirrorsf old in automatically as
soon as you lock the vehicle from the outside.
Rthe exterior mirrorsf old out automatically
again as soon as you unlock the vehicle.
iIf the exterior mirrorsh ave been folded in
manually, they do not fold out.
Exterior mirror pushed out of position
If an exterior mirror has been pushed out of
position ,proceed as follows:
XVehicles without electrically folding exte-
rior mirrors: move the exterior mirror into
the correct position manually.
XVehicles with electrically folding exterior
mirrors: press and hold button :until you
hear aclick and then the mirror engaging in
position (
Ypage 107).
The mirror housing is engaged again and you
can adjust the exterior mirrorsasu sual
(
Ypage 106).
Automatic anti-glare mirrors
GWARNING
Electrolyte may escape if the glass in an auto-
matic anti-glare mirror breaks. The electrolyte
is harmful and causes irritation. It must not
come int ocontact with your skin ,eyes, res-
piratory organs or clothing or be swallowed.
There is arisk of injury.
If you come int ocontact with the electrolyte,
observe the following:
RRinse off the electrolyte from your skin
immediately with water.
RImmediately rinse the electrolyte out of
your eyes thoroughly with clean water.
RIf the electrolyte is swallowed, immediately
rinse your mouth out thoroughly. Do not
induce vomiting.
RIf electrolyte comes int ocontact with your
skin or hair or is swallowed, seek medical
attention immediately.
RImmediately chang eout of clothing which
has come int ocontact with electrolyte.
RIf an allergic reaction occurs, seek medical
attention immediately.
Mirrors107
Seats, steering wheel and mirrors
Z
Page 110 of 354
The rear-view mirror and the exterior mirror on
the driver's side automatically go into anti-glare
mode if the following conditions are met simul-
taneously:
Rthe ignition is switched on
Rincident light from headlamps strikes the sen-
sor in the rear-view mirror
The mirrors do not go into anti-glare mode if
reverse gear is engaged or if the interior lighting
is switched on.
Parking position for the exterior mir-
ror on the front-passenger side
Storing the parking position
You can position the front-passenger side exte-
rior mirror in such away that you can see the
rear wheel on that side as soon as you engage
reverse gear. You can store this position.
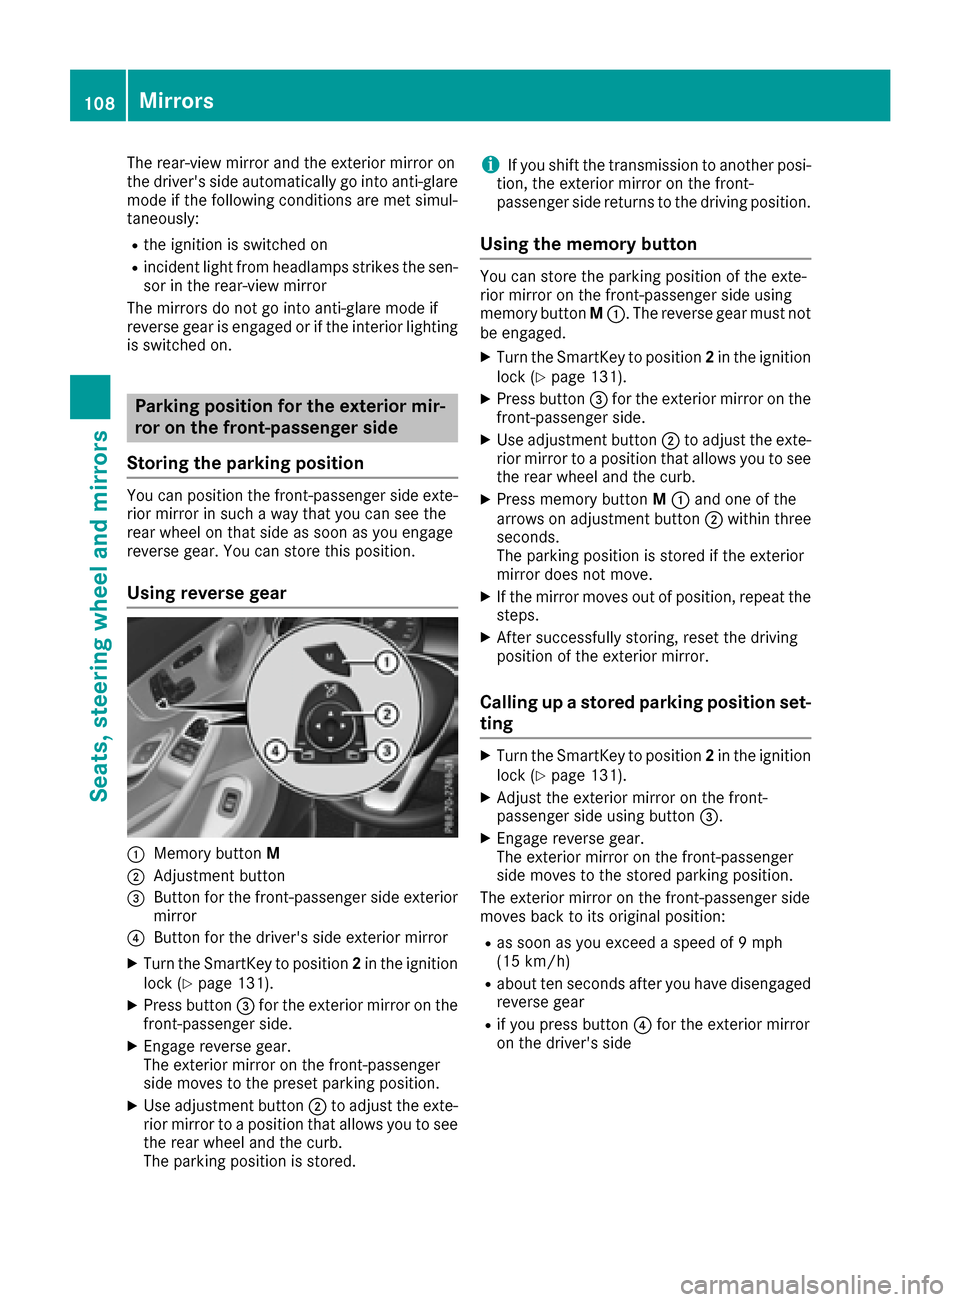
Using reverse gear
:Memory button M
;Adjustment button
=Button for the front-passenger side exterior
mirror
?Button for the driver's side exterior mirror
XTurn the SmartKey to position 2in the ignition
lock (Ypage 131).
XPress button =for the exterior mirror on the
front-passenger side.
XEngage reverse gear.
The exterior mirror on the front-passenger
side moves to the preset parking position.
XUse adjustmen tbutton ;to adjust the exte-
rior mirror to aposition that allows you to see
the rear wheel and the curb.
The parking position is stored.
iIf you shift the transmission to another posi-
tion, the exterior mirror on the front-
passenger side return stothe driving position.
Using the memor ybutton
You can store the parking position of the exte-
rior mirror on the front-passenger side using
memory button M:.T he reverse gear must not
be engaged.
XTurn the SmartKey to position 2in the ignition
lock (Ypage 131).
XPress button =for the exterior mirror on the
front-passenger side.
XUse adjustmen tbutton ;to adjust the exte-
rior mirror to aposition that allows you to see
the rear wheel and the curb.
XPress memory button M: and one of the
arrows on adjustmen tbutton ;within three
seconds.
The parking position is stored if the exterior
mirror does not move.
XIf the mirror moves out of position, repeat the
steps.
XAfter successfully storing, reset the driving
position of the exterior mirror.
Calling up astored parking position set-
ting
XTurn the SmartKey to position 2in the ignition
lock (Ypage 131).
XAdjust the exterior mirror on the front-
passenger side using button =.
XEngage reverse gear.
The exterior mirror on the front-passenger
side moves to the stored parking position.
The exterior mirror on the front-passenger side
moves back to its original position:
Ras soon as you exceed aspeed of 9mph
(15 km/h)
Rabout ten seconds after you have disengaged
reverse gear
Rif you press button ?for the exterior mirror
on the driver's side
108Mirrors
Seats, steering wheel and mirrors
Page 111 of 354
Memory function
Important safety notes
GWARNING
If you use the memory function on the driver's side while driving, you coul dlose control of
the vehicleasar esult of the adjustments
being made .There is arisk of an accident.
Only use the memory function on the driver's
side when the vehicleiss tationary.
GWARNING
When the memory function adjusts the seat or steering wheel, you and other vehicleo ccu-
pants –particularly children –coul db ecome
trapped. There is arisk of injury.
Whil ethe memory function is making adjust-
ments, make sure that no one has any body
parts in the swee pofthe seat or steering
wheel. If somebody becomest rapped, imme-
diately release the memory function position
button. The adjustment process is stopped.
GWARNING
Childre ncoul db ecome trappe difthey acti-
vate the memory function, particularly when
unattended .There is arisk of injury.
When leaving the vehicle, alway stake the
SmartKey with you and lock the vehicle. Never
leave children unsupervised in the vehicle.
The memory function can be use datany time,
e.g. even when the key is not in the ignitio nlock.
Storing settings
With the memory function, you can store up to
three different settings, e.g. for three different
people.
The following settings are stored as asingle
memory preset:
Rposition of the seat, backrest and head
restraint
Rdriver's side:p osition of the exterior mirrors
on the driver's and front-passenger sides
Rposition of the head-up display
XAdjust the seat accordingly (Ypag e98).
XOn the driver's side ,adjust the steering wheel
(Ypag e104) and the exterior mirrors
(Ypag e106).
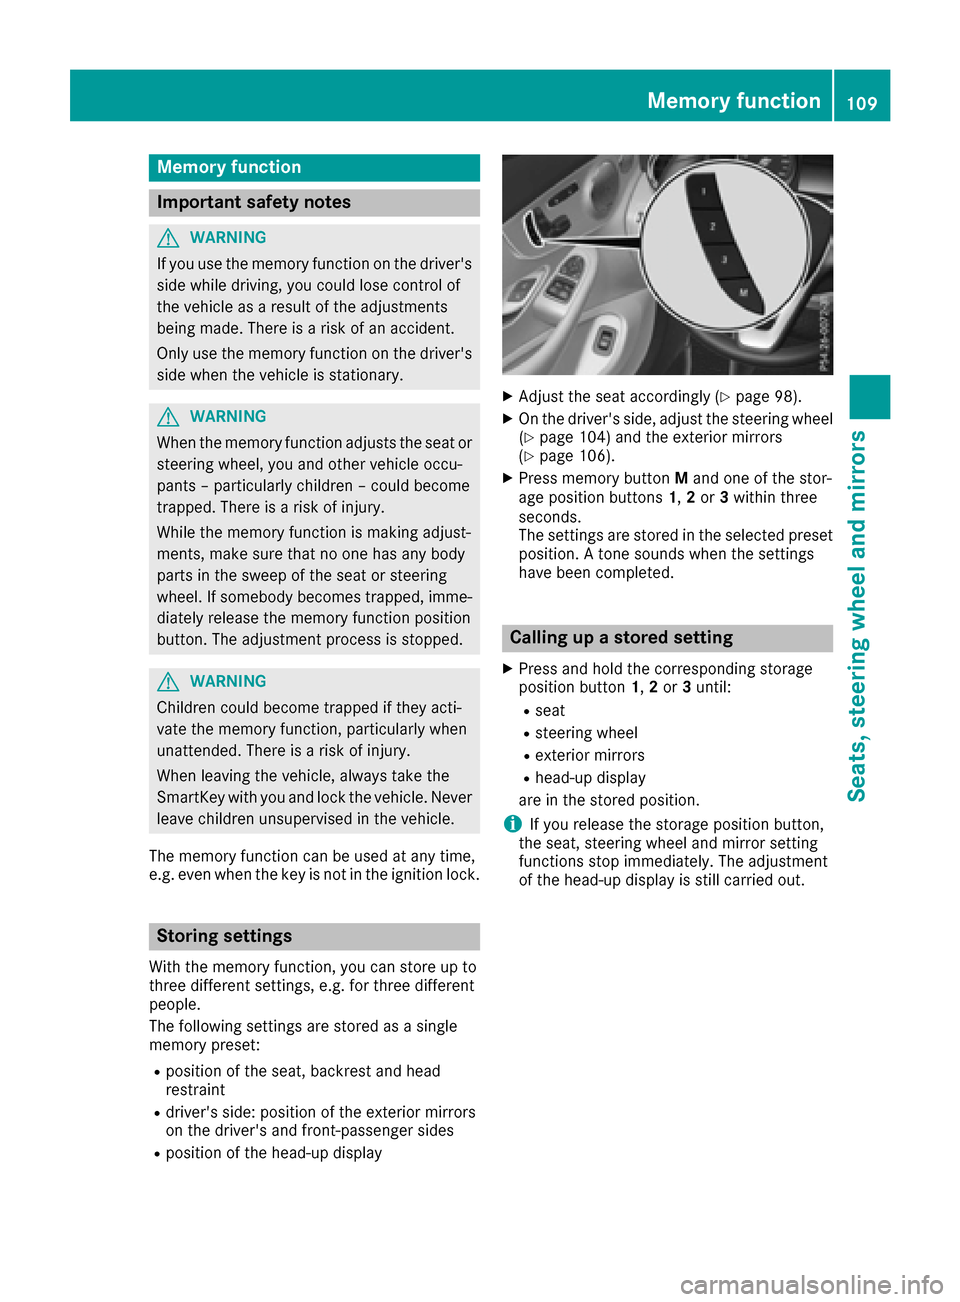
XPress memory button Mand one of the stor-
age position buttons 1,2or 3withi nthree
seconds.
The settings are stored in the selected preset
position. Atone sound swhen the settings
have been completed.
Calling up astored setting
XPress and hold the corresponding storage
position button 1,2or 3until:
Rseat
Rsteering wheel
Rexterior mirrors
Rhead-up display
are in the stored position.
iIf you release the storage position button,
the seat, steering whee land mirror setting
functions stop immediately. The adjustment
of the head-up display is still carrie dout.
Memory function109
Seats, steering wheel and mirrors
Z
Page 207 of 354

XPress theòbutton on the steerin gwheel
to open the menu list.
XPress the :or9 button on the steering
wheel to select the Tripmenu.
XPress9or: to select the display with
approximate range :and currentf uel con-
sumption ;.
Approximate range :that can be covered is
calculated accordingtoy our currentdriving
style and the amount of fuel in the tank .If
there is only asmall amount of fuel left in the
fuel tank ,avehicle being refueled C
appears instead of approximate range :.
Recuperation display =shows you if energy
has been recuperated from the kinetic energy in overrun mode and saved in the battery.
Recuperation display =depends on the
engine installed and is therefore not available
in all vehicles.
ECO display
The ECO display is not availableinM ercedes-
AMG vehicles.
XPress òon the steerin gwheel to open the
menu list.
XPress the :or9 button on the steering
wheel to select the Tripmenu.
XConfirm by pressing aon the steering
wheel.
XPress the :or9 button to select ECO
display.
If the ignition remains switched off for longer
than four hours, the ECO display will be auto-
matically reset.
For more information on the ECO display, see
(
Ypage 156).
Trip computer "From Start" or "From
Reset"
:Distance
;Drivin gtime
=Average speed
?Average fuel consumption
XPress the òbutton on the steerin gwheel
to open the menu list.
XPress :or9 on the steerin gwheel to
select the Tripmenu.
XConfirm by pressing aon the steering
wheel.
XPress :or9 to select From Startor
From Reset.
The values in the From
Startsubmenu are cal-
culated from the start of ajourney, while the
values in the From Reset
submenu are calcu-
lated from the last time the submenu was reset
(
Ypage 206).
In the following cases the trip computer is auto- matically reset From Start
:
Rthe ignition has been switched off for more
than four hours.
R999 hours have been exceeded.
R9,999 miles have been exceeded.
When 9,999 hours or 99,999m iles have been
exceeded, the trip computer is automatically
reset From Reset
.
Digital speedometer
XPress òon the steerin gwheel to open the
menu list.
XPress :or9 on the steerin gwheel to
select the Tripmenu.
Menus and submenus205
On-board computer and displays
Z
Page 208 of 354

XConfirmbyp ressing aon thesteering
wheel.
XPress the :or9 buttontos elect the
digit al speedometer.
Resetting values
XPress the òbuttonont hesteering wheel
to open th emenulist.
XPress :or9 on thesteering wheel to
select the Tripmenu.
XConfirmbyp ressing aon thesteering
wheel.
XPress the :or9 buttontos elect the
function that you wishto reset.
XPress the abutton.
XPress :to select Yesand press ato
confirm.
You can reset th evalues of th efollowin gfunc-
tions:
RTrip odometer
R"From Start "tripc om puter
R"From Reset"t ripc om puter
RECO display
If you reset th evalues intheE CO displ ay, the
values inthe" From Start "tripc om puter are also
reset.Ify ou reset th evalues inthe" From Start"
tr ip computer, th evalues intheE CO displ ay are
also reset.
Navigation system menu
Displaying navigation instructions
In the Navimenu, th emultifunction display
shows navigation instructions. You can fin dfur-
ther informatio nonnavigation instructionsi n
th es eparate operatin ginstructions.
XSwit ch on th emultimed iasystem (see sepa-
rat eo peratin ginstructions).
XPress the òbuttonont hesteering wheel
to open th emenulist.
XPress :or9 on thesteering wheel to
select the Navimenu.
XConfirmbyp ressing aon thesteering
wheel.
Route guidance not active
:Direction of travel
;Currentr oad
Route guidance active
No change of direction announced
:Distance to th enextd estination
;Estimate darrival time
=Distance to th enextc hang eofd irection
?Currentr oad
206Menusa nd submenus
On-boardc omputer and displays
Page 210 of 354
Other status indicatorsofthe naviga-
tion system
:Additional information
Other possible additional information:
RNew Route...or Calculating Route...
An ew route is calculated.
RRoad Not Mapped
The vehicle position is inside the area of the
digital map but the road is not recognized, e.g.
newly built streets, car parks or private land.
RNo Route
No route could be calculated to the selected
destination.
RO
You have reached the destination or an inter-
mediate destination.
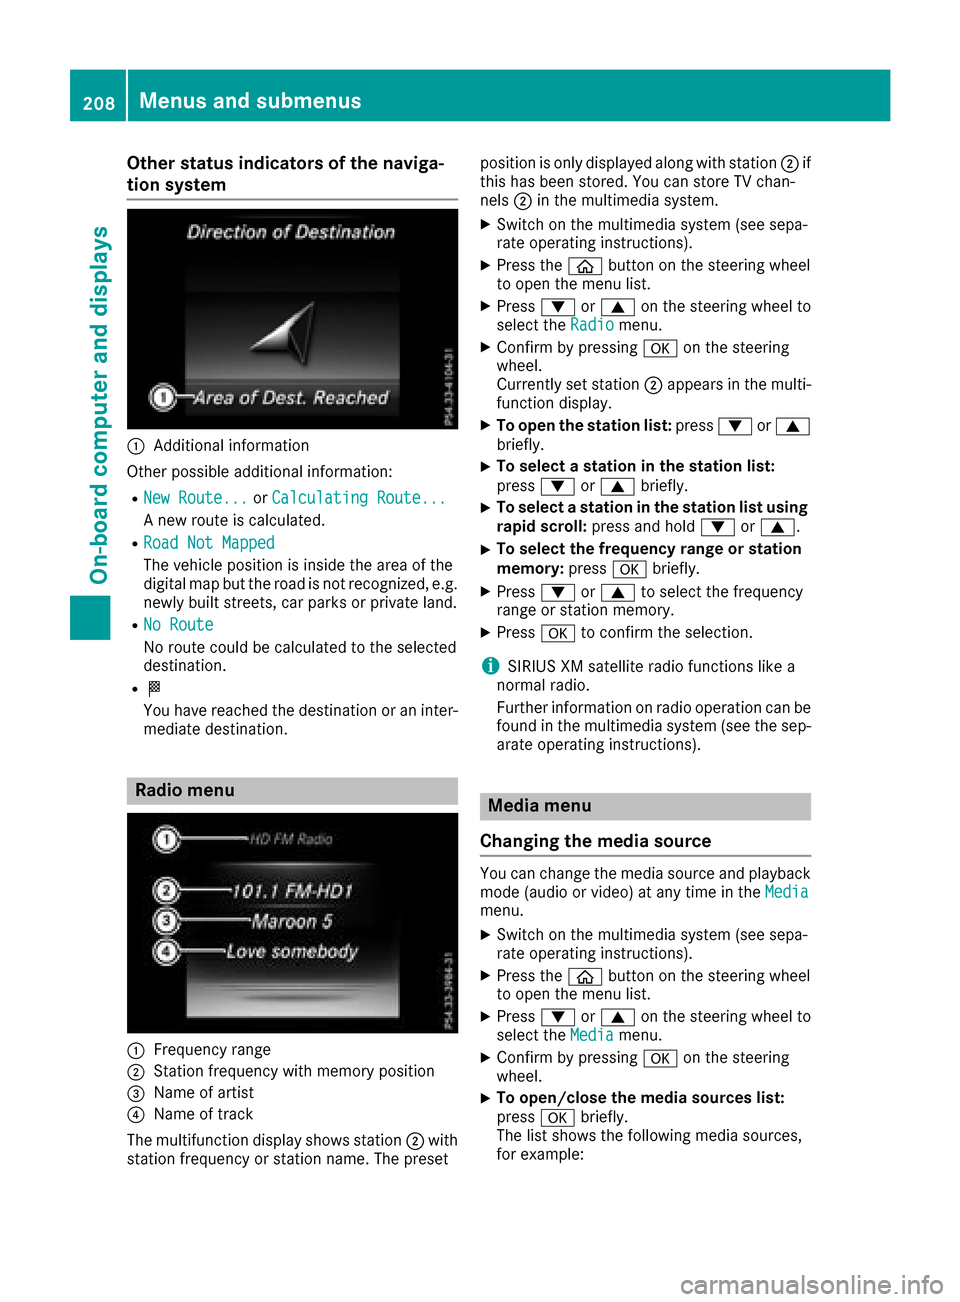
Radio menu
:Frequenc yrange
;Station frequenc ywith memory position
=Name of artist
?Name of track
The multifunction display shows station ;with
station frequenc yorstation name. The preset position is only displayed along with station
;if
this has been stored. You can stor eTVchan-
nels ;in the multimedia system.
XSwitc hont he multimedia system (see sepa-
rate operatin ginstructions).
XPress the òbutton on the steering wheel
to open the menu list.
XPress :or9 on the steering wheel to
select the Radiomenu.
XConfirm by pressing aon the steering
wheel.
Currently set station ;appears in the multi-
function display.
XTo open the station list: press:or9
briefly.
XTo select astation in the station list:
press :or9 briefly.
XTo select astation in the station list using
rapid scroll: press and hold :or9.
XTo select the frequency range or station
memory: pressabriefly.
XPress :or9 to select the frequency
range or station memory.
XPress ato confirm the selection.
iSIRIUS XM satellite radio function slike a
normal radio.
Further information on radio operation can be
found in the multimedia system (see the sep-
arate operatin ginstructions).
Media menu
Changing the media source
You can change the media source and playback
mode (audio or video) at any time in the Media
menu.
XSwitchont he multimedia system (see sepa-
rate operatin ginstructions).
XPress the òbutton on the steering wheel
to open the menu list.
XPress :or9 on the steering wheel to
select the Mediamenu.
XConfirm by pressing aon the steering
wheel.
XTo open/close the media sources list:
press abriefly.
The list shows the following media sources,
for example:
208Menus and submenus
On-boardc omputer and displays
Page 216 of 354
Using theDisplay Contentfunction, you can
choose from up to four displayo ptions depend-
ing on the vehicle's equipment. The selected
contents appearint he Head-up Display.
In Mercedes-AMG vehicles, you can also choose
between two AMG displays. If you select an
AMG display, the Head-up Display shows AMG-
specific contents.
XPress the òbutton on the steering wheel
to open the menu list.
XPress :or9 on the steering wheel to
select the Settingsmenu.
XConfirm by pressing aon the steering
wheel.
XPress :or9 to select the Head-upDisplaysubmenu.
XPressato confirm.
XSelect DisplayContentwith: or9.
XPress ato confirm.
Ag raphic selection list appears.
XPress :or9 to select the desired dis-
play.
XPress the abutton to confirm the selec-
tion.
You can find further information on navigation
displays in the multimedia system (see separate operating instructions).
Information on displays of Traffic Sign Assist
(
Ypage 190).
Setting the position
You can adjust the position of the Head-up Dis-
play on the windshield. You can compensate for
height differences if the seat positions are
changed, for example.
XSwitch on the Head-up Display (Ypage 203).
XPress the òbutton on the steering wheel
to open the menu list.
XPress the :or9 button on the steering
wheel to select the Settingsmenu.
XConfirm by pressing aon the steering
wheel.
XUse : or9 to select the Head-upDisplaysubmenu.
XPressato confirm.
XPress :or9 to select the Positionfunction.
XPress theabutton to save the setting.
XPress :or9 to adjust the position to a
level from Level+5(up) toLevel-5(down).
XPress the aor% button to save the
setting.
Using the Memory function, you can save and
call up the set position of the Head-up Display as
as ingle memory preset (
Ypage 109).
Setting the brightness
The brightness of the Head-up Display is auto-
matically adjusted to the surrounding ambient
light. You can also individually adjust the bright-
ness of the Head-up Display.
XSwitch on the Head-up Display (Ypage 203).
XPress the òbutton on the steering wheel
to open the menu list.
XPress the :or9 button on the steering
wheel to select the Settingsmenu.
XConfirm by pressing aon the steering
wheel.
XUse : or9 to select the Head-upDisplaysubmenu.
XPressato confirm.
XPress :or9 to select the Brightnessfunction.
XPress theabutton to save the setting.
XPress the :or9 button to adjust the
brightness to alevel from Level+5(bright) to
Level -5(dark).
XPress the aor% button to save the
setting.
Light submenu
Switching the daytimer unning lamps on/
off
This function is not available in Canada.
XPress òon the steering wheel to open the
menu list.
XPress :or9 on the steering wheel to
select the Settingsmenu.
XConfirm by pressing aon the steering
wheel.
XPress :or9 to select the Lightssubmenu.
XPressato confirm.
XUsing :or9,s elect the DaytimeRunning Lightsfunction.
If the DaytimeRunningLightsfunction has
been switched on, the cone of light and the
214Menus and submenus
On-board computer and displays
Page 217 of 354
Wsymbol are shown in white in the multi-
function display.
XPress the abutton to save the setting.
Further information on daytime running lamps
Daytime Running Lights
(Ypage 110).
Instrument cluster submenu
Selecting the distance unit
The DisplayUnitSpeed-/Odometerfunction
allowsy ou to choose whether certain displays
appearink ilometers or miles in the multifunc-
tion display.
XPress the òbutton on the steering wheel
to open the menu list.
XPress the :or9 button on the steering
wheel to select the Settingsmenu.
XConfirm by pressing aon the steering
wheel.
XUse : or9 to select the InstrumentClustersubmenu.
XPressato confirm.
XPress :or9 to select the DisplayUnit Speed-/Odometerfunction.
The current setting kmorMilesappears.
XPress the abutton to save the setting.
The selected unit of measurement for distance
applies to:
RDigital speedometer in the Tripmenu
ROdometer and the trip odometer
RTrip computer
RCurrent consumption and the range
RRange
RNavigation instructions in the Navimenu
RCruise control
RDISTRONIC PLUS with Steering Assist and
Stop&Go Pilot
RASSYST PLUS service interval display
Switching the additional speedometer
on/off
If the additional speedometer is switched on,
the speed is shown in the status bar in the mul-
tifunction displayinstead of the outside tem-
perature.
The speed displayisi nverse to the speedome-
ter.
XPress the òbutton on the steering wheel
to open the menu list.
XPress :or9 on the steering wheel to
select the Settingsmenu.
XConfirm by pressing aon the steering
wheel.
XPress :or9 to select the Instru‐ment Clustersubmenu.
XPressato confirm.
XUsing :or9,s elect the AdditionalSpeedometer [km/h]function.
The current selection appears.
XTo activate/deactivate: press theabut-
ton again.
Restoring the factory settings
XPress the òbutton on the steering wheel
to open the menu list.
XPress the :or9 button on the steering
wheel to select the Settingsmenu.
XConfirm by pressing aon the steering
wheel.
XUse : or9 to select the FactorySettingssubmenu.
XPressato confirm.
The Reset All Settings?function
appears.
XPress :or9 to select NoorYes.
XPress ato confirm the selection.
If you have selected Yes,the multifunction
displays howsaconfirmation message.
For safety reasons, the Daytime Running
Lightsfunction in theLightssubmenu is only
reset when the vehicle is stationary.
Menus and submenus215
On-board computer and displays
Z
Page 218 of 354
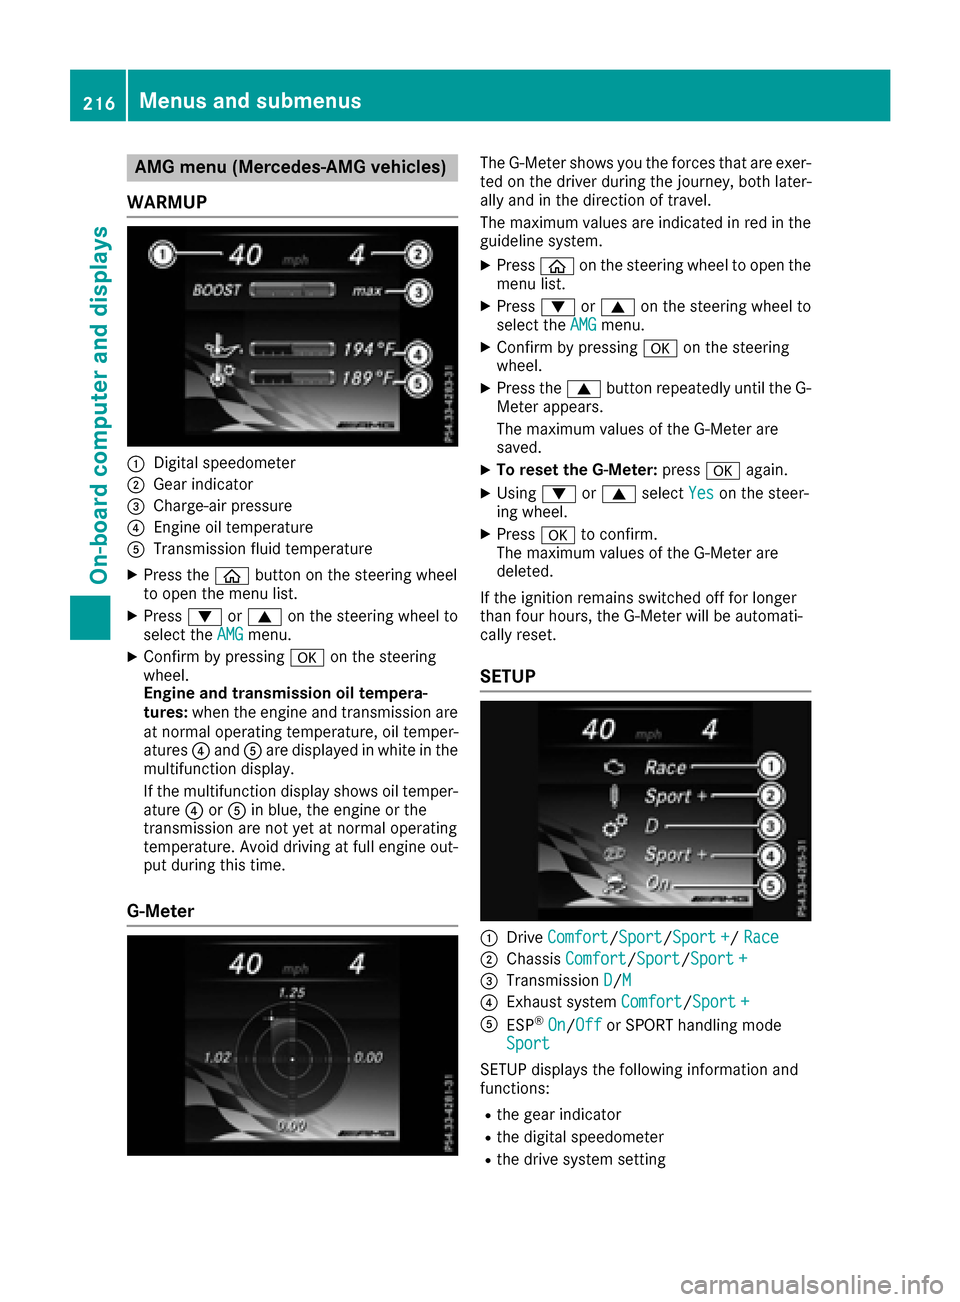
AMG menu(Mercedes-AM Gvehicles)
WAR MUP
:Digital speedometer
;Gear indicator
=Charge-air pressur e
?Engineoil temperature
ATransmission fluid temperature
XPress th eò buttonont hesteering whee l
to open th emenulist .
XPress :or9 on thesteering whee lto
select th eAMGmenu.
XConfir mbyp ressing aon thesteering
wheel.
Engin eand transmission oil tempera-
tures :when th eenginea nd transmission are
at normal operating temperature, oil temper-
atures ?and Aare displayed in whit einthe
multifunction display.
If th emultifunction display shows oil temper-
atur e? orA in blue, th eengineort he
transmission are no tyet at normal operating
temperature. Avoid drivin gatfull engin eout-
put during this time.
G- Meter
The G-Meter shows you th eforce stha tare exer-
te dont hedriver during th ejou rney, bot hlater-
ally and in th edirection of travel .
The maximum value sare indicated in red in th e
guidelin esystem.
XPress òon thesteering whee ltoo pen th e
men ulist .
XPress :or9 on thesteering whee lto
select th eAMGmenu.
XConfir mbyp ressing aon thesteering
wheel.
XPress th e9 buttonrepeatedly until th eG-
Meter appears.
The maximum value softheG-Meter are
saved.
XTo reset th eG-Meter: press aagain.
XUsing :or9 select Yeson thesteer -
ing wheel.
XPress ato confirm .
The maximum value softheG-Meter are
deleted.
If th eignition remain sswitched off for longer
than four hours, th eG-Meter will be automati-
call yreset .
SETUP
:Drive Comfor t/Sport/Sport +/Rac e
;Chassis Comfort/Sport/Sport +
=Transmission D/M
?Exhaust system Comfort/Sport +
AESP®On/Offor SPORT handlin gmode
Sport
SETUP displays th efollowin ginformation and
functions:
Rth eg ear indicator
Rthed igital speedometer
Rthed rive system setting
216Menusa nd submenus
On-boardc omputer andd isplays