sensor MERCEDES-BENZ C-Class COUPE 2017 CL205 Owner's Guide
[x] Cancel search | Manufacturer: MERCEDES-BENZ, Model Year: 2017, Model line: C-Class COUPE, Model: MERCEDES-BENZ C-Class COUPE 2017 CL205Pages: 354, PDF Size: 8.66 MB
Page 113 of 354
light switchtotheT position, the daytime
running lamps and parking lamps switc hon.
If the engin eisrunning and you turn the light
switc htotheL position, the manual settings
tak eprecedenc eover the daytime running
lamps.
USA only:
The daytime running lamps improve the visibility
of your vehicle duringt he day. To do this,the
daytime running lamps function must be
switched on using the on-board computer
(
Ypage 214).
If the engin eisrunning and you turn the light
switc htotheT orL position, the manual
settings tak eprecedenc eover the daytime run-
nin glamps.
Low-beam headlamps
Even if the light sensor does not detect that it is
dark,t he parking lamps and low-beam head-
lamps switc honwhen the ignition is switched on
and the light switc hisset to the Lposition.
This is aparticularly useful function in the event
of rain and fog.
XTo switch on th elow-beam headlamps:
turn the SmartKey in the ignition lock to posi-
tion 2or star tthe engine.
XTurn the light switc htotheL position.
The green Lindicator lamp in the instru-
mentc luster lightsu p.
Rear fog lamp
The rear fog lamp improves visibilityofy our
vehicle for the traffic behindint he eventofthick
fog. Please tak enoteoft he country-specific
regulations for the use of rear fog lamps.
XTo switch on th erearfog lamp: turn the
SmartKey in the ignition lock to position 2or
star tthe engine.
XTurn the light switc htotheL orÃ
position.
XPress the Rbutton.
The yellow Rindicator lamp in the instru-
mentc luster lightsu p.
XTo switch off th erearfog lamp: press the
R button.
The yellow Rin
dicator lamp in the instru-
mentc luster goes out.
Parking lamps
!If the battery charge is very low, the parking
lamps or standing lamps are automatically
switched off to enable the nex tengin estart.
Always park your vehicle safely and suffi-
ciently lit accordingtol egal standards. Avoid
using the parking lamps Toveraperiod of
several hours. If possible,s witchont he right-
hand X or left-hand Wstanding lamp.
XTo switch on: turn the light switc htothe
T position.
The green Tindicator lamp in the instru-
mentc luster lightsu p.
Standing lamps
Switchingonthe standing lamps ensures the
correspondin gside of the vehicle is illuminated.
XTo switch on th estanding lamps: the
SmartKey should not be in the ignition lock or
it should be in position 0.
XTurn the light switchtotheW (left-hand
side of the vehicle) or X((right-han dside
of the vehicle) position.
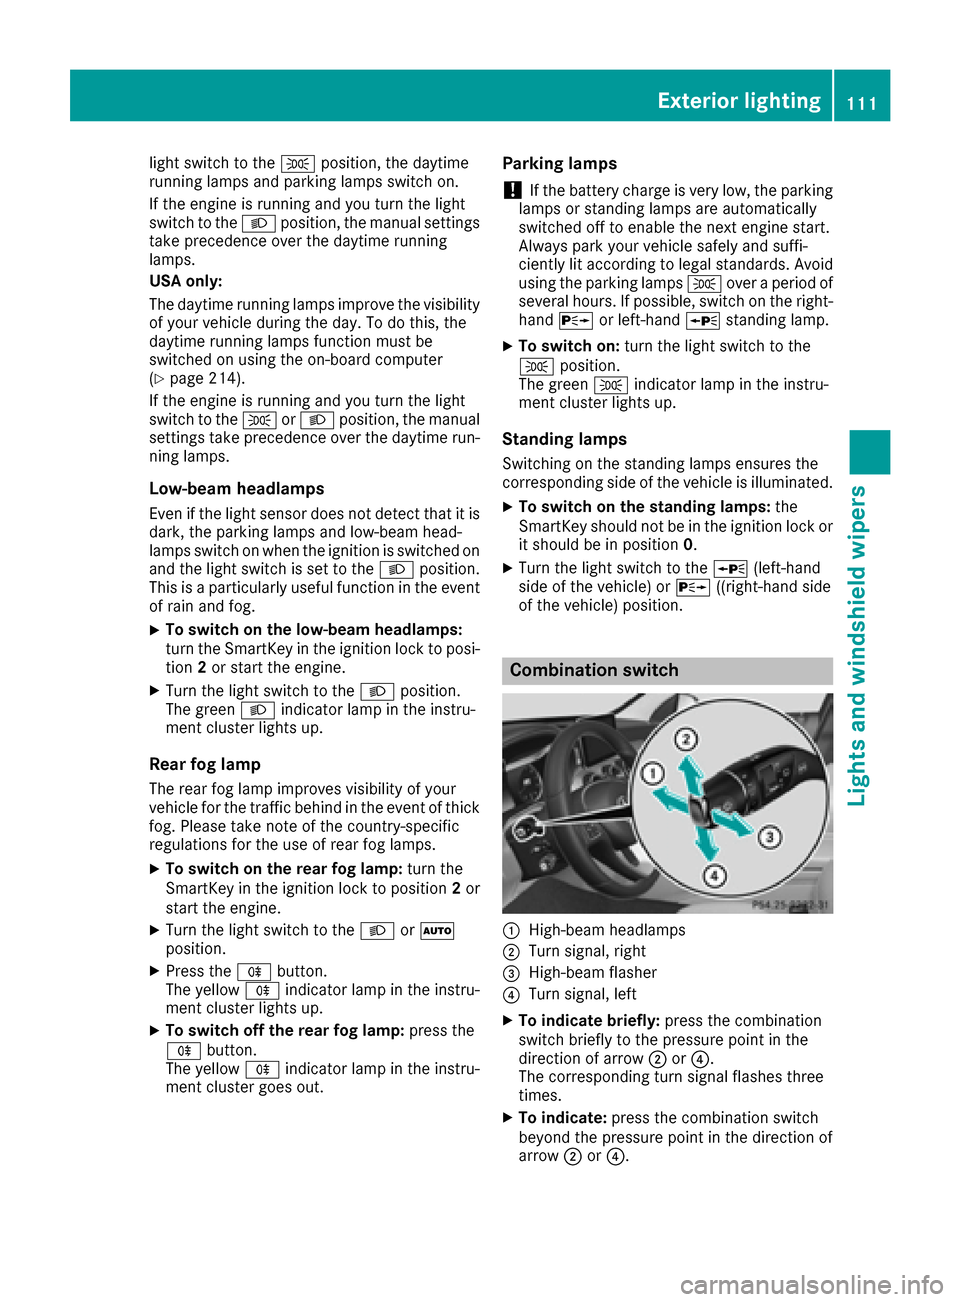
Combination switch
:High-beam headlamps
;Turn signal, right
=High-beam flasher
?Turn signal, left
XTo indicate briefly: press the combination
switc hbriefly to the pressure point in the
direction of arrow ;or?.
The correspondin gturn signal flashes three
times.
XTo indicate: press the combination switch
beyond the pressure point in the direction of
arrow ;or?.
Exterior lighting111
Lightsa nd windshield wipers
Z
Page 114 of 354
XTo switchonthe high-beam headlamps:
turn the light switch to LorÃ.
XPress the combinatio nswitch beyond the
pressure point in the direction of arrow :.
In the Ãposition, the high-bea mhead-
lamps are onlys witched on when it is dark and
the engine is running.
The blue Kindicator lamp in the instru-
ment cluster lights up when the high-beam
headlamps are switched on.
XTo switc hoff the high-beam headlamps:
move the combinatio nswitch back to its nor-
malp osition.
The blue Kindicator lamp in the instru-
ment cluster goe sout.
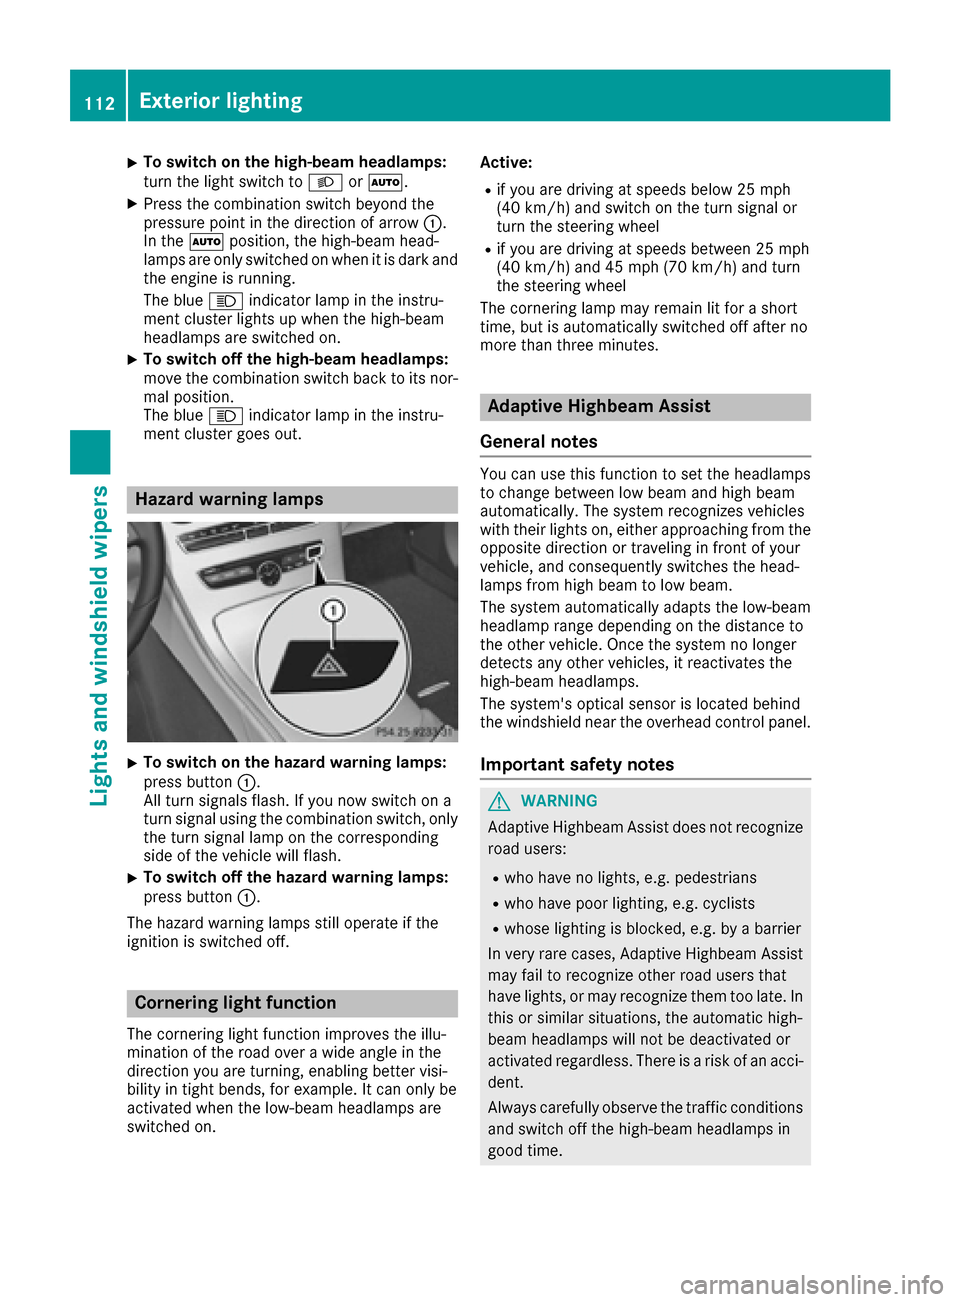
Hazard warning lamps
XTo switc honthe hazard warning lamps:
press button :.
All turn signals flash. If yo unow switch on a
turn signalu sing the combinatio nswitch ,only
the turn signall ampont he corresponding
side of the vehicl ewillf lash.
XTo switc hoff the hazard warning lamps:
press button :.
The hazard warning lamps stil lope rate if the
ignition is switched off.
Cornerin glight function
The cornering light functio nimprove sthe illu-
minatio nofthe roa doveraw idea ngle in the
direction yo uare turning, enabling better visi-
bility in tight bends, for example. It can onlyb e
activate dwhent he low-bea mheadlamps are
switched on. Active:
Rif yo
uare driving at speed sbelow 25 mph
(40 km/h )and switch on the turn signalo r
turn the steering wheel
Rif yo uare driving at speed sbetween 25 mph
(40 km/h )and 45 mph (70 km/h )and turn
the steering wheel
The cornering lamp mayr emainlitfor ashort
time ,but is automaticall yswitched off afte rno
more thant hreem inutes.
Adaptiv eHighbeam Assist
General notes
Yo uc an us ethisf unctio ntoset the headlamps
to change between lo wbeama nd high beam
automatically. The system recognizes vehicles
with thei rlights on, either approaching from the
opposite direction or traveling in front of your
vehicle, and consequentlys witches the head-
lamps from high beam to lo wbeam.
The system automaticall yadapt sthe low-beam
headlam prang edepen ding on the distance to
the othe rvehicle. Once the system no longer
detects any othe rvehicles, it reactivates the
high-bea mheadlamps.
The system's optica lsensor is locate dbehin d
the windshield nea rthe overhead contro lpan el.
Important safety notes
GWARNING
Adaptive Highbeam Assist does not recognize
roa dusers:
Rwh oh avenol ights ,e.g.p edes trians
Rwhoh avep oorlighting, e.g .cyclists
Rwhose lighting is blocked, e.g .byab arrier
In very rar ecases, Adaptive Highbeam Assist
mayf ailtor ecognize othe rroa du sers that
have lights ,ormayrecognize them too late. In
thisors imilar situations, the automatic high-
beam headlamps will not be deactivate dor
activate dregardless. There is ariskofana cci-
dent.
Alway scarefull yobserve the traffic conditions
and switch off the high-bea mheadlamps in
goo dtime.
112Exterior lighting
Lights and windshield wiper s
Page 115 of 354
Adaptive Highbeam Assist cannottake into
account road, weather or traffic conditions.
Adaptive Highbeam Assist is onlyana id.Y ou are
responsibl efor adjusting the vehicle's lighting
to the prevailing light, visibility and traffic con-
ditions.
In particular, the detection of obstacle scan be
restricte difthereis:
Rpoor visibility ,e.g.d ue to fog ,heavy rain or
snow
Rdirt on the sensors or the sensors are
obscured
Switchin gAdaptiv eHighbeam Assist
on/off
XTo switc hon:turn the light switch to Ã.
XPress the combinationswitch beyond the
pressure point in the direction of arrow :.
The _ indicator lamp in the multifunction
display lights up if it is dark and the light sen-
sor activates the low-bea mheadlamps.
If yo uaredriving at speed sabove 25 km/h:
If yo uaredriving at speed sabove approx-
imately16m ph (25 km/h):
The headlam prange is set automatically
depending on the distance between the vehi-
cle and othe rroa du sers.
If yo uaredriving at speed sabove approx-
imately1 9mph (30 km/h )and no othe rroad
users have been detected:
The high-bea mheadlamps ar eswitched on
automatically. The Kindicator lamp in the
instrument cluster also lights up.
If yo uaredriving at speed sbelow approx-
imately16m ph (25 km/h)orotherroa du sers
have been detecte dorthe roads ar eade-
quately lit:
The high-bea mheadlamps ar eswitched off
automatically. The Kindicator lamp in the
instrument cluster goe sout.T he_ indi-
cato rlam pint he multifunctio ndisplay
remains lit.
XTo switc hoff:move the combinatio nswitch
back to its norma lposition or move the light
switch to another position.
The _ indicator lamp in the ins trume
nt
cluster goe sout.
Headlamps fogged up on the inside
Certai nclimatic and physical conditions may
cause moisture to form in the headlamp. This
moisture does not affect the functionality of the
headlamp.
Interior lighting
Overvie wofinterior lighting
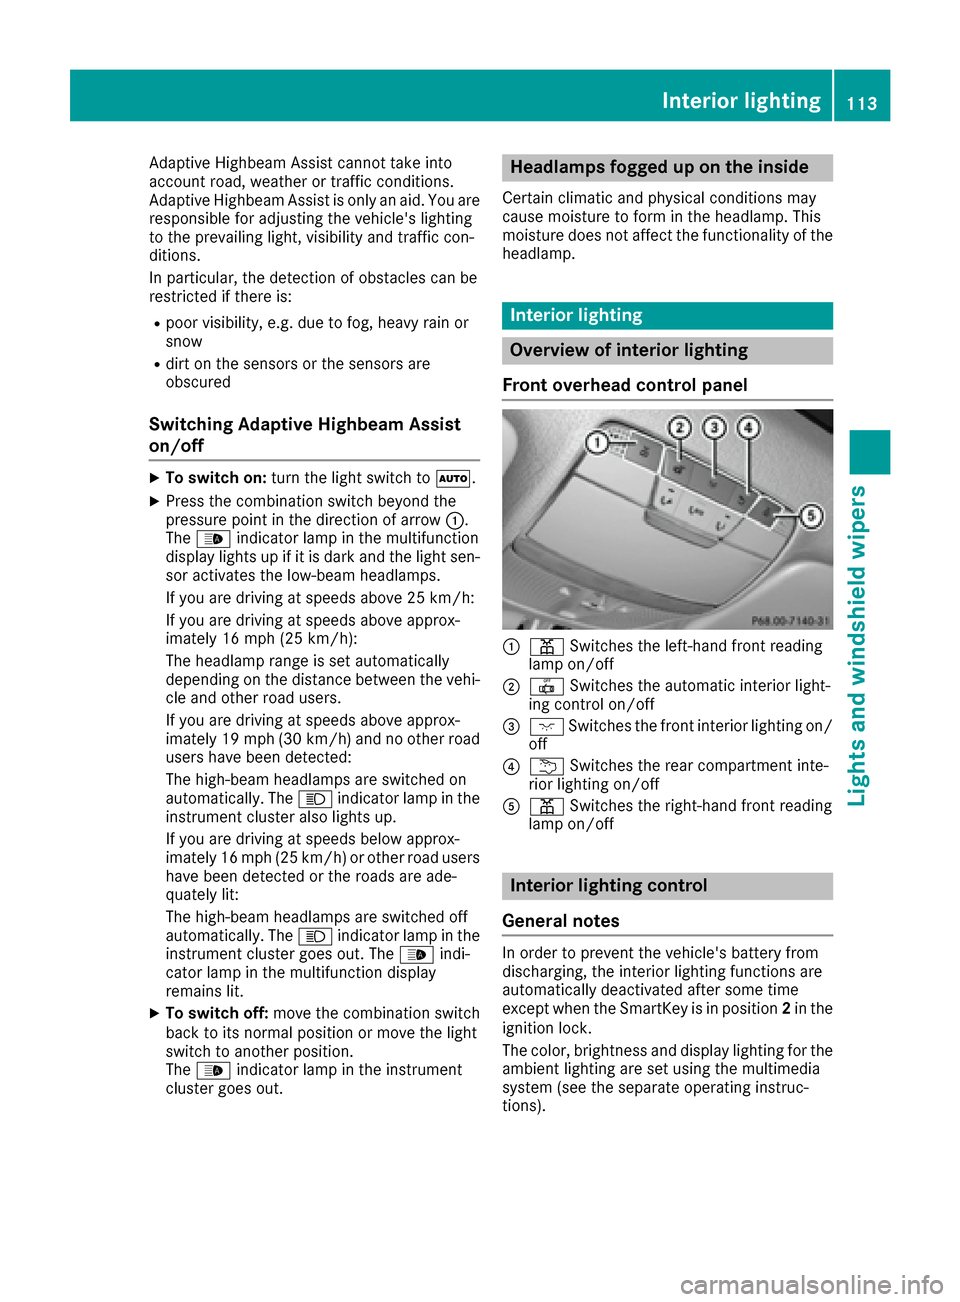
Front overhead controlp anel
:pSwitchest he left-hand front reading
lamp on/off
;| Switchest he automatic interio rlight-
ing contro lon/off
=c Switchest he front interio rlighting on/
off
?u Switchest he rearcompartment inte-
rio rlighting on/off
Ap Switchest he right-hand front reading
lamp on/off
Interior lighting control
General notes
In order to prevent the vehicle's battery from
discharging, the interio rlighting functions are
automaticall ydeactivated afte rsom etime
except when the SmartKeyisinp osition2in the
ignition lock.
The color, brightness and display lighting for the
ambient lighting ar eset using the multimedia
system (see the separate operating instruc-
tions).
Interior lighting113
Lights and windshield wiper s
Z
Page 118 of 354
XPress on housing cover:turn clockwise and
lock.
XReplace the cover in the frontw heel housing
(Ypage 114).
Windshield wipers
Switching the windshield wiper
on/off
!
Do not operate the windshield wipers when
the windshield is dry, as this could damage
the wiper blades. Moreover, dust that has col-
lected on the windshield can scratch the glass
if wiping takes place when the windshield is
dry.
If it is necessary to switch on the windshield
wipers in dry weather conditions, alwaysu se
washer fluid when operating the windshield
wipers.
!If the windshield wipers leave smears on the
windshield after the vehicle has been washed
in an automatic car wash, wax or other resi-
dues may be the reason for this. Clean the
windshield using washer fluid after washing
the vehicle in an automatic car wash.
!Intermittent wiping with rain sensor: due to
optical influences and the windshield becom-
ing dirty in dry weather conditions, the wind-
shield wipers may be activated inadvertently.
This could then damage the windshield wiper
blades or scratch the windshield.
For this reason, you should alwayss witch off
the windshield wipers in dry weather.
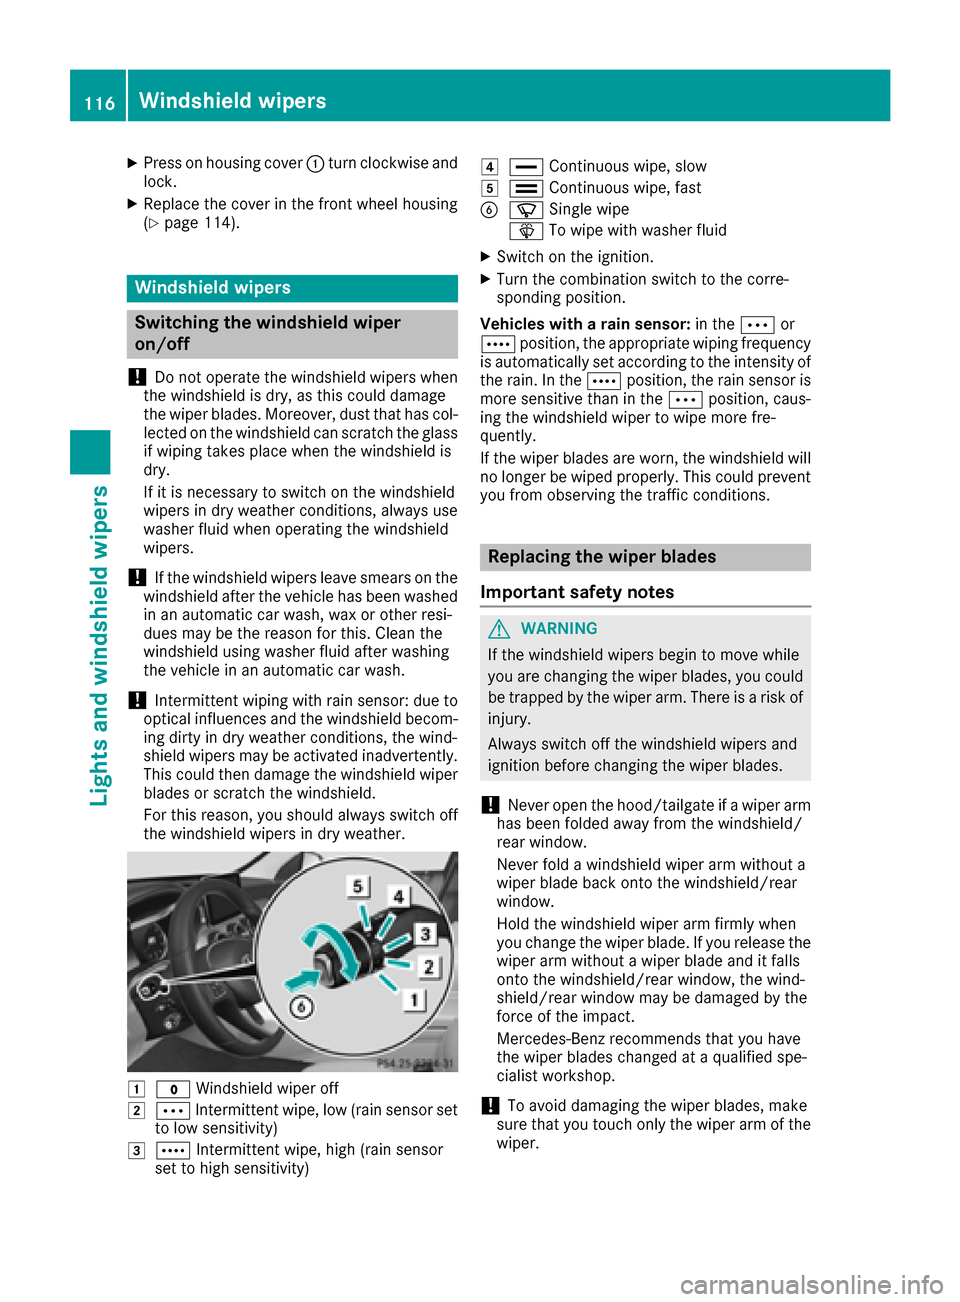
1$ Windshield wiper off
2ÄIntermittent wipe, low (rain sensor set
to low sensitivity)
3Å Intermittent wipe, high (rain sensor
set to high sensitivity)
4° Continuous wipe, slow
5¯Continuous wipe, fast
BíSingle wipe
î To wipe with washer fluid
XSwitchont he ignition.
XTurn the combination switch to the corre-
sponding position.
Vehicles with arain sensor: in theÄor
Å position, the appropriate wiping frequency
is automatically set accordingtot he intensity of
the rain. In the Åposition, the rain sensor is
more sensitive than in the Äposition, caus-
ing the windshield wiper to wipe more fre-
quently.
If the wiper blades are worn, the windshield will
no longer be wiped properly. This could prevent
you from observing the traffic conditions.
Replacing the wiper blades
Important safety notes
GWARNING
If the windshield wipers begin to move while
you are changin gthe wiper blades, you could
be trapped by the wiper arm. There is arisk of
injury.
Always switch off the windshield wipers and
ignition before changin gthe wiper blades.
!Never open the hood/tailgate if awiper arm
has been folded away from the windshield/
rear window.
Never fold awindshield wiper arm without a
wiper blade back ont othe windshield/rear
window.
Hold the windshield wiper arm firmly when
you change the wiper blade. If you release the
wiper arm without awiper blade and it falls
ont othe windshield/rear window, the wind-
shield/rear window may be damaged by the
force of the impact.
Mercedes-Benz recommends that you have
the wiper blades changed at aqualified spe-
cialist workshop.
!To avoid damaging the wiper blades, make
sure that you touch only the wiper arm of the
wiper.
116Windshield wipers
Lights and windshield wipers
Page 164 of 354
the cruisecontro llev er up :or down ;to
the pressure point.
Ever ytim et he cruis econtro llev er is pressed
up : or down ;the last spee dstored is
increasedorr educed.
XTo adjustthe setspeed in 5mph incre-
ments (10k m/h increments): briefly press
the cruise control lever up :or down ;to
the pressure point.
Ever ytime the cruise control lever is pressed
up : or down ;the last speed stored is
increased or reduced.
iCruise control is not deactivated if you
depress the accelerator pedal. If you acceler-
ate to overtake, cruise control adjusts the
vehicle's speed to the last speed stored after
you have finished overtaking.
Deactivating cruise control
There are several ways to deactivate cruise con-
trol:
XBriefly press the cruise control lever forwards
=.
or
XBrake.
Cruise control is automatically deactivated if:
Ryou engage the electric parkin gbrake
Ryou are driving at less than 20 mph (30 km/ h)
RESP®intervenes or youdeactivate ESP®
Ryous hift the transmission to position Nwhile
driving
If cruis econtro lisdeactivated ,you will hear a
warning tone .You will see the Cruise Con‐
trolOffmessage in the multifunctio ndisplay
for approximately fiv eseconds.
iWhen yo uswitch off the engine ,the last
spee dstored is cleared.
DISTRONIC PLUS
General notes
DISTRONI CPLUSregulate sthe spee dand auto-
maticall yhelps youm aintain the distance to the
vehicl edetecte dinf ront. Vehicles ar edetected
with the ai dofthe rada rsensor system.
DISTRONI CPLUSb rakes automaticall ysothat
the set spee disnot exceeded. Chang
einto alower gear in good time on long
and stee pdownhil lgradients .Thisise specially
important if the vehicl eisladen .Byd oing so, you
will make us eofthe braking effect of the engine.
Thi srelieves the load on the brake system and
prevents the brakes fromo verheating and wear-
ing too quickly.
If DISTRONI CPLUSd etects thatt here isarisko f
ac ollision, yo uwillbew arned visuall yand
acoustically. DISTRONI CPLUSc anno tprevent a
collision withou tyou rintervention. An intermit-
tent warning tone will thens ound and the dis-
tance warning lamp will light up in the instru-
ment cluster .Brake immediatel yinorder to
increase the distance to the vehicl einfront or
take evasive action provided it is safe to do so.
DISTRONI CPLUSo perates in range between
0m ph (0 km/h )and 120 mph (20 0km/h).
Do not us eDISTRONI CPLUSw hile drivin gon
roads with stee pgradients.
As DISTRONI CPLUSt ransmits ra da
rw ave
s ,it
can resemble the rada rdetectors of the respon-
sibl eauthorities. Yo ucan refer to the relevant
chapte rinthe Operator' sManualifq uestions
ar ea sked abou tthis.
iUSA only: Thi sdeviceh asbeen approved by
the FCC as a"Vehi cularRadar System" .The
rada rsensor is intende dfor us einana uto-
motive rada rsystem only. Removal ,tamper-
ing ,ora ltering of the devic ewillv oida ny war-
ranties, and is not permitted by the FCC .Do
not tampe rwith, alter, or us einany non-
approved way.
Any unauthorized modification to thisd evice
could voi dthe user' sauthority to operate the
equipment.
iCanad aonly: Thi sdevicec omplies with
RSS-210 of Industry Canada. Operatio nis
subject to the following two conditions:
1. Thi sdevicem aynot cause harmfu linter-
ference ,and
2. Thi sdevicem usta ccep tany interference
received, including interferenc ethatm ay
cause undesired operatio nofthe device.
Removal ,tampering, or altering of the device
will voi dany warranties, and is not permitted.
Do not tampe rwith, alter, or us einany non-
approved way.
Any unauthorized modification to thisd evice
could voi dthe user' sauthority to operate the
e
quipment.
162Driving system s
Driving an dparking
Page 165 of 354
Important safety notes
GWARNING
DISTRONI CPLUSd oes no treac tto:
Rpeople or animals
Rstationary obstacles on th eroad ,e.g.s top-
ped or parked vehicles
Roncomin gand crossing traffic
As aresult ,DISTR ONICPLUSm ay neither giv e
warning snorinterven einsuchs ituations.
Ther eisar iskofana ccident.
Always pay careful attention to th etraffic sit -
uation and be read ytob rake.
GWARNIN G
DISTRONI CPLUSc anno talways clearly iden -
tify other road user sand comple xtraffic sit -
uations.
In suc hcases, DISTRONI CPLUSm ay:
Rgiveanu nnecessary warning and then
brak ethe vehicl e
Rneither giv eawarning no rinterven e
Raccelerate or brak eunexpectedly
Ther eisar iskofana ccident.
Continue to driv ecarefully and be read yto
brake, in particular when warned to do so by
DISTRONI CPLUS.
GWARNIN G
DISTRONI CPLUSb rakes your vehicl ewithu p
to 50 %ofthe maximu mpossible deceleration.
If this braking force is insufficient, DISTRONIC
PLUS warns you visuall yand audibly.T here is
ar isk of an accident.
In such cases ,apply the brakes yourself and
try to take evasive action.
!If DISTRONIC PLUS or the HOLD function is
activated, the vehicl ebrakes automatically in
certain situations.
To prevent damage to the vehicle, deactivate
DISTRONIC PLUS and the HOLD function in
the following or other similar situations:
Rwhen towing the vehicle
Rin the car wash If you fail to adapt you
rdriving style ,DISTRONIC
PLUS can neither reduce the risk of accident nor
override the law sofphysics. DISTRONIC PLUS
cannot take into account the road ,traffic and
weather conditions. DISTRONIC PLUS is only an
aid .You are responsiblef or the distance to the
vehicl einfront, for vehicl espeed, for braking in
good time and for staying in you rlane.
Do not use DISTRONIC PLUS:
Rin road and traffic conditions which do not
allow you to maintain aconstant speede .g. in
heavy traffic or on winding roads
Ron slippery road surfaces. Braking or accel-
erating coul dcaus ethe drive wheels to lose
traction and the vehicl ecoul dthen skid
Rwhen there is poor visibility, e.g. due to fog,
heavy rain or snow
DISTRONIC PLUS may not detect narrow vehi-
cles driving in front, e.g. motorcycles, or vehi-
cles driving on adifferent line.
In particular, the detection of obstacles can be
impaired if:
Rthere is dirt on the sensors or anything else
covering the sensors
Rthere is snow or heavy rain
Rthere is interference by other rada rsources
Rthere are strong rada rreflections, for exam-
ple ,inp arking gara ges
If DISTR
ONIC PLUS no longe rdetects avehicle
in front, DISTRONIC PLUS may unexpectedly
accelerate the vehicl etothe stored speed.
This speedm ay:
Rbe too high if you are driving in afilter lane or
an exit lane
Rbe so high in the right lane that you pas svehi-
cles driving on the left (left-hand drive coun-
tries)
Rbe so high in the left lane that you pas svehi-
cles driving on the right (right-hand drive
countries)
If there is achange of drivers, advise the new
drive rofthe speeds tored.
Driving systems163
Driving and parking
Z
Page 176 of 354
XPress button:.
Indicator lamp =lights up. You have selected
Sport mode.
The AMG Suspension System SPORT
mes-
sage appears in the multifunction display.
Sport +mode
The very firm setting of the suspension setting in
Sport +mode ensures the best possible contact
with the road. Select this mode only when driv-
ing on race circuits.
If indicator lamps ;and =are off:
XPress button :twice.
Indicator lamps ;and =light up. You have
selected Sport +mode.
The AMG
SuspensionSystemSPORT +mes-
sage appears in the multifunction display.
If indicator lamp =lights up:
XPress button :once.
Secondi ndicator lamp ;lights up. You have
selected Sport +mode.
The AMG
SuspensionSystemSPORT +mes-
sage appears in the multifunction display.
Comfort mode
In Comfort mode, the driving characteristics of
your vehicle are more comfortable. Select this
mode if you favor amore comfortable driving
style, but also when driving fast on straight
roads, e.g. highways.
XPress button :repeatedly until indicator
lamps ;and =go out.
You have selected Comfort mode.
The AMG
SuspensionSystemCOMFORTmes-
sage appears in the multifunction display.
4MATIC (permanent four-wheel drive)
4MATI Censures that all four wheels are perma-
nently driven. Together with ESP®,iti mproves
the traction of your vehicle whenever adrive
wheel spins due to insufficien tgrip.
If you fail to adapt your driving style, 4MATI Ccan
neither reduce the risk of accident nor override the laws of physics. 4MATI Ccannot take
account of road, weather and traffic conditions.
4MATI Ciso nly an aid. You are responsible for
the distanc etothe vehicle in front, for vehicle speed, for braking in good time and for staying in
your lane.
If
ad rive wheel spins due to insufficien tgrip:
ROnly depress the accelerator pedal as far as
necessary when pulling away.
RAccelerate less when driving.
!Never tow the vehicle with one axle raised.
This may damage the transfer case. Damage
of this sort is not covered by the Mercedes-
Benz Limited Warranty. All wheels must
remain either on the ground or be fully raised.
Observe the instruction sfor towing the vehi-
cle with all wheels in full contact with the
ground.
iIn wintry driving conditions, the maximum
effect of 4MATI Ccan only be achieved if you
use winter tires (M+S tires), with snow chains
if necessary.
PARKTRONIC
Important safety notes
PARKTRONIC is an electronic parking aid with
ultrasonic sensors.Itm onitors the area around
your vehicle using six sensors in the front
bumper and six sensors in the rear bumper.
PARKTRONIC indicates visually and audibly the
distanc ebetween your vehicle and an object.
PARKTRONIC is only an aid. It is not areplace-
ment for your attention to your immediate sur-
roundings. You are alwaysr esponsible for safe
maneuvering, parking and exitin gaparking
space. When maneuvering, parking or pulling
out of aparking space, make sure that there are
no persons, animals or object sinthe area in
which you are maneuvering.
!When parking, pay particular attention to
object sabove or below the sensors,s uch as
flower pots or trailer drawbars. PARKTRONIC
does not detect such object swhen they are in
the immediate vicinityoft he vehicle. You
could damage the vehicle or the objects.
The sensors may not detect snow and other
object sthat absorb ultrasonic waves.
Ultrasonic sources such as an automatic car
wash, the compressed-air brakes on atruck
or ap neumatic drill could cause PARKTRONIC
to malfunction.
PARKTRONIC may not function correctly on
uneven terrain.
174Driving systems
Driving and parking
Page 177 of 354

PARKTRONIC is activated automatically when
you:
Rswitch on the ignition
Rshift the transmission to positionD,Ror N
PARKTRONIC is deactivated at speeds above
11 mph (18 km/h). It is reactivated at lower
speeds.
Range of the sensors
General notes
PARKTRONIC does not take object sinto con-
sideration that are:
Rbelow the detection range, e.g. people, ani-
mals or objects.
Rabove the detection range, e.g. overhanging
loads, truck overhangs or loading ramps.
:Sensors in the frontb umper, left-hand side
(example)
The sensors must be free from dirt, ice or slush.
They can otherwise not function correctly. Clean
the sensors regularly, takin gcare not to scratch
or damage them (
Ypage 296).
Fronts ensors
CenterApprox .40in( approx.
100 cm)
CornersApprox .24in( approx.
60 cm)
Rear sensors
CenterApprox .48in( approx.
120 cm)
CornersApprox .32in( approx.
80 cm)
Minimum distance
CenterApprox .8in (approx. 20 cm)
CornersApprox .6in (approx. 15 cm)
If there is an obstacle within this range, the rel-
evant warning displays light up and awarning
ton esounds. If the distanc efalls below the min-
imum, the distanc emay no longer be shown.
Driving systems175
Driving and parking
Z
Page 178 of 354
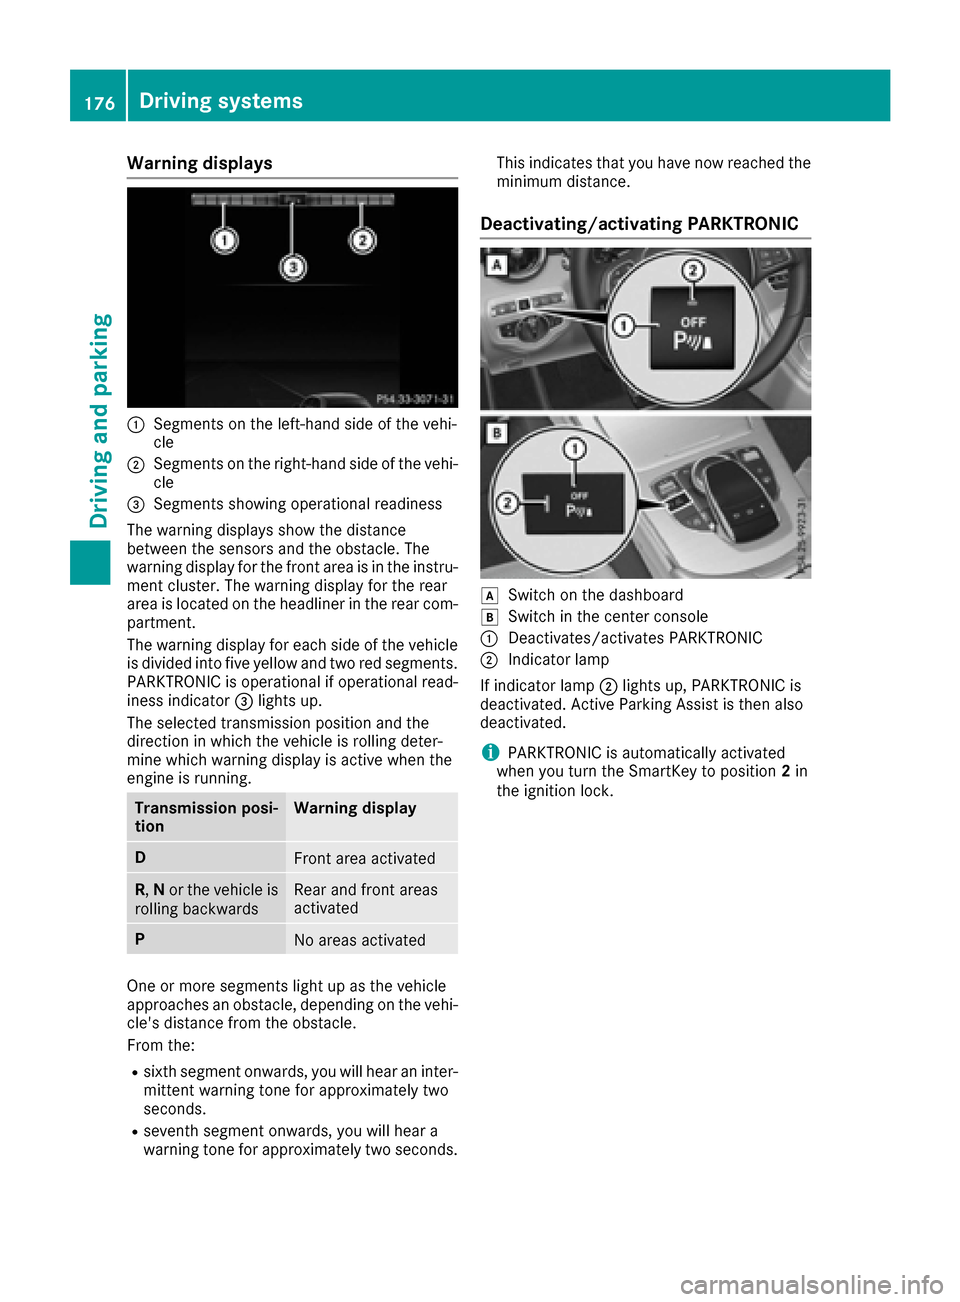
Warning displays
:Segments on the left-hand side of the vehi-
cle
;Segments on the right-hand side of the vehi-cle
=Segments showing operational readiness
The warning display sshow the distance
between the sensors and the obstacle. The
warning display for the front area is in the instru-
ment cluster. The warning display for the rear
area is located on the headliner in the rear com-
partment.
The warning display for each side of the vehicle
is divided into five yellow and two red segments.
PARKTRONIC is operational if operational read-
iness indicator =lights up.
The selected transmission position and the
direction in which the vehicl eisrolling deter-
mine which warning display is active whe nthe
engine is running.
Transmission posi-
tionWarning display
DFront area activated
R, Nor the vehicl eis
rolling backwardsRea rand front areas
activated
PNo area sactivated
One or more segments light up as the vehicle
approache sanobstacle, depending on the vehi-
cle's distance from the obstacle.
From the:
Rsixth segment onwards, you wil lhearani nter-
mittent warning tone for approximately two
seconds.
Rseventh segment onwards, you wil lheara
warning tone for approximately two seconds. This indicates that you have now reache
dthe
minimu mdistance.
Deactivating/activating PARKTRONIC
dSwitch on the dashboard
eSwitch in the center console
:Deactivates/activates PARKTRONIC
;Indicator lamp
If indicator lamp ;lights up, PARKTRONIC is
deactivated. Active Parking Assist is then also
deactivated.
iPARKTRONIC is automatically activated
whe nyou turn the SmartKey to position 2in
the ignition lock.
176Driving systems
Driving and parking
Page 179 of 354
Problems with PARKTRONIC
ProblemPossible causes/consequences andMSolutions
Only the red segments in
the PARKTRONIC warn-
ing displaysare lit. You
also hear awarning tone
for approximately two
seconds.
PARKTRONIC is then
deactivated and the indi-
cator lamp on the
PARKTRONIC button
lights up.PARKTRONIC has malfunctioned and has switched off.
XIf problems persist, have PARKTRONIC checked at aqualified spe-
cialist workshop.
Only the red segments in
the PARKTRONIC warn-
ing displaysa re lit.
PARKTRONIC is then
deactivated.The PARKTRONIC sensors are dirty or there is interference.
XClean the PARKTRONIC sensors (Ypage 296).
XSwitch the ignition back on.
The problem may be caused by an external source of radio or ultra-
sound waves.
XSee if PARKTRONIC functions in adifferent location.
Active Parking Assist
General notes
Active Parking Assist is an electronic parking aid
with ultrasound. It measures the road on both
sides of the vehicle. Aparking symbol indicates
as uitable parking space. Active steering inter-
vention and brake application can assist you
during parking and when exiting aparking
space. You may also use PARKTRONIC
(
Ypage 174).
Important safety notes
Active Parking Assist is merely an aid. It is not a
replacement for your attention to your immedi-
ate surroundings. You are always responsible
for safe maneuvering, parking and exiting a
parking space. Make sure that no persons, ani-
mals or object sare in the maneuvering range.
When PARKTRONIC is switched off, Active Park-
ing Assist is also unavailable.
GWARNING
While parking or pulling out of aparking
space, the vehicle swings out and can drive
onto areas of the oncomingl ane. This could
result inacollision with another road user.
There is arisk of an accident.
Pay attention to other road users. Stop the
vehicle if necessary or cancel the Active Park- ing Assist parking procedure.
!If unavoidable, you should drive over obsta-
cles such as curbs slowly and not at asharp
angle. Otherwise, you may damage the
wheels or tires.
Active Parking Assist may also display spaces
not suitable for parking, e.g.:
Rwhere parking or stopping is prohibited
Rin front of driveways or entrances and exits
Ron unsuitable surfaces
Parking tips:
ROn narrow roads, drive as close to the parking
space as possible.
RParking spaces that are littered or overgrown
might be identified or measured incorrectly.
RParking spaces that are partially occupied by
trailer drawbars might not be identified as
such or be measured incorrectly.
RSnowfall or heavy rain may lead to aparking
space being measured inaccurately.
Driving systems177
Driving and parking
Z