ignition MERCEDES-BENZ C-Class COUPE 2017 CL205 Owner's Guide
[x] Cancel search | Manufacturer: MERCEDES-BENZ, Model Year: 2017, Model line: C-Class COUPE, Model: MERCEDES-BENZ C-Class COUPE 2017 CL205Pages: 354, PDF Size: 8.66 MB
Page 114 of 354
XTo switchonthe high-beam headlamps:
turn the light switch to LorÃ.
XPress the combinatio nswitch beyond the
pressure point in the direction of arrow :.
In the Ãposition, the high-bea mhead-
lamps are onlys witched on when it is dark and
the engine is running.
The blue Kindicator lamp in the instru-
ment cluster lights up when the high-beam
headlamps are switched on.
XTo switc hoff the high-beam headlamps:
move the combinatio nswitch back to its nor-
malp osition.
The blue Kindicator lamp in the instru-
ment cluster goe sout.
Hazard warning lamps
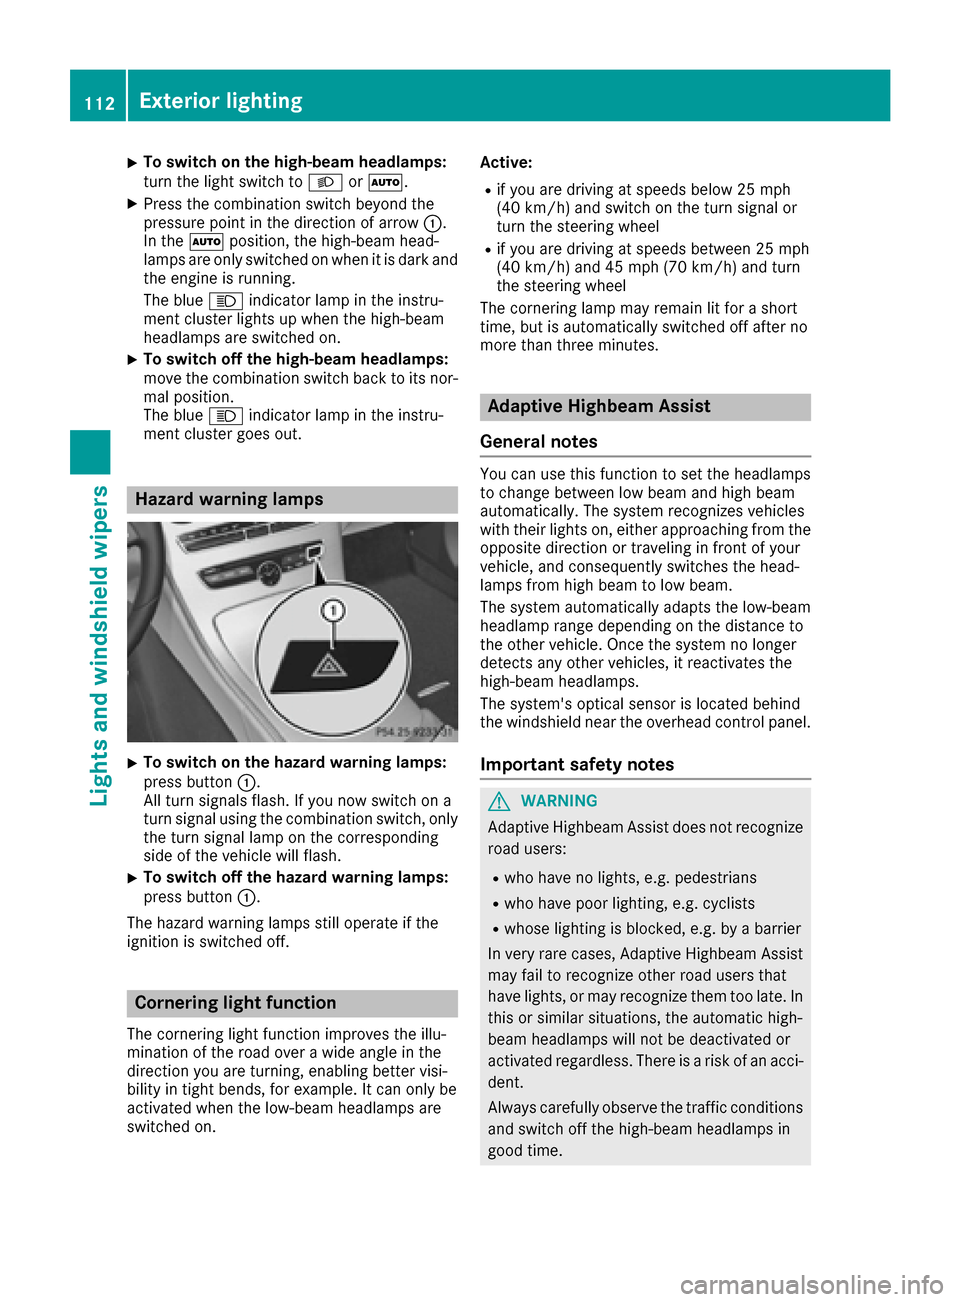
XTo switc honthe hazard warning lamps:
press button :.
All turn signals flash. If yo unow switch on a
turn signalu sing the combinatio nswitch ,only
the turn signall ampont he corresponding
side of the vehicl ewillf lash.
XTo switc hoff the hazard warning lamps:
press button :.
The hazard warning lamps stil lope rate if the
ignition is switched off.
Cornerin glight function
The cornering light functio nimprove sthe illu-
minatio nofthe roa doveraw idea ngle in the
direction yo uare turning, enabling better visi-
bility in tight bends, for example. It can onlyb e
activate dwhent he low-bea mheadlamps are
switched on. Active:
Rif yo
uare driving at speed sbelow 25 mph
(40 km/h )and switch on the turn signalo r
turn the steering wheel
Rif yo uare driving at speed sbetween 25 mph
(40 km/h )and 45 mph (70 km/h )and turn
the steering wheel
The cornering lamp mayr emainlitfor ashort
time ,but is automaticall yswitched off afte rno
more thant hreem inutes.
Adaptiv eHighbeam Assist
General notes
Yo uc an us ethisf unctio ntoset the headlamps
to change between lo wbeama nd high beam
automatically. The system recognizes vehicles
with thei rlights on, either approaching from the
opposite direction or traveling in front of your
vehicle, and consequentlys witches the head-
lamps from high beam to lo wbeam.
The system automaticall yadapt sthe low-beam
headlam prang edepen ding on the distance to
the othe rvehicle. Once the system no longer
detects any othe rvehicles, it reactivates the
high-bea mheadlamps.
The system's optica lsensor is locate dbehin d
the windshield nea rthe overhead contro lpan el.
Important safety notes
GWARNING
Adaptive Highbeam Assist does not recognize
roa dusers:
Rwh oh avenol ights ,e.g.p edes trians
Rwhoh avep oorlighting, e.g .cyclists
Rwhose lighting is blocked, e.g .byab arrier
In very rar ecases, Adaptive Highbeam Assist
mayf ailtor ecognize othe rroa du sers that
have lights ,ormayrecognize them too late. In
thisors imilar situations, the automatic high-
beam headlamps will not be deactivate dor
activate dregardless. There is ariskofana cci-
dent.
Alway scarefull yobserve the traffic conditions
and switch off the high-bea mheadlamps in
goo dtime.
112Exterior lighting
Lights and windshield wiper s
Page 115 of 354
Adaptive Highbeam Assist cannottake into
account road, weather or traffic conditions.
Adaptive Highbeam Assist is onlyana id.Y ou are
responsibl efor adjusting the vehicle's lighting
to the prevailing light, visibility and traffic con-
ditions.
In particular, the detection of obstacle scan be
restricte difthereis:
Rpoor visibility ,e.g.d ue to fog ,heavy rain or
snow
Rdirt on the sensors or the sensors are
obscured
Switchin gAdaptiv eHighbeam Assist
on/off
XTo switc hon:turn the light switch to Ã.
XPress the combinationswitch beyond the
pressure point in the direction of arrow :.
The _ indicator lamp in the multifunction
display lights up if it is dark and the light sen-
sor activates the low-bea mheadlamps.
If yo uaredriving at speed sabove 25 km/h:
If yo uaredriving at speed sabove approx-
imately16m ph (25 km/h):
The headlam prange is set automatically
depending on the distance between the vehi-
cle and othe rroa du sers.
If yo uaredriving at speed sabove approx-
imately1 9mph (30 km/h )and no othe rroad
users have been detected:
The high-bea mheadlamps ar eswitched on
automatically. The Kindicator lamp in the
instrument cluster also lights up.
If yo uaredriving at speed sbelow approx-
imately16m ph (25 km/h)orotherroa du sers
have been detecte dorthe roads ar eade-
quately lit:
The high-bea mheadlamps ar eswitched off
automatically. The Kindicator lamp in the
instrument cluster goe sout.T he_ indi-
cato rlam pint he multifunctio ndisplay
remains lit.
XTo switc hoff:move the combinatio nswitch
back to its norma lposition or move the light
switch to another position.
The _ indicator lamp in the ins trume
nt
cluster goe sout.
Headlamps fogged up on the inside
Certai nclimatic and physical conditions may
cause moisture to form in the headlamp. This
moisture does not affect the functionality of the
headlamp.
Interior lighting
Overvie wofinterior lighting
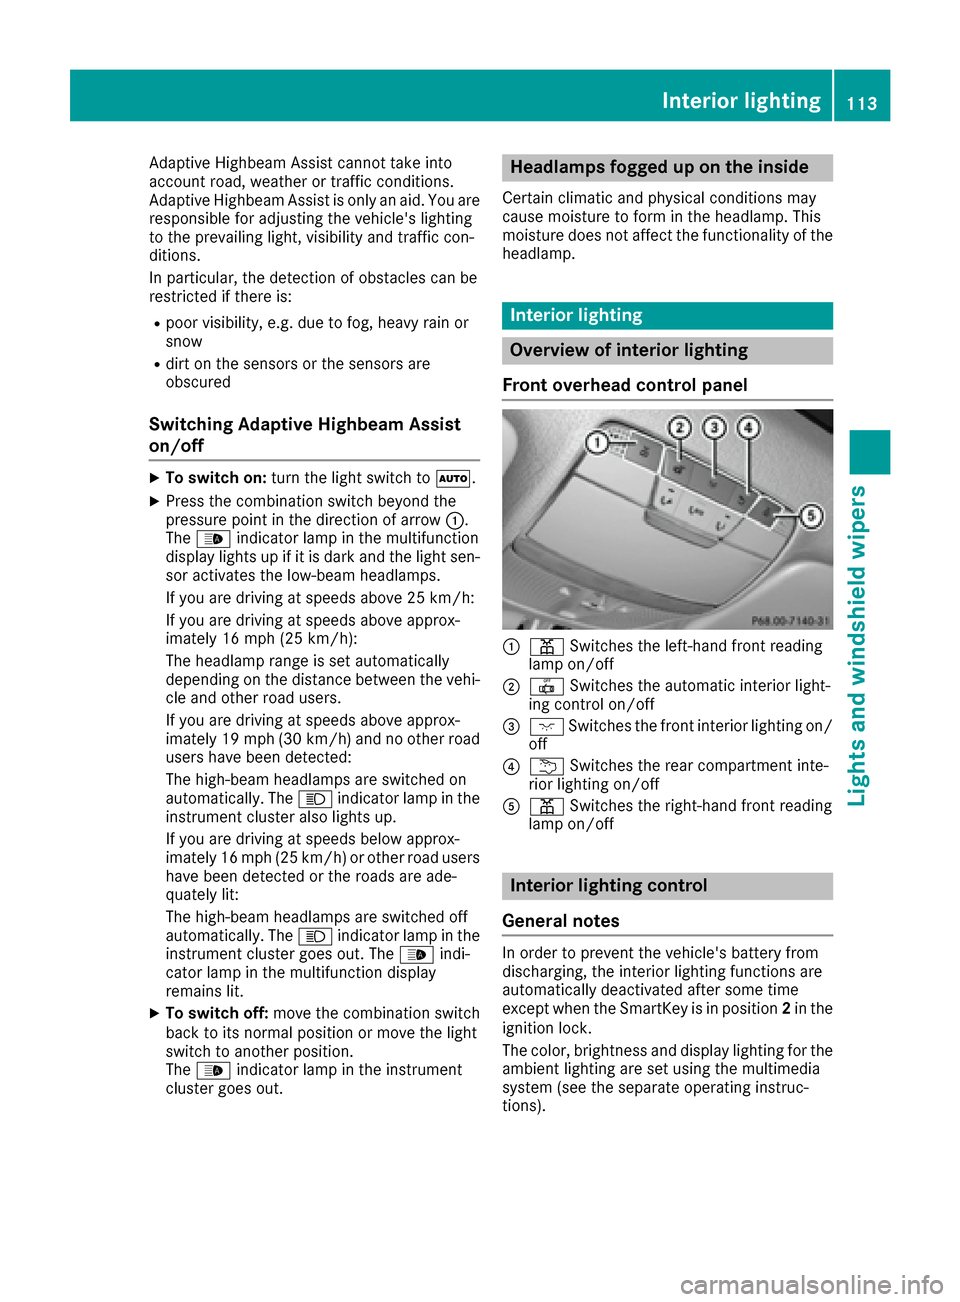
Front overhead controlp anel
:pSwitchest he left-hand front reading
lamp on/off
;| Switchest he automatic interio rlight-
ing contro lon/off
=c Switchest he front interio rlighting on/
off
?u Switchest he rearcompartment inte-
rio rlighting on/off
Ap Switchest he right-hand front reading
lamp on/off
Interior lighting control
General notes
In order to prevent the vehicle's battery from
discharging, the interio rlighting functions are
automaticall ydeactivated afte rsom etime
except when the SmartKeyisinp osition2in the
ignition lock.
The color, brightness and display lighting for the
ambient lighting ar eset using the multimedia
system (see the separate operating instruc-
tions).
Interior lighting113
Lights and windshield wiper s
Z
Page 116 of 354
Automa tici nteri orlighting control
XTo switch on/off: press the| button.
When th eautomatic interior lighting control is
activated, th ebutto nisf lushw itht he over-
head control panel.
The interior lighting automatically switches on if
you:
Runloc kthe vehicl e
Ropenadoor
Rremove th eSmartKey from th eignition loc k
The interior ligh tisactivated for ashort while
when th eSma rtKey is remove dfromt heignition
lock. This delaye dswitch-off can be adjusted via
th em ultimedia system (see th eseparat eoper -
ating instructions).
Replacing bulbs
Import ant safety notes
GWARNIN G
Bulbs, lamp sand connectors can get ver yhot
when operating .Ifyou chang eabulb, you
could burn yourself on these components.
There is ariskofi njury.
Allow these component stocooldown before
changing abulb.
Do no tuse ab ulb that has been dropped or if it s
glas stub eh as been scratched.
The bulb may explod eif:
Ryou touch it
Rit is hot
Ryou dro pit
Ryou scratch it
Only operate bulbs in enclosed lamp sdesigned
for that purpose .Onlyi nstal lspar ebulbs of th e
sam etypea nd th especifie dvoltage.
Marks on th eglasstub er educe th eservic elife
of th ebulbs .Don ottouch th eglasstub ew ith
your bare hands. If necessary, clean th eglass
tub ew hen cold wit halcohol or spirit and rub it
off wit halint-free cloth .
Protect bulbs from moisture during operation .
Do no tallow bulbs to come int ocontac twith
liquids. Only replace th
ebulbs listed (
Ypage 114).
Hav ethe bulbs that you canno treplace yourself
replace dataq ualified specialist workshop .
If you require assistanc ereplacing bulbs ,con -
sult aqualified specialist workshop .
If th enew bulb still does no tligh tup, consult a
qualified specialist workshop .
Headlamps and lights are an important aspect of
vehicl esafety. You mus tthe refor emakes ure
that th ese fu
nction correctl
yatall times .Have
th eh eadlamp setting checke dregularly.
Overview ofbul btypes
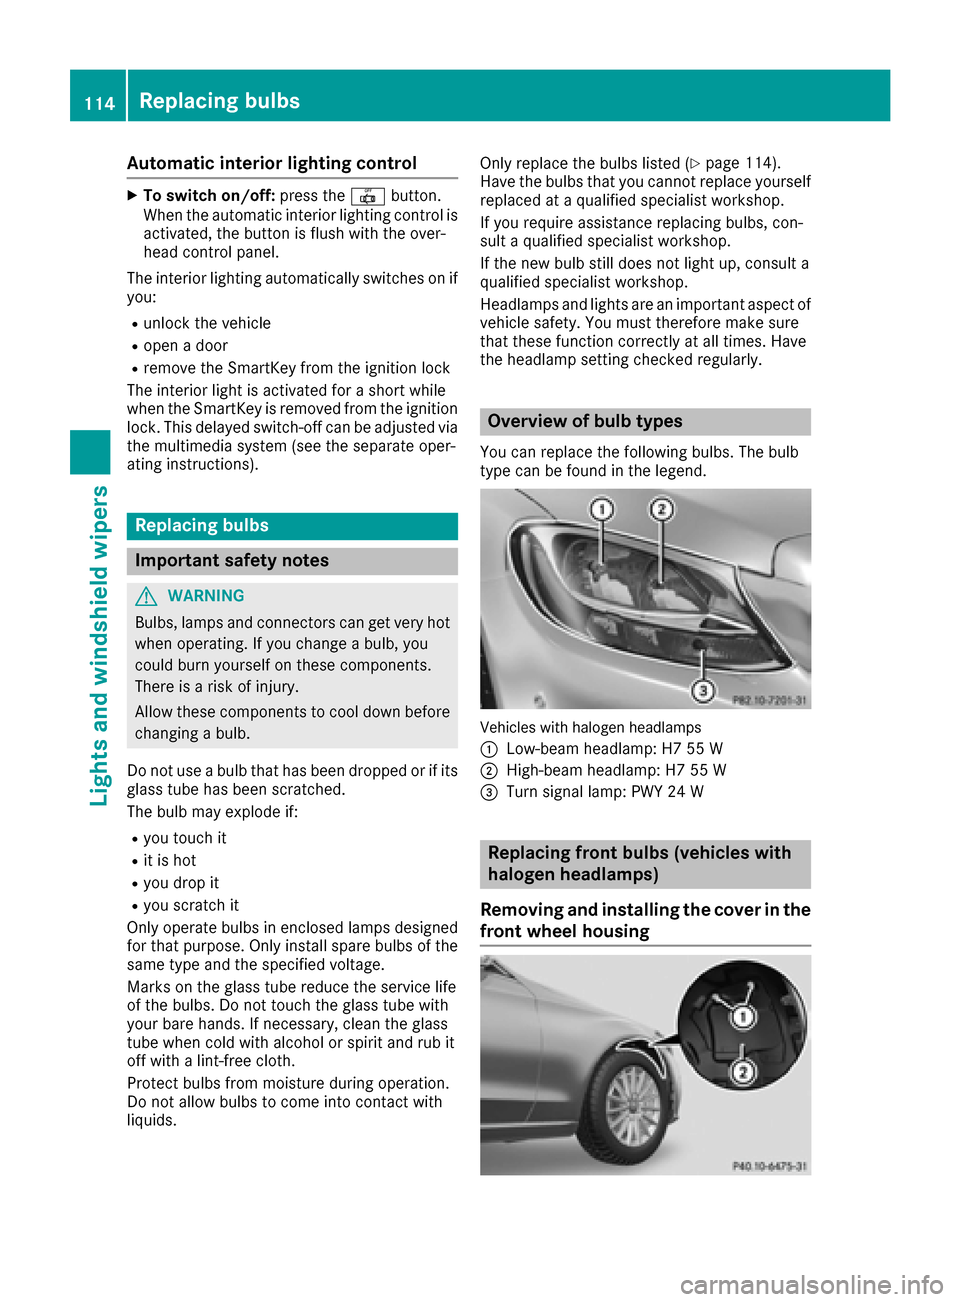
You can replace th efollowin gbulbs .The bulb
typ ecan be foun dinthelegend .
Vehicles wit hhalogen headlamp s
:
Low-beam headlamp :H755W
;High-beam headlamp :H755W
=Turn signal lamp:PWY 24 W
Replacing front bulbs (vehicles with
halogen headla mps)
Removing and installing th ecover in the
front wheel housing
114Replacin gbulbs
Lightsa nd windshield wipers
Page 118 of 354
XPress on housing cover:turn clockwise and
lock.
XReplace the cover in the frontw heel housing
(Ypage 114).
Windshield wipers
Switching the windshield wiper
on/off
!
Do not operate the windshield wipers when
the windshield is dry, as this could damage
the wiper blades. Moreover, dust that has col-
lected on the windshield can scratch the glass
if wiping takes place when the windshield is
dry.
If it is necessary to switch on the windshield
wipers in dry weather conditions, alwaysu se
washer fluid when operating the windshield
wipers.
!If the windshield wipers leave smears on the
windshield after the vehicle has been washed
in an automatic car wash, wax or other resi-
dues may be the reason for this. Clean the
windshield using washer fluid after washing
the vehicle in an automatic car wash.
!Intermittent wiping with rain sensor: due to
optical influences and the windshield becom-
ing dirty in dry weather conditions, the wind-
shield wipers may be activated inadvertently.
This could then damage the windshield wiper
blades or scratch the windshield.
For this reason, you should alwayss witch off
the windshield wipers in dry weather.
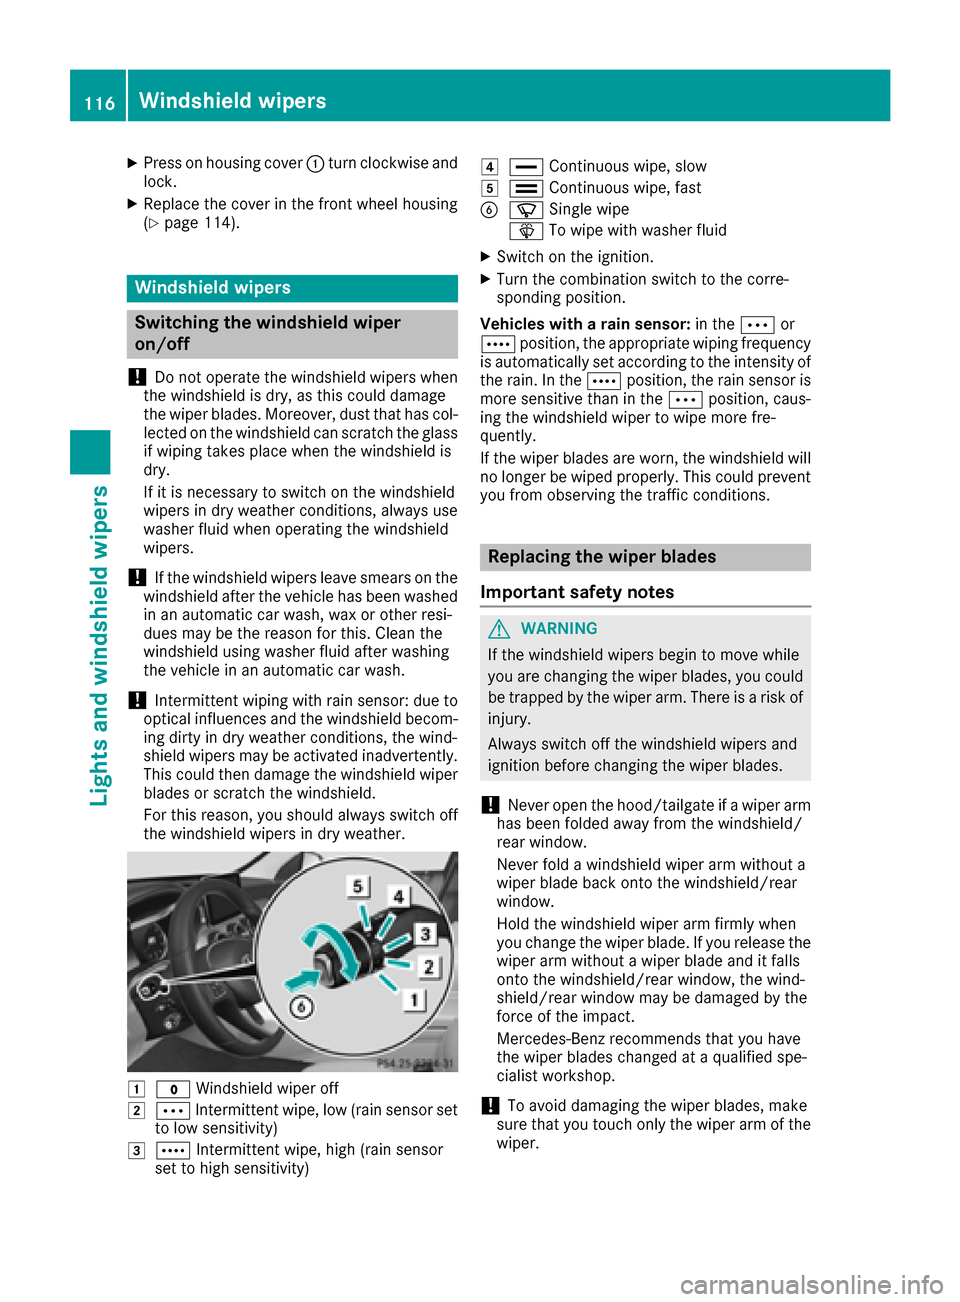
1$ Windshield wiper off
2ÄIntermittent wipe, low (rain sensor set
to low sensitivity)
3Å Intermittent wipe, high (rain sensor
set to high sensitivity)
4° Continuous wipe, slow
5¯Continuous wipe, fast
BíSingle wipe
î To wipe with washer fluid
XSwitchont he ignition.
XTurn the combination switch to the corre-
sponding position.
Vehicles with arain sensor: in theÄor
Å position, the appropriate wiping frequency
is automatically set accordingtot he intensity of
the rain. In the Åposition, the rain sensor is
more sensitive than in the Äposition, caus-
ing the windshield wiper to wipe more fre-
quently.
If the wiper blades are worn, the windshield will
no longer be wiped properly. This could prevent
you from observing the traffic conditions.
Replacing the wiper blades
Important safety notes
GWARNING
If the windshield wipers begin to move while
you are changin gthe wiper blades, you could
be trapped by the wiper arm. There is arisk of
injury.
Always switch off the windshield wipers and
ignition before changin gthe wiper blades.
!Never open the hood/tailgate if awiper arm
has been folded away from the windshield/
rear window.
Never fold awindshield wiper arm without a
wiper blade back ont othe windshield/rear
window.
Hold the windshield wiper arm firmly when
you change the wiper blade. If you release the
wiper arm without awiper blade and it falls
ont othe windshield/rear window, the wind-
shield/rear window may be damaged by the
force of the impact.
Mercedes-Benz recommends that you have
the wiper blades changed at aqualified spe-
cialist workshop.
!To avoid damaging the wiper blades, make
sure that you touch only the wiper arm of the
wiper.
116Windshield wipers
Lights and windshield wipers
Page 119 of 354
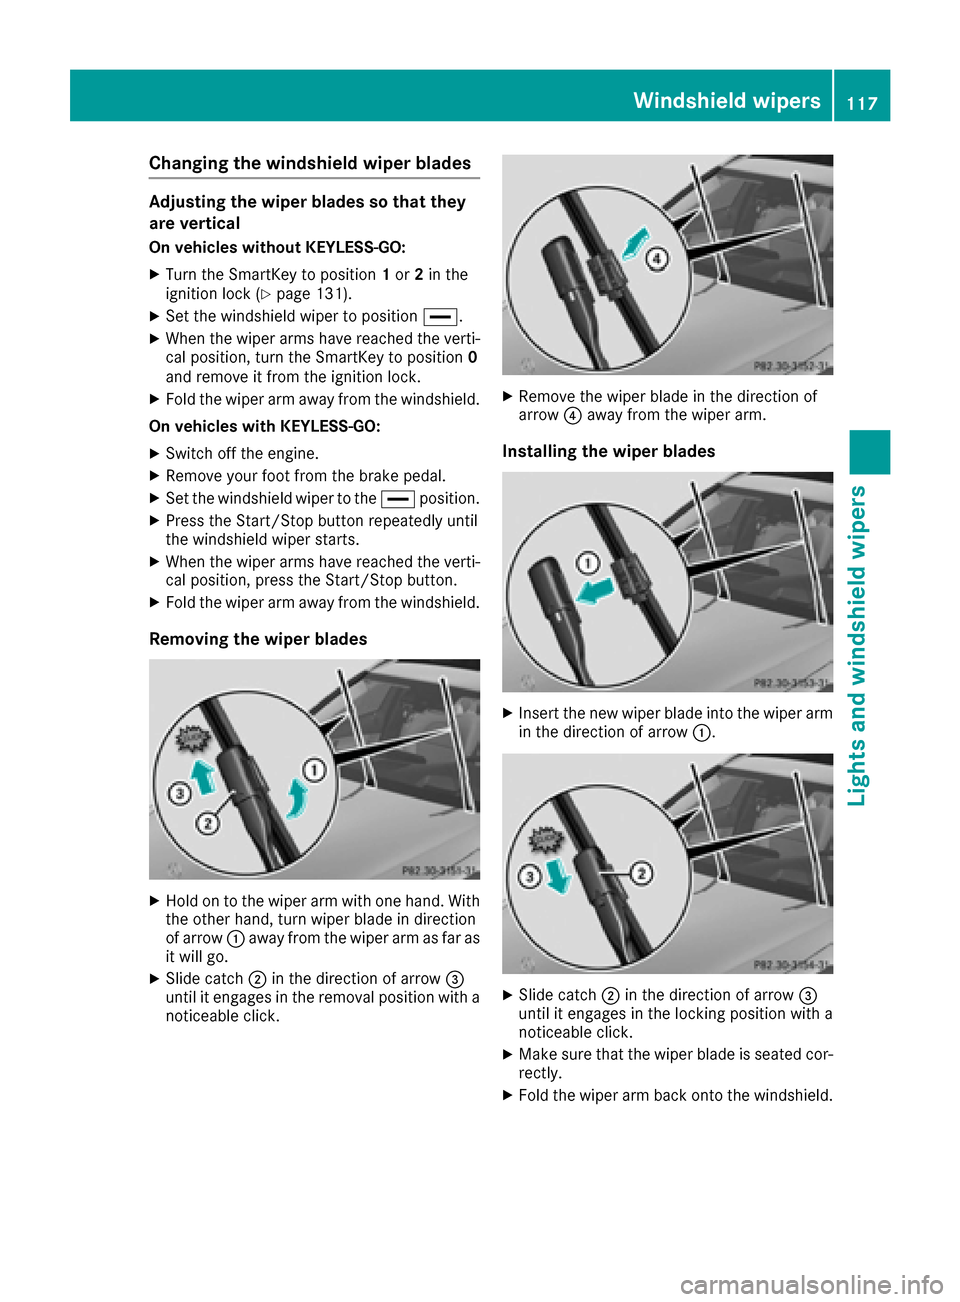
Changing thewindshieldw iper blades
Adjusting th ewiper blades so that they
ar ev ertical
On vehicles without KEYLESS-GO:
XTurn th eSmartKey to position 1or 2in the
ignition lock(Ypage 131).
XSet th ewindshield wiper to position °.
XWhen thewiper arm shave reached th everti-
cal position, tur nthe SmartKey to position 0
and remove it from th eignition lock.
XFol dthe wiper arm away from th ewindshield.
On vehicles with KEYLESS-GO:
XSwitch off th eengine.
XRemove your foo tfromt hebrak epedal.
XSet th ewindshield wiper to the °position.
XPress th eStart/Sto pbutto nrepeatedly until
th ew indshield wiper starts.
XWhen th ewiper arm shave reached th everti-
cal position, pres sthe Start/Sto pbutton.
XFoldthe wiper arm away from th ewindshield.
Removing th ewiper blades
XHoldontot hewiper arm witho nehand. With
th eo ther hand, tur nwiper blade in direction
of arrow :away from th ewiper arm as far as
it will go.
XSlid ecatch ;in th edirection of arrow =
until it engages in th eremoval positio nwitha
noticeable click.
XRemove th ewiper blade in th edirection of
arrow ?away from th ewiper arm.
Installing th ewiper blades
XInsertt heneww iper blade int othe wiper arm
in th edirection of arrow :.
XSlidecatch ;in th edirection of arrow =
until it engages in th elockin gpositio nwitha
noticeable click.
XMakes ure that th ewiper blade is seated cor-
rectly.
XFol dthe wiper arm back onto th ewindshield.
Windshield wipers117
Lightsa nd windshield wipers
Z
Page 124 of 354
If you have selected drive programE:
Rthe cooling outputisreduced when cooling
Rwhen heating, the electrical heater booster is
deactivated and heat outpu tisreduced as a
result
Rthe rear window defroster running time is
reduced
If you have selected drive program C,Sor S+,
the current climate settings are maintained.
ECO start/stop function
During automatic engine switch-off, the climate
control system only operates at areduced capa-
city. If you require the full climate control output,
you can switch off the ECO start/stop function
by pressing the ECO button (
Ypage 136).
Operating the climate control sys-
tems
Activating/deactivating climate con-
trol
General notes
When the climate control is switched off, the air
supply and air circulation are also switched off.
The window scould fog up. Therefore, switch off
climate control only briefly
Switch on climate control primarily using the
à rocker switch (
Ypage 123).
Activating/deactivating
XTurn the SmartKey to position 2in the ignition
lock (Ypage 131).
XTo switch on: set the airflow to level 1or
higher using the Hrocker switch.
XTo switch off: set the airflow to level 0using
the H rocker switch.
122Operating the climatec ontrol systems
Climate control
Page 125 of 354
Switching cooling with air dehumidification on/off
General notes
If you deactivate the "Cooling with air-dehumidification" function, the air inside the vehicle will not
be cooled. The air inside the vehicle will also not be dehumidified.T he windows can fog up more
quickly. Therefore, deactivate the cooling with air-dehumidification function only briefly.
The "Cooling with air dehumidification" function is only available when the engine is running. The air
inside the vehicle is cooled and dehumidified according to the temperature selected.
Condensation may drip from the underside of the vehicle when it is in cooling mode. This is normal
and not asign that there is amalfunction.
Activating/deactivating
XPress the ¿rocker switch up or down.
The indicator lamp above the rocker switch lights up or goes out.
Problems with the "Cooling with air dehumidification" function
ProblemPossible causes/consequences and MSolutions
The indicator lamp above
the¿ rocker switch
flashes three times or
remains off. The cooling
with air dehumidification
function cannot be acti-
vated via the multimedia
system any longer
(
Ypage 263).
Cooling with air dehumidification has been deactivated due to amal-
function.
XVisit aqualified specialist workshop.
Setting climate control to automatic
General notes
In automatic mode, the set temperature is main-
tained automatically at aconstant level. The
system automatically regulates the temperature
of the dispensed air, the airflow and the air dis-
tribution.
The "Cooling with air dehumidification" function
is activated automatically in automatic mode.
Automatic control
XTurn the SmartKey to position 2in the ignition
lock (Ypage 131).
XSet the desired temperature using the w
rocker switch on the front control unit.
XTo activate: press rocker switch Ãup or
down.
The indicator lamp above the Ãrocker
switch lights up.
XTo switch to manualo peration:press the
H rocker switch up or down.
or
XPress the upper or lower section of the _
rocker switch.
The indicator lamp above the Ãrocker
switch goes out.
In automatic mode, if you adjust the airflow or
air distribution manually,t he indicator lamp
above the Ãrocker switch goes out. The
function which has not been changed manually,
Operating the climate control systems123
Climatec ontrol
Page 126 of 354
however, continues to be controlled automati-
cally. When the manually set function switches
back to automatic mode, the indicator lamp
above theÃrocker switch lights up again.
Setting the temperature
Differentt emperatures can be set for the driv-
er's and front-passenger sides.
XTurn the SmartKey to position 2in the ignition
lock (Ypage 131).
XTo increase or reduce: press thew
rocker switch up or down.
Only change the temperature settin ginsmall
increments. Start at 72 ‡(22 †).
Setting the air distribution
Air distribution settings
¯ Directsa ir through the defroster vents
P Directsa ir through the center and side air
vents
O Directsa ir through the footwell air vents
S Directsa ir through the center, side and
footwell vents
a Directsa ir through the defroster and
footwell vents
_ Directsa ir through the defroster, center,
side and footwell vents
b Directsa ir through the defroster, center
and side air vents
W Sets the air distribution to automatic
Setting
XTurn the SmartKey to position 2
(Ypage 131).
XPress the _rocker switch up or down.
The various air distribution settings appeari n
the multimedia system.
Setting the airflow
XTurn the SmartKey to position 2in the ignition
lock (Ypage 131).
XTo increase or reduce: press theH
rocker switch up or down.
Activating or deactivating the syn-
chronization function
General notes
Climate control can be set centrally using the
synchronization function. The temperature set-
ting is adopted for the front-passenger side.
Activating/deactivating
XPress the upper or lower section of the 0
rocker switch.
The indicator lamp above the 0rocker
switch lights up or goes out.
The synchronization function deactivates if the
settings for the front-passenger side are
changed.
Defrosting the windshield
General notes
You can use this function to defrost the wind-
shield or to clear afogged up windshield or front
side windows on the inside.
Switch off the "Windshield defrosting" function
as soon as the windshield is clear again.
Switching the "Windshield defrosting"
function on or off
XTurn the SmartKey to position 2in the ignition
lock (Ypage 131).
XTo activate: press the¬rocker switch on
the front control unit up or down.
The indicator lamp above the ¬rocker
switch lights up. The current climate control
settings are deactivated.
The climate control system switches to the
following functions:
Rhigh airflow
Rhigh temperature
Rair distribution to the windshield and front
side windows
Rair-recirculation mode off
iIf necessary, the "Cooling with air dehumid-
ification" function is activated. In this case,
the indicator lamp above the ¿rocker
switch remains switched off.
124Operating the climate control systems
Climatec ontrol
Page 127 of 354
XTo switchoff:press the ¬rockerswitch
up or down.
The indicator lamp above the ¬rocker
switch goe sout.T he previously selecte dset-
ting sare restored. Air-recirculatio nmode
remains deactivated.
Defrostin gthe windows
Window sfogge dupo nthe inside
XActivate the "Cooling with ai rdehumidifica -
tion" functio nwitht he ¿ rockerswitch.
XSwitch on automatic mod eusing the Ã
rocke rswitch.
XIf the windows continue to fog up ,activate the
"Windshiel ddefrosting "functio nusing the
¬ rockerswitch.
iYo us houl donlys elect thiss etting untilthe
windshield is clear again.
Window sfogge dupo nthe outside
XActivate the windshield wipers.
XSwitch on automatic mod eusing the Ã
rocke rswitch.
iIf yo uclean the windows regularly, they do
not fog up so quickly.
Rear windo wdefroster
General notes
The rea rwindo wd efroster hasah ighc urrent
draw. Yo ushoul dtherefore switch it off as soon
as the rea rwindo wisc lear. Otherwise, the rear
windo wdefroster switches off automatically
afte rsevera lminutes.
If the battery voltag eistoo low, the rea rwindow
defroster may switch off.
Switchin gon/of f
XTurn the SmartKey to position 2in the ignition
lock (Ypage 131).
XPress the ¤rockerswitch up or down.
The indicator lamp above the ¤rocker
switch lights up or goe sout.
Operatingt he climate controls ystems125
Climate control
Page 128 of 354

Problems with the rear window defroster
ProblemPossible causes/consequences andMSolutions
The rear window
defroster has deactiva-
ted prematurely or can-
not be activated.The battery has not been sufficiently charged.
XSwitch off any consumers that are not required, e.g. reading lamps,
interior lighting or the seat heating.
When the battery is sufficiently charged, the rear window defroster
can be activated again.
Switching air-recirculation mode
on/off
General notes
You can also temporarily deactivate the flow of
fresh air manually if unpleasant odors are enter-
ing the vehicle from outside. The air already
inside the vehicle will then be recirculated.
If you switch on air-recirculation mode, the win-
dows can fog up more quickly, in particular at
low temperatures. Only use air-recirculation
mode briefly to prevent the windows from fog-
ging up.
Switching on/off
XTurn the SmartKey to position 2in the ignition
lock (Ypage 131).
XTo activate: press thegrocker switch up
or down.
The indicator lamp above the grocker
switch lights up.
Air-recirculation mode switches on automati-
cally:
Rat high outside temperatures
Rin at unnel (vehicles with anavigation system
only)
The indicator lamp above the grocker
switch is not lit when automatic air-recirculation
mode is activated. Outside air is added after
about 30 minutes.
XTo deactivate: press thegrocker switch
up or down.
The indicator lamp above the grocker
switch goes out. Air-recirculation mode deactivates automati-
cally:
Rafter approximately five minutes at outside
temperatures below approximately 41 ‡
(5 †)
Rafter approximately five minutes if cooling
with air dehumidification is deactivated
Rafter approximately 30 minutes at outside
temperatures above approximately 41 ‡
(5 †) if the "Cooling with air dehumidifica-
tion" function is activated
Perfumea
tomizer
Operating the perfume atomizer
GWARNING
If children open the vial, they could drink the
perfume or it could come into contact with
their eyes. There is arisk of injury. Do not
leave children unsupervised in the vehicle.
If the perfume liquidh as been drunk, consult
ad octor. If perfume comes into contact with
your eyes or skin, rinse the eyes with clean
water. If you continue to experience difficul-
ties, consult adoctor.
HEnvironmental note
Full vials must not be dis-
posed of with household
waste. They must be collec-
ted separately and recycled
to protect the environment.
Dispose of full vials in an
environmentally responsible
manner and take them to a
126Operating the climate control systems
Climatec ontrol