park assist MERCEDES-BENZ C-Class COUPE 2017 CL205 Workshop Manual
[x] Cancel search | Manufacturer: MERCEDES-BENZ, Model Year: 2017, Model line: C-Class COUPE, Model: MERCEDES-BENZ C-Class COUPE 2017 CL205Pages: 354, PDF Size: 8.66 MB
Page 309 of 354
Remove theSmartKey if you park th evehicl e
and do no trequire any electrical consumers.
The vehicl ewill then use ver ylittl ee nergy, thus
conserving battery power .
Charging the12Vbattery
Vehicles with alithium-ion battery:
!Only use battery chargers wit hamaximum
charging voltag eof14.4V .
All other vehicles:
GWARNIN G
During charging and jump-starting ,explosive
gase scan escape from th ebattery. There is a
ris kofane xplosion .
Particularly avoi dfire, open flames, creating
sparks and smoking. Ensur ethe re is sufficien t
ventilation while charging and jump-starting .
Do no tlean ove rabattery.
GWARNIN G
Battery acid is caustic. There is ariskofi njury.
Avoid contact wit hskin, eyes or clothing .Do
no tinhale any battery gases. Do no tlean ove r
th eb attery. Kee pchildren away from batter-
ies. Wash away battery acid immediately wit h
plenty of clean water and seek medical atten -
tion .
GWARNIN G
Ad ischarged battery can freez eattempera-
tures belo wfreezing point. When jump-start -
ing th evehicl eorc harging th ebattery, gase s
can escape from th ebattery. There is arisko f
an explosion .
Allow th efroze nbattery to thaw out before
charging it or jump-starting .
!Only use battery chargers wit hamaximum
charging voltag eof14.8V .
All vehicles:
!Only charge th ebattery usin gthe jump-
starting connection point.
The jump-starting connection poin tisinthe
engin ecom partmen t(
Ypage 308).
XOpen thehood.
XConnect th ebattery charge rtothepositive
termina land ground poin tinthesam eorder
as when connecting th edonor battery in th e
jump-starting procedure (
Ypage 308).
Kee paway from fir eand open flames. Do no t
lean ove rabattery. Never charge th ebattery if it
is still installed in th evehicle, unless you use a
battery charge rwhichh as been tested and
approve dbyMercedes-Benz .Abattery charge r
uni tspecially adapted for Mercedes-Benz vehi-
cle sand tested and approve dbyMercedes-
Benz is available as an accessory. It permit sthe
charging of th ebattery in it sinstalled position .
Contac tanauthorize dMercedes-Be nz C
ente
r
for further information and availability. Read th e
battery charger's operating instruction sbefore
charging th ebattery.
All vehicles excep tvehicles with alithium-
ion battery: if theindicator/warning lamp sin
th ei nstrumen tcluste rdon otligh tupatl ow
temperatures ,itisveryl ikely that th edis-
charge dbattery has frozen .Inthisc asey ou may
neither jump-start th evehicl enorcharge th e
battery. The servic elife of athawed-out battery
may be shorter. The starting characteristics can be impaired, particularly at low temperatures .
Hav ethe thawed-out battery checke dataquali-
fie ds pecialist workshop.
Vehicles with alithium-ion battery: at low
temperatures ,donotcharge abattery whic hhas
been remove dusingab attery charger. Allow th e
battery to warm up gentl yfirst ,ifn eces sary.
Otherwise, th eservic elife can be shortened and
th es tarting characteristics impaired, especially
at low temperatures .
Battery (vehicle)307
Breakdown assistance
Z
Page 310 of 354
Jump-starting
For the jump-starting procedure, use only the jump-starting connection point in the engine com-
partment,consisting of apositive terminal and aground point.
All vehiclese xcept vehiclesw ithalithium-ion battery:
GWARNING
Battery acid is caustic. There is arisk of injury.
Avoid contact with skin, eyes or clothing. Do not inhale any battery gases. Do not lean over the
battery. Keep children away from batteries. Wash away battery acid immediately with plenty of
clean water and seek medical attention.
GWARNING
During charging and jump-starting, explosive gases can escape from the battery. There is arisk
of an explosion.
Particularly avoid fire, open flames, creating sparks and smoking. Ensure there is sufficient ven-
tilation while charging and jump-starting. Do not lean over abattery.
GWARNING
During the charging process, abattery produces hydrogen gas. If ashort circuit occurs or sparks
are created, the hydrogen gas can ignite. There is arisk of an explosion.
RMake sure that the positive terminal of aconnected battery does not come into contact with
vehicle parts.
RNever place metal objects or tools on abattery.
RIt is important that you observe the described order of the battery terminals when connecting
and disconnecting abattery.
RWhen jump-starting, make sure that the battery poles with identical polarity are connected.
RIt is particularly important to observe the described order when connecting and disconnecting
the jumper cables.
RNever connect or disconnectt he battery terminals while the engine is running.
GWARNING
Ad ischarged battery can freeze at temperatures below freezing point. When jump-starting the
vehicle or charging the battery, gases can escape from the battery. There is arisk of an explosion.
Allow the frozen battery to thaw out before charging it or jump-starting.
If, at low temperatures, the indicator lamps/warning lamps in the instrument cluster do not light up,
it is highly likely that the discharged battery has frozen.Int his case, you may neither charge the
battery nor jump-start the vehicle. The service life of athawed-out battery may be shorter. The
starting characteristicsc an be impaired, particularly at low temperatures. Have the thawed-out
battery checked at aqualified specialist workshop.
All vehicles:
!Avoid repeated and lengthy starting attempts. Otherwise, the catalytic converter could be
damaged by the non-combusted fuel.
308Jump-starting
Breakdown assistance
Page 311 of 354
Do not start the vehicleusing arapid charging device. If your vehicle's battery is discharged, the
engine can be jump-started froma nothervehicleorf romas econd battery using jumpe rcables.
Observe the following points:
RThe battery is not accessible in al lvehicles. If the othe rvehicle's battery is not accessible ,jump-
start the vehicl eusing asecond battery or ajump-starting device.
RYo um ayonl yjump-star tthe vehicl ewhent he engine and exhaust system ar ecold.
RAllv eh icle sexcept vehicle swithal ithium-io nbattery: do not start the engine if the battery
is frozen. Let the battery thawf irst.
ROnlyjump-star tfromb atteries with a12Vvoltagerating.
ROnlyu sejumpe rcable swhich have asufficient cross-sectio nand insulate dtermina lclamps.
RIf the battery is full ydischarged, leav ethe battery thati sbeing used to jump-star tconnected for
af ew minute sbefor ea ttempting to start. Thi scharge sthe battery slightly.
RMake sure thatt he two vehicles do not touch.
Make sure that:
Rthe jumpe rcable sarenot damaged.
Rwhen the jumpe rcable sareconnected to the battery ,uninsulated sections of the termina lclamp
do not come into contact with othe rmetalsections.
Rthe jumpe rcable scanno tcome into contact with parts which can mov ewhent he engine is
running ,suc hast he V-bel tpulle yort he fan.
XSecure the vehicl ebyapplyingthe electri cparkin gb rake.
XShift the transmission to position P.
XMake sure thatt he ignition is switched off .All indicator lamps in the instrument cluster must be
off .W henu sing the SmartKey, tur nthe SmartKeytop osition0in the ignition lock and remove it
(
Ypage 131).
XSwitch off al lelectrical consumers ,e.g.r ea rw indo wd efroster ,lighting, etc.
XOpen the hood.
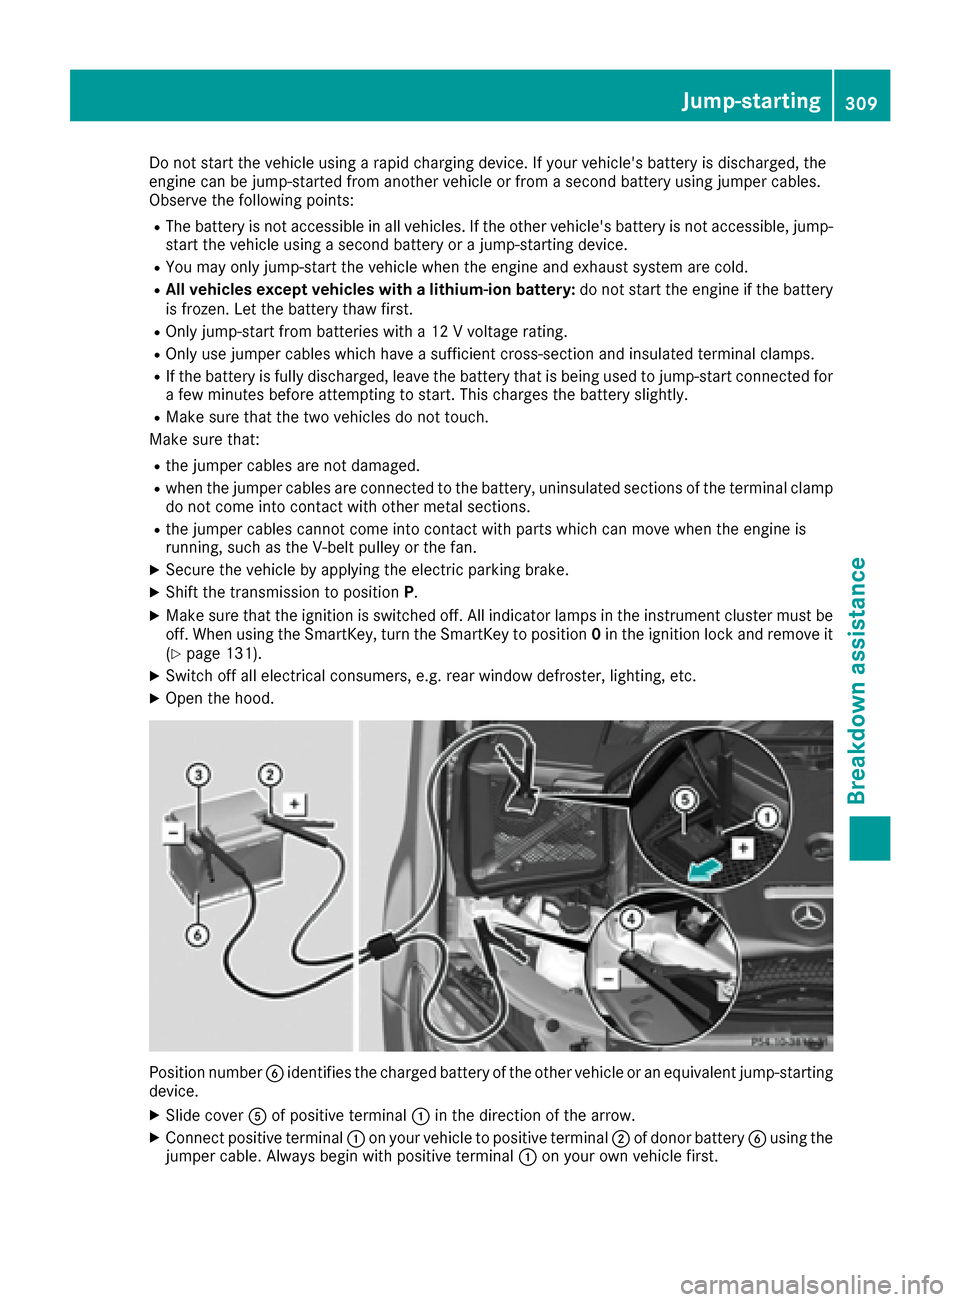
Positio nnumber Bidentifie sthe charge dbattery of the othe rvehicl eorane quivalen tjump-starting
device.
XSlide cover Aof positive terminal :in the direction of the arrow.
XConnect positive terminal :on your vehicl etopositive terminal ;of donor battery Busing the
jumpe rcable .Alway sbegin with positive terminal :on your ow nvehicl efirst.
Jump-starting309
Breakdow nassistance
Z
Page 312 of 354
XStart the engine of the donorvehicl eand run it at idling speed.
XConnect negative terminal =of dono rbattery Bto ground point ?of your vehicl eusing the
jumper cable ,connecting the jumper cable to dono rbattery Bfirst.
XStart the engine.
XBefore disconnecting the jumper cables, le tthe engine run for several minutes.
XFirst, remove the jumper cable sfrom ground point ?and negative terminal =,then from pos-
itive clamp :and positive terminal ;.Begineacht ime at the contacts on your ownv ehiclefirst.
XClose cover Aof positive terminal :afte rremoving jumper cables.
XHave the battery checke dataqualified specialist workshop.
Jump-starting is not considered to be anorma loperating condition.
iJumpe rcable sand further information regarding jump-starting can be obtaine datany qualified
specialist workshop.
Towin gand tow-starting
Important safety notes
GWARNING
Functions relevant to safety are restricted or
no longer available if:
Rthe engine is not running.
Rthe brake system or the power steering is
malfunctioning.
Rthere is amalfunction in the voltag esupply
or the vehicle's electrical system.
If your vehicl eisbeing towed, much more
force may be necessary to stee rorbrake.
There is ariskofana ccident.
In such cases, us eatow bar. Before towing,
make sure that the steering move sfreely.
GWARNING
You can no longer stee rthe vehicl eifthe
steering wheel lock hasb eene ngaged .There
is ar iskofana ccident.
Alway sswitch off the ignition when towing the
vehicl ewithat ow cable or atow bar.
GWARNING
Whe ntowing or tow-starting another vehicle
and its weight is greate rthan the permissible
gross weigh tofyourv ehicle, the:
Rthe towing eyec ould detach itself
Rthe vehicle/trailer combination could roll-
over.
There is ariskofana ccident.
Whe ntowing or tow-starting another vehicle,
its weight shoul dnot be greate rthan the per-
missible gross weight of your vehicle.
Details on the permissible gross vehicl eweight
of your vehicl ecan be found on the vehicl eide n-
tification plate (
Ypage 343).
!Whe nCOLLISIONP REVENTION ASSIST
PLUS, DISTRONIC PLU Sorthe HOLD function
is activated, the vehicl ebrakes automatically
in certain situations.
To avoid damag etothe vehicle, deactivate
thes esystems in the following or similar sit-
uations:
Rwhen towing the vehicle
Rin the car wash
!Make sure that the electri cparking brake is
released .Ifthe electri cparking brake is faulty,
visit aquali fied specialist workshop.
!Secure the tow rop eortow ba rtothe towing
eyeo nly.Otherwise, the vehicl ecould
become damaged.
310Towinga nd tow-starting
Breakdown assistance
Page 313 of 354
!Do not use the towing eye for recovery. This
could damage the vehicle. If in doubt, have
the vehicle recovered using acrane.
!When towing, pull aways lowly and
smoothly. If the tractive power is too high, the
vehicles could be damaged.
!Shift the automatic transmission to Nand
do not open the driver's or front passenger's
door during towing. The automatic transmis-
sion may otherwise shift to position P,which
could damage the transmission.
!Do not tow with sling-type equipment. This
could damage the vehicle.
!The vehicle can be towed amaximum of
30 miles (50km). The towing speed of 30 mph (50 km/h) must not be exceeded.
If the vehicle has to be towed more than
30 miles (50km), the entire vehicle must be
raised and transported.
It is better to have the vehicle transported than
to have it towed away.
If the vehicle has suffered transmission damage,
have it transported on atransporter or trailer.
The automatic transmission must be in position N when the vehicle is being towed. If the auto-
matic transmission cannot be shifted to position
N,h ave the vehicle transported on atransporter
or trailer.
The battery must be connected and charged.
Otherwise, you:
Rcannot turn the SmartKey to position 2in the
ignition lock
Rcannot release the electric parking brake
Rcannot shift the automatic transmission to
position N
Disarm the automatic locking feature before the vehicle is towed (
Ypage 81). You could other-
wise be locked out when pushing or towing the
vehicle.
Installing/removing the towing eye
Installingt he towing eye
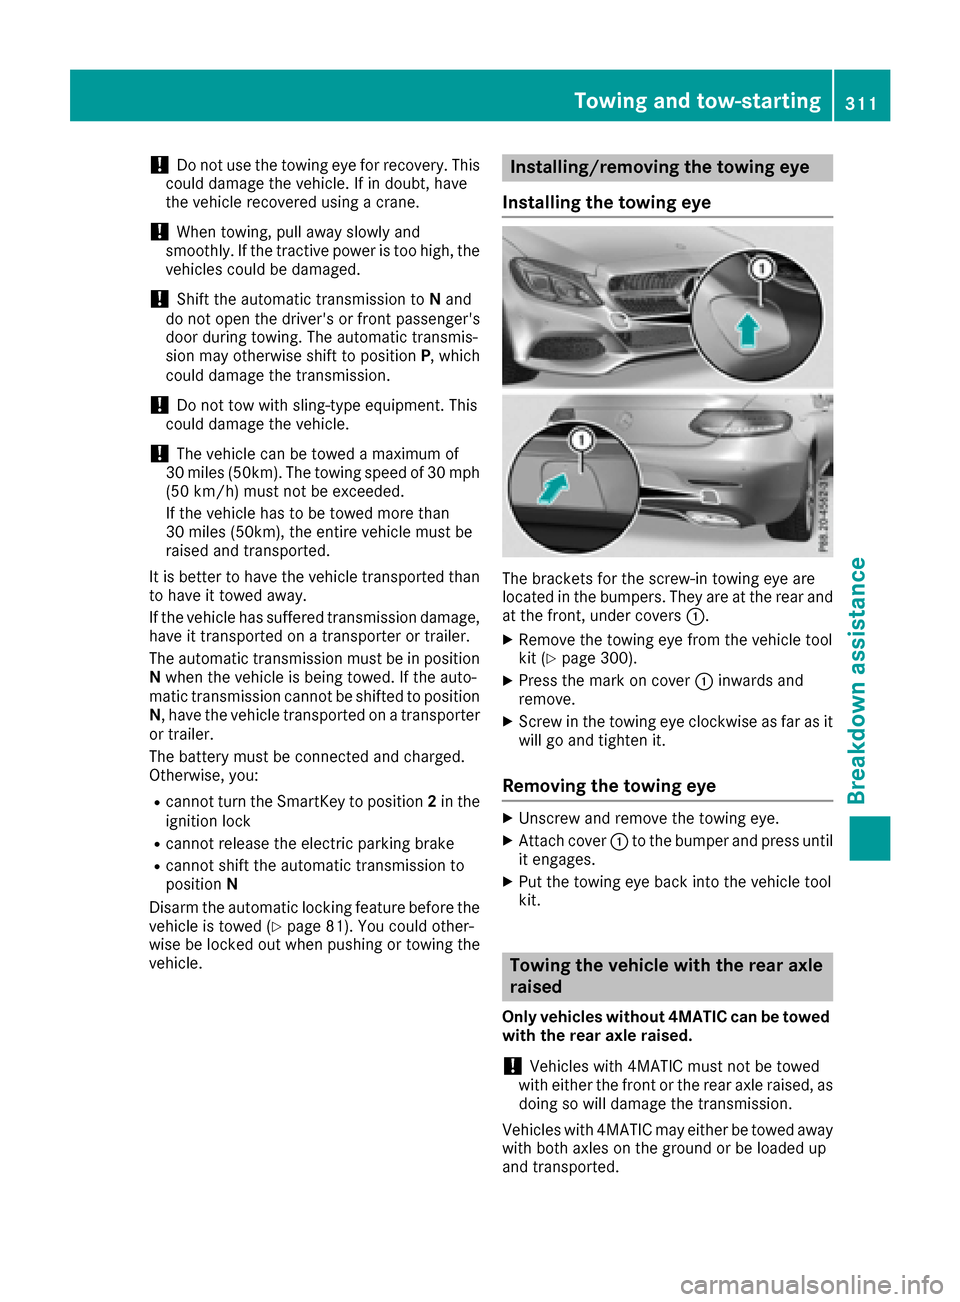
The brackets for the screw-in towing eye are
located in the bumpers. They are at the rear and
at the front,u nder covers:.
XRemove the towing eye from the vehicle tool
kit (Ypage 300).
XPress the mark on cover :inwards and
remove.
XScrew in the towing eye clockwise as far as it will go and tighten it.
Removing the towing eye
XUnscrew and remove the towing eye.
XAttach cover :to the bumper and press until
it engages.
XPut the towing eye back into the vehicle tool
kit.
Towing the vehiclew ith the rear axle
raised
Only vehicles without 4MATIC can be towed
with the rear axle raised.
!Vehicles with 4MATIC must not be towed
with either the front or the rear axle raised, as doing so will damage the transmission.
Vehicles with 4MATIC may either be towed away
with both axles on the ground or be loadedu p
and transported.
Towing and tow-starting311
Breakdown assistance
Z
Page 314 of 354

!Vehicles with automatic transmission must
not be towed with the rear axle raised. The
vehicle/trailer combination may otherwise
swerve or even roll over.
Towing avehiclew ith both axles on
the ground
The automatic transmission automaticallys hifts
to position Pwhen you open the driver's or front-
passenger door or when you remove the Smart-
Key from the ignition lock. In order to ensure
that the automatic transmission stays in posi-
tion Nwhen towing the vehicle, you must
observe the following points:
XMake sure that the vehicle is stationary.
XTurn the SmartKey to position 2in the ignition
lock.
XDepress and hold the brake pedal.
XShift the automatic transmission to position
N.
XLeave the SmartKey in position 2in the igni-
tion lock.
XRelease the brake pedal.
XRelease the electric parking brake.
XSwitch on the hazard warning lamps
(Ypage 112).
In order to signal achange of direction when
towing the vehicle with the hazard warning
lamps switched on, use the combination switch
as usual. In this case, only the indicator lamps
for the direction of travel flash. After resetting
the combination switch, the hazard warning
lamp starts flashing again.
Transporting the vehicle
4MATIC vehicles/vehiclesw ith auto-
matic transmission
!When the vehicle is loadedf or transport, the
front and rear axles must be stationary and on the same transportation vehicle. Positioning
over the connection point of the transport
vehicle is not permitted. The drive train may
otherwise be damaged.
All vehicles
!You may only secure the vehicle by the
wheels, not by parts of the vehicle such as
axle or steering components. Otherwise, the
vehicle could be damaged.
The towing eye can be used to pull the vehicle
onto atrailer or transporter for transporting pur-
poses.
XTurn the SmartKey to position 2in the ignition
lock.
XShift the automatic transmission to position
N.
As soon as the vehicleh as been loaded:
XPrevent the vehicle from rolling awayb y
applying the electric parking brake.
XShift the automatic transmission to posi-
tion P.
XTurn the SmartKey to position 0in the ignition
lock and remove it.
XSecure the vehicle.
312Towing and tow-starting
Breakdown assistance
Page 321 of 354
Snow chains
GWARNING
If snow chains are installed to the front
wheels, they may drag against the vehicle
body or chassis components. This could
cause damage to the vehicle or the tires.
There is arisk of an accident.
To avoid hazardous situations:
Rnever install snow chains to the front
wheels
Ralways install snow chains in pairs to the
rear wheels.
For safety reasons, Mercedes-Benz recom-
mends that you only use snow chains that have
been specially approved for your vehicle by
Mercedes-Benz, or are of acorresponding
standard of quality. For more information,
please contact aqualified specialist workshop.
If you inten dtomount snow chains, please bear
the following points in mind:
RSnow chains may not be mounted on all
wheel/tire combinations .Permissible wheel-
tire combination s(
Ypage 340).
ROnly use snow chains when driving on roads
completely covered by snow. Remove the
snow chains as soon as possible when you
come toaroad that is not snow-covered.
RLocal regulations may restrict the use of snow
chains. Observe the appropriate regulations if
you wish to mount snow chains.
RDo not exceed the maximum permissible
speed of 31 mph (50 km/h).
ROn vehicles with AIRMATIC, you must drive at
raised vehicle level if snow chains have been
installed (
Ypage 172).
RWhen snow chains are installed, never use
Active Parking Assist (Ypage 177).
You may wish to deactivate ESP®when pulling
away with snow chains installed:
RAll vehicles (except Mercedes ‑AMG vehicles)
(Ypage 67)
RMercedes‑AM Gvehicles (Ypage 68)
You can thereby allow the wheels to spin in a
controlled manner, achieving an increased driv- ing force (cuttin gaction).
Tire pressure
Tire pressures pecifications
Important safety notes
GWARNING
Underinflated or overinflated tires pose the
following risks:
Rthe tires may burst, especially as the load
and vehicle speed increase.
Rthe tires may wear excessively and/or
unevenly, which may greatly impair tire
traction.
Rthe driving characteristics, as well as steer-
ing and braking, may be greatly impaired.
There is arisk of an accident.
Follow recommended tire inflation pressures
and check the pressure of all the tires includ-
ing the spare wheel:
Rmonthly, at least
Rif the load changes
Rbefore beginning along journey
Runder different operating conditions, e.g.
off-road driving
If necessary, correct the tire pressure.
The data on the Tire and Loading Information
placard and tire pressure table shown here are
examples. Tire pressure specifications are vehi-
cle-specific and may deviate from the data
shown here. The tire pressure specifications
that are valid for your vehicle can be found on
the Tire and Loading Information placard and
tire pressure table on the vehicle.
General notes
The recommended tire pressures for the tires
mounted at the factory can be found on the
labels described here.
Further information on tire pressures can be
obtained at aqualified specialist workshop.
Tire pressure319
Wheels and tires
Z
Page 337 of 354
PSI (pounds per squareinch)
Astandard unit of measure for tire pressure.
Aspect ratio
Relationship between tire height and tire width
in percent.
Tire pressure
This is pressure inside the tire applying an out-
ward force to each square inch of the tire's sur-
face. The tire pressure is specified in pounds per
square inch (psi), in kilopascal (kPa) or in bar.
The tire pressure should only be corrected when
the tires are cold.
Cold tire pressure
The tires are cold:
Rif the vehicle has been parked with the tires
out of direct sunlight for at least three hours
and
Rif the vehicle has not been driven further than
1m ile (1.6 km)
Tread
The part of the tire that comes into contact with
the road.
Bead
The tire bead ensures that the tire sits securely
on the wheel. There are several steel wires in the
bead to prevent the tire from coming loose from
the wheel rim.
Sidewall
The part of the tire between the tread and the
bead.
Weight of optional extras
The combined weight of those optional extras
that weigh more than the replaced standard
parts and more than 5lbs (2.3 kg). These
optional extras, such as high-performance
brakes, level control, aroof rack or ahigh-per-
formanceb attery, are not included in the curb
weight and the weight of the accessories.
TIN (Tire Identification Number)
This is aunique identifier which can be used by
at ire manufacturer to identify tires, for example
for aproduct recall, and thus identify the pur-
chasers. The TIN is made up of the manufactur-
er's identity code, tire size, tire type code and
the manufacturing date.
Load bearing index
The load bearing index (also load index) is acode
that contains the maximum load bearing capa-
city of atire.
Traction
Traction is the result of friction between the tires
and the road surface.
Treadwear indicators
Narrow bars (tread wear bars) that are distrib-
uted over the tire tread. If the tire tread is level
with the bars, the wear limit of áin (1.6 mm)
has been reached.
Occupant distribution
The distribution of occupants in avehicle at their
designated seating positions.
Total load limit
Nominal load and luggage load plus 68 kg
(15 0lbs)m ultiplied by the number of seats in
the vehicle.
Changing awheel
Flat tire
The "Breakdown assistance" section
(Ypage 300) contains information and notes on
how to deal with aflat tire. Information on driv-
ing with MOExtended tires in the event of aflat
tire can be found under "MOExtended tires (tires
with run-flat characteristics" (
Ypage 301).
Rotating the wheels
GWARNING
Interchanging the front and rear wheels may
severely impair the driving characteristics if
the wheels or tires have different dimensions. The wheel brakes or suspension components
may also be damaged. There is arisk of acci-
dent.
Rotate front and rear wheels only if the wheels and tires are of the same dimensions.
!On vehicles equippedw ithatire pressure
monitor ,electronic components are located
in the wheel.
Changing awheel335
Wheels and tires
Z
Page 347 of 354
Other identifications, for example:
R0W-30
R5W-30
R5W-40
Fuel
Important safety notes
GWARNING
Fuel is highly flammable. If you handle fuel
incorrectly, there is arisk of fire and explo-
sion.
You must avoid fire, open flames, creating
sparks and smoking. Switch off the engine
and, if applicable, the auxiliary heating before refueling.
GWARNING
Fuel is poisonous and hazardous to health.
There is arisk of injury.
You must make sure that fuel does not come into contact with your skin, eyes or clothing
and that it is not swallowed. Do not inhale fuel
vapors. Keep fuel awayf rom children.
If you or others come into contact with fuel,
observe the following:
RWash awayf uel from skin immediately
using soap and water.
RIf fuel comes into contact with your eyes,
immediately rinse them thoroughly with
clean water. Seek medical assistance with-
out delay.
RIf fuel is swallowed, seek medical assis-
tance without delay.Don ot induce vomit-
ing.
RImmediately change out of clothing which
has come into contact with fuel.
Tank capacity
ModelTotal capacity
All models17.4 US gal (66.0 l)
ModelOf which
reserve
Mercedes-AMG vehiclesApprox.
2.6 US gal (10.0 l)
Allo ther modelsApprox.
1.8 US gal (7.0 l)
Gasoline
Fuel grade
!Do not use diesel to refuel vehicle swith a
gasoline engine. Do not switch on the ignition
if you accidentally refuel with the wrong fuel.
Otherwise, the fuel wil lenter the fuel system.
Even small amounts of the wrong fuel could
resul tind amage to the fuel system and the
engine. Notify aqualified specialist workshop
and have the fuel tank and fuel lines drained
completely.
!Only refuel using unleaded premiumg rade
gasoline with at least 91 AKI/95 RON.
iE10 fuel contains up to 10% bioethanol.
Yourv ehicle is E10-compatible .You can
refuel you rvehicle using E10 fuel.
!Only use the fuel recommended.O perating
the vehicle with other fuel scan leadtoe ngine
failure.
!Do not use the following:
RE15 (gasoline with 15% ethanol)
RE85 (gasoline with 85% ethanol)
RE100 (100% ethanol)
RM15 (gasoline with 15% methanol)
RM30 (gasoline with 30% methanol)
RM85 (gasoline with 85% methanol)
RM100 (100% methanol)
RGasoline with metalliferous additives
RDiesel
Do not mix such fuel swith the fuel recom-
mended for you rvehicle.
!To ensure the longevity and ful lperform-
ance of the engine, only premium-grade
unleade dgasoline must be used.
Service products and fillingc apacities345
Technical data
Z