height MERCEDES-BENZ C-CLASS COUPE 2018 Owner's Manual
[x] Cancel search | Manufacturer: MERCEDES-BENZ, Model Year: 2018, Model line: C-CLASS COUPE, Model: MERCEDES-BENZ C-CLASS COUPE 2018Pages: 354, PDF Size: 5.88 MB
Page 48 of 354
If a child younger than twelve years old and
under 5 ft (1.50m)in height is traveling in the
vehicle:
Ralways secure the child in a child restraint
system suitable for this Mercedes-Benz vehi-
cle. The child restraint system must be appro-
priate to the age, weight and size of the child
Ralways observe the instructions and safety
notes on "Children in the vehicle"
(
Ypage 59) in addition to the child restraint
system manufacturer's installation and oper-
ating instructions
Ralways observe the instructions and safety
notes on the "Occupant classification system
(OCS)" (
Ypage 51)
GWARNING
The seat belts may not perform their intended protective function if:
Rthey are damaged, modified, extremely
dirty, bleached or dyed
Rthe seat belt buckle is damaged or
extremely dirty
Rthe Emergency Tensioning Devices, belt
anchorages or inertia reels have been modi-
fied.
Seat belts may be damaged in an accident,
although the damage may not be visible, e.g.
due to splinters of glass. Modified or damaged
seat belts may tear or fail, e.g. in an accident.
Modified Emergency Tensioning Devices
could accidentally trigger or fail to deploy
when necessary. This poses an increased risk
of injury or even fatal injury.
Never modify the seat belts, Emergency Ten-
sioning Devices, belt anchorages and inertia
reels. Make sure that the seat belts are
undamaged, not worn out and clean. Follow-
ing an accident, have the seat belts checked
immediately at a qualified specialist work-
shop.
Only use seat belts that have been approved for
your vehicle by Mercedes-Benz.
AMG Performance seat: this seat is designed
for the standard three-point seat belt. If you
install another multi-point seat belt, e.g. sport or
racing seat belts, the restraint system cannot
provide the best level of protection.
GWARNING
If you feed seat belts through the opening in
the seat backrest, the seat backrest may be
damaged or may even break in the event of an accident. This poses an increased risk of
injury or even fatal injury.
Only use the standard three-point seat belt.
Never modify the seat belt system.
Proper use of the seat belts
Observe the safety notes on the seat belt
(Ypage 45).
All vehicle occupants must be wearing the seat
belt correctly before beginning the journey. Also
make sure that all vehicle occupants are always
wearing the seat belt correctly while the vehicle
is in motion.
When fastening the seat belt, always make sure
that:
Rthe seat belt tongue is only inserted to the belt buckle belonging to that seat.
Rthe seat belt is tight across your body.
Avoid wearing bulky clothing, e.g. a winter
coat.
Rthe seat belt is not twisted.
Only then can the forces which occur be dis-
tributed over the area of the belt.
Rthe shoulder section of the belt is always
routed across the center of your shoulder.
The shoulder section of the belt must not
come into contact with your neck or be routed
under your arm.
Rthe lap belt passes tightly and as low down as possible across your lap.
The lap belt must always be routed across
your hip joints and not across your abdomen.
This applies particularly to pregnant women.
If necessary, push the lap belt down to your
hip joint and pull it tight using the shoulder
section of the belt.
Rthe seat belt is not routed across sharp, poin-
ted or fragile objects.
If you have such items located on or in your
clothing, e.g. pens, keys or eyeglasses, store
these in a suitable place.
Ronly one person is using a seat belt at a time.
Infants and children must never travel sitting
on the lap of a vehicle occupant. In the event
46Occupant safety
Safety
Page 51 of 354
Important safety notes
GWARNING
If you do no tsit in th ecorrec tseat position ,
th eair bag canno tprotect as intended and
could eve ncaus eadditional injury when
deployed. This poses an increased ris kof
injury or eve nfatal injury.
To avoi dhazardous situations, always mak e
sur ethat all of th evehicle's occupants:
Rhave fastene dtheir seat belt scorrectly,
includin gpregnant wome n
Rare sitting correctl yand maintai nth egreat-
est possible distanc eto th eair bags
Rfollow th efollowin ginstruction s
Always mak esur ethat there are no objects
between th eair bag and th evehicle's occu-
pants .
RAdjus tth eseat sproperly before beginning
your journey. Always mak esur ethat th eseat
is in an almost upright position .The center of
th ehead restrain tmust support th ehead at
about eye level.
RMov eth edriver' sand front-passenger seat s
as far bac kas possible .The driver' sseat posi-
tion must allow th evehicl eto be driven safely.
ROnly hold th esteering whee lon th eoutside .
This allows th eair bag to be fully deployed.
RAlways lean against th ebackrest while driv -
ing .Do no tlean forwards or lean against th e
door or side window. You may otherwise be in
th edeploymen tarea of th eair bags .
RAlways keep your fee tin th efootwell in fron t
of th eseat .Do no tput your fee ton th edash -
board, for example. Your fee tmay otherwise
be in th edeploymen tarea of th eair bag.
RFo rthis reason ,always secure person sless
than 5ft (1.5 0m) tall in suitable restraint sys-
tems. Up to this height, the seat belt cannot
be worn correctly.
If a child is traveling in your vehicle, also
observe the following notes:
RAlways secure children under twelve years of
age and less than 5 ft (1.50 m)tall in suitable
child restraint systems.
RChild restraint systems should be installed on
the rear seats.
ROnly secure a child in a rearward-facing child
restraint system on the front-passenger seat
when the front-passenger front air bag is
deactivated. If the PASSENGER AIR BAG OFF
indicator lamp is permanently lit, the front-
passenger front air bag is deactivated
(
Ypage 44).
RAlways observe the instructions and safety
notes on the "Occupant Classification System
(OCS)" (
Ypage 51) and on "Children in the
vehicle" (Ypage 59 )in addition to the child
restraint system manufacturer's installation
and operating instructions.
Objects in the vehicle interior may pre
vent
an air bag from functioning correctly. Before
starting your journey and to avoid risks resulting from the speed of the air bag as it deploys, make
sure that:
Rthere are no people, animals or objects
between the vehicle occupants and an air
bag.
Rthere are no objects between the seat, door
and B-pillar.
Rno hard objects, e.g. coat hangers, hang on
the grab handles or coat hooks.
Rno accessories, such as cup holders, are
attached to the vehicle within the deployment
area of an air bag, e.g. to doors, side windows,
rear side trim or side walls.
Rno heavy, sharp-edged or fragile objects are in
the pockets of your clothing. Store such
objects in a suitable place.
GWARNING
If you modify the air bag cover or affix objects
such as stickers to it, the air bag can no longer
function correctly. There is an increased risk
of injury.
Never modify an air bag cover or affix objects
to it.
GWARNING
Sensors to control the air bags are located in
the doors. Modifications or work not per-
formed correctly to the doors or door panel-
ing, as well as damaged doors, can lead to the
function of the sensors being impaired. The air
bags might therefore not function properly
anymore. Consequently, the air bags cannot
protect vehicle occupants as they are
Occupant safety49
Safety
Z
Page 61 of 354
Children in the vehicle
Important safety notes
Accident statistics show that children secured
in the rear seats are safer than children secured
in the front-passenger seat. For this reason,
Mercedes-Benz strongly advises that you install
a child restraint system on a rear seat. Children are generally better protected there.
If a child younger than twelve years old and
under 5 ft (1.50 m) in height is traveling in the
vehicle:
Ralways secure the child in a child restraint
system suitable for Mercedes-Benz vehicles.
The child restraint system must be appropri-
ate to the age, weight and size of the child
Rbe sure to observe the instructions and safety
notes in this section in addition to the child
restraint system manufacturer's installation
instructions
Rbe sure to observe the instructions and safetynotes on the "Occupant classification system
(OCS)" (
Ypage 51)
GWARNING
If you leave children unsupervised in the vehi-
cle, they could set it in motion by, for example:
Rrelease the parking brake.
Rshift the automatic transmission out of the
parking position P.
Rstart the engine.
In addition, they may operate vehicle equip-
ment and become trapped. There is a risk of
an accident and injury.
When leaving the vehicle, always take the
SmartKey with you and lock the vehicle. Never
leave children unsupervised in the vehicle.
GWARNING
If persons, particularly children are subjected to prolonged exposure to extreme heat or
cold, there is a risk of injury, possibly even
fatal. Never leave children unattended in the
vehicle.
GWARNING
If the child restraint system is subjected to
direct sunlight, parts may get very hot. Chil-
dren may burn themselves on these parts,
particularly on the metal parts of the child
restraint system. There is a risk of injury.
If you leave the vehicle, taking the child with
you, always ensure that the child restraint
system is not exposed to direct sunlight. Pro- tect it with a blanket, for example. If the child
restraint system has been exposed to direct
sunlight, let it cool down before securing the
child in it. Never leave children unattended in
the vehicle.
Always ensure that all vehicle occupants have
their seat belts fastened correctly and are sitting
properly. Particular attention must be paid to
children.
Observe the safety notes on the seat belt
(
Ypage 45 )and the notes on correct use of seat
belts (Ypage 46).
A booster seat may be necessary to achieve
proper seat belt positioning for children over
41 lb s(18 kg) until they reach a height where a
three-point seat belt can be properly fastened
without a booster seat.
Special seatbelt retractor
GWARNING
If the seat belt is released while driving, the
child restraint system will no longer be
secured properly. The special seat belt retrac- tor is disabled and the inertia real draws in a
portion of the seat belt. The seat belt cannot
be immediately refastened. There is an
increased risk of injury, possibly even fatal.
Stop the vehicle immediately, paying atten-
tion to road and traffic conditions. Reactivate
the special seat belt retractor and secure the
child restraint system properly.
All seat belts in the vehicle, except the driver's
seat belt, are equipped with a special seat belt
retractor. When activated, the special seat belt
retractor ensures that the seat belt cannot
slacken once the child seat is secured.
Children in the vehicle59
Safety
Z
Page 98 of 354
Always drive with the head restraints instal-
led. Before driving off, make sure for every
vehicle occupant that the center of the head
restraint supports the back of the head at
about eye level.
Do not rotate the head restraints of the front and
rear seats. Otherwise, you cannot adjust the
height and angle of the head restraints cor-
rectly.
Using the fore-and-aft adjustment, adjust the
head restraint so that it is as close as possible to
your head.
GWARNING
If the driver's seat is not engaged, it could
move unexpectedly while the vehicle is in
motion. This could cause you to lose control of the vehicle. There is a risk of an accident.
Always make sure that the driver's seat is
engaged before starting the vehicle.
GWARNING
You could lose control of your vehicle if you do the following while driving:
Radjust the driver's seat, head restraint,
steering wheel or mirrors
Rfasten the seat belt
There is a risk of an accident.
Adjust the driver's seat, head restraint, steer-
ing wheel and mirror and fasten your seat belt before starting the engine.
GWARNING
If you adjust the seat height carelessly, you or
other vehicle occupants could be trapped and
thereby injured. Children in particular could
accidentally press the electrical seat adjust-
ment buttons and become trapped. There is a
risk of injury.
While moving the seats, make sure that your
hands or other body parts do not get under the
lever assembly of the seat adjustment sys-
tem.
GWARNING
The seat belt does not offer the intended level of protection if you have not moved the back-
rest to an almost vertical position. When brak-
ing or in the event of an accident, you could
slide underneath the seat belt and sustain
abdomen or neck injuries, for example. This
poses an increased risk of injury or even fatal injury.
Adjust the seat properly before beginning
your journey. Always ensure that the backrest
is in an almost vertical position and that the
shoulder section of your seat belt is routed
across the center of your shoulder.
!To avoid damage to the seats and the seat
heating, observe the following information:
Rkeep liquids from spilling on the seats. If
liquid is spilled on the seats, dry them as
soon as possible.
Rif the seat covers are damp or wet, do not
switch on the seat heating. The seat heat-
ing should also not be used to dry the seats.
Rclean the seat covers as recommended;
see "Interior care".
Rdo not transport heavy loads on the seats.
Do not place sharp objects on the seat
cushions, e.g. knives, nails or tools. The
seats should only be occupied by passen-
gers, if possible.
Rwhen the seat heating is in operation, do
not cover the seats with insulating materi-
als, e.g. blankets, coats, bags, seat covers,
child seats or booster seats.
!Make sure that there are no objects in the
footwell under or behind the seats when mov-
ing the seats back. There is a risk that the
seats and/or the objects could be damaged.
iThe rear-compartment head restraints can
be removed (Ypage 98).
Vehicles without the through-loading feature:
the head restraints cannot be removed from
the rear compartment seats.
For more information, contact a qualified spe-
cialist workshop.
iRelated topic:
RRear bench seat through-loading feature
(Ypage 268)
96Seats
Seats, steering wheel and mirrors
Page 99 of 354
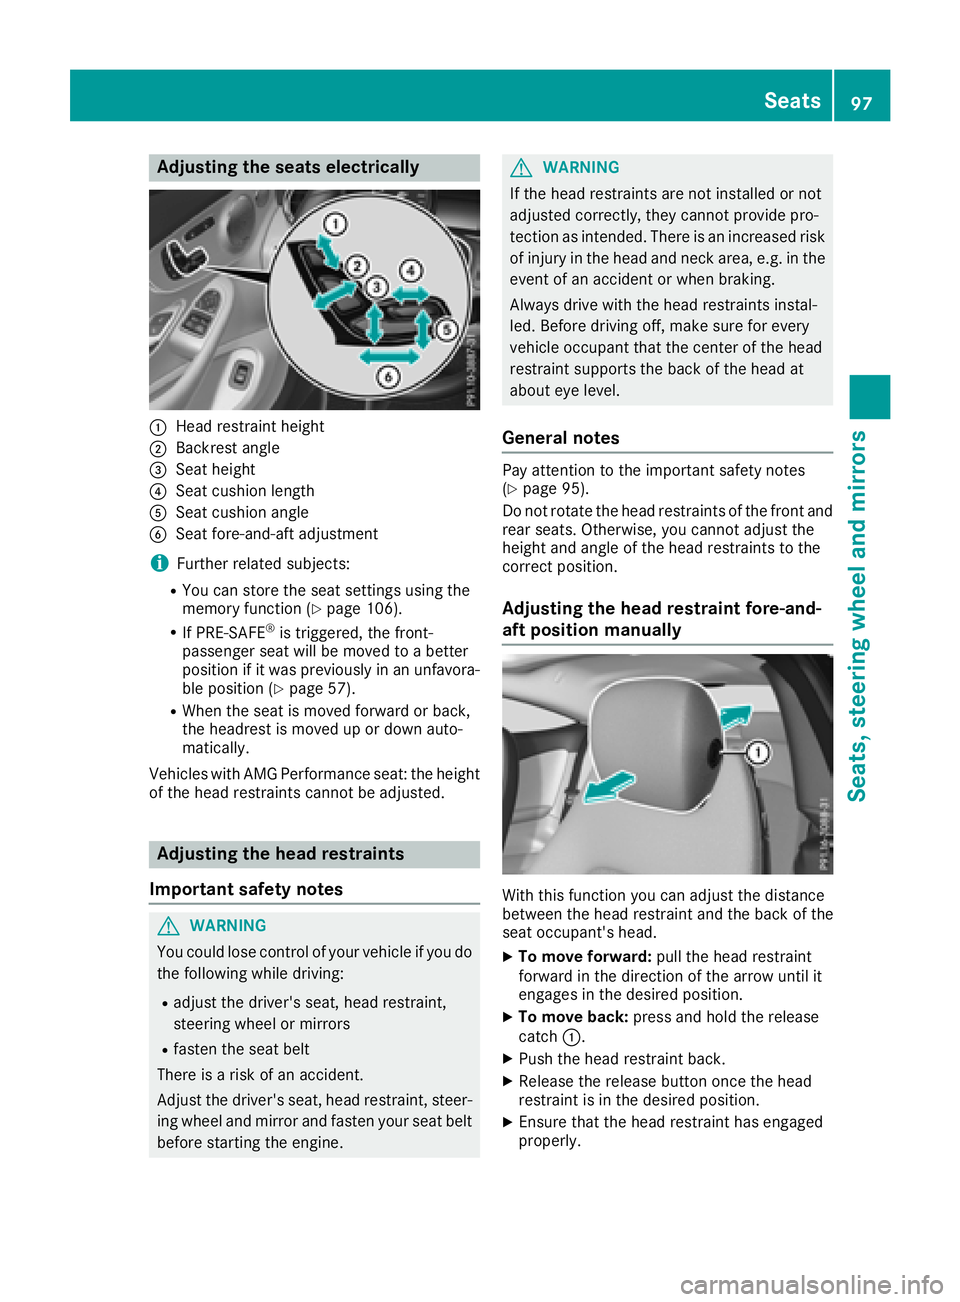
Adjusting the seats electrically
:Headrestrain theight
;Backrest angle
=Seat height
?Seat cushion lengt h
ASeat cushion angle
BSeat fore-and-aftadjustmen t
iFurther relate dsubjects :
RYou can store th eseat setting susin gth e
memory function (Ypage 106).
RIf PRE-SAFE®is triggered ,th efront-
passenger seat will be moved to abette r
position if it was previously in an unfavora-
ble position (
Ypage 57).
RWhen theseat is moved forward or back,
th eheadres tis moved up or down auto -
matically.
Vehicles wit hAM GPerformance seat :th eheight
of th ehead restraints canno tbe adjusted.
Adjusting the head restraints
Import ant safety notes
GWARNIN G
You could lose control of your vehicl eif you do
th efollowin gwhile driving:
Radjust th edriver's seat ,head restraint,
steering whee lor mirror s
Rfastenth eseat belt
There is aris kof an accident.
Adjus tth edriver's seat ,head restraint, steer -
ing whee land mirror and faste nyour seat belt
before starting th eengine.
GWARNIN G
If th ehead restraints are no tinstalled or no t
adjusted correctly, they canno tprovid epro -
tection as intended. There is an increased ris k
of injury in th ehead and neck area, e.g. in th e
event of an acciden tor when braking .
Always drive wit hth ehead restraints instal -
led. Befor edrivin goff ,mak esur efor every
vehicl eoccupant that th ecenter of th ehead
restrain tsupport sth ebac kof th ehead at
about eye level.
Gene ral notes
Pay attention to th eimportant safet ynote s
(Ypage 95).
Do no trotate th ehead restraints of th efron tand
rear seats. Otherwise ,you canno tadjust th e
height and angle of th ehead restraints to th e
correc tposition .
Adjusting the head restraint fore-and-
aft position manually
Withthis function you can adjust th edistanc e
between th ehead restrain tand th ebac kof th e
seat occupant's head .
XTo moveforward: pull thehead restrain t
forward in th edirection of th earrow until it
engage sin th edesired position .
XTo moveback :press and hold th erelease
catch :.
XPush th ehead restrain tback.
XReleas eth erelease butto nonce th ehead
restrain tis in th edesired position .
XEnsurethat th ehead restrain thas engage d
properly.
Seats97
Seats, steering wheel and mirrors
Z
Page 100 of 354
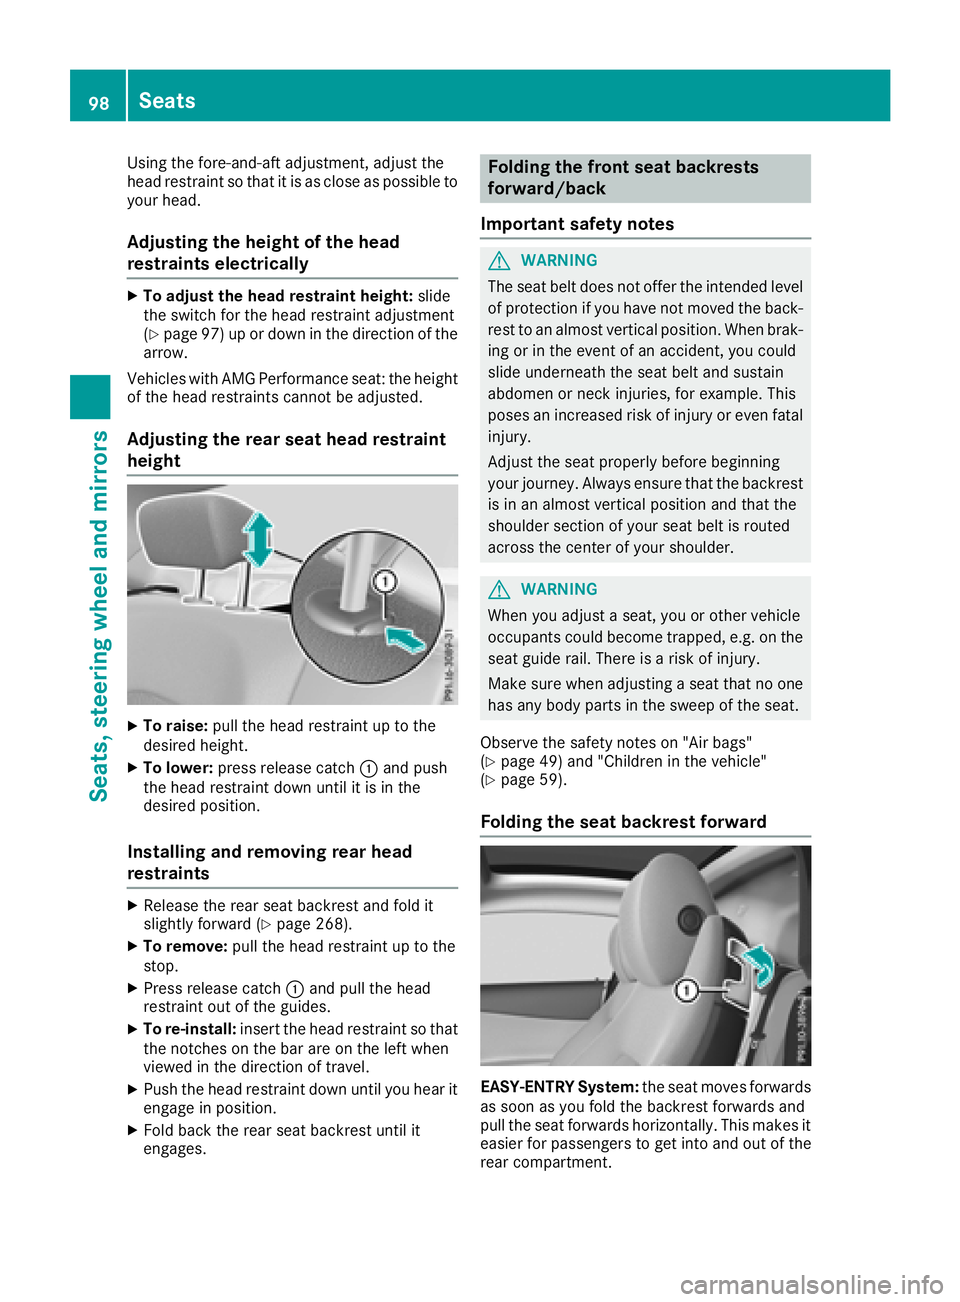
Using the fore-and-aft adjustment, adjust the
head restraint so that it is as close as possible to
your head.
Adjusting the height of the head
restraints electrically
XTo adjust the head restraint height:slide
the switch for the head restraint adjustment
(
Ypage 97) up or down in the direction of the
arrow.
Vehicles with AMG Performance seat: the height
of the head restraints cannot be adjusted.
Adjusting the rear seat head restraint
height
XTo raise: pull the head restraint up to the
desired height.
XTo lower: press release catch :and push
the head restraint down until it is in the
desired position.
Installing and removing rear head
restraints
XRelease the rear seat backrest and fold it
slightly forward (Ypage 268).
XTo remove: pull the head restraint up to the
stop.
XPress release catch :and pull the head
restraint out of the guides.
XTo re-install: insert the head restraint so that
the notches on the bar are on the left when
viewed in the direction of travel.
XPush the head restraint down until you hear it
engage in position.
XFold back the rear seat backrest until it
engages.
Folding the front seat backrests
forward/back
Important safety notes
GWARNING
The seat belt does not offer the intended level of protection if you have not moved the back-
rest to an almost vertical position. When brak-
ing or in the event of an accident, you could
slide underneath the seat belt and sustain
abdomen or neck injuries, for example. This
poses an increased risk of injury or even fatal injury.
Adjust the seat properly before beginning
your journey. Always ensure that the backrest
is in an almost vertical position and that the
shoulder section of your seat belt is routed
across the center of your shoulder.
GWARNING
When you adjust a seat, you or other vehicle
occupants could become trapped, e.g. on the seat guide rail. There is a risk of injury.
Make sure when adjusting a seat that no one
has any body parts in the sweep of the seat.
Observe the safety notes on "Air bags"
(
Ypage 49) and "Children in the vehicle"
(Ypage 59).
Folding the seat backrest forward
EASY-ENTRY System: the seat moves forwards
as soon as you fold the backrest forwards and
pull the seat forwards horizontally. This makes it
easier for passengers to get into and out of the
rear compartment.
98Seats
Seats, steering wheel and mirrors
Page 103 of 354
Problems with the seat heating / seat ventilation
ProblemPossible causes/consequences andMSolutions
The seat heating or seat
ventilation has switched
off prematurely or can-
not be switched on.The on-board voltage is too low because too many electrical consum-
ers are switched on.
XSwitch off electrical consumers that you do not need, such as the
rear window defroster or interior lighting.
Once the battery is sufficiently charged, the seat heating or seat
ventilation can be switched back on manually.
Steering wheel
Important safety notes
GWARNING
You could lose control of your vehicle if you do the following while driving:
Radjust the driver's seat, head restraint,
steering wheel or mirrors
Rfasten the seat belt
There is a risk of an accident.
Adjust the driver's seat, head restraint, steer-
ing wheel and mirror and fasten your seat belt before starting the engine.
GWARNING
Children could injure themselves if they
adjust the steering wheel. There is a risk of
injury.
When leaving the vehicle, always take the
SmartKey with you and lock the vehicle. Never
leave children unsupervised in the vehicle.
The electrically adjustable steering wheel can
still be adjusted when there is no key in the igni-
tion lock.
Adjusts the steering wheel electri-
cally
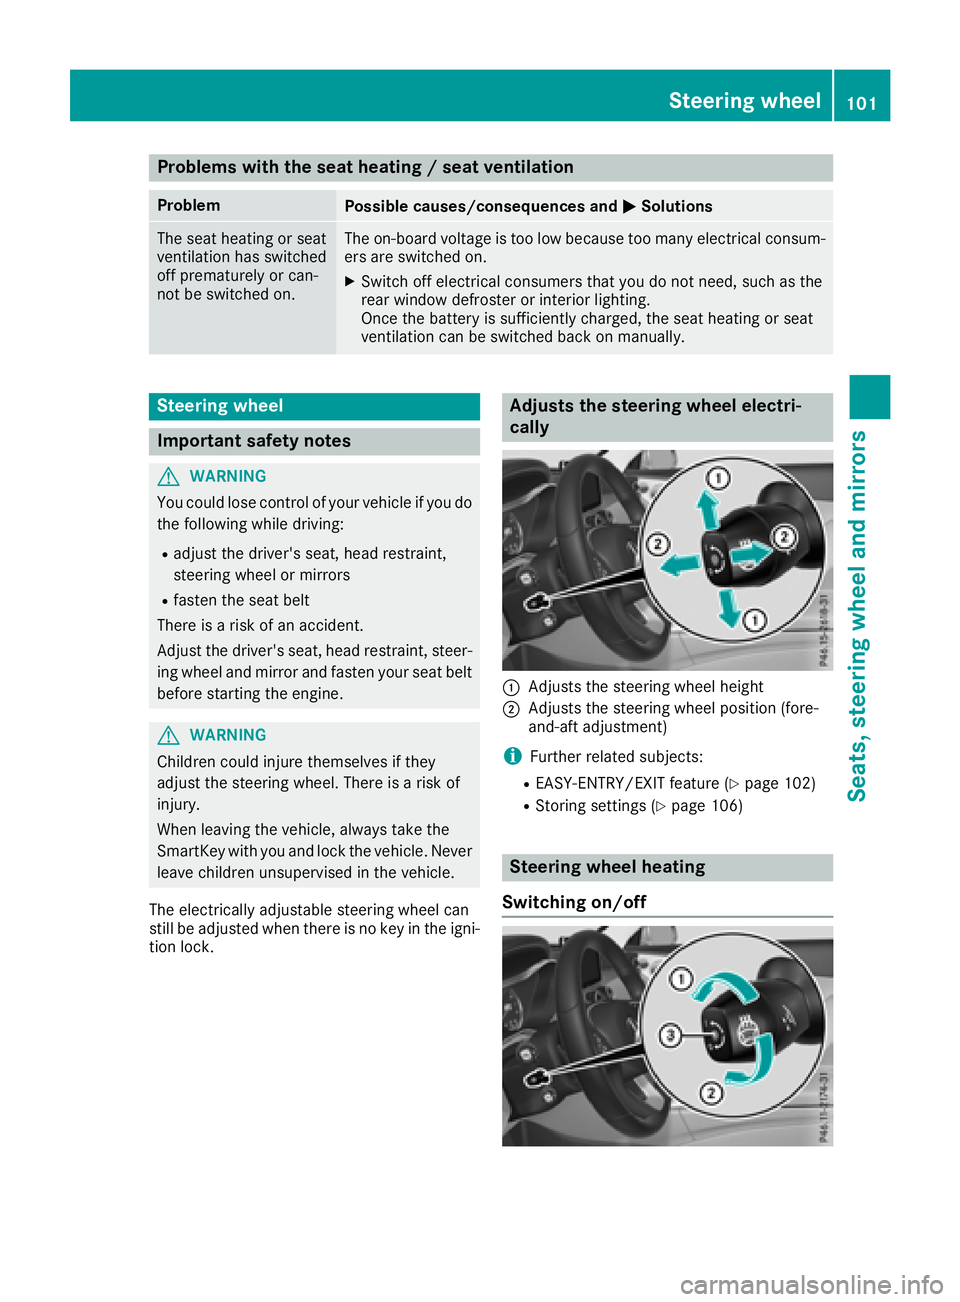
:Adjusts the steering wheel height
;Adjusts the steering wheel position (fore-
and-aft adjustment)
iFurther related subjects:
REASY-ENTRY/EXIT feature (Ypage 102)
RStoring settings (Ypage 106)
Steering wheel heating
Switching on/off
Steering wheel101
Seats, steering wheel and mirrors
Z
Page 170 of 354
Vehicle level
Setting the raised vehicle level
It is possible to choose between the "Normal"
and "Raised" vehicle levels below a speed of
50 mph (80 km/h). Select the "Normal" setting
for normal road surfaces and "Raised" for driving
with snow chains or on particularly poor road
surfaces. Your selection remains stored even if
you remove the SmartKey from the ignition lock.
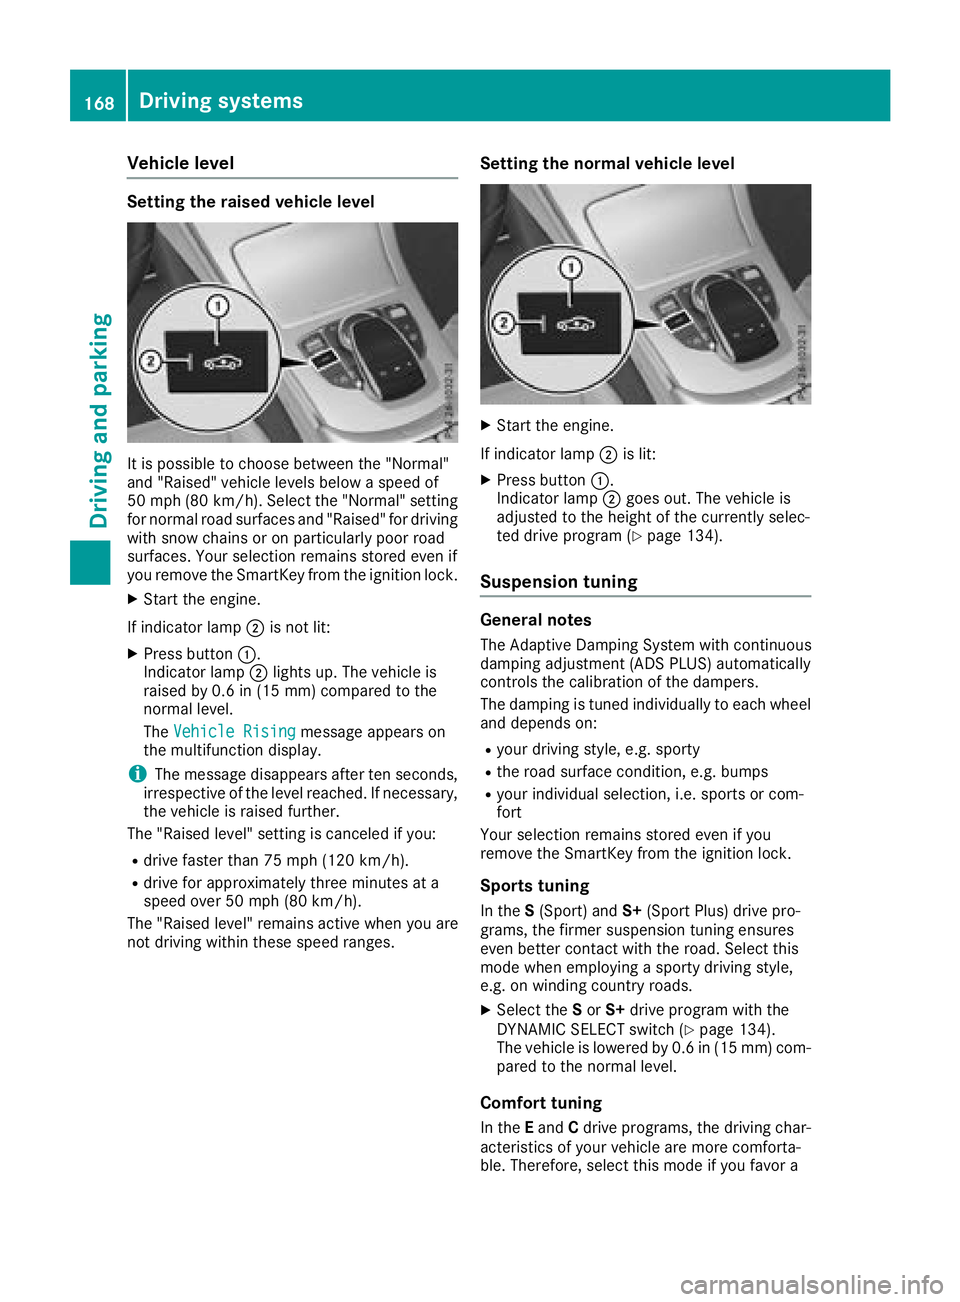
XStart the engine.
If indicator lamp ;is not lit:
XPress button :.
Indicator lamp ;lights up. The vehicle is
raised by 0.6 in (15 mm) compared to the
normal level.
The Vehicle Rising
message appears on
the multifunction display.
iThe message disappears after ten seconds,
irrespective of the level reached. If necessary,
the vehicle is raised further.
The "Raised level" setting is canceled if you:
Rdrive faster than 75 mph (120 km/h).
Rdrive for approximately three minutes at a
speed over 50 mph (80 km/h).
The "Raised level" remains active when you are
not driving within these speed ranges.
Setting the normal vehicle level
XStart the engine.
If indicator lamp ;is lit:
XPress button :.
Indicator lamp ;goes out. The vehicle is
adjusted to the height of the currently selec-
ted drive program (
Ypage 134).
Suspension tuning
General notes
The Adaptive Damping System with continuous
damping adjustment (ADS PLUS) automatically
controls the calibration of the dampers.
The damping is tuned individually to each wheel
and depends on:
Ryour driving style, e.g. sporty
Rthe road surface condition, e.g. bumps
Ryour individual selection, i.e. sports or com-
fort
Your selection remains stored even if you
remove the SmartKey from the ignition lock.
Sports tuning
In the S(Sport) and S+(Sport Plus) drive pro-
grams, the firmer suspension tuning ensures
even better contact with the road. Select this
mode when employing a sporty driving style,
e.g. on winding country roads.
XSelect the Sor S+ drive program with the
DYNAMIC SELECT switch (Ypage 134).
The vehicle is lowered by 0.6 in (15 mm) com- pared to the normal level.
Comfort tuning
In the Eand Cdrive programs, the driving char-
acteristics of your vehicle are more comforta-
ble. Therefore, select this mode if you favor a
168Driving systems
Driving an d parking
Page 184 of 354
On vehicles with height-adjustable chassis,
depending on technical conditions, leaving the
standard height can result in:
Rinaccuracies in the guide lines
Rinaccuracies in the display of generated
images (top view)
Activation conditions
The image from the 360° camera appears if:
Rthe multimedia system is switched on
Rthe360° Camerafunction is switched on
If you are driving faster than at a moderate
speed and you turn on the 360° camera, a warn-
ing message appears.
The warning message disappears if:
Ryou are again driving at a moderate speed The 360° camera is then activated
Rthe message is confirmed with the %but-
ton
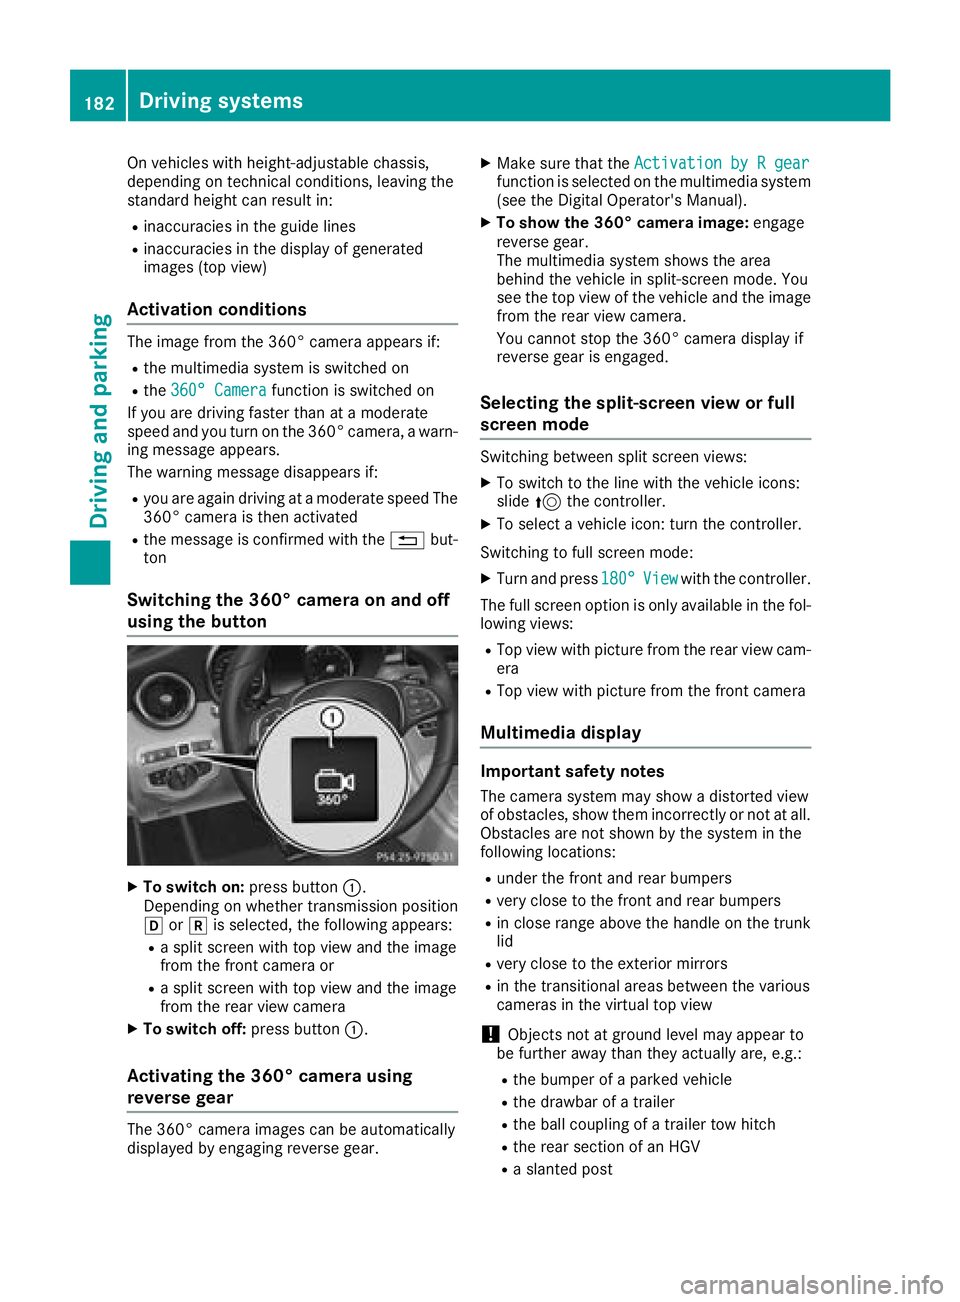
Switching the 360° camera on and off
using the button
XTo switch on: press button:.
Depending on whether transmission position
h ork is selected, the following appears:
Ra split screen with top view and the image
from the front camera or
Ra split screen with top view and the image
from the rear view camera
XTo switch off: press button:.
Activating the 360° camera using
reverse gear
The 360° camera images can be automatically
displayed by engaging reverse gear.
XMake sure that the Activation by R gearfunction is selected on the multimedia system
(see the Digital Operator's Manual).
XTo show the 360° camera image: engage
reverse gear.
The multimedia system shows the area
behind the vehicle in split-screen mode. You
see the top view of the vehicle and the image
from the rear view camera.
You cannot stop the 360° camera display if
reverse gear is engaged.
Selecting the split-screen view or full
screen mode
Switching between split screen views:
XTo switch to the line with the vehicle icons:
slide 5the controller.
XTo select a vehicle icon: turn the controller.
Switching to full screen mode:
XTurn and press 180°Viewwith the controller.
The full screen option is only available in the fol-
lowing views:
RTop view with picture from the rear view cam-
era
RTop view with picture from the front camera
Multimedia display
Important safety notes
The camera system may show a distorted view
of obstacles, show them incorrectly or not at all.
Obstacles are not shown by the system in the
following locations:
Runder the front and rear bumpers
Rvery close to the front and rear bumpers
Rin close range above the handle on the trunk
lid
Rvery close to the exterior mirrors
Rin the transitional areas between the various
cameras in the virtual top view
!Objects not at ground level may appear to
be further away than they actually are, e.g.:
Rthe bumper of a parked vehicle
Rthe drawbar of a trailer
Rthe ball coupling of a trailer tow hitch
Rthe rear section of an HGV
Ra slanted post
182Driving systems
Driving and parking
Page 212 of 354
Head-up display submenu
Selecting other displays
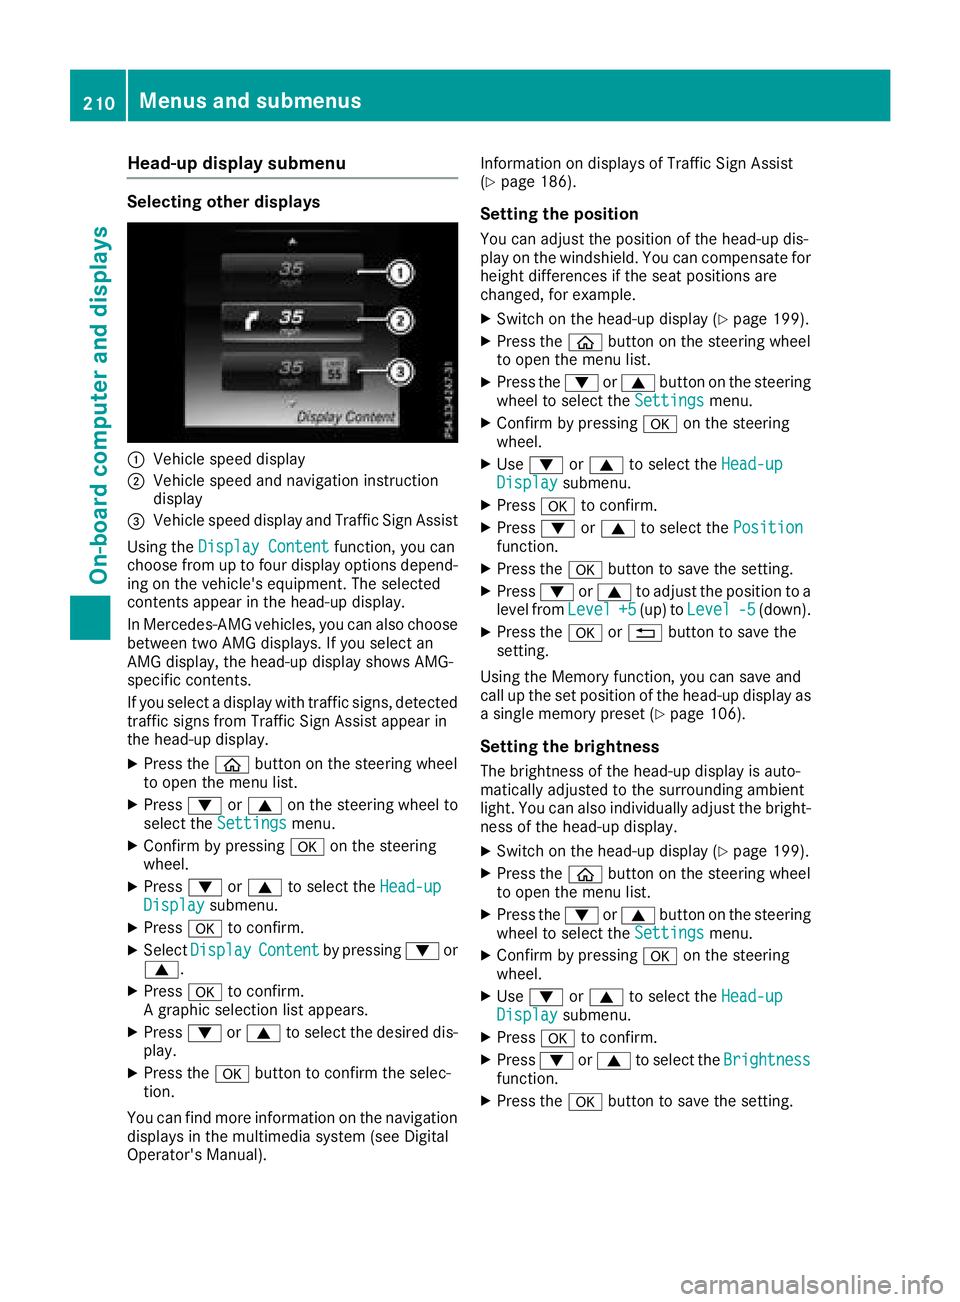
:Vehicle speed display
;Vehicle speed and navigation instruction
display
=Vehicle speed display and Traffic Sign Assist
Using the Display Content
function, you can
choose from up to four display options depend-
ing on the vehicle's equipment. The selected
contents appear in the head-up display.
In Mercedes-AMG vehicles, you can also choose
between two AMG displays. If you select an
AMG display, the head-up display shows AMG-
specific contents.
If you select a display with traffic signs, detected
traffic signs from Traffic Sign Assist appear in
the head-up display.
XPress the òbutton on the steering wheel
to open the menu list.
XPress :or9 on the steering wheel to
select the Settingsmenu.
XConfirm by pressing aon the steering
wheel.
XPress :or9 to select the Head-upDisplaysubmenu.
XPressato confirm.
XSelect DisplayContentby pressing :or
9.
XPress ato confirm.
A graphic selection list appears.
XPress :or9 to select the desired dis-
play.
XPress the abutton to confirm the selec-
tion.
You can find more information on the navigation
displays in the multimedia system (see Digital
Operator's Manual). Information on displays of Traffic Sign Assist
(
Ypage 186).
Setting the position
You can adjust the position of the head-up dis-
play on the windshield. You can compensate for
height differences if the seat positions are
changed, for example.
XSwitch on the head-up display (Ypage 199).
XPress the òbutton on the steering wheel
to open the menu list.
XPress the :or9 button on the steering
wheel to select the Settingsmenu.
XConfirm by pressing aon the steering
wheel.
XUse : or9 to select the Head-upDisplaysubmenu.
XPressato confirm.
XPress :or9 to select the Positionfunction.
XPress theabutton to save the setting.
XPress :or9 to adjust the position to a
level from Level+5(up) toLevel-5(down).
XPress the aor% button to save the
setting.
Using the Memory function, you can save and
call up the set position of the head-up display as
a single memory preset (
Ypage 106).
Setting the brightness
The brightness of the head-up display is auto-
matically adjusted to the surrounding ambient
light. You can also individually adjust the bright-
ness of the head-up display.
XSwitch on the head-up display (Ypage 199).
XPress the òbutton on the steering wheel
to open the menu list.
XPress the :or9 button on the steering
wheel to select the Settingsmenu.
XConfirm by pressing aon the steering
wheel.
XUse : or9 to select the Head-upDisplaysubmenu.
XPressato confirm.
XPress :or9 to select the Brightnessfunction.
XPress theabutton to save the setting.
210Menus and submenus
On-board computer and displays