ignition MERCEDES-BENZ C-CLASS COUPE 2021 Workshop Manual
[x] Cancel search | Manufacturer: MERCEDES-BENZ, Model Year: 2021, Model line: C-CLASS COUPE, Model: MERCEDES-BENZ C-CLASS COUPE 2021Pages: 549, PDF Size: 9.74 MB
Page 376 of 549
Note
s on care of car parts &
WARNING Risk of entrapment if the
windscreen wipers are swit ched on while
th e windscreen is being cleaned
If th e windscreen wipers are set in motion
while you are cleaning the windscreen or
wiper blades, you can be trapped bythe
wiper arm. #
Alw ays switch off the windscreen wip‐
ers and the ignition before cleaning the
windscreen or wiper blades. &
WARNING Risk of bu rns from theta il‐
pipe and tailpipe trims
The exhaust tailpipe and tailpipe trims can
become very hot. If you come into contact
with these parts of theve hicle, you could
burn yourself. #
Alw ays be particular lycareful around
th eta ilpipe and theta ilpipe trims and
supervise children especially closely in
th is area. #
Allow vehicle parts tocool down before
to uching them. To
avo id damage totheve hicle, obser vethe
no tes on cleaning and care of thefo llowing vehi‐
cle parts:
Wheels and rims
R Use wate r and acid-free alloy wheel cleaners.
R Do not use acidic alloy wheel cleaners to
re mo vebrake dust. This could damage wheel
bolts and brake components.
R Toavo id cor rosion of the brake disks and
brakepads, drive theve hicle for a few
minutes af ter cleaning before parking it. The
brake disks and brakepads warm up and dry
out.
Wi ndo ws
R Clean the windo wsinside and outside with a
damp clo thand with a cleaning agent recom‐
mended for Mercedes-Benz.
R Do not use dry clo ths or abrasive or sol vent-
based cleaning agents toclean the inside of
windo ws. %
Remo veextern al fogging or dirt on the wind‐
screen in front of the multifunction camera.
Otherwise, driving sy stems and driving
saf ety sy stems may be impaired or not avail‐
able (/ page175).
Wi per blades
R Movethe wiper arms into there placement
position (/ page130).
R With th e wiper arms folded out, clean the
wiper blades with a damp clo th.
R Do not clean the wiper blades too of ten.
Ex terior lighting
R Clean the lenses with a wet sponge and mild
cleaning agent, e.g. car sha mpoo.
R Only use cleaning agents or cleaning clo ths
th at are suitable for plast ic lenses.
Sensors R Clean the sensors in the front and rear
bumpers with a soft clo thand car shampoo
(/ page 175).
R When using a high -pressure cleaner,maintain
a minimum dis tance of 30 cm. Maintenance and care
373
Page 385 of 549
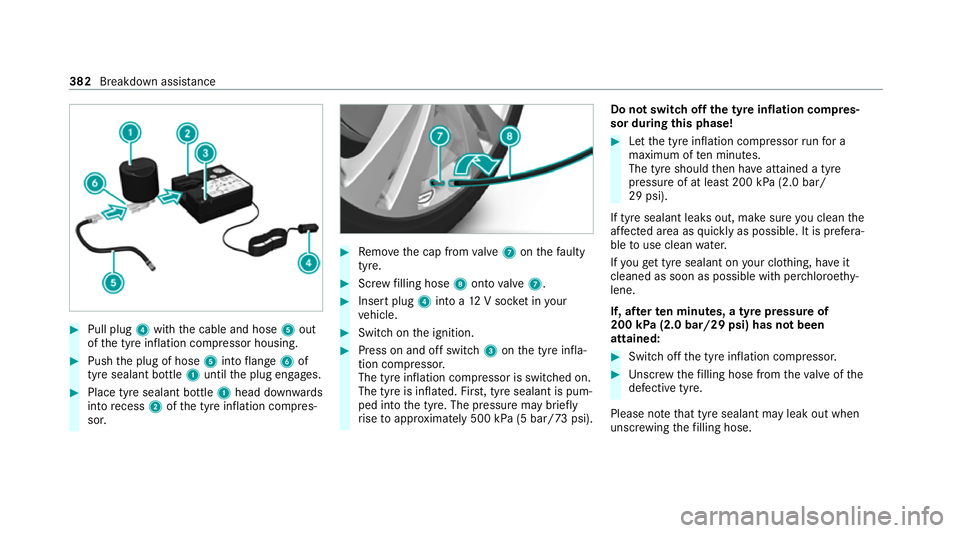
#
Pull plug 4with the cable and hose 5out
of the tyre inflation compressor housing. #
Push the plug of hose 5into flange 6of
tyre sealant bottle 1until the plug engages. #
Place tyre sealant bottle 1head down wards
into recess 2ofthe tyre inflation compres‐
sor. #
Remo vethe cap from valve 7 onthefa ulty
tyre. #
Screw filling hose 8onto valve 7. #
Insert plug 4into a 12V soc ket in your
ve hicle. #
Switch on the ignition. #
Press on and off switch 3onthe tyre infla‐
tion compressor.
The tyre inflation compressor is switched on.
The tyre is inflated. Fir st, tyre sealant is pum‐
ped into the tyre. The pressure may brief ly
ri se toappr oximately 500 kPa (5 bar/73 psi). Do not switch off
the ty reinflation compres‐
sor during this phase! #
Let the tyre inflation compressor runfo r a
maximum of ten minu tes.
The tyre should then ha veattained a tyre
pressure of at least 200 kPa (2.0 bar/
29 psi).
If tyre sealant leaks out, make sure you clean the
af fected area as quickly as possible. It is prefera‐
ble touse clean water.
If yo uge t tyre sealant on your clo thing, ha veit
cleaned as soon as possible with per chloroe thy‐
lene.
If, af terte n minutes, a tyre pressure of
200 kPa (2.0 bar/29 psi) has not been
attained: #
Switch off the tyre inflation compressor. #
Unscr ew thefilling hose from theva lve of the
defective tyre.
Please no tethat tyre sealant may leak out when
unscr ewing thefilling hose. 382
Breakdown assis tance
Page 391 of 549
If
th e indicator/warning lamps in the instrument
clus ter do not light up at low temp eratures, it is
ve ry likely that the dischar ged battery has fro‐
zen. In this case you may neither jump-s tart the
ve hicle nor charge the batter y.
The service life of a battery that has been
th awe d may be dramatically shor tened. The
st arting characteristics may be impaired, espe‐
cially at low temp eratures.
It is recommended that you ha veathaw ed bat‐
te ry checked at a qualified specialist workshop.
All vehicles
* NO
TEDama gecaused bynumerous or
ex tended attem ptsto start the engine Nume
rous or extended attem ptsto start the
engine may damage the catalytic con verter
due tonon-combu sted fuel. #
Avoid numerous and extended attem pts
to start the engine. Obser
vethefo llowing points during starting
assis tance and when charging the battery:
R Only use undamaged jump lead/charging
cables with a suf ficient cross-section and
insula tedte rm inal clamps.
R Non- insulated parts of thete rm inal clamps
must not come into con tact wi thother me tal
parts while the jump lead/charging cable is
connected tothe battery/jump-s tart connec‐
tion point.
R The jump lead/charging cable must not
come into contact wi thany parts which may
mo vewhen the engine is running.
R Alw ays make sure that nei ther you nor the
battery is elect rostatically charge d.
R Keep away from fire and naked flames.
R Do not lean overth e batter y.
Obser vethe additional following points when
ch arging the battery:
R Only use battery charge rs tested and
appr oved for Mercedes-Benz.
R Read the battery charge r's operating instruc‐
tions before charging the batter y. Obser
vethe additional following points during
st arting assis tance:
R Starting assis tance may only be pr ovided
using vehicles, batteries or other jump start
devices with a nominal voltage of 12V.
R The vehicles must not touch.
R Vehicles with a petrol engine: jump-start
th eve hicle only when the engine and exhaust
sy stem are cold. St
arting assi stance and charging the12 V
battery Preparing
starting assi stance/charging #
Secure theve hicle byapplying the electric
parking brake. #
Automatic transmission: shiftthe trans‐
mission toposition j. #
Manual transmission: shiftthe transmis‐
sion toneutral. #
Switch off the ignition and all electrical con‐
sumers. #
Open the bonn et. 388
Breakdown assis tance
Page 396 of 549
&
WARNING Risk of accident due tolimi‐
te d saf ety-re lated functions during the
to wing process
Saf ety-re lated functions are limited or no lon‐
ge rav ailable in thefo llowing situations:
R the ignition is switched off.
R the brake sy stem or po werst eering sys‐
te m is malfunctioning.
R the energy supply or the on-board electri‐
cal sy stem is malfunctioning.
When your vehicle is then towe daw ay, signif‐
icantly more ef fort may be requ ired tosteer
and brake than is no rmally requ ired. #
Use a tow bar. #
Make sure that thesteering wheel can
mo vefreely before towing theve hicle
aw ay. *
NO
TEDama gedue toexcessive tracti ve
po wer If
yo u pull away sharpl y,the tractive po wer
may be too high and theve hicles could be
damaged. #
Pull away slowly and smoo thly. Loading the
vehicle for transport #
Obser vethe no tes on towing away
( / page 391). #
Connect theto w bar totheto wing eye in
order toload theve hicle.
% You can also attach theto w bar tothe trailer
hitch. #
Vehicles with automatic transmission:
shift the automatic transmission toposition
i.
% Ve
hicles with automatic transmission:
th e automatic transmission may be loc ked in
position jintheeve nt of dama getothe
electrical sy stem. Toshift toi , pr ovide the on-board electrical sy
stem with po wer
( / page 388). #
Load theve hicle onto the transpor ter. #
Vehicles with automatic transmission:
shift the automatic transmission toposition
j. #
Use the electric parking brake tosecure the
ve hicle against rolling away. #
Only secure theve hicle bythe wheels.
Ve hicles with ADS PLUS (Adaptive Damping
Sy stem PLUS) &
WARNING Risk of an accident when
transporting vehicles with Adaptive
Damping Sy stem PLUS
When transporting vehicles with Adaptive
Damping Sy stem PLUS, theve hicle/trailer
combination may begin torock andstart to
skid. #
When transporting, ensure that:
R theve hicle has been loaded onto
th e transpor ter cor rectly Breakdown assis
tance 393
Page 399 of 549
amperage,
the electric line could be overloa‐
ded.
This could result in a fire. #
Alw aysre place faulty fuses with speci‐
fi ed new fuses conta iningthe cor rect
amperage. *
NO
TEDama gedue toincor rect fuses Electrical components or sy
stems may be
damaged byincor rect fuses, or their func‐
tionality may be significant lyimpaired. #
Only use fuses that ha vebeen appr oved
by Mercedes-Benz and which ha vethe
cor rect fuse rating. Blown fuses mu
stbe replaced with fuses of the
same rating, which you can recognise bythe col‐
our and the label. The fuse ratings and fu rther
information tobe obser ved can be found in the
fuse assignment diagram.
Fu se assignment diag ram: onthe fuse box in
th e boot (/ page 398). *
NO
TEDama geor malfunctions caused
by moisture Moisture may cause dama
getothe electrical
sy stem or cause it tomalfunction. #
When the fuse box is open, make sure
th at no moisture can enter the fuse
box. #
When closing the fuse box, make sure
th at the seal of the lid is positioned cor‐
re ctly on the fuse box. If
th e newly inser ted fuse also blo ws, ha vethe
cause traced and rectified at a qualified special‐
ist workshop.
Ensure thefo llowing before replacing a fuse:
R The vehicle is secured against rolling away.
R All electrical consumers are switched off.
R The ignition is switched off.
The electrical fuses are located in various fuse
bo xes:
R Fuse box in the engine compartment on the
driver's side (/ page 396) R
Fuse box on the driver's side of the cockpit
(/ page 397)
R Fuse box in the front passenger foot we ll
(/ page 398)
R Fuse box in the boot on theright-hand side
of theve hicle, when vie wed in the direction
of tr avel (/ page 398) Opening and closing
the fuse box in the
engine compa rtment Requ
irements:
R A dry clo thand a sc rewdriver are available.
Obse rveth e no tes on electrical fuses
(/ page 395).
Opening &
WARNING Risk of inju ryfrom using the
windscreen wipers while the engine bon‐
net is open
When the engine bonn etis open, and the
windscreen wipers are set in motion, you can
be trapped bythe wiper linkage. 396
Breakdown assis tance
Page 400 of 549
#
Alw ays switch off the windscreen wip‐
ers and ignition before opening the
engine bonn et. #
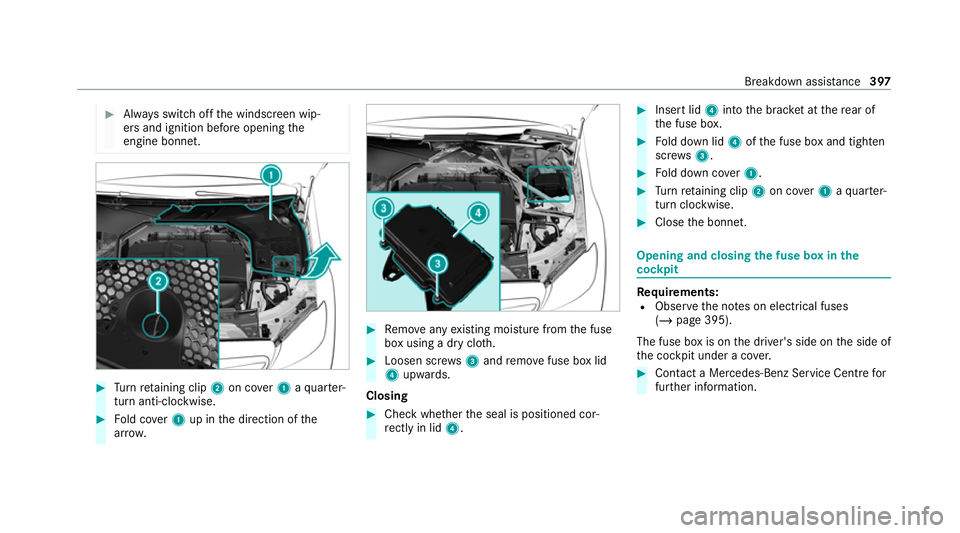
Turn retai ning clip 2on co ver1 aqu arter-
turn anti-clo ckwise. #
Fold co ver1 up in the direction of the
ar row. #
Remo veany existing moisture from the fuse
box using a dry clo th. #
Loosen scr ews3 and remo vefuse box lid
4 upwards.
Closing #
Che ckwhe ther the seal is positioned cor‐
re ctly in lid 4. #
Insert lid 4into the brac ket at there ar of
th e fuse box. #
Fold down lid 4ofthe fuse box and tighten
scr ews3. #
Fold down co ver1. #
Turn retai ning clip 2on co ver1 aqu arter-
turn clo ckwise. #
Close the bonn et. Opening and closing
the fuse box in the
cockpit Re
quirements:
R Obser vethe no tes on electrical fuses
(/ page 395).
The fuse box is on the driver's side on the side of
th e cockpit under a co ver. #
Con tact a Mercedes-Benz Service Centre for
fur ther information. Breakdown assis
tance 397
Page 405 of 549
If
th e preceding tyre sizes are complemented by
th e+ symbol, the tyre pressure information
fo llowing sho wsalternative tyre pressures. Fuel
consum ption may then increase slightl y.
The load conditions "partially laden" and "fully
laden" are defined in theta ble for dif fere nt num‐
be rs of passengers and amounts of luggage. The
actual number of seats may dif fer from this. Ty
re pressure moni toring sy stem Fu
nction of the ty repressure moni toring sys‐
tem
The sy stem checks the tyre pressure and the
tyre temp erature of the tyres fitted totheve hicle
by means of a tyre pressu resensor.
The tyre pressure and the tyre temp erature
appear in the on-board computer (/ page 402).
If th ere is a subs tantial pressure loss or if the
tyre temp erature is excessive, you will be
wa rned with display messages (/ page477) or
th eh warning lamp in the instrument clus ter
( / page 500). The tyre pressure monitoring sy
stem is only an
aid. It is the driver's responsibility toset the tyre
pressure tothere commended cold tyre pressure
suitable forth e operating situation.
In most cases, the tyre pressure monitoring sys‐
te m will auto matically update the new refere nce
va lues af teryo u ha vechanged the tyre pressure.
Yo u can, ho wever,also update there fere nce val‐
ues byrestarting the tyre pressure monitoring
sy stem manually (/ page 403).
Sy stem limits
The sy stem may be impaired or may not function
particularly in thefo llowing situations:
R the tyre pressure has been set incor rectly
R sudden pressure loss caused byafo re ign
object penetrating the tyre, forex ample
R there is a malfunction caused byano ther
ra dio signal source
Checking the ty repressure with the tyre
pressure moni toring sy stem
Requ irements:
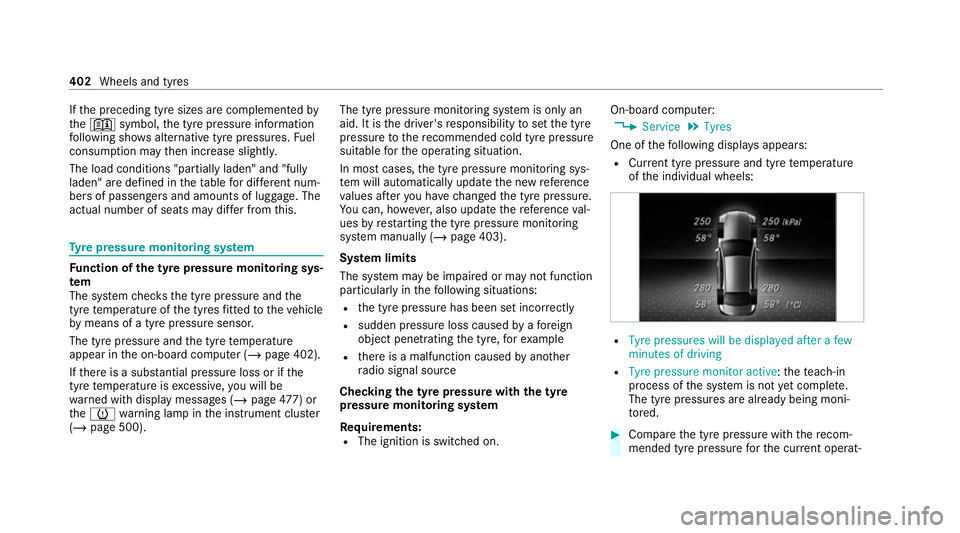
R The ignition is switched on. On-board computer:
4 Service 5
Tyres
One of thefo llowing displa ysappears:
R Cur rent tyre pressure and tyre temp erature
of the individual wheels: R
Tyre pressures will be displayed after a few
minutes of driving
R Tyre pressure monitor active: thete ach-in
process of the sy stem is not yet compl ete.
The tyre pressures are already being moni‐
to re d. #
Compare the tyre pressure with there com‐
mended tyre pressure forth e cur rent operat‐ 402
Wheels and tyres
Page 424 of 549
R
brake fluid
R windsc reen washer fluid
R climate cont rol sy stem refrigerant
Only use products app rove dby Mercedes-Benz.
Damage caused bythe use of products that ha ve
not been appr oved is not co veredby the
Mercedes-Benz warranty or goodwill gestures.
The operating fluids appr ovedby Mercedes-Benz
can be identified bythefo llowing insc ript ions on
th e conta iner:
R MB- Freigabe (e.g. MB-Fr eigabe 229.51 )
R MB-Appr oval (e.g. MB-App rova l 229.51)
Fu rther information on appr oved operating flu‐
ids:
R inthe Mercedes-Benz Specifications for
Operating Fluids byentering the designation
- at https://be vo.mercedes-benz.com
- inthe Mercedes-Benz BeVo App
R at a qualified specialist workshop &
WARNING Risk offire or explosion from
fuel
Fu els are highly flammable. #
Fire, naked flames, smoking and crea‐
tion of spar ksmust be avoided. #
Swit choff the ignition and, if available,
th est ationary heater, before and while
re fuelling theve hicle. &
WARNING Risk of inju ryfrom fuels
Fu els are poisonous and hazardous to your
health. #
Do not swallow fuel or let it come into
contact with skin, eyes or clo thing. #
Do not inhale fuel vapour. #
Keep children away from fuel. #
Keep doors and windo wsclosed du ring
th ere fuelling process.
If yo u or other people come into contact with
fuel, obser vethefo llowing: #
Immediately rinse fuel off your skin with
soap and water. #
If fuel comes into contact with your
ey es, immediately rinse them thor‐
oughly with clean water.Seek medical
attention immediately. #
Ifyo u swallow fuel, seek medical atten‐
tion immediatel y.Do not induce vomit‐
ing. #
Change immediately out of clo thing that
has come into con tact wi thfuel. Flexible-fuel
vehicles can be refuelled with the
fo llowing fuel types:
R unleaded petrol
R E85 fuel
R a mixture of E85 fuel and unleaded petrol
Flexible-fuel vehicles can be identified bythe
Ethanol up toE85 sticke r on the inside of the
fuel filler flap.
Depending on the count ry,th e fuels you can use
in your vehicle may dif fer from the information in
th e Owner's Manual. The fuels that ha vebeen Te
ch nical da ta421
Page 425 of 549
appr
ovedfo ryo ur vehicle can be found on the
instruction label on the inside of the fuel filler
fl ap. Fu
el Information on fuel
grades forve hicles with
petrol engines
Obser vethe no tes on operating fluids
(/ page 420).
* NO
TEDama gecaused bythe wrong fuel Even small amounts of
the wrong fuel could
re sult in damage tothe fuel sy stem, the
engine and the emission control sy stem. #
Only refuel using unleaded, sulphu r-free
petrol that con form sto European
EN 228, or an equi valent specification.
Fu el of this specification may con tain up to
10 %ethanol by volume. Your vehicle is suita‐
ble for use with E10 fuel. Ne
verre fuel with one of thefo llowing fuels:
R diesel
R regular petrol with an octane number
lo we rth an 91 RON
R petrol with more than 10%ethanol byvol‐
ume, e.g. E15, E20, E85, E100
R petrol with more than 3% me thanol by
vo lume, e.g. M15, M30
R petrol with additives con taining me tal
If yo u ha veacciden tally refuelled with the
wrong fuel: #
do not swit ch the ignition on. #
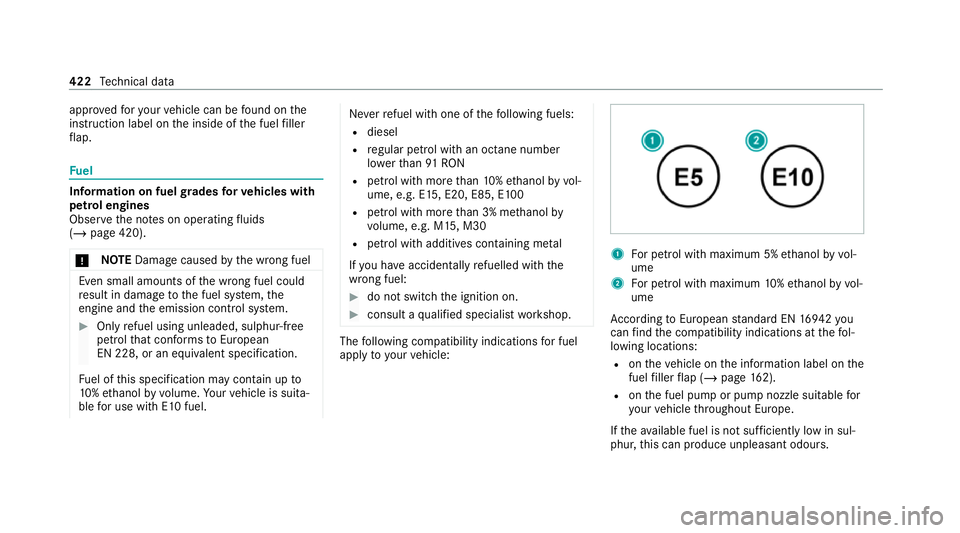
consult a qualified specialist workshop. The
following compatibility indications for fuel
apply to yourvehicle: 1
For petrol with maximum 5% ethanol byvol‐
ume
2 For petrol with maximum 10%ethanol by vol‐
ume
Ac cording toEuropean standard EN 1694 2you
can find the compatibility indications at thefo l‐
lowing locations:
R ontheve hicle on the information label on the
fuel filler flap (/ page162).
R onthe fuel pump or pump nozzle suitable for
yo ur vehicle thro ughout Europe.
If th eav ailable fuel is not suf ficiently low in sul‐
phu r,th is can produce unpleasant odours. 422
Tech nical da ta
Page 427 of 549
R
marine diesel
R heating oil
R pure bio-diesel fuel or vege table oil
R paraf fin or kerosene
If yo u ha veacciden tally refuelled with the
wrong fuel: #
Do not swit ch the ignition on. #
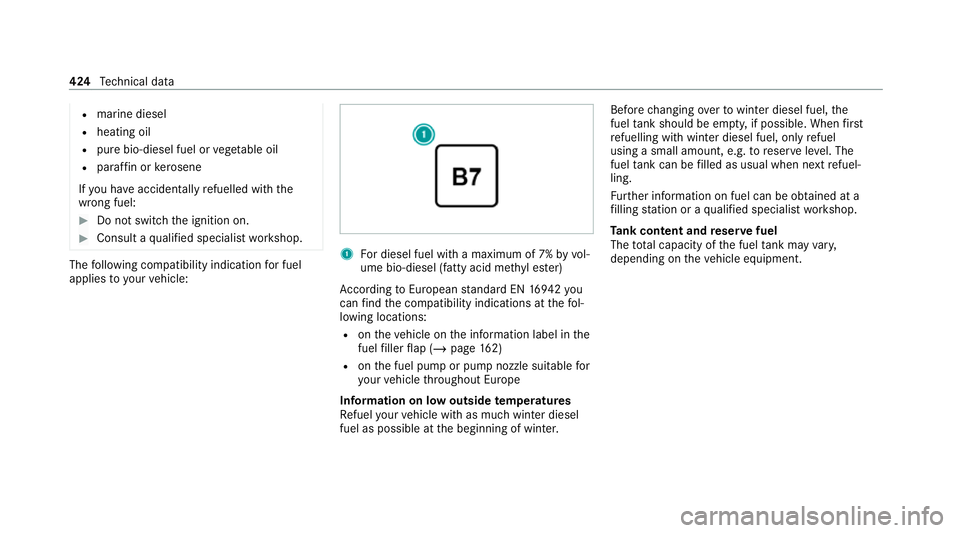
Consult a qualified specialist workshop. The
following compatibility indication for fuel
applies to yourvehicle: 1
For diesel fuel with a maximum of 7% byvol‐
ume bio-diesel (fatty acid me thyl es ter)
Ac cording toEuropean standard EN 1694 2you
can find the compatibility indications at thefo l‐
lowing locations:
R ontheve hicle on the information label in the
fuel filler flap (/ page162)
R onthe fuel pump or pump nozzle suitable for
yo ur vehicle thro ughout Europe
Information on low outside temperatures
Re fuel your vehicle with as much winter diesel
fuel as possible at the beginning of winter. Before
changing overto winter diesel fuel, the
fuel tank should be em pty, if possible. When first
re fuelling with winter diesel fuel, only refuel
using a small amount, e.g. toreser veleve l. The
fuel tank can be filled as usual when next refuel‐
ling.
Fu rther information on fuel can be obtained at a
fi lling station or a qualified specialist workshop.
Ta nk content and reser vefuel
The total capacity of the fuel tank may vary,
depending on theve hicle equipment. 424
Tech nical da ta