headlamp MERCEDES-BENZ C-CLASS ESTATE 2007 User Guide
[x] Cancel search | Manufacturer: MERCEDES-BENZ, Model Year: 2007, Model line: C-CLASS ESTATE, Model: MERCEDES-BENZ C-CLASS ESTATE 2007Pages: 377, PDF Size: 6.19 MB
Page 107 of 377
Light
s 104 could otherwise cause an accident if the
headlamps were to switch off temporarily.
i When the light switch is set to *you
cannot switch on the front or rear fog-
lamps.
X Make sure that the key is in position 2in
the ignition lock .
X To switch on the front foglamps: turn the
light switch to the BorC position .
X Pull the light switch out to the first stop.
The ¥ green indicator lamp next to the
light switch lights up.
X To switch on the rear foglamp: turn the
light switch to the Bposition .
X Pull the light switch out to the second stop.
The † yellow indicator lamp next to th e
light switch lights up.
X To switch off the front foglamps/rear
foglamp: push in the light switch to the
stop .
The corresponding indicator lamp goes out. Combination switch (turn signals,
main-beam headlamps and headlam
p
flasher)
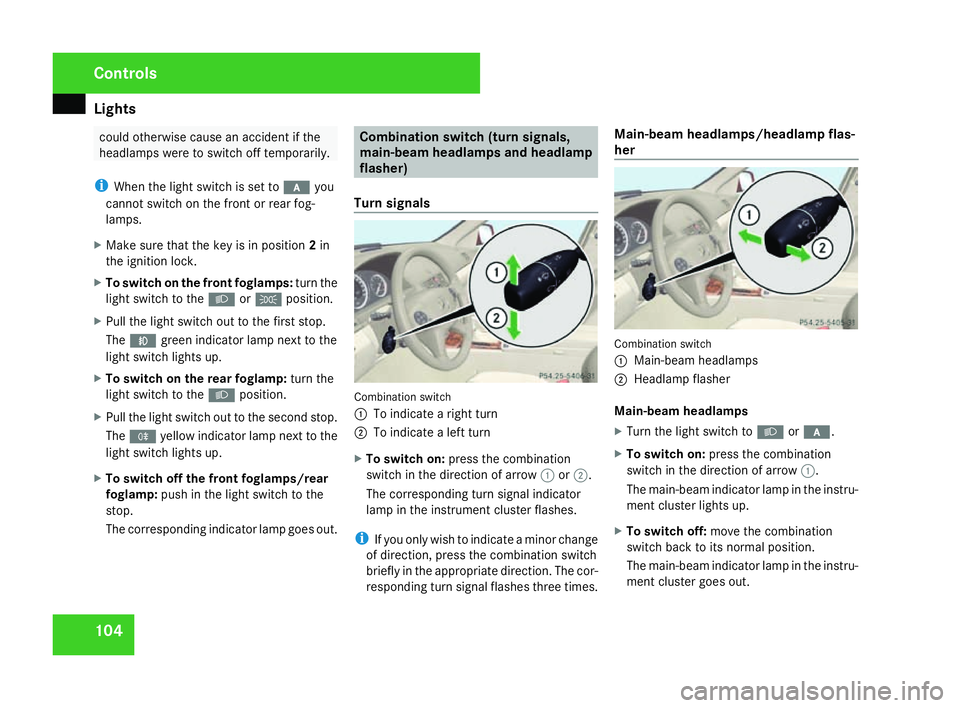
Turn signals Combination switch
1 To indicate a right turn
2 To indicate a left turn
X To switch on :press the combination
switch in the direction of arrow 1or2 .
The corresponding turn signal indicator
lamp in the instrument cluster flashes.
i If you only wish to indicate a minor change
of direction, press the combination switch
briefly in the appropriate direction. The cor-
responding turn signal flashes three times. Main-beam headlamps/headlamp flas-
her
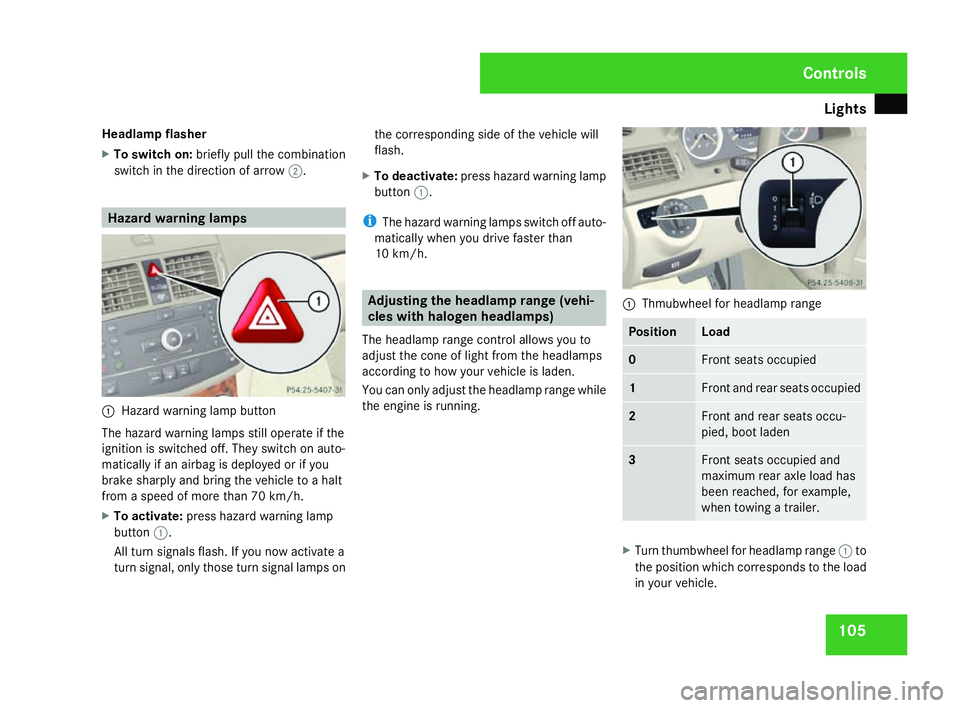
Combination switch
1
Main-beam headlamps
2 Headlamp flasher
Main-beam headlamps
X Turn the light switch to Bor* .
X To switch on: press the combinatio n
switch in the direction of arrow 1.
The main-beam indicator lamp in the instru-
ment cluster lights up.
X To switch off: move the combinatio n
switch back to its normal position.
The main-beam indicator lamp in the instru-
ment cluster goes out. Controls
204_AKB; 2; 3, en-GB
mkalafa,
2007-06-26T23:11:51+02:00 - Seite 104
Page 108 of 377
Light
s 105
Headlamp flasher
X
To switch on: briefly pull the combinatio n
switch in the direction of arrow 2. Hazard warning lamps
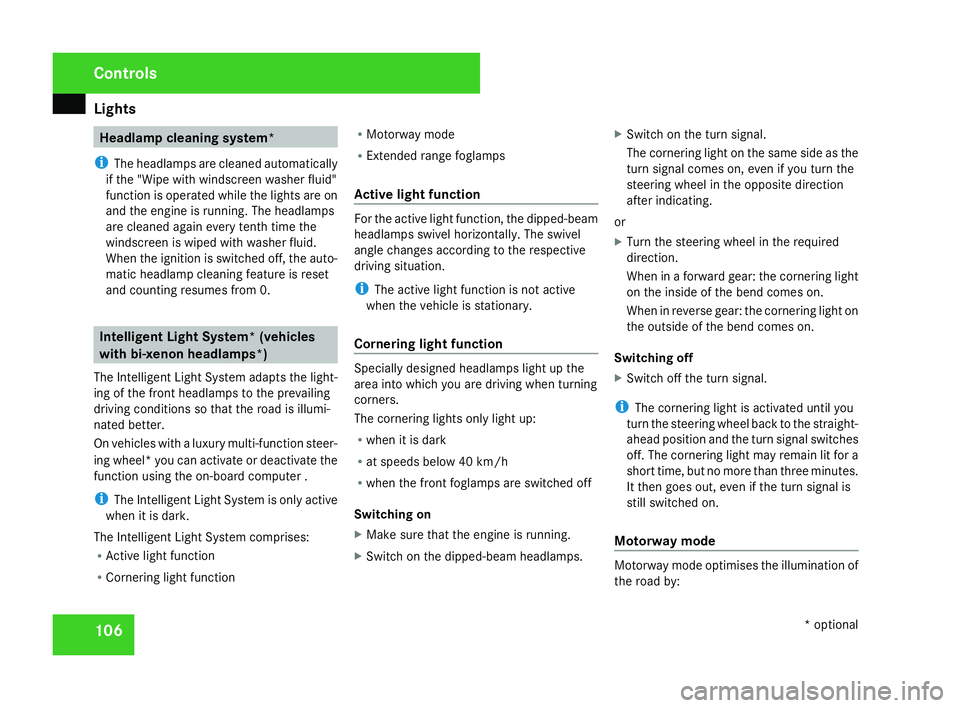
1
Hazard warning lamp button
The hazard warning lamps still operate if the
ignition is switched off. They switch on auto-
matically if an airbag is deployed or if yo u
brake sharply and bring the vehicle to a halt
from a speed of more than 70 km/h.
X To activate :press hazard warning lamp
button 1.
All turn signals flash. If you now activate a
turn signal, only those turn signal lamps on the corresponding side of the vehicle will
flash.
X To deactivate :press hazard warning lamp
button 1.
i The hazard warning lamps switch off auto-
matically when you drive faster than
10 km/h. Adjusting the headlamp range (vehi-
cles with halogen headlamps)
The headlamp range control allows you to
adjust the cone of light from the headlamps
according to how your vehicle is laden.
You can only adjust the headlamp range while
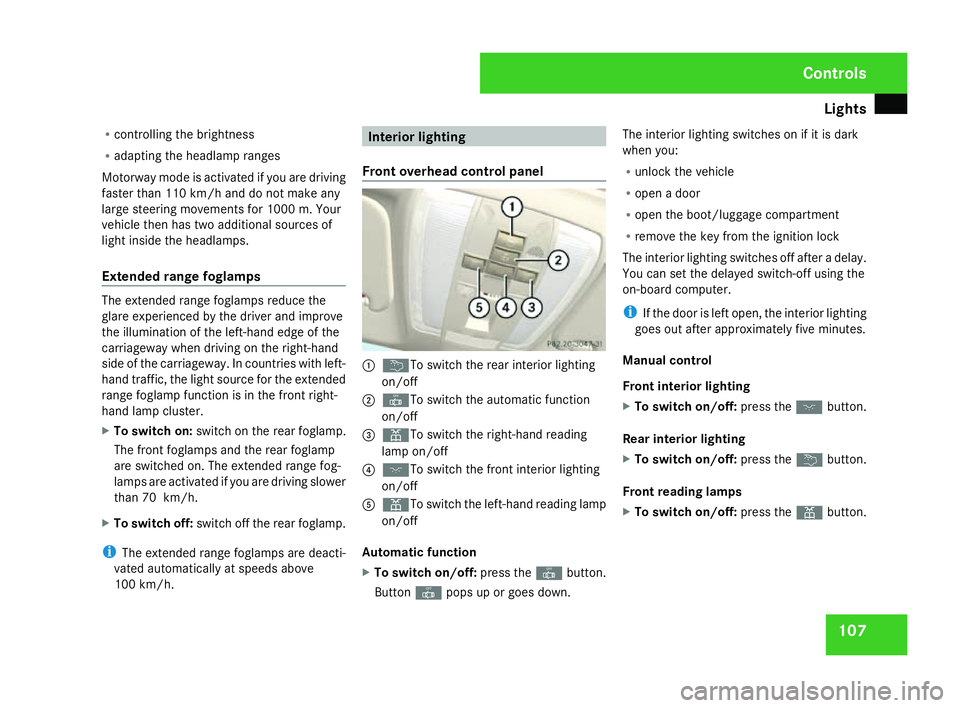
the engine is running. 1
Thmubwheel for headlamp range Position Load
0 Front seats occupied
1 Front and rear seats occupied
2 Front and rear seats occu
-
pied, boot laden 3 Front seats occupied and
maximum rear axle load ha s
been reached, for example,
when towing a trailer. X
Turn thumbwheel for headlamp range 1to
the position which corresponds to the load
in your vehicle. Controls
204_AKB; 2; 3, en-G
B
mkalafa , 2007-06-26T23:11:51+02:00 - Seite 105
Page 109 of 377
Light
s 106 Headlamp cleaning system*
i The headlamps are cleaned automatically
if the "Wipe with windscreen washer fluid"
function is operated while the lights are on
and the engine is running. The headlamps
are cleaned again every tenth time the
windscreen is wiped with washer fluid.
When the ignition is switched off, the auto-
matic headlamp cleaning feature is reset
and counting resumes from 0. Intelligent Light System* (vehicles
with bi-xenon headlamps*)
The Intelligent Light System adapts the light-
ing of the front headlamps to the prevailing
driving conditions so that the road is illumi-
nated better .
On vehicles with a luxury multi-function steer-
ing wheel* you can activate or deactivate the
function using the on-board computer .
i The Intelligent Light System is only active
when it is dark.
The Intelligent Light System comprises:
R Active light functio n
R Cornering light function R
Motorway mode
R Extended range foglamps
Active light function For the active light function, the dipped-beam
headlamps swivel horizontally. The swivel
angle changes according to the respectiv
e
driving situation .
i The active light function is not active
when the vehicle is stationary.
Cornering light function Specially designed headlamps light up the
area into which you are driving when turnin
g
corners.
The cornering lights only light up :
R when it is dark
R at speeds below 40 km/h
R when the front foglamps are switched off
Switching on
X Make sure that the engine is running.
X Switch on the dipped-beam headlamps. X
Switch on the turn signal .
The cornering light on the same side as the
turn signal comes on, even if you turn the
steering wheel in the opposite direction
after indicating.
or
X Turn the steering wheel in the required
direction .
When in a forward gear: the cornering light
on the inside of the bend comes on.
When in reverse gear: the cornering light on
the outside of the bend comes on.
Switching off
X Switch off the turn signal .
i The cornering light is activated until you
turn the steering wheel back to the straight -
ahead position and the turn signal switches
off. The cornering light may remain lit for a
short time, but no more than three minutes.
It then goes out, even if the turn signal is
still switched on.
Motorway mode Motorway mode optimises the illumination of
the road by:Controls
* optional
204_AKB; 2; 3, en-GB
mkalafa,
2007-06-26T23:11:51+02:00 - Seite 106
Page 110 of 377
Light
s 107
R
controlling the brightness
R adapting the headlamp ranges
Motorway mode is activated if you are driving
faster than 110 km/h and do not make any
large steering movements for 1000 m. Your
vehicle then has two additional sources of
light inside the headlamps.
Extended range foglamp sThe extended range foglamps reduce the
glare experienced by the driver and improve
the illumination of the left-hand edge of the
carriageway when driving on the right-hand
side of the carriageway. In countries with left-
hand traffic, the light source for the extended
range foglamp function is in the front right-
hand lamp cluster.
X To switch on: switch on the rear foglamp.
The front foglamps and the rear foglamp
are switched on. The extended range fog -
lamps are activated if you are driving slower
than 70 km/h.
X To switch off: switch off the rear foglamp.
i The extended range foglamps are deacti-
vated automatically at speeds above
100 km/h. Interior lighting
Front overhead control panel 1
¦ To switch the rear interior lighting
on/of f
2 ¥ To switch the automatic function
on/of f
3 X To switch the right-hand reading
lamp on/of f
4 ð To switch the front interior lighting
on/of f
5 X To switch the left-hand reading lamp
on/of f
Automatic function
X To switch on/off: press the¥button.
Button ¥pops up or goes down. The interior lighting switches on if it is dark
when you:
R
unlock the vehicl e
R open a door
R open the boot/luggage compartment
R remove the key from the ignition lock
The interior lighting switches off after a delay.
You can set the delayed switch-off using the
on-board computer .
i If the door is left open, the interior lighting
goes out after approximately five minutes.
Manual control
Front interior lightin g
X To switch on/off: press theðbutton.
Rear interior lighting
X To switch on/off: press the¦button.
Front reading lamps
X To switch on/off: press theXbutton. Controls
204_AKB; 2; 3, en-GB
mkalafa,
2007-06-26T23:11:51+02:00 - Seite 107
Page 146 of 377
On-board computer (vehicles with the luxury multi-function steering wheel*, 12 buttons)
143
R
Motorway mode
R Active light functio n
R Extended range foglamps
X Press %or$ to select the Light
submenu.
X Press #to confirm.
X Press %or$ to select the Intell.
Light System function.
You will see the selected setting: Onor
Off.
X Press #to change the selected setting .
Switching the daytime driving lights on/
off
If you have activated the Daylight driving
lights function and the light switch is in the
M or* position, the parking lamp,
dipped-beam headlamps and licence plate
lighting are switched on automatically when
the engine is running.
In countries where daytime driving lamps are
legally required, Onis the factory setting.
X Press %or$ to select the Light
submenu.
X Press #to confirm. X
Press %or$ to select the Daytime
driving lamps function.
You will see the selected setting: Onor
Off.
X Press #to change the selected setting .
Switching the surround lighting on or off
If you activate the Surround lighting func-
tion and you unlock the vehicle with the key
when it is dark, the following will light up:
R The side lamps
R The tail lamps
R The licence plate lighting
R The front foglamps
The surround lighting switches off automati-
cally after 40 seconds or if the driver's door
is opened.
X Press %or$ to select the Light
submenu.
X Press #to confirm.
X Press %or$ to select the Surround
lighting function.
You will see the selected setting: Onor
Off .
X Press #to change the selected setting .Activating or deactivating the interior
lighting delayed switch-off
If you activate the
Interior lighting
delay sw. off function and pull the key out
of the ignition lock, the interior lighting
remains on for around 10 seconds if it is dark .
X Press %or$ to select the Light
submenu.
X Press #to confirm.
X Press %or$ to select the Interior
Lighting Delay function.
You will see the selected setting: Onor
Off .
X Press #to change the selected setting .
Vehicl e In the
Vehicle menu, you can activate/deac-
tivate the automatic locking feature or set the
permanent Speedtronic with Speed limit
(winter tyres) function(Y page 151).
Activating/deactivating automatic door
locking
If you select the Automatic Door Lock func-
tion, the vehicle is centrally locked above a
speed of around 15 km/h. Controls
* optional
204_AKB; 2; 3, en-GB
mkalafa,
2007-06-26T23:11:51+02:00 - Seite 143 Z
Page 213 of 377
Tyres and wheels
21
0
X
Replace cap 1and tighten all the way to
the stop.
You will find further information about coolan t
in the "Technical data" section
( Y page 368). Windscreen washer system/head-
lamp cleaning system
*
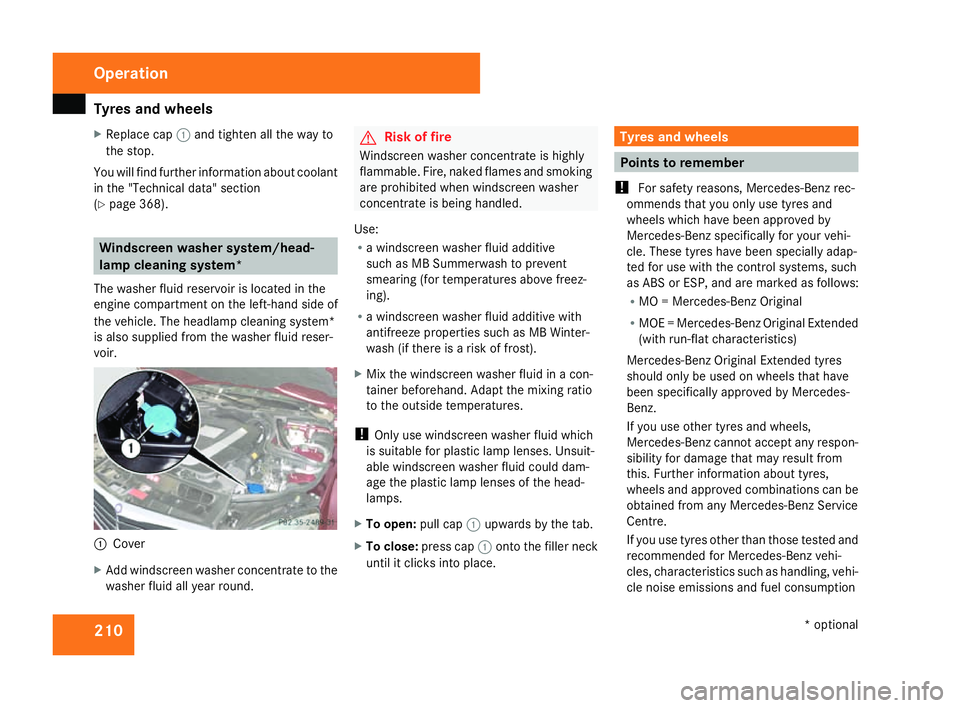
The washer fluid reservoir is located in the
engine compartment on the left-hand side of
the vehicle. The headlamp cleaning system*
is also supplied from the washer fluid reser-
voir. 1
Cove r
X Add windscreen washer concentrate to the
washer fluid all year round. G
Risk of fire
Windscreen washer concentrate is highly
flammable. Fire, naked flames and smoking
are prohibited when windscreen washe r
concentrate is being handled.
Use :
R a windscreen washer fluid additive
such as MB Summerwash to preven t
smearing (for temperatures above freez-
ing).
R a windscreen washer fluid additive wit h
antifreeze properties such as MB Winter-
wash (if there is a risk of frost).
X Mix the windscreen washer fluid in a con-
tainer beforehand. Adapt the mixing ratio
to the outside temperatures.
! Only use windscreen washer fluid which
is suitable for plastic lamp lenses. Unsuit-
able windscreen washer fluid could dam-
age the plastic lamp lenses of the head-
lamps.
X To open: pull cap1upwards by the tab .
X To close: press cap 1onto the filler neck
until it clicks into place. Tyres and wheels
Points to remember
! For safety reasons, Mercedes-Benz rec-
ommends that you only use tyres and
wheels which have been approved by
Mercedes-Benz specifically for your vehi-
cle. These tyres have been specially adap-
ted for use with the control systems, such
as ABS or ESP, and are marked as follows:
R MO = Mercedes-Benz Original
R MOE = Mercedes-Benz Original Extended
(with run-flat characteristics)
Mercedes-Benz Original Extended tyres
should only be used on wheels that have
been specifically approved by Mercedes-
Benz.
If you use other tyres and wheels,
Mercedes-Benz cannot accept any respon-
sibility for damage that may result from
this. Further information about tyres,
wheels and approved combinations can be
obtained from any Mercedes-Benz Service
Centre.
If you use tyres other than those tested and
recommended for Mercedes-Benz vehi-
cles, characteristics such as handling, vehi-
cle noise emissions and fuel consumption Operation
* optional
204_AKB; 2; 3, en-GB
mkalafa
, 2007-06-26T23:11:51+02:00 - Seite 210
Page 223 of 377
Trailer towing*
22
0 Driving abroad
An extensive Mercedes-Benz Service networ k
is also available in other countries. You can
obtain the relevant workshop directories
from any Mercedes-Benz Service Centre.
Only low-octane fuel is available in certain
countries.
You can find further information about fuel
grades on (Y page 204). Symmetrical dipped beam
If your journey takes you to countries where
vehicles are driven on the opposite side of the
road to the country in which the vehicle is
registered, your headlamps must be switched
to symmetrical dipped beam. Oncoming traf -
fic will be dazzled less .
X Have the headlamps switched over at a
qualified specialist workshop, e. g. a
Mercedes-Benz Service Centre. G
Risk of accident
Have your headlamps switched back to
asymmetrical dipped beam if you visit a
country in which traffic drives on the same
side of the road as in the country in which
your vehicle was registered. You may oth- erwise dazzle the oncoming traffic and
could cause an accident.
Trailer towing*
Folding out the ball coupling
Please also observe the notes on the restric-
ted function of Parktronic* when towing a
trailer on (Y page 155).
Before you can tow a trailer with your vehicle,
you must fold out the ball coupling.
The release wheel is located behind the left-
hand side trim panel in the boot/luggage
compartment . G
Risk of accident
Make sure that the ball coupling is
engaged, either in its folded out or folded
in position, and that the indicator lamp is
off.
Do not turn the release wheel when a traile r
is coupled up. The trailer might otherwise
become detached. Operation
* optional
204_AKB; 2; 3, en-GB
mkalafa,
2007-06-26T23:11:51+02:00 - Seite 220
Page 231 of 377
Car
e 228
High-pressure cleaners G
Risk of accident
Do not use high-pressure cleaners with cir-
cular-jet nozzles (dirt grinders) to clean
your vehicle or - especially - the tyres. Yo u
could otherwise damage the tyres and
cause an accident.
! Observe the instructions issued by the
equipment manufacturer concerning the
distance to be maintained between the
nozzle of the high-pressure cleaner and the
vehicle (at least 30 cm).
Move the high-pressure cleaner nozzle
around when cleaning your vehicle .
Do not aim directly at any of the following:
R Tyres
R Door joint
R Electrical components
R Batter y
R Connectors
R Bulbs
R Seals
Damaged seals or electrical components
can lead to failures or leaks .Cleaning the wiper blades and the out
-
side of the windscreen G
Risk of injury
Turn the key to position 0in the ignition
lock before cleaning the windscreen or the
wiper blades. There is otherwise a risk of
the windscreen wipers being set in motion
and causing injury.
! Only fold the windscreen wipers away
from the windscreen when vertical, other-
wise you will damage the bonnet.
X Fold the wiper arms away from the wind-
screen until you feel them engage.
X Clean the windscreen and the wiper blades .
X Fold the windscreen wipers back agai n
before the ignition is switched on.
! Do not clean the wiper blades too often,
as otherwise the coating may come off.
This could cause wiper noise.
Cleaning the windows !
Do not use dry cloths, abrasive products,
solvents or cleaning agents containing sol-
vents to clean the inside of the windows. Clean the insides of the windows with
a
damp cloth or commercially-available glass
cleaner. Avoid touching the inside of the
rear windscreen and the side windows with
hard objects, e.g. ice scrapers or rings. You
could otherwise cause damage to the win-
dows, rear window heating or aerial on the
rear window.
i Anti-glare film retrofitted to the insides of
the windows could interfere with radio or
mobile phone reception, especially if it is
conductive or metal-coated film. Informa -
tion about anti-glare film can be obtained
from any Mercedes-Benz Service Centre.
Cleaning the headlamps X
Clean the headlamp lenses with a wet
sponge.
! Only use washer fluid which is suitable
for plastic lenses. Unsuitable washer fluid
could damage the plastic lenses of th e
headlamps.
Therefore, do not use the following:
R Dry cloths
R Abrasive cleaning agents Operatio
n
204_AKB; 2; 3, en-GB
mkalafa,
2007-06-26T23:11:51+02:00 - Seite 228
Page 256 of 377
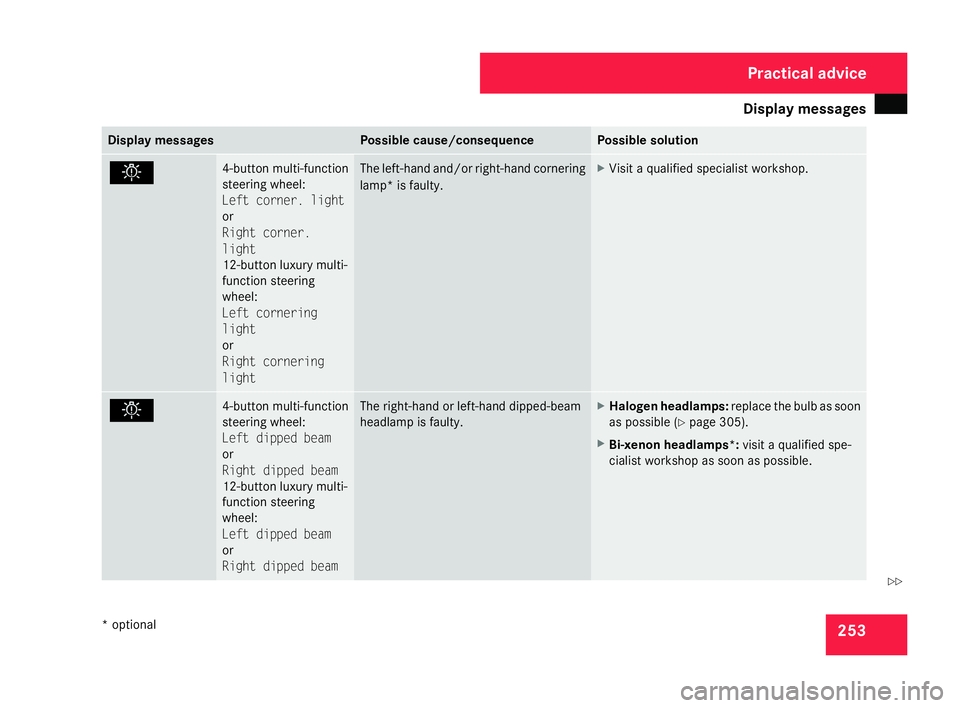
Display
messages 25
3 Display messages Possible cause/consequence Possible solution
. 4-button multi-function
steering wheel:
Left corner. light
or
Right corner
.
light
12-button luxury multi-
function steering
wheel:
Left cornering
light
or
Right cornering
light The left-hand and/or right-hand cornering
lamp* is faulty. X
Visit a qualified specialist workshop. . 4-button multi-function
steering wheel:
Left dipped beam
or
Right dipped beam
12-button luxury multi-
function steering
wheel:
Left dipped beam
or
Right dipped beam The right-hand or left-hand dipped-bea
m
headlamp is faulty. X
Halogen headlamps: replace the bulb as soon
as possible (Y page 305).
X Bi-xenon headlamps*: visit a qualified spe-
cialist workshop as soon as possible . Practical advice
* optional
204_AKB; 2; 3, en-GB
mkalafa,
2007-06-26T23:11:51+02:00 - Seite 253 Z
Page 264 of 377
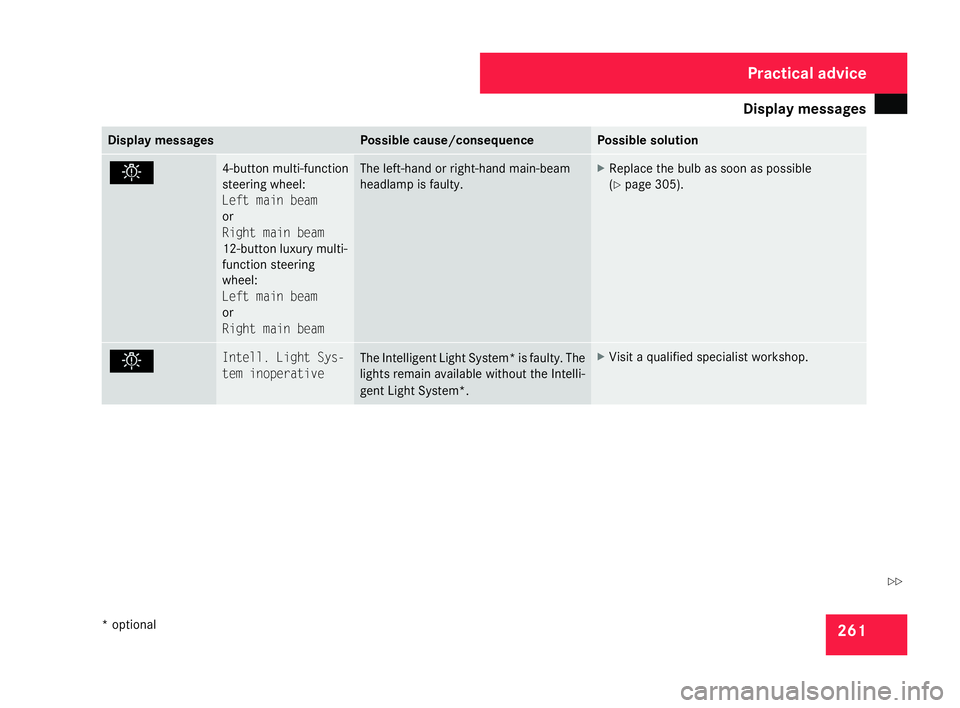
Display
messages 26
1 Display messages Possible cause/consequence Possible solution
. 4-button multi-function
steering wheel:
Left main beam
or
Right main beam
12-button luxury multi-
function steering
wheel:
Left main beam
or
Right main beam The left-hand or right-hand main-beam
headlamp is faulty. X
Replace the bulb as soon as possibl e
( Y page 305). . Intell. Light Sys-
tem inoperative
The Intelligent Light System* is faulty. The
lights remain available without the Intelli-
gent Light System*. X
Visit a qualified specialist workshop. Practical advice
* optional
204_AKB; 2; 3, en-GB
mkalafa,
2007-06-26T23:11:51+02:00 - Seite 261 Z