oil MERCEDES-BENZ C-CLASS ESTATE 2007 Owners Manual
[x] Cancel search | Manufacturer: MERCEDES-BENZ, Model Year: 2007, Model line: C-CLASS ESTATE, Model: MERCEDES-BENZ C-CLASS ESTATE 2007Pages: 377, PDF Size: 6.19 MB
Page 10 of 377
7
Hill start assist . . . . . . . . . . . . . . .
.151
Parktroni c.. . . . . . . . . . . . . . . . . .153
Speedtronic . . . . . . . . . . . . . . . . . .148
Driving tip
Braking . . . . . . . . . . . . . . . . . . . . . .217
Driving abroad . . . . . . . . . . . . . . . .220
Driving on wet road s.. . . . . . . . ..219
Fording . . . . . . . . . . . . . . . . . . . . . .219
Trailer towing . . . . . . . . . . . . . . . . .222
Winter . . . . . . . . . . . . . . . . . . . . . .217
DVD Audio/Vide o
Operation (on-board computer,
luxury multi-function steering
wheel) . . . . . . . . . . . . . . . . . . . . . .137 E
Easy-entry/exit On-board computer (luxury multi-
function steering wheel) . . . . . . . .144
Easy-entry feature . . . . . . . . . . . . . . ..93
Easy-exit feature . . . . . . . . . . . . . . . . .93
Easy-Pack fix kit . . . . . . . . . . . . . . . .191
EASY-PACK tailgate . . . . . . . . . . . . . ..82
EBV . . . . . . . . . . . . . . . . . . . . . . . . . . . .70
Display message (luxury multi -
function steering wheel) . . . . . . . .251
Display message (multi-function
steering wheel) . . . . . . . . . . . . . . .239 Electrical/electronic equipmen
t
Retrofitting . . . . . . . . . . . . . . . . . . .337
Electronic brake-power distribution
see EBV
Electronic Stability Program
see ESP
Electronic Traction Support
see ETS
e mark . . . . . . . . . . . . . . . . . . . . . . . . .337
Emergency engine starting . . . . . ..331
Emergency key element Lost . . . . . . . . . . . . . . . . . . . . . . . .296
Emergency locking
Vehicle . . . . . . . . . . . . . . . . . . . . . .301
Emergency release
Fuel filler fla p.. . . . . . . . . . . . . . . .302
Emergency running mode
Automatic transmission . . . . . . . . .292
Emergency unlocking
Boot . . . . . . . . . . . . . . . . . . . . . . . .301
Tailgate . . . . . . . . . . . . . . . . . . . . .302
Vehicle . . . . . . . . . . . . . . . . . . . . . .300
Engine
Running irregularl y.. . . . . . . . . . . .291
Starting problems . . . . . . . . . . . . .290
Starting with KEYLESS GO . . . . . . .114
Starting with the key . . . . . . . . . . .113
Technical data . . . . . . . . . . . . . . . .341
Engine diagnostic warning lamp . ..2 82 Engine electronics
. . . . . . . . . . . . . ..337
Malfunction . . . . . . . . . . . . . . . . . .290
Engine number . . . . . . . . . . . . . . . . . .340
Engine oil . . . . . . . . . . . . . . . . . . . . . .367
Checking the oil level (dipstick) . . .208
Consumption . . . . . . . . . . . . . . . . .208
Display message . . . . . . . . . . . . . .267
Filler neck . . . . . . . . . . . . . . . . . . .209
Topping up . . . . . . . . . . . . . . . . . . .209
ESP . . . . . . . . . . . . . . . . . . . . . . . . . . . .68
Activating/deactivating . . . . . . . . . .69
Display message . . . . . . . . . . . . . .240
Display message (luxury multi-
function steering wheel) . . . . . . . .248
Display message (multi-function
steering wheel) . . . . . . . . . . . . . . .238
Trailer stabilising . . . . . . . . . . . . . . .69
Warning lamp . . . . . . . . . . . . . .68, 279
ETS . . . . . . . . . . . . . . . . . . . . . . . . . . . .69
Exterior mirror parking position Storin g.. . . . . . . . . . . . . . . . . . .95, 97
Exterior mirrors
Adjusting . . . . . . . . . . . . . . . . . . . . .94
Anti-dazzle mode (automatic) . . . . .95
Folding in/out (automatically ).. . . .95
Folding in/out (electrically) . . . . . . .94
Folding in (on-board computer,
luxury multi-function steering
wheel ).. . . . . . . . . . . . . . . . . . . . .144
Malfunction . . . . . . . . . . . . . . . . . .295 Index
204_AKB; 2; 3, en-GB
mkalafa,
2007-06-26T23:11:51+02:00 - Seite
7
Page 26 of 377
Exterior view
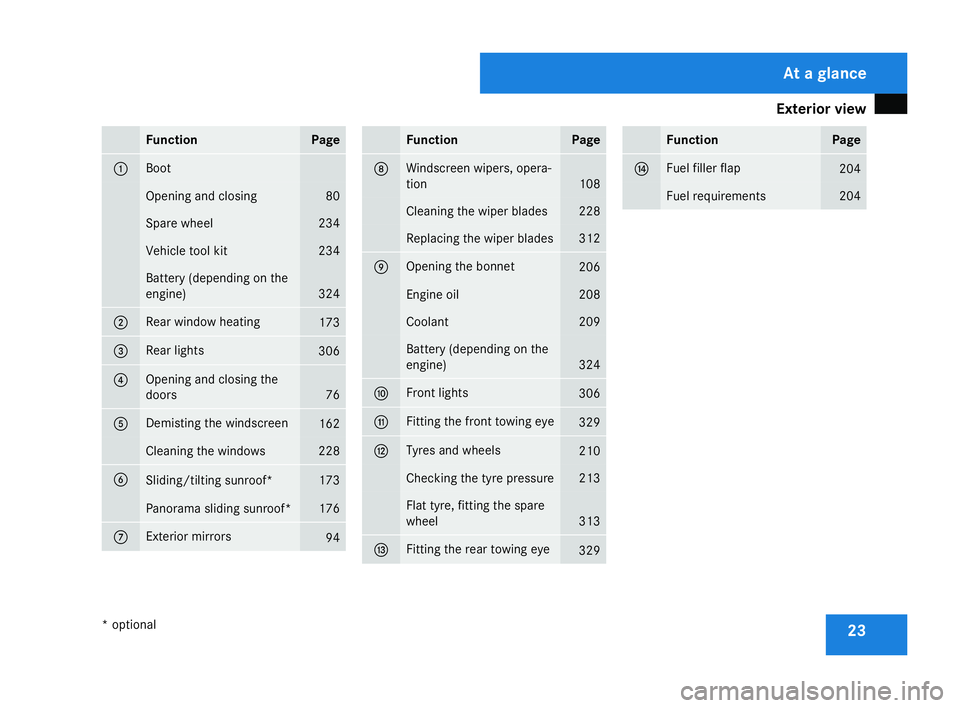
23Function Pag
e 1 Boot
Opening and closing 80
Spare wheel 234
Vehicle tool kit 234
Battery (depending on the
engine)
324
Rear window heating
173
Rear lights
306
4 Opening and closing the
doors 76
5 Demisting the windscreen
162
Cleaning the windows 228
6
Sliding/tilting sunroof* 173
Panorama sliding sunroof* 176
7 Exterior mirrors
94 Functio
n Page
8 Windscreen wipers, opera-
tion
108
Cleaning the wiper blades 228
Replacing the wiper blades 312
9 Opening the bonnet
206
Engine oil 208
Coolant 209
Battery (depending on the
engine)
324
a Front lights
306
b Fitting the front towing ey
e 329
c Tyres and wheels
210
Checking the tyre pressure 213
Flat tyre, fitting the spare
wheel
313
d Fitting the rear towing ey
e 329 Function Page
e Fuel filler fla
p 204
Fuel requirements 204At a glance
* optional
204_AKB; 2; 3, en-GB
mkalafa,
2007-06-26T23:11:51+02:00 - Seite 232
3
Page 208 of 377
Refuelling
20
5
X
Open the fuel filler flap.
X Turn the fuel filler cap to the left and
remove it.
X Insert the fuel filler cap into the holder
bracket on the inside of filler flap 2.
X Only fill the tank until the pump nozzle
switches off.
! Overfilling the tank could damage the fuel
system.
X Replace the fuel filler cap and turn it to th e
right. You will hear the fuel filler cap lock.
X Close the fuel filler flap.
i Vehicles with a diesel engine:
If you have run the tank completely dry, it
will be necessary to bleed the fuel system
( Y page 289). Petrol (EN 228)
! Refuel using only unleaded premium
grade petrol with a minimum octane num-
ber of 95 RON/85 MON conforming to
European standard EN 228 .
You could otherwise impair engine output
or damage the engine.
You will find further information about pet-
rol under "Technical data" in the index .
i As a temporary measure, only when the
recommended fuel is not available, yo u
may also use regular unleaded petrol,
91 RON/82.5 MON. This may reduce per-
formance and increase petrol consump-
tion. Avoid driving at full throttle.
In some countries, the available petrol qual-
ity may not be sufficient and could caus e
coking around the inlet valve. In thes e
cases, and in consultation with a
Mercedes-Benz Service Centre, the petrol
may be mixed with the additive recommen-
ded by Mercedes-Benz (part no.
A000989254510). You must observe the
notes and mixing ratios given on the con -
tainer. Diesel (EN 590)
! Only use diesel that complies with the
EN 590 European standard.
You could otherwise impair engine outpu t
or damage the engine.
You will find further information about die-
sel under "Technical data" in the index.
! When refuelling vehicles with a diesel par-
ticle filter in countries outside the EU, only
low-sulphur Euro diesel with less than
0.005 percent sulphur content by weight
should be used. In countries in which diesel
with a higher sulphur content is available
(e.g. 0.035 percent by weight), the engine
oil should be renewed at more frequent
intervals. More information about intervals
for changing the engine oil can be obtained
from any Mercedes-Benz Service Centre.
! Using fuel that does not comply with EN
590 can increase wear and damage the
engine and the exhaust system. Do not use
the following:
R Marine diesel
R Heating oil
R Bio-diesel Operation
204_AKB; 2; 3, en-G
B
mkalafa , 2007-06-26T23:11:51+02:00 - Seite 205 Z
Page 209 of 377
Engine compartment
206R
Vegetable oil
R Petrol
R Petroleum
R Kerosene
Do not add such fuels to diesel fuel and do
not use any special additives (exception:
flow improvers – see "Low outside temper-
atures").
Damage caused by the use of unapproved
fuels or additives is not covered by the war-
ranty.
Low outside temperatures The flow properties of diesel may be insuffi-
cient at low ambient temperatures.
To prevent operating problems, diesel fuel
with improved cold flow qualities is available
during the winter months. Your vehicle must
be refuelled with this winter diesel at temper-
atures of -5 °C or below.
You can use this winter diesel at tempera-
tures down to about -20 °C without problems.
If only summer diesel fuel or less cold-resist-
ant winter diesel fuel (e.g. in Mediterranean
regions) is available, you should add an
amount of flow improver to the fuel corre-
sponding to the outside temperature. Mix the additive with the diesel in good time,
before the flow properties of the diesel
become insufficient. Otherwise, malfunctions
can only be rectified by heating the entire fuel
system, e.g. by parking the vehicle in a heated
garage. G
Risk of fire
Do not use petrol to refuel vehicles with a
diesel engine. Never mix diesel with petrol.
This would damage the fuel system and
engine and could result in a vehicle fire.
Flow improver
The effectiveness of a flow improver is not
guaranteed with every fuel. Observe the infor -
mation provided by the manufacturer when
using a flow improver. Only use flow improv-
ers that have been tested and approved by
Mercedes-Benz. Information about flow
improvers that have been tested and
approved by Mercedes-Benz can be obtained
from any Mercedes-Benz Service Centre. Engine compartment
Bonne
t G
Risk of accident
Do not pull the release lever while the vehi-
cle is in motion. The bonnet could other-
wise open.
Opening G
Risk of injury
There is a risk of injury if the bonnet is open,
even if the engine is not running.
Some engine components can become
very hot.
To avoid the risk of burns, only touch thos e
components described in the Owner’s Man-
ual and observe the relevant safety notes. G
Risk of injury
The radiator fan between the radiator and
the engine can start automatically, even if
the key has been removed from the ignition
lock. For this reason you must not reach
into the turning area of the fan. You could
otherwise sustain an injury.
Vehicles with a petrol engine: Operatio
n
204_AKB; 2; 3, en-GB
mkalafa,
2007-06-26T23:11:51+02:00 - Seite 206
Page 210 of 377
Engine compartment
207The electronic ignition system uses high
voltage. For this reason you must never
touch components of the ignition system
(ignition coil, ignition cable, spark plug con-
nector, test socket) when :
R the engine is running
R the engine is being started
R the ignition is switched on and the engine
is being cranked by hand
Vehicles with a diesel engine :
The electronic injection control uses high
voltage. Therefore, never touch fuel injec -
tion system components when:
R the engine is running
R the engine is being started
R the ignition is switched on
X Make sure that the windscreen wipers are
switched off. G
Risk of injury
The windscreen wipers and wiper rod s
could be set in motion.
When the bonnet is open, you or others
could be injured by the wiper rods. Make sure that the windscreen wipers are
switched off and that the key has bee
n
pulled out of the ignition lock before open-
ing the bonnet.
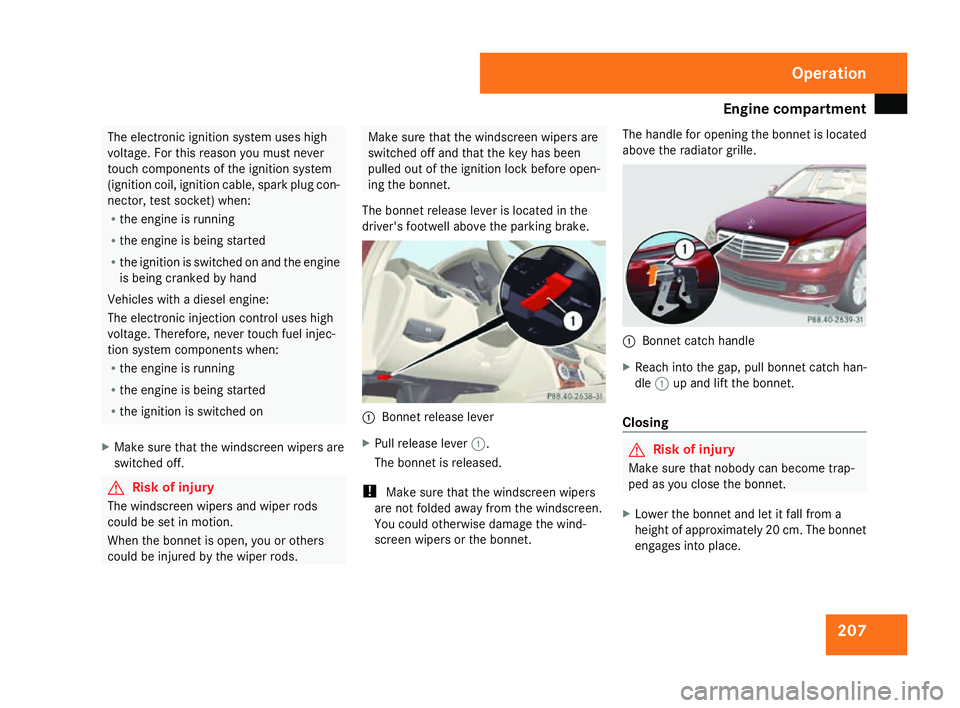
The bonnet release lever is located in the
driver's footwell above the parking brake. 1
Bonnet release lever
X Pull release lever 1.
The bonnet is released.
! Make sure that the windscreen wipers
are not folded away from the windscreen .
You could otherwise damage the wind-
screen wipers or the bonnet. The handle for opening the bonnet is located
above the radiator grille.
1
Bonnet catch handle
X Reach into the gap, pull bonnet catch han -
dle 1up and lift the bonnet.
Closing G
Risk of injury
Make sure that nobody can become trap -
ped as you close the bonnet.
X Lower the bonnet and let it fall from a
height of approximately 20 cm. The bonnet
engages into place. Operation
204_AKB; 2; 3, en-GB
mkalafa,
2007-06-26T23:11:51+02:00 - Seite 207
Page 211 of 377
Engine compartment
208 Engine oil
Depending on how it is driven, the vehicl e
consumes a maximum of 0.8 l oil per 1,000
km. The oil consumption may be higher than
this when the vehicle is new or if you fre-
quently drive at high engine speeds. You can
only estimate the oil consumption after yo u
have driven a considerable distance.
You will find further information about engine
oil in the "Technical data" section
( Y page 336).
Checking the engine oil level Before checking the engine oil level the fol-
lowing conditions for the vehicle should be
met:
R
It should be parked on level ground
R The engine should be switched off for at
least five minutes if the engine was at nor-
mal operating temperature
R The engine should be switched off for at
least 30 minutes if the engine was not at
operating temperature (i.e. if you only star-
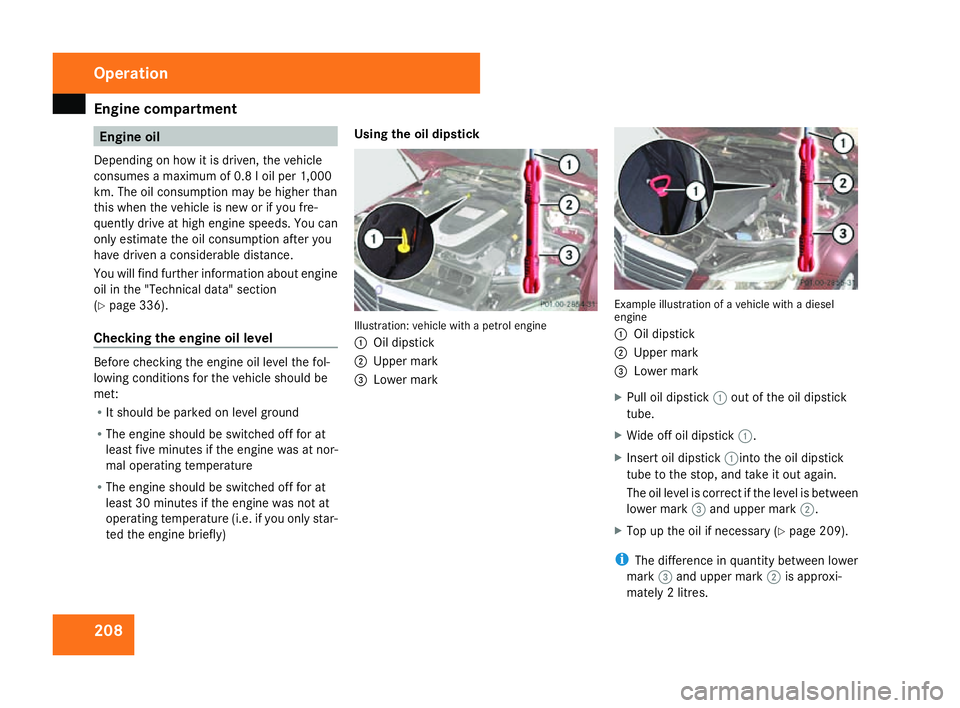
ted the engine briefly) Using the oil dipstick
Illustration: vehicle with a petrol engine
1
Oil dipstick
2 Upper mark
3 Lower mark Example illustration of a vehicle with a diese
l
engine
1 Oil dipstick
2 Upper mark
3 Lower mark
X Pull oil dipstick 1out of the oil dipstick
tube.
X Wide off oil dipstick 1.
X Insert oil dipstick 1into the oil dipstick
tube to the stop, and take it out again.
The oil level is correct if the level is between
lower mark 3and upper mark 2.
X Top up the oil if necessary (Y page 209).
i The difference in quantity between lower
mark 3and upper mark 2is approxi-
mately 2 litres. Operation
204_AKB; 2; 3, en-GB
mkalafa,
2007-06-26T23:11:51+02:00 - Seite 208
Page 212 of 377
Engine compartment
209
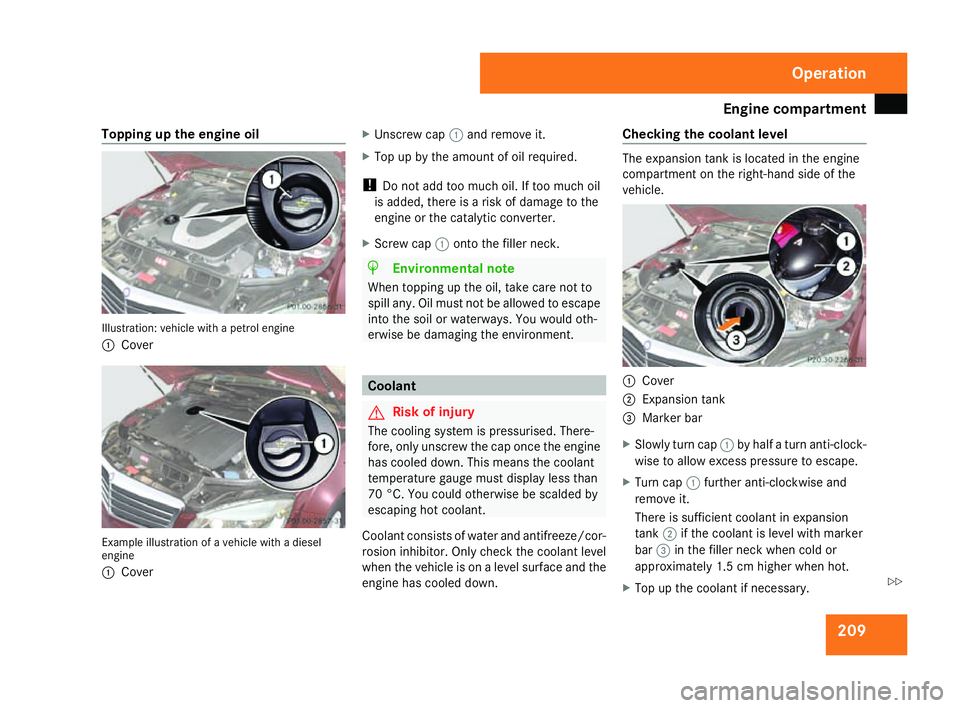
Topping up the engine oil
Illustration: vehicle with a petrol engin
e
1 Cove r Example illustration of a vehicle with a diese
l
engine
1 Cove r X
Unscrew cap 1and remove it.
X Top up by the amount of oil required.
! Do not add too much oil. If too much oil
is added, there is a risk of damage to the
engine or the catalytic converter.
X Screw cap 1onto the filler neck. H
Environmental not
e
When topping up the oil, take care not to
spill any. Oil must not be allowed to escape
into the soil or waterways. You would oth-
erwise be damaging the environment . Coolan
t G
Risk of injury
The cooling system is pressurised. There-
fore, only unscrew the cap once the engine
has cooled down. This means the coolant
temperature gauge must display less than
70 °C. You could otherwise be scalded by
escaping hot coolant.
Coolant consists of water and antifreeze/cor -
rosion inhibitor. Only check the coolant leve l
when the vehicle is on a level surface and th e
engine has cooled down. Checking the coolant level The expansion tank is located in the engin
e
compartment on the right-hand side of the
vehicle . 1
Cove r
2 Expansion tank
3 Marker bar
X Slowly turn cap 1by half a turn anti-clock -
wise to allow excess pressure to escape.
X Turn cap 1further anti-clockwise and
remove it.
There is sufficient coolant in expansion
tank 2if the coolant is level with marker
bar 3in the filler neck when cold or
approximately 1.5 cm higher when hot .
X Top up the coolant if necessary. Operation
204_AKB; 2; 3, en-GB
mkalafa,
2007-06-26T23:11:51+02:00 - Seite 209 Z
Page 214 of 377
Tyres and wheels
21
1
may be adversely affected. In addition, the
wheels may come into contact with the
body or the axle components when heavily
loaded or when driving with snow chains.
This could result in damage to the tyres or
the vehicle.
! Retreaded tyres are neither tested nor
recommended by Mercedes-Benz, since
previous damage cannot always be detec-
ted on retreaded tyres. As a result,
Mercedes-Benz cannot guarantee vehicl e
safety if retreaded tyres are fitted. Do not
fit used tyres if you have no information
about their previous usage. G
Risk of accident
If wheels or tyres other than those which
have been tested are fitted:
R the brakes or chassis components could
be damage d
R wheel and tyre clearances can no longer
be guarantee d
This could cause an accident .
Modification work on the brake system and
wheels is not permitted, nor is the use of
spacer plates or brake dust shields. This inva-
lidates the General Operating Permit for the
vehicle. Notes on selecting, fitting and replacing
tyres R
Only fit tyres and wheels of the same type
and make.
R Only fit tyres of the correct size onto the
wheels.
R After fitting new tyres, run them in at mod -
erate speeds for the first 100 km as they
only reach their full performance after this
distance.
R Fit new tyres on the front wheels first if
tyres of the same size are required on the
front and rear wheels.
R Replace the tyres after six years at the lat -
est, regardless of wear. This also applies to
the spare wheel.
R Do not drive with tyres which have too little
tread depth as this significantly reduce s
the traction on wet roads (aquaplaning).
! Store tyres that are not being used in a
cool, dry and preferably dark place. Protect
the tyres against oil, grease, petrol and die-
sel . Notes on regularly inspecting wheels
and tyre
s R
Regularly check the wheels and tyres of
your vehicle for damage (e.g. cuts, punctu-
res, tears, bumps on tyres and deforma-
tion, cracks or severe corrosion on wheels),
at least every 14 days, as well as after off -
road trips or after travelling on rough roads.
Damaged wheels could cause a loss of tyre
pressure.
R Regularly check the tyre tread depth and
the condition of the tread across the whol e
width of the tyre (Y page 212). If neces-
sary, turn the front wheels to full lock in
order to inspect the inner side of the tyre
surface.
R All wheels must have a valve cap to protect
the valve against dirt and moisture.
R Regularly check the pressure of all your
tyres (including the spare tyre*), particu-
larly prior to long trips, and correct th e
pressure as necessary (Y page 213).
Notes on driving R
While driving, pay attention to vibrations,
noises and unusual handling characteris-
tics, e.g. pulling to one side. This may indi- Operation
* optional
204_AKB; 2; 3, en-GB
mkalafa,
2007-06-26T23:11:51+02:00 - Seite 211
Page 230 of 377
Car
e 227Care
Notes on care
Regular and proper care maintains the value
of your vehicle.
i It is advisable to use Mercedes-Benz care
products.
Scratches, corrosive deposits, areas affected
by corrosion and damage caused by inade-
quate care cannot always be completely
repaired. In such cases, visit a qualified spe-
cialist workshop immediately, e.g. a
Mercedes-Benz Service Centre.
Repair damage caused by loose chippings
and remove the following substances imme-
diately, whilst avoiding rubbing too hard:
R Soak insect remains with insect remover
and rinse off afterwards .
R Soak bird droppings with water and rins e
off afterwards.
R Remove tree resin, oils, fuels and grease by
rubbing gently with a cloth soaked in clean-
ing or lighter fluid .
R Use silicone remover to remove wax.
R Use tar remover to remove tar stains. H
Environmental not
e
Dispose of empty packaging, cleaning
cloths and polishing wads in an environ-
mentally-responsible manner.
! Do not affix :
R stickers
R films
R magnetic plates or similar
to painted surfaces, otherwise you could
damage the paintwork. Vehicle care
! Do not park the vehicle for a long perio d
of time directly after cleaning, especially if
the wheels have just been cleaned with a
wheel cleaner. Wheel cleaners could cause
rapid corrosion of the brake discs and
brake pads/linings. After cleaning, park
the vehicle when it is at normal operatin g
temperature.
Automatic car wash You can wash the vehicle in an automatic car
wash from the very start,!
Do not use high pressure car wash sys-
tems. The strong water jet could damage
painted parts or attachments.
! Do not use a brush-free automatic car
wash that uses chemical agents to wash
the vehicle.
but preferably one without brushes.
If the vehicle is very dirty, prewash it befor e
cleaning it in an automatic car wash.
! Make sure that the automatic car wash is
suitable for the size of the vehicle. Fold in
the exterior mirrors before the vehicle is
washed. There is otherwise a risk of dam-
age to the exterior mirrors.
! Make sure the side windows are com-
pletely closed, the ventilation/heater
blower is fully turned off and the wind-
screen wiper switch is set to 0. The rai n
sensor may otherwise be activated, for
instance, leading to inadvertent wiper
sweeps being triggered. This could cause
damage to the vehicle.
After using an automatic car wash, wipe off
wax from the windscreen and the wiper
blades. This will prevent smears and reduce
wiping noises caused by residue on the wind-
screen. Operation
204_AKB; 2; 3, en-GB
mkalafa,
2007-06-26T23:11:51+02:00 - Seite 227
Page 232 of 377
Car
e 229
R
Solvents
R Cleaning agents containing solven t
You could otherwise scratch or damage the
surface of the lenses.
Plastic trim !
Do not use dry, coarse or hard cloths and
do not scrub. Doing so will scratch or dam-
age the surfaces.
X Wipe plastic parts with a damp, lint-free
cloth (e.g. a microfibre cloth).
X Light soiling: use a low-foaming soap (e.g .
a light liquid hand soap) diluted in water.
X Heavy soiling: use a cleaning agent that is
solvent-free and non-corrosive. Mercedes-
Benz recommends that you use a
Mercedes-Benz cleaning product for this
purpose.
Cleaning the steering wheel boss and
dashboard X
Moisten a clean lint-free cloth with water.
X Clean the plastic parts and the dashboard.
X If particularly dirty, use a mild detergent. G
Risk of injury
Do not use cleaners and cockpit care
sprays containing solvents to clean the
cockpit and steering wheel boss. Cleaners
containing solvents cause the surface to
become porous and in the event of an air-
bag being triggered, plastic parts that have
become loose could cause considerable
injuries.
Leather upholstery* !
Cleaning
R Clean genuine leather covers using a
damp cloth, then wipe these down after -
wards using a dry cloth. When doing this,
make sure that the leather does not
become soaked. For leather care, you
should use leather care foam A 001 98 6
59 71 10. You can purchase this at any
Mercedes-Benz Service Centre.
R Clean artificial leather covers with a cloth
moistened with a solution containing 1%
detergent (e. g. Pril).
R Clean fabric covers with a micro-fibr e
cloth moistened with a solution contain-
ing 1% detergent (e .g. Pril). When clean-
ing, take care not to rub too vigorously and always wipe entire seat sections to
avoid leaving visible lines. Leave the sea
t
to dry afterwards. Cleaning results
depend on the type of dirt and how long
it has been there.
R Clean Alcantara covers with a damp
cloth. Make sure you wipe entire seat
sections to avoid leaving visible lines.
i Note that leather covers are subject to a
natural ageing process because they are a
natural product and may react in different
ways (e.g. increased formation of wrinkles)
to certain environmental influences (such
as high humidity, intense heat).
Note that regular care is essential to ensure
that the quality (both appearance and com-
fort) of the covers is retained in the long
term .
Cleaning the wooden trim* X
Moisten a clean lint-free cloth with water.
X Clean the wooden trim.
X If particularly dirty, use a mild detergent. Operation
* optional
204_AKB; 2; 3, en-GB
mkalafa
, 2007-06-26T23:11:51+02:00 - Seite 229