tire pressure MERCEDES-BENZ C-CLASS ESTATE 2007 Owners Manual
[x] Cancel search | Manufacturer: MERCEDES-BENZ, Model Year: 2007, Model line: C-CLASS ESTATE, Model: MERCEDES-BENZ C-CLASS ESTATE 2007Pages: 377, PDF Size: 6.19 MB
Page 11 of 377
8Parking position . . . . . . . . . . . .
.95, 97
Resetting . . . . . . . . . . . . . . . . . . . . .94
Storing settings . . . . . . . . . . . . . . . .96
Exterior view
Overview . . . . . . . . . . . . . . . . . . . . .22 F
Fastening seat belt s
Children . . . . . . . . . . . . . . . . . . . . . .64
Fire extinguishe r. . . . . . . . . . . . . . . .233
First-aid kit . . . . . . . . . . . . . . . . . . . . .233
Flat tyre MOExtended run-flat system . . . . .323
Preparing the vehicle . . . . . . . . . . .313
TIREFIT kit . . . . . . . . . . . . . . . . . . .314
Floormat . . . . . . . . . . . . . . . . . . . . . . .201
Foglamps Display message . . . . . . . . . . . . . .263
Fog lamps (extended range ). . . . . . .107
Fording . . . . . . . . . . . . . . . . . . . . . . . .219
Frequencies Telephone . . . . . . . . . . . . . . . . . . .338
Front airbag . . . . . . . . . . . . . . . . . . . . .50
Front-passenger airbag . . . . . . . . . . ..50
Fuel . . . . . . . . . . . . . . . . . . . . . . . . . . .360
Diese l.. . . . . . . . . . . . . . . . . . . . . .205
Loss . . . . . . . . . . . . . . . . . . . . . . . .288
Petrol . . . . . . . . . . . . . . . . . . . . . . .205
Fuel consumptio n. . . . . . . . . . .361, 362 Fuel filler flap
Emergency release . . . . . . . . . . . . .302
Opening/closing . . . . . . . . . . . . . .204
Fuel filte r
Display message (luxury multi -
function steering wheel) . . . . . . . .251
Display message (multi-function
steering wheel) . . . . . . . . . . . . . . .242
Fuel lin e
Malfunction . . . . . . . . . . . . . . . . . .288
Fuel remaining
Calling up (on-board computer,
luxury multi-function steering
wheel) . . . . . . . . . . . . . . . . . . . . . .134
Fuel tank
Malfunction . . . . . . . . . . . . . . . . . .288
Fuse allocation chart . . . . . . . . . . ..333
Fuse box Boot . . . . . . . . . . . . . . . . . . . . . . . .334
Dashboard . . . . . . . . . . . . . . . . . . .333
Engine compartment . . . . . . . . . . .333
Luggage compartment . . . . . . . . . .334
Fuse s. . . . . . . . . . . . . . . . . . . . . . . . . .332 G
Gearshift program Manua l.. . . . . . . . . . . . . . . . . . . . .121
Genuine Mercedes-Benz parts . . . ..336
Glove compartment . . . . . . . . . . . . ..193 Gross vehicle weight, maximum
permissible
. . . . . . . . . . . . . . . .356, 357 H
Headlamp Misting up . . . . . . . . . . . . . . . . . . .294
Headlamp mode (automatic ). . . . . .103
Headlamps Cleaning . . . . . . . . . . . . . . . . . . . . .228
Cleaning system . . . . . . . . . . . . . . .106
Head restraint
Adjusting (front) . . . . . . . . . . . . .87, 89
Adjusting (rear) . . . . . . . . . . . . . . . .89
NECK-PRO . . . . . . . . . . . . . . . . . . . .53
Removing (rear) . . . . . . . . . . . . . . . .90
Resetting triggered head
restraints . . . . . . . . . . . . . . . . . . . .303
Heatin g
see Thermatic
High-pressure cleaners . . . . . . . . . ..228
Hill start assist . . . . . . . . . . . . . . . . .151 I
Immobiliser . . . . . . . . . . . . . . . . . . . . .70
Indicator and warning lam p
Brakes (red) . . . . . . . . . . . . . . . . . .280
Engine diagnostic . . . . . . . . . . . . . .282
ESP . . . . . . . . . . . . . . . . . . . . .68, 279
LIM . . . . . . . . . . . . . . . . . . . . . . . . .146 Index
204_AKB; 2; 3, en-GB
mkalafa,
2007-06-26T23:11:51+02:00 - Seite
8
Page 18 of 377
15
Tim
e
Entering (on-board computer,
multi-function steering wheel) . . . .129
Setting . . . . . . . . . . . . . . . . . . . . . .124
Setting (on-board computer,
luxury multi-function steering
wheel) . . . . . . . . . . . . . . . . . . . . . .142
TIREFIT kit
Using . . . . . . . . . . . . . . . . . . . . . . .314
TopTether . . . . . . . . . . . . . . . . . . . . . . .62
Total distance recorde r
Resetting the trip meter . . . . . . . . .123
Tow-away protection . . . . . . . . . . . . ..71
Towin g. . . . . . . . . . . . . . . . . . . . . . . .331
Towing eye Fitting . . . . . . . . . . . . . . . . . . . . . . .330
Removing . . . . . . . . . . . . . . . . . . . .332
Tow-starting . . . . . . . . . . . . . . . . . . . .331
Trailer 7-pin connector . . . . . . . . . . . . . . .225
Display message . . . . . . . . . . . . . .254
Display message (luxury multi-
function steering wheel) . . . . . . . .249
Display message (multi-function
steering wheel) . . . . . . . . . . . . . . .241
Power supply . . . . . . . . . . . . . . . . .225
Trailer loads
Technical data . . . . . . . . . . . . . . . .359
Trailer tow hitch . . . . . . . . . . . . . . . .220
Notes on care . . . . . . . . . . . . . . . .230 Trailer towing
Driving tips . . . . . . . . . . . . . . . . . . .222
ESP . . . . . . . . . . . . . . . . . . . . . . . . . .69
Mounting dimensions . . . . . . . . . . .358
Parktroni c.. . . . . . . . . . . . . . . . . .155
Transmission output (maximum)
Telephone/two-way radio . . . . . . .337
Transport (vehicle) . . . . . . . . . . . . ..332
Trip computer On-board computer (luxury multi-
function steering wheel) . . . . . . . .133
On-board computer (multi-func-
tion steering wheel) . . . . . . . . . . . .128
Trip meter . . . . . . . . . . . . . . . . . . . . . .128
Resetting . . . . . . . . . . . . . . . .123, 128
Turn signal lamps
Display message . . . . . . . . . .254, 256
Two-way radio
Installatio n.. . . . . . . . . . . . . . . . . .337
Tyre grip . . . . . . . . . . . . . . . . . . . . . . .219
Tyre pressure . . . . . . . . . . . . . . . . . .213
Display message . . . . . . . . . . . . . .243
Tyre pressure loss warning syste m214
Tyre pressure s
Table . . . . . . . . . . . . . . . . . . . . . . .347
Tyres
Direction of rotatio n.. . . . . . . . . . .212
General notes . . . . . . . . . . . . . . . . .210
Technical data . . . . . . . . . . . . . . . .348
Tyre tread . . . . . . . . . . . . . . . . . . . . . .212 U
Unladen weight . . . . . . . . . . . ..356, 357
Unlocking Emergency unlocking . . . . . . . . . . .300
from the inside (central unlocking
button) . . . . . . . . . . . . . . . . . . . . . . .80 V
Variable Speedtroni c. . . . . . . . . . . . .149
Vehicle Emergency unlocking . . . . . . .300, 301
Individual settings . . . . . . . . . . . . .140
Leaving parked up . . . . . . . . . . . . .299
Towing . . . . . . . . . . . . . . . . . . . . . .331
Tow-starting . . . . . . . . . . . . . . . . . .331
Transporting . . . . . . . . . . . . . . . . . .332
Vehicle battery . . . . . . . . . . . . . . . . .324
Vehicle dimension s. . . . . . . . . . . . . .355
Vehicle electronics . . . . . . . . . . . . ..337
Vehicle identification plates . . . . ..339
Vehicle tool kit . . . . . . . . . . . . . . . . . .234
Vehicle weights . . . . . . . . . . . . . . . . .355 W
Warning and indicator lamp ABS (yellow) . . . . . . . . . . . . . . . . . .279
Warning signal
Audible . . . . . . . . . . . . . . . . . . . . . .286 Index
204_AKB; 2; 3, en-GB
mkalafa,
2007-06-26T23:11:51+02:00 - Seite 15
Page 215 of 377
Tyres and wheels
21
2
cate that the wheels or tyres are damaged.
If you suspect that a tyre is defective,
reduce your speed and stop the vehicle as
soon as possible to check the wheels and
tyres for damage. Hidden tyre damag
e
could also be causing the unusual handling
characteristics. If you find no signs of dam-
age, have the wheels and tyres inspected
at a specialist workshop, for example at a
Mercedes-Benz Service Centre.
R When parking your vehicle, make sure that
the tyres do not get deformed by the kerb
or other obstacles. If it is necessary to drive
over kerbs, speed humps or similar, try to
do so slowly and at an obtuse angle. Oth-
erwise, the tyres, particularly the sidewalls,
could get damaged. Direction of rotation
Direction of rotation Tyres with a specified direction of rotation
have additional benefits, e.g. if there is a risk
of aquaplaning. You will only gain these ben-
efits if the correct direction of rotation is
observed.
An arrow on the sidewall of the tyre indicates
its correct direction of rotation.
i You may fit a spare tyre *against th e
direction of rotation. MOExtended run-flat system
*
The MOExtended run-flat system* allows you
to continue driving the vehicle even when one
or more tyres lose all air pressure.
The MOExtended run-flat system* may only
be used in combination with the tyre pressure
loss warning system and only on wheels spe-
cifically tested and approved by Mercedes-
Benz.
i Vehicles with MOExtended run-flat sys-
tem* are not equipped with the TIREFIT
kit*. 14 It is therefore recommended to additionally
equip your vehicle with the TIREFIT kit*
when fitting tyres that do not feature run-
flat properties, e.g. winter tyres.
i A TIREFIT kit* is available from any quali-
fied specialist workshop, e.g. a Mercedes-
Benz Service Centre.
You will find notes on driving with a flat tyr e
in the "Practical advice" section
( Y page 323). Tyre tread
G
Risk of accident
Bear in mind that:
R tyre grip decreases rapidly on wet roads
when the tread depth is less than 3 mm.
You should thus replace tyres that have
insufficient tread.
R winter tyres should be replaced when th e
tread depth is 4 mm or less because oth -
erwise they no longer provide adequate
grip.
R the tread on a tyre may not wear evenly .
You should thus regularly check the tread
14 Only for certain countries. Operation
* optional
204_AKB; 2; 3, en-GB
mkalafa,
2007-06-26T23:11:51+02:00 - Seite 212
Page 216 of 377
Tyres and wheels
21
3 depth and the condition of the tread
across the entire width of all tyres. If nec
-
essary, turn the steering wheel so that
you can see the tyre tread more easily.
You could otherwise lose control of the
vehicle and cause an accident due to the
reduced grip of the tyres on the road. Tyre pressures
G
Risk of accident
Tyre pressure that is either too high or too
low has a negative effect on the vehicle’ s
active safety, which could lead you to caus e
an accident. You should therefore regularly
check the pressure of all your tyres (includ -
ing the spare tyre*), particularly prior to
long trips, and correct the pressure as nec -
essary.
To test tyre pressure, use a suitable pressure
gauge. The outer appearance of a tyre does
not permit any reliable conclusion about the
tyre pressure.
If the vehicle is to be heavily laden or driven
at high speeds, the tyre pressure must be
adapted according to the specifications given
in the fuel filler flap (Y page 204). Use the highest specified tyre pressure for
the spare wheel*
. G
Risk of accident
Should the tyre pressure drop repeatedly:
R Check the tyre for foreign bodies.
R Check whether the wheel is losing air or
the valve is leaking .
Tyre pressure that is too low has a negative
effect on the vehicle’s active safety, which
could lead to your causing an accident .
Tyre pressure changes by approximately
0.1 bar for every 10 °C change in ambient
temperature.
If you measure the tyre pressure in enclosed
spaces where the temperature differs from
the outside temperature, you will have to cor-
rect the measured value accordingly.
When the vehicle is driven, the tyre tempera-
ture, and with it the tyre pressure, will
increase depending on the road speed and
the load on the tyres.
Therefore, you should only correct tyre pres-
sures when the tyres are cold.
The pressure of warm tyres should only be
corrected if it is too low for the current oper-
ating conditions. You will find a table of tyre pressures for var-
ious operating conditions on the inside of
your vehicle's fuel filler flap.
Driving with tyre pressure that is too high or
too low can:
R
shorten the service life of the tyres
R cause increased tyre damag e
R have a negative effect on handling charac-
teristics (e.g. by causing aquaplaning)
i The tyre pressure values given for low
loads are minimum values which offer you
good ride comfort characteristics .
You can, however, also use the values given
for higher loads. These are permissible and
will not adversely affect the running of the
vehicle.
Also check the tyre pressure of the spare
wheel* . H
Environmental not
e
Check the tyre pressure regularly, and at
least every 14 days. Operation
* optional
204_AKB; 2; 3, en-GB
mkalafa,
2007-06-26T23:11:51+02:00 - Seite 21
3
Page 318 of 377
Flat tyre
315G
Risk of injury
TIREFIT must not come into contact with
your skin, eyes or clothing .
R If TIREFIT comes into contact with your
eyes or skin, immediately rinse thor -
oughly with clean water.
R Change out of clothing which has come
into contact with TIREFIT immediately.
R If an allergic reaction occurs, consult a
doctor immediately.
Keep TIREFIT away from children .
R If TIREFIT is swallowed, immediately
rinse your mouth out thoroughly with
water and drink plenty of water.
R Do not induce vomiting. Consult a doctor
immediately.
R Do not inhale TIREFIT fumes .
i If TIREFIT leaks out, allow it to dry. It can
then be removed like a layer of film.
If you get TIREFIT on your clothing, have it
cleaned as soon as possible with perchloro -
ethylene. G
Risk of injury
Comply with the manufacturer's safety
instructions shown on the sticker on the
electric air pump.
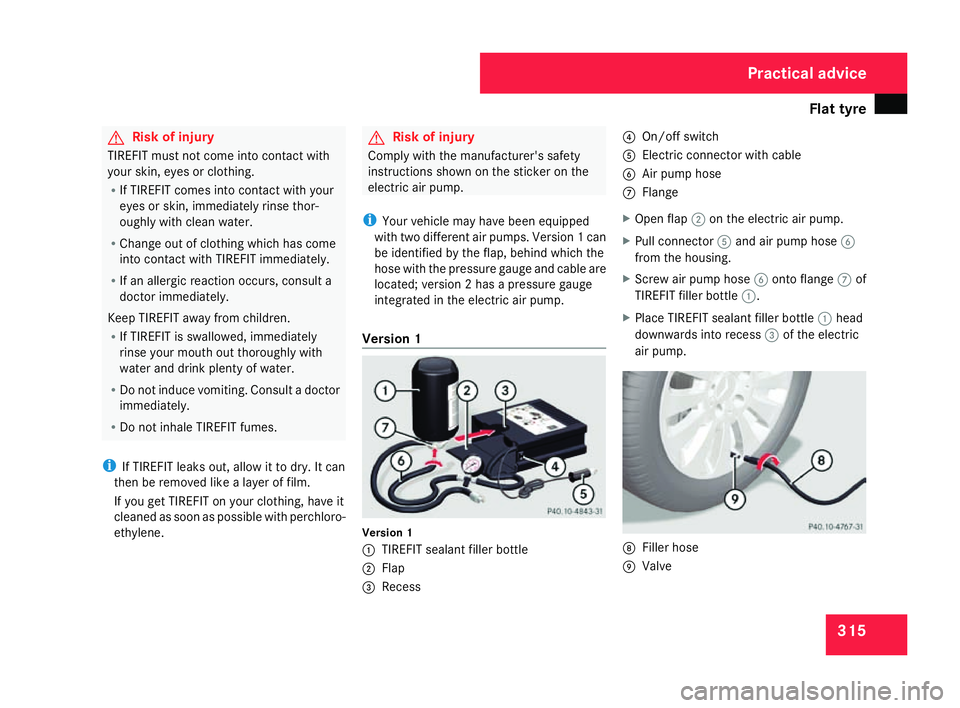
i Your vehicle may have been equipped
with two different air pumps. Version 1 can
be identified by the flap, behind which the
hose with the pressure gauge and cable are
located; version 2 has a pressure gauge
integrated in the electric air pump.
Version 1 Version
1
1 TIREFIT sealant filler bottle
2 Flap
3 Recess 4
On/off switch
5 Electric connector with cable
6 Air pump hos e
7 Flange
X Open flap 2on the electric air pump.
X Pull connector 5and air pump hose 6
from the housing.
X Screw air pump hose 6onto flange 7of
TIREFIT filler bottle 1.
X Place TIREFIT sealant filler bottle 1head
downwards into recess 3of the electric
air pump. 8
Filler hos e
9 Valve Practical advice
204_AKB; 2; 3, en-GB
mkalafa,
2007-06-26T23:11:51+02:00 - Seite 315
Page 319 of 377
Flat tyre
316
X
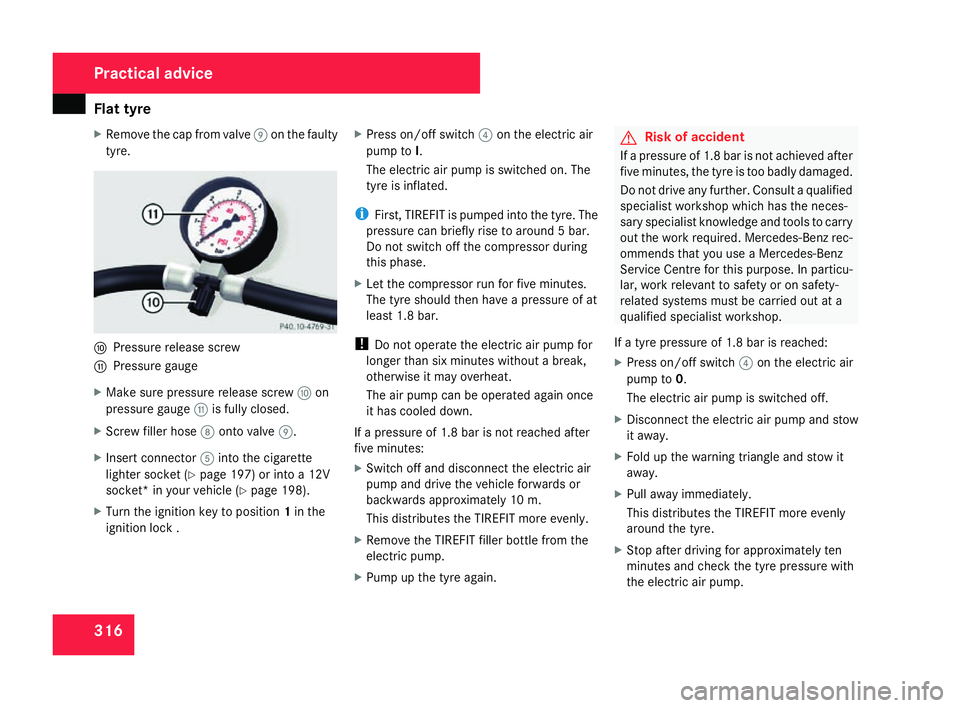
Remove the cap from valve 9on the faulty
tyre. a
Pressure release screw
b Pressure gauge
X Make sure pressure release screw aon
pressure gauge bis fully closed.
X Screw filler hose 8onto valve 9.
X Insert connector 5into the cigarett e
lighter socket (Y page 197) or into a 12V
socket* in your vehicle (Y page 198).
X Turn the ignition key to position 1in the
ignition lock . X
Press on/off switch 4on the electric air
pump to I.
The electric air pump is switched on. The
tyre is inflated.
i First, TIREFIT is pumped into the tyre. The
pressure can briefly rise to around 5 bar.
Do not switch off the compressor during
this phase.
X Let the compressor run for five minutes.
The tyre should then have a pressure of at
least 1.8 bar.
! Do not operate the electric air pump for
longer than six minutes without a break,
otherwise it may overheat.
The air pump can be operated again once
it has cooled down.
If a pressure of 1.8 bar is not reached after
five minutes:
X Switch off and disconnect the electric ai r
pump and drive the vehicle forwards or
backwards approximately 10 m.
This distributes the TIREFIT more evenly.
X Remove the TIREFIT filler bottle from th e
electric pump.
X Pump up the tyre again. G
Risk of accident
If a pressure of 1.8 bar is not achieved afte r
five minutes, the tyre is too badly damaged.
Do not drive any further. Consult a qualified
specialist workshop which has the neces-
sary specialist knowledge and tools to carry
out the work required. Mercedes-Benz rec-
ommends that you use a Mercedes-Benz
Service Centre for this purpose. In particu-
lar, work relevant to safety or on safety-
related systems must be carried out at a
qualified specialist workshop.
If a tyre pressure of 1.8 bar is reached:
X Press on/off switch 4on the electric air
pump to 0.
The electric air pump is switched off.
X Disconnect the electric air pump and stow
it away .
X Fold up the warning triangle and stow it
away .
X Pull away immediately.
This distributes the TIREFIT more evenly
around the tyre.
X Stop after driving for approximately ten
minutes and check the tyre pressure with
the electric air pump. Practical advice
204_AKB; 2; 3, en-G
B
mkalafa , 2007-06-26T23:11:51+02:00 - Seite 316
Page 320 of 377
Flat tyre
317G
Risk of accident
If the tyre pressure is now lower than
1.3 bar, the tyre is too badly damaged. Do
not drive any further. Consult a qualified
specialist workshop which has the neces -
sary specialist knowledge and tools to carry
out the work required. Mercedes-Benz rec-
ommends that you use a Mercedes-Benz
Service Centre for this purpose. In particu-
lar, work relevant to safety or on safety-
related systems must be carried out at a
qualified specialist workshop.
X If the tyre pressure is still at least 1.3 bar,
correct it (see fuel filler flap for values).
To increase the tyre pressure: switch on
the electric air pump.
To reduce the tyre pressure :open pres-
sure release screw aon pressure
gauge b.
X Drive to the nearest workshop and have the
tyre changed there.
X Have the TIREFIT kit replaced as soon as
possible at a qualified specialist workshop ,
e.g. at a Mercedes-Benz Service Centre. G
Risk of accident
Do not exceed the maximum speed of 80
km/h.
The “max. 80 km/h” sticker must be affixe d
within the driver's field of vision.
The vehicle's handling characteristics may
be affected. H
Environmental not
e
Have the used TIREFIT kit disposed of pro-
fessionally, e.g. at a Mercedes-Benz
Service Centre.
X Have the TIREFIT kit replaced every fou r
years at a qualified specialist workshop ,
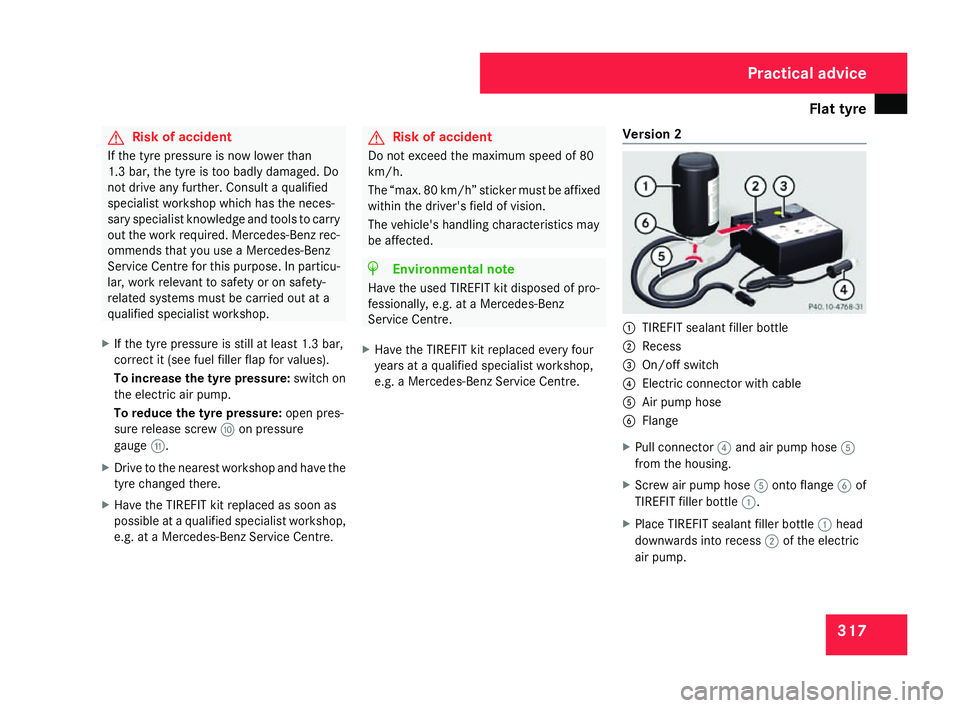
e.g. a Mercedes-Benz Service Centre. Version
2 1
TIREFIT sealant filler bottle
2 Recess
3 On/off switch
4 Electric connector with cable
5 Air pump hos e
6 Flange
X Pull connector 4and air pump hose 5
from the housing.
X Screw air pump hose 5onto flange 6of
TIREFIT filler bottle 1.
X Place TIREFIT sealant filler bottle 1head
downwards into recess 2of the electric
air pump. Practical advice
204_AKB; 2; 3, en-GB
mkalafa,
2007-06-26T23:11:51+02:00 - Seite 317
Page 321 of 377
Flat tyre
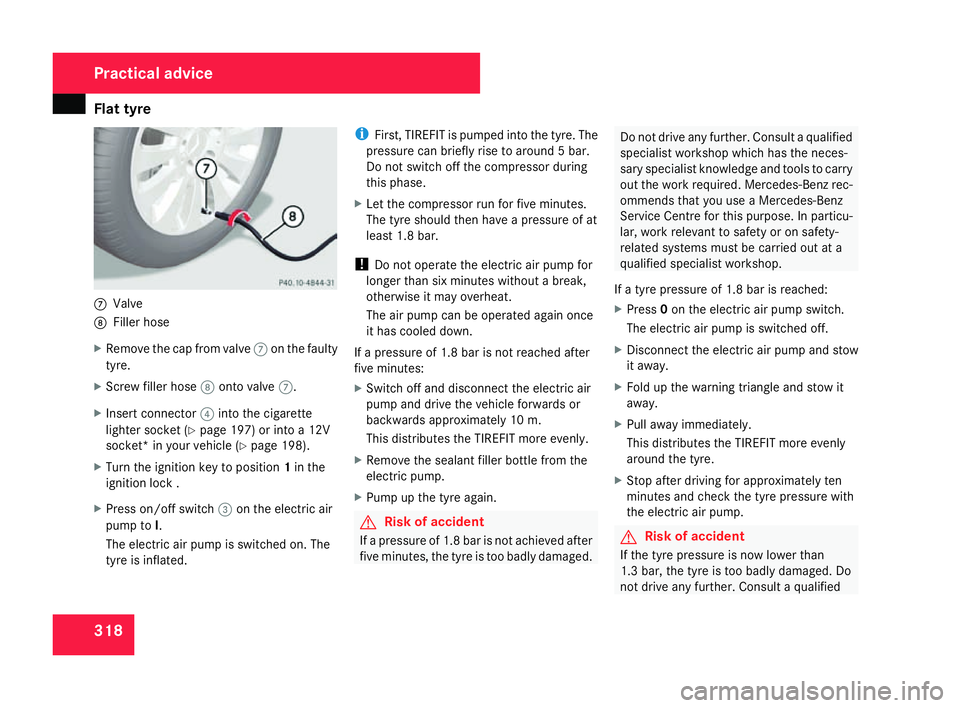
3187
Valve
8 Filler hos e
X Remove the cap from valve 7on the faulty
tyre.
X Screw filler hose 8onto valve 7.
X Insert connector 4into the cigarett e
lighter socket (Y page 197) or into a 12V
socket* in your vehicle (Y page 198).
X Turn the ignition key to position 1in the
ignition lock .
X Press on/off switch 3on the electric air
pump to I.
The electric air pump is switched on. The
tyre is inflated. i
First, TIREFIT is pumped into the tyre. The
pressure can briefly rise to around 5 bar.
Do not switch off the compressor during
this phase.
X Let the compressor run for five minutes.
The tyre should then have a pressure of at
least 1.8 bar.
! Do not operate the electric air pump for
longer than six minutes without a break,
otherwise it may overheat.
The air pump can be operated again once
it has cooled down.
If a pressure of 1.8 bar is not reached after
five minutes:
X Switch off and disconnect the electric ai r
pump and drive the vehicle forwards or
backwards approximately 10 m.
This distributes the TIREFIT more evenly.
X Remove the sealant filler bottle from th e
electric pump.
X Pump up the tyre again. G
Risk of accident
If a pressure of 1.8 bar is not achieved afte r
five minutes, the tyre is too badly damaged. Do not drive any further. Consult a qualified
specialist workshop which has the neces-
sary specialist knowledge and tools to carry
out the work required. Mercedes-Benz rec-
ommends that you use a Mercedes-Benz
Service Centre for this purpose. In particu-
lar, work relevant to safety or on safety-
related systems must be carried out at
a
qualified specialist workshop.
If a tyre pressure of 1.8 bar is reached:
X Press 0on the electric air pump switch.
The electric air pump is switched off.
X Disconnect the electric air pump and stow
it away .
X Fold up the warning triangle and stow it
away .
X Pull away immediately.
This distributes the TIREFIT more evenly
around the tyre.
X Stop after driving for approximately ten
minutes and check the tyre pressure with
the electric air pump. G
Risk of accident
If the tyre pressure is now lower than
1.3 bar, the tyre is too badly damaged. Do
not drive any further. Consult a qualified Practical advice
204_AKB; 2; 3, en-G
B
mkalafa , 2007-06-26T23:11:51+02:00 - Seite 318
Page 322 of 377
Flat tyre
319specialist workshop which has the neces-
sary specialist knowledge and tools to carry
out the work required. Mercedes-Benz rec -
ommends that you use a Mercedes-Benz
Service Centre for this purpose. In particu-
lar, work relevant to safety or on safety-
related systems must be carried out at a
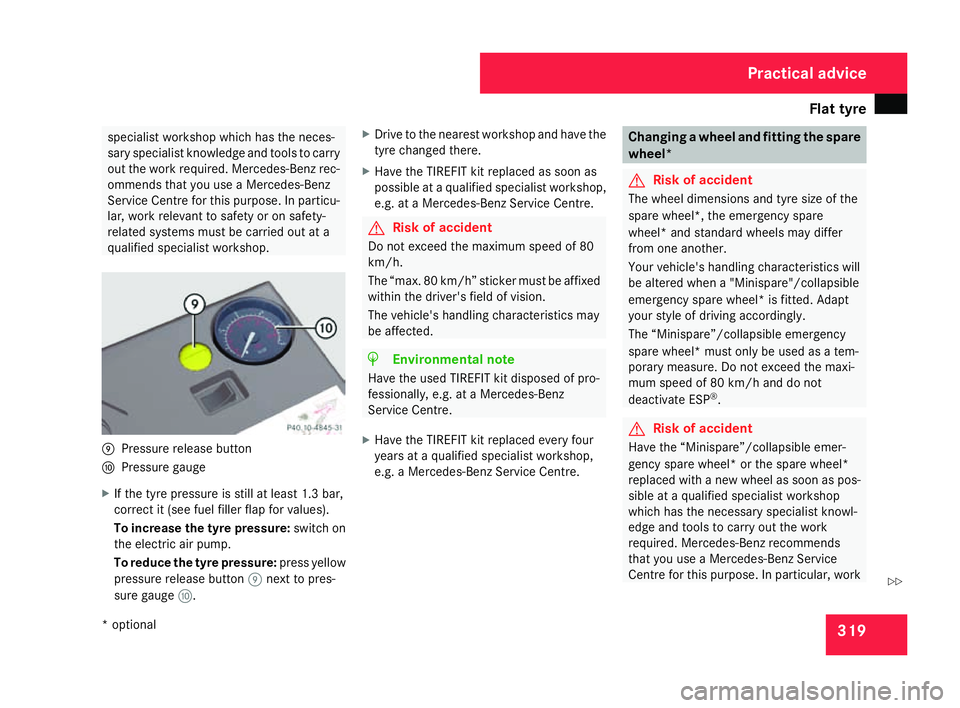
qualified specialist workshop. 9
Pressure release button
a Pressure gauge
X If the tyre pressure is still at least 1.3 bar,
correct it (see fuel filler flap for values).
To increase the tyre pressure: switch on
the electric air pump.
To reduce the tyre pressure :press yellow
pressure release button 9next to pres-
sure gauge a. X
Drive to the nearest workshop and have the
tyre changed there.
X Have the TIREFIT kit replaced as soon as
possible at a qualified specialist workshop ,
e.g. at a Mercedes-Benz Service Centre. G
Risk of accident
Do not exceed the maximum speed of 80
km/h.
The “max. 80 km/h” sticker must be affixe d
within the driver's field of vision.
The vehicle's handling characteristics may
be affected. H
Environmental not
e
Have the used TIREFIT kit disposed of pro-
fessionally, e.g. at a Mercedes-Benz
Service Centre.
X Have the TIREFIT kit replaced every fou r
years at a qualified specialist workshop ,
e.g. a Mercedes-Benz Service Centre. Changing a wheel and fitting the spar
e
wheel * G
Risk of accident
The wheel dimensions and tyre size of the
spare wheel*, the emergency spare
wheel* and standard wheels may differ
from one another.
Your vehicle's handling characteristics will
be altered when a "Minispare"/collapsibl e
emergency spare wheel* is fitted. Adapt
your style of driving accordingly.
The “Minispare”/collapsible emergency
spare wheel* must only be used as a tem-
porary measure. Do not exceed the maxi-
mum speed of 80 km/h and do not
deactivate ESP ®
. G
Risk of accident
Have the “Minispare”/collapsible emer-
gency spare wheel* or the spare wheel *
replaced with a new wheel as soon as pos-
sible at a qualified specialist workshop
which has the necessary specialist knowl-
edge and tools to carry out the work
required. Mercedes-Benz recommends
that you use a Mercedes-Benz Service
Centre for this purpose. In particular, work Practical advice
* optiona l
204_AKB; 2; 3, en-GB
mkalafa,
2007-06-26T23:11:51+02:00 - Seite 319 Z
Page 326 of 377
Flat tyre
323
X
Turn the jack back to its initial position and
store it and the rest of the vehicle tool kit
in the boot/luggage compartment.
Vehicles with the "Minispare" emergency
spare wheel*:
X Transport the faulty wheel in the boot/lug-
gage compartment.
or
X Depending on the size of the wheel, yo u
may also be able to secure the faulty whee l
in the spare wheel well. In this case, you
will have to remove the stowage well casin g
from the spare wheel well and stow it
securely in the boot/luggage compart-
ment. MOExtended run-flat system*
The MOExtended run-flat system* must only
be used in conjunction with the tyre pressure
loss warning system*.
! The maximum permissible distance which
can be driven in run-flat mode depends on
the load in the vehicle. It is 50 km if the
vehicle is partially laden and 30 km if fully
laden. The maximum permissible distance which
can be driven in run-flat mode is counted
from the moment the tyre pressure loss
warning appears in the multi-function dis-
play.
You must not exceed a maximum speed of
80 km/h.
i Vehicles featuring the MOExtended run-
flat system* are not equipped with the
TIREFIT kit*.
It is therefore recommended to additionally
equip your vehicle with the TIREFIT kit*
when fitting tyres that do not feature run-
flat properties, e.g. winter tyres.
i A TIREFIT kit* is available from any quali-
fied specialist workshop, e.g. a Mercedes-
Benz Service Centre. G
Risk of accident
The handling characteristics of your vehicl e
deteriorate in run-flat mode, for example:
R when cornering
R when braking
R when accelerating rapidly
Adapt your driving style accordingly and
avoid sudden changes in direction and sud- den acceleration, as well as driving over
obstacles (i.e. kerbs, potholes), and driving
off-road. This is particularly the case when
the vehicle is heavily laden .
The maximum permissible distance that
can be driven in run-flat mode depends to
a large extent on the loads placed on the
vehicle. It can be shorter due to high
speeds, a heavy load, sudden acceleration
and/or manoeuvring, the road surface con-
dition, outside temperature, etc., or further
if you drive carefully and conservatively.
Do not continue to drive in run-flat mode if:
R you hear banging noises
R the vehicle starts to shake
R you see smoke and smell rubber
R ESP ®
is intervening constantly
R there are tears in the sidewalls of the tyr e
After driving in run-flat mode, you must
have the rims checked for damage at a
qualified specialist workshop which has the
necessary specialist knowledge and tools
to carry out the work required. The faulty
tyre must be replaced in every case.
Mercedes-Benz recommends that you use
a Mercedes-Benz Service Centre for this Practical advice
* optional
204_AKB; 2; 3, en-GB
mkalafa,
2007-06-26T23:11:51+02:00 - Seite 323 Z