interior lights MERCEDES-BENZ C-CLASS ESTATE 2014 Owners Manual
[x] Cancel search | Manufacturer: MERCEDES-BENZ, Model Year: 2014, Model line: C-CLASS ESTATE, Model: MERCEDES-BENZ C-CLASS ESTATE 2014Pages: 489, PDF Size: 15.08 MB
Page 17 of 489
Display message ............................ 333
Overview ........................................ 138
Setting the dipped-beam head-
lamps for driving on the right/left .. 313
Interior lighting
Control ........................................... 141
Emergency lighting ........................ 141
Overview ........................................ 140
Reading lamp ................................. 140
Interior motion sensor
Deactivating .................................... .88
Function ........................................... 88
Priming ............................................ 88
Switching off .................................... 88
Internal combustion engine
Malfunction .................................... 285
ISOFIX child seat securing system .... 65J
Jack Storage location ............................ 411
Using ............................................. 443
Jump starting (engine) ...................... 422K
Key Changing the battery ....................... 94
Checking the battery ....................... 94
Convenience closing feature .......... 108
Convenience opening feature ........ 108
Display messag e............................ 352
Door central locking/unlocking ....... 91
Emergency key element ................... 93
Important safety notes .................... 90
KEYLESS-GO start function .............. 92
Loss ................................................. 95
Modifying the programming ............. 92
Overview .......................................... 90
Positions (ignition lock) ................. 185
Problem (malfunction) ..................... 95
Starting the engine ........................ 188
Key positions
Key ................................................ 185
Start/Stop button .......................... 185
KEYLESS-GO
Convenience closing ...................... 109
Deactivation ..................................... 91 Locking ............................................ 91
Removing the Start/Stop button ... 186
Unlocking ......................................... 91
Kickdown
Driving tips .................................... 200
Kneebag ............................................... 53 L
Lamps see Warning and indicator lamps
Lane Keeping Assist
Activating/deactivating (on-
board computer) ............................ 311
Display message ............................ 340
Function/information .................... 265
see Active Lane Keeping Assist
Lane package ..................................... 263
Lashing eyelets ................................. 376
Licence plate lamp (display mes-
sage) ................................................... 333
Light sensor (display message) ....... 334
Lighting
see Lights
Lights
Activating/deactivating the Intel-
ligent Light System ........................ 313
Active light function ....................... 138
Adaptive Highbeam Assist PLUS .... 139
Automatic headlamp mode ............ 135
Cornering light function ................. 138
Dipped-beam headlamp s............... 135
Driving abroad ............................... 134
Foglamps (extended range) ........... 139
Hazard warning lamps ................... 137
Headlamp flashe r........................... 137
Headlamp range ............................ 136
Intelligent Light System (func-
tion) ............................................... 138
Light switch ................................... 134
Main-beam headlamp s................... 137
Misted up headlamp s.................... 140
Motorway mode ............................. 138
Parking lamps ................................ 136
Rear foglamp ................................. 135
Setting exterior lighting ................. 134
Side lamps ..................................... 136
Turn signals ................................... 137 14
Index
Page 58 of 489
criteria are met, the front-passenger front
airbag is deployed.
R PASSENGER AIR BAG OFF ;lights up: the
front-passenger front airbag is disabled. It
will then not be deployed in the event of an accident.
If the status of the front-passenger front air-
bag changes while the vehicle is in motion, an
airbag display message appears in the instru-
ment cluster (Y page 330). When the front-
passenger seat is occupied, always pay atten-
tion to the PASSENGER AIR BAG ON and
PASSENGER AIR BAG OFF indicator lamps. Be aware of the status of the front-passenger
front airbag both before and during the jour-
ney.
If there is no child restraint system fitted to
the front-passenger seat, the front passenger must sit:
R with the seat belt fastened correctly
R in an almost upright position with their
back against the seat backrest
R with their feet resting on the floor, if possi-
ble
If the front passenger does not observe these
conditions, the automatic front-passenger
front airbag deactivation system may be influ- enced, e.g. because the front passenger:
R transfers their weight by supporting them-
selves on a vehicle armrest
R sits in such a way that their weight is raised
from the seat cushion
The front-passenger front airbag may be dis-
abled by mistake as a result of these or similar
actions. In this case, the PASSENGER AIR
BAG OFF indicator lamp lights up perma-
nently. The front-passenger front airbag does not then deploy during an accident. G
WARNING
If the PASSENGER AIRBAG OFF indicator lamp is lit, the front-passenger front airbag is disa-
bled. It will not be deployed in the event of an
accident and cannot perform its intended pro-
tective function. A person in the front-
passenger seat could then, for example, come into contact with the vehicle's interior, espe-
cially if the person is sitting too close to the
dashboard. This poses an increased risk of
injury or even fatal injury.
When the front-passenger seat is occupied,
always make sure that:
R the classification of the person in the front-
passenger seat is correct and that the front- passenger front airbag is enabled or disa-
bled in accordance with the person in the
front-passenger seat.
R the front-passenger seat has been moved
back as far back as possible.
R the person is seated correctly.
Make sure, both before and during the jour-
ney, that the status of the front-passenger
front airbag is correct. G
WARNING
If you secure a child on the co-driver's seat in a rearward-facing child restraint system and
the PASSENGER AIR BAG ON indicator lamp
lights up, the co-driver's airbag could be
deployed in the event of an accident. The childcould be struck by the airbag. There is an
increased risk of injury, possibly even fatal.
In this case, always ensure that the co-driver's
airbag is disabled. The PASSENGER AIRBAG
OFF indicator lamp must light up.
If the PASSENGER AIR BAG OFF indicator
lamp remains off and/or the PASSENGER AIR BAG ON indicator lamp lights up, do not install
a rearward-facing child restraint system on
the front-passenger seat. Further information can be found under "Problems with the auto-matic front-passenger front airbag deactiva-
tion system" (Y page 59). Occupant safety
55Safety Z
Page 136 of 489
Useful information
............................134
Exterior lighting ................................ 134
Interior lighting ................................. 140
Replacing bulbs ................................. 141
Windscreen wipers ...........................146 133Lights and windscreen wipers
Page 143 of 489
Adaptive Highbeam Assist Plus cannot take
into account road, weather or traffic condi-
tions. Adaptive Highbeam Assist Plus is only
an aid. You are responsible for adjusting the
vehicle's lighting to the prevailing light, visi-
bility and traffic conditions.
In particular, the detection of obstacles can
be restricted if there is:
R poor visibility, e.g. due to fog, heavy rain or
snow
R dirt on the sensors or if the sensors are
obscured
Switching Adaptive Highbeam Assist
PLUS on/off X
To switch on: turn the light switch to Ã.
X Press the combination switch beyond the
pressure point in the direction of arrow :.
The _ indicator lamp in the multifunc-
tion display lights up when it is dark and the light sensor activates the dipped-beam
headlamps.
If you are driving at speeds above 25 km/h:
The headlamp range is set automatically
depending on the distance between the
vehicle and other road users.
If you are driving at speeds above approx-
imately 30 km/h and no other road users
are recognised:
The main-beam headlamps are switched on
automatically. The Kindicator lamp in
the instrument cluster also lights up.
If you are driving at speeds above 45 km/h and other road users are recognised:
Partial main-beam is selected automati-
cally. The Kindicator lamp in the instru-
ment cluster also lights up.
If you are driving at speeds below approx-
imately 40 km/h:
The partial main-beam headlamps are
switched off automatically. If no other road users are recognised, the main-beam head-
lamps are switched on. If you are driving at speeds below approx-
imately 25 km/h or the roads are ade-
quately illuminated:
The main-beam headlamps are switched off
automatically. The Kindicator lamp in
the instrument cluster goes out. The _
indicator lamp in the multifunction display
remains lit.
X To switch off: move the combination
switch back to its normal position or move the light switch to another position.
The _ indicator lamp in the multifunc-
tion display goes out. Headlamps misted up on the inside
Certain climatic and physical conditions may
cause moisture to form in the headlamp. This
moisture does not affect the functionality of
the headlamp. Interior lighting
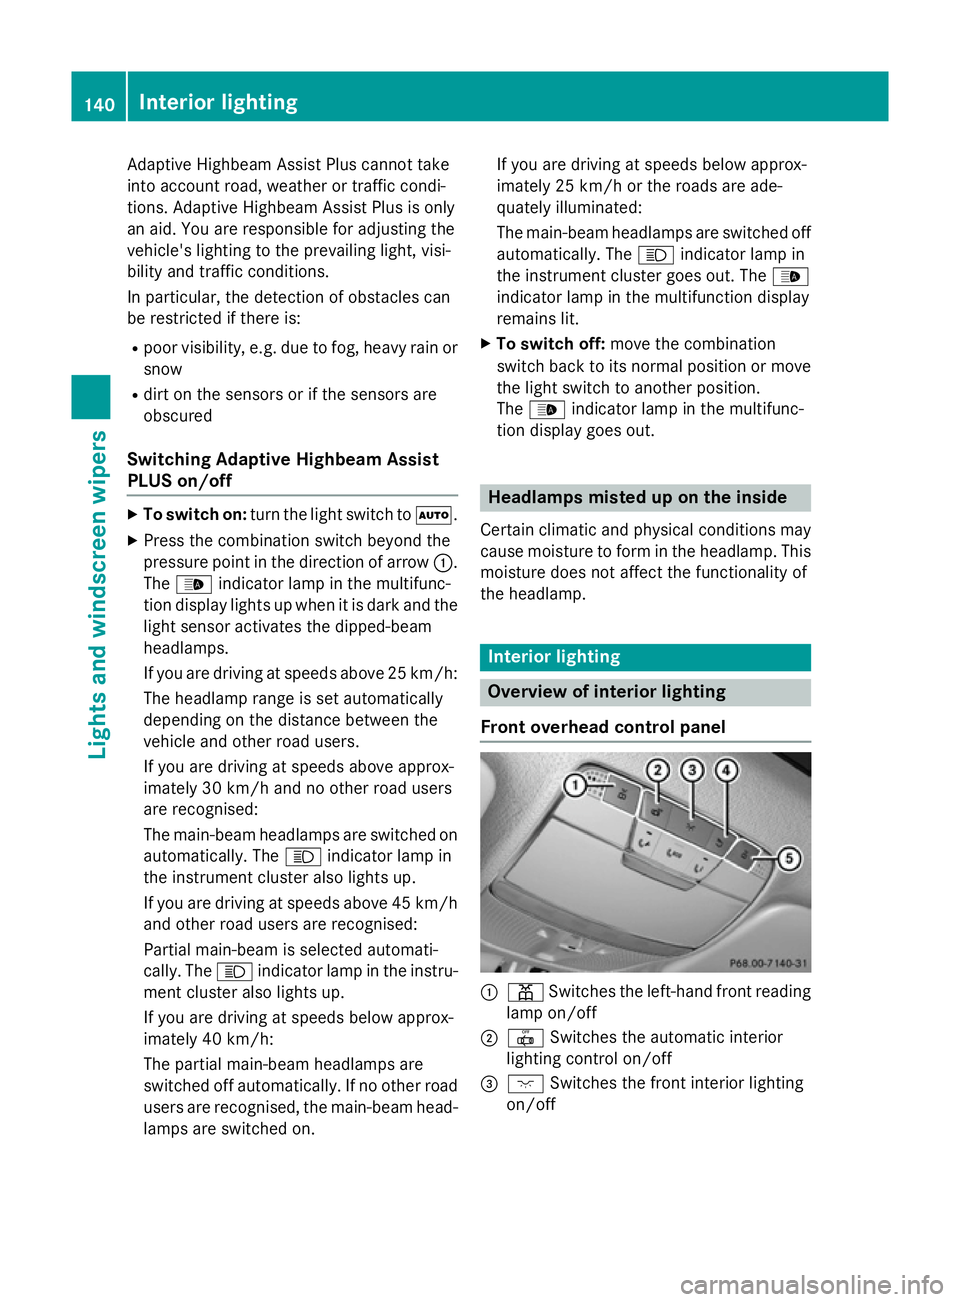
Overview of interior lighting
Front overhead control panel :
p Switches the left-hand front reading
lamp on/off
; | Switches the automatic interior
lighting control on/off
= c Switches the front interior lighting
on/off 140
Interior lightingLights and
windscreen wipers
Page 144 of 489
?
u Switches the rear interior lighting
on/off
A p Switches the right-hand front read-
ing lamp on/off
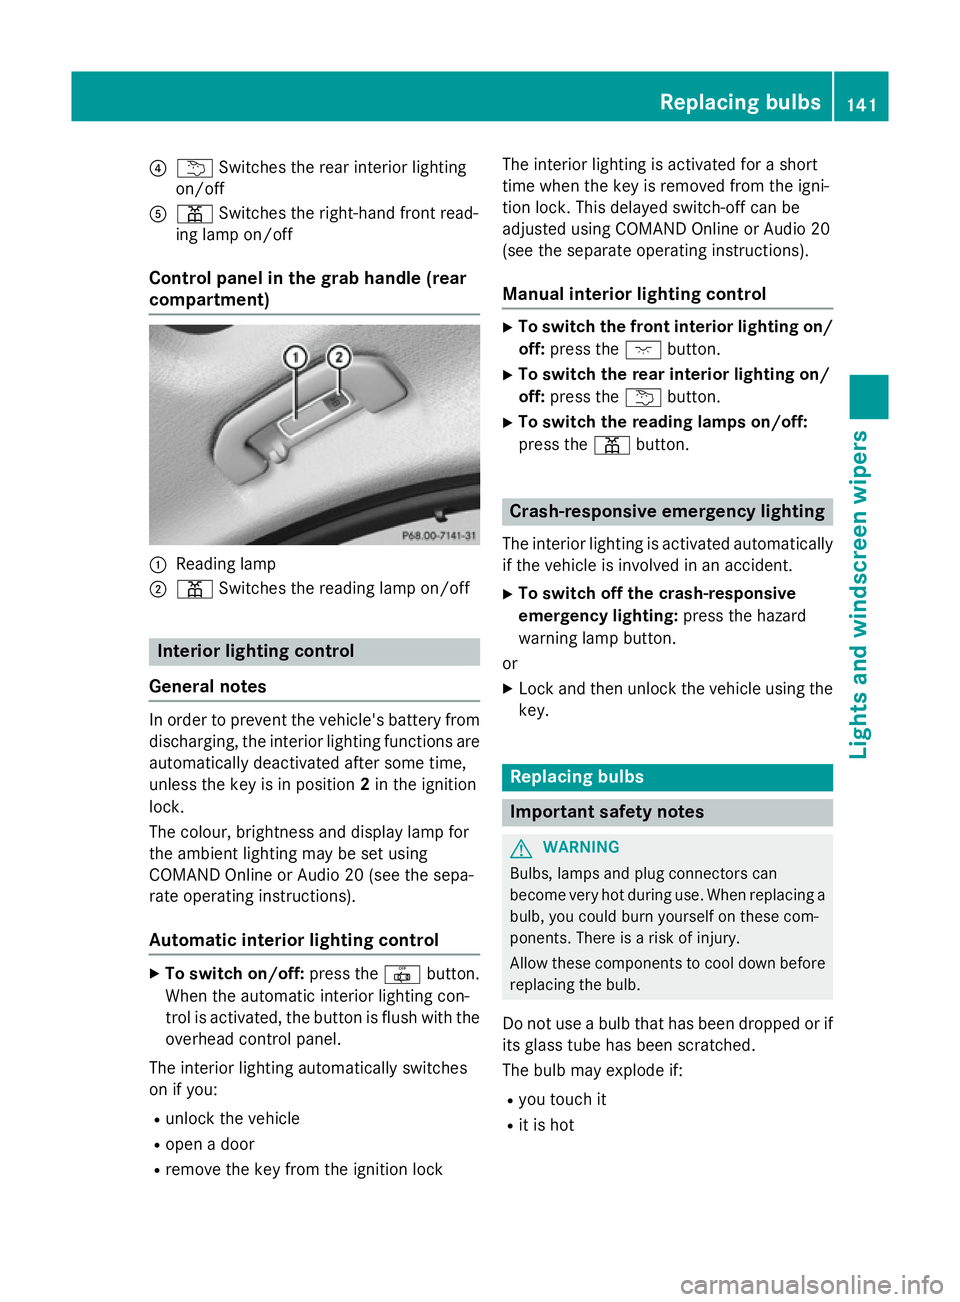
Control panel in the grab handle (rear
compartment) :
Reading lamp
; p Switches the reading lamp on/off Interior lighting control
General notes In order to prevent the vehicle's battery from
discharging, the interior lighting functions are
automatically deactivated after some time,
unless the key is in position 2in the ignition
lock.
The colour, brightness and display lamp for
the ambient lighting may be set using
COMAND Online or Audio 20 (see the sepa-
rate operating instructions).
Automatic interior lighting control X
To switch on/off: press the|button.
When the automatic interior lighting con-
trol is activated, the button is flush with the overhead control panel.
The interior lighting automatically switches
on if you:
R unlock the vehicle
R open a door
R remove the key from the ignition lock The interior lighting is activated for a short
time when the key is removed from the igni-
tion lock. This delayed switch-off can be
adjusted using COMAND Online or Audio 20
(see the separate operating instructions).
Manual interior lighting control X
To switch the front interior lighting on/
off: press the cbutton.
X To switch the rear interior lighting on/
off: press the ubutton.
X To switch the reading lamps on/off:
press the pbutton. Crash-responsive emergency lighting
The interior lighting is activated automatically
if the vehicle is involved in an accident.
X To switch off the crash-responsive
emergency lighting: press the hazard
warning lamp button.
or X Lock and then unlock the vehicle using the
key. Replacing bulbs
Important safety notes
G
WARNING
Bulbs, lamps and plug connectors can
become very hot during use. When replacing a bulb, you could burn yourself on these com-
ponents. There is a risk of injury.
Allow these components to cool down beforereplacing the bulb.
Do not use a bulb that has been dropped or if
its glass tube has been scratched.
The bulb may explode if:
R you touch it
R it is hot Replacing bulbs
141Lights and windscreen wipers Z
Page 163 of 489
Information about using
THERMOTRONIC automatic climate
control
THERMOTRONIC automatic climate
control The following contains instructions and rec-
ommendations to enable you to get the most
out of your THERMOTRONIC automatic cli-
mate control.
R Activate climate control using the Ã
rocker switch. The indicator lamp above
the à rocker switch lights up. The "Cool-
ing with air dehumidification" function is
not activated automatically in automatic
mode. If necessary, activate this function
(Y page 161).
R Set the temperature to 22 †.
R Only use the windscreen demisting func-
tion briefly until the windscreen is clear
again.
R Only use air-recirculation mode briefly, e.g.
if there are unpleasant outside odours or
when in a tunnel. The windows could oth-
erwise mist up as no fresh air is drawn into the vehicle in air-recirculation mode.
R Use the residual heat function if you want to
heat or ventilate the vehicle interior when
the ignition is switched off. The residual
heat function can only be activated or deac-
tivated with the ignition switched off. The
residual heat function is deactivated when
the ignition is switched on.
AGILITY SELECT switch You can choose between various drive pro-
grams with the AGILITY SELECT switch
(Y page 201).
If you have selected drive program E, the cli-
mate control switches to Eco mode. In Eco mode:
R the cooling output is reduced when cooling
R when heating, the electrical heater booster
is deactivated and heat output is reduced
as a result
R the rear window heating running time is
reduced
If you have selected drive program C,Sor S+
the climate control switches to Comfort
mode. The current climate control settings
are maintained in Comfort mode.
ECO start/stop function During automatic engine switch-off, the cli-
mate control only operates at a reduced capa-
city. If you require the full climate control out-
put, you can switch off the ECO start/stop
function by pressing the ECO button
(Y page 191).
Hybrid vehicles The "Cooling with air dehumidification" func-
tion is available when the vehicle is opera-
tional and the indicator lamp above the
¿
rocker switch is lit.
If the internal combustion engine has been
shut off automatically, the set interior tem-
perature will be maintained for a certain
period of time. Operating the climate control system
Switching climate control on/off
General notes When the climate control is switched off, the
air supply and air circulation are also
switched off. The windows could mist up.
Therefore, only switch off climate control
briefly.
Switch on climate control primarily using the à rocker switch (Y page 162).160
Operating the climate control systemClimate cont
rol
Page 171 of 489
Problems with the rear window heating
Problem
Possible causes/consequences and
M
MSolutions The rear window heat-
ing has switched off
prematurely or cannot
be activated. The battery has not been sufficiently charged.
X Switch off any consumers that are not required, e.g. reading
lamps, interior lighting or the seat heating.
When the battery is sufficiently charged, the rear window heat- ing can be activated again. Activating/deactivating air-recircula-
tion mode
General notes You can also temporarily deactivate the flow
of fresh air manually if unpleasant odours are
entering the vehicle from outside. The air
already inside the vehicle will then be recir-
culated.
If you activate air-recirculation mode, the win-
dows can mist up more quickly, in particular
at low temperatures. Only use air-recircula-
tion mode briefly to prevent the windows
misting up.
Activating/deactivating X
Turn the key to position 2in the ignition
lock (Y page 185).
X To activate: press thegrocker switch
up or down.
The indicator lamp above the grocker
switch lights up.
Air-recirculation mode is activated automati-
cally: R at high outside temperatures
R at high levels of pollution (THERMOTRONIC
automatic climate control only)
R in a tunnel (vehicles with a navigation sys-
tem only)
The indicator lamp above the grocker
switch is not lit when automatic air-recircula- tion mode is activated. Outside air is added
after approximately 30 minutes. X
To deactivate: press thegrocker
switch up or down.
The indicator lamp above the grocker
switch goes out.
Air-recirculation mode is deactivated auto-
matically:
R after approximately five minutes at outside
temperatures below approximately 5 †
R after approximately five minutes if cooling
with air dehumidification is deactivated
R after approximately 30 minutes at outside
temperatures above approximately 5 † if
the cooling with air dehumidification func-
tion is activated Convenience opening/closing using
the air-recirculation button
G
WARNING
When the convenience closing feature is oper- ating, parts of the body could become trapped
in the closing area of the side window and the
sliding sunroof. There is a risk of injury.
Observe the complete closing procedure
when the convenience closing feature is oper-
ating. When closing make sure that no parts of the body are in the closing area. G
WARNING
During convenience opening parts of the body could be drawn in or become trapped
between the side window and window frame.
There is a risk of injury. 168
Operating the climate control systemClimate control
Page 172 of 489
When opening, make sure that nobody is
touching the side window. If someone
becomes trapped, press the Wswitch
immediately to open/close the side window
in the door. The side window stops. To con-
tinue closing the side window, pull on the
W switch.
X Convenience closing feature (vehicles
with a sliding sunroof/panorama slid-
ing sunroof): press and hold the g
rocker switch up or down until the side win- dows and the sliding sunroof/panorama
sliding sunroof start to close automatically.The indicator lamp above the grocker
switch lights up. Air-recirculation mode is
activated.
X Convenience closing feature (vehicles
without a sliding sunroof/panorama
sliding sunroof): press and hold the g
rocker switch up or down until the side win- dows start to close automatically.
The indicator lamp above the grocker
switch lights up. Air-recirculation mode is
activated.
If you open the side windows or the sliding sunroof/panorama sliding sunroof man-
ually after closing them with the conveni-
ence closing feature, they will remain in this
position when opened using the conveni-
ence opening feature.
If parts of the body are in the closing area
during convenience closing, proceed as fol-
lows:
X Press the Wbutton for opening/closing
the side windows.
The side windows stop.
X To then open the side window, press the
W button again.
X Only vehicles with sliding sunroof/
panorama sliding sunroof: press the3
switch to open/close the sliding sun-
roof/panorama sliding sunroof.
The sliding sunroof/panorama sliding sun-
roof stops.
X To then open the sliding sunroof/pano-
rama sliding sunroof, pull back on the 3
button.
Notes on the automatic reversing feature for:
R the side windows (Y page 107)
R the sliding sunroof/panorama sliding sun-
roof (Y page 111)
X Convenience opening feature (vehicles
with a sliding sunroof/panorama slid-
ing sunroof): press and hold the g
rocker switch up or down until the side win- dows and the sliding sunroof/panorama
sliding sunroof start to open automatically.
The indicator lamp above the grocker
switch goes out. Air-recirculation mode is
deactivated.
X Convenience opening feature (vehicles
without a sliding sunroof/panorama
sliding sunroof): press and hold the g
rocker switch up or down until the side win- dows start to open automatically.
The indicator lamp above the grocker
switch goes out. Air-recirculation mode is
deactivated. Activating/deactivating the residual
heat function
General notes The residual heat function is only available
with THERMOTRONIC automatic climate con- trol and THERMATIC automatic climate con-
trol with auxiliary heating.
Once the engine is switched off, it is possible
to make use of the residual heat of the engine to continue heating or ventilating the front
compartment of the vehicle for approximately
30 minutes. The heating or ventilation time
depends on the set interior temperature. Operating the climate control system
169Climate control Z
Page 173 of 489
Activating/deactivating
X
Turn the key to position 0in the ignition
lock or remove it (Y page 185).
X To activate: press the!rocker switch
up or down.
The indicator lamp above the !rocker
switch lights up.
The blower will run at a low speed regardless of the airflow setting.
If you activate the residual heat function at
high temperatures, only the ventilation will be
activated. The blower runs at medium speed.
X To deactivate: press the!rocker
switch up or down.
The indicator lamp above the !rocker
switch goes out.
Residual heat is deactivated automatically:
R after approximately 30 minutes
R when the ignition is switched on
R if the battery voltage drops
R when the auxiliary heating is switched on Perfume atomiser
Operating the perfume atomiser G
WARNING
If children open the perfume vial, they could
drink the perfume or it could come into con-
tact with their eyes. There is a risk of injury. Do not leave children unsupervised in the vehicle.
If the perfume liquid has been drunk, consult
a doctor. If perfume comes into contact with
your eyes or skin, rinse the eyes with clean
water. If you continue to experience difficul-
ties, consult a doctor. H
Environmental note Full perfume vials must not
be disposed of with house-
hold rubbish. They must be
collected separately and dis-
posed of in an environmen- tally responsible recycling
system.
Dispose of full perfume vials
in an environmentally
responsible manner and
take them to a special waste
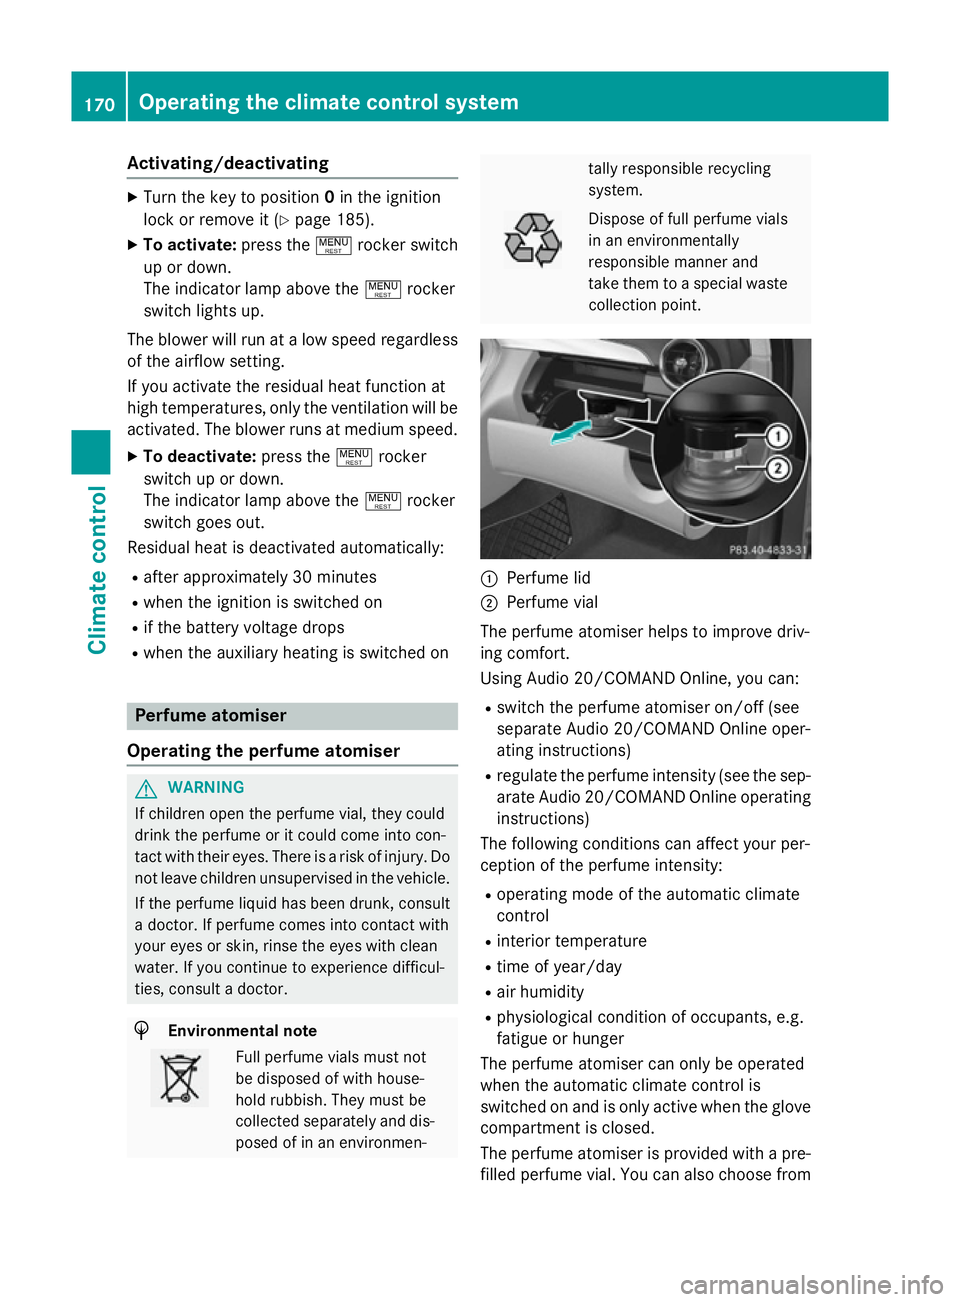
collection point. :
Perfume lid
; Perfume vial
The perfume atomiser helps to improve driv-
ing comfort.
Using Audio 20/COMAND Online, you can:
R switch the perfume atomiser on/off (see
separate Audio 20/COMAND Online oper-
ating instructions)
R regulate the perfume intensity (see the sep-
arate Audio 20/COMAND Online operating
instructions)
The following conditions can affect your per-
ception of the perfume intensity:
R operating mode of the automatic climate
control
R interior temperature
R time of year/day
R air humidity
R physiological condition of occupants, e.g.
fatigue or hunger
The perfume atomiser can only be operated
when the automatic climate control is
switched on and is only active when the glove compartment is closed.
The perfume atomiser is provided with a pre-
filled perfume vial. You can also choose from 170
Operating the climate control systemClimate cont
rol
Page 180 of 489
iliary heating could switch from ventilation
mode to heating mode or from heating mode to ventilation mode.
The auxiliary heating switches off when the
engine is switched off. The auxiliary ventila-
tion is not active if the engine is running.
The auxiliary heating/ventilation switches off
automatically after 30 minutes. This time limit can be altered. To do this, visit a qualified
specialist workshop.
You cannot use the auxiliary ventilation to
cool the vehicle interior to a temperature
lower than the outside temperature.
Before switching on X
Turn the key to position 2in the ignition
lock (Y page 185).
X Set the desired temperature using the
w rocker switch on the front control
unit.
or X Set the desired temperature using
Audio 20/COMAND Online; see the sepa-
rate operating instructions.
If you do not alter the temperature before
switching on the auxiliary heating, the last
temperature setting will be adopted.
Auxiliary heating or ventilation can also be
switched on if the manually set climate con-
trol is activated. Optimum comfort can be
attained when the system is set to automatic
mode. Set the temperature to 22 †.
You can activate or deactivate the auxiliary
heating/ventilation:
R using the rocker switch on the centre con-
sole (Y page 177)
R using the remote control (Y page 177)
The on-board computer can be used to spec- ify up to three departure times, one of which
may be preselected:
R using the remote control (Y page 177)
R using Audio 20/COMAND Online; see the
separate operating instructions Switching the auxiliary heating/venti-
lation on/off using the centre console
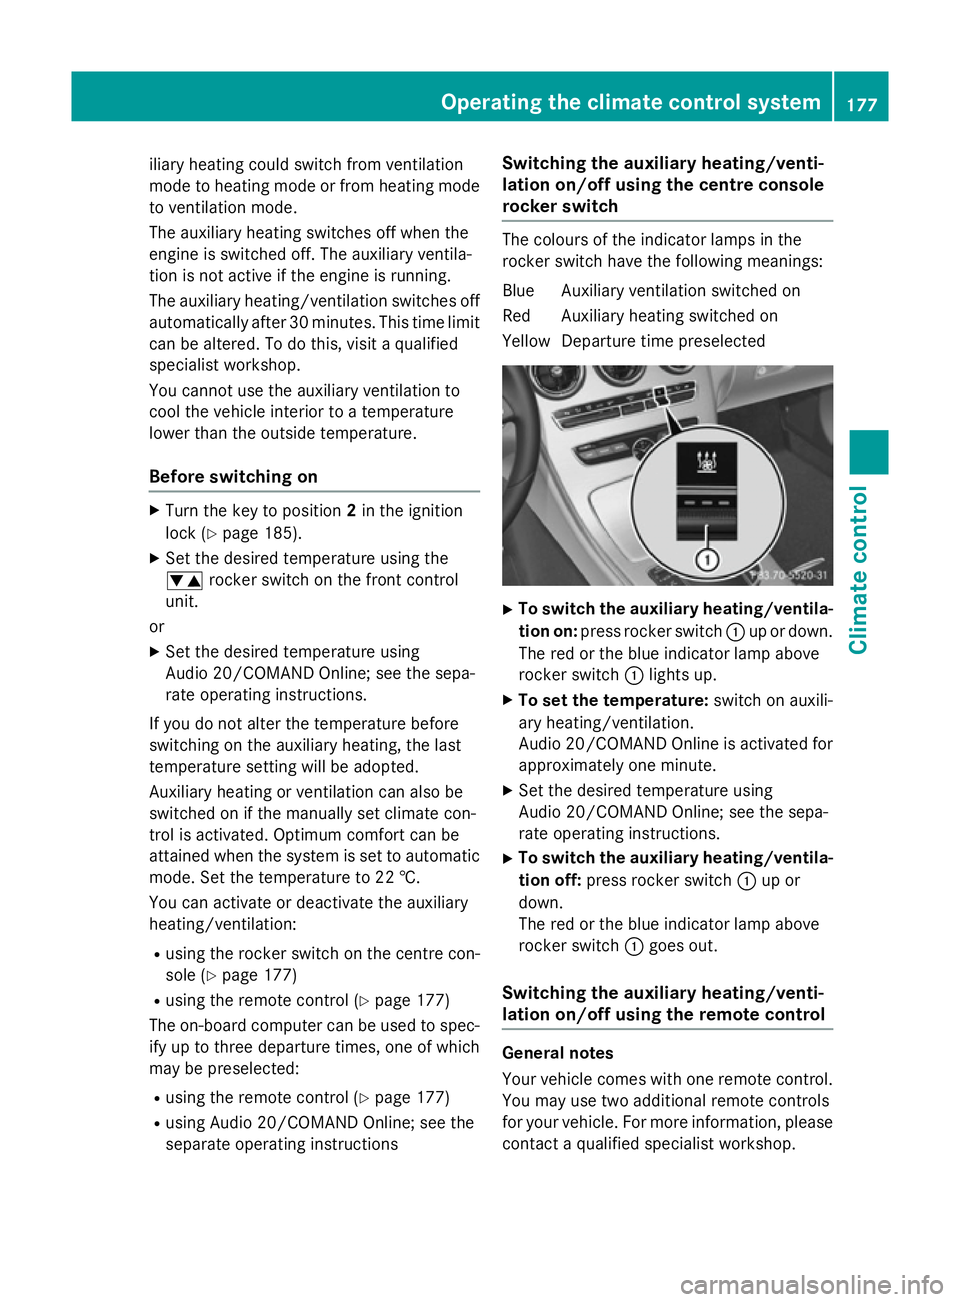
rocker switch The colours of the indicator lamps in the
rocker switch have the following meanings:
Blue Auxiliary ventilation switched on
Red Auxiliary heating switched on
Yellow Departure time preselected X
To switch the auxiliary heating/ventila-
tion on: press rocker switch :up or down.
The red or the blue indicator lamp above
rocker switch :lights up.
X To set the temperature: switch on auxili-
ary heating/ventilation.
Audio 20/COMAND Online is activated for approximately one minute.
X Set the desired temperature using
Audio 20/COMAND Online; see the sepa-
rate operating instructions.
X To switch the auxiliary heating/ventila-
tion off: press rocker switch :up or
down.
The red or the blue indicator lamp above
rocker switch :goes out.
Switching the auxiliary heating/venti-
lation on/off using the remote control General notes
Your vehicle comes with one remote control.
You may use two additional remote controls
for your vehicle. For more information, pleasecontact a qualified specialist workshop. Operating the climate control system
177Climate control Z