MERCEDES-BENZ C-CLASS ESTATE 2020 Owners Manual
Manufacturer: MERCEDES-BENZ, Model Year: 2020, Model line: C-CLASS ESTATE, Model: MERCEDES-BENZ C-CLASS ESTATE 2020Pages: 565, PDF Size: 10.27 MB
Page 141 of 565
Ad
justing the brightness #
Select Brightness . #
Set a brightness value.
Ac tivating the brightness for zones #
Select Brightness zones .#
Activate Oor deacti vate ª the function.
The Display ,Front andRear zones can be set
separately. Setting
the interior lighting switch-off delay
time Multimedia sy
stem:
4 Vehicle 5
÷ Light settings
5 Interior light shut-off #
Set the switch-off delay time. Changing bulbs (only
forve hicles with halo‐
ge n headla mps) Note
s onchanging bulbs &
WARNING Risk of burn s from hot com‐
ponent parts whilst replacing a bulb
Bulbs, lamps and plugs can become very hot
during operation.
When replacing a bulb, you could burn your‐
self on these component parts. #
Allow the component parts tocool
down before replacing the bulb. R
Do not use a bulb if it has been dropped or if
itsglass has been sc ratched. The bulb may
ot herwise explode.
R Do not touch theglass bulb with your bare
hands.
R Protect bulbs from moisture and do not allow
bulbs tocome into contact wi thliquids. Overview of
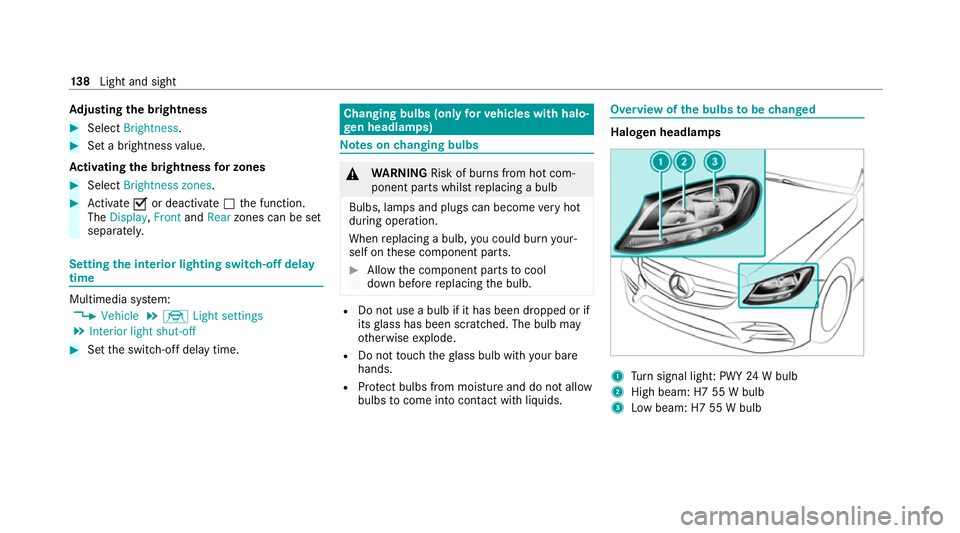
the bulbs tobe changed Halogen headlamps
1
Turn signal light: PWY 24W bulb
2 High beam: H7 55 W bulb
3 Low beam: H7 55 W bulb 13 8
Light and sight
Page 142 of 565
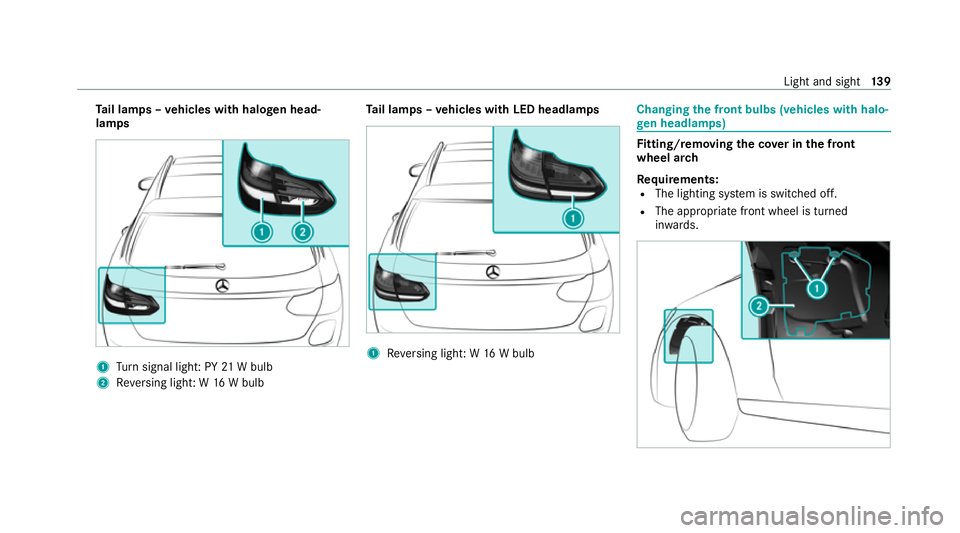
Ta
il lamps – vehicles with halogen head‐
lamps 1
Turn signal light: PY 21W bulb
2 Reversing light: W 16W bulb Ta
il lamps – vehicles with LED headlamps 1
Reversing light: W 16W bulb Changing
the front bulbs (vehicles with halo‐
ge n headla mps) Fi
tting/ removing the co ver in the front
wheel ar ch
Re quirements:
R The lighting sy stem is switched off.
R The appropriate front wheel is turned
inwa rds. Light and sight
13 9
Page 143 of 565
#
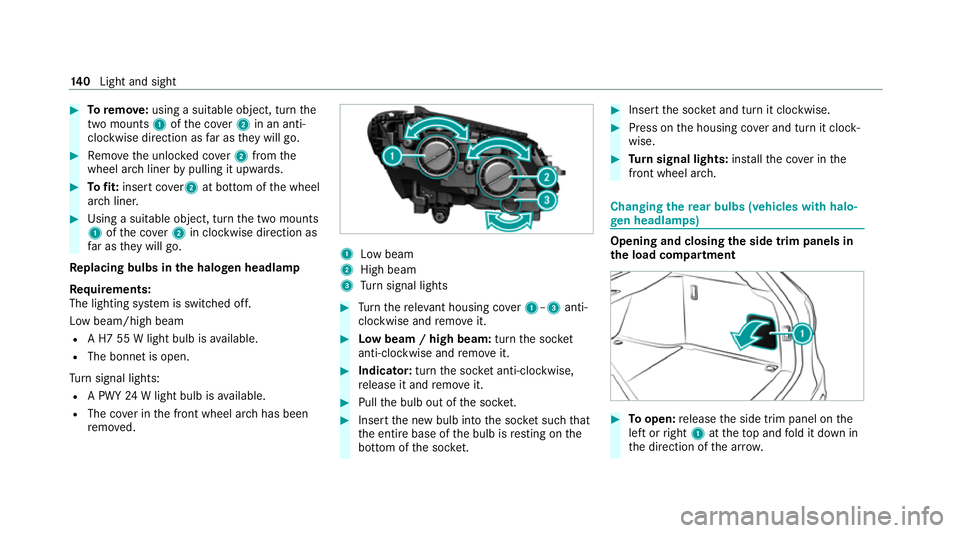
Toremo ve:using a suitable object, turn the
two mounts 1ofthe co ver2 in an anti-
clockwise direction as far as they will go. #
Remo vethe unloc ked co ver2 from the
wheel ar chliner bypulling it upwards. #
Tofit: inse rtco ver 2 at bottom of the wheel
ar ch liner. #
Using a suitable object, turn the two mounts
1 ofthe co ver2 in clockwise direction as
fa r as they will go.
Re placing bulbs in the halo gen headla mp
Re quirements:
The lighting sy stem is switched off.
Low beam/high beam
R A H7 55 W light bulb is available.
R The bonnet is open.
Tu rn signal lights:
R A PWY 24W light bulb is available.
R The co ver in the front wheel ar chhas been
re mo ved. 1
Low beam
2 High beam
3 Turn signal lights #
Turn there leva nt housing co ver1–3 anti-
clockwise and remo veit. #
Low beam / high beam: turnthe soc ket
anti-clockwise and remo veit. #
Indicator: turnthe soc ket anti-clo ckwise,
re lease it and remo veit. #
Pull the bulb out of the soc ket. #
Inse rtthe new bulb into the soc ket su chthat
th e entire base of the bulb is resting on the
bottom of the soc ket. #
Inse rtthe soc ket and turn it clo ckwise. #
Press on the housing co ver and turn it clock‐
wise. #
Turn signal lights: installth e co ver in the
front wheel ar ch. Changing
there ar bulbs (vehicles with halo‐
ge n headla mps) Opening and closing
the side trim panels in
th e load compa rtment #
Toopen: release the side trim panel on the
left or right 1attheto p and fold it down in
th e direction of the ar row. 14 0
Light and sight
Page 144 of 565
#
Toclose: reinse rtside trim panel1.
Re placing the tail lamp bulbs
Re quirements:
The lighting sy stem is switched off.
The tailgate is open.
Tu rn signal lights:
R PY21W bulb
R The side trim panel is open.
% The bulb forth e turn signal lights can only be
ch anged in vehicles with halogen headlamp s.
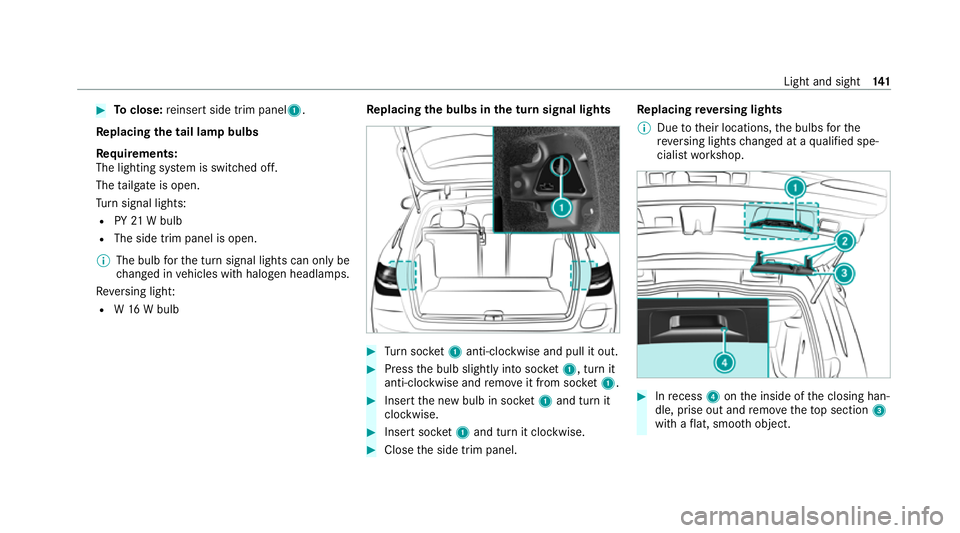
Re versing light:
R W16 W bulb Re
placing the bulbs in the turn signal lights #
Turn soc ket1 anti-clo ckwise and pull it out. #
Press the bulb slightly into soc ket1, turn it
anti-clo ckwise and remo veit from soc ket1. #
Inse rtthe new bulb in soc ket1 and turn it
clo ckwise. #
Insert soc ket1 and turn it clo ckwise. #
Close the side trim panel. Re
placing reve rsing lights
% Due totheir locations, the bulbs forthe
re ve rsing lights changed at a qualified spe‐
cialist workshop. #
Inrecess 4onthe inside of the closing han‐
dle, prise out and remo vetheto p section 3
with a flat, smo oth object. Light and sight
141
Page 145 of 565

#
Pull there maining lo wer section of handle
1 with a strong tug toremo veit from the
trim and then place it toone side. #
Reach under theright-hand side of trim 7
and lightly tug along the entire length of the
trim in order tounclip it. #
Release and remo veconnector 6forthe
sur round lighting. #
Vehicles with EASY -PAC K tailgate: pull out
th e plug connector forth e switch in thetop
ri ght of the trim. #
Vehicles with electric fold-out trailer tow
hit ch: unlo ckand pull out the plug connector
fo rth e switch in theto p left of the trim. #
Place trim 7toone side. #
Onthe appropriate side, unclip there maining
section of trim 8with a strong tug until
bulb holder 9is accessible. #
Remo vethe light bulb from bulb holder 9. #
Insert the new bulb in bulb holder 9. #
Position trim 8and engage it in place by
ge ntly tapping it with your hand. #
Check that all of the me tal clips are inse rted
in the sections that we replaced toone side:
two clips 2forth e upper section of handle
3, four clips 5forth e trim 7. 14 2
Light and sight
Page 146 of 565
#
If not, remo vethe missing me tal clips from
th e panel apertures in theta ilgate and inse rt
th em in the cor responding positions. #
Take trim 7and connect plug connector 6
to the sur round lighting.
The sur round lighting does not illuminate
until theta ilgate has been closed and then
opened again. #
Vehicles with EASY -PAC K tailgate: insert
th e plug connector forth e switch in thetop
ri ght of the trim. #
Vehicles with electric fold-out trailer tow
hit ch: inse rtthe plug connector forthe
switch in theto p left of the trim. #
Position trim 7and engage it in place by
ge ntly tapping it with your hand, starting
from the outside. #
Clip in the lo wer section of handle 1again. #
Insert and engage the upper section of han‐
dle 3into lo wer section 1. Wi
ndscreen wipers and windscreen washer
sy stem Switching
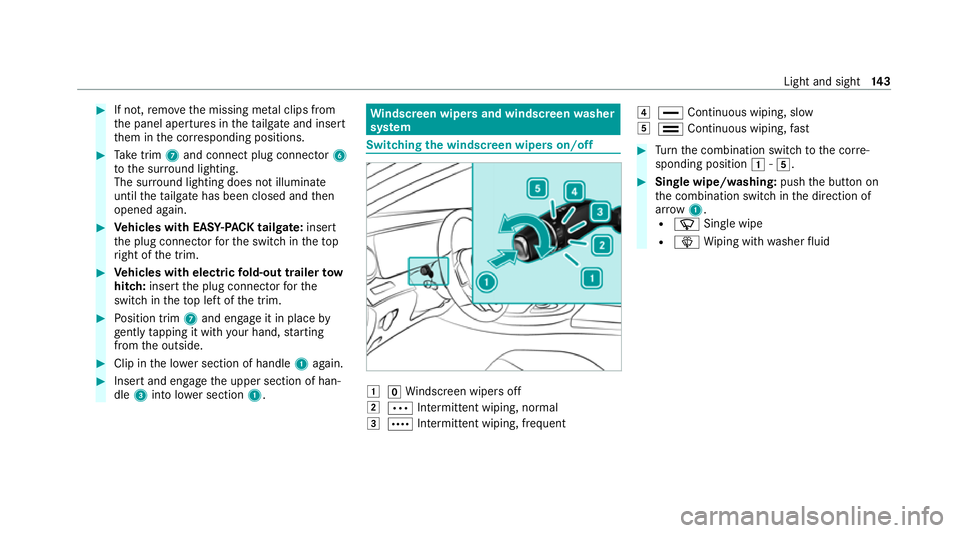
the windscreen wipers on/off 1
gWindsc reen wipers off
2 Ä Intermittent wiping, normal
3 Å Intermittent wiping, frequent 4
° Continuous wiping, slow
5 ¯ Continuous wiping, fast #
Turn the combination switch tothe cor re‐
sponding position 1-5. #
Single wipe/washing: pushthe button on
th e combination switch in the direction of
ar row 1.
R í Single wipe
R î Wiping with washer fluid Light and sight
14 3
Page 147 of 565
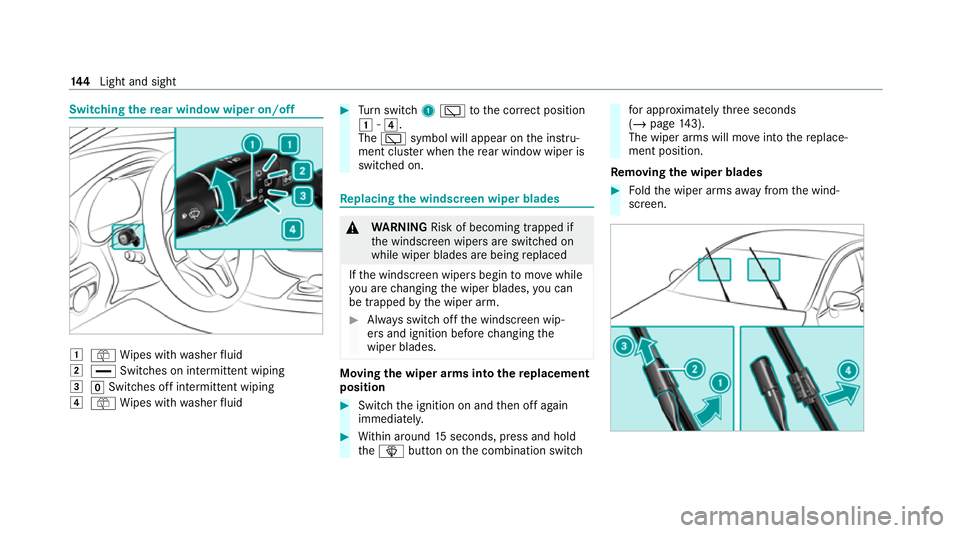
Switching
there ar window wiper on/off 1
ô Wipes with washer fluid
2 ° Switches on intermittent wiping
3 gSwitches off intermittent wiping
4 ô Wipes with washer fluid #
Turn switch 1è tothe cor rect position
1 -4.
The è symbol will appear on the instru‐
ment clus ter when there ar wind owwiper is
swit ched on. Re
placing the windsc reen wiper blades &
WARNING Risk of becoming trapped if
th e windscreen wipers are switched on
while wiper blades are being replaced
If th e windscreen wipers begin tomo vewhile
yo u are changing the wiper blades, you can
be trapped bythe wiper arm. #
Alw ays switch off the windscreen wip‐
ers and ignition before changing the
wiper blades. Moving
the wiper arms into there placement
position #
Switch the ignition on and then off again
immediatel y. #
Within around 15seconds, press and hold
th eî button on the combination switch fo
r appro ximately thre e seconds
(/ page 143).
The wiper arms will mo veinto there place‐
ment position.
Re moving the wiper blades #
Foldthe wiper arms away from the wind‐
screen. 14 4
Light and sight
Page 148 of 565
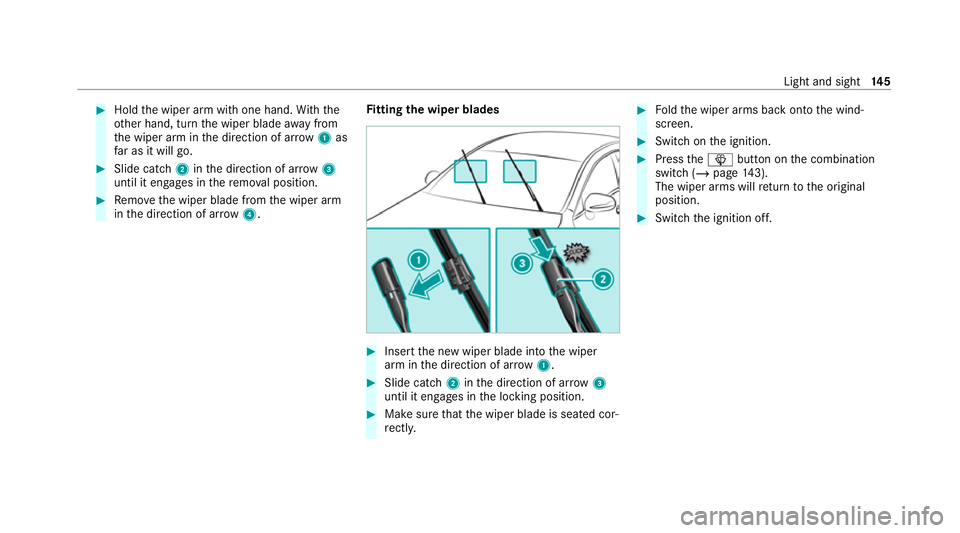
#
Hold the wiper arm with one hand. With the
ot her hand, turn the wiper blade away from
th e wiper arm in the direction of ar row 1 as
fa r as it will go. #
Slide catch 2inthe direction of ar row 3
until it engages in there mo val position. #
Remo vethe wiper blade from the wiper arm
in the direction of ar row4. Fi
tting the wiper blades #
Inse rtthe new wiper blade into the wiper
arm in the direction of ar row1. #
Slide catch 2inthe direction of ar row 3
until it engages in the locking position. #
Make sure that the wiper blade is seated cor‐
re ctly. #
Foldthe wiper arms back onto the wind‐
screen. #
Switch on the ignition. #
Press theî button on the combination
switch (/ page143).
The wiper arms will return tothe original
position. #
Switch the ignition off. Light and sight
14 5
Page 149 of 565
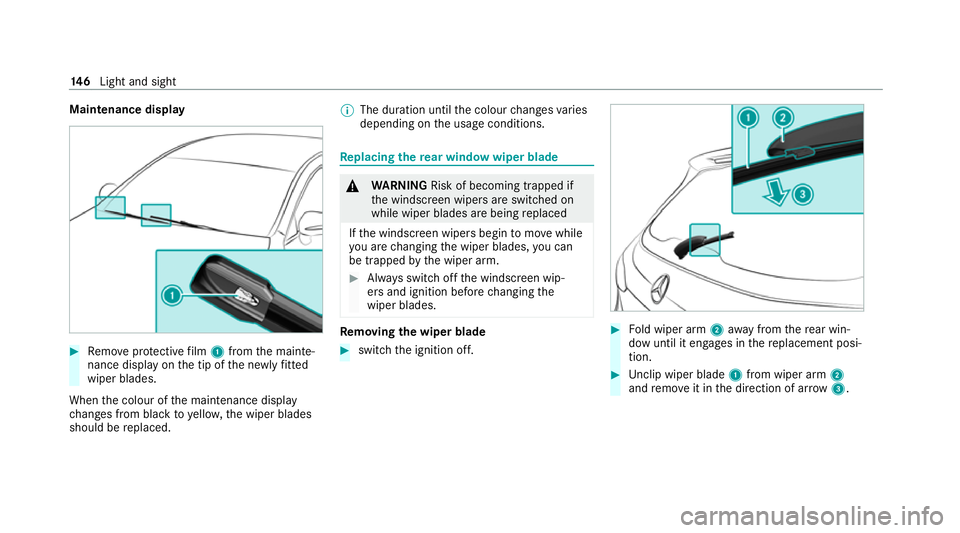
Maintenance display
#
Remo veprotective film 1 from the mainte‐
nance display on the tip of the newly fitted
wiper blades.
When the colour of the maintenance display
ch anges from black to yellow, the wiper blades
should be replaced. %
The duration until the colour changes varies
depending on the usage conditions. Re
placing the rear window wiper blade &
WARNING Risk of becoming trapped if
th e windscreen wipers are switched on
while wiper blades are being replaced
If th e windscreen wipers begin tomo vewhile
yo u are changing the wiper blades, you can
be trapped bythe wiper arm. #
Alw ays switch off the windscreen wip‐
ers and ignition before changing the
wiper blades. Re
moving the wiper blade #
switch the ignition off. #
Fold wiper arm 2away from there ar win‐
dow until it engages in there placement posi‐
tion. #
Unclip wiper blade 1from wiper arm 2
and remo veit in the direction of ar row 3. 14 6
Light and sight
Page 150 of 565
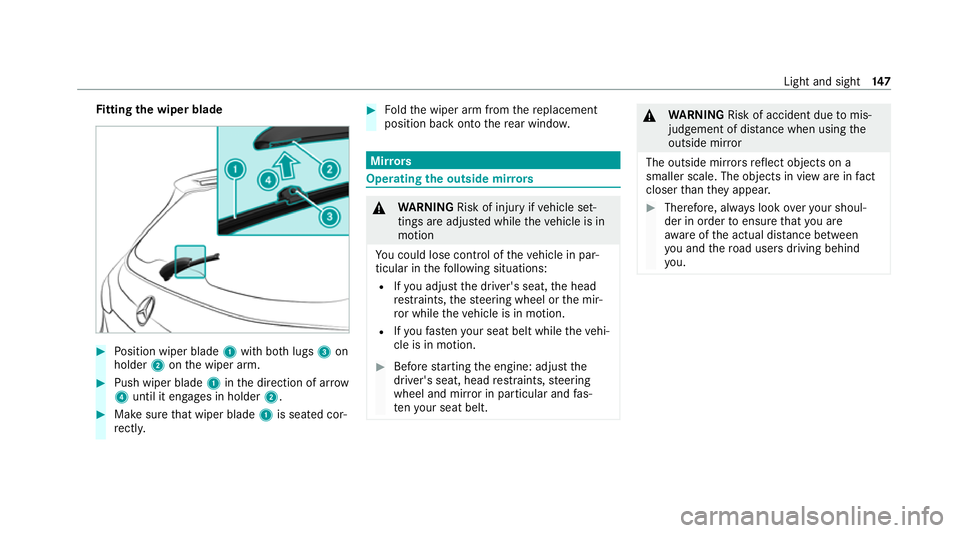
Fi
tting the wiper blade #
Position wiper blade 1with bo thlugs 3on
holder 2onthe wiper arm. #
Push wiper blade 1inthe direction of ar row
4 until it en gage s in holder 2. #
Make sure that wiper blade 1is seated cor‐
re ctly. #
Foldthe wiper arm from there placement
position back onto there ar wind ow. Mir
rors Operating
the outside mir rors &
WARNING Risk of injury ifve hicle set‐
tings are adjus ted while theve hicle is in
motion
Yo u could lose cont rol of theve hicle in par‐
ticular in thefo llowing situations:
R Ifyo u adjust the driver's seat, the head
re stra ints, thesteering wheel or the mir‐
ro r while theve hicle is in motion.
R Ifyo ufast enyour seat belt while theve hi‐
cle is in motion. #
Before starting the engine: adjust the
driver's seat, head restra ints, steering
wheel and mir ror in particular and fas‐
te nyo ur seat belt. &
WARNING Risk of accident due tomis‐
judgement of dis tance when using the
outside mir ror
The outside mir rors reflect objects on a
smaller scale. The objects in view are in fact
closer than they appear. #
Therefore, alw ays look over your shoul‐
der in order toensure that you are
aw are of the actual dis tance between
yo u and thero ad users driving behind
yo u. Light and sight
147