roof rack MERCEDES-BENZ C-CLASS ESTATE 2020 Owners Manual
[x] Cancel search | Manufacturer: MERCEDES-BENZ, Model Year: 2020, Model line: C-CLASS ESTATE, Model: MERCEDES-BENZ C-CLASS ESTATE 2020Pages: 565, PDF Size: 10.27 MB
Page 24 of 565
Pr
otection of the environment
* NO
TEPlug-in hybrid #
Obser vethe no tes in the Supplement.
Yo u could otherwise failto recognise
dangers. +
ENVI
RONMENTAL NOTEEnvironmental
dama gedue tooperating conditions and
personal driving style The pollutant emission of
theve hicle is
directly related tothewa yyo u operate the
ve hicle.
Operate your vehicle in an environmentally
re sponsible manner tohelp pr otect the envi‐
ro nment. Please obser vethefo llowing rec‐
ommendations on ope rating conditions and
pe rsonal driving style.
Operating conditions: #
Make sure that the tyre pressure is cor‐
re ct. #
Do not car ryany unnecessary weight
(e.g. roof luggage rack s once you no
lon ger need them). #
Adhere tothe service inter vals.
A regularly serviced vehicle will contri b‐
ute toenvironmen tal pr otection. #
Alw ays ha vemaintenance workcar ried
out at a qualified specialist workshop.
Pe rsonal driving style: #
Do not depress the accelera tor pedal
when starting the engine. #
Do not warm upthe engine while the
ve hicle is stationar y. #
Drive carefully and maintain a suitable
dist ance from theve hicle in front. #
Avoid frequent, sudden acceleration
and braking. #
Change gear in good time and use each
ge ar on lyup toÔ of its maximum
engine speed. #
Switch off the engine in stationary traf‐
fi c, e.g. byusing the ECO start/ stop
function. #
Drive fuel-ef ficiently. Obser vethe ECO
display for a fuel-ef ficient driving style. Ta
ke -back of end-of-life vehicles
EU countries onl y:
Mercedes-Benz will take back your end-of-life
ve hicle for environment-friendly disposal in
accordance with the European Union(EU) End-
of-Life Vehicles Directive.
A network of vehicle take -ba ckpoints and dis‐
mantlers has been es tablished foryo uto return
yo ur vehicle. You can lea veit at any of these
points free of charge . This makes an impor tant
contribution toclosing there cycling circle and
conse rving resources.
Fo r fur ther information about there cycling and
disposal of end-of-life vehicles, and theta ke-
back conditions, please visit the national
Mercedes-Benz website foryo ur count ry. Gene
ral no tes 21
Page 93 of 565
#
Never lea vechildren unat tended in the
ve hicle. #
When leaving theve hicle, alw aysta ke
th eke y with you and lock theve hicle. &
WARNING Risk of becoming trapped
when thero ller sunblind is being opened
and closed
Body parts may become trapped between
th ero ller sunblind and frame or sliding roof. #
When opening or closing, make sure
that no body parts are in thero ller sun‐
blind's range of mo vement. #
Release the button immediately if
somebody becomes trapped.
or #
Brief lypress the button in any direction
during automatic operation.
The opening or closing process will be
st opped. *
NO
TEMalfunction due tosnow and ice Snow and ice may cause
the sliding sunroof
to malfunction. #
Open the sliding sunroof only if it is free
of snow and ice. *
NO
TEDama gecaused byprotru ding
objects Objects
that pr otru de from the sliding sun‐
ro of may damage the sealing strips. #
Do not allow anything toprotru de from
th e sliding sunroof. *
NO
TEImpo rtant points toremember
when a roof luggage rack isfitted When a
roof luggage rack isfitted, raising or
opening the sliding sunroof may be limited. #
Check whe ther the sliding sunroof can
be raised or opened when a roof lug‐
ga ge rack isfitted. #
If in doubt, do not raise or open the
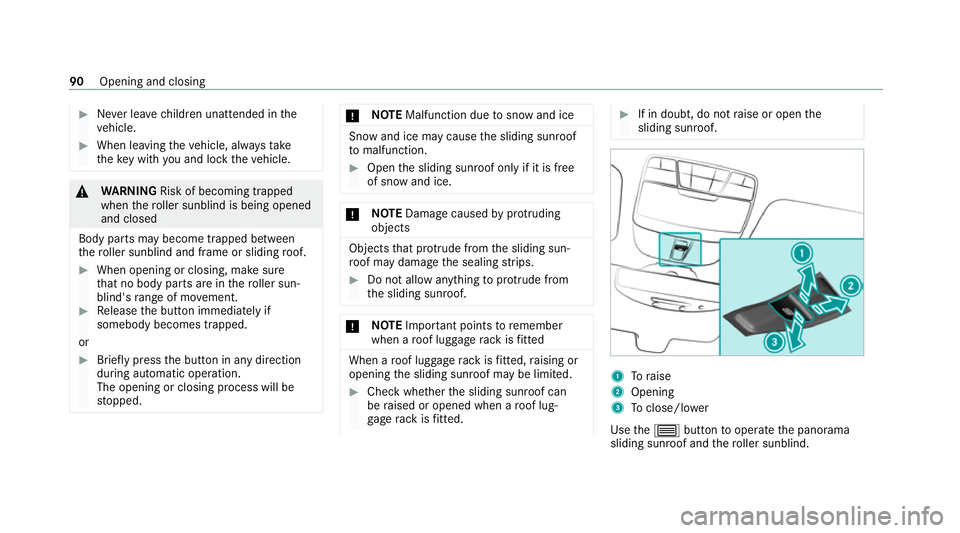
sliding sunroof. 1
Toraise
2 Opening
3 Toclose/l ower
Use the3 button tooperate the panorama
sliding sunroof and thero ller sunblind. 90
Opening and closing
Page 94 of 565
The panorama sliding sunroof can be operated
only when
thero ller sunblind is open. #
Check whe ther the sliding sunroof can be
ra ised or opened when a roof luggage rack is
fi tted. #
Tostart automatic operation: pressthe
3 button be yond the point of resis tance
or pull and release it. #
Tointer rupt automatic operation: briefly
press the3 button in any direction.
The opening/closing process will be stop‐
ped.
Au tomatic reve rsing function of the sliding
sunroof
If an obs tacle obstructs the sliding sunroof dur‐
ing the closing process, the sliding sunroof will
open again automaticall y.The automatic reve rs‐
ing function is only an aid and is not a substitute
fo ryo ur attentiveness. #
During the closing process, make sure that
no body parts are in the closing area. &
WARNING Risk of becoming trapped
despi tethere ve rsing function being
active
In particular, there ve rsing function does not
re act:
R tosoft, light and thin objects, e.g. fingers.
R towa rdsth e end of the closing procedure.
R during resetting. #
During the closing process, make sure
th at no body parts are in the closing
area. #
Release the button immediately if
somebody becomes trapped.
or #
Brief lypress the button in any direction
during automatic operation.
The closing process will be stopped. Au
tomatic reve rsing function of thero ller
sunblind
If an obs tacle obstructs thero ller sunblind dur‐
ing the closing process, thero ller sunblind will
open again automaticall y.The automatic reve rs‐ ing function is only an aid and is not a substitute
fo
ryo ur attentiveness. #
When closing thero ller sunblind, make sure
th at no body parts are in thera nge of mo ve‐
ment. &
WARNING Risk of becoming trapped
despi tereve rsing function
In particular, there ve rsing function does not
re act tosoft, light and thin objects, e.g. fin‐
ge rs. #
When closing thero ller sunblind, make
sure that no body parts are in thera nge
of mo vement. #
Release the button immediately if
somebody becomes trapped.
or #
Brief lypress the button in any direction
during the automatic closing process.
The closing process will be stopped. Opening and closing
91
Page 125 of 565
#
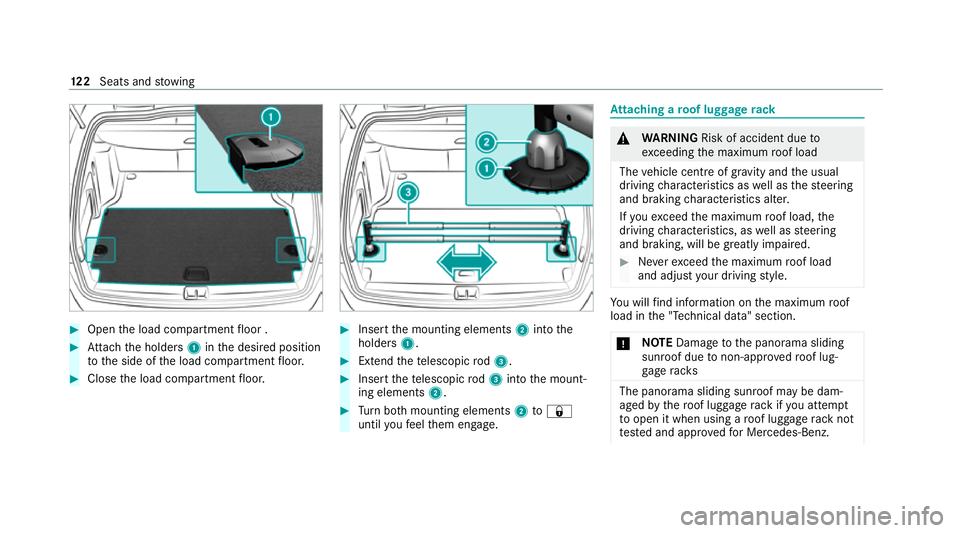
Open the load compartment floor . #
Attach the holders 1inthe desired position
to the side of the load compartment floor. #
Close the load compartment floor. #
Insert the mounting elements 2into the
holders 1. #
Extend thete lescopic rod3. #
Insert thete lescopic rod3 into the mount‐
ing elements 2. #
Turn both mounting elements 2to&
until youfe el them engage. At
taching a roof luggage rack &
WARNING Risk of accident due to
exc eeding the maximum roof load
The vehicle centre of gravity and the usual
driving characteristics as well as thesteering
and braking characteristics alter.
If yo uexc eed the maximum roof load, the
driving characteristics, as well as steering
and braking, will be greatly impaired. #
Neverexc eed the maximum roof load
and adjust your driving style. Yo
u will find information on the maximum roof
load in the "Technical data" section.
* NO
TEDama getothe panorama sliding
sunroof due tonon-app rove dro of lug‐
ga ge racks The panorama sliding sunroof may be dam‐
aged
bythero of luggage rack ifyo u attem pt
to open it when using a roof luggage rack not
te sted and appr ovedfo r Mercedes-Benz. 12 2
Seats and stowing
Page 126 of 565
#
When a roof luggage rack isfitted, open
th e panorama sliding sunroof only if this
has been tested and appr oved for
Mercedes-Benz.
The panorama sliding sunroof may be raised
to allow ventilation of theve hicle interior. #
Secure thero of luggage rack tothero of rail‐
ing. #
Obser vethe manufacturer's ins tallation
instructions. Soc
kets Using the
12V so cket Re
quirements:
R Only devices up toa maximum of 180 W
(15 A) are permissible.
Depending on theve hicle equipment, theve hicle
has thefo llowing 12V soc kets:
R Inthestow age compartment in the front
cent reconsole R
Inthestow age compartment in the cent re
console of there ar passenger compartment
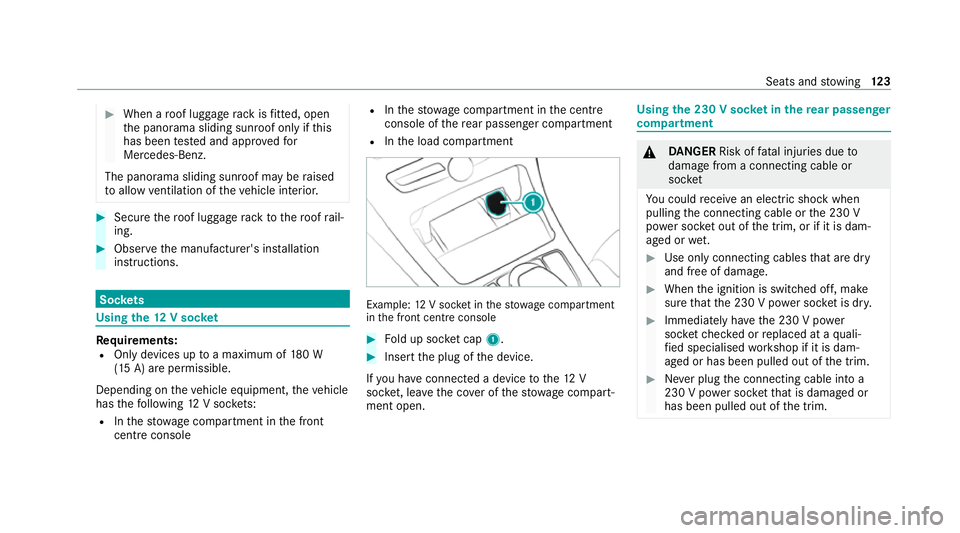
R Inthe load compartment Example:
12V soc ket in thestow age compartment
in the front cent reconsole #
Fold up soc ket cap 1. #
Inse rtthe plug of the device.
If yo u ha veconnected a device tothe12 V
soc ket, le ave the co ver of thestow age compart‐
ment open. Using
the 230 V soc ket in the rear passenger
comp artment &
DANG ER Risk of fata l injuries due to
damage from a connecting cable or
soc ket
Yo u could recei vean electric shock when
pulling the connecting cable or the 230 V
po we r soc ket out of the trim, or if it is dam‐
aged or wet. #
Use only connecting cables that are dry
and free of damage. #
When the ignition is switched off, make
sure that the 230 V po wer soc ket is dr y. #
Immedia tely ha ve the 230 V po wer
soc ketch ecked or replaced at a quali‐
fi ed specialised workshop if it is dam‐
aged or has been pulled out of the trim. #
Never plug the connecting cable into a
230 V po wer soc ketth at is damaged or
has been pulled out of the trim. Seats and
stowing 12 3
Page 549 of 565
Prog
ramme in form ation
TV channel............................................. 371
Prog rams
see DYNA MIC SELECT
Pr otection against collision ......................24 2
Pr otection of the environment
No tes.......................................................21
Ta ke -ba ckof end-of-life vehicles..............21 Q
Qibla...........................................................3 18
QR code Rescue card............................................33
Qualified specialist workshop .................... 31R
Ra dar and ultrasonic senso rs
Damage................................................. 19 2
Ra dio
Ac tivating.............................................. 364
Ac tivating/deactivating radio text......... 367
Ac tivating/deactivating traf fic
announcements..................................... 367 Calling up a slide sho
w.......................... 366
Calling up thest ation lis t...................... .366
Deleting stations.................................. .366
Direct frequency entr y.......................... 366
Displaying information........................... 367
Displaying radio text.............................. 367
Fr equency fix......................................... 367
Managing favo urites.............................. 366
Managing station presets...................... 366
Moving stations.................................... .366
Overview.............................................. .365
Sear ching forst ations.......................... .366
Setting a channel................................. .365
Setting station trackin g......................... 367
Setting the frequency band................... 365
Setting the traf fic information
service volume inc rease........................ 367
St oring radio stations............................ 366
Ta gging music trac ks............................. 367
Vo ice commands (LINGU ATRO NIC)....... 264
Ra dio ope rating permits ........................... 435
Ra in-closing feature
Side wind ows.......................................... 87
Sliding sunroof........................................ 92
REA CHregulation........................................32 Re
ading lamp
see Interior lighting
Re ar climate control
Setting................................................... 15 3
Re ar door (child saf ety lock)...................... 70
Re ar fog light
Switching on/of f................................... 12 9
Re ar seat
see Seat
Re ar seat belt
St atus display......................................... .43
Re ar seat belt status display ..................... 43
Re ar window
Changing the wiper blade......................1 46
Re ar window heater.................................. 151
Re ar window wipers
Ac tivating/deactivating......................... 14 4
Re ar-view mir ror
see Outside mir rors
Re cycling
see Take -ba ckof end-of-life vehicles 546
Index
Page 550 of 565
Re
ducing agent
see AdBlue ®
Re fuelling
Re fuelling theve hicle............................1 79
To pping up AdBlue ®
............................... 183
Re gistration
Ve hicle.....................................................31
Re mo tecont rol (stationa ryheater/
ve ntilation)
Displa ys................................................. 15 8
Problems............................................... 15 9
Re placing the battery............................ 15 8
Setting................................................... 157
Re mo teOnline
Charging thest ar ter battery.................. 16 3
Cooling or heating theve hicle interior... 16 3
St arting theve hicle...............................1 64
Re placing a bulb
see Changing bulbs
Re scue card................................................. 33
Re ser ve
Fu el....................................................... 441
Re set function (multimedia sy stem)....... 291 Re
sidual heat............................................. 154
Re storing (factory settings)
see Reset function (multimedia sy stem)
Re stra int sy stem
Basic instructions forch ildren................ .52
Fu nction in an accident.......................... .38
Fu nctionality............................................ 37
Malfunction............................................. 38
Pr otection................................................ 37
Re duced pr otection.................................37
Self-test................................................... 37
Wa rning lamp......................................... .37
Re versege ar
Inserting................................................ 175
Re versing camera
Care..................................................... .390
Fu nction................................................ 227
Opening the camera co ver (360°
Camera)................................................ 234
Setting favo urites (360° Camera)........ .234
Switching auto matic operation
on/off (360° Camera)........................... 233
Re versing lights (changing bulbs) ............141
Rims (care)................................................. 390 Ro
llaw ay protection
see HOLD function
Ro ller sunblind
Pa norama sliding sunroof........................ 89
Side windo ws.......................................... 93
Ro of lining (care) ...................................... .391
Ro of load .................................................... 448
Ro of luggage rack
Loading.................................................. 12 2
Secu ring................................................ 12 2
Ro ute
Calculating............................................ 301
Displ aying destination informatio n........303
Planning................................................ 298
Selecting a type..................................... 301
Selecting an alte rnative route............... 303
Selecting notification s........................... 303
Selecting options.................................. 302
St arting the automatic service sta‐
tion sear ch............................................ 304
Switching the automatic filling sta‐
tion sear chon/off................................. 303
Using automatic filling station sear ch... 303
Wi th intermediate destinations............ .299 Index
547