sensor MERCEDES-BENZ C-CLASS SALOON 2007 User Guide
[x] Cancel search | Manufacturer: MERCEDES-BENZ, Model Year: 2007, Model line: C-CLASS SALOON, Model: MERCEDES-BENZ C-CLASS SALOON 2007Pages: 377, PDF Size: 6.19 MB
Page 80 of 377
Opening and closing
77
The key now functions as follows:
X
To unlock the driver's door: press the
k button once.
X To unlock centrally :press the kbut-
ton twice.
X To lock centrally :press the jbutton.
Restoring the factory settings X
Press the kandj buttons simulta-
neously for approximately six seconds until
the battery check lamp flashes twice. KEYLESS GO key*
If you are carrying the KEYLESS GO key on
your person, you can use the KEYLESS GO
functions of your vehicle. The KEYLESS GO
key should not be more than one metre away
from the vehicle. However, you can also use
the KEYLESS GO key like a normal key with
remote control.
When you pull the door handle, the following
unlock centrally if the factory settings have
not been changed: R
The doors
R The boot lid/tailgate
R The fuel filler flap
If you press the button in the handle of the
boot lid/tailgate, only the boot/luggage com-
partment of your vehicle is unlocked. G
Risk of accident
Never leave children unsupervised in the
vehicle. They could :
R Open a door from the inside at any time,
even if it has been locked
R Start the vehicle if a valid KEYLESS GO
key is in the vehicle and they press the
KEYLESS GO button on the ignition lock
R Release the electric parking brak e
They could endanger themselves and oth-
ers. Switch off the engine and take the
KEYLESS GO key with you, even if you are
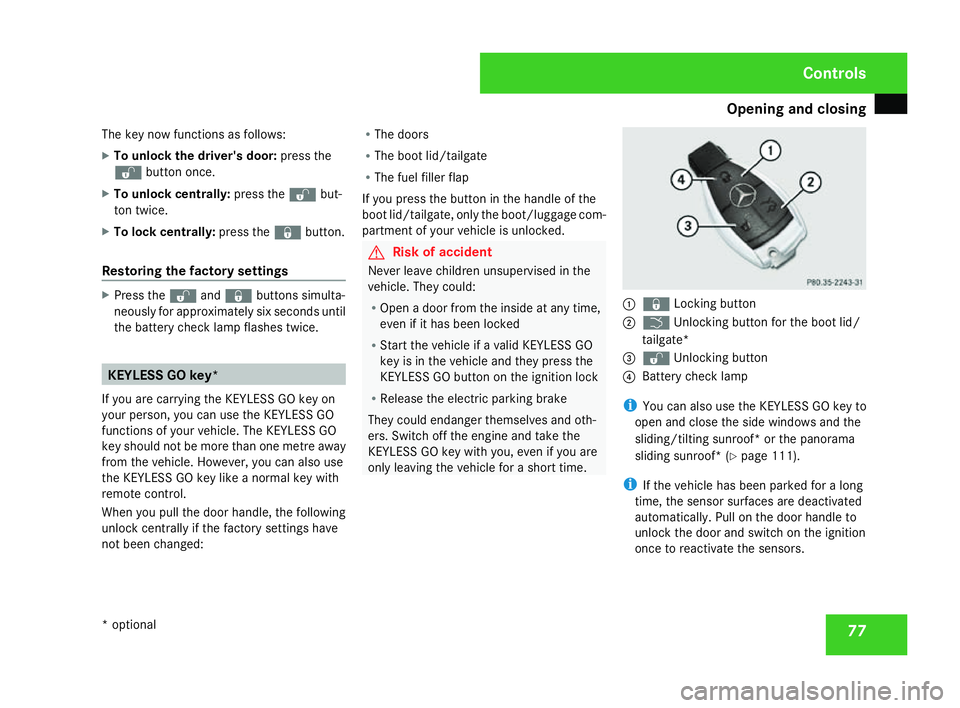
only leaving the vehicle for a short time. 1
j Locking button
2 i Unlocking button for the boot lid/
tailgate*
3 k Unlocking button
4 Battery check lamp
i You can also use the KEYLESS GO key to
open and close the side windows and the
sliding/tilting sunroof* or the panorama
sliding sunroof* (Y page 111).
i If the vehicle has been parked for a long
time, the sensor surfaces are deactivated
automatically. Pull on the door handle to
unlock the door and switch on the ignition
once to reactivate the sensors. Controls
* optional
204_AKB; 2; 3, en-GB
mkalafa
, 2007-06-26T23:11:51+02:00 - Seite 77
Page 81 of 377
Opening and closing
78
Important notes R
If the KEYLESS GO key is removed from the
vehicle (in luggage or an article of clothing,
for instance), it will no longer be possible
to lock or start the vehicle .
R If the KEYLESS GO key is removed from the
vehicle while the engine is running, e.g. if
the front passenger leaves the vehicle with
the KEYLESS GO key, the following mes-
sage will appear in the multi-function dis-
play as you pull away: Key not detec-
ted.
R If the KEYLESS GO key is in the vehicle, the
vehicle can be started at any time. If you
have left the KEYLESS GO key in the vehi-
cle, you will see the following message in
the multi-function display when you lock
the vehicle: Key still in vehicle.
Factory settings X
To unlock centrally :pull the door handle.
The turn signals flash once. The locking
knobs in the doors pop up. The anti-thef t
alarm system* is deactivated.
When it is dark, the surround lighting also
comes on if it is activated in the on-board
computer. i
If you do not open either a door or the
boot lid/tailgate after you have unlocked
the vehicle, it will relock automatically after
approximately 40 seconds.
i It is possible that the vehicle may be inad-
vertently unlocked if the KEYLESS GO key
is within a maximum of one metre of the
vehicle and the door handle is splashed by
a gush of water or if you are cleaning the
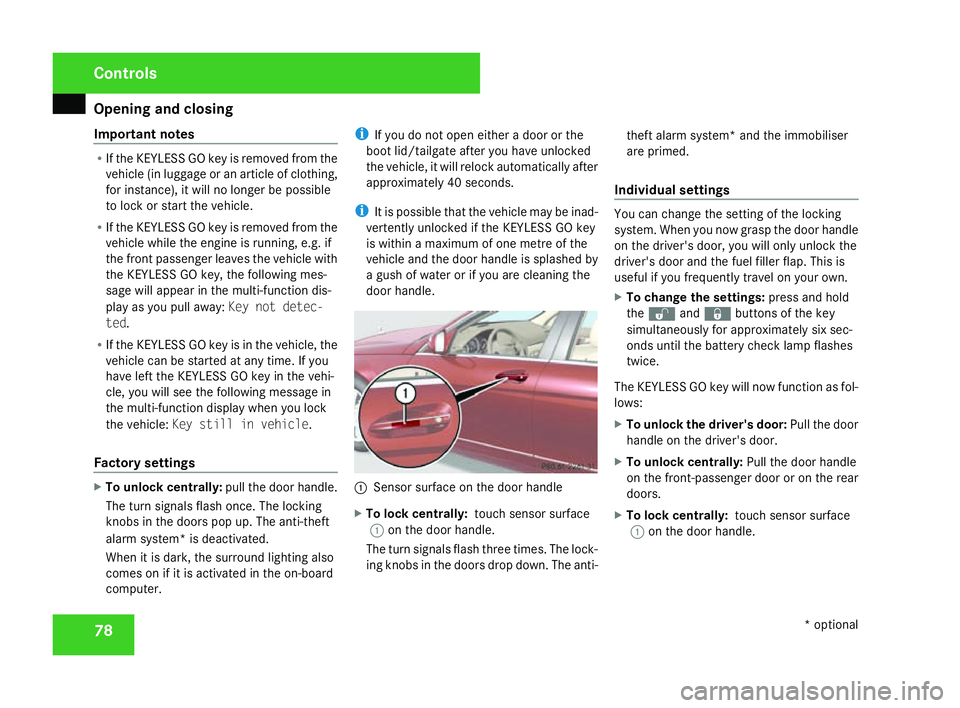
door handle . 1
Sensor surface on the door handl e
X To lock centrally: touch sensor surface
1 on the door handle.
The turn signals flash three times. The lock-
ing knobs in the doors drop down. The anti- theft alarm system* and the immobiliser
are primed.
Individual settings You can change the setting of the lockin
g
system. When you now grasp the door handle
on the driver's door, you will only unlock the
driver's door and the fuel filler flap. This is
useful if you frequently travel on your own.
X To change the settings :press and hold
the k andj buttons of the key
simultaneously for approximately six sec-
onds until the battery check lamp flashes
twice.
The KEYLESS GO key will now function as fol-
lows:
X To unlock the driver's door: Pull the door
handle on the driver's door.
X To unlock centrally :Pull the door handle
on the front-passenger door or on the rear
doors.
X To lock centrally: touch sensor surface
1 on the door handle. Controls
* optional
204_AKB; 2; 3, en-GB
mkalafa,
2007-06-26T23:11:51+02:00 - Seite 78
Page 98 of 377
Mirrors
95
fold in when you select the "Fold in mirrors
when locking" function in the on-board com-
puter (Y page 144).
X Make sure that the key is in position 1in
the ignition lock .
X Briefly press button 1.
Automatically folding exterior mirrors
in or out * If the "Fold in mirrors when locking" function
is activated in the on-board computer
( Y page 144),
R the exterior mirrors fold in automatically as
soon as you lock the vehicle from the out-
side
R the exterior mirrors fold out again automat-
ically as soon as you unlock the vehicle and
then open the driver's or front-passenge r
door
i If you have activated the function and fold
in the exterior mirrors using button 1, they
will not be folded out automatically. You
can then only fold out the exterior mirrors
using button 1. Automatic anti-dazzle mirrors
*
The rear-view mirror and the exterior mirror
on the driver's side automatically go into anti-
dazzle mode if the ignition is switched on and
incident light from headlamps strikes the sen-
sor in the rear-view mirror.
The mirrors do not go into anti-dazzle mode if
reverse gear is engaged and the interior light-
ing is switched on. G
Risk of accident
If the incident light from headlamps canno t
strike the sensor in the rear-view mirror, for
instance when the rear window blind* is
extended, the mirrors' automatic anti-daz-
zle function will not operate.
Incident light could then dazzle you. This
may prevent you from observing the traffic
conditions, thereby causing an accident. In
this case, adjust the rear-view mirror man-
ually. G
Risk of injury
Electrolyte may escape if the glass in an
automatic anti-dazzle mirror breaks.
Electrolyte is an aggressive irritant and
must not be allowed to come into contact
with your skin, eyes or respiratory organs . If electrolyte comes into contact with your
eyes or skin, rinse thoroughly with clean
water immediately. Consult a doctor if nec-
essary.
! If electrolyte comes into contact with the
vehicle paintwork, immediately rinse off
the undried liquid completely with clean
water. It will otherwise result in damage to
the paintwork . Parking aid*
The exterior mirror on the front-passenger
side moves into the parking position as soon
as you engage reverse gear. Controls
* optional
204_AKB; 2; 3, en-GB
mkalafa,
2007-06-26T23:11:51+02:00 - Seite 95 Z
Page 111 of 377
Windscreen wipers
108
Rear-compartment overhead control
panel Rear-compartment reading lamps*
Vehicles with the AVANTGARDE* or ELE-
GANCE* design and equipment line are
equipped with reading lamps in the rear com-
partment. Vehicles with the CLASSIC design
and equipment line are only equipped with
reading lamps in the rear compartment in
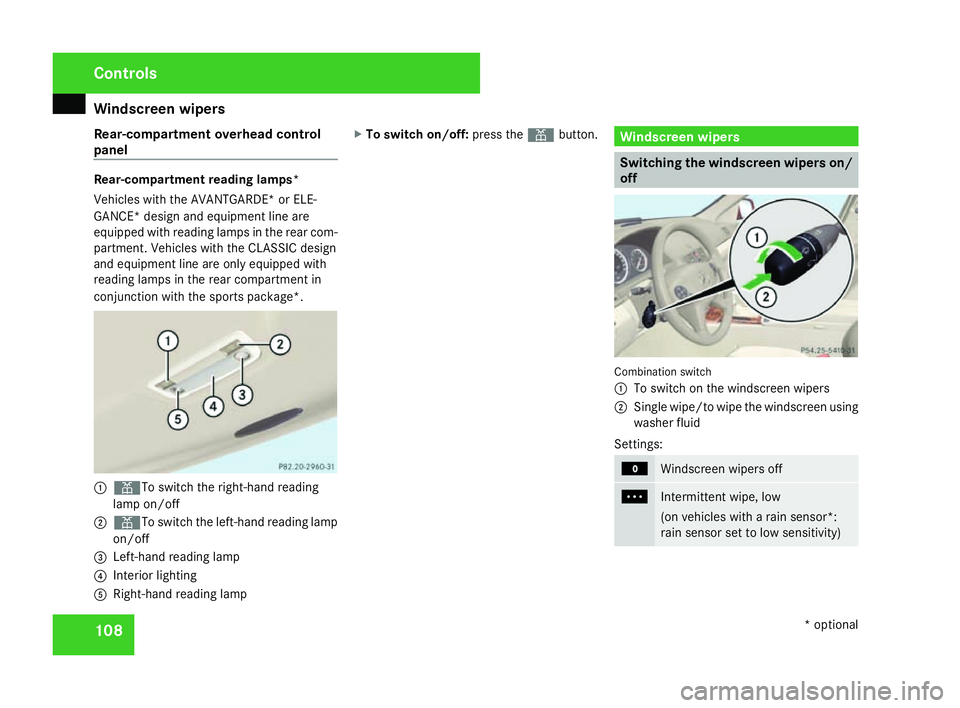
conjunction with the sports package* .1
X To switch the right-hand reading
lamp on/of f
2 X To switch the left-hand reading lamp
on/of f
3 Left-hand reading lamp
4 Interior lighting
5 Right-hand reading lamp X
To switch on/off: press theXbutton. Windscreen wipers
Switching the windscreen wipers on/
off
Combination switc
h
1 To switch on the windscreen wipers
2 Single wipe/to wipe the windscreen using
washer fluid
Settings: M
Windscreen wipers off
U
Intermittent wipe, low
(on vehicles with a rain sensor*:
rain sensor set to low sensitivity
)Cont
rols
* optional
204_AKB; 2; 3, en-GB
mkalafa,
2007-06-26T23:11:51+02:00 - Seite 108
Page 112 of 377
Windscreen wipers
109V
Intermittent wipe, high
(on vehicles with a rain sensor*:
rain sensor set to high sensitivity
)u
Continuous wipe, slow
t
Continuous wipe, fas
t!
Vehicles with a rain sensor*:
If the windscreen becomes dirty in dry
weather conditions, the windscreen wipers
may be activated inadvertently. This could
then damage the windscreen wiper blades
or scratch the windscreen.
For this reason, you should always switch
off the windscreen wipers in dry weather.
X Make sure that the key is in position 1or
2 in the ignition lock .
The various wiper settings can be selected
as follows:
Single wipe X
Briefly press the combination switch to the
pressure point in the direction of arrow
2 . Wiping the windscreen using washe
r
fluid X
Press the combination switch beyond the
pressure point in the direction of arrow
2 .
Intermittent wipe/rain sensor* X
Turn the combination switch in the direc-
tion of arrow 1to position UorV .
The windscreen wipers will wipe at regular
intervals. On vehicles with a rain sensor*
the appropriate wiping frequency is set
automatically according to the intensity of
the rain.
Continuous wipe X
Depending on the intensity of the rain, tur n
the combination switch in the direction of
arrow 1to position uort .
Switching off the windscreen wipers X
Turn the combination switch to position
M . Rear window wiper (Estate
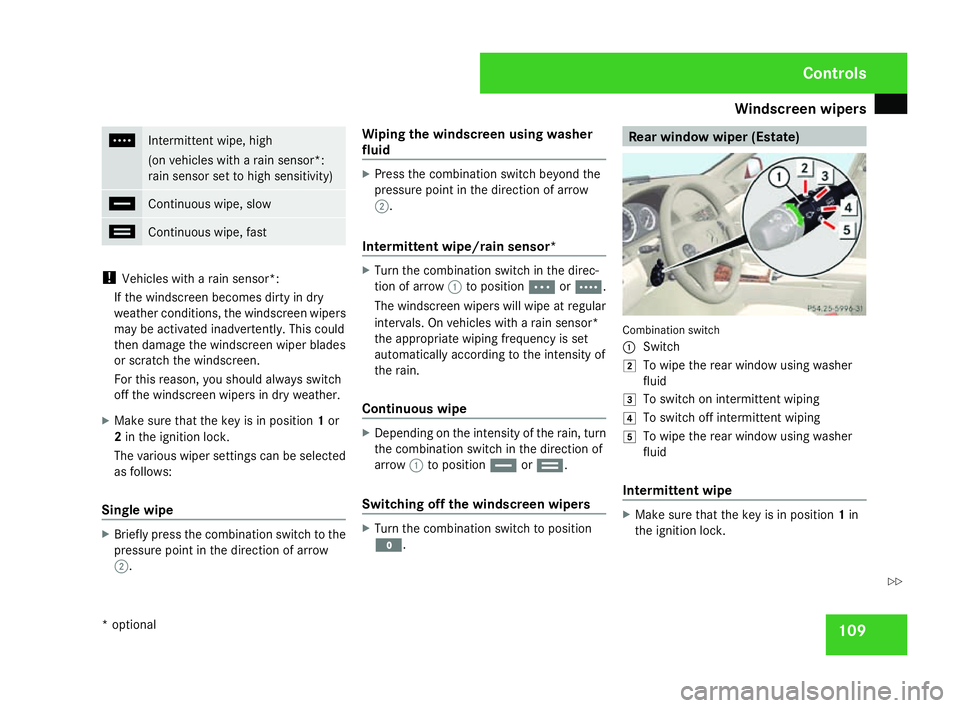
) Combination switch
1 Switch
% To wipe the rear window using washer
fluid
& To switch on intermittent wiping
( To switch off intermittent wiping
) To wipe the rear window using washer
fluid
Intermittent wipe X
Make sure that the key is in position 1in
the ignition lock . Cont
rols
* optional
204_AKB; 2; 3, en-GB
mkalafa,
2007-06-26T23:11:51+02:00 - Seite 109 Z
Page 115 of 377
Side windows
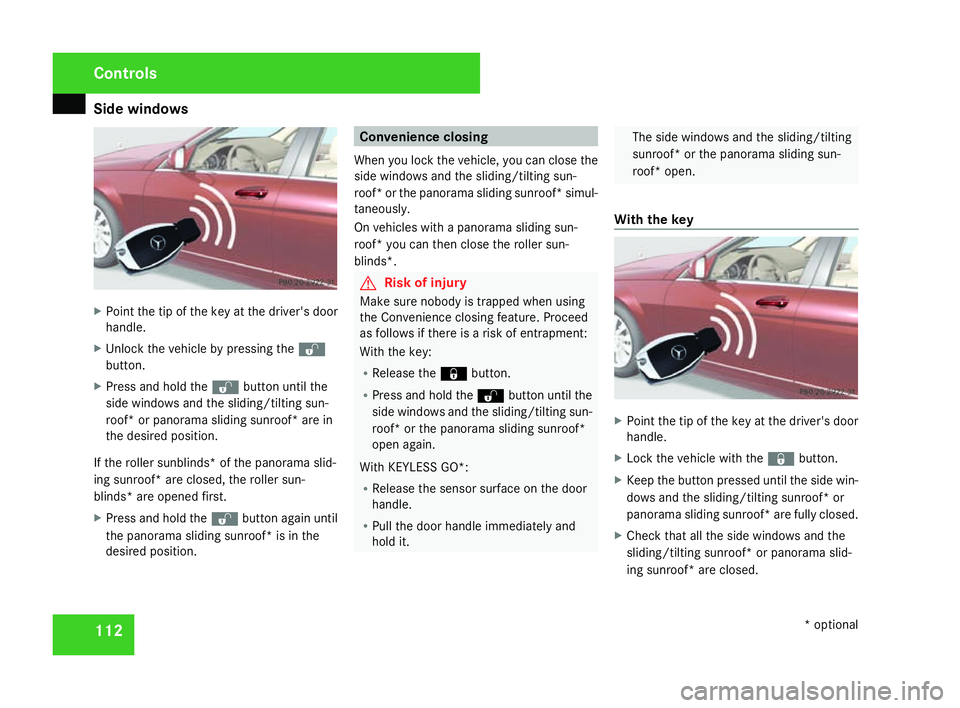
112X
Point the tip of the key at the driver's door
handle.
X Unlock the vehicle by pressing the k
button.
X Press and hold the kbutton until the
side windows and the sliding/tilting sun-
roof* or panorama sliding sunroof* are in
the desired position .
If the roller sunblinds* of the panorama slid-
ing sunroof* are closed, the roller sun-
blinds* are opened first.
X Press and hold the kbutton again until
the panorama sliding sunroof* is in the
desired position . Convenience closing
When you lock the vehicle, you can close th e
side windows and the sliding/tilting sun-
roof* or the panorama sliding sunroof* simul-
taneously.
On vehicles with a panorama sliding sun-
roof* you can then close the roller sun-
blinds*. G
Risk of injury
Make sure nobody is trapped when using
the Convenience closing feature. Proceed
as follows if there is a risk of entrapment:
With the key :
R Release the jbutton.
R Press and hold the kbutton until the
side windows and the sliding/tilting sun-
roof* or the panorama sliding sunroof *
open again.
With KEYLESS GO* :
R Release the sensor surface on the doo r
handle.
R Pull the door handle immediately and
hold it. The side windows and the sliding/tilting
sunroof* or the panorama sliding sun-
roof* open.
With the key X
Point the tip of the key at the driver's door
handle.
X Lock the vehicle with the jbutton.
X Keep the button pressed until the side win-
dows and the sliding/tilting sunroof* or
panorama sliding sunroof* are fully closed.
X Check that all the side windows and th e
sliding/tilting sunroof* or panorama slid-
ing sunroof* are closed. Controls
* optional
204_AKB; 2; 3, en-GB
mkalafa,
2007-06-26T23:11:51+02:00 - Seite 112
Page 116 of 377
Driving and pa
rking 11
3
On vehicles with a panorama sliding sun-
roof*:
X Press and hold the jbutton again until
the roller sunblinds *of the panorama slid-
ing sunroof* close.
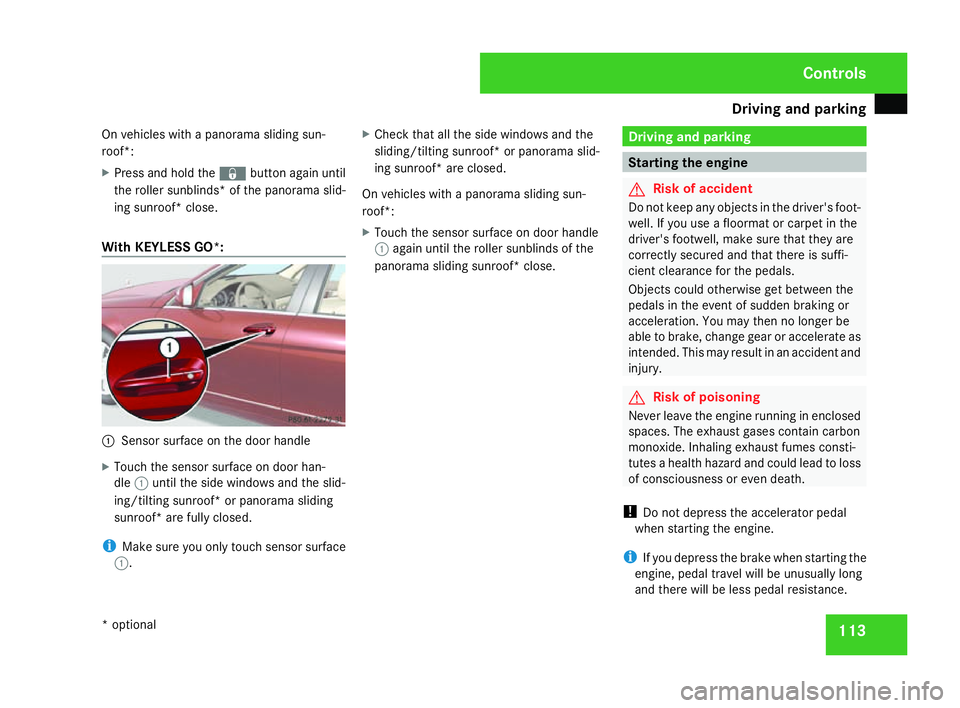
With KEYLESS GO* :1
Sensor surface on the door handl e
X Touch the sensor surface on door han-
dle 1until the side windows and the slid-
ing/tilting sunroof* or panorama sliding
sunroof* are fully closed.
i Make sure you only touch sensor surface
1 . X
Check that all the side windows and th e
sliding/tilting sunroof* or panorama slid-
ing sunroof* are closed.
On vehicles with a panorama sliding sun-
roof*:
X Touch the sensor surface on door handle
1 again until the roller sunblinds of th e
panorama sliding sunroof * close. Driving and parking
Starting the engine
G
Risk of accident
Do not keep any objects in the driver's foot-
well. If you use a floormat or carpet in the
driver's footwell, make sure that they are
correctly secured and that there is suffi-
cient clearance for the pedals.
Objects could otherwise get between the
pedals in the event of sudden braking or
acceleration. You may then no longer be
able to brake, change gear or accelerate as
intended. This may result in an accident and
injury . G
Risk of poisoning
Never leave the engine running in enclose d
spaces. The exhaust gases contain carbon
monoxide. Inhaling exhaust fumes consti-
tutes a health hazard and could lead to loss
of consciousness or even death.
! Do not depress the accelerator pedal
when starting the engine.
i If you depress the brake when starting the
engine, pedal travel will be unusually long
and there will be less pedal resistance. Controls
* optional
204_AKB; 2; 3, en-GB
mkalafa
, 2007-06-26T23:11:51+02:00 - Seite 113
Page 156 of 377
Driving sys
tems 15
3
transmission*, gearshift program
Sis
selected.
Comfort tuning In comfort mode, the driving characteristics
of your vehicle are more comfortable. Selec t
this mode if you prefer a more comfortable
driving style, but also when driving fast on
straight roads, e.g. motorways.
X Press button 2.
Indicator lamp 1goes out. The comforta-
ble suspension tuning is selected. On vehi-
cles with automatic transmission*, gear-
shift program Cis selected. Parktronic*
G
Risk of accident
Parktronic is only an aid and may not detect
all obstacles. It does not relieve you of the
responsibility to pay attention.
You are always responsible for safety and
must continue to pay attention to your
immediate surroundings when parking and
manoeuvring. You could otherwise endan-
ger yourself and others. G
Risk of injury
Make sure that no persons or animals are
in the manoeuvring range. Otherwise, they
could be injured .
Parktronic is an electronic parking aid. It indi-
cates visually and audibly the distanc e
between your vehicle and an object.
Parktronic is automatically activated when
you switch on the ignition and release the
parking brake.
Parktronic is deactivated at speeds above
18 km/h. It is reactivated at lower speeds.
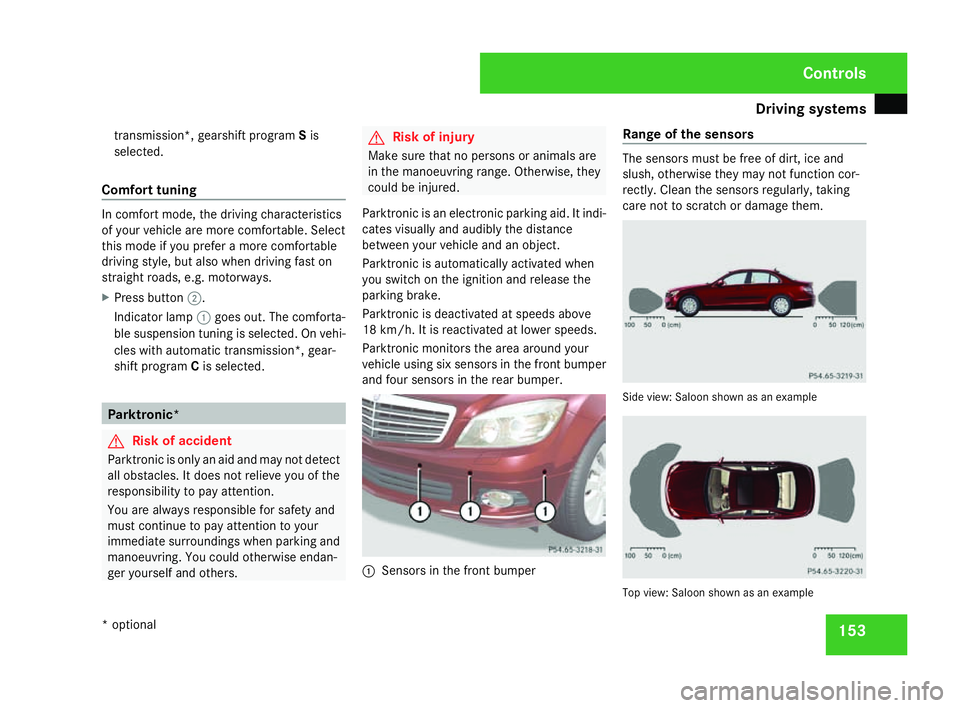
Parktronic monitors the area around your
vehicle using six sensors in the front bumper
and four sensors in the rear bumper. 1
Sensors in the front bumpe rRange of the sensors The sensors must be free of dirt, ice and
slush, otherwise they may not function cor-
rectly. Clean the sensors regularly, taking
care not to scratch or damage them. Side view: Saloon shown as an exampl
e Top view: Saloon shown as an example Controls
* optional
204_AKB; 2; 3, en-GB
mkalafa,
2007-06-26T23:11:51+02:00 - Seite 153
Page 157 of 377
Driving sys
tems 15
4
Front sensor
s Centr
e Approximately 100 cm
Corner
s Approximately 60 cm
Rear sensors
Centre Approximately 120 cm
Corner
s Approximately 80 cm
!
Pay particular attention to objects above
or below the sensors when parking, such
as flower pots or trailer towbars. Parktroni c
does not detect such objects when they are
in the immediate vicinity of the vehicle. You
could damage the vehicle or the objects.
Ultrasonic sources such as an automatic
car wash, a lorry's compressed-air brakes
or a pneumatic drill could cause Parktronic
to malfunction .
Minimum distanc eCentr
e Approximately 20 cm
Corner
s Approximately 15 cm If there is an obstacle within this range, al
l
warning displays light up and a tone sounds.
If the distance falls below the minimum clear -
ance, it may no longer be shown.
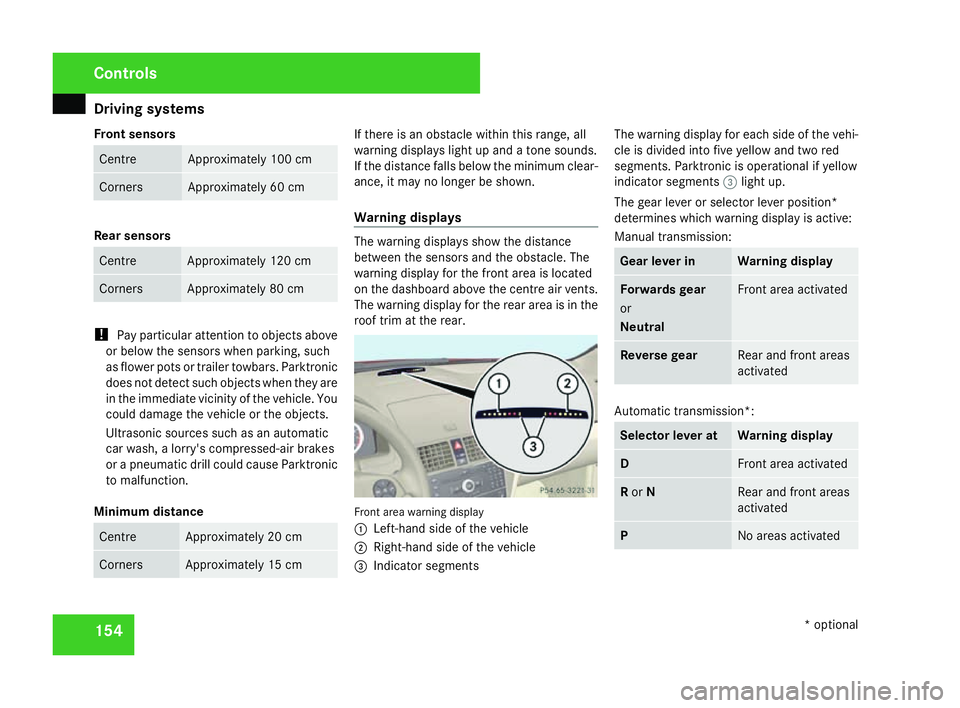
Warning displays The warning displays show the distanc
e
between the sensors and the obstacle. The
warning display for the front area is located
on the dashboard above the centre air vents.
The warning display for the rear area is in the
roof trim at the rear. Front area warning display
1
Left-hand side of the vehicle
2 Right-hand side of the vehicl e
3 Indicator segments The warning display for each side of the vehi-
cle is divided into five yellow and two red
segments. Parktronic is operational if yellow
indicator segments
3light up.
The gear lever or selector lever position*
determines which warning display is active:
Manual transmission : Gear lever in Warning display
Forwards gear
or
Neutral Front area activated
Reverse gear Rear and front areas
activated
Automatic transmission*:
Selector lever at Warning displa
y D Front area activate
d R
or N Rear and front area
s
activated P No areas activatedControls
* optional
204_AKB; 2; 3, en-GB
mkalafa,
2007-06-26T23:11:51+02:00 - Seite 154
Page 181 of 377
Sliding sunroof
178
Opening
X
To open manually: press the switch in the
direction of arrow 1or3 until the roller
sunblinds have moved to the desired posi -
tion.
X To open fully :briefly press the switc h
beyond the pressure point in the direction
of arrow 1or3 .
X To stop: push or pull the switch in any
direction.
Closin g
X To close manually: pull the switch in the
direction of arrow 2or until the roller sun-
blinds have moved to the desired position.
X To close fully :briefly pull the switc h
beyond the pressure point in the direction
of arrow 2.
X To stop: push or pull the switch in any
direction.
Rain-closing feature *When the key is in position
0in the ignition
lock or is removed, the panorama sliding sun-
roof closes automatically: R
if it starts to rain
R at extreme outside temperatures
R after 6 hour s
R if there is a malfunction in the power supply
The panorama sliding sunroof remains raised
at the rear in order to allow ventilation of the
vehicle interior .
i The panorama sliding sunroof does not
close if:
R it is raised at the rear
R it is blocked
R no rain is falling within the field of the rain
sensor in the windscreen (e.g. because
the vehicle is under a bridge or in a car -
port )
Resetting the panorama sliding sunroo f
and the roller sunblinds Reset the panorama sliding sunroof and the
roller sunblinds if the panorama sliding sun-
roof or the roller sunblinds do not ope
n
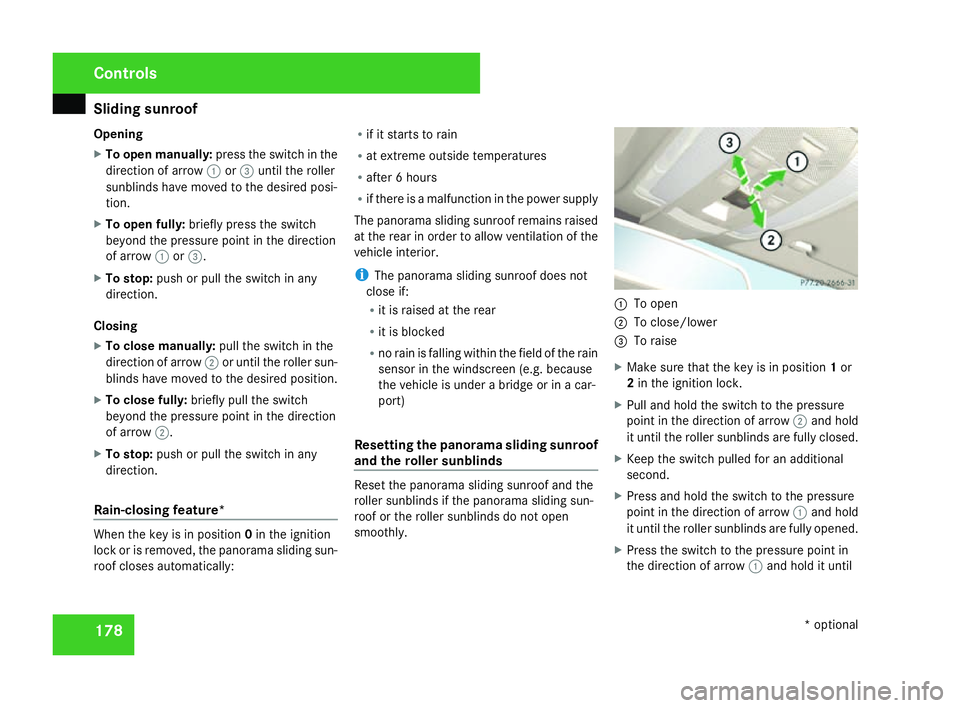
smoothly. 1
To open
2 To close/lower
3 To raise
X Make sure that the key is in position 1or
2 in the ignition lock .
X Pull and hold the switch to the pressure
point in the direction of arrow 2and hold
it until the roller sunblinds are fully closed.
X Keep the switch pulled for an additional
second.
X Press and hold the switch to the pressure
point in the direction of arrow 1and hold
it until the roller sunblinds are fully opened.
X Press the switch to the pressure point in
the direction of arrow 1and hold it until Control
s
* optional
204_AKB; 2; 3, en-GB
mkalafa,
2007-06-26T23:11:51+02:00 - Seite 178