tyre pressure MERCEDES-BENZ C-CLASS SALOON 2011 Owners Manual
[x] Cancel search | Manufacturer: MERCEDES-BENZ, Model Year: 2011, Model line: C-CLASS SALOON, Model: MERCEDES-BENZ C-CLASS SALOON 2011Pages: 401, PDF Size: 9.74 MB
Page 7 of 401
1, 2, 3 ...
12-button multifunction steering
wheel Operating the on-board computer .227
Overview .......................................... 41
12 Vsocket
see Sockets
4-button multifunction steering
wheel
Overview .......................................... 40
4-button multifunction steering
wheel
Operating the on-board computer .223
4ETS
see ETS/4ETS (Electronic Trac-
tion System)
4MATIC (permanent four-wheel
drive) .................................................. 195
4MATIC off-road system ...................195 A
ABS (Anti-lock Braking System) Display message (12-button mul-
tifunctio nsteering wheel) ..............255
Display message (4-button multi-
function steering wheel) ................250
Function/notes ................................ 72
Important safety notes ....................72
Warning lamp ................................. 293
Activating/deactivating air-recir-
culation mode .................................... 141
Activating/deactivating cooling
with air dehumidification .................137
Active Blin dSpot Assist
Display message (12-button mul-
tifunction steering wheel) ..............276
Function/notes ............................. 209
Switching on/off (on-board com-
puter, 12-button multifunction
steering wheel) .............................. 238
Towing atrailer .............................. 212
Active Driving Assistance package .209
Active Lane Keeping Assist Display message (12-button mul-
tifunctio nsteering wheel) ..............275
Function/informatio n.................... 212Switching on/off (on-board com-
puter, 12-button multifunction
steering wheel)
.............................. 238
Towing atrailer .............................. 215
Active light function .........................121
Active Service Syste mPLUS
see ASSYS TPLUS service interval
display
ADAPTIVE BRAKE .................................78
Adaptive brake lamps .........................74
Adaptive Highbeam Assist Function/notes ............................. 122
Adaptive Main-beam Assist
Display message (12-button mul-
tifunctio nsteering wheel) ..............267
Adaptive Main-Beam Assist
Switching on/off (on-board com-
puter) ............................................. 240
Additional speedometer ...................239
Additives (engine oil) ........................382
Adjusting the headlamp range .........120
Airbags Activation ......................................... 47
Front airbag (driver, front
passenger )....................................... 50
Important safety guidelines .............48
Kneebag .......................................... .50
Sidebag ............................................ 50
Windowba g...................................... 51
Air-conditioning system
see Climate control
Airf ilter
Display message (12-button mul-
tifunction steering wheel) ..............271
Display message (4-button multi-
function steering wheel) ................269
AIRF LOW ........................................... 138
Air pressure see Tyre pressure
Airv ents
Glove compartmen t....................... 148
Important safety notes ..................147
Rea r............................................... 148
Setting ........................................... 147
Setting the centre air vents ...........148
Setting the side air vents ...............148 4
Index
Page 10 of 401
High-performance brake system
....177
Important safety notes ..................175
Parking brake ................................ 175
Warning lamp ................................. 293
Breakdown
see Flat tyre
see Towing away/tow-starting
Bulbs
see Changing bulbs C
Calling up a fault see Display messages
Capacities
see Technical data
Car
see Vehicle
Care
Automatic car wash .......................327
Carpets .......................................... 332
Display ........................................... 331
Exterior lighting ............................. 330
Gea rors elector lever .................... 332
High-pressure cleaner .................... 328
Matt paintwork .............................. 329
Notes ............................................. 327
Paint .............................................. 328
Plastic trim .................................... 331
Reversing camera ..........................330
Roof lining ...................................... 332
Seat bel t........................................ 332
Seat cover ..................................... 332
Sensors ......................................... 330
Steering wheel ............................... 332
Tai lpipes ....................................... 331
Trim pieces .................................... 332
Washing by hand ........................... 328
Wheels ........................................... 328
Windows ........................................ 329
Wiper blades .................................. 329
Wooden trim .................................. 332
Car key
see Key
Car wash (care) ................................. 327
CD player/CD changer (12-button
multifunction steering wheel) .......... 234Cell phone
see Mobile phone
Central locking
Automatic locking (on-board com-
puter) ............................................. 242
Locking/unlocking (key ).................. 84
Centre console ..................................... 42
Changing bulbs Brake lamps ................................... 128
Cornering light function .................127
Dipped-bea mheadlamps ............... 126
Important safety notes ..................125
Main-beam headlamps ................... 127
Overview of bul btypes .................. 126
Parking lamps (front) .....................127
Reversing lamps ............................ 128
Standing lamps .............................. 127
Child-proof locks
Important safety notes ....................71
Rea rdoors ....................................... 71
Children
Fastening seat belts ......................... 64
In the vehicle ................................... 57
Restraint systems ............................ 57
Child seat
Automatic recognition .....................59
Display message (12-button mul-
tifunctio nsteering wheel) ..............260
Display message (4-button multi-
function steering wheel) ................253
Integrated ........................................ 63
Integrated, ICS padded pla ytable ....65
Integrated, side head restraints .......66
Integrated, storing ........................... 67
ISOFIX .............................................. 60
On the front-passenger sea t............ 58
Problem (malfunction) .....................63
Recommendations ...........................70
Suitable positions ............................ 68
Cigarette lighter ................................ 317
Cleaning Trailer tow hitch ............................. 331
Climate control
Activating/deactivating rear win-
dow heating ................................... 141
Auxiliary heating/ventilation .......... 143
Controlling automatically ...............138 Index
7
Page 26 of 401

Towing away
Fitting the towing ey e.................... 352
Removing the towing eye. ..............353
With both axles on the ground .......353
Tow-starting
Emergency engine starting ............354
Fitting the towing eye. ...................352
Important safety notes ..................351
Removing the towing eye. ..............353
Trailer coupling
see Towing atrailer
Trailer towing
7-pin connector ............................. 220
Blind Spot Assist ............................ 207
Cleaning the trailer tow hitch ......... 331
Coupling up atrailer ...................... 218
Decoupling atrailer ....................... 218
Driving tips .................................... 215
ESP ®
................................................ 77
Folding in the ball coupling ............218
Folding out the ball coupling ..........217
Important safety notes ..................215
Mounting dimensions ....................387
Parking Guidance ........................... 202
Parktroni c...................................... 198
Power supply ................................. 219
Shift range ..................................... 163
Trailer loads ................................... 388
Transmission
see Automatic transmission
see Manual transmission
Transporting the vehicle ..................353
Trim pieces (cleaning instructions) .332
Trip computer On-board computer (12-button
multifunctio nsteering wheel) ........231
On-board computer (4-button
multifunctio nsteering wheel) ........226
Trip meter
Displaying/resetting (4-button
multifunctio nsteering wheel) ........225
Displaying (12-button multifunc-
tion steering wheel) .......................231
Resetting (12-button multifunc-
tion steering wheel) .......................232
Trip odometer
see Trip meter Turn signal
Display message (12-button mul-
tifunctio nsteering wheel) ..............265
Display message (4-button multi-
function steering wheel) ................262
Turn signals
Switching on/off ........................... 120
Two-way radio
Frequencies ................................... 377
Installatio n..................................... 377
Transmission output (maximum) .... 377
Type identification plate
see Vehicle identification plate
Tyre pressure
Calling up (on-board computer) .....363
Display message (12-button mul-
tifunctio nsteering wheel) ..............281
Display message (4-button multi-
function steering wheel) ................280
Not reached (TIREFIT) ....................340
Pressure loss warning ....................362
Reached (TIREFIT) ..........................340
Recommended ............................... 361
Tyre pressure monitor
Function/notes ............................. 363
Restarting ...................................... 365
Warning lamp ................................. 300
Tyres
Checking ........................................ 358
Directio nofrotation ...................... 366
Display message (12-button mul-
tifunction steering wheel) ..............281
Display message (4-button multi-
function steering wheel) ................280
Grip ................................................ 177
Important safety notes ..................358
Replacing ....................................... 365
Service life ..................................... 359
Storing ........................................... 366
Tyr esize (data) .............................. 366
Tyr etread ...................................... 359
see Flat tyre Index
23
Page 29 of 401
Protection of the environment
Notes
H
Environmental note
Daimler's declared policy is one of integrated
environmental protection.
The objectives are for the natural resources
which form the basis of our existence on this
planet to be used sparingly and in a manner
which takes the requirements of both nature
and humanity into account.
You too can help to protect the environment
by operating your vehicle in an environmen-
tally responsible manner.
Fuel consumption and the rate of engine,
transmission, brake and tyre wear depend on
the following factors:
R operating conditions of your vehicle
R your personal driving style
You can influence both factors. You should
bear the following in mind:
Operating conditions:
R avoid short trips as these increase fuel con-
sumption.
R make sure that the tyre pressures are
always correct.
R do not carry any unnecessary weight.
R keep an eye on the vehicle's fuel consump-
tion.
R remove roof racks once you no longer need
them.
R a regularly serviced vehicle will contribute
to environmental protection. You should
therefore adhere to the service intervals.
R always have maintenance work carried out
at a qualified specialist workshop, e.g. a
Mercedes-Benz Service Centre.
Personal driving style:
R do not depress the accelerator pedal when
starting the engine.
R do not warm up the engine with the vehicle
stationary. R
drive carefully and maintain a safe distance
from the vehicle in front.
R avoid frequent, sudden acceleration.
R change gear in good time and use each gear
only up to Ôof its maximum engine speed.
R switch off the engine in stationary traffic. Returning end-of-life vehicles
Mercedes-Benz will take back your
Mercedes-Benz to dispose of it in an environ-
mentally responsible manner, in accordance
with the European Union (EU) End of Life
Vehicles Directive.
The End of Life Vehicles Directive applies to
vehicles with a gross vehicle weight of up to
3.5 t, in accordance with national regulations.
For several years, Mercedes-Benz has been
meeting all the legal requirements for a
design which allows for recycling and reuse.
There is a network of return points and dis-
assembly plants which can recycle your vehi-
cle in an environmentally responsible man-
ner. The options for recycling vehicles and
parts are constantly being developed and
improved. This means that your Mercedes-
Benz will also continue to meet even the
increased recycling quotas in the future in
good time. You can obtain further information
from your national Mercedes-Benz homepage
or your national hotline number. Vehicle equipment
This Owner's Manual describes all models
and all standard and optional equipment of
your vehicle available at the time of publica-
tion of the Owner's Manual. Country-specific
differences are possible. Please note that
your vehicle may not be equipped with all fea-
tures described. This also applies to safety-
relevant systems and functions. The equip-
ment in your vehicle may therefore differ from
that shown in the descriptions and illustra-
tions. All the systems found in your vehicle 26
Introduction
Page 42 of 401
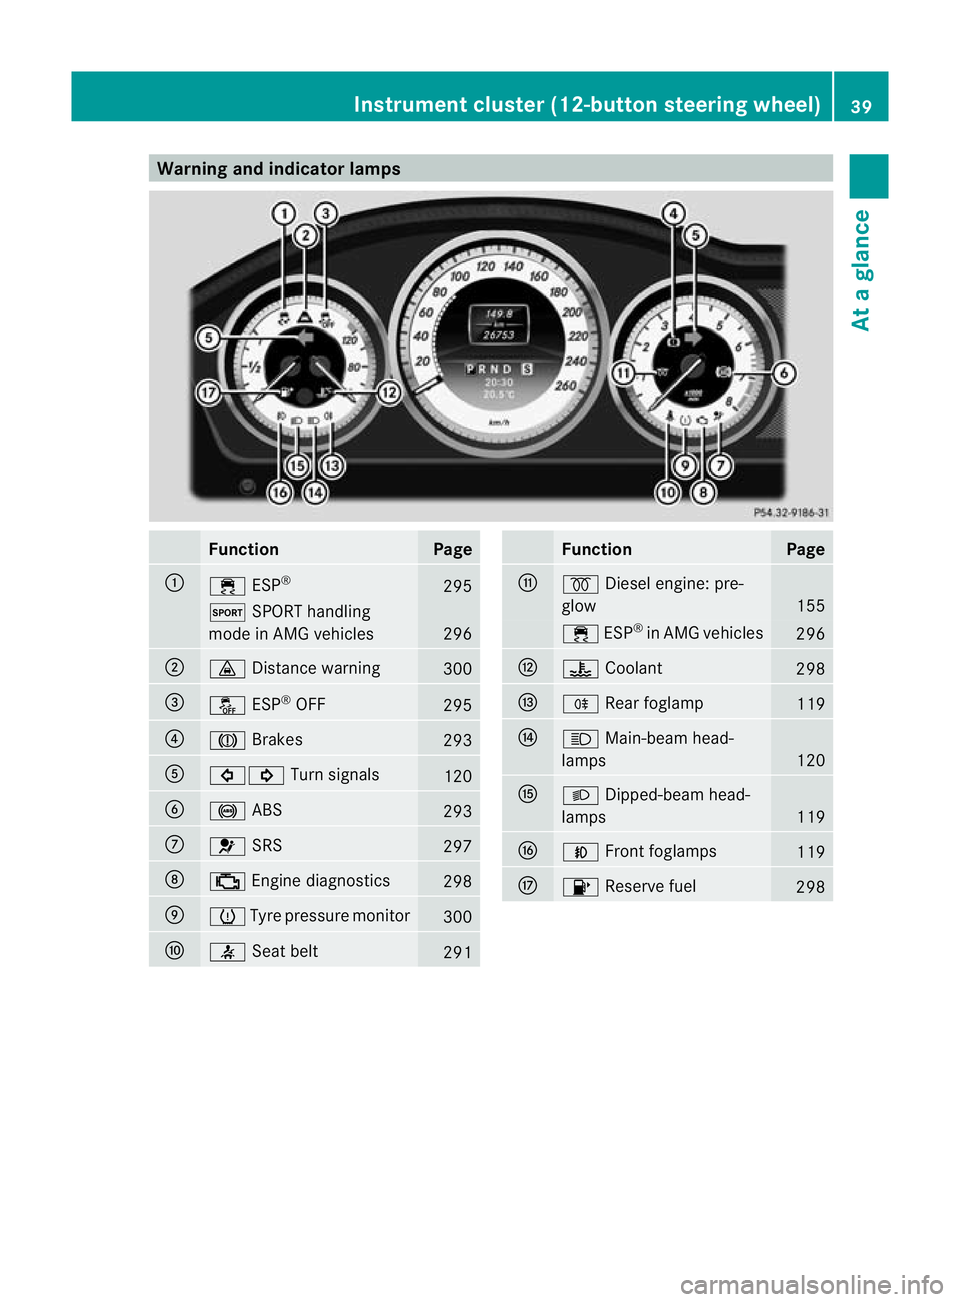
Warning and indicator lamps
Function Page
:
÷
ESP® 295
M
SPORT handling
mode in AMG vehicles 296
;
·
Distance warning 300
=
å
ESP®
OFF 295
?
J
Brakes 293
A
#!
Turn signals 120
B
!
ABS 293
C
6
SRS 297
D
;
Engine diagnostics 298
E
h
Tyre pressure monitor 300
F
7
Seat belt 291 Function Page
G
%
Diesel engine: pre-
glow 155
÷
ESP®
in AMG vehicles 296
H
?
Coolant 298
I
R
Rearfoglamp 119
J
K
Main-beam head-
lamps 120
K
L
Dipped-beam head-
lamps 119
L
N
Front foglamps 119
M
8
Reserve fuel 298Instrument cluster (12-button steering wheel)
39At a glance
Page 75 of 401
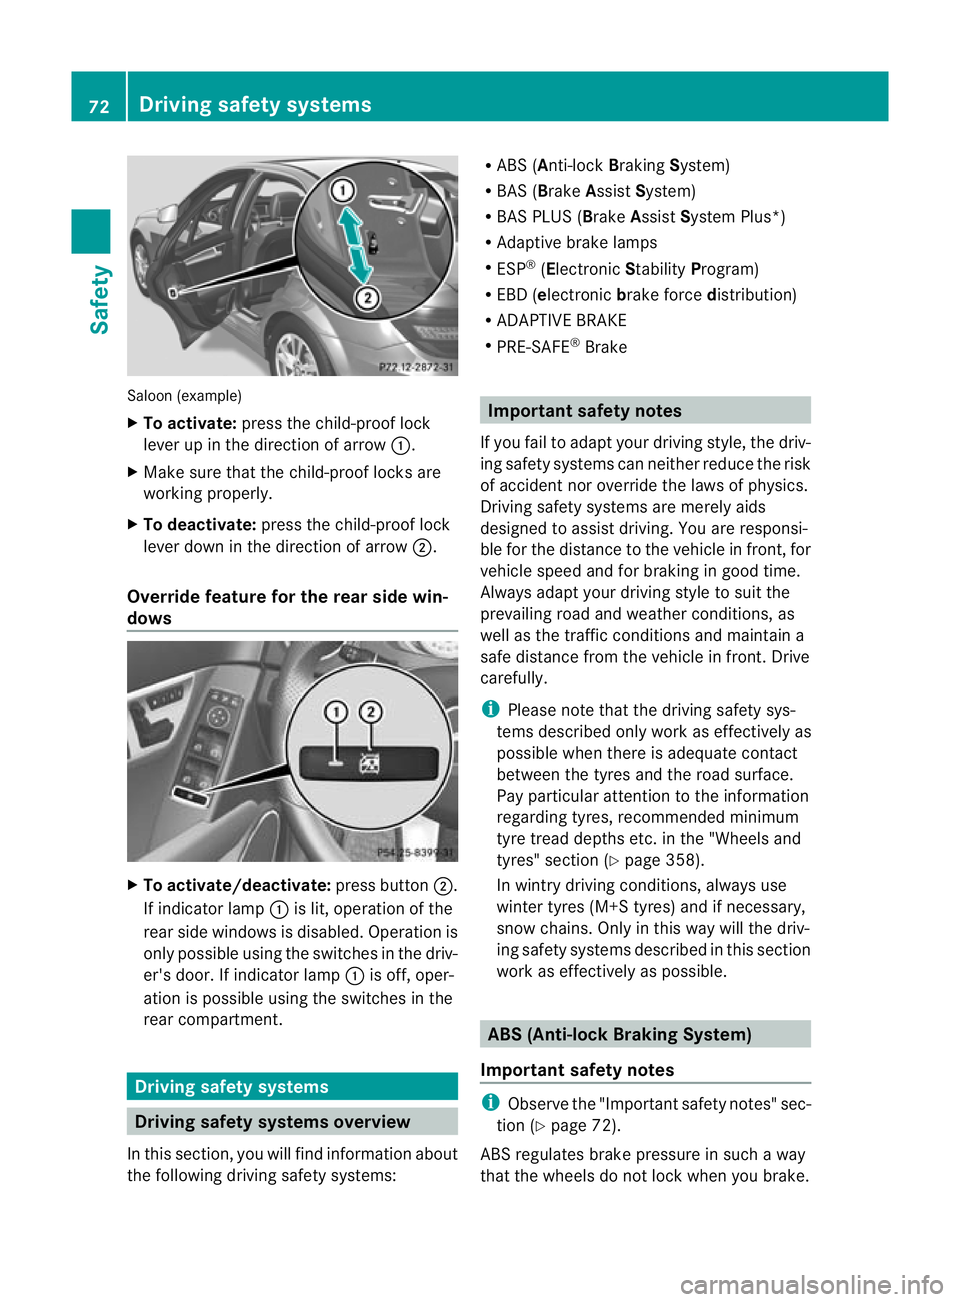
Saloon (example)
X
To activate: press the child-proof lock
lever up in the direction of arrow :.
X Make sure that the child-proof locks are
working properly.
X To deactivate: press the child-proof lock
lever dow ninthe direction of arrow ;.
Override feature for the rear side win-
dows X
To activate/deactivate: press button;.
If indicator lamp :is lit, operation of the
rear side windows is disabled. Operation is
only possible using the switches in the driv-
er's door. If indicator lamp :is off, oper-
ation is possible using the switches in the
rear compartment. Driving safety systems
Driving safety systems overview
In this section, you will find information about
the following driving safety systems: R
ABS ( Anti-lock BrakingSystem)
R BAS ( Brake Assist System)
R BAS PLUS ( BrakeAssist System Plus*)
R Adaptive brake lamps
R ESP ®
(Electronic StabilityProgram)
R EBD ( electronic brake force distribution)
R ADAPTIVE BRAKE
R PRE-SAFE ®
Brake Important safety notes
If you fail to adapt your driving style, the driv-
ing safety systems can neither reduce the risk
of accident nor override the laws of physics.
Driving safety systems are merely aids
designed to assist driving. You are responsi-
ble for the distance to the vehicle in front, for
vehicle speed and for braking in good time.
Always adapt your driving style to suit the
prevailing road and weather conditions, as
well as the traffic conditions and maintain a
safe distance from the vehicle in front. Drive
carefully.
i Please note that the driving safety sys-
tems described only work as effectively as
possible when there is adequate contact
between the tyres and the road surface.
Pay particular attention to the information
regarding tyres, recommended minimum
tyre tread depths etc. in the "Wheels and
tyres" section (Y page 358).
In wintry driving conditions, always use
winter tyres (M+S tyres) and if necessary,
snow chains. Only in this way will the driv-
ing safety systems described in this section
work as effectively as possible. ABS (Anti-lockB
raking System)
Important safety notes i
Observe the "Important safety notes" sec-
tion (Y page 72).
ABS regulates brake pressure in such a way
tha tthe wheels do not lock when you brake. 72
Driving safety systemsSafety
Page 174 of 401
not been adapted to suit the climatic condi-
tions, e.g .diesel fuel fro mwarmer regions.
i Further information about country-spe-
cific fuel properties can be obtained from
oil companies, e.g .atfilling stations.
Flow improver Flow improvers can be added to improve the
cold resistance of diesel fuel. The effective-
ness of a flow improver is not guaranteed with
every diesel fuel.
Correct dosage and thorough mixing are deci-
sive factors in ensuring improvement in low-
temperature resistance. Avoid excessive dos-
age. Excessive dosage may actually decrease
low-temperature resistance under certain cir-
cumstances. Follow the manufacturer's dos-
ing instructions.
Mix the additive with the diesel in good time,
before the flow properties of the diesel
become inadequate. Malfunctions can other-
wise only be rectified by heating the entire
fuel system, e.g. by parking the vehicle in a
heated garage.
Observe the information provided by the man-
ufacturer when using a flow improver. Only
use flow improvers that have been tested and
approved by Mercedes-Benz. You can obtain
further information from any Mercedes-Benz
Service Centre. Refuelling
Fuel filler flap The fuel filler flap is unlocked or locked auto-
matically when you open or close the vehicle
with the key or using KEYLESS-GO.
The position of the fuel filler cap is displayed
in the instrument cluster 8.The arrow
next to the filling pump indicates the side of
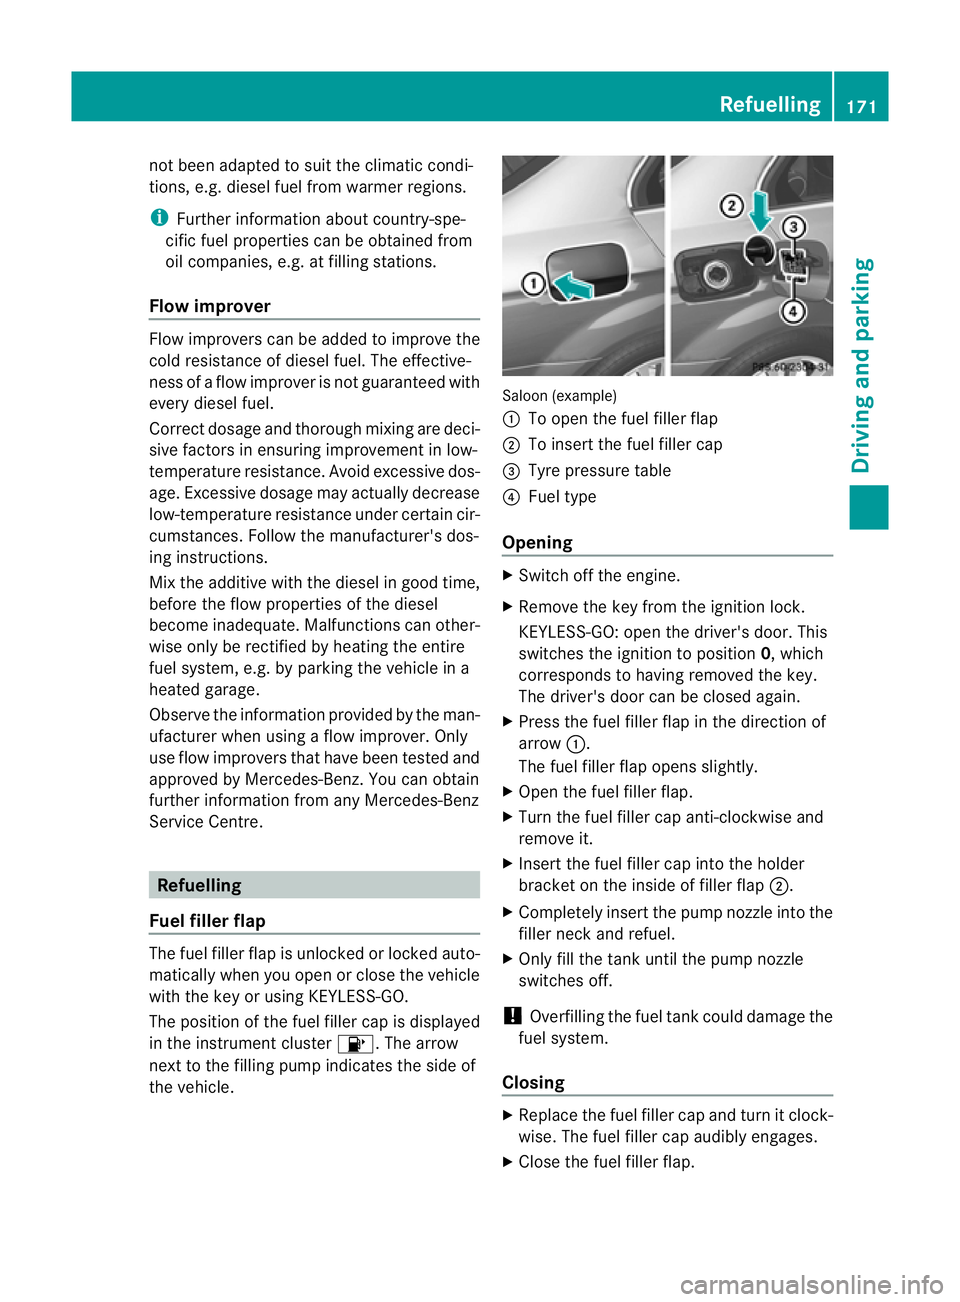
the vehicle. Saloon (example)
:
To open the fuel filler flap
; To insert the fuel filler cap
= Tyre pressure table
? Fuel type
Opening X
Switch off the engine.
X Remove the key from the ignition lock.
KEYLESS-GO: open the driver's door. This
switches the ignition to position 0, which
corresponds to having removed the key.
The driver's door can be closed again.
X Press the fuel filler flap in the direction of
arrow :.
The fuel filler flap opens slightly.
X Open the fuel filler flap.
X Turn the fuel filler cap anti-clockwise and
remove it.
X Insert the fuel filler cap into the holder
bracket on the inside of filler flap ;.
X Completely insert the pump nozzle into the
filler neck and refuel.
X Only fill the tank until the pump nozzle
switches off.
! Overfilling the fuel tank could damage the
fuel system.
Closing X
Replace the fuel filler cap and turn it clock-
wise. The fuel filler cap audibly engages.
X Close the fuel filler flap. Refuelling
171Driving and parking Z
Page 184 of 401
G
WARNING
Never depress the brake peda lcontinuously
while the vehicle is in motion, e.g. never cause
the brakes to rub by applying constant slight
pedal pressure. This causes the brake system
to overheat, increases the braking distance
and can lead to the brakes failing completely. G
WARNING
Do not change down for additional engine
braking on a slippery road surface. This could
cause the drive wheels to lose their grip and
the vehicle could skid.
You can set a variable or permanent limit
speed:
R variable for speed limits, e.g. in built-up
areas
R permanent for long-term speed restric-
tions, e.g. when driving with winter tyres
fitted (Y page 183) G
WARNING
Speedtronic is only an aid designed to assist
driving. You are responsible for the vehicle's
speed and for braking in good time.
i The speed indicated in the speedometer
may differ slightly from the limit speed
stored.
Variable SPEEDTRONIC General notes
With the cruise control lever, you can operate
cruise control or DISTRONIC PLUS and vari-
able SPEEDTRONIC.
The LIM indicator lamp on the cruise control
lever indicates which system you have selec-
ted:
R LIM indicator lamp off: cruise control or
DISTRONIC PLUS is selected.
R LIM indicator lamp on: variable SPEED-
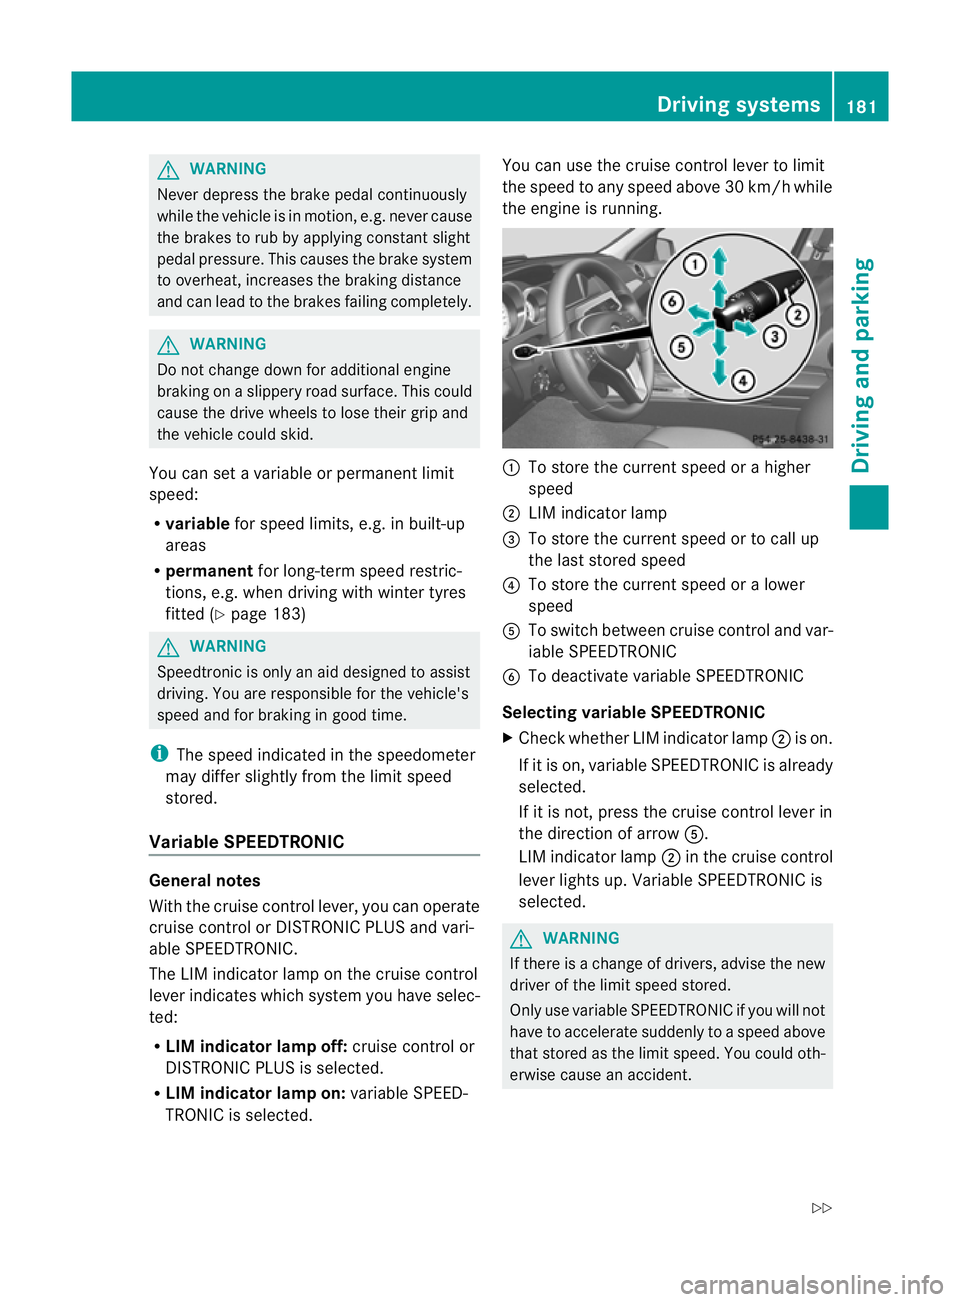
TRONIC is selected. You can use the cruise control lever to limit
the speed to any speed above 30 km/hw
hile
the engine is running. :
To store the current speed or a higher
speed
; LIM indicator lamp
= To store the current speed or to call up
the last stored speed
? To store the current speed or a lower
speed
A To switch between cruise control and var-
iable SPEEDTRONIC
B To deactivate variable SPEEDTRONIC
Selecting variable SPEEDTRONIC
X Check whether LIM indicator lamp ;is on.
If it is on, variable SPEEDTRONIC is already
selected.
If it is not, press the cruise control lever in
the direction of arrow A.
LIM indicator lamp ;in the cruise control
lever lights up. Variable SPEEDTRONIC is
selected. G
WARNING
If there is a change of drivers, advise the new
driver of the limit speed stored.
Only use variable SPEEDTRONIC if you will not
have to accelerate suddenly to a speed above
that stored as the limit speed. You could oth-
erwise cause an accident. Driving systems
181Driving and parking
Z
Page 186 of 401
You will hear a warning tone if this is the
case.
R on vehicles with manual transmission, if
you shift to a higher gear and as a result the
engine speed is too low. G
WARNING
It is not possible to deactivate variable Speed-
tronic by braking.
i The last speed stored is cleared when you
switch off the engine.
Permanent SPEEDTRONIC You can use the on-board computer to limit
the speed permanently to avalue between
160 km/h (e.g. for driving on winter tyres)
and the maximum speed ( Ypage 241).
Shortly before the store dspeed is reached, it
appears in the multifunction display.
Permanent SPEEDTRONIC remains active,
even if variable SPEEDTRONIC is deactivated.
You cannot exceed the stored limit speed,
even if you depress the accelerator pedal
beyond the pressure point (kickdown). DISTRONIC PLUS
Important safety notes DISTRONIC PLUS regulates the speed and
automatically helps you maintain the dis-
tance to the vehicle detected in front. It
brakes automatically in order to avoid
exceeding the set speed.
On long and steep downhill gradients, espe-
cially if the vehicle is laden or towing a trailer,
you must select shift range 1,2or 3in good
time. By doing so, you will make use of the
braking effec tofthe engine. This relieves the
load on the brake system and prevents the
brakes from overheating and wearing too
quickly.
If a slower-moving vehicle is detected in front,
DISTRONIC PLUS causes your vehicle to brake and maintain the preset distance to the
vehicle in front. G
WARNING
Do not change down for additional engine
braking on a slippery road surface. This could
cause the drive wheels to lose their grip and
the vehicle could skid. G
WARNING
DISTRONIC PLUS is only an aid designed to
assist driving. The driver remains fully respon-
sible for the vehicle's distance from other
vehicles, the vehicle's speed and for braking
in good time.
DISTRONIC PLUS does not react in particular
to:
R pedestrians
R stationary obstacles on the road, e.g. stop-
ped or parked vehicles
R oncoming and crossing traffic
DISTRONIC PLUS may not detect narrow vehi-
cles driving in front,e .g. motorcycles, or vehi-
cles driving on a different line. Therefore,
always pay attention to traffic conditions even
when DISTRONIC PLUS is activated. Other-
wise, you may fail to recognise dangers in
time, cause an accident and injure yourself
and others. G
WARNING
DISTRONIC PLUS cannot take account of road
and traffic conditions. If DISTRONIC doe snot
recognise or no longer recognises the vehicle
in front, do not activate DISTRONIC or, if it is
already active, deactivate it. This is especially
the case:
R before corners
R on filter lanes
R when changing to a lane with faster moving
traffic
R in complex driving situations or where lanes
are diverted, e.g. at roadworks on a motor-
way Driving systems
183Driving and parking
Z
Page 203 of 401
might therefore issue steering instructions
too soon. This may lead to a collision. For this
reason, you should avoid using Parking Guid-
ance in such situations.
G
WARNING
Make sure that no persons or animals are in
the manoeuvring range. Otherwise, they
could be injured.
When PARKTRONIC is deactivated, Parking
Guidance is also unavailable.
Use Parking Guidance for parking spaces:
R that are parallel to the directio noftravel
R that are on straight roads, not bends
R that are on the same level as the road, i.e.
not on the pavement, for example. Parking
Guidance may not detect flat kerbs
Parking tips:
R on narrow roads, drive as closely as possi-
ble pastt he parking space.
R parking spaces that are littered, overgrown
or partially occupied by trailer drawbars
might be identified incorrectly or not at all.
R snowfall or heavy rain may lead to a parking
space being measured inaccurately.
R pay attention to the PARKTRONIC
(Y page 197) warning messages during the
parking procedure.
R when transporting a load which protrudes
from your vehicle, you must not use Parking
Guidance.
R never use Parking Guidance with snow
chains or an emergency spare wheel fitted.
R make sure that the tyre pressures are
always correct.T his hasadirec teffect on
the steering instructions.
R the way you rvehicle is positioned in the
parking space after parkin gis dependent
on various factors. These include the posi-
tion and shape of the vehicles parked in
front and behind it and the conditions of the
location. In some cases, Parking Guidance
may guide you too far or not far enough into
a parking space. In some cases, it may also lead you across or onto the kerb. If neces-
sary, cancel the parking procedure with
Parking Guidance.
! If unavoidable, you should drive over
obstacles such as kerbs slowly and not at
a sharp angle. Otherwise, you may damage
the wheels or tyres.
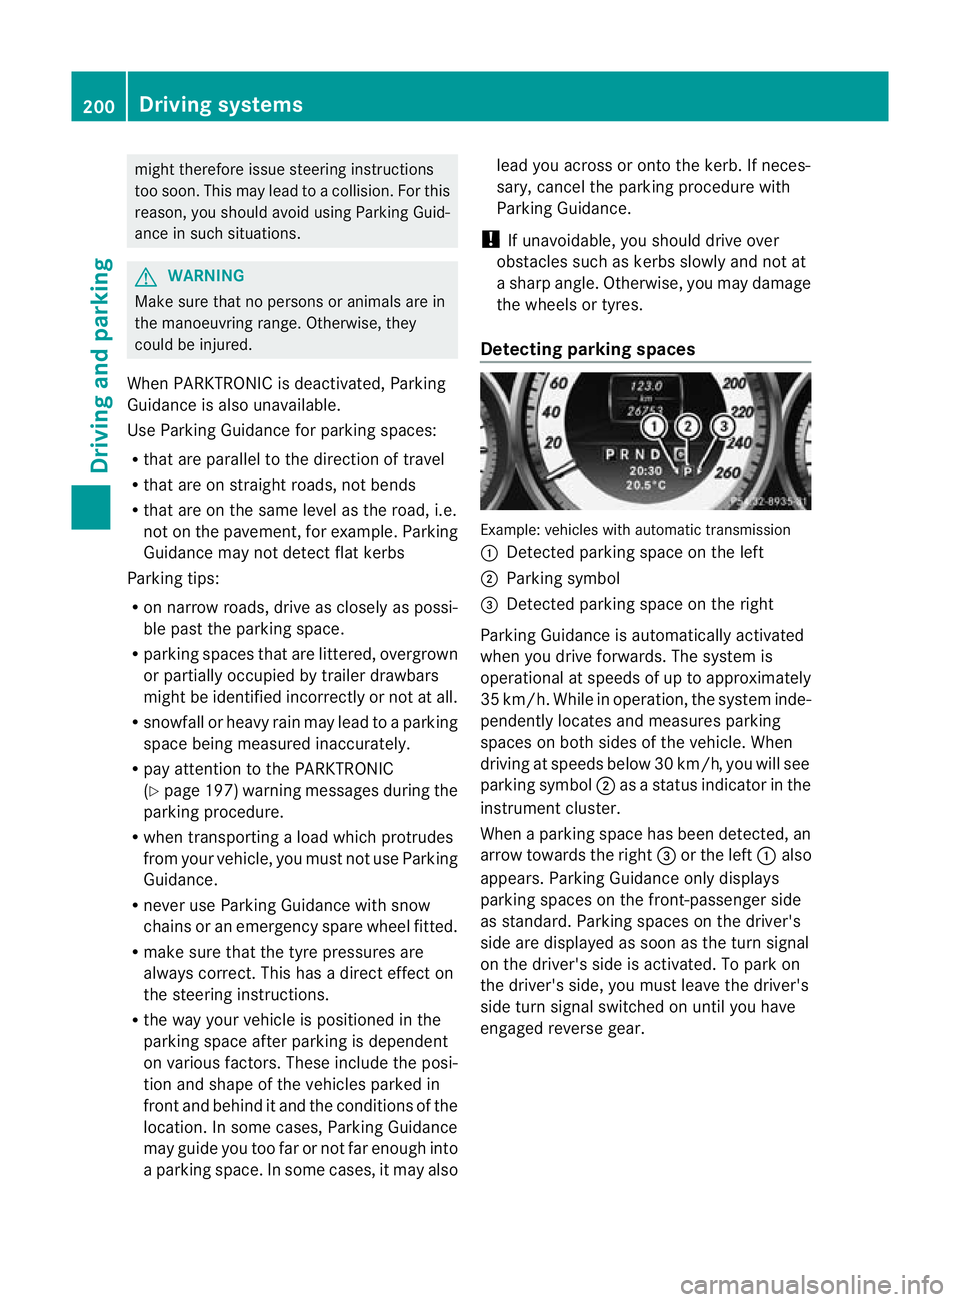
Detecting parking spaces Example: vehicles with automatic transmission
:
Detected parking space on the left
; Parking symbol
= Detected parking space on the right
Parking Guidance is automatically activated
when you drive forwards. The system is
operational at speeds of up to approximately
35 km/h. While in operation, the system inde-
pendently locates and measures parking
spaces on both sides of the vehicle. When
driving at speeds below 30 km/h, you will see
parking symbol ;as a status indicator in the
instrument cluster.
When a parking space has been detected, an
arrow towards the right =or the left :also
appears. Parking Guidance only displays
parking spaces on the front-passenger side
as standard. Parking spaces on the driver's
side are displayed as soon as the turn signal
on the driver's side is activated. To park on
the driver's side, you must leave the driver's
side turn signal switched on until you have
engaged reverse gear. 200
Driving systemsDriving and parking