brake MERCEDES-BENZ C-CLASS SALOON 2012 Repair Manual
[x] Cancel search | Manufacturer: MERCEDES-BENZ, Model Year: 2012, Model line: C-CLASS SALOON, Model: MERCEDES-BENZ C-CLASS SALOON 2012Pages: 557, PDF Size: 10.15 MB
Page 386 of 557
Note
s on paint work/matt finish paintwork
care Obse
rveth e no tes on cleaning and care toavo id
damaging the paintwor k.
Pa int
R Insect remains: soak with insect remo ver and
ri nse off the treated areas af terw ards.
R Bird droppings: soak with water and rinse off
af te rw ards.
R Tree resin, oils, fuels and greases: remo veby
ru bbing gently wi tha clo thsoaked in petro‐
leum ether or lighter fluid.
R Coolant and brake fluid: remo vewith a damp
clo thand clean water.
R Tarst ains: use tar remo ver.
R Wax: use silicone remo ver.
R Do not attach sticke rs,fi lms or similar mate‐
ri als.
R Remo vedirt immediately, where possible.
Matt finish
R Only use care products appr ovedfor
Mercedes-Benz. R
Do not polish theve hicle and light-alloy
wheels.
R Only use car washes that cor respond tothe
latest engineering standards.
R Do not use car wash programmes with a final
hot wax treatment.
R Do not use paint cleane rs, buf fing or polish‐
ing products, gloss preser vers, e.g. wax.
R Alw ays ha vepaintwork repairs car ried out at
a qu alified specialist workshop. Note
s on cleaning decorative foils Obser
vethe no tes on matt finish care in the
ch ap ter "No tes on paintwork/matt finish paint‐
wo rkcare" (/ page 383). They also apply to
matt decorative foils.
Obser vethe no tes on cleaning decorative foils to
av oid vehicle damage.
Cleaning
R For cleaning, use plenty of water and a mild
cleaning agent without additives or abrasive
subs tances, e.g. a car sha mpoo appr ovedfor
Mercedes-Benz. R
Remo vedirt immediatel y,where possible,
whilst avoiding rubbing too hard. There is
ot herwise a risk of damaging the decorative
fo il ir reparabl y.
R Ifth ere is dirt on thefinish or if the decora‐
tive foil is dull: use thePa int Cleaner recom‐
mended and appr oved for Mercedes-Benz.
R Insect remains: soak with insect remo ver and
ri nse off the treated areas af terw ards.
R Bird droppings: soak with water and rinse off
af te rw ards.
R Topreve ntwate rst ains, dry a foil-wrapped
ve hicle with a soft, absorbent clo thafter
eve rycar wash.
Av oiding dama getothe decorative foil
R The service life and colouring of decorative
foils are impaired by:
- sunlight
- temp erature, e.g. hot air blo wer
- weather conditions
- stone chippings and dirt
- chemical cleaning agents Maintenance and care
383
Internal use only
Page 387 of 557
-
oily products
R Do not use polish on matt decorative foil.
Po lishing will ha vethe ef fect of shining the
fo il-wrapped sur face.
R Do not treat matt or stru ctured deco rative
fo ils with wax.Pe rm anent stains may occur.
Sc ratches, cor rosive deposits, areas af fected by
cor rosion and damage caused byincor rect care
cannot al ways be comple tely re paired. In such
cases, visit a qualified specialist workshop.
Yo u can obtain more information on care and
cleaning products from the manufacturer.
In the case of foil-wrapped sur faces, optical dif‐
fe re nces may occur between the sur faces that
we renot pr otected bya decorative foil af ter
re moving a decorative foil.
% Have wo rkor repairs todecorative foils car‐
ri ed out at a qualified specialist workshop,
e.g. in a Mercedes-Benz Service Centre. Note
s on care of car parts &
WARNING Risk of entrapment if the
windscreen wipers are swit ched on while
th e windscreen is being cleaned
If th e windscreen wipers are set in motion
while you are cleaning the windscreen or
wiper blades, you can be trapped bythe
wiper arm. #
Alw ays switch off the windscreen wip‐
ers and the ignition before cleaning the
windscreen or wiper blades. &
WARNING Risk of burn s fromtheta il‐
pipe and tailpipe trims
The exhaust tailpipe and tailpipe trims can
become very hot. If you come into contact
with these parts of theve hicle, you could
burn yourself. #
Alw ays be particular lycareful around
th eta ilpipe and theta ilpipe trims and
supervise children especially closely in
th is area. #
Allow vehicle parts tocool down before
to uching them. To
avo id damage totheve hicle, obser vethe
no tes on cleaning and care of thefo llowing vehi‐
cle parts:
Wheels and rims
R Use wate r and acid-free alloy wheel cleaners.
R Do not use acidic alloy wheel cleaners to
re mo vebrake dust. This could damage wheel
bolts and brake components.
R Toavo id cor rosion of the brake disks and
brakepads, drive theve hicle for a few
minutes af ter cleaning before parking it. The
brake disks and brakepads warm up and dry
out.
Wi ndo ws
R Clean the windo wsinside and outside with a
damp clo thand with a cleaning agent recom‐
mended for Mercedes-Benz.
R Do not use dry clo ths or abrasive or sol vent-
based cleaning agents toclean the inside of
windo ws. 384
Maintenance and care
Internal use only
Page 403 of 557
Obser
vethefo llowing points during starting
assis tance and when charging the battery:
R Only use undamaged jump lead/charging
cables with a suf ficient cross-section and
insula tedte rm inal clamps.
R Non- insulated parts of thete rm inal clamps
must not come into con tact wi thother me tal
parts while the jump lead/charging cable is
connected tothe battery/jump-s tart connec‐
tion point.
R The jump lead/charging cable must not
come into contact wi thany parts which may
mo vewhen the engine is running.
R Alw ays make sure that nei ther you nor the
battery is elect rostatically charge d.
R Keep away from fire and naked flames.
R Do not lean overth e batter y.
Obser vethe additional following points when
ch arging the battery:
R Only use battery charge rs tested and
appr oved for Mercedes-Benz.
R Read the battery charge r's operating instruc‐
tions before charging the batter y. Obser
vethe additional following points during
st arting assis tance:
R Starting assis tance may only be pr ovided
using vehicles, batteries or other jump start
devices with a nominal voltage of 12V.
R The vehicles must not touch.
R Vehicles with a petrol engine: jump-start
th eve hicle only when the engine and exhaust
sy stem are cold. St
arting assi stance and charging the12 V
battery Preparing
starting assi stance/charging #
Secure theve hicle byapplying the electric
parking brake. #
Automatic transmission: shiftthe trans‐
mission toposition j. #
Manual transmission: shiftthe transmis‐
sion toneutral. #
Switch off the ignition and all electrical con‐
sumers. #
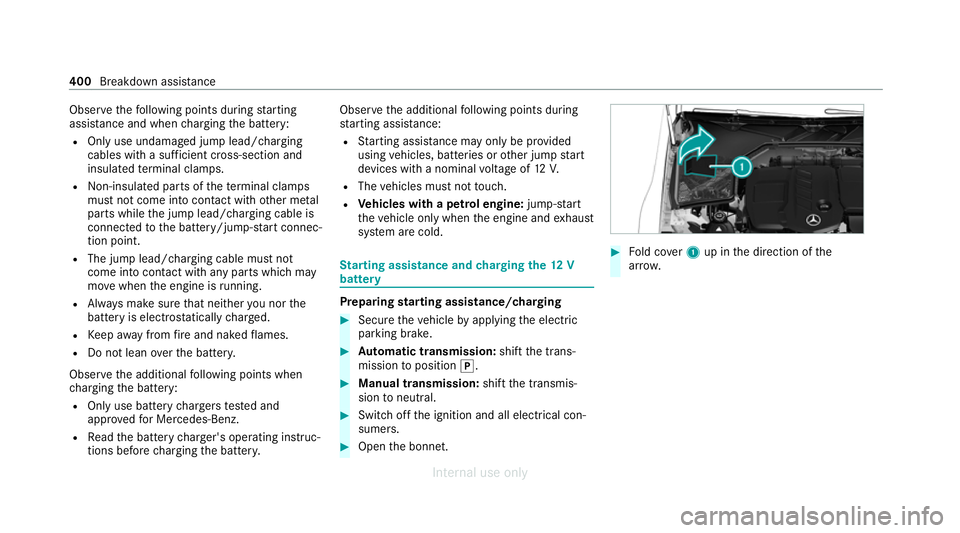
Open the bonn et. #
Fold co ver1 up in the direction of the
ar row. 400
Breakdown assis tance
Internal use only
Page 405 of 557
Re
placing the 12V battery #
Obser vethe no tes on the12 V battery
(/ page 396).
Mercedes-Benz recommends that you ha vethe
12 V battery replaced at a qualified specialist
wo rkshop, e.g. at a Mercedes-Benz Service
Centre.
Obser vethefo llowing no tes if youwa ntto
re place the battery yourself:
R Alw aysre place a faulty bat tery with a battery
which meets the specific vehicle require‐
ments.
The vehicle is equipped with an AGMtech nol‐
ogy battery (Absorbent Glass Mat) or a li th‐
ium-ion batter y.Fu llve hicle functionality is
only guaranteed with an AGM battery or lith‐
ium-ion batter y.Fo r saf etyre asons,
Mercedes-Benz recommends that you on ly
use bat teries which ha vebeen tested and
appr ovedfo ryo ur vehicle byMercedes-Benz.
R Carryove r de tach able parts, such as vent
hoses, elbow fittings or term inal co vers from
th e battery being replaced. R
Make sure that theve nt hose is al ways con‐
nected tothe original opening on the side of
th e batter y.
Fit any existing or supplied cell caps.
Otherwise, gases or battery acid could
escape.
R Make sure that de tach able parts are recon‐
nected in the same way. To
w- starting or towing away Pe
rm itted towing me thods Plug-in
hybrid: be sure toobser vethe no tes in
th e Supplement. You could otherwise failto rec‐
ognise dangers.
* NO
TEDama gefrom auto matic braking If one of
thefo llowing functions is switched
on, theve hicle brakes automatically in cer‐
ta in situations:
R Active Brake Assi st
R Active Dis tance Assi stDISTRONIC R
HOLD function
R Active Parking Assist
To avo id damage totheve hicle, deactivate
th ese sy stems in thefo llowing or similar sit‐
uations: #
During towing #
In a car wash Mercedes-Benz
recommends transporting your
ve hicle in the case of a breakdown, rath er than
to wing it away.
Fo rto wing, use a tow rope or tow bar with bo th
axles on the ground. Do not use tow bar sys‐
te ms.
* NO
TEDama getotheve hicle due to tow‐
ing away incor rectly #
Obser vethe instructions and no tes on
to wing away. 402
Breakdown assis tance
Internal use only
Page 406 of 557
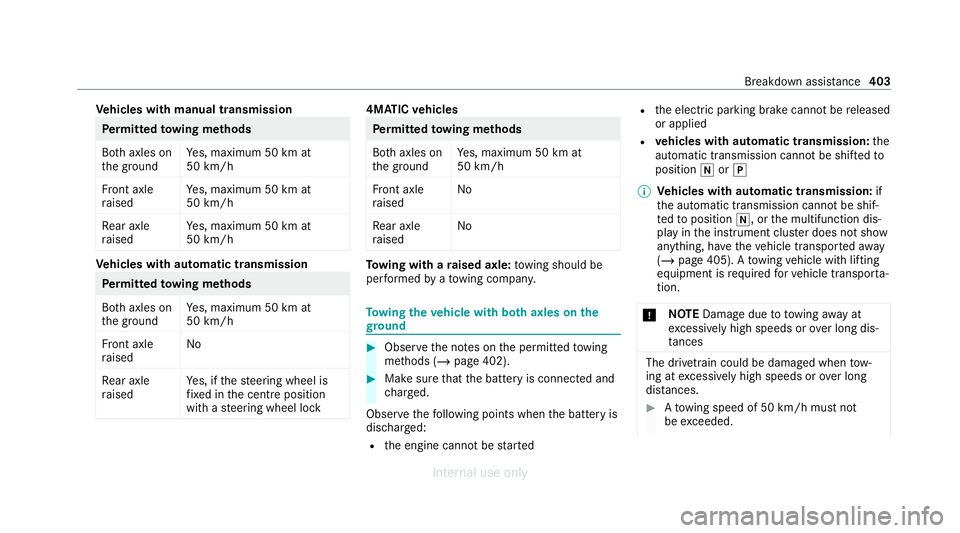
Ve
hicles with manual transmission Pe
rm itted towing me thods
Bo th axles on
th e ground Ye
s, maximum 50 km at
50 km/h
Fr ont axle
ra ised Ye
s, maximum 50 km at
50 km/h
Re ar axle
ra ised Ye
s, maximum 50 km at
50 km/h Ve
hicles with automatic transmission Pe
rm itted towing me thods
Bo th axles on
th e ground Ye
s, maximum 50 km at
50 km/h
Fr ont axle
ra ised No
Re ar axle
ra ised Ye
s, if thesteering wheel is
fi xe d in the cent reposition
with a steering wheel lock 4MATIC
vehicles Pe
rm itted towing me thods
Bo th axles on
th e ground Ye
s, maximum 50 km at
50 km/h
Fr ont axle
ra ised No
Re ar axle
ra ised No To
wing with a raised axle: towing should be
per form ed byato wing compan y. To
wing theve hicle with bo thaxles on the
gr ound #
Obser vethe no tes on the permitted towing
me thods (/ page 402). #
Make sure that the battery is connected and
ch arge d.
Obser vethefo llowing points when the battery is
dischar ged:
R the engine cann otbe star ted R
the electric parking brake cann otbe released
or applied
R vehicles with automatic transmission: the
automatic transmission cannot be shif tedto
position iorj
% Vehicles with automatic transmission: if
th e automatic transmission cann otbe shif‐
te dto position i, orthe multifunction dis‐
play in the instrument clus ter does not show
anything, ha vetheve hicle transpor tedaw ay
( / page 405). A towing vehicle with lifting
equipment is requiredforve hicle transpor ta‐
tion.
* NO
TEDama gedue to to wing away at
exc essively high speeds or over long dis‐
ta nces The driv
etra in could be damaged when tow‐
ing at excessively high speeds or over long
dis tances. #
Atowing speed of 50 km/h must not
be exc eeded. Breakdown assis
tance 403
Internal use only
Page 407 of 557
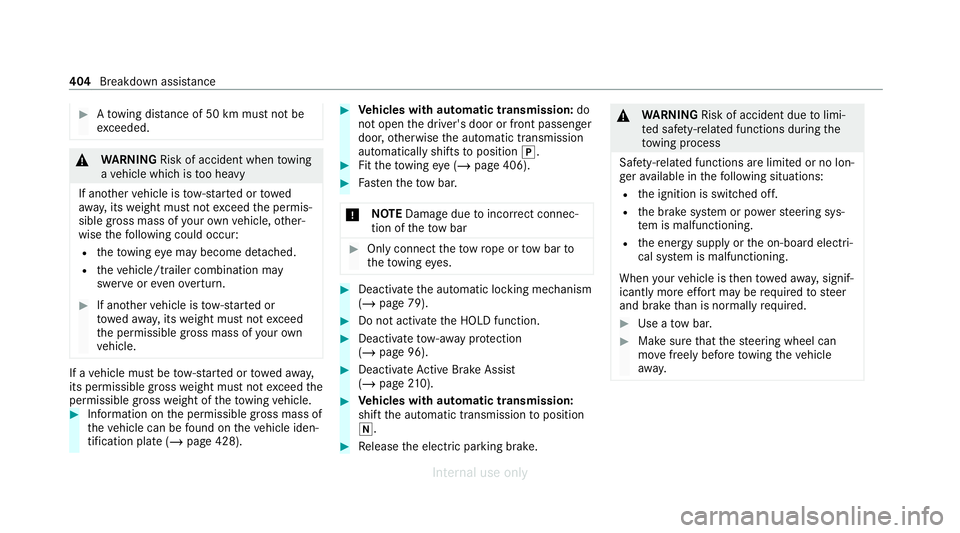
#
Atowing dis tance of 50 km must not be
exc eeded. &
WARNING Risk of accident when towing
a ve hicle which is too heavy
If ano ther vehicle is tow- star ted or towed
aw ay, its weight must not exceed the permis‐
sible gross mass of your ow nve hicle, other‐
wise thefo llowing could occur:
R theto wing eye may become de tach ed.
R theve hicle/trailer combination may
swer veoreve nov erturn. #
If ano ther vehicle is tow- star ted or
to we daw ay, its weight must not exceed
th e permissible gross mass of your own
ve hicle. If a
vehicle must be tow- star ted or towe daw ay,
its permissible gross weight must not exceed the
permissible gross weight of theto wing vehicle. #
Information on the permissible gross mass of
th eve hicle can be found on theve hicle iden‐
tification plate (/ page 428). #
Vehicles with automatic transmission: do
not open the driver's door or front passenger
door, otherwise the automatic transmission
automatically shifts toposition j. #
Fittheto wing eye (/ page 406). #
Fasten theto w bar.
* NO
TEDama gedue toincor rect connec‐
tion of theto w bar #
Onlyconnect theto w rope or tow bar to
th eto wing eyes. #
Deactivate the automatic locking mechanism
(/ page 79). #
Do not activate the HOLD function. #
Deactivate tow- aw ay protection
(/ page 96). #
Deactivate Active Brake Assi st
( / page 210). #
Vehicles with automatic transmission:
shift the automatic transmission toposition
i. #
Release the electric parking brake. &
WARNING Risk of accident due tolimi‐
te d saf ety-re lated functions during the
to wing process
Saf ety-re lated functions are limited or no lon‐
ge rav ailable in thefo llowing situations:
R the ignition is switched off.
R the brake sy stem or po werst eering sys‐
te m is malfunctioning.
R the energy supply or the on-board electri‐
cal sy stem is malfunctioning.
When your vehicle is then towe daw ay, signif‐
icantly more ef fort may be requ ired tosteer
and brake than is norm allyrequ ired. #
Use a tow bar. #
Make sure that thesteering wheel can
mo vefreely before towing theve hicle
aw ay. 404
Breakdown assis tance
Internal use only
Page 408 of 557
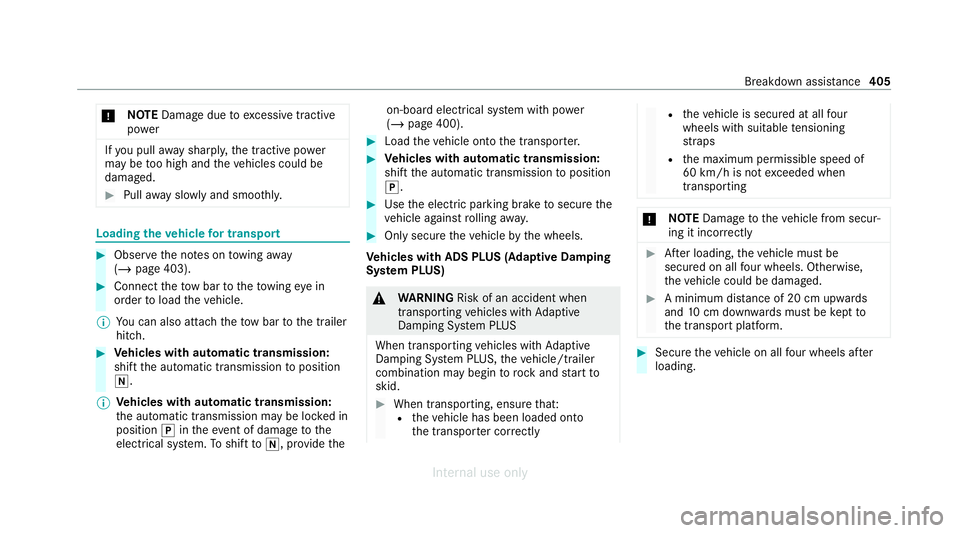
*
NO
TEDama gedue toexcessive tracti ve
po wer If
yo u pull away sharpl y,the tractive po wer
may be too high and theve hicles could be
damaged. #
Pull away slowly and smoo thly. Loading the
vehicle for transport #
Obser vethe no tes on towing away
( / page 403). #
Connect theto w bar totheto wing eye in
order toload theve hicle.
% You can also attach theto w bar tothe trailer
hitch. #
Vehicles with automatic transmission:
shift the automatic transmission toposition
i.
% Ve
hicles with automatic transmission:
th e automatic transmission may be loc ked in
position jintheeve nt of damage tothe
electrical sy stem. Toshift toi , pr ovide the on-board electrical sy
stem with po wer
( / page 400). #
Load theve hicle onto the transpor ter. #
Vehicles with automatic transmission:
shift the automatic transmission toposition
j. #
Use the electric parking brake tosecure the
ve hicle against rolling away. #
Only secure theve hicle bythe wheels.
Ve hicles with ADS PLUS (Adaptive Damping
Sy stem PLUS) &
WARNING Risk of an accident when
transporting vehicles with Adaptive
Damping Sy stem PLUS
When transporting vehicles with Adaptive
Damping Sy stem PLUS, theve hicle/trailer
combination may begin torock andstart to
skid. #
When transporting, ensure that:
R theve hicle has been loaded onto
th e transpor ter cor rectly R
theve hicle is secured at all four
wheels with suitable tensioning
st ra ps
R the maximum permissible speed of
60 km/h is not exceeded when
transporting *
NO
TEDama getotheve hicle from secur‐
ing it incor rectly #
After loading, theve hicle must be
secured on all four wheels. Otherwise,
th eve hicle could be damaged. #
A minimum dis tance of 20 cm up wards
and 10cm down wards must be kept to
th e transport platform. #
Secure theve hicle on all four wheels af ter
loading. Breakdown assis
tance 405
Internal use only
Page 417 of 557
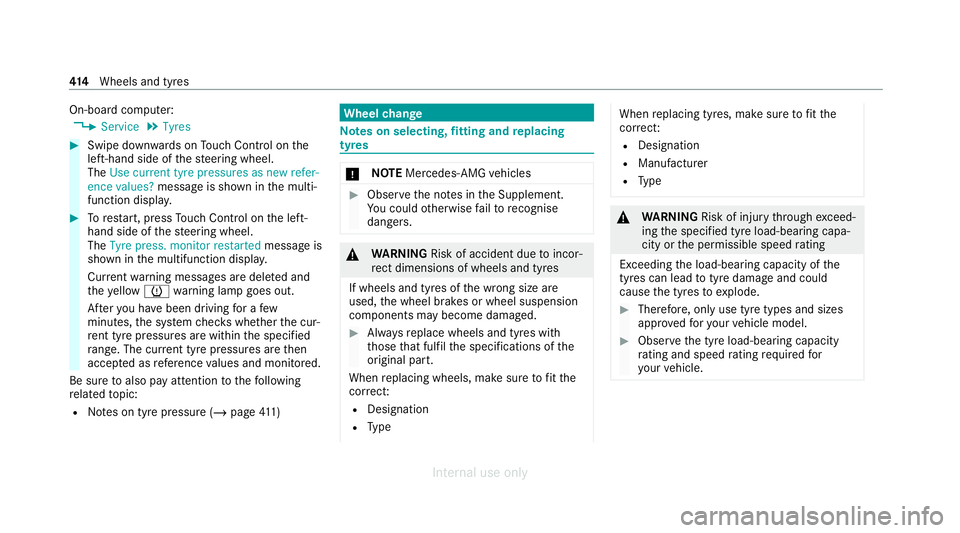
On-board computer:
4 Service 5
Tyres #
Swipe down wards on Touch Control on the
left-hand side of thesteering wheel.
The Use current tyre pressures as new refer-
ence values? message is shown in the multi‐
function displa y.#
Torestart, press Touch Control on the left-
hand side of thesteering wheel.
The Tyre press. monitor restarted message is
shown in the multifunction displa y.
Cur rent wa rning messages are dele ted and
th eye llow h warning lamp goes out.
Af teryo u ha vebeen driving for a few
minutes, the sy stem checks whe ther the cur‐
re nt tyre pressures are wi thin the specified
ra nge. The cur rent tyre pressures are then
accep ted as refere nce values and monitored.
Be sure toalso pay attention tothefo llowing
re lated topic:
R Notes on tyre pressure (/ page411) Wheel
change Note
s on selecting, fitting and replacing
tyres *
NO
TEMercedes-AMG vehicles #
Obser vethe no tes in the Supplement.
Yo u could otherwise failto recognise
dangers. &
WARNING Risk of accident due toincor‐
re ct dimensions of wheels and tyres
If wheels and tyres of the wrong size are
used, the wheel brakes or wheel suspension
components may become damaged. #
Alw aysre place wheels and tyres with
th ose that fulfil the specifications of the
original part.
When replacing wheels, make sure tofit the
cor rect:
R Designation
R Type When
replacing tyres, make sure tofit the
cor rect:
R Designation
R Manufactu rer
R Type &
WARNING Risk of injury thro ugh exceed‐
ing the specified tyre load-bearing capa‐
city or the permissible speed rating
Exceeding the load-bearing capacity of the
tyres can lead totyre dama geand could
cause the tyres toexplode. #
Therefore, only use tyre types and sizes
appr ovedfo ryo ur vehicle model. #
Obser vethe tyre load-bearing capacity
ra ting and speed rating requ iredfor
yo ur vehicle. 414
Wheels and tyres
Internal use only
Page 419 of 557
*
NO
TEDama getosummer tyres at low
ambient temp eratures At
low ambient temp eratures, tears could
fo rm when driving with summer tyres, caus‐
ing permanent damage tothe tyre. #
Attemp eratures below 7 °C use i
M+S- tyres. Ac
cessory pa rts th at are not appr ovedfo ryo ur
ve hicle byMercedes-Benz or are not being used
cor rectly can impair the operating saf ety.
Before pu rchasing and using non-appr oved
accesso ries, visit a qualified specialist workshop
and enquire about:
R Suitability
R Legal stipulations
R Factory recommendations &
WARNING Risk of accident with high
per form ance tyres
The special tire tread in combination with the
optimised tyre compound means that the ri
sk of skidding and aquaplaning on wet
ro ads is inc reased.
In addition, the tyre grip is greatly reduced at
a low outside temp erature and tyre running
te mp erature. #
Switch on the ESP ®
and adapt your
driving style accordingly. #
Use i M+S tyres at outside temp er‐
atures of less than 10 °C. #
Only use the tyres forth eir intended
purpose. Obser
vethefo llowing when selecting, fitting and
re placing tyres:
R Countr y-specific requirements for tyre
appro valth at define a specific tyre type for
yo ur vehicle.
R Furthermore, the use of cer tain tyre types in
cer tain regions and areas of operation can
be highly beneficial.
R Only use tyres and wheels of the same type
(summer tyres, winter tyres, MOEx tended
tyres) and the same make. R
Only fit wheels of the same size on one axle
(left and right).
It is only permissible tofit a di fferent wheel
size in theeve nt of a flat tyre in order to
drive tothe specialist workshop.
R Do not make any modifications tothe brake
sy stem, the wheels or the tyres.
The use of shims or brake dust shields is not
permitted and may in validate theve hicle's
ge neral operating pe rmit.
R Vehicles with a tyre pressure monitoring
sy stem: allfitted wheels mu stbe equipped
with functioning sensors forth e tyre pres‐
sure monitoring sy stem.
R Attemp eratures below 7°C use winter tyres
or all-season tyres mar kedi M+Sfor all
wheels.
Wi nter tyres pr ovide the best possible grip in
wintry road conditions.
R For M+S tyres, only use tyres with the same
tread.
R Obser vethe maximum permissible speed for
th e M+S tyres fitted. 416
Wheels and tyres
Internal use only
Page 420 of 557
If
th e tyre's maximum speed is below that of
th eve hicle, this must be indicated byan
appropriate label in the driver's field of
vision.
R Run in new tyres at moderate speeds forthe
fi rs t10 0 km.
R Replace the tyres af ter six years at the latest,
re ga rdless of wear.
R When replacing with tyres that do not
fe ature run-flat characteristics: vehicles
with MOExtended tyres are not equipped
with a TIREFIT kit at thefa ctor y.Equip the
ve hicle with a TIREFIT kit af terre placing with
tyres that do not feature run-flat characteris‐
tics, e.g. winter tyres.
% You can permanently limit the maximum
ve hicle speed for driving with winter tyres
(/ page 196).
Fo r more information on wheels and tyres, con‐
ta ct a qualified specialist workshop.
Be sure toalso obse rveth efo llowing fur ther
re lated subjects:
R Notes on tyre pressure (/ page411) R
Tyre pressure table (/ page412)
R Notes on the emer gency spa rewheel
(/ page 424) Note
s on inter changing wheels &
WARNING Risk of injury thro ugh dif fer‐
ent wheel sizes
Inter changing the front and rear wheels can
se verely impair the driving characteristics.
The disk brakes or wheel suspension compo‐
nents may also be damaged. #
Onlyinter change the front and rear
wheels if the wheels and tyres ha vethe
same dimensions. Inter
changing the front and rear wheels if the
wheels or tyres ha vediffere nt dimensions can
re nder thege neral operating pe rmit in valid.
The wear pat tern s on the front and rear wheels
dif fer:
R front wheels wear more on the tyre shoulder R
rear wheels wear more in the cent reofthe
tyre
Do not drive wi thtyres that ha vetoo little tread
dep th. This significantly reduces traction on wet
ro ads (aquaplaning).
On vehicles with the same front and rear wheel
size, you can inter change the wheels every
5000 to10,000 km, depending on thewe ar.
Ensure the direction of rotation is maintained for
th e wheels.
Obser vethe instructions and saf ety no tes on
"Changing a wheel" when doing so
(/ page 418). Note
s onstoring wheels When
storing wheels, obser vethefo llowing
no tes:
R Afterre moving wheels, store them in a cool,
dry and preferably dark place.
R Protect the tyres from conta ct withoil,
grease or fuel. Wheels and tyres
417
Internal use only