fuel pressure MERCEDES-BENZ C-CLASS SALOON 2012 Owners Manual
[x] Cancel search | Manufacturer: MERCEDES-BENZ, Model Year: 2012, Model line: C-CLASS SALOON, Model: MERCEDES-BENZ C-CLASS SALOON 2012Pages: 557, PDF Size: 10.15 MB
Page 6 of 557
Mir
rors ........................................................ 141Climate control
........................................ 14 4
Overview of climate contro l systems ..........1 44
Operating the climate control sy stem ......... 14 5 Driving and pa
rking ................................. 15 4
Driving ........................................................ 154
DY NA MIC SELECT switch ............................1 65
Au tomatic transmission .............................. 167
Fu nction of the 4MATIC .............................. 172
Re fuelling .................................................... 172
Pa rking ...................................................... .178
Driving and driving sa fety sy stems .............1 85
Tr ailer hit ch................................................. 237
Bicycle rack function ................................... 241
Ve hicle towing instructions ........................ .243 Instrument display and on-board
comp
uter.................................................. 244
No tes on the instrument display and on-
board computer .......................................... 24 4
Instrument display overview ...................... .245 Overview of buttons on
thesteering
wheel ..........................................................2 46
Operating the on-board computer .............. 24 6
Overview of displa yson the multifunc‐
tion display .................................................2 47
Head-up display .......................................... 24 8 LINGU
ATRO NIC ........................................ 250
No tes on operating saf ety .......................... 250
Ope ration ................................................... 250
Using LINGU ATRO NIC ef fectively ............... 252
Essential voice commands ........................ .252 Multimedia sy
stem .................................. 265
Overview and operation .............................. 265
Sy stem settings .......................................... 274
Fit & Healt hy............................................... 285
Na vigation .................................................. 287
Te lephone .................................................. .313
Online and Internet functions ..................... 340
Media ......................................................... 346
Ra dio .......................................................... 358
TV ............................................................... 361
Sound ......................................................... 369 Main
tenance and care ............................. 372
ASS YST PLUS service inter val display .........3 72
Engine compartment .................................. 373
Cleaning and care .......................................3 81 Breakdown assistance
............................388
Emergency .................................................. 388
Flat tyre ...................................................... 390
Battery (vehicle) ......................................... 396
To w- starting or towing away ....................... 402
Electrical fuses ........................................... 407 Wheels and tyres
...................................... 41 0
No tes on noise or unusual handling char‐
acteristics .................................................. .410
No tes on regular lyinspecting wheels and
tyres ............................................................ 41 0
No tes on snow chains ................................ .410
Ty re pressure ...............................................4 11
Wheel change .............................................. 414
Emergency spare wheel .............................. 424 Contents
3
Internal use only
Page 14 of 557
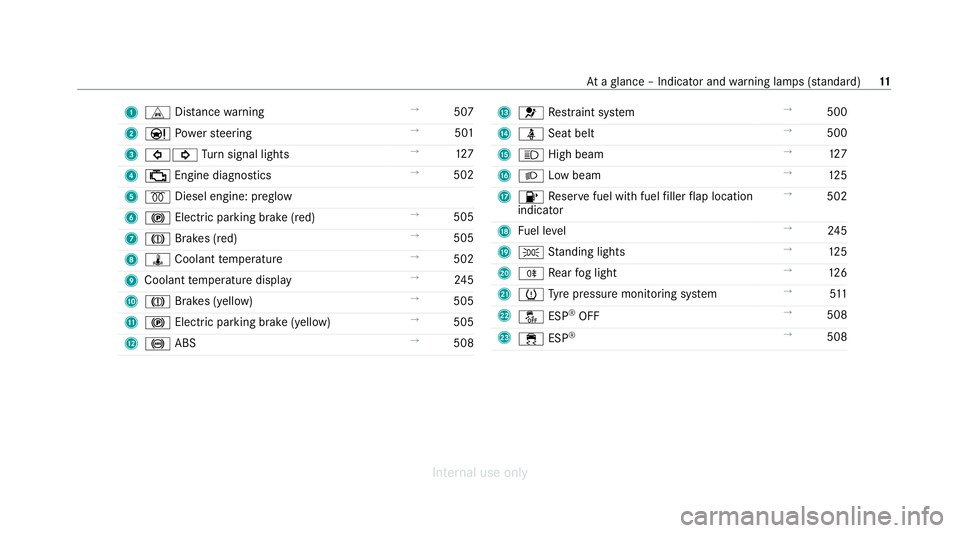
1
L Distance warning →
507
2 Ð Powe rst eering →
501
3 #! Turn signal lights →
127
4 ; Engine diagnostics →
502
5 % Diesel engine: preglow
6 ! Electric pa rking brake (red) →
505
7 J Brakes (red) →
505
8 ÿ Coolant temp erature →
502
9 Coolant temp erature display →
24 5
A J Brakes (yellow) →
505
B ! Electric parking brake (yell ow)→
505
C ! ABS →
508 D
6 Restra int sy stem →
500
E ü Seat belt →
500
F K High beam →
127
G L Low beam →
12 5
H 8 Reser vefuel with fuel filler flap location
indicator →
502
I Fuel le vel →
24 5
J T Standing lights →
12 5
K R Rear fog light →
12 6
L h Tyre pressure monitoring sy stem →
511
M å ESP®
OFF →
508
N ÷ ESP®
→
508 At
aglance – Indicator and warning lamps (s tanda rd) 11
Internal use only
Page 16 of 557
1
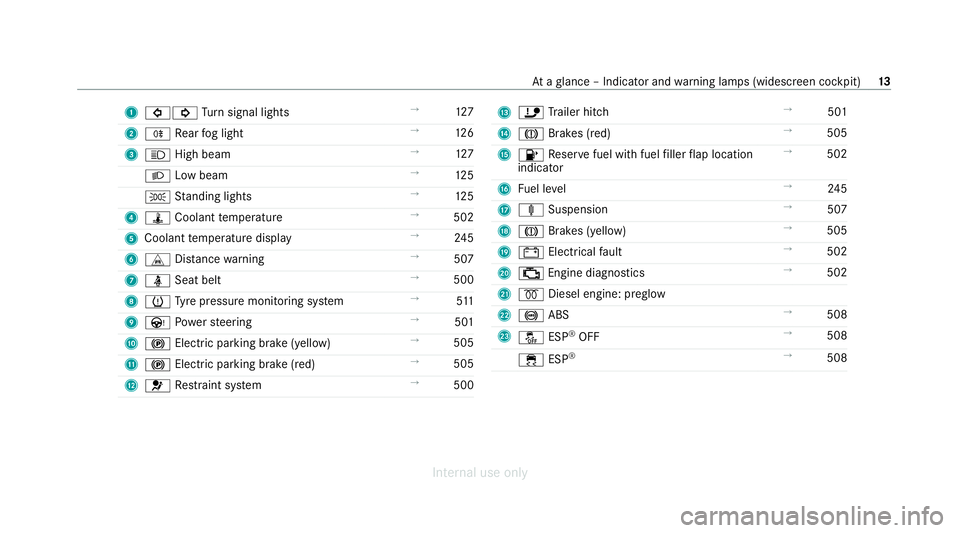
#! Turn signal lights →
127
2 R Rear fog light →
12 6
3 K High beam →
127
L Low beam →
12 5
T Standing lights →
12 5
4 ÿ Coolant temp erature →
502
5 Coolant temp erature display →
24 5
6 L Distance warning →
507
7 ü Seat belt →
500
8 h Tyre pressure monitoring sy stem →
511
9 Ù Powe rst eering →
501
A ! Electric pa rking brake (yellow) →
505
B ! Electric parking brake (red) →
505
C 6 Restra int sy stem →
500 D
ï Trailer hit ch →
501
E J Brakes (red) →
505
F 8 Reser vefuel with fuel filler flap location
indicator →
502
G Fuel le vel →
24 5
H ä Suspension →
507
I J Brakes (yellow) →
505
J # Electrical fault →
502
K ; Engine diagnostics →
502
L % Diesel engine: preglow
M ! ABS →
508
N å ESP®
OFF →
508
÷ ESP®
→
508 At
aglance – Indicator and warning lamps (widesc reen cockpit) 13
Internal use only
Page 22 of 557
1
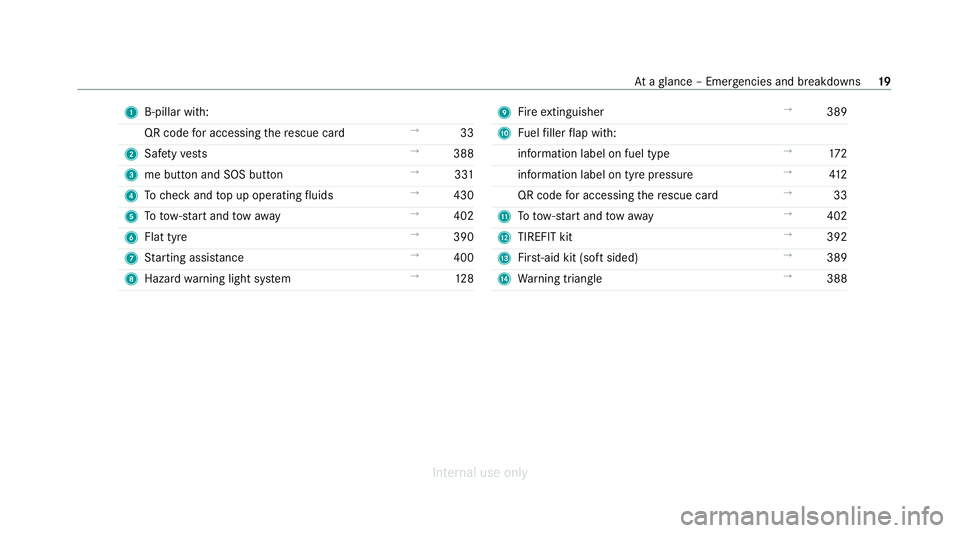
B-pillar with:
QR code for accessing there scue card →
33
2 Safetyve sts →
388
3 me button and SOS button →
331
4 Tocheck and top up operating fluids →
430
5 Totow- start and tow aw ay →
402
6 Flat tyre →
390
7 Starting assis tance →
400
8 Haza rdwa rning light sy stem →
12 8 9
Fire extinguisher →
389
A Fuelfiller flap with:
information label on fuel type →
172
information label on tyre pressure →
412
QR code for accessing there scue card →
33
B Totow- start and tow aw ay →
402
C TIREFIT kit →
392
D First-aid kit (so ftsided) →
389
E Warning triangle →
388 At
aglance – Emer gencies and breakdowns 19
Internal use only
Page 24 of 557
Pr
otection of the environment
* NO
TEPlug-in hybrid #
Obser vethe no tes in the Supplement.
Yo u could otherwise failto recognise
dangers. +
ENVI
RONMENTAL NOTEEnvironmental
dama gedue tooperating conditions and
personal driving style The pollutant emission of
theve hicle is
directly related tothewa yyo u operate the
ve hicle.
Operate your vehicle in an environmentally
re sponsible manner tohelp pr otect the envi‐
ro nment. Please obser vethefo llowing rec‐
ommendations on ope rating conditions and
pe rsonal driving style.
Operating conditions: #
Make sure that the tyre pressure is cor‐
re ct. #
Do not car ryany unnecessary weight
(e.g. roof luggage rack s once you no
lon ger need them). #
Adhere tothe service inter vals.
A regularly serviced vehicle will contri b‐
ute toenvironmen tal pr otection. #
Alw ays ha vemaintenance workcar ried
out at a qualified specialist workshop.
Pe rsonal driving style: #
Do not depress the accelera tor pedal
when starting the engine. #
Do not warm upthe engine while the
ve hicle is stationar y. #
Drive carefully and maintain a suitable
dist ance from theve hicle in front. #
Avoid frequent, sudden acceleration
and braking. #
Change gear in good time and use each
ge ar on lyup toÔ of its maximum
engine speed. #
Switch off the engine in stationary traf‐
fi c, e.g. byusing the ECO start/ stop
function. #
Drive fuel-ef ficiently. Obser vethe ECO
display for a fuel-ef ficient driving style. Ta
ke -back of end-of-life vehicles
EU countries onl y:
Mercedes-Benz will take back your end-of-life
ve hicle for environment-friendly disposal in
accordance with the European Union(EU) End-
of-Life Vehicles Directive.
A network of vehicle take -ba ckpoints and dis‐
mantlers has been es tablished foryo uto return
yo ur vehicle. You can lea veit at any of these
points free of charge . This makes an impor tant
contribution toclosing there cycling circle and
conse rving resources.
Fo r fur ther information about there cycling and
disposal of end-of-life vehicles, and theta ke-
back conditions, please visit the national
Mercedes-Benz website foryo ur count ry. Gene
ral no tes 21
Internal use only
Page 160 of 557
Ensu
rethefo llowing before starting the engine:
R the legal stipulations in the area where your
ve hicle is par ked allow engine starting via
smartphone.
R it is safe tostart and runth e engine where
yo ur vehicle is par ked.
R The fuel tank is su fficiently full.
St arting theve hicle (Remo teOnline) &
WARNING Risk of crushing or entrap‐
ment due tounin tentional starting of the
engine
Limbs could be crushed or trapped if the
engine is star ted unintentionally during
service or maintenance work. #
Alw ays secure the engine against unin‐
te ntional starting before car rying out
maintenance or repair work. Re
quirements:
R park position jis selected.
R the anti- theft alarm sy stem is not activated.
R the panic alarm is not activated. R
the hazard warning light sy stem is switched
off.
R the bonn etis closed.
R the doors are closed and loc ked.
R the windo wsand sliding sun roof are closed. #
Start theve hicle using the smartphone.
Af tereve ryengine start, the engine runs for
te n minu tes.
Yo u can car ryout a maximum of two consecu‐
tive starting attem pts. Yo u must start theve hicle
once with theke y before trying tostart the
engine again with the smartphone. you can stop
th eve hicle again at any time.
% Further information can be found in the
smartphone app.
Securing the engine against starting before
car rying out maintenance or repair work: #
switch on the hazard warning light sy stem.
or #
unlock the doors.
or #
open a side window or the sliding sunroof. Ru
nning-in no tes To
preser vethe engine during thefirs t15 00 km:
R drive at varying road speeds and engine
speeds.
R do not drive at speeds greater than
14 0 km/h.
R drive theve hicle in drive program A
or ;.
R shift tothe next highest gear at theve ry lat‐
est when the needle reaches the last third
before there d area in there v counter.
R do not shift down a gear manually in order to
brake.
R avoidove rstraining theve hicle, e.g. driving at
full thro ttle.
R do not depress the accelera tor pedal past
th e pressure point (kickdown).
R only increase the engine speed gradually and
accelera tetheve hicle tofull speed af ter
15 00 km. Driving and parking
157
Internal use only
Page 174 of 557
#
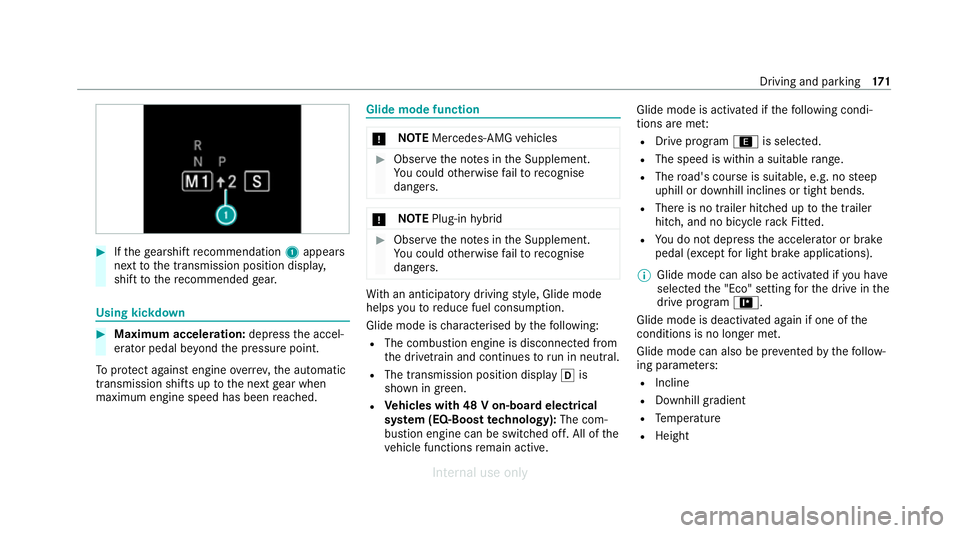
Ifth ege arshift recommendation 1appea rs
next tothe transmission position displa y,
shift tothere commended gear. Using kickd
own #
Maximum acceleration: depressthe accel‐
erator pedal be yond the pressure point.
To protect against engine overrev ,th e automatic
transmission shifts up tothe next gear when
maximum engine speed has been reached. Glide mode function
*
NO
TEMercedes-AMG vehicles #
Obser vethe no tes in the Supplement.
Yo u could otherwise failto recognise
dangers. *
NO
TEPlug-in hybrid #
Obser vethe no tes in the Supplement.
Yo u could otherwise failto recognise
dangers. Wi
th an anticipatory driving style, Glide mode
helps youto reduce fuel consum ption.
Glide mode is characterised bythefo llowing:
R The combustion engine is disconnected from
the driv etra in and continues torun in neutral.
R The transmission position displ ayh is
shown in green.
R Vehicles with 48 V on-board electrical
sy stem (EQ-Boost technology): The com‐
bustion engine can be switched off. All of the
ve hicle functions remain active. Glide mode is activated if
thefo llowing condi‐
tions are me t:
R Drive prog ram ; is selected.
R The speed is within a suitable range.
R The road's course is suitable, e.g. no steep
uphill or downhill inclines or tight bends.
R There is no trailer hitched up tothe trailer
hitch, and no bicycle rack Fitted.
R You do not depress the accelera tor or brake
pedal (e xcept for light brake applications).
% Glide mode can also be activated if you ha ve
selected the "Eco" setting forth e drive in the
drive prog ram =.
Glide mode is deactivated again if one of the
conditions is no longer met.
Glide mode can also be pr evented bythefo llow‐
ing parame ters:
R Incline
R Downhill gradient
R Temp erature
R Height Driving and parking
171
Internal use only
Page 178 of 557
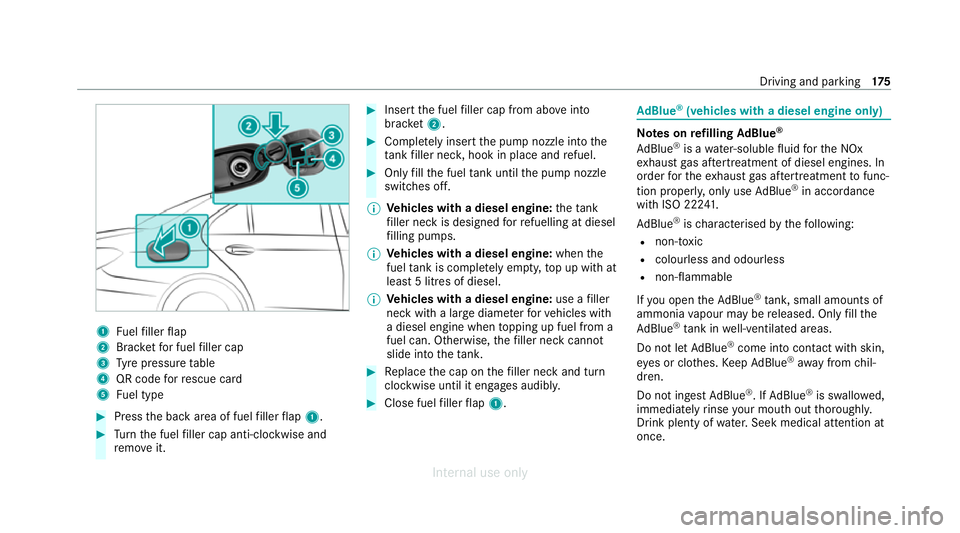
1
Fuelfiller flap
2 Brac ketfo r fuel filler cap
3 Tyre pressure table
4 QR code forre scue card
5 Fuel type #
Press the back area of fuel filler flap 1. #
Turn the fuel filler cap anti-clockwise and
re mo veit. #
Insert the fuel filler cap from abo veinto
brac ket2. #
Comp lete ly inse rtthe pump nozzle into the
ta nk filler nec k,hook in place and refuel. #
Only fill th e fuel tank until the pump nozzle
switches off.
% Vehicles with a diesel engine: theta nk
fi ller neck is designed forre fuelling at diesel
fi lling pumps.
% Vehicles with a diesel engine: whenthe
fuel tank is compl etely em pty, top up with at
least 5 litres of diesel.
% Vehicles with a diesel engine: use afiller
neck with a lar gediame terfo rve hicles with
a diesel engine when topping up fuel from a
fuel can. Otherwise, thefiller neck cannot
slide into theta nk. #
Replace the cap on thefiller neck and turn
clockwise until it engages audibl y. #
Close fuel filler flap 1. Ad
Blue ®
(vehicles with a diesel engine only) Note
s onrefilling AdBlue ®
Ad Blue ®
is a wate r-soluble fluid forth e NOx
ex haust gas af tertre atment of diesel engines. In
order forth eex haust gas af tertre atment tofunc‐
tion proper ly, only use AdBlue ®
in acco rdance
with ISO 22 241.
Ad Blue ®
is ch aracterised bythefo llowing:
R non-t oxic
R colourless and odourless
R non-flammable
If yo u open theAd Blue ®
tank, small amounts of
ammonia vapour may be released. Only fill the
Ad Blue ®
tank in well-ventilated areas.
Do not let AdBlue ®
come into contact wi thskin,
ey es or clo thes. Keep AdBlue ®
aw ay from chil‐
dren.
Do not ingest AdBlue ®
. If AdBlue ®
is swallo wed,
immediately rinse your mouth out thoroughly.
Drink plenty of water.Seek medical attention at
once. Driving and park
ing175
Internal use only
Page 398 of 557
If, af
terte n minutes, a tyre pressure of
200 kPa (2.0 bar/29 psi) has been attained: &
WARNING Risk of accident from driving
wi th sealed tyres
A tyre temp orarily sealed with tyre sealant
impairs the handling characteristics and is
not suitable for higher speeds. #
Adapt your driving style according lyand
drive carefull y. #
Do not exceed the maximum speed
limit with a tyre that has been repaired
using tyre sealant. #
Obser vethe maximum permissible speed for
a tyre sealed with tyre sealant 80 km/h. #
Affix th e upper section of the TIREFIT sticker
to the instrument clus ter in a location where
it will be easi lyseen bythe driver.
* NO
TEStaining from leaking tyre sealant Af
ter use, excess tyre sealant may leak out
from thefilling hose. #
Therefore, place thefilling hose in the
plastic bag that con tained the TIREFIT
kit. +
ENVIRONMEN
TALNO TEEnvironmental
pollution caused byenvironmen tally ir re‐
sponsible disposal Ty
re sealant contains polluta nts. #
Have the tyre sealant bottle disposed of
professionall y,e.g. at a Mercedes-Benz
Service Centre. #
Switch off the tyre inflation compressor. #
Unscr ew thefilling hose from theva lve of the
defective tyre. #
Stow th e tyre sealant bottle and the tyre
inflation compressor. #
Pull away immediatel y. #
Stop driving af ter appro ximately ten minu tes
and check the tyre pressure using the tyre
inflation compressor.
The tyre pressure must now be at least
13 0 kPa (1.3 bar/19 psi). &
WARNING Risk of accident due tothe
specified tyre pressure not being
attained
If th e specified tyre pressure is not reached,
th e tyre is too badly damaged. The tyre seal‐
ant cannot repair the tyre in this ins tance.
The braking and driving characteristics may
be great lyimpaired. #
Do not continue driving. #
Consult a qualified specialist workshop. Countries
that ha veMercedes-Benz
Service24h: you will find a sticke r with thete le‐
phone number, e.g. on the B‑pillar on the driver's
side. #
Cor rect the tyre pressure if it is still at least
13 0 kPa (1.3 bar/19 psi). See the tyre pres‐
sure table on the fuel filler flap forva lues. #
Toincrease the ty repressure: switch on
th e tyre inflation compressor. Breakdown assis
tance 395
Internal use only
Page 414 of 557
#
Neverfit snow chains on the front
wheels. #
Only fit snow chains on there ar wheels
in pairs. *
NO
TEDama getocomponents of the
ve hicle body or chassis due tofitted
snow chains If
yo ufit snow chains tothe front wheels of
4MATIC vehicles, you may damage co mpo‐
nents of theve hicle body or chassis. #
Onlyfit snow chains tothere ar wheels
of 4MATIC vehicles. Obser
vethefo llowing no tes when using snow
ch ains:
R Snow ch ains are on ly permissible for cer tain
wheel/tyre combinations. You can obtain
information about this from a Mercedes-Benz
Service Cent re.
R For saf etyre asons, only use snow chainsthat
ha ve been specifically appr ovedfo ryo ur ve
hicle byMercedes-Benz, or snow chains
with the same quality standard.
R If sn ow ch ains are fitted, the maximum per‐
missible speed is 50 km/h.
R Vehicles with Active Park ing Assis t:do
not use Active Parking Assist when snow
ch ains are fitted.
R Vehicles with le vel control: if snowchains
are fitted, only drive at raised vehicle le vel
( / page 219).
% You can permanently limit the maximum
ve hicle speed for driving with winter tyres
(/ page 196).
% You can deactivate ESP ®
to pull away
( / page 190). This all owsth e wheels to
spin, achieving an increased driving forc e. Ty
re pressure Note
s on tyre pressure Ty
re pressure which is too high or too low can:
R Shor tenth e service life of the tyres. R
Cause increased tyre damage.
R Adversely af fect driving characteristics and
th us driving saf ety, e.g. due toaquaplaning. &
WARNING Risk of accident due torepea‐
te d pressure drop in the tyres
The wheels, valves or tyres could be dam‐
aged.
To o low a tyre pressure can lead tothe tyres
bur sting. #
Examine the tyres forfo re ign objects. #
Check whe ther the tyre has a puncture
or theva lve has a leak. #
Ifyo u are unable torectify the damage,
conta ct aqualified specialist workshop. Information on
there commended tyre pressure
fo rth eve hicle's factor y-fitted tyres can be found
on the tyre pressure table on the inside of the
fuel filler flap (/ page412).
Use a suita ble pressure gauge tocheck the tyre
pressure. The outer appearance of a tyre does Wheels and tyres
411
Internal use only