engine MERCEDES-BENZ C-CLASS SALOON 2014 Owners Manual
[x] Cancel search | Manufacturer: MERCEDES-BENZ, Model Year: 2014, Model line: C-CLASS SALOON, Model: MERCEDES-BENZ C-CLASS SALOON 2014Pages: 489, PDF Size: 14.88 MB
Page 428 of 489
Before replacing a fuse
X Secure the vehicle against rolling away
(Y page 207).
X Switch off all electrical consumers.
X Make sure that the ignition is switched off
(Y page 181).
or
X When using the key, turn the key to position
0 in the ignition lock and remove it
(Y page 181).
All indicator lamps in the instrument cluster
must be off.
The fuses are located in various fuse boxes:
R fuse box on the driver's side of the dash-
board
R fuse box in the front-passenger footwell
R fuse box in the engine compartment on the
driver's side
R fuse box under the boot floor on the right-
hand side of the vehicle, when viewed in the
direction of travel
The fuse allocation chart is on the fuse box in
the boot (Y page 426). Dashboard fuse box
! Do not use a pointed object such as a
screwdriver to open the cover in the dash-
board. You could damage the dashboard or
the cover.
! Make sure that no moisture can enter the
fuse box when the cover is open.
! When closing the cover, make sure that it
is lying correctly on the fuse box. Moisture seeping in or dirt could otherwise impair
the operation of the fuses. X
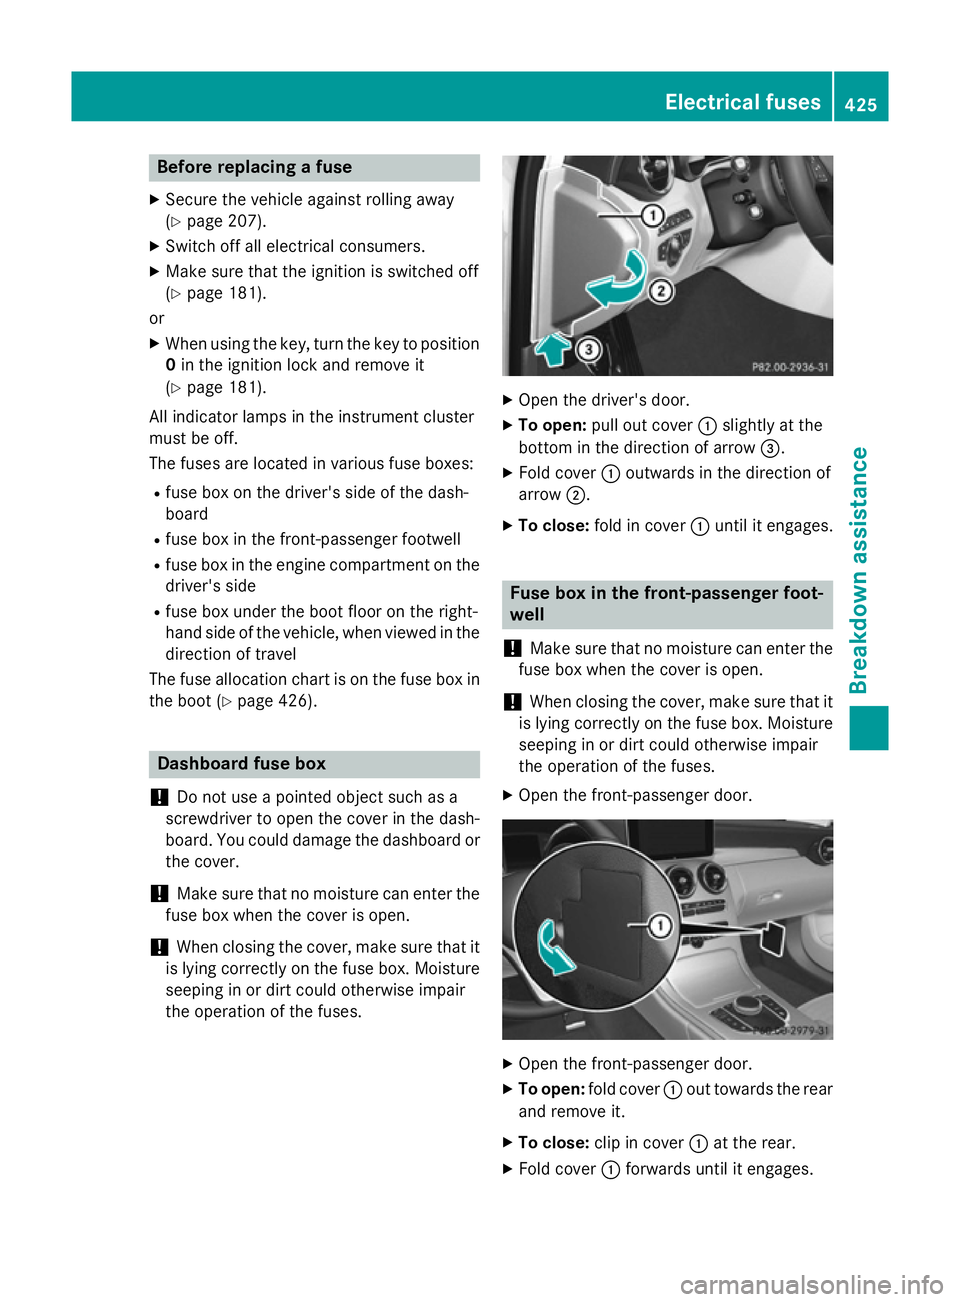
Open the driver's door.
X To open: pull out cover :slightly at the
bottom in the direction of arrow =.
X Fold cover :outwards in the direction of
arrow ;.
X To close: fold in cover :until it engages. Fuse box in the front-passenger foot-
well
! Make sure that no moisture can enter the
fuse box when the cover is open.
! When closing the cover, make sure that it
is lying correctly on the fuse box. Moisture seeping in or dirt could otherwise impair
the operation of the fuses.
X Open the front-passenger door. X
Open the front-passenger door.
X To open: fold cover :out towards the rear
and remove it.
X To close: clip in cover :at the rear.
X Fold cover :forwards until it engages. Electrical fuses
425Breakdown assis tance Z
Page 429 of 489
Fuse box in the engine compartment
G
WARNING
When the bonnet is open, and the windscreen wipers are set in motion, you can be injured by
the wiper linkage. There is a risk of injury.
Always switch off the windscreen wipers and
the ignition before opening the bonnet.
! Make sure that no moisture can enter the
fuse box when the cover is open.
! When closing the cover, make sure that it
is lying correctly on the fuse box. Moisture
seeping in or dirt could otherwise impair
the operation of the fuses. X
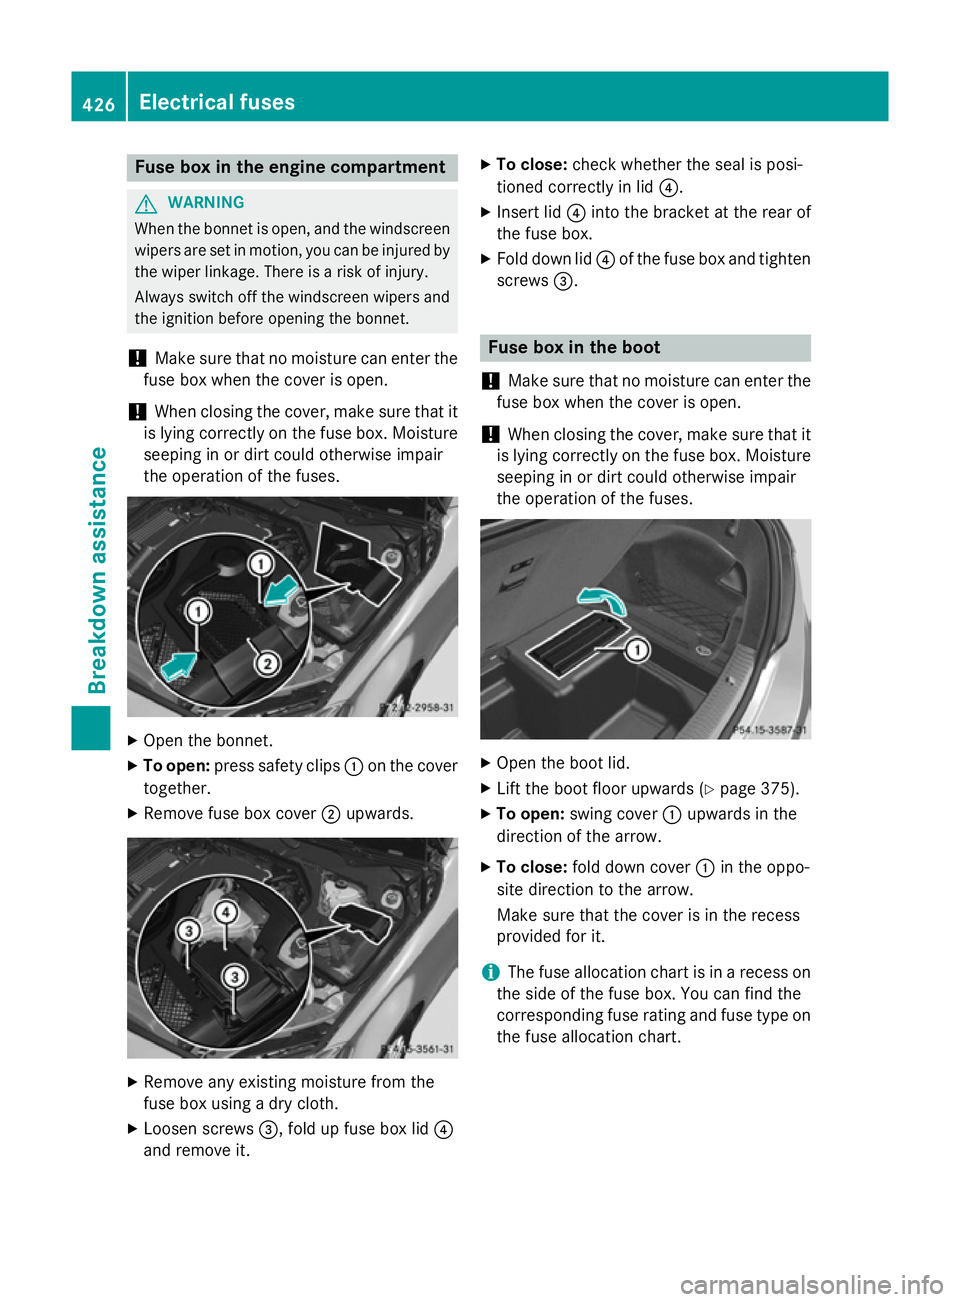
Open the bonnet.
X To open: press safety clips :on the cover
together.
X Remove fuse box cover ;upwards. X
Remove any existing moisture from the
fuse box using a dry cloth.
X Loosen screws =, fold up fuse box lid ?
and remove it. X
To close: check whether the seal is posi-
tioned correctly in lid ?.
X Insert lid ?into the bracket at the rear of
the fuse box.
X Fold down lid ?of the fuse box and tighten
screws =. Fuse box in the boot
! Make sure that no moisture can enter the
fuse box when the cover is open.
! When closing the cover, make sure that it
is lying correctly on the fuse box. Moisture seeping in or dirt could otherwise impair
the operation of the fuses. X
Open the boot lid.
X Lift the boot floor upwards (Y page 375).
X To open: swing cover :upwards in the
direction of the arrow.
X To close: fold down cover :in the oppo-
site direction to the arrow.
Make sure that the cover is in the recess
provided for it.
i The fuse allocation chart is in a recess on
the side of the fuse box. You can find the
corresponding fuse rating and fuse type on the fuse allocation chart. 426
Electrical fusesBreakdown assistance
Page 441 of 489
Vehicles with an emergency spare wheel:
in the event of a flat tyre, the emergency
spare wheel is fitted according to the descrip-
tion under "Fitting a wheel" (Y page 438).Interchanging the wheels
G
WARNING
Interchanging the front and rear wheels may
severely impair the driving characteristics if
the wheels or tyres have different dimensions. The wheel brakes or suspension components may also be damaged. There is a risk of acci-
dent.
Interchange front and rear wheels only if the
wheels and tyres are of the same dimensions.
! On vehicles fitted with a tyre pressure
monitor, electronic components are loca-
ted in the wheel.
Tyre-fitting tools should not be applied in
the area of the valve, as this could damage
the electronic components.
Only have tyres changed at a qualified spe- cialist workshop.
Interchanging the front and rear wheels of
differing dimensions can render the general
operating permit invalid.
Observe the instructions and safety notes in
the "Fitting a wheel" section (Y page 438).
The wear patterns on the front and rear tyres differ depending on the operating conditions.Interchange the wheels before a clear wear
pattern has formed on the tyres. Front tyres
typically wear more on the shoulders and the
rear tyres in the centre.
On vehicles that have the same size front and
rear wheels, you can interchange the wheels
every 5,000 to 10,000 km depending on the
degree of tyre wear. Ensure the direction of
rotation is maintained.
Clean the contact surfaces of the wheel and
the brake disc thoroughly every time a wheel is interchanged. Check the tyre pressure and,
if necessary, restart the tyre pressure loss warning system (Y
page 437)or the tyre pres-
sure monitor (Y page 435). Direction of rotation
Tyres with a specified direction of rotation
have additional benefits, e.g. if there is a risk of aquaplaning. You will only gain these ben-
efits if the correct direction of rotation is
observed.
An arrow on the sidewall of the tyre indicates
its correct direction of rotation. Storing wheels
Store wheels in a cool, dry and preferably
dark place if they are not being used. Protect
the tyres against oil, grease, petrol and diesel. Fitting a wheel
Preparing the vehicle X
Stop the vehicle on solid, non-slippery and
level ground.
X Apply the electric parking brake manually.
X Move the front wheels to the straight-
ahead position.
X Vehicles with manual transmission:
depress the clutch pedal fully and engage
first or reverse gear.
X Vehicles with automatic transmission:
shift the transmission to position P.
X Make sure that in vehicles with AIRMATIC,
the vehicle level is set to "Normal"
(Y page 234).
X Switch off the engine.
X Vehicles without KEYLESS-GO: remove
the key from the ignition lock.
X Vehicles with KEYLESS-GO start-func-
tion or KEYLESS-GO: open the driver's
door.
The on-board electronics now have status
0. This is the same as the key having been removed. 438
Changing a wheelWheels and tyres
Page 443 of 489
must be positioned vertically, directly under
the jacking point of the vehicle.
Observe the following when raising the
vehicle: R to raise the vehicle, only use the vehicle-
specific jack that has been tested and
approved by Mercedes-Benz. If the jack is
used incorrectly, it could tip over while the vehicle is raised.
R the jack is designed only to raise and hold
the vehicle for a short time while a wheel
is being changed. It is not suitable for per-
forming maintenance work under the vehi- cle.
R avoid changing the wheel on uphill and
downhill slopes.
R before raising the vehicle, secure it from
rolling away by applying the parking brake
and positioning wheel chocks. Do not
release the parking brake while the vehicle
is raised.
R the jack must be placed on a firm, flat and
non-slip surface. On a loose surface, a
large, flat load-bearing underlay must be
used. On a slippery surface, a non-slip
underlay must be used, e.g. rubber mats.
R do not use wooden blocks or similar
objects as a jack underlay. Otherwise, the
jack will not be able to achieve its load-
bearing capacity due to the restricted
height.
R make sure that the distance between the
underside of the tyres and the ground does not exceed 3 cm.
R never place your hands or feet under the
raised vehicle.
R do not lie under the vehicle.
R do not start the engine when the vehicle is
raised.
R do not open or close a door or the boot lid
when the vehicle is raised.
R make sure that no persons are present in
the vehicle when the vehicle is raised. Vehicles with steel wheels and wheel
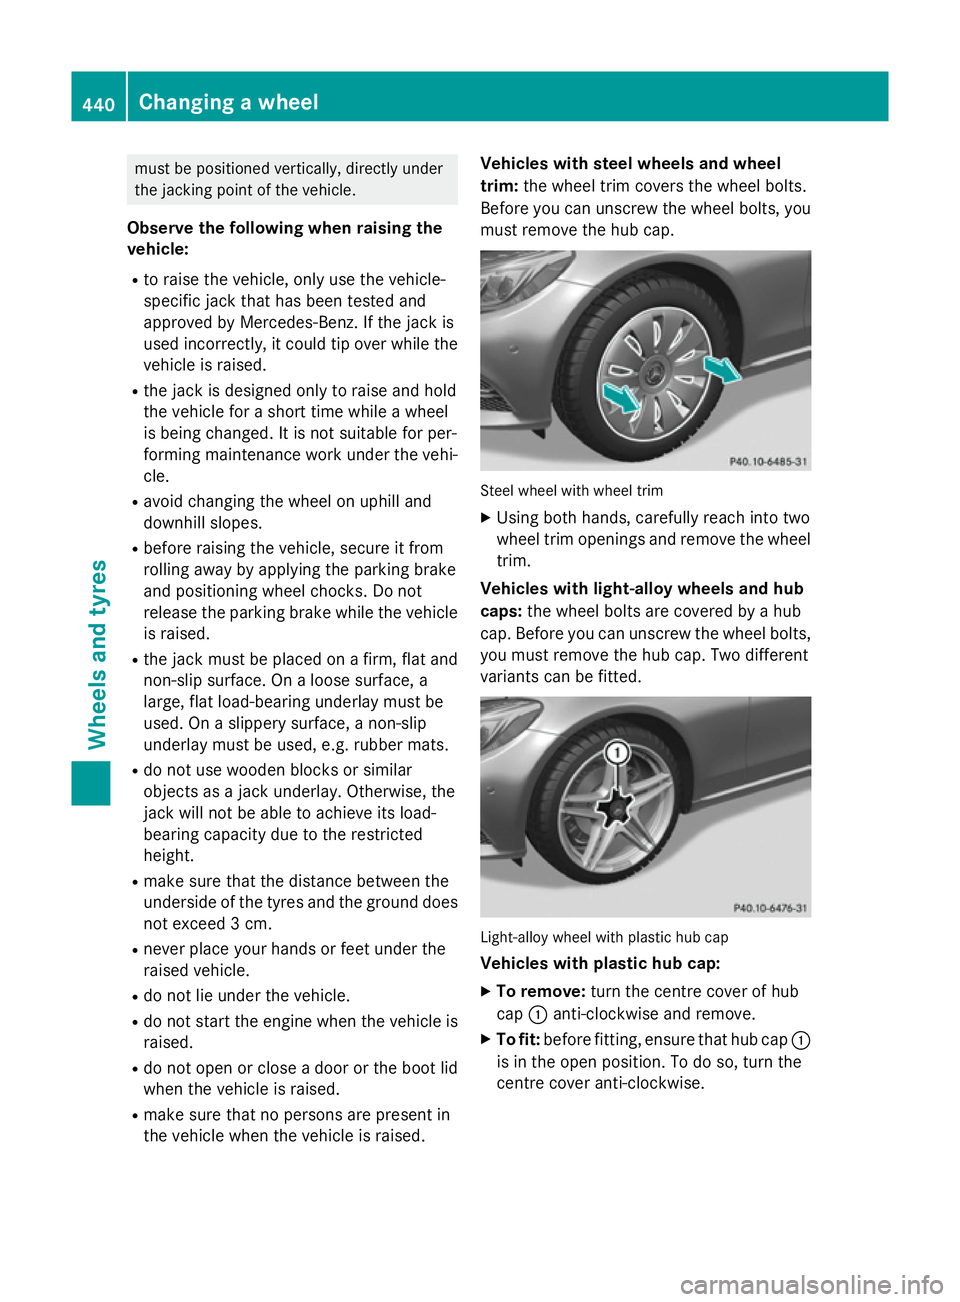
trim:
the wheel trim covers the wheel bolts.
Before you can unscrew the wheel bolts, you must remove the hub cap. Steel wheel with wheel trim
X
Using both hands, carefully reach into two
wheel trim openings and remove the wheel trim.
Vehicles with light-alloy wheels and hub
caps: the wheel bolts are covered by a hub
cap. Before you can unscrew the wheel bolts, you must remove the hub cap. Two different
variants can be fitted. Light-alloy wheel with plastic hub cap
Vehicles with plastic hub cap:
X To remove: turn the centre cover of hub
cap :anti-clockwise and remove.
X To fit: before fitting, ensure that hub cap :
is in the open position. To do so, turn the
centre cover anti-clockwise. 440
Changing a wheelWheels and tyres
Page 469 of 489
Useful information
i This Owner's Manual describes all mod-
els, series and optional equipment for your
vehicle that were available at the time of
going to press. National variations are pos- sible. Note that your vehicle may not be
equipped with all of the functions descri-
bed. This is also the case for systems and
functions relevant to safety.
i Read the information on qualified special-
ist workshops: (Y page 27). Information on technical data
You can find current technical data on the
Internet on our Mercedes ‑Benz homepage.
i The technical data was determined in
accordance with EU Directives. All data
applies to the vehicle's standard equip-
ment. The data may therefore differ for
vehicles with optional equipment. You can
obtain further information from a
Mercedes-Benz Service Centre. Vehicle electronics
Tampering with the engine electron-
ics
! Only have work carried out on the engine
electronics and its associated parts, such
as control units, sensors, actuating com-
ponents and connector leads, at a qualified specialist workshop. Vehicle components
may otherwise wear more quickly and the
vehicle's operating permit may be invalida- ted. Retrofitting two-way radios and
mobile phones (RF transmitters)
G
WARNING
If RF transmitters are tampered with or not
properly retrofitted, the electromagnetic radi- ation they emit can interfere with the vehicle
electronics. This may jeopardise the opera-
tional safety of the vehicle. There is a risk of an
accident.
You should have all work on electrical and
electronic components carried out at a quali-
fied specialist workshop. G
WARNING
If you use the RF transmitter in the vehicle in
an improper way, its electromagnetic radia-
tion can disrupt vehicle electronics, e.g. if:
R the RF transmitter is not connected to an
exterior aerial
R the exterior aerial is fitted incorrectly or is
not a low-reflection aerial
This can jeopardise the operating safety of the vehicle. There is a risk of an accident.
Have the low-reflection exterior aerial fitted at
a qualified specialist workshop. When oper-
ating in the vehicle, always connect the RF
transmitter to the low-reflection exterior aer-
ial.
! The operating permit may be invalidated if
the instructions for installation and use of
RF transmitters are not observed.
In particular, the following conditions must be complied with:
R only approved wavebands may be used.
R observe the maximum permissible out-
put in these wavebands.
R only approved aerial positions may be
used.
Excessive levels of electromagnetic radiation
may cause damage to your health and to the
health of others. The use of an exterior aerial
takes into consideration the scientific discus- 466
Vehicle electronicsTechnical data
Page 471 of 489
Identification plates
Vehicle identification plate with vehi-
cle identification number (VIN) X
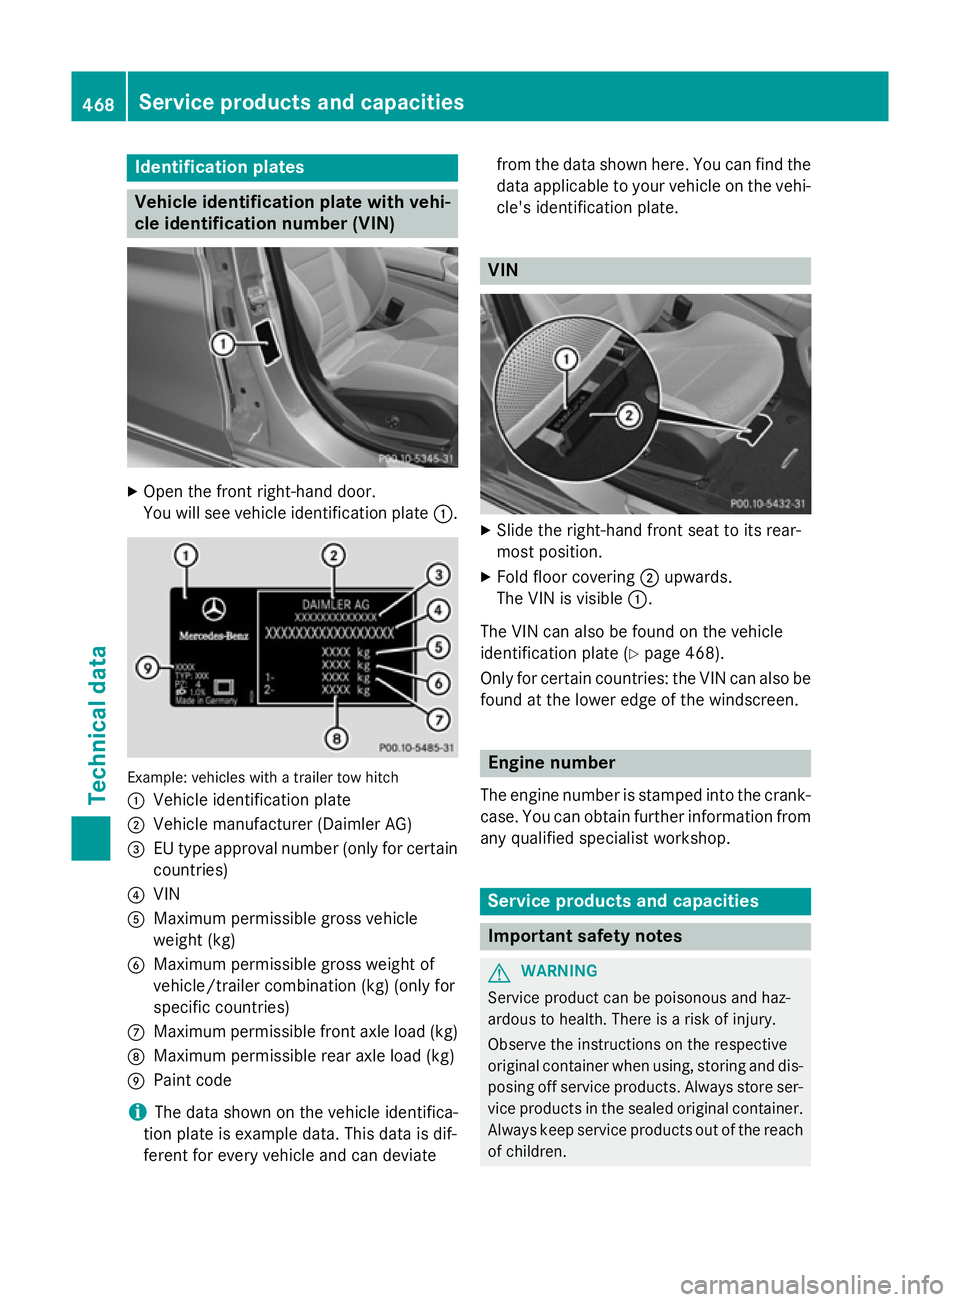
Open the front right-hand door.
You will see vehicle identification plate :.Example: vehicles with a trailer tow hitch
: Vehicle identification plate
; Vehicle manufacturer (Daimler AG)
= EU type approval number (only for certain
countries)
? VIN
A Maximum permissible gross vehicle
weight (kg)
B Maximum permissible gross weight of
vehicle/trailer combination (kg) (only for
specific countries)
C Maximum permissible front axle load (kg)
D Maximum permissible rear axle load (kg)
E Paint code
i The data shown on the vehicle identifica-
tion plate is example data. This data is dif-
ferent for every vehicle and can deviate from the data shown here. You can find the
data applicable to your vehicle on the vehi- cle's identification plate. VIN
X
Slide the right-hand front seat to its rear-
most position.
X Fold floor covering ;upwards.
The VIN is visible :.
The VIN can also be found on the vehicle
identification plate (Y page 468).
Only for certain countries: the VIN can also be
found at the lower edge of the windscreen. Engine number
The engine number is stamped into the crank-
case. You can obtain further information from any qualified specialist workshop. Service products and capacities
Important safety notes
G
WARNING
Service product can be poisonous and haz-
ardous to health. There is a risk of injury.
Observe the instructions on the respective
original container when using, storing and dis- posing off service products. Always store ser-
vice products in the sealed original container. Always keep service products out of the reach
of children. 468
Service products and capacitiesTechnical data
Page 472 of 489
H
Environmental note
Dispose of service products in an environ-
mentally-responsible manner.
Service products include the following:
R fuels
R exhaust gas aftertreatment additives, e.g.
AdBlue ®
R lubricants (e.g. engine oil, transmission oil)
R coolant
R brake fluid
R windscreen washer fluid
R climate control system refrigerant
Components and service products must be
matched. Only use products recommended
by Mercedes-Benz. Damage which is caused
by the use of products which have not been
recommended is not covered by the
Mercedes-Benz warranty or goodwill ges-
tures. They are listed in this Mercedes-Benz
Owner's Manual in the appropriate section.
You can identify service products approved
by Mercedes-Benz by the following inscrip-
tions on the container:
R MB-Freigabe (e.g. MB-Freigabe 229.51)
R MB Approval (e.g. MB Approval 229.51)
Other designations or recommendations indi- cate a level of quality or a specification in
accordance with an MB Sheet Number (e.g.
MB 229.5). They have not necessarily been
approved by Mercedes-Benz.
Other identifications, for example:
R 0 W-30
R 5 W-30
R 5 W-40
Further information can be obtained from any
Mercedes-Benz Service Centre or on the
Internet at http://bevo.mercedes-benz.com. Fuel
Important safety notes G
WARNING
Fuel is highly flammable. If you handle fuel
incorrectly, there is a risk of fire and explo-
sion.
You must avoid fire, naked flames, creating
sparks and smoking. Switch off the engine
and, if applicable, the auxiliary heating before refuelling. G
WARNING
Fuels are poisonous and hazardous to health. There is a danger of injury.
Do not swallow fuel or let it come into contact
with skin, eyes or clothing. Do not inhale fuel
vapours. Keep fuels out of the reach of chil-
dren.
If you or others come into contact with fuel,
observe the following:
R Wash the fuel off any affected areas of skin
with water and soap immediately.
R If you get fuel in your eyes, rinse them thor-
oughly with clean water immediately. Seek immediate medical attention.
R If fuel is swallowed, seek immediate medi-
cal attention. Do not induce vomiting.
R Change any clothing that has come into
contact with fuel immediately. Service products and capacities
469Technical data Z
Page 473 of 489
Tank capacity
The total capacity of the fuel tank may vary,
depending on the vehicle equipment. Model Total capacity
C 180 (only for certain
countries)
C 200 (only for certain countries)
C 250 (only for certain
countries)
C 220 BlueTEC BlueEF-
FICIENCY Edition (only
for certain countries) 66.0 l
C 180 BlueEFFICIENCY
Edition 41.0 l
C 300 BlueTEC Hybrid
50.0 l
All other models
41.0 l
or
66.0 l Model Of which
reserve fuel All models
Approx. 7.0 l
Petrol
Fuel grade
! Do not use diesel to refuel vehicles with a
petrol engine. Do not switch on the ignition if you accidentally refuel with the wrong
fuel. Otherwise, the fuel will enter the fuel
system. Even small amounts of the wrong
fuel can result in damage to the fuel system
and the engine. Notify a qualified specialist
workshop and have the fuel tank and fuel
lines drained completely.
! Only refuel using premium-grade unlea-
ded petrol with at least 95 ROZ/85 MOZ,
that conforms to European standard
EN 228 or E DIN 51626–1 or an equivalent specification. Fuel of this specification can contain up to
10 % ethanol.
Fuel that does not conform to EN 228 or
E DIN 51626–1 can lead to increased wear
and damage the engine and exhaust sys-
tem.
! Only use the fuel recommended. Operat-
ing the vehicle with other fuels can lead to
engine failure.
! Do not use the following:
R E85 (petrol with 85% ethanol)
R E100 (100% ethanol)
R M15 (petrol with 15% methanol)
R M30 (petrol with 30% methanol)
R M85 (petrol with 85% methanol)
R M100 (100% methanol)
R petrol with additives containing metal
R Diesel
Do not mix such fuels with the fuel recom-
mended for your vehicle. Do not use addi-
tives. Otherwise, engine damage may
occur. This does not include cleaning addi-
tives for the removal and prevention of res-
idue build-up. Petrol must only be mixed
with additives recommended by Mercedes- Benz; see "Additives". You can obtain fur-
ther information from any Mercedes-Benz
Service Centre.
Usually you will find information about the
fuel grade on the pump. If you cannot find the label on the petrol pump, ask the filling sta-
tion staff.
i E10 fuel contains up to 10% bioethanol.
Your vehicle is suitable for use with E10
fuel. You may refuel your vehicle using E10
fuel.
C 180, C 250: as a temporary measure, if the
recommended fuel is not available, you may
also use regular unleaded petrol with an
octane rating of 93 RON/83 MON.
All other models: as a temporary measure, if
the recommended fuel is not available, you
may also use regular unleaded petrol with an 470
Service products and capacitiesTechnical data
Page 474 of 489
octane rating of 91 RON/82 MON. This may
reduce engine performance and increase fuel consumption. Avoid driving at full throttle andsudden acceleration. Never refuel using fuel
with a lower RON/MON.
i In some countries, the available petrol
may not be sufficiently low in sulphur. This
fuel can temporarily produce unpleasant
odours, especially on short journeys. As
soon as sulphur-free fuel (sulphur content
<1 0 ppm) is used for refuelling, the odours
are reduced.
Information on refuelling (Y page 201).
C 200, C 250
! Only refuel using unleaded, sulphur-free
unleaded petrol with at least 95 RON/
85 MON that conforms to European stand- ard EN 228 or an equivalent specification.
You could otherwise impair engine output
or damage the emission control system.
i In some countries, the available petrol
may not be sufficiently low in sulphur. This
fuel can temporarily produce unpleasant
odours, especially on short journeys. As
soon as sulphur-free fuel (sulphur content
<1 0 ppm) is used for refuelling, the odours
are reduced.
Additives ! Operating the engine with fuel additives
added later can lead to engine failure. Do
not mix fuel additives with fuel. This does
not include additives for the removal and
prevention of residue build-up. Petrol must only be mixed with additives recommended
by Mercedes-Benz. Observe the instruc-
tions for use in the product description.
More information about recommended
additives can be obtained from any
Mercedes-Benz Service Centre.
Mercedes-Benz recommends that you use
fuel brands that have additives.
The quality of the fuel available in some coun- tries may not be sufficient. Residue could
build up in the injection system as a result. In this case, in consultation with a Mercedes-
Benz Service Centre, the petrol may be mixed
with the cleaning additive recommended by
Mercedes-Benz. Always observe the notes
and mixing ratios specified on the container.
Diesel Fuel grade
G
WARNING
If you mix diesel fuel with petrol, the flash
point of this fuel mixture is lower than that of pure diesel fuel. When the engine is running,
components in the exhaust system may over-
heat unnoticed. There is a risk of fire.
Never refuel with petrol. Never add petrol to
diesel fuel.
! When refuelling, only use diesel fuel that
conforms to the European standard EN 590
or is of equivalent quality. Fuel that does
not conform to EN 590 can lead to
increased wear as well as damage to the
engine and exhaust system.
! Do not use the following:
R marine diesel
R heating oil
R bio-diesel
R vegetable oil
R petrol
R paraffin
R kerosene
Do not mix such fuels with diesel fuel and
do not use any special additives. Other-
wise, engine damage may occur.
! Vehicles with diesel particle filters:
in
countries outside the EU, only use low sul-
phur Euro diesel with a sulphur content of
under 50 ppm. Otherwise, the emission
control system could be damaged.
! Vehicles without a diesel particle fil-
ter: in countries where only diesel fuel with
a high sulphur content is available, you will need to carry out your vehicle's oil change Service products and capacities
471Technical data Z
Page 475 of 489
at shorter intervals. More information
about the interval for oil change can be
obtained from any qualified specialist
workshop.
Usually you will find information about the
fuel grade on the pump. If you cannot find the label on the petrol pump, ask the filling sta-
tion staff.
Information on refuelling (Y page 201).
Low outside temperatures
In winter months, diesel fuel with an improved cold flow quality is available. In Europe, the
EN 590 standard defines various climate-
dependent temperature categories. Malfunc-
tions can be avoided by refuelling with diesel
fuel that corresponds to the climatic specifi-
cations outlined in EN 590. At unusually low
outside temperatures, it is possible that the
flow characteristics of the diesel fuel could be insufficient. Accordingly, diesel fuel from
warmer areas may not be suitable for opera-
tion in colder climatic conditions.
i Further information on country-specific
fuel properties and fuel types with low-tem-
perature resistance can be obtained from
oil companies, e.g. at filling stations.
Fuel consumption information H
Environmental note
CO 2(carbon dioxide) is the gas which scien-
tists believe to be principally responsible for
global warming (the greenhouse effect). Your
vehicle's CO 2emissions are directly related to
fuel consumption and therefore depend on:
R efficient use of the fuel by the engine
R driving style
R other non-technical factors, such as envi-
ronmental influences, road conditions or
traffic flow
You can minimise your vehicle's CO 2emis-
sions by driving carefully and having it serv-
iced regularly. The vehicle will use more fuel than usual in the
following situations:
R at very low outside temperatures
R in urban traffic
R on short journeys
R in mountainous terrain
R when towing a trailer
i Only for certain countries: you can find
the current consumption and emission val-
ues of your vehicle in the COC documents
(EU CERTIFICATE OF CONFORMITY). These documents are delivered with your vehicle.
The consumption figures were, in each
case, based on the currently applicable ver-sion:
R for vehicles that comply with standards
up to and including the EURO 4 standard, in accordance with EU Directive
80/1268/EEC
R for vehicles that comply with or exceed
the Euro 5 standard, in accordance with
Regulation (EC) No. 715/2007
Deviations from these values may occur
under normal operating conditions. AdBlue
®
Important safety notes AdBlue
®
is a water-soluble fluid for the
exhaust gas aftertreatment of diesel engines. It is:
R non-toxic
R colourless and odourless
R non-flammable
If you open the AdBlue ®
tank, small amounts
of ammonia vapour may be released.
Ammonia vapours have a pungent odour and
are particularly irritating to the skin, to
mucous membranes and to the eyes. You may experience a burning sensation in your eyes,
nose and throat. You may also experience
coughing and watery eyes. 472
Service products and capacitiesTechnical data