roof MERCEDES-BENZ C-CLASS SALOON 2014 User Guide
[x] Cancel search | Manufacturer: MERCEDES-BENZ, Model Year: 2014, Model line: C-CLASS SALOON, Model: MERCEDES-BENZ C-CLASS SALOON 2014Pages: 489, PDF Size: 14.88 MB
Page 65 of 489
PRE-SAFE
®
(anticipatory occupant
protection)
Introduction PRE-SAFE
®
takes pre-emptive measures to
protect occupants in certain hazardous sit-
uations.
Important safety notes !
Make sure that there are no objects in the
footwell under or behind the seats when
moving the seats back. There is a risk that
the seats and/or the objects could be dam-
aged.
Although your vehicle is equipped with a PRE-
SAFE ®
system, the possibility of injury in the
event of an accident cannot be ruled out.
Always adapt your driving style to suit the
prevailing road and weather conditions and
maintain a safe distance from the vehicle in
front. Drive carefully.
Function PRE-SAFE
®
intervenes:
R in emergency braking situations, e.g. when
BAS is activated
R in critical driving situations, e.g. when phys-
ical limits are exceeded and the vehicle
understeers or oversteers severely
R vehicles with the Driving Assistance pack-
age: when a driver assistance system inter-
venes powerfully or the radar sensor sys-
tem detects an imminent danger of colli-
sion in certain situations
PRE-SAFE ®
takes the following measures
depending on the hazardous situation detec-
ted:
R the front seat belts are pre-tensioned.
R if the vehicle skids, the sliding sunroof and
the side windows are closed so that only a
small gap remains. The panorama sliding
sunroof is completely closed.
R vehicles with the memory function for the
front-passenger seat: the front-passenger seat is adjusted if it is in an unfavourable
position.
If the hazardous situation passes without
resulting in an accident, PRE-SAFE ®
slackens
the belt pre-tensioning. All settings made by
PRE-SAFE ®
can then be reversed.
If the seat belt pre-tensioning is not reduced:
X Move the seat backrest or seat back
slightly when the vehicle is stationary.
Seat belt pre-tensioning is reduced and the
locking mechanism is released.
The seat-belt adjustment is an integral part of
the PRE-SAFE ®
convenience function. You
will find information on the convenience func-
tion under "Belt adjustment" (Y page 50). PRE-SAFE
®
PLUS (anticipatory occu-
pant protection PLUS)
Introduction PRE-SAFE
®
PLUS is only available in vehicles
with the Driving Assistance package.
Using the radar sensor system, PRE-SAFE ®
PLUS is able to detect that a head-on or rear-
end collision is imminent. In certain hazard-
ous situations, PRE-SAFE ®
PLUS takes pre-
emptive measures to protect the vehicle
occupants.
Important safety notes The intervention of PRE-SAFE
®
PLUS cannot
prevent an imminent collision.
The driver is not warned when PRE-SAFE ®
PLUS intervenes.
PRE-SAFE ®
PLUS does not intervene:
R if the vehicle is reversing
R when the vehicle is towing a trailer and
there is a risk of a rear-end collision
PRE-SAFE ®
PLUS does not perform braking
actions while the vehicle is in motion or when
Parking Guidance is active. 62
Occupant safetySafety
Page 71 of 489
Always observe the information on suitable
positioning of the child restraint system
(Y page 68) in addition to the child restraint
system manufacturer's installation and oper- ating instructions.
Forward-facing child restraint system If it is absolutely necessary to fit a forward-
facing child restraint system to the front-
passenger seat, always move the front-
passenger seat as far back as possible. Fully
retract the seat cushion length. The entire
base of the child restraint system must
always rest on the seat cushion of the front-
passenger seat. The backrest of the child
restraint system must, as far as possible, be
resting on the backrest of the front-
passenger seat. The child restraint system
must not touch the roof or be put under strain
by the head restraint. Adjust the angle of the seat backrest and the head restraint position
accordingly. Always make sure that the shoul- der belt strap is correctly routed from the
vehicle belt outlet to the shoulder belt guide
on the child restraint system. The shoulder
belt strap must be routed forwards and down-
wards from the vehicle belt outlet. If neces-
sary, adjust the vehicle belt outlet and the
front-passenger seat accordingly.
Always observe the information on suitable
positioning of the child restraint system
(Y page 68) in addition to the child restraint
system manufacturer's installation and oper-
ating instructions. Suitable positioning of the child
restraint system
Introduction Only child restraint systems which are
approved in accordance with the ECE stand-
ard ECE R44 are permitted for use in the vehi- cle.
For certain child restraint systems in weight
categories II or III, this can mean that the area
of use is restricted. The maximum size setting of the child restraint system is not possible
due to possible contact with the roof.
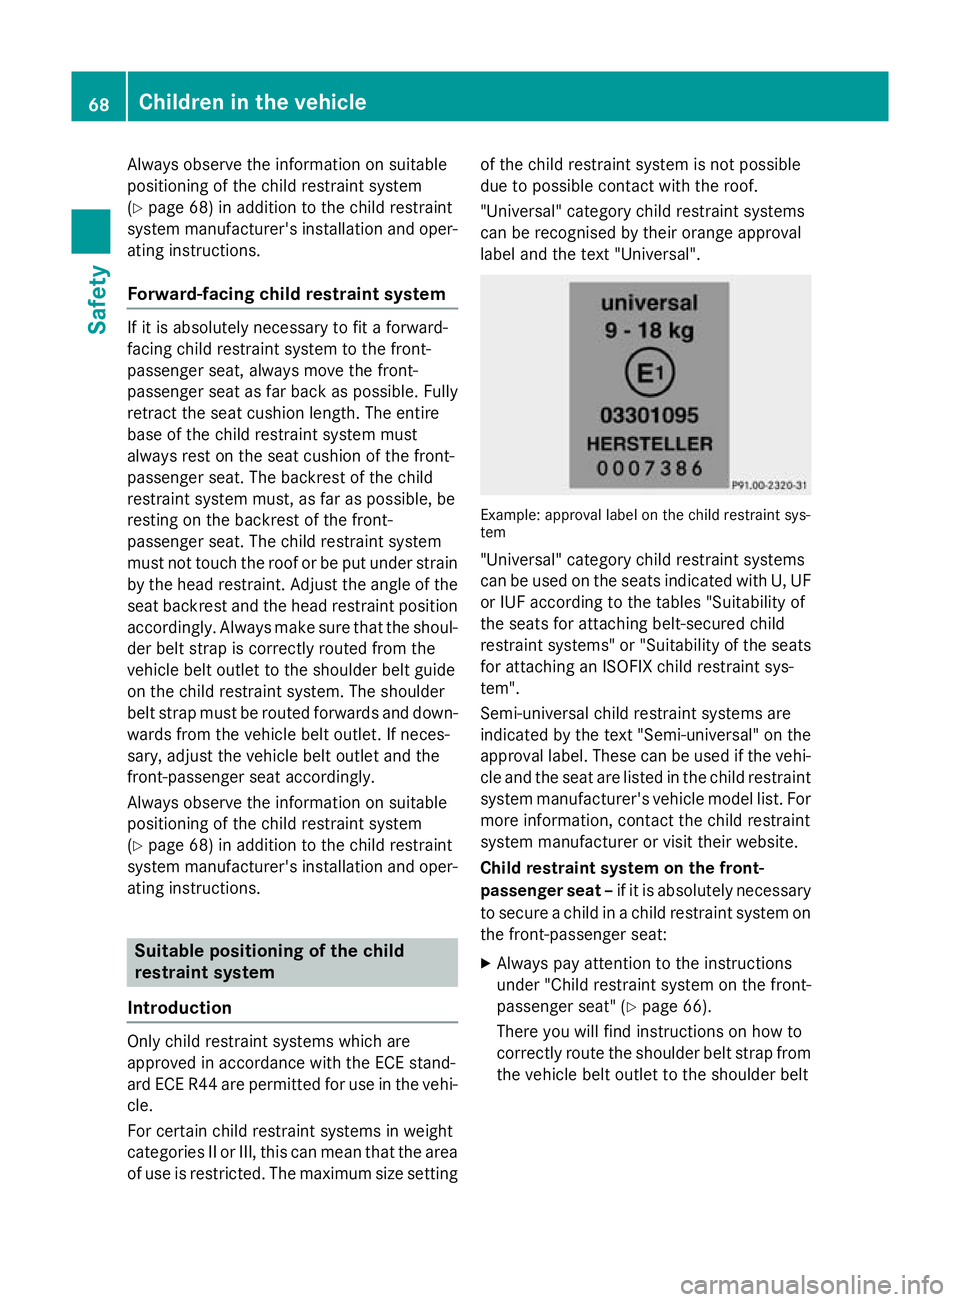
"Universal" category child restraint systems
can be recognised by their orange approval
label and the text "Universal".
Example: approval label on the child restraint sys-
tem
"Universal" category child restraint systems
can be used on the seats indicated with U, UF
or IUF according to the tables "Suitability of
the seats for attaching belt-secured child
restraint systems" or "Suitability of the seats
for attaching an ISOFIX child restraint sys-
tem".
Semi-universal child restraint systems are
indicated by the text "Semi-universal" on the
approval label. These can be used if the vehi- cle and the seat are listed in the child restraintsystem manufacturer's vehicle model list. For
more information, contact the child restraint
system manufacturer or visit their website.
Child restraint system on the front-
passenger seat – if it is absolutely necessary
to secure a child in a child restraint system on the front-passenger seat:
X Always pay attention to the instructions
under "Child restraint system on the front-
passenger seat" (Y page 66).
There you will find instructions on how to
correctly route the shoulder belt strap from the vehicle belt outlet to the shoulder belt 68
Children in the vehicleSafety
Page 72 of 489
guide on the child restraint system
(Y
page 68).
X Move the front-passenger seat as far back
as possible and fully retract the seat cush-
ion length.
X Move the backrest to an almost vertical
position.
The entire base of the child restraint sys-
tem must always rest on the seat cushion of the front-passenger seat. The backrest of
the forward-facing child restraint system
must, as far as possible, be resting on the
backrest of the front-passenger seat. The
child restraint system must not touch the
roof or be put under strain by the head
restraint. Adjust the angle of the seat back- rest and the head restraint position accord-
ingly. Also observe the child restraint sys-
tem manufacturer's installation instruc-
tions.
X Move the seat cushion angle to the highest,
most vertical position.
Suitability of the seats for attaching
belt-secured child restraint systems If you use a baby car seat of category 0 or 0+
or a rearward-facing child restraint system of category I on a rear seat, you must adjust the
driver's or front-passenger seat so that the
seat does not touch the child restraint sys-
tem.
If you use a forward-facing child restraint sys-
tem from category I, you must, where possi- ble, dismantle the head restraint of the
respective seat (Y page 122). The backrest of
the child restraint system must, as far as pos- sible, lie flat against the backrest of the seat.
Always observe the notes in the "Child
restraint system" section (Y page 64) and the
child restraint system manufacturer's instal-
lation instructions.
When you remove the child restraint system,
you must immediately replace the head
restraint (Y page 121). All vehicle occupants
must adjust their head restraints correctly
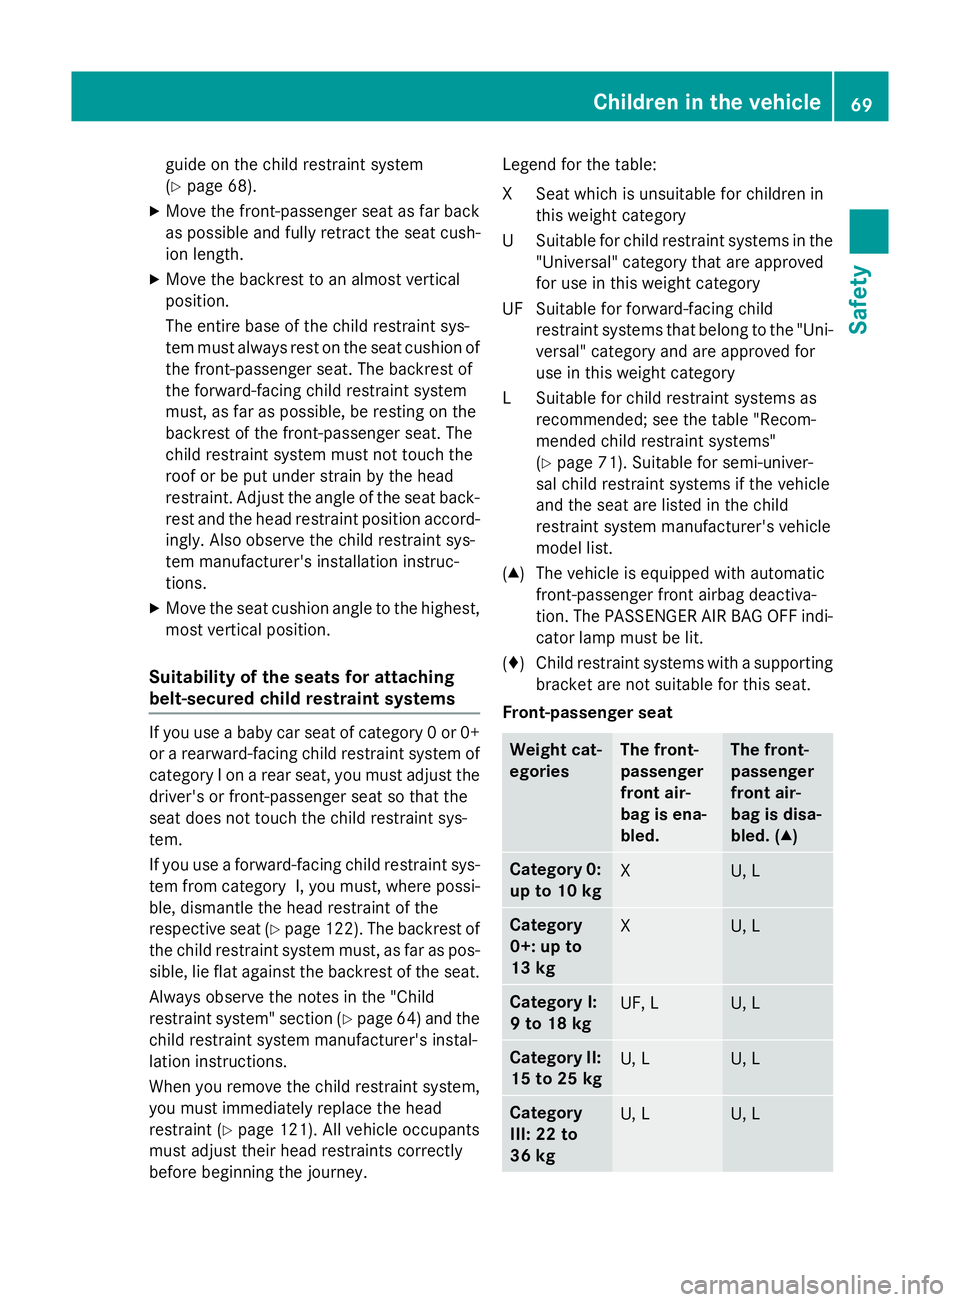
before beginning the journey. Legend for the table:
XS
eat which is unsuitable for children in
this weight category
US uitable for child restraint systems in the
"Universal" category that are approved
for use in this weight category
UF Suitable for forward-facing child restraint systems that belong to the "Uni-
versal" category and are approved for
use in this weight category
LS uitable for child restraint systems as
recommended; see the table "Recom-
mended child restraint systems"
(Y page 71). Suitable for semi-univer-
sal child restraint systems if the vehicle
and the seat are listed in the child
restraint system manufacturer's vehicle
model list.
(▲) The vehicle is equipped with automatic front-passenger front airbag deactiva-
tion. The PASSENGER AIR BAG OFF indi-
cator lamp must be lit.
(♦) Child restraint systems with a supporting bracket are not suitable for this seat.
Front-passenger seat Weight cat-
egories The front-
passenger
front air-
bag is ena-
bled. The front-
passenger
front air-
bag is disa-
bled. (▲)
Category 0:
up to 10 kg X U, L
Category
0+: up to
13 kg
X U, L
Category I:
9 to 18 kg
UF, L U, L
Category II:
15 to 25 kg U, L U, L
Category
III: 22 to
36 kg
U, L U, LChildren in the vehicle
69Safety Z
Page 74 of 489

Weight category 0+: up to 13 kg up to
approximately 15 months Size cate-
gory Equipment Rear seat,
left and
right
E ISO/R1 IL
D ISO/R2 IL
C ISO/R3 IL (♦)
Weight category I: 9 to 18 kg approx-
imately 9 months to 4 years
Size cate-
gory Equipment Rear seat,
left and
right
D ISO/R2 IL
C ISO/R3 IL (♦)
B ISO/F2 IUF
B1 ISO/F2X IUF
A ISO/F3 IUF
The child restraint system must not touch the
roof or be put under strain by the head
restraint. Adjust the head restraint position
accordingly. Also observe the child restraint
system manufacturer's installation instruc-
tions. Recommended child restraint sys-
tems
General notes Always observe the information on "Child
restraint systems on the front-passenger
seat" (Y
page 66) and on "Suitable positioning
of the child restraint system" (Y page 68).
You can obtain further information about the
correct child restraint system from any
Mercedes-Benz Service Centre. Recommended child restraint systems
for attaching with the vehicle seat belt Weight category 0: up to 10 kg; up to
approximately 6 months
Manufac-
turer
Britax Römer Britax Römer
Type
BABY SAFE
plus BABY SAFE
plus II
Approval
number
(E1 ...)
03 301146
04 301146 04 301146
Order num-
ber
(A 000 ...)
970 10 00
Colour code:
9H95 970 20 00
Colour code:
9H95
Weight category 0+: up to 13 kg; up to
approximately 15 months
Manufac-
turer
Britax
Römer Britax Römer
Type
BABY
SAFE plus BABY SAFE plus
II
Approval
number
(E1 ...)
03 30114
6
04 30114
6 04 301146
Order
number
(A 000 ...)
970 10 00
Colour
code:
9H95 970 20 00
Colour code:
9H95
Weight category I: 9 to 18 kg; approx-
imately 9 months to 4 years
Manufacturer
Britax Römer
Type
DUO plus
Approval number
(E1 ...)
03 301133
04 301133
Order number
(A 000 ...)
970 16 00
Colour code: 9H95 Children in the vehicle
71Safety Z
Page 75 of 489
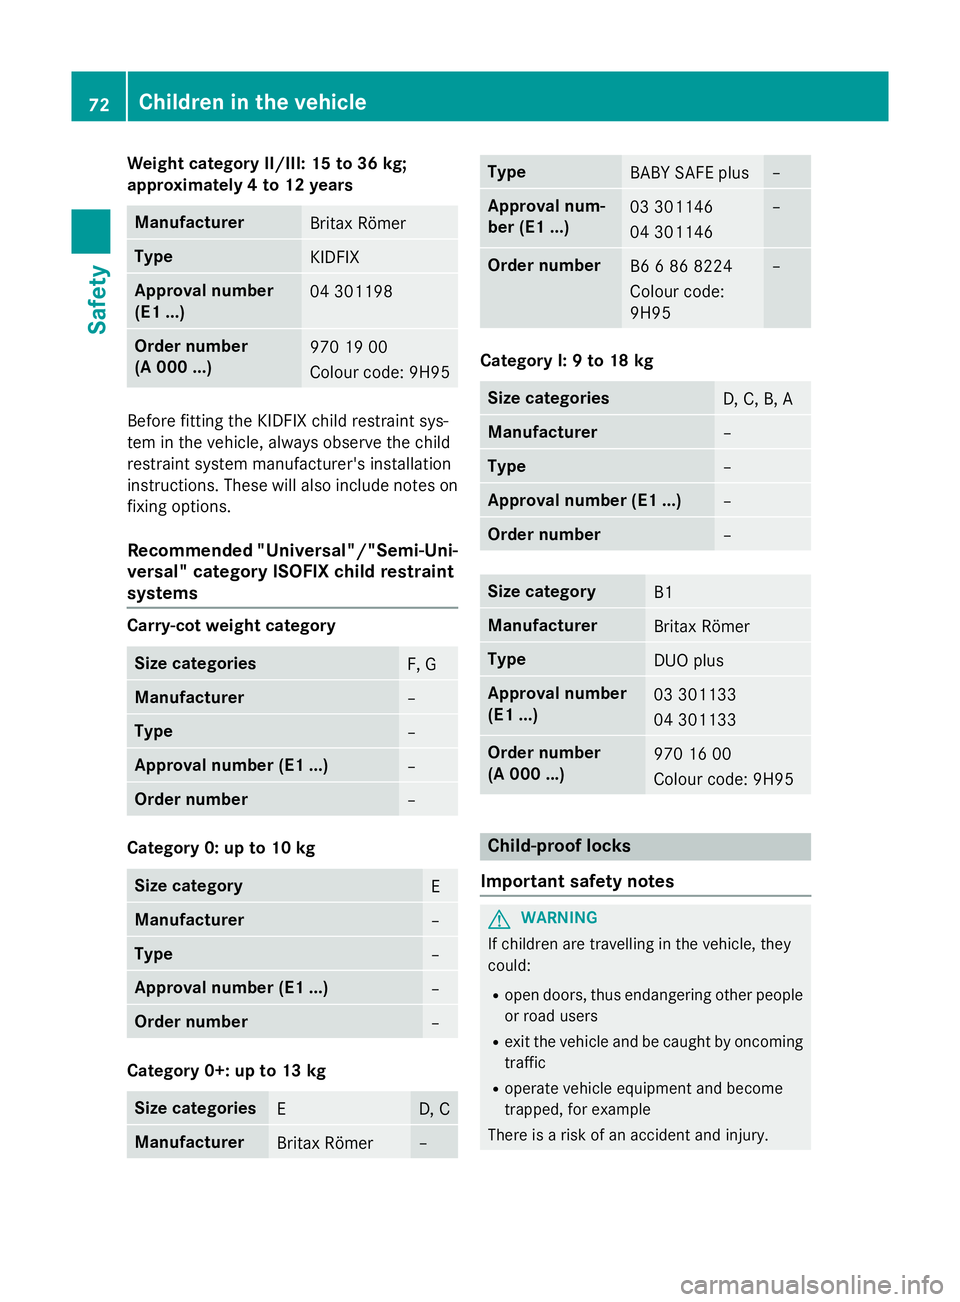
Weight category II/III: 15 to 36 kg;
approximately 4 to 12 years Manufacturer
Britax Römer
Type
KIDFIX
Approval number
(E1 ...)
04 301198
Order number
(A 000 ...)
970 19 00
Colour code: 9H95
Before fitting the KIDFIX child restraint sys-
tem in the vehicle, always observe the child
restraint system manufacturer's installation
instructions. These will also include notes on
fixing options.
Recommended "Universal"/"Semi-Uni-
versal" category ISOFIX child restraint
systems Carry-cot weight category
Size categories
F, G
Manufacturer
–
Type
–
Approval number (E1 ...)
–
Order number
–
Category 0: up to 10 kg
Size category
E
Manufacturer
–
Type
–
Approval number (E1 ...)
–
Order number
–
Category 0+: up to 13 kg
Size categories
E D, C
Manufacturer
Britax Römer – Type
BABY SAFE plus –
Approval num-
ber (E1 ...)
03 301146
04 301146 –
Order number
B6 6 86 8224
Colour code:
9H95 –
Category I: 9 to 18 kg
Size categories
D, C, B, A
Manufacturer
–
Type
–
Approval number (E1 ...)
–
Order number
–
Size category
B1
Manufacturer
Britax Römer
Type
DUO plus
Approval number
(E1 ...)
03 301133
04 301133
Order number
(A 000 ...)
970 16 00
Colour code: 9H95
Child-proof locks
Important safety notes G
WARNING
If children are travelling in the vehicle, they
could:
R open doors, thus endangering other people
or road users
R exit the vehicle and be caught by oncoming
traffic
R operate vehicle equipment and become
trapped, for example
There is a risk of an accident and injury. 72
Children in the vehicleSafety
Page 76 of 489
Always activate the child-proof locks and
override feature if children are travelling in the vehicle. When leaving the vehicle, always take the key with you and lock the vehicle. Never
leave children unattended in the vehicle.
Override feature for:
R the rear doors (Y page 73)
R the rear side windows (Y page 73)G
WARNING
If you leave children unattended in the vehi-
cle, they may be able to set the vehicle in
motion if, for example, they:
R release the parking brake
R shift the automatic transmission out of park
position Por shift manual transmission into
neutral
R start the engine
In addition, they may operate vehicle equip-
ment and become trapped. There is a risk of
an accident and injury.
When leaving the vehicle, always take the key with you and lock the vehicle. Never leave
children unattended in the vehicle. G
WARNING
If persons (particularly children) are exposed
to heat or cold for a prolonged period, there is a risk of serious or even fatal injuries. Never
leave persons (particularly children) unatten-
ded in the vehicle. G
WARNING
If the child restraint system is placed in direct sunlight, the parts could become very hot.
Children could be suffer burns by touching
these parts, in particular on the metallic parts
of the child restraint system. There is a risk of injury.
If you and your child leave the vehicle, always
make sure that the child restraint system is
not in direct sunlight. Cover it with a blanket, for example. If the child restraint system has
been exposed to direct sunlight, leave it to
cool down before securing the child in it. Never leave children unattended in the vehi-
cle.
Child-proof locks for the rear doors You secure each door individually with the
child-proof locks on the rear doors. A door
secured with a child-proof lock cannot be
opened from inside the vehicle. When the
vehicle is unlocked, the door can be opened
from the outside.
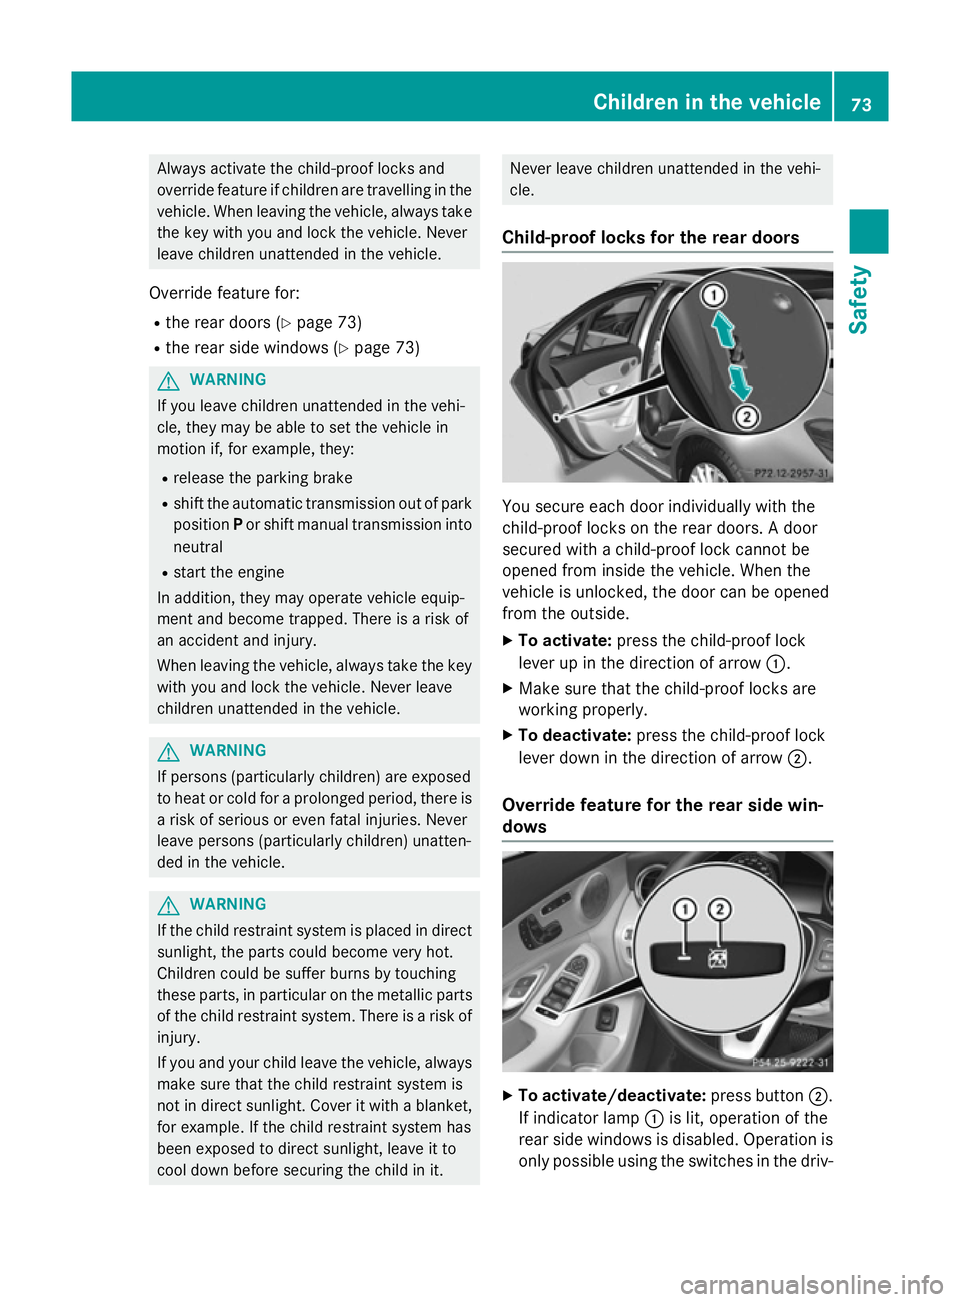
X To activate: press the child-proof lock
lever up in the direction of arrow :.
X Make sure that the child-proof locks are
working properly.
X To deactivate: press the child-proof lock
lever down in the direction of arrow ;.
Override feature for the rear side win-
dows X
To activate/deactivate: press button;.
If indicator lamp :is lit, operation of the
rear side windows is disabled. Operation is
only possible using the switches in the driv- Children in the vehicle
73Safety Z
Page 90 of 489
R
the side windows are closed
R the sliding sunroof or the panorama slid-
ing sunroof is closed
R there are no objects, e.g. mascots, hang-
ing on the rear-view mirror or on the grab handles on the roof trim
This will prevent false alarms.
X Make sure that:
R the doors are closed
R the sliding sunroof or the panorama slid-
ing sunroof is closed
R the boot lid is closed
Only then is the interior motion sensor
primed.
X Lock the vehicle with the key or KEYLESS-
GO.
The interior motion sensor is primed after
approximately 30 seconds.
Switching off X
Unlock the vehicle with the key or KEY-
LESS-GO.
or X Insert the key into the ignition lock.
or X Press the Start/Stop button.
The key must be in the vehicle.
The interior motion sensor is automatically
deactivated.
Deactivating You can deactivate the interior motion sensor
using COMAND Online or Audio 20. You can
find information about deactivating the inte-
rior motion sensor in the separate COMAND
Online or Audio 20 operating instructions. Protection against theft
87Safety Z
Page 92 of 489

Useful information
..............................90
Key ........................................................ 90
Doors .................................................... 96
Boot .................................................... 101
Side windows .................................... 106
Sliding sunroof .................................. 110 89Opening and closing
Page 100 of 489
The doors can then be opened from the inside
after the vehicle has been locked from the
outside. The anti-theft alarm system is trig-
gered if the door is opened from the inside.
Switch off the alarm (Y page 85).
All countries: G
WARNING
If children are left unsupervised in the vehicle, they could:
R open doors, thereby endangering other per-
sons or road users
R get out and be struck by oncoming traffic
R operate vehicle equipment and become
trapped, for example
In addition, the children could also set the
vehicle in motion, for example, if they:
R release the parking brake
R shift the automatic transmission out of park
position P or shift manual transmission into
neutral
R start the engine
There is a risk of an accident and injury.
When leaving the vehicle, always take the key with you and lock the vehicle. Never leave
children and animals unattended in the vehi-
cle. Keep the keys out of the reach of children.
Stow luggage or loads preferably in the boot.
Observe the loading guidelines (Y page 368).Unlocking and opening the doors
from the inside
Only for the United Kingdom: if the vehicle
has been locked with the key or with KEY-
LESS-GO, the double lock function is activa-
ted as standard. It is then not possible to open the doors from inside the vehicle. You can
deactivate the double lock function by deac-
tivating the interior motion sensor . The doors can then be opened from the inside after thevehicle has been locked from the outside. You
can only open the rear doors from inside the
vehicle if they are not secured by the child- proof locks (Y
page 73). The anti-theft alarm
system is triggered if the door is opened from
the inside. Switch off the alarm (Y page 85).
For all countries except the United King-
dom:
You can open a door from inside the vehicle
even if it has been locked. You can only open
the rear doors from inside the vehicle if they
are not secured by the child-proof locks
(Y page 73). If the vehicle has previously been
locked with the key or with KEYLESS-GO,
opening a door from the inside will trigger the
anti-theft alarm system. Switch off the alarm
(Y page 85). X
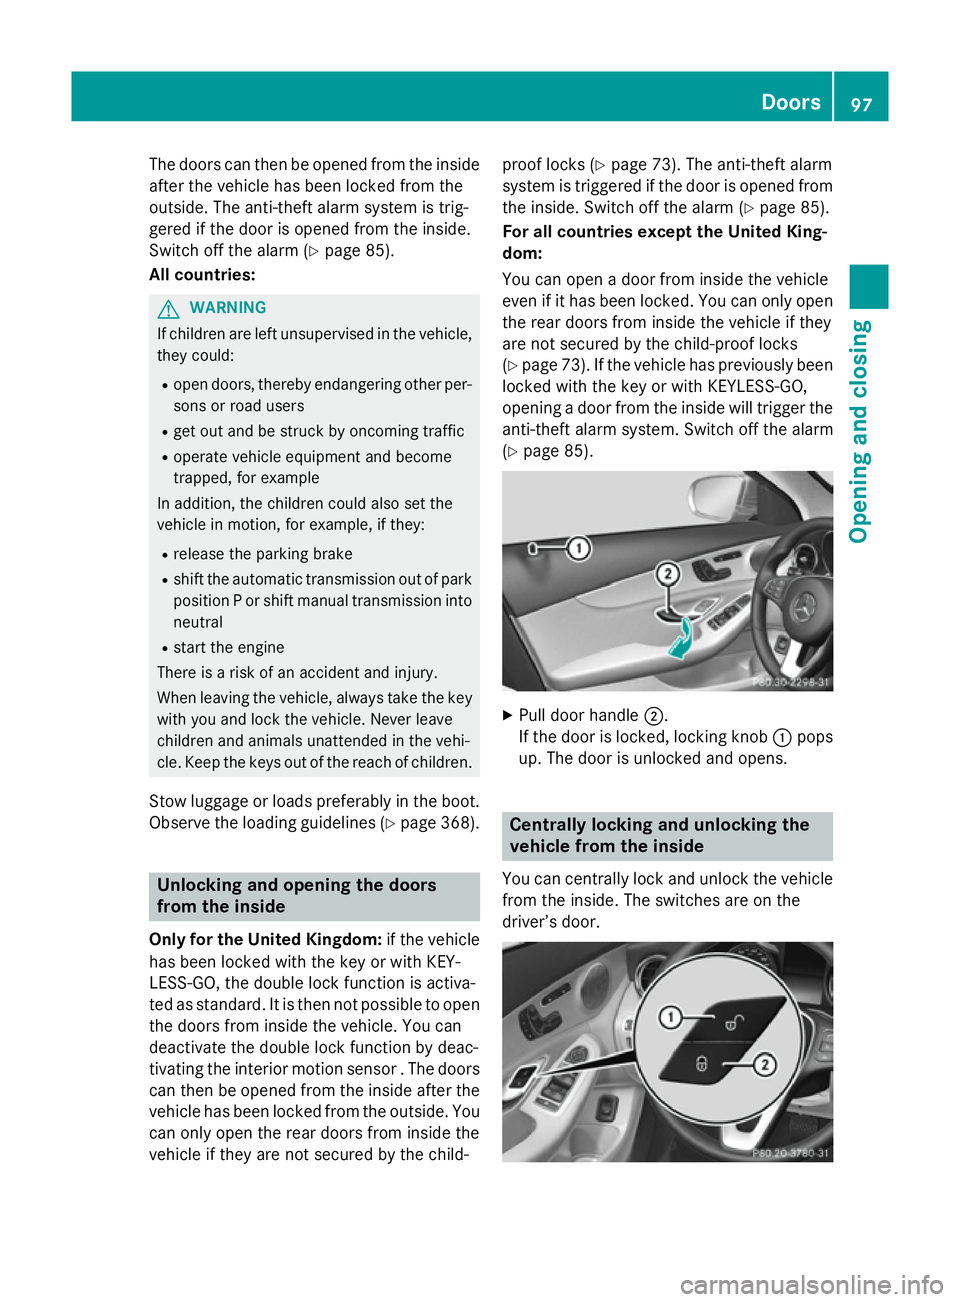
Pull door handle ;.
If the door is locked, locking knob :pops
up. The door is unlocked and opens. Centrally locking and unlocking the
vehicle from the inside
You can centrally lock and unlock the vehicle from the inside. The switches are on the
driver’s door. Doors
97Opening and closing Z
Page 101 of 489
X
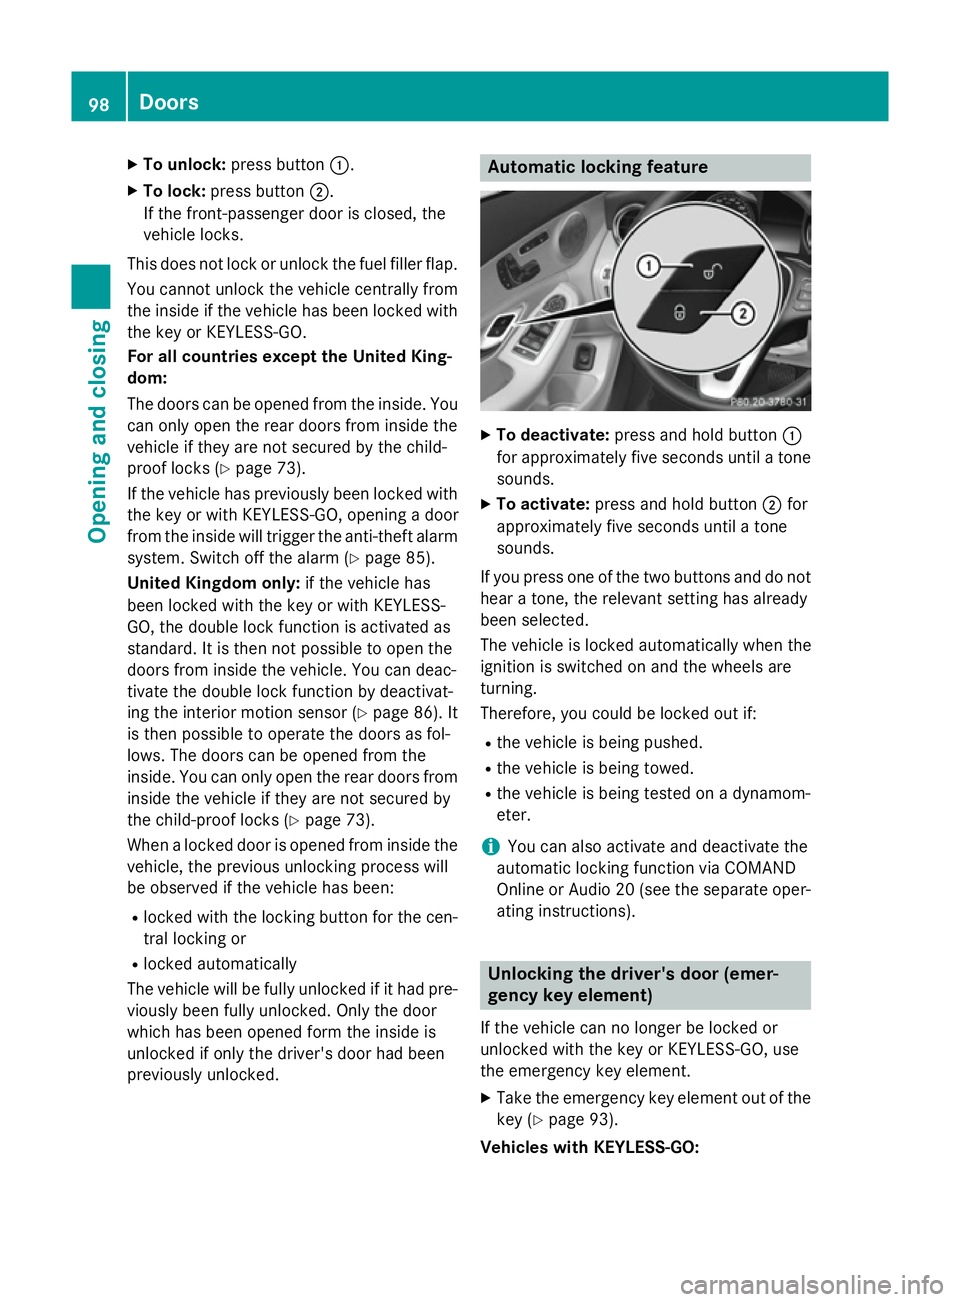
To unlock: press button :.
X To lock: press button ;.
If the front-passenger door is closed, the
vehicle locks.
This does not lock or unlock the fuel filler flap. You cannot unlock the vehicle centrally from
the inside if the vehicle has been locked with
the key or KEYLESS-GO.
For all countries except the United King-
dom:
The doors can be opened from the inside. You can only open the rear doors from inside the
vehicle if they are not secured by the child-
proof locks (Y page 73).
If the vehicle has previously been locked with the key or with KEYLESS-GO, opening a door
from the inside will trigger the anti-theft alarm system. Switch off the alarm (Y page 85).
United Kingdom only: if the vehicle has
been locked with the key or with KEYLESS-
GO, the double lock function is activated as
standard. It is then not possible to open the
doors from inside the vehicle. You can deac-
tivate the double lock function by deactivat-
ing the interior motion sensor (Y page 86). It
is then possible to operate the doors as fol-
lows. The doors can be opened from the
inside. You can only open the rear doors from
inside the vehicle if they are not secured by
the child-proof locks (Y page 73).
When a locked door is opened from inside the vehicle, the previous unlocking process will
be observed if the vehicle has been:
R locked with the locking button for the cen-
tral locking or
R locked automatically
The vehicle will be fully unlocked if it had pre- viously been fully unlocked. Only the door
which has been opened form the inside is
unlocked if only the driver's door had been
previously unlocked. Automatic locking feature
X
To deactivate: press and hold button :
for approximately five seconds until a tone sounds.
X To activate: press and hold button ;for
approximately five seconds until a tone
sounds.
If you press one of the two buttons and do not hear a tone, the relevant setting has already
been selected.
The vehicle is locked automatically when the
ignition is switched on and the wheels are
turning.
Therefore, you could be locked out if:
R the vehicle is being pushed.
R the vehicle is being towed.
R the vehicle is being tested on a dynamom-
eter.
i You can also activate and deactivate the
automatic locking function via COMAND
Online or Audio 20 (see the separate oper-
ating instructions). Unlocking the driver's door (emer-
gency key element)
If the vehicle can no longer be locked or
unlocked with the key or KEYLESS-GO, use
the emergency key element.
X Take the emergency key element out of the
key (Y page 93).
Vehicles with KEYLESS-GO: 98
DoorsOpening and closing