fuel pressure MERCEDES-BENZ C-CLASS SALOON 2014 Owners Manual
[x] Cancel search | Manufacturer: MERCEDES-BENZ, Model Year: 2014, Model line: C-CLASS SALOON, Model: MERCEDES-BENZ C-CLASS SALOON 2014Pages: 489, PDF Size: 14.88 MB
Page 16 of 489
Important safety notes .................. 295
Setting the position ....................... 310
Storing settings (memory func-
tion) ............................................... 131
Switching on or off .........................2 96
Switching the display on/off ......... 310
Headlamp
Cleaning system (notes) ................ 476
Headlamp flasher .............................. 137
Headlamps
Misting up ...................................... 140
see Automatic headlamp mode
Heating
see Climate control
High-pressure cleaners .................... 398
High-voltage battery
Charge leve l................................... 273
Charging ........................................ 416
Charging (on-board computer) ....... 274
General notes .................................. 43
Vehicle fire ....................................... 43
Hill start assist .................................. 185
HOLD function
Activating ....................................... 233
Deactivating ................................... 233
Display message ............................ 340
Function/note s............................. 232
Horn ...................................................... 32
Hybrid drive
Displaying the total range .............. 276
Generated electrical energy ........... 276
Hybrid operation
AGILITY SELECT switch .................. 277
Automatic engine start (ECO
Start/Stop function) ...................... 280
Automatic engine switch-off (ECO
start/stop function) ....................... 280
Driving tips .................................... 278
ECO start/stop function ................ 279
Energy flow display ........................ 273
Extended overrun mod e................. 280
Fuel consumption .......................... 276
General notes ................................ 269
Important safety notes .................. 269
Manual gearshifting ....................... 278
Noiseless start ............................... 277
Operating (on-board computer) ..... 273
Overrun mode ................................ 280 Overview (instrument cluster) ........ 272
Power display (electric motor) ....... 272
Problems ....................................... 282
Pulling away ................................... 277
RBS (Recuperative Brake Sys-
tem) ............................................... 269
Resetting values (Audio 20) ........... 276
Resetting values (COMAND
Online) ........................................... 276
Starting the engine ........................ 276
Hybrid system
Automatic deactivation .................... 42
Danger of electric shock .................. 42
Display message ............................ 337
High-voltage battery ........................ 43
Important safety notes .................... 42
Manual deactivation ......................... 43
Opening the bonnet ......................... 44
Overview ........................................ 271
Problems (malfunctions) ................ 282
READY indicator ............................. 276
Warning lamp ................................. 362
Hybrid vehicle
Climate control (THERMATIC) ........ 153
Climate control
(THERMOTRONIC) .......................... 156
Hybrid vehicles
Important safety notes .................... 42 I
Ignition lock see Key positions
Immobiliser .......................................... 85
Indicator and warning lamp
Restraint system ............................ 359
Indicator and warning lamps
COLLISION PREVENTION ASSIST
PLUS .............................................. 363
Coolant .......................................... 360
Engine diagnostics ......................... 360
Indicator lamps
Display message ............................ 330
see Warning and indicator lamps
Indicators
see Turn signals
Insect protection on the radiator .... 392 Index
13
Page 25 of 489
Function/notes ............................. 433
General notes ................................ 433
Important safety notes .................. 434
Radio type approval for the tyre
pressure monitor ........................... 436
Restarting ...................................... 435
Warning lamp ................................ .364
Warning message .......................... 435
Tyres
Changing a wheel .......................... 437
Checking ........................................ 429
Direction of rotatio n...................... 438
Display message ............................ 343
Important safety notes .................. 428
MOExtended tyre s......................... 430
Replacing ....................................... 438
Service life ..................................... 429
Storing ........................................... 438
Summer tyres in winter ................. 430
Tyre size (data ).............................. 444
Tyre tread ...................................... 429
Wheel and tyre combinations ........ 445
see Flat tyre U
Unlocking Emergency unlocking ....................... 98
From inside the vehicle (central
unlocking button) ............................. 97 V
Vanity mirror (in sun visor) .............. 378
Vehicle
Correct use ...................................... 28
Data acquisition ............................... 28
Display message ............................ 345
Electronics ..................................... 466
Equipment ....................................... 25
Implied warranty .............................. 28
Individual settings .......................... 307
Leaving parked up ......................... 211
Locking (in an emergency) ............. 100
Locking (key) ................................... 91
Lowering ........................................ 443
Operating safety .............................. 25
Pulling away ................................... 184
Raising ........................................... 439 Registration ..................................... 28
Securing from rolling away ............ 439
Towing away .................................. 420
Transporting .................................. 423
Unlocking (in an emergency) ........... 98
Unlocking (key) ................................ 91
Vehicle data ................................... 476
Vehicle data
Boot load (maximum) ..................... 476
Roof load (maximum) ..................... 476
Vehicle dimensions ........................... 476
Vehicle emergency locking .............. 100
Vehicle identification number
see VIN
Vehicle identification plate .............. 468
Vehicle level
AIRMATIC ...................................... 234
Display message ............................ 337
Vehicle maintenance
see ASSYST PLUS
Vehicle tool kit .................................. 407
Video
Operating the DVD ......................... 303
VIN ...................................................... 468 W
Warning and indicator lamps ABS ................................................ 355
Brakes ........................................... 353
Distance warning signal ................. 363
ESP ®
.............................................. 357
ESP ®
OFF ....................................... 358
Hybrid system ................................ 362
LIM (cruise control )........................ 216
LIM (DISTRONIC PLUS) .................. 223
LIM (variable SPEEDTRONIC) ......... 219
Overview .......................................... 35
Parking brake ................................ 359
PASSENGER AIR BAG ...................... 46
RBS (Recuperative Brake Sys-
tem) ............................................... 362
Reserve fuel ................................... 360
Seat belt ........................................ 351
SRS ................................................ 282
Steering ......................................... 365
Tyre pressure monitor ................... 364
Warning triangle ................................ 40622
Index
Page 27 of 489
Protection of the environment
General notes
H
Environmental note
Daimler's declared policy is one of compre-
hensive environmental protection.
Our objectives are to use the natural resour-
ces which form the basis of our existence on
this planet sparingly and in a manner which
takes the requirements of both nature and
humanity into consideration.
You too can help to protect the environment
by operating your vehicle in an environmen-
tally-responsible manner.
Fuel consumption and the rate of engine,
transmission, brake and tyre wear depend on
the following factors:
R operating conditions of your vehicle
R your personal driving style
You can influence both factors. Therefore,
please bear the following in mind:
Operating conditions:
R avoid short trips, as these increase fuel
consumption.
R observe the correct tyre pressure.
R do not carry any unnecessary weight in the
vehicle.
R remove the roof rack once you no longer
need it.
R a regularly serviced vehicle will contribute
to environmental protection. You should
therefore adhere to the service intervals.
R all maintenance work should be carried out
at a qualified specialist workshop.
Personal driving style:
R do not depress the accelerator pedal when
starting the engine.
R do not warm up the engine when the vehicle
is stationary.
R drive carefully and maintain a safe distance
from the vehicle in front.
R avoid frequent, sudden acceleration and
braking. R
change gear in good time and use each gear
only up to Ôof its maximum engine speed.
R switch off the engine in stationary traffic.
R monitor the vehicle's fuel consumption. H
Environmental note
Have defective high-voltage batteries dis-
posed of in an environmentally responsible
manner. Consult a qualified specialist work-
shop which has the necessary specialist
knowledge and tools to carry out the work
required. Mercedes-Benz recommends that
you use a Mercedes-Benz Service Centre for
this purpose. Returning an end-of-life vehicle
EU countries only:
Mercedes-Benz will take back your old vehicle to dispose of it in an environmentally-respon-sible manner in accordance with the Euro-
pean Union (EU) End of Life Vehicles Direc-
tive.
There is a network of return points and dis-
assembly plants available. You can return
your vehicle to these plants free of charge.
This makes a valuable contribution to the
recycling process and the conservation of
resources.
For further information on recycling old vehi- cles, recovery and the terms of the policy,
visit the Mercedes-Benz homepage. Genuine Mercedes-Benz parts
H
Environmental note
Daimler AG also supplies reconditioned
assemblies and parts which are of the same
quality as new parts. For these, the same war-
ranty applies as for new parts. 24
Introduction
Page 38 of 489
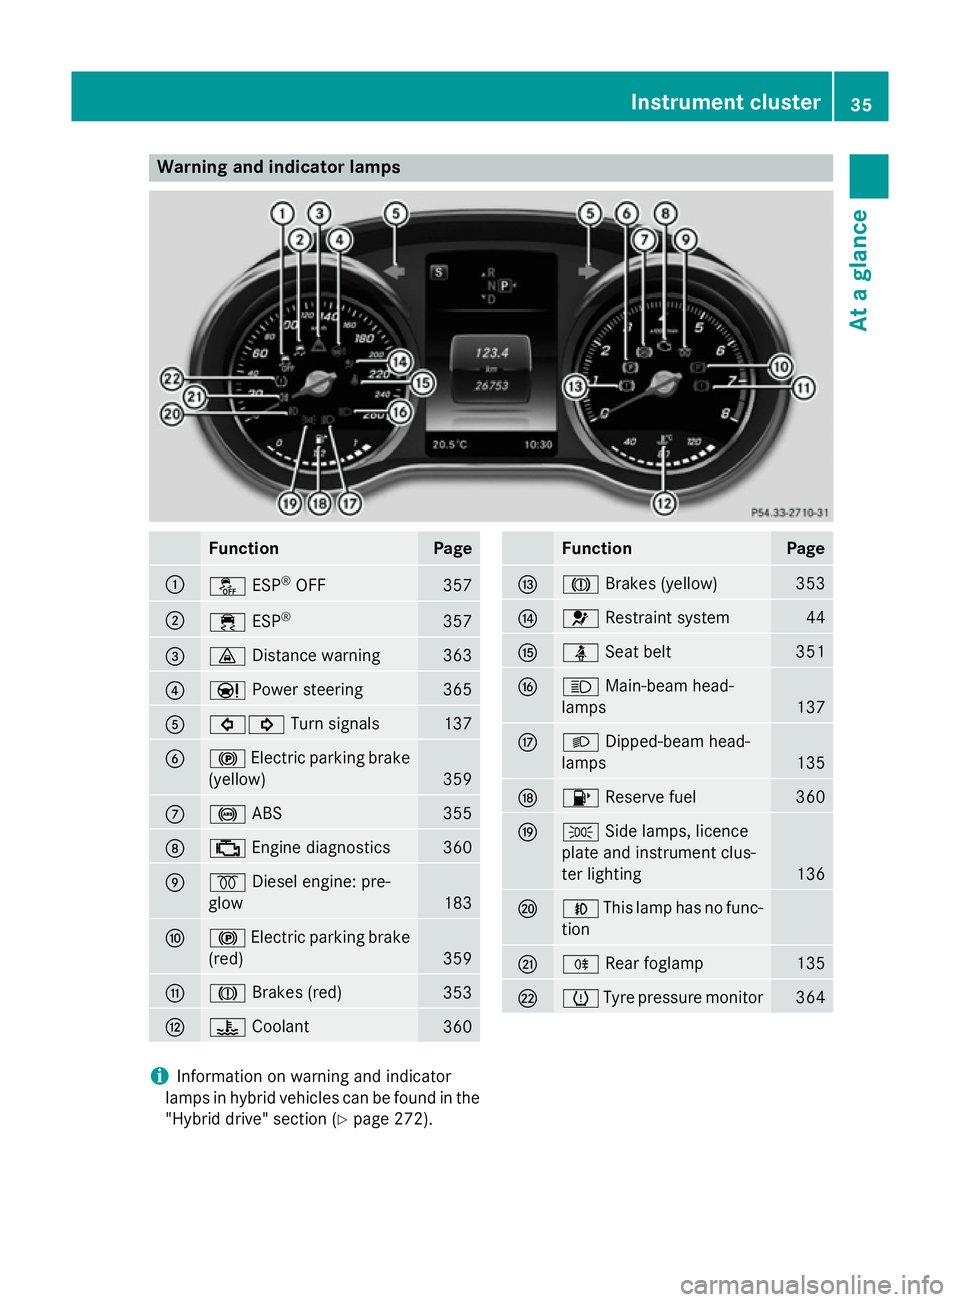
Warning and indicator lamps
Function Page
:
å
ESP®
OFF 357
;
÷
ESP® 357
=
·
Distance warning 363
?
Ð
Power steering 365
A
#!
Turn signals 137
B
!
Electric parking brake
(yellow) 359
C
!
ABS 355
D
;
Engine diagnostics 360
E
%
Diesel engine: pre-
glow 183
F
!
Electric parking brake
(red) 359
G
J
Brakes (red) 353
H
?
Coolant 360 Function Page
I
J
Brakes (yellow) 353
J
6
Restraint system 44
K
ü
Seat belt 351
L
K
Main-beam head-
lamps 137
M
L
Dipped-beam head-
lamps 135
N
8
Reserve fuel 360
O
T
Side lamps, licence
plate and instrument clus-
ter lighting 136
P
N
This lamp has no func-
tion Q
R
Rear foglamp 135
R
h
Tyre pressure monitor 364
i
Information on warning and indicator
lamps in hybrid vehicles can be found in the
"Hybrid drive" section (Y page 272). Instrument cluster
35At a glance
Page 205 of 489
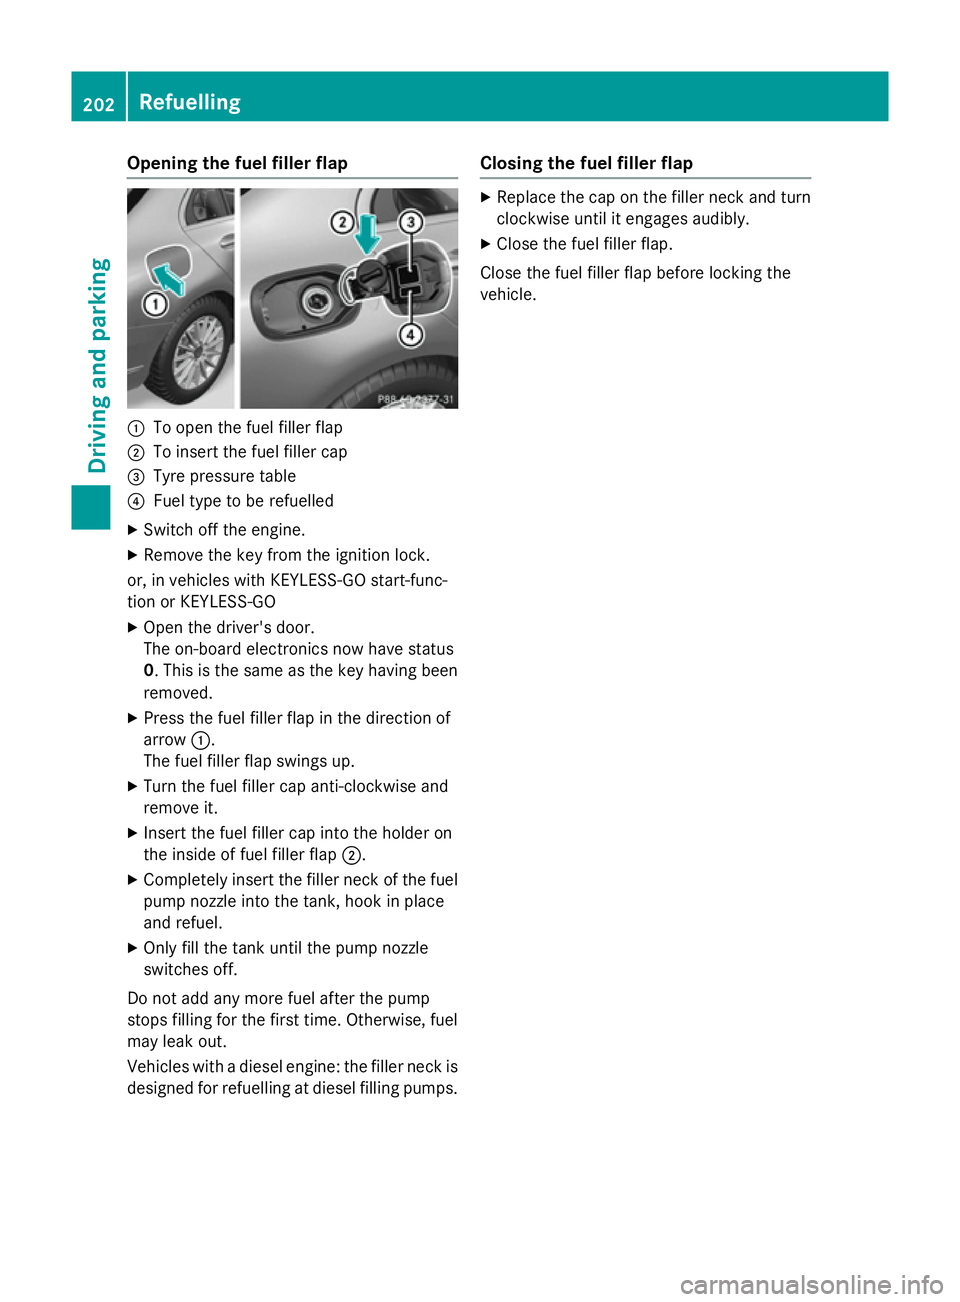
Opening the fuel filler flap
:
To open the fuel filler flap
; To insert the fuel filler cap
= Tyre pressure table
? Fuel type to be refuelled
X Switch off the engine.
X Remove the key from the ignition lock.
or, in vehicles with KEYLESS-GO start-func-
tion or KEYLESS ‑GO
X Open the driver's door.
The on-board electronics now have status
0. This is the same as the key having been
removed.
X Press the fuel filler flap in the direction of
arrow :.
The fuel filler flap swings up.
X Turn the fuel filler cap anti-clockwise and
remove it.
X Insert the fuel filler cap into the holder on
the inside of fuel filler flap ;.
X Completely insert the filler neck of the fuel
pump nozzle into the tank, hook in place
and refuel.
X Only fill the tank until the pump nozzle
switches off.
Do not add any more fuel after the pump
stops filling for the first time. Otherwise, fuel
may leak out.
Vehicles with a diesel engine: the filler neck is designed for refuelling at diesel filling pumps. Closing the fuel filler flap X
Replace the cap on the filler neck and turn
clockwise until it engages audibly.
X Close the fuel filler flap.
Close the fuel filler flap before locking the
vehicle. 202
RefuellingDriving and parking
Page 214 of 489
Emergency braking
The vehicle can also be braked during an
emergency by using the electric parking
brake.
X While driving, push handle :of the elec-
trical parking brake (Y page 209).
The vehicle is braked as long as you keep
handle :of the electric parking brake
depressed. The longer the electric parking
brake handle :is depressed, the greater the
braking force.
During braking:
R a warning tone sounds
R the Release park. brake
Release park. brake message
appears
R the red !indicator lamp in the instru-
ment cluster flashes
When the vehicle has been braked to a stand- still, the electric parking brake is applied. Parking up the vehicle
If you leave the vehicle parked up for longer
than four weeks, the battery may be damaged by exhaustive discharging and further dam-
aged in the event of this occurring again.
X Disconnect the battery or connect it to a
trickle charger.
i You can obtain information about trickle
chargers from a qualified specialist work-
shop.
If you leave the vehicle parked up for longer
than six weeks, it may suffer from lack of use.
X Visit a qualified specialist workshop and
seek advice.
Hybrid vehicles: observe the safety notes
for the high-voltage battery (Y page 269). Driving tips
General driving tips
Important safety notes G
WARNING
If you switch off the ignition while driving,
safety-relevant functions are only available
with limitations, or not at all. This could affect, for example, the power steering and the brake
boosting effect. You will require considerably
more effort to steer and brake. There is a risk of an accident.
Do not switch off the ignition while driving.
Drive sensibly – save fuel Observe the following tips to save fuel:
X The tyres should always be inflated to the
recommended tyre pressure.
X Remove unnecessary loads.
X Remove roof racks when they are not nee-
ded.
X Warm up the engine at low engine speeds.
X Avoid frequent acceleration or braking.
X Have all maintenance work carried out as
indicated by the service intervals in the
Service Booklet or by the service interval
display.
Fuel consumption also increases when driv-
ing in cold weather, in stop-start traffic, on
short journeys and in hilly terrain. ECO display
The ECO display shows you how economical
your driving style is. The ECO display assists
you in achieving the most economical driving
style for the selected settings and prevailing
conditions. Consumption can be significantly influenced by your driving style. Driving tips
211Driving and parking Z
Page 216 of 489
time, the driver has adopted the most eco-
nomical driving style for the selected settings
and prevailing conditions. The ECO display
border lights up.
The ECO display does not indicate the actual fuel consumption. The additionally achieved
range displayed under Bonus fr. start Bonus fr. start
does not indicate a fixed consumption reduc-
tion.
In addition to driving style, the actual con-
sumption is affected by other factors, such
as:
R load
R tyre pressure
R cold start
R choice of route
R the use of electrical consumers
These factors are not included in the ECO dis-
play.
An economical driving style involves driving at a moderate engine speed.
To achieve a higher value in the categories
"acceleration" and "smooth driving":
R observe the gearshift recommendation
R drive the vehicle in drive program E(vehi-
cles with the AGILITY SELECT switch)
On long journeys at a constant speed, e.g. on the motorway, only the outer area for "con-
stant" will change.
The ECO display summarises the driving style
from the start of the journey to its completion. Therefore, there are more marked changes in
the outer areas at the start of a journey. Dur- ing a prolonged driving time, these changes
are smaller. For more marked changes, per-
form a manual rest (Y page 299).
Further information on the ECO display
(Y page 298). Brakes
Important safety notes G
WARNING
If you shift down on a slippery road surface in an attempt to increase the engine's braking
effect, the drive wheels could lose their grip.
This increases the risk of skidding and having
an accident.
Do not shift down for additional engine brak-
ing on a slippery road surface.
Downhill gradients Change into a lower gear in good time on long
and steep downhill gradients. Take particular note of this when driving a laden vehicle and
when towing a trailer.
This also applies if cruise control, DISTRONIC
PLUS or SPEEDTRONIC are activated.
This will use the braking effect of the engine,
so less braking will be required to maintain
vehicle speed. This relieves the load on the
brake system and prevents the brakes from
overheating and wearing too quickly.
Heavy and light loads G
WARNING
The braking system can overheat if you leave your foot on the brake pedal while driving.
This increases the braking distance and could
even cause the braking system to fail. There is
a risk of an accident.
Never use the brake pedal as a footrest. Do
not simultaneously depress both the brake
pedal and the accelerator pedal while driving.
! Depressing the brake pedal constantly
results in excessive and premature wear to
the brake pads.
If heavy demands are made on the brakes, do not park the vehicle immediately. Drive on for
a short while. This allows the airflow to cool
the brakes more quickly. Driving
tips
213Driving an d parking Z
Page 287 of 489
!
Depressing the brake pedal constantly
results in excessive and premature wear to
the brake pads.
When reversing the vehicle towards the
trailer, make sure there is nobody between
the trailer and the vehicle.
Couple and uncouple the trailer carefully. If
you do not couple the trailer to the towing
vehicle correctly, the trailer could become
detached.
When towing a trailer, your vehicle's handling
characteristics will be different in comparison to when driving without a trailer.
The vehicle/trailer combination:
R is heavier
R is restricted in its acceleration and gradi-
ent-climbing capability
R has an increased braking distance
R is affected more by strong crosswinds
R demands more sensitive steering
R has a larger turning circle
This can impair the vehicle's handling char-
acteristics. Adapt your driving style accord-
ingly. Maintain a safe distance. Drive care-
fully.
When towing a trailer, always adjust your
speed to the current road and weather con-
ditions. Do not exceed the maximum permis- sible speed for your vehicle/trailer combina-
tion. Notes on towing a trailer
General notes Trailer towing is not permissible on the fol-
lowing models:
R C 180 BlueEFFICIENCY Edition
R C 220 BlueTEC BlueEFFICIENCY Edition
When towing a trailer, set the tyre pressure on
the rear axle of the towing vehicle for a max-
imum load; see the tyre pressure table in the fuel filler flap (Y page 432). On vehicles without level control, the height
of the ball coupling will alter according to the
load placed on the vehicle. If necessary, use a
trailer with a height-adjustable drawbar.
You will find fitting dimensions and loads
under "Technical data" (Y page 477).
When towing a trailer, the ECO start/stop
function is deactivated. The èECO sym-
bol appears yellow in the multifunction dis-
play. For further information on the ECO
start/stop function; see (Y page 186).
Driving tips Observe the notes on ESP
®
trailer stabilisa-
tion (Y page 82).
The maximum permissible speed for vehicle/ trailer combinations depends on the type of
trailer. Before beginning the journey, check
the trailer's documents to see what the max- imum permitted speed is. Observe the legally
prescribed maximum speed in the relevant
country.
For certain Mercedes-Benz vehicles, the max-
imum permissible rear axle load is increased
when towing a trailer. See the "Technical
data" section to find out whether this applies
to your vehicle (Y page 478). If you utilise any
of the added maximum rear axle load when
towing a trailer, the vehicle/trailer combina-
tion may not exceed a maximum speed of
100 km/h for reasons concerning the oper-
ating permit. This also applies in countries in
which the permissible maximum speed for
vehicle/trailer combinations is above
100 km/h.
When towing a trailer, your vehicle's handling
characteristics will be different in comparison to when driving without a trailer and it will
consume more fuel.
Change into a lower gear in good time on long
and steep downhill gradients.
This also applies if cruise control, DISTRONIC
PLUS or SPEEDTRONIC are activated.
This will use the braking effect of the engine,
so less braking will be required to maintain
vehicle speed. This relieves the load on the 284
Towing a trailerDriving and parking
Page 402 of 489
X
Soak bird droppings with water and rinse
off the treated areas afterwards.
X Remove coolant, brake fluid, tree resins,
oils, fuels and greases by rubbing gently
with a cloth soaked in petroleum ether or
lighter fluid.
X Use tar remover to remove tar stains.
X Use silicone remover to remove wax.
Care and treatment of matt paintwork !
Never polish the vehicle or the light alloy
wheels. Polishing makes the paintwork
shiny.
! The following may cause the paint to
become shiny and thus reduce the matt
effect:
R Vigorous rubbing with unsuitable mate-
rials.
R Frequent use of car washes.
R Washing the vehicle in direct sunlight.
! Never use paint cleaner, buffing or pol-
ishing products, or gloss preserver, e.g.
wax. These products are only suitable for
high-gloss surfaces. Their use on vehicles
with matt finish leads to considerable sur-
face damage (shiny, spotted areas).
Always have paintwork repairs carried out
at a qualified specialist workshop.
! Do not use wash programs with a hot wax
treatment under any circumstances.
Observe these notes if your vehicle has a
clear matt finish. This will help you to avoid
damage to the paintwork due to incorrect
treatment.
These notes also apply to light-alloy wheels
with a clear matt finish.
The vehicle should preferably be washed by
hand using a soft sponge, car shampoo and
plenty of water.
Use only insect remover and car shampoo
from the range of approved Mercedes-Benz
care products. Cleaning vehicle parts
Cleaning the wheels G
WARNING
The water jet of circular-jet nozzles (dirt grind- ers) can cause damage not visible from the
outside to tyres or chassis components. Com-
ponents damaged in this way can unexpect-
edly fail. There is a risk of an accident.
Do not use high-pressure cleaners with circu-
lar-jet nozzles to clean the vehicle. Have dam- aged tyres or chassis components replaced
immediately.
! Do not use acidic wheel cleaning products
to remove brake dust. This could damage
wheel bolts and brake components.
! Do not park up the vehicle for an extended
period straight after cleaning it, particularly after having cleaned the wheels with wheel cleaner. Wheel cleaners could cause
increased corrosion of the brake discs and
brake pads/linings. For this reason, you
should drive for a few minutes after clean-
ing. Braking heats the brake discs and the
brake pads/linings, thus drying them. The
vehicle can then be parked up.
Cleaning the windows G
WARNING
If the windscreen wipers are set in motion
when cleaning the windscreen or wiper
blades, you could become trapped. There is a danger of injury.
Always switch off the windscreen wipers and
the ignition before cleaning the windscreen orwiper blades.
! Do not use dry cloths, abrasive products,
solvents or cleaning agents containing sol- vents to clean the inside of the windows. Do
not touch the insides of the windows with
hard objects, e.g. an ice scraper or ring.
There is otherwise a risk of damaging the
windows. Care
399Maintenance and care Z
Page 415 of 489
H
Environmental note
Have the used tyre sealant bottle disposed of professionally, e.g. at a qualified specialist
workshop.
If a tyre pressure of 180 kPa (1.8 bar/26 psi) has been attained after five minutes:
X Switch off the tyre inflation compressor.
X Unscrew the filler hose from the valve of
the faulty tyre.
X Stow the tyre sealant bottle, the tyre infla-
tion compressor and the warning triangle.
X Pull away immediately .
X Stop after driving for approximately ten
minutes and check the tyre pressure with
the tyre inflation compressor.
The tyre pressure must now be at least
130 kPa (1.3 bar/19 psi). G
WARNING
If the required tyre pressure is not reached
after driving for a short period, the tyre is too badly damaged. The tyre sealant cannot
repair the tyre in this instance. Damaged tyres and a tyre pressure that is too low can signif-
icantly impair the vehicle's braking and driv-
ing characteristics. There is a risk of accident.
Do not continue driving. Contact a qualified
specialist workshop.
i In your vehicle, you will find a sticker with
the Mercedes-Benz Service24h telephone
number, e.g. on the B-pillar on the driver's
side.
X Correct the tyre pressure if it is still at least
130 kPa (1.3 bar/19 psi). See the fuel filler
flap for values.
X To increase the tyre pressure: switch on
the tyre inflation compressor. X
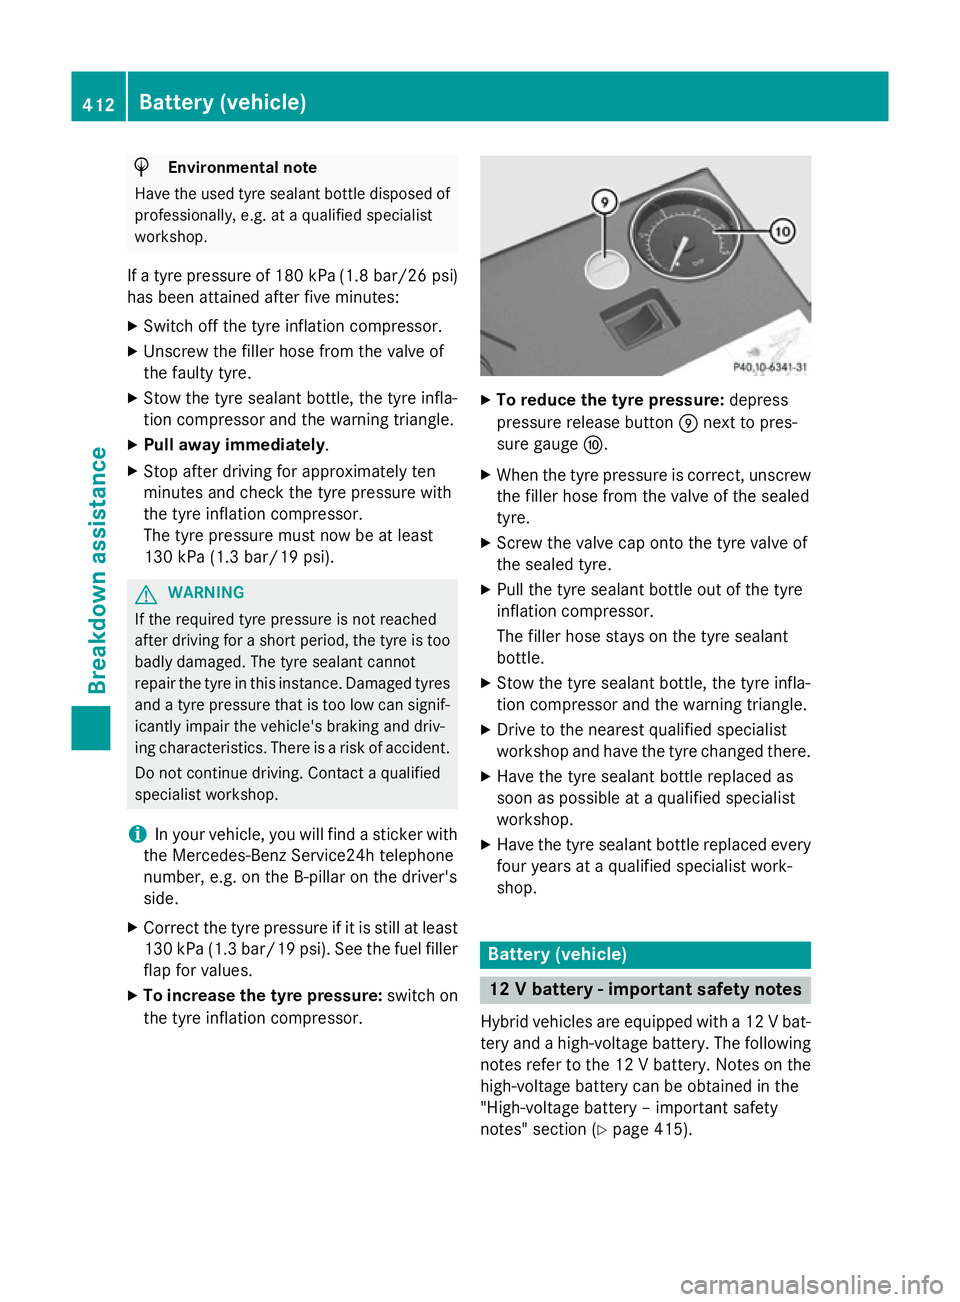
To reduce the tyre pressure: depress
pressure release button Enext to pres-
sure gauge F.
X When the tyre pressure is correct, unscrew
the filler hose from the valve of the sealed
tyre.
X Screw the valve cap onto the tyre valve of
the sealed tyre.
X Pull the tyre sealant bottle out of the tyre
inflation compressor.
The filler hose stays on the tyre sealant
bottle.
X Stow the tyre sealant bottle, the tyre infla-
tion compressor and the warning triangle.
X Drive to the nearest qualified specialist
workshop and have the tyre changed there.
X Have the tyre sealant bottle replaced as
soon as possible at a qualified specialist
workshop.
X Have the tyre sealant bottle replaced every
four years at a qualified specialist work-
shop. Battery (vehicle)
12 V battery - important safety notes
Hybrid vehicles are equipped with a 12 V bat- tery and a high-voltage battery. The followingnotes refer to the 12 V battery. Notes on thehigh-voltage battery can be obtained in the
"High-voltage battery – important safety
notes" section (Y page 415).412
Battery (vehicle)Breakdown assistance