power steering MERCEDES-BENZ C-CLASS SALOON 2014 Owners Manual
[x] Cancel search | Manufacturer: MERCEDES-BENZ, Model Year: 2014, Model line: C-CLASS SALOON, Model: MERCEDES-BENZ C-CLASS SALOON 2014Pages: 489, PDF Size: 14.88 MB
Page 13 of 489
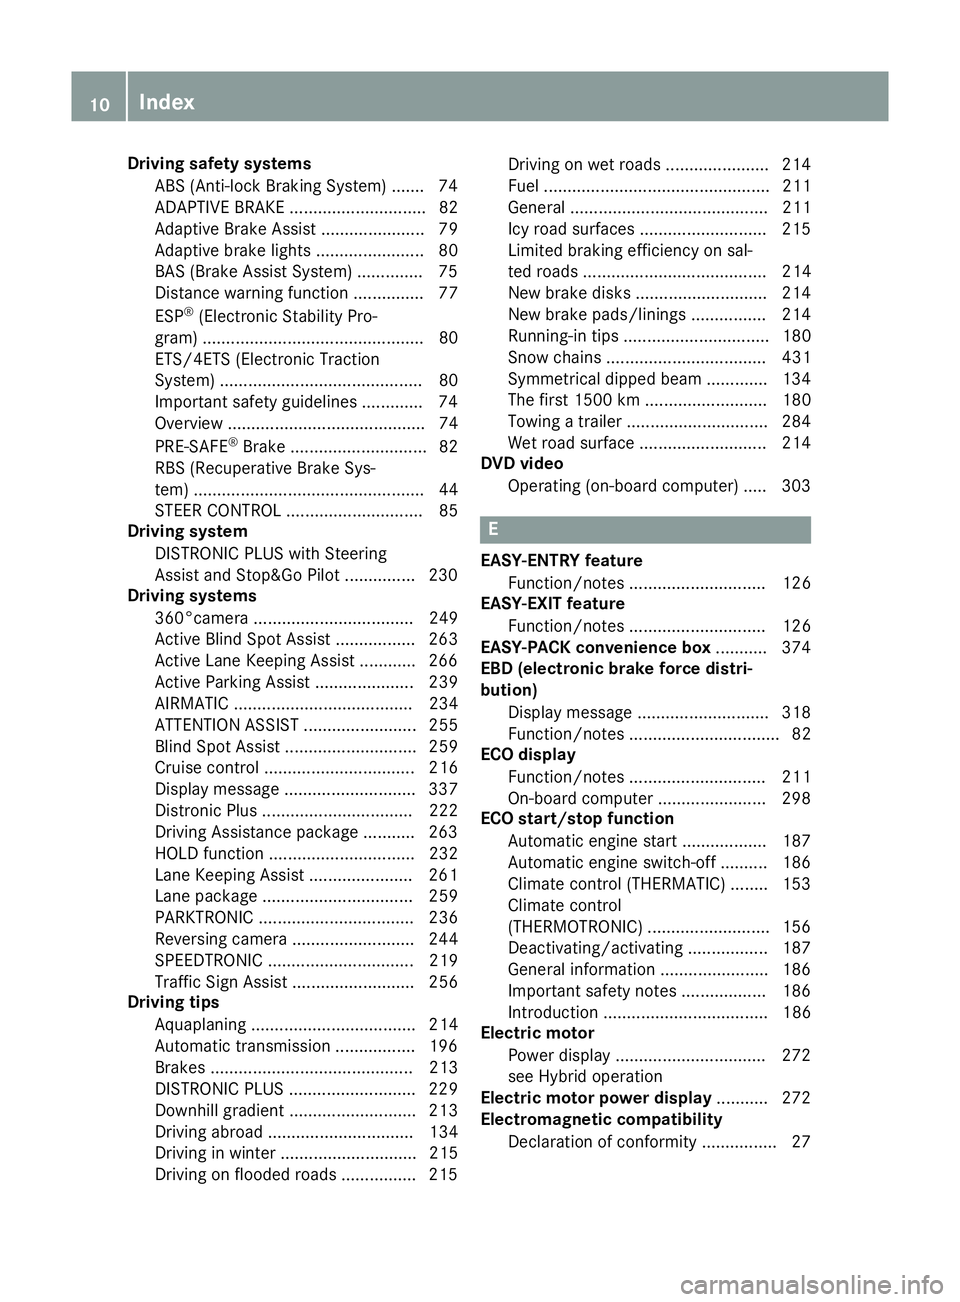
Driving safety systems
ABS (Anti-lock Braking System) ...... .74
ADAPTIVE BRAK E............................. 82
Adaptive Brake Assist ...................... 79
Adaptive brake lights ....................... 80
BAS (Brake Assist System) .............. 75
Distance warning function ............... 77
ESP ®
(Electronic Stability Pro-
gram) ............................................... 80
ETS/4ETS (Electronic Traction
System) ........................................... 80
Important safety guidelines ............. 74
Overview .......................................... 74
PRE-SAFE ®
Brake ............................. 82
RBS (Recuperative Brake Sys-
tem) ................................................. 44
STEER CONTROL ............................. 85
Driving system
DISTRONIC PLUS with Steering
Assist and Stop&Go Pilot ............... 230
Driving systems
360°camera .................................. 249
Active Blind Spot Assist ................. 263
Active Lane Keeping Assist ............ 266
Active Parking Assist ..................... 239
AIRMATIC ...................................... 234
ATTENTION ASSIST ........................ 255
Blind Spot Assist ............................ 259
Cruise control ................................ 216
Display message ............................ 337
Distronic Plus ................................ 222
Driving Assistance packag e........... 263
HOLD function ............................... 232
Lane Keeping Assist ...................... 261
Lane package ................................ 259
PARKTRONIC ................................. 236
Reversing camera .......................... 244
SPEEDTRONIC ............................... 219
Traffic Sign Assist .......................... 256
Driving tips
Aquaplaning ................................... 214
Automatic transmission ................. 196
Brakes ........................................... 213
DISTRONIC PLUS ........................... 229
Downhill gradient ........................... 213
Driving abroad ............................... 134
Driving in winter ............................. 215
Driving on flooded roads ................ 215 Driving on wet roads ...................... 214
Fuel ................................................ 211
General .......................................... 211
Icy road surfaces ........................... 215
Limited braking efficiency on sal-
ted roads ....................................... 214
New brake disks ............................ 214
New brake pads/linings ................ 214
Running-in tip s............................... 180
Snow chains .................................. 431
Symmetrical dipped beam ............. 134
The first 1500 km .......................... 180
Towing a trailer .............................. 284
Wet road surface ........................... 214
DVD video
Operating (on-board computer) ..... 303 E
EASY-ENTRY feature Function/note s............................. 126
EASY-EXIT feature
Function/note s............................. 126
EASY-PACK convenience box ........... 374
EBD (electronic brake force distri-
bution)
Display message ............................ 318
Function/note s................................ 82
ECO display
Function/note s............................. 211
On-board computer ....................... 298
ECO start/stop function
Automatic engine start .................. 187
Automatic engine switch-off .......... 186
Climate control (THERMATIC) ........ 153
Climate control
(THERMOTRONIC) .......................... 156
Deactivating/activating ................. 187
General information ....................... 186
Important safety notes .................. 186
Introduction ................................... 186
Electric motor
Power display ................................ 272
see Hybrid operation
Electric motor power display ........... 272
Electromagnetic compatibility
Declaration of conformity ................ 27 10
Index
Page 38 of 489
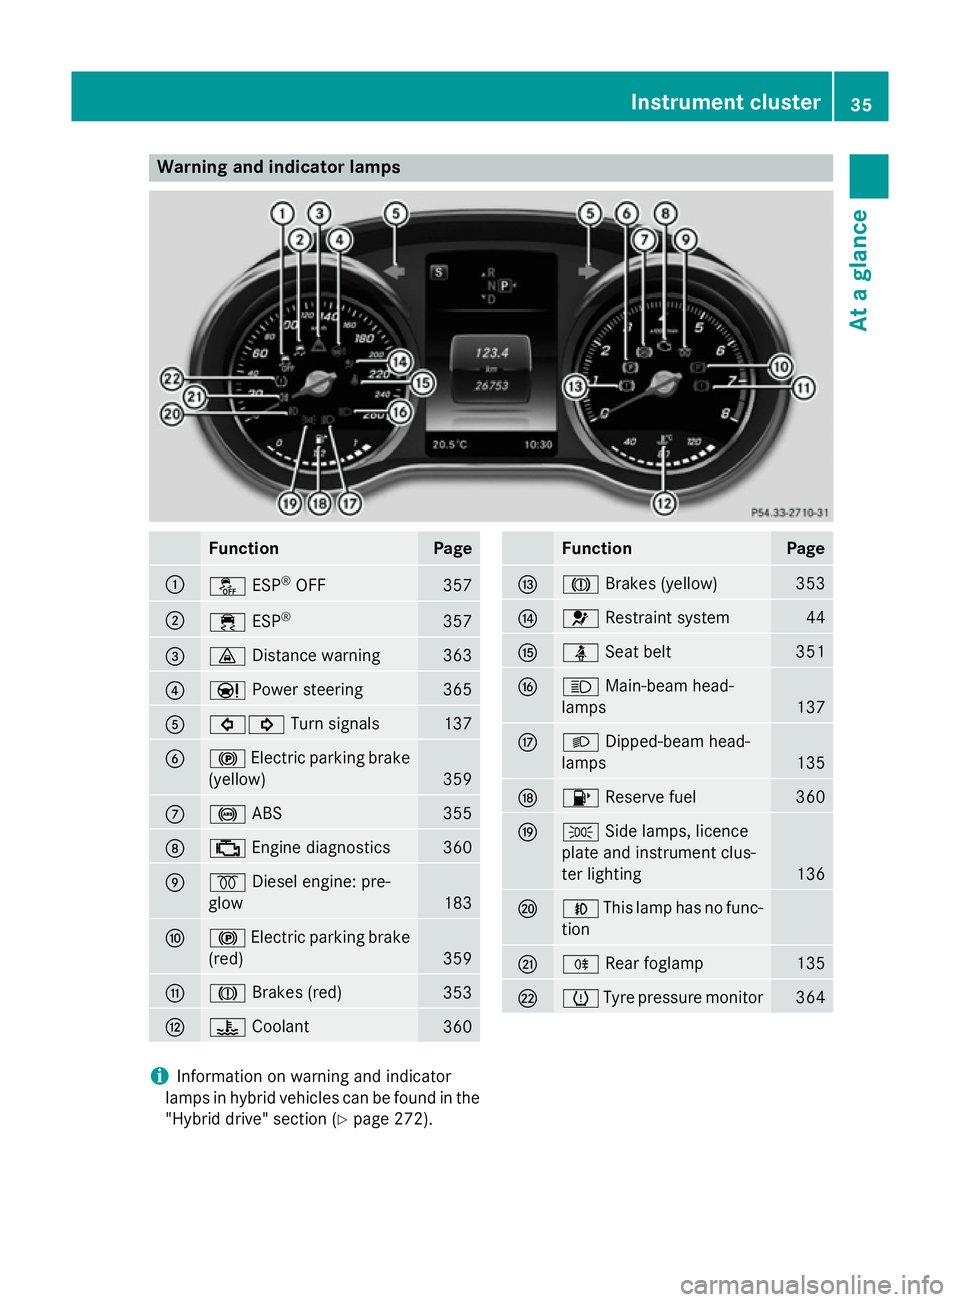
Warning and indicator lamps
Function Page
:
å
ESP®
OFF 357
;
÷
ESP® 357
=
·
Distance warning 363
?
Ð
Power steering 365
A
#!
Turn signals 137
B
!
Electric parking brake
(yellow) 359
C
!
ABS 355
D
;
Engine diagnostics 360
E
%
Diesel engine: pre-
glow 183
F
!
Electric parking brake
(red) 359
G
J
Brakes (red) 353
H
?
Coolant 360 Function Page
I
J
Brakes (yellow) 353
J
6
Restraint system 44
K
ü
Seat belt 351
L
K
Main-beam head-
lamps 137
M
L
Dipped-beam head-
lamps 135
N
8
Reserve fuel 360
O
T
Side lamps, licence
plate and instrument clus-
ter lighting 136
P
N
This lamp has no func-
tion Q
R
Rear foglamp 135
R
h
Tyre pressure monitor 364
i
Information on warning and indicator
lamps in hybrid vehicles can be found in the
"Hybrid drive" section (Y page 272). Instrument cluster
35At a glance
Page 88 of 489
The braking action of PRE-SAFE
®
Brake is
ended automatically if:
R you manoeuvre to avoid the obstacle
R there is no longer a risk of collision
R there is no longer an obstacle detected in
front of your vehicle STEER CONTROL
General notes STEER CONTROL is only available in vehicles
without 4MATIC.
STEER CONTROL helps you by transmitting a noticeable steering force to the steering
wheel in the direction required for vehicle
stabilisation.
This steering support is provided in particular
if:
R both right wheels or both left wheels are on
a wet or slippery road surface when you
brake
R the vehicle starts to skid
Important safety notes i
Observe the "Important safety notes" sec-
tion (Y page 74).
No steering support is provided from STEER
CONTROL, if:
R ESP ®
is malfunctioning
R the steering is faulty
If ESP ®
is malfunctioning, you will be assisted
further by the electrical power steering. Protection against theft
Immobiliser
The immobiliser prevents your vehicle from
being started without the correct key. X
To activate with the key: remove the key
from the ignition lock.
X To activate with KEYLESS-GO start-
function or KEYLESS-GO: switch the igni-
tion off and open the driver's door.
X To deactivate: switch on the ignition.
When leaving the vehicle, always take the key with you and lock the vehicle. Anyone can
start the engine if a valid key has been left
inside the vehicle.
i The immobiliser is always deactivated
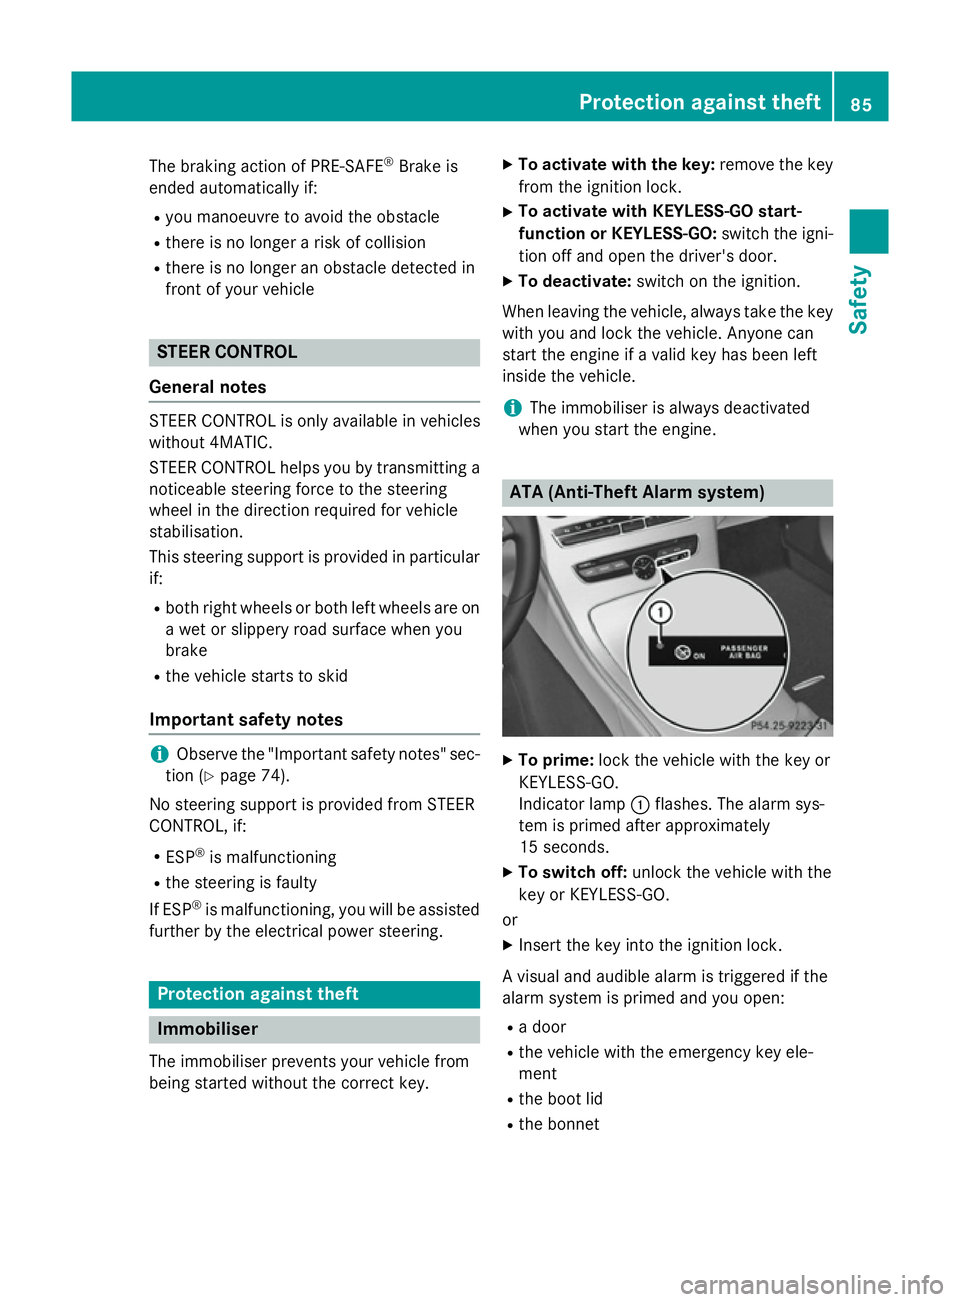
when you start the engine. ATA (Anti-Theft Alarm system)
X
To prime: lock the vehicle with the key or
KEYLESS-GO.
Indicator lamp :flashes. The alarm sys-
tem is primed after approximately
15 seconds.
X To switch off: unlock the vehicle with the
key or KEYLESS-GO.
or X Insert the key into the ignition lock.
A visual and audible alarm is triggered if the
alarm system is primed and you open: R a door
R the vehicle with the emergency key ele-
ment
R the boot lid
R the bonnet Protection against theft
85Safety Z
Page 183 of 489
Useful information
i This Owner's Manual describes all mod-
els, series and optional equipment for your
vehicle that were available at the time of
going to press. National variations are pos- sible. Note that your vehicle may not be
equipped with all of the functions descri-
bed. This is also the case for systems and
functions relevant to safety.
i Read the information on qualified special-
ist workshops: (Y page 27). Running-in notes
Important safety notes
In certain driving and driving safety systems,
the sensors adjust automatically while a cer-
tain distance is being driven after the vehicle has been delivered or after repairs. Full sys-
tem effectiveness is not reached until the end
of this teach-in procedure.
Brake pads/linings and discs that are either
new or have been replaced only achieve opti- mum braking effect after several hundred kil-
ometres of driving. Compensate for the
reduced braking effect by applying greater
force to the brake pedal. The first 1,500 km
If you treat the engine with sufficient care
from the very start, you will be rewarded with excellent performance for the remainder of
the engine's life.
R Drive at varying road speeds and engine
speeds for the first 1,500 km.
R Avoid overstraining the vehicle during this
period, e.g. driving at full throttle.
R When changing gears manually, change up
in good time, before the rev counter needle
reaches Ôof the way to the red area of the
rev counter. R
Do not shift down a gear manually in order
to brake.
R Vehicles with automatic transmission: try
to avoid depressing the accelerator pedal
beyond the point of resistance (kickdown).
After 1,500 km, you may gradually accelerate the vehicle to full road and engine speeds.
You should also observe these notes on run-
ning-in if the engine or parts of the drive train
on your vehicle have been replaced.
Always observe the applicable speed limit. Driving
Important safety notes
G
WARNING
Objects in the driver's footwell may restrict
the clearance around the pedals or block a
depressed pedal. This jeopardises the oper-
ating and road safety of the vehicle. There is a risk of an accident.
Stow all objects securely in the vehicle so that
they do not get into the driver's footwell.
Always fit the floormats securely and as pre-
scribed in order to ensure that there is always sufficient room for the pedals. Do not use
loose floormats and do not place several floor-mats on top of one another. G
WARNING
Unsuitable footwear can hinder correct usage of the pedals, e.g.:
R shoes with thick soles
R shoes with high heels
R slippers
There is a risk of an accident.
Wear suitable footwear to ensure correct
usage of the pedals. G
WARNING
If you switch off the ignition while driving,
safety-relevant functions are only available
with limitations, or not at all. This could affect, for example, the power steering and the brake 180
DrivingDriving and parking
Page 196 of 489
Automatic transmission
Important safety notes
G
WARNING
If the engine speed is above the idling speed
and you engage transmission position Dor R,
the vehicle could pull away suddenly. There is a risk of an accident.
When engaging transmission position Dor R,
always firmly depress the brake pedal and do not simultaneously accelerate. G
WARNING
The automatic transmission switches to neu-
tral position Nwhen you switch off the engine.
The vehicle may roll away. There is a risk of an
accident.
After switching off the engine, always switch
to parking position P. Prevent the parked vehi-
cle from rolling away by applying the parking
brake.
Bear in mind that power transmission
between the engine and the transmission is
interrupted when the engine is switched off.
For this reason, shift the automatic transmis-
sion to Pwhen the engine is switched off and
the vehicle is stationary. Apply the electric
parking brake to prevent the vehicle from roll- ing away.
Hybrid Vehicles: observe the safety instruc-
tions for hybrid vehicles (Y page 269). DIRECT SELECT lever
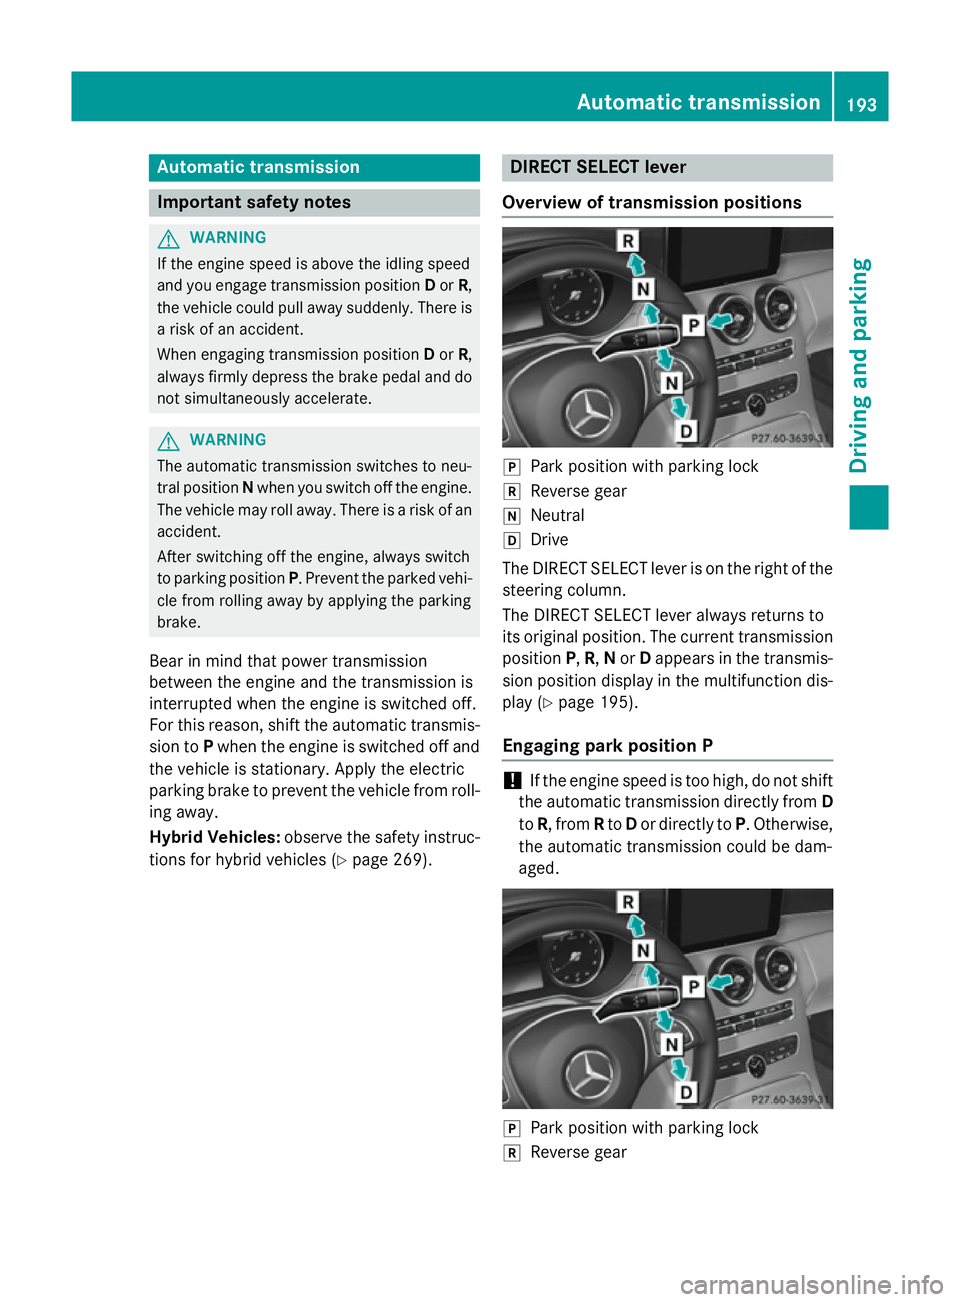
Overview of transmission positions j
Park position with parking lock
k Reverse gear
i Neutral
h Drive
The DIRECT SELECT lever is on the right of the
steering column.
The DIRECT SELECT lever always returns to
its original position. The current transmission position P,R, Nor Dappears in the transmis-
sion position display in the multifunction dis- play (Y page 195).
Engaging park position P !
If the engine speed is too high, do not shift
the automatic transmission directly from D
to R, from Rto Dor directly to P. Otherwise,
the automatic transmission could be dam-
aged. j
Park position with parking lock
k Reverse gear Automatic trans
mission
193Driving an d parking Z
Page 210 of 489
X
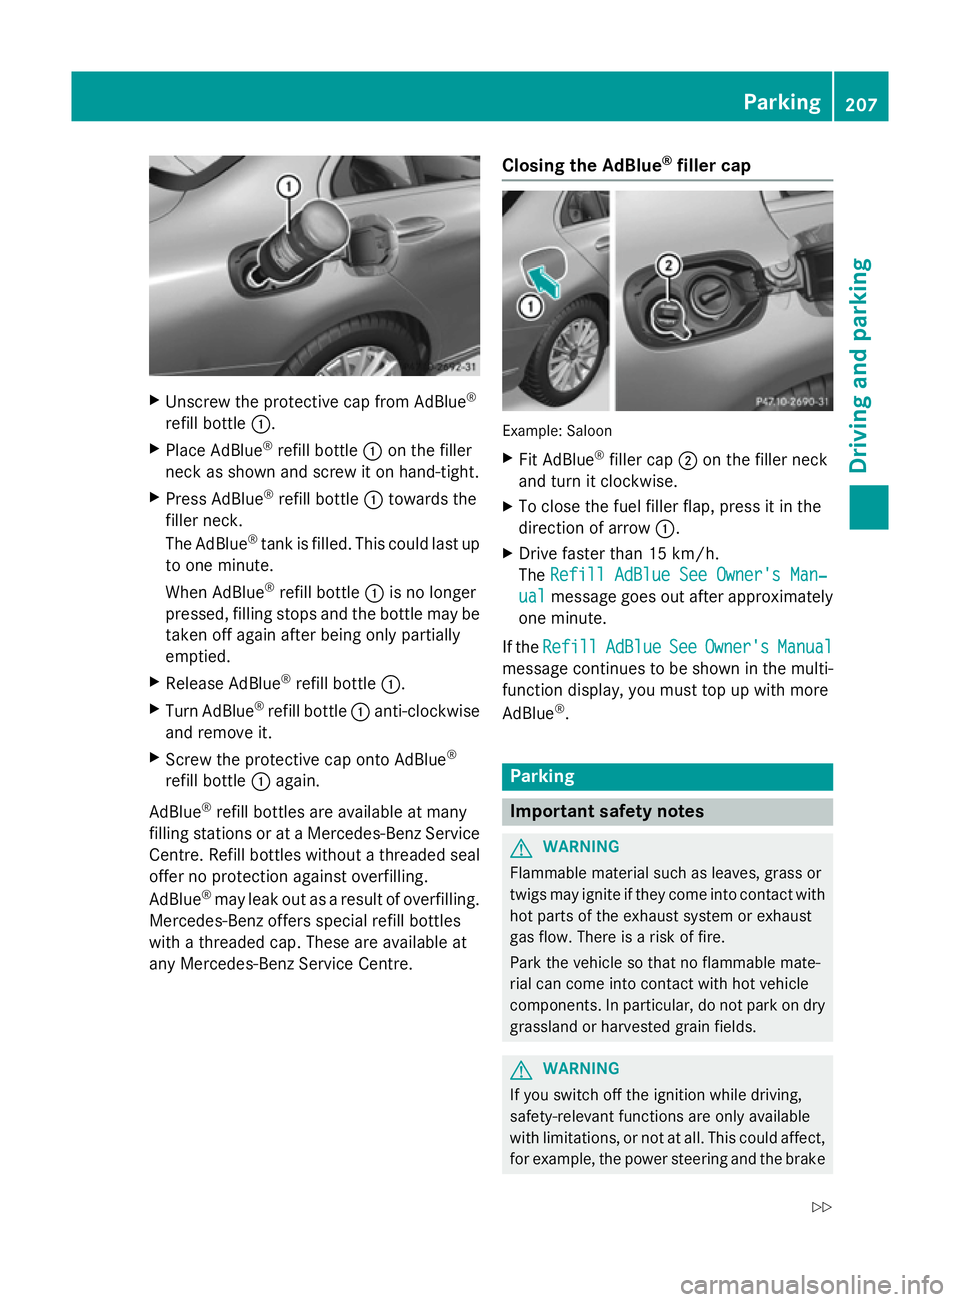
Unscrew the protective cap from AdBlue ®
refill bottle :.
X Place AdBlue ®
refill bottle :on the filler
neck as shown and screw it on hand-tight.
X Press AdBlue ®
refill bottle :towards the
filler neck.
The AdBlue ®
tank is filled. This could last up
to one minute.
When AdBlue ®
refill bottle :is no longer
pressed, filling stops and the bottle may be
taken off again after being only partially
emptied.
X Release AdBlue ®
refill bottle :.
X Turn AdBlue ®
refill bottle :anti-clockwise
and remove it.
X Screw the protective cap onto AdBlue ®
refill bottle :again.
AdBlue ®
refill bottles are available at many
filling stations or at a Mercedes-Benz Service
Centre. Refill bottles without a threaded seal offer no protection against overfilling.
AdBlue ®
may leak out as a result of overfilling.
Mercedes-Benz offers special refill bottles
with a threaded cap. These are available at
any Mercedes-Benz Service Centre. Closing the AdBlue
®
filler cap Example: Saloon
X Fit AdBlue ®
filler cap ;on the filler neck
and turn it clockwise.
X To close the fuel filler flap, press it in the
direction of arrow :.
X Drive faster than 15 km/h.
The Refill AdBlue See Owner's Man‐ Refill AdBlue See Owner's Man‐
ual
ual message goes out after approximately
one minute.
If the Refill
Refill AdBlue
AdBlueSee
SeeOwner's
Owner's Manual
Manual
message continues to be shown in the multi-
function display, you must top up with more
AdBlue ®
. Parking
Important safety notes
G
WARNING
Flammable material such as leaves, grass or
twigs may ignite if they come into contact with hot parts of the exhaust system or exhaust
gas flow. There is a risk of fire.
Park the vehicle so that no flammable mate-
rial can come into contact with hot vehicle
components. In particular, do not park on dry grassland or harvested grain fields. G
WARNING
If you switch off the ignition while driving,
safety-relevant functions are only available
with limitations, or not at all. This could affect, for example, the power steering and the brake Parking
207Driving and parking
Z
Page 214 of 489
Emergency braking
The vehicle can also be braked during an
emergency by using the electric parking
brake.
X While driving, push handle :of the elec-
trical parking brake (Y page 209).
The vehicle is braked as long as you keep
handle :of the electric parking brake
depressed. The longer the electric parking
brake handle :is depressed, the greater the
braking force.
During braking:
R a warning tone sounds
R the Release park. brake
Release park. brake message
appears
R the red !indicator lamp in the instru-
ment cluster flashes
When the vehicle has been braked to a stand- still, the electric parking brake is applied. Parking up the vehicle
If you leave the vehicle parked up for longer
than four weeks, the battery may be damaged by exhaustive discharging and further dam-
aged in the event of this occurring again.
X Disconnect the battery or connect it to a
trickle charger.
i You can obtain information about trickle
chargers from a qualified specialist work-
shop.
If you leave the vehicle parked up for longer
than six weeks, it may suffer from lack of use.
X Visit a qualified specialist workshop and
seek advice.
Hybrid vehicles: observe the safety notes
for the high-voltage battery (Y page 269). Driving tips
General driving tips
Important safety notes G
WARNING
If you switch off the ignition while driving,
safety-relevant functions are only available
with limitations, or not at all. This could affect, for example, the power steering and the brake
boosting effect. You will require considerably
more effort to steer and brake. There is a risk of an accident.
Do not switch off the ignition while driving.
Drive sensibly – save fuel Observe the following tips to save fuel:
X The tyres should always be inflated to the
recommended tyre pressure.
X Remove unnecessary loads.
X Remove roof racks when they are not nee-
ded.
X Warm up the engine at low engine speeds.
X Avoid frequent acceleration or braking.
X Have all maintenance work carried out as
indicated by the service intervals in the
Service Booklet or by the service interval
display.
Fuel consumption also increases when driv-
ing in cold weather, in stop-start traffic, on
short journeys and in hilly terrain. ECO display
The ECO display shows you how economical
your driving style is. The ECO display assists
you in achieving the most economical driving
style for the selected settings and prevailing
conditions. Consumption can be significantly influenced by your driving style. Driving tips
211Driving and parking Z
Page 275 of 489
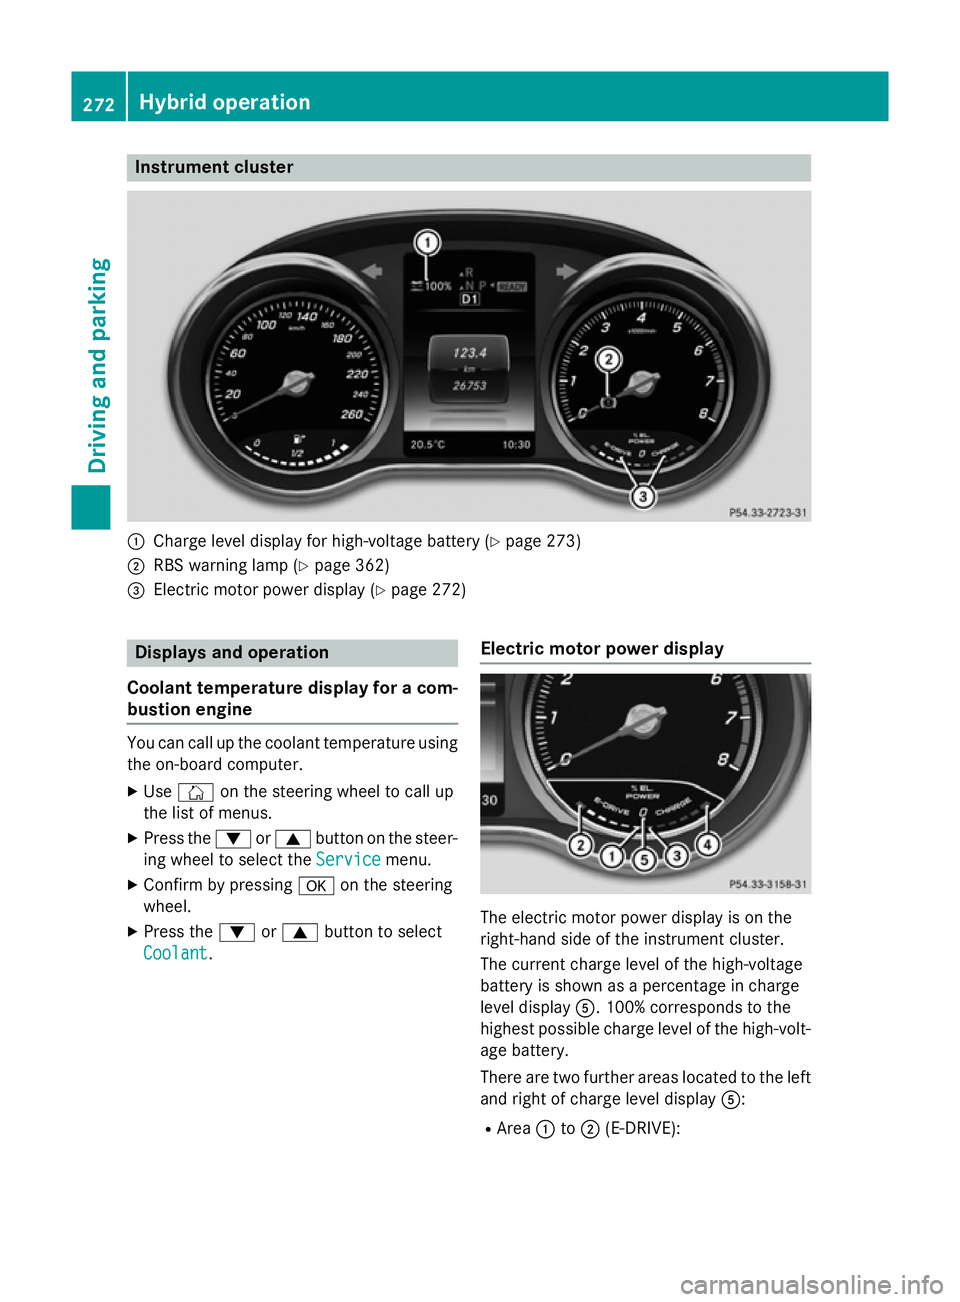
Instrument cluster
:
Charge level display for high-voltage battery (Y page 273)
; RBS warning lamp (Y page 362)
= Electric motor power display (Y page 272)Displays and operation
Coolant temperature display for a com- bustion engine You can call up the coolant temperature using
the on-board computer.
X Use Ñ on the steering wheel to call up
the list of menus.
X Press the :or9 button on the steer-
ing wheel to select the Service
Servicemenu.
X Confirm by pressing aon the steering
wheel.
X Press the :or9 button to select
Coolant
Coolant. Electric motor power display The electric motor power display is on the
right-hand side of the instrument cluster.
The current charge level of the high-voltage
battery is shown as a percentage in charge
level display
A. 100% corresponds to the
highest possible charge level of the high-volt- age battery.
There are two further areas located to the left
and right of charge level display A:
R Area :to; (E-DRIVE): 272
Hybrid operationDriving and pa
rking
Page 276 of 489
This shows the electric output from the
electric motor, e.g. when driving using the
electric motor or in boost mode.
When the motor is switched on, the display is at :. When driving solely on electricity,
the display fills up from :to; depending
on the power output demanded as a result
of pressing the accelerator pedal.
If the display has reached limit ;, addi-
tional power output can only be provided by
the combustion engine. The combustion
engine starts. If the display is approaching
limit ;and you remove your foot from the
accelerator pedal, the display empties
again. The combustion engine is not
switched on. At low speeds, you can
thereby control the electric drive usage so
that you only drive in electric mode.
R Area =to? (CHARGE):
This shows the recuperated energy which is
stored in the high-voltage battery as elec-
trical energy.
When the display reaches limit ?, the max-
imum recuperative braking power has been exhausted. The conventional brakes are
activated.
Operating the on-board computer You can display the current operating condi-
tion of the hybrid system in the multifunction
display and the COMAND display
(Y page 273).
You can display the current operating condi-
tion of the hybrid system in the multifunction display and the Audio 20/COMAND Online
display (Y page 273).
In the Audio 20/COMAND Online display, you
can also call up a graphic display of the fuel
consumption and generated electricity
(Y page 276). Menus and submenus
Selecting messages in the Audio 20/
COMAND Online display X
Press the Øbutton on the controller.
The vehicle menu appears.
X To select Energy Energyflow
flow: turn and press the
controller.
The energy flow is displayed.
X To select Consumption Consumption: turn and press the
controller.
Fuel consumption and the electric energy
generated are displayed.
X To exit the display: press the %button
on the controller.
Selecting the energy flow display in the multifunction display X
Use Ñ on the steering wheel to call up
the list of menus.
X Press the :or9 button on the steer-
ing wheel to select the Trip Tripmenu.
X Confirm by pressing aon the steering
wheel.
X Use : or9 to select Energy flow
Energy flow .
The energy flow is displayed.
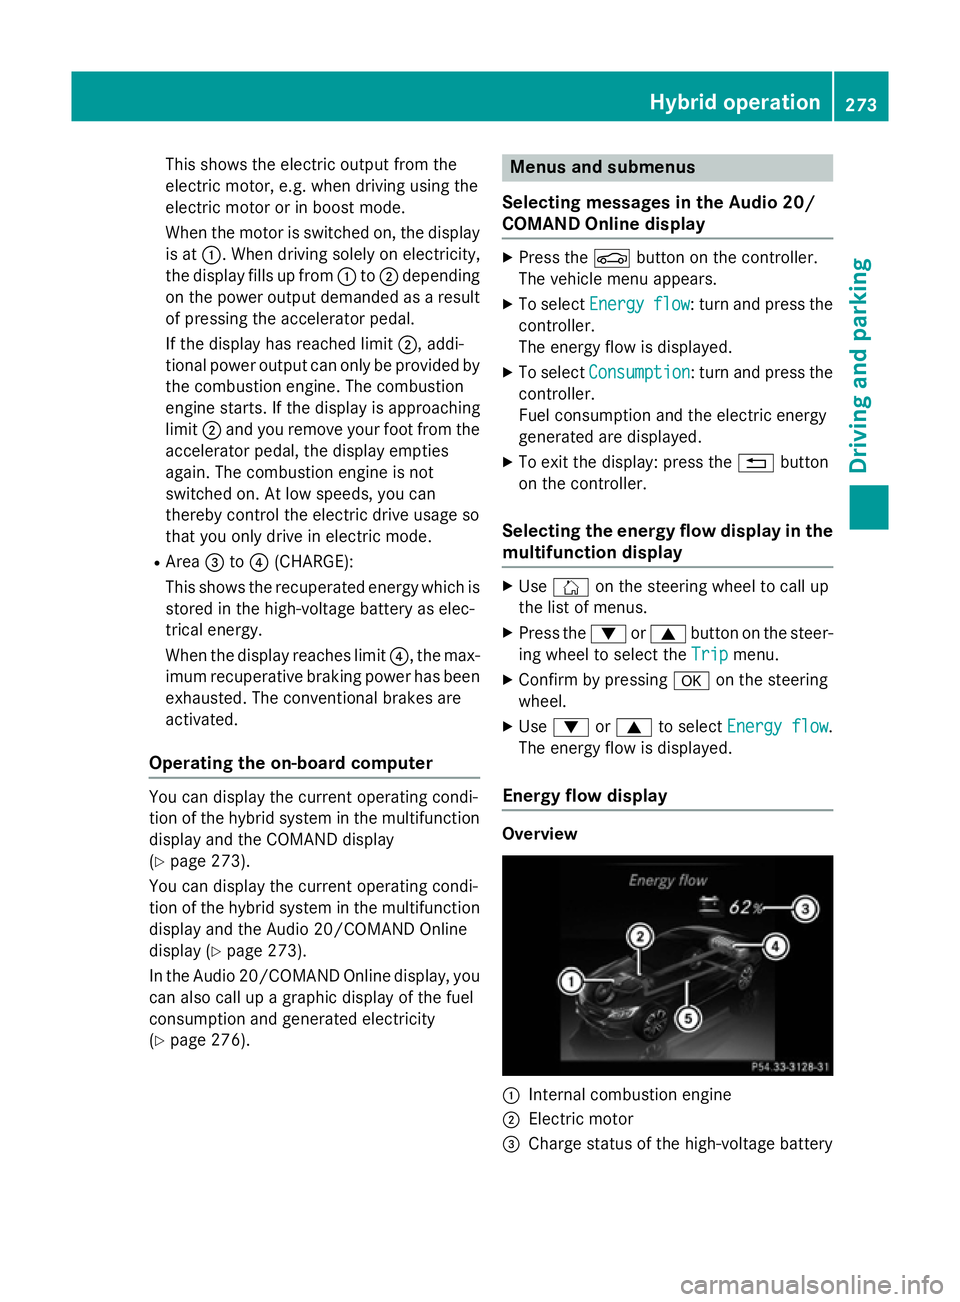
Energy flow display Overview
:
Internal combustion engine
; Electric motor
= Charge status of the high-voltage battery Hybrid operation
273Driving and parking Z
Page 280 of 489
X
Observe the notes on starting the engine
(Y page 183).
X Turn the key to position 3in the ignition
lock (Y page 183) or press the Start/Stop
button once (Y page 184).
The vehicle is operational when READY indi-
cator :lights up.
Noiseless start The vehicle starts in electric mode without the
internal combustion engine. The internal
combustion engine starts only after the
power demanded by the driver exceeds the
available power that the electric motor can
currently provide.
Noiseless start operation is dependent on the
outside temperature and the operating tem-
perature of the internal combustion engine.
The vehicle is operational when READY indi-
cator :lights up. Pulling away
X Depress the brake pedal and keep it
depressed.
X Shift the transmission to position Dor R.
X Release the brake pedal.
Further information on pulling away
(Y page 184). Driving
AGILITY SELECT switch Driving programs
Use the AGILITY SELECT switch to change the
drive program. Depending on the drive pro-
gram selected, the following vehicle charac-
teristics will change:
R the drive (engine and transmission man-
agement)
R the suspension
R the steering R
the availability of the ECO start/stop func-
tion (Y page 279)
R the climate control settings
- THERMATIC (Y page 153)
- THERMOTRONIC (Y page 156)
R the rear window heating operation period
(Y page 164)
R the performance of the seat heating
(Y page 123)
If the ignition is switched off for less than four
hours, the previously selected drive program
is activated when the engine is next started. If the ignition is switched off for more than four
hours, drive program Cis activated when the
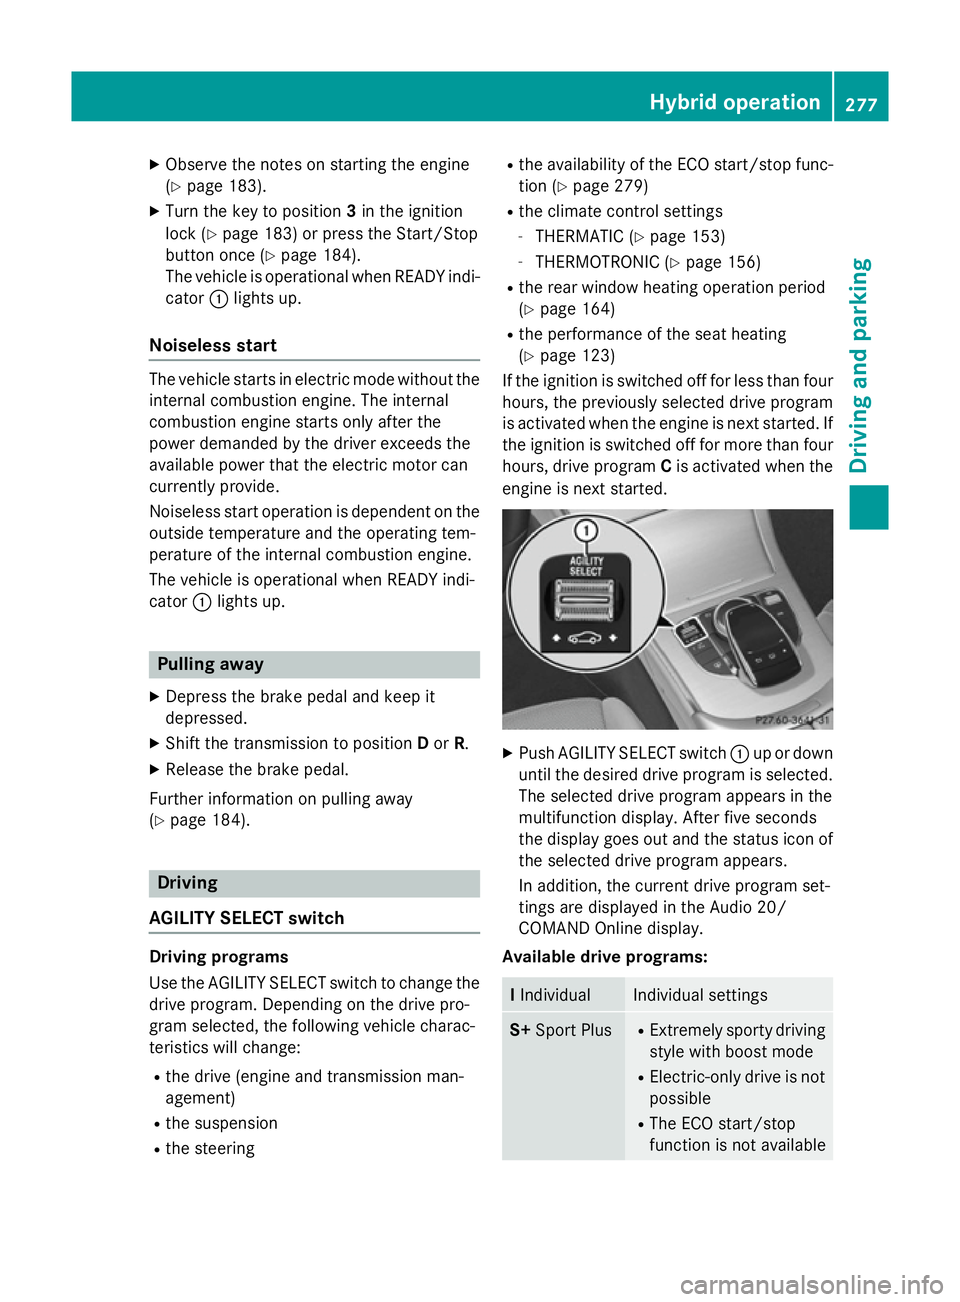
engine is next started. X
Push AGILITY SELECT switch :up or down
until the desired drive program is selected. The selected drive program appears in the
multifunction display. After five seconds
the display goes out and the status icon of
the selected drive program appears.
In addition, the current drive program set-
tings are displayed in the Audio 20/
COMAND Online display.
Available drive programs: I
Individual Individual settings
S+
Sport Plus R
Extremely sporty driving
style with boost mode
R Electric-only drive is not
possible
R The ECO start/stop
function is not available Hybrid operation
277Driving and parking Z