remote start MERCEDES-BENZ C-CLASS SALOON 2014 Owners Manual
[x] Cancel search | Manufacturer: MERCEDES-BENZ, Model Year: 2014, Model line: C-CLASS SALOON, Model: MERCEDES-BENZ C-CLASS SALOON 2014Pages: 489, PDF Size: 14.88 MB
Page 9 of 489
Automatic transmission emer-
gency running mode
.........................200
Auxiliary heating/ventilation
Important safety notes .................. 172
Problem (display message) ............ 177
Remote control .............................. 173
Setting the departure time ............. 175
Switching on/off (on the centre
console) ......................................... 173
Axle load, permissible (trailer tow-
ing) ...................................................... 480 B
Bag hook ............................................ 374
Ball coupling
Folding in ....................................... 286
Folding out ..................................... 285
BAS (Brake Assist System) ................. 75
BAS PLUS with Cross-Traffic Assist (Brake Assist PLUS with Cross-
Traffic Assist)
Function/notes ................................ 75
Important safety notes .................... 76
Battery (high-voltage)
see High-voltage battery
Battery (key)
Checking .......................................... 94
Important safety notes .................... 93
Replacing ......................................... 94
Battery (vehicle)
Charging ........................................ 416
Display message ............................ 334
Important safety notes .................. 412
Jump starting ................................. 418
Belt
see Seat belts
Belt tensioner
Activation ......................................... 60
Blind Spot Assist
Activating/deactivating (on-
board computer) ............................ 309
Display message ............................ 339
Notes/function .............................. 259
Trailer towing ................................. 261
see Active Blind Spot Assist
BlueTEC (AdBlue ®
) ............................ .472 BlueTEC
®
Topping up AdBlue ®
....................... 204
Bonnet
Active bonnet (pedestrian protec-tion) ............................................... 390
Closing .......................................... .392
Display message ............................ 347
Important safety notes .................. 390
Opening ......................................... 391
Boot
Emergency release ........................ 105
Important safety notes .................. 101
Locking separately ......................... 105
Opening/closing (automatically
from inside) ................................... 104
Opening/closing (automatically
from outside) ................................. 102
Opening/closing (from the out-
side, HANDS-FREE ACCESS) .......... 103
Opening/closing (manually from
outside) ......................................... 102
Boot lid
Display message ............................ 347
Obstacle recognition ..................... .101
Opening dimensions ..................... .476
Opening/closing ............................ 101
Boot load (maximum) ........................ 476
Box (boot) .......................................... .374
Brake
EBD ................................................. .82
Brake Assist
see BAS (Brake Assist System)
Brake fluid
Display message ............................ 322
Notes ............................................. 475
Brake force distribution, elec-
tronic
see EBD (electronic brake force
distribution)
Brake lamps
Adaptive ........................................... 80
Display message ............................ 330
Brake pedal
Pedal resistance/pedal travel .......... 44
Brakes
ABS .................................................. 74
Adaptive Brake Assist ...................... 79 6
Index
Page 11 of 489
Controlling automatically ..............
.159
Convenience opening/closing
(air-recirculation mode) ................. 165
Cooling with air dehumidification .. 157
Demisting the windows .................. 163
Demisting the windscreen ............. 163
ECO start/stop function ................ 155
ECO start/stop function
(THERMATIC) ................................. 152
Hybrid vehicle (THERMOTRONIC ).. 155
Hybrid vehicles (THERMATIC )........ 152
Important safety notes .................. 150
Indicator lamp ................................ 159
Information about using
THERMATIC automatic climate
control ........................................... 152
Information on using
THERMOTRONIC automatic cli-
mate control .................................. 155
Ionisation ....................................... 169
Overview of systems ...................... 150
Perfume atomizer .......................... 167
Pre-entry climate control ............... 169
Problem with the rear window
heating .......................................... 165
Problems with cooling with air
dehumidification ............................ 159
Rear control panel ......................... 154
Remote activation of heating/
ventilation systems ........................ 171
Setting the air distribution ............. 161
Setting the air vents ...................... 177
Setting the airflow ......................... 162
Setting the climate mod e............... 160
Setting the temperature ................ 160
Switching air-recirculation mode
on/of f............................................ 165
Switching on/of f........................... 156
Switching residual heat on/off ...... 166
Switching the rear window heat-
ing on/of f...................................... 164
Switching the synchronisation
function on and off ........................ 162
THERMATIC automatic climate
control (2-zone) ............................. 151
THERMOTRONIC (3-zone) auto-
matic climate control ..................... 154 Cockpit
Overview .......................................... 32
Collapsible emergency spare
wheel
see Emergency spare wheel
COLLISION PREVENTION ASSIST
PLUS
Activating/deactivating ................. 308
Display message ............................ 322
Operation/note s.............................. 77
COMAND display
Cleaning ......................................... 402
Combination switch .......................... 137
Consumption statistics (on-board
computer) .......................................... 299
Convenience box ............................... 374
Convenience closing feature ............ 107
Convenience opening feature .......... 107
Convenience opening/closing (air-
recirculation mode) ........................... 165
Coolant (engine)
Checking the level ......................... 393
Display message ............................ 333
Important safety notes .................. 475
Temperature display in the instru-
ment cluster .................................. 293
Temperature display in the on-
board computer ............................. 307
Warning lamp ................................. 360
Cooling
see Climate control
Copyright ............................................. 29
Cornering light function
Display message ............................ 329
Function/note s............................. 138
Crash-responsive emergency light-
ing ....................................................... 141
Crosswind Assist ................................. 82
Cruise control
Cruise control lever ....................... 216
Deactivating ................................... 218
Display message ............................ 342
Driving system ............................... 216
Important safety notes .................. 216
LIM indicator lamp ......................... 216
Selecting ........................................ 217
Setting a speed .............................. 218 8
Index
Page 93 of 489
Useful information
i This Owner's Manual describes all mod-
els, series and optional equipment for your
vehicle that were available at the time of
going to press. National variations are pos- sible. Note that your vehicle may not be
equipped with all of the functions descri-
bed. This is also the case for systems and
functions relevant to safety.
i Read the information on qualified special-
ist workshops: (Y page 27). Key
Important safety notes
United Kingdom only: G
WARNING
When the double locks are activated, the
doors can no longer be opened from the
inside. People in the vehicle can no longer get out, e.g. in hazardous situations. There is a
risk of injury.
Therefore, do not leave any people unsuper-
vised in the vehicle, particularly children, eld-
erly people or people in need of special assis-
tance. Do not activate the double lock when
people are in the vehicle.
If the vehicle has been locked from the out-
side, the double-lock function is activated as
standard. It is then not possible to open the
doors from inside the vehicle. You can deac-
tivate the double lock function by deactivat-
ing the interior motion sensor . The doors can
then be opened from the inside after the vehi- cle has been locked from the outside. The
anti-theft alarm system is triggered if the door
is opened from the inside. Switch off the
alarm (Y page 85).
All countries: G
WARNING
If you leave children unattended in the vehi-
cle, they may be able to set the vehicle in
motion if, for example, they:
R release the parking brake
R shift the automatic transmission out of park
position Por shift manual transmission into
neutral
R start the engine
In addition, they may operate vehicle equip-
ment and become trapped. There is a risk of
an accident and injury.
When leaving the vehicle, always take the key with you and lock the vehicle. Never leave
children unattended in the vehicle. G
WARNING
If you attach heavy or large objects to the key, the key could be unintentionally turned in the
ignition lock. This could cause the engine to
be switched off. There is a risk of an accident.
Do not attach any heavy or large objects to the
key. Remove any bulky keyrings before insert-
ing the key into the ignition lock.
! Keep the key away from strong magnetic
fields. Otherwise, the remote control func-
tion could be affected.
Strong magnetic fields can occur in the
vicinity of powerful electrical installations.
Do not keep the key: R with electronic devices, e.g. a mobile
phone or another key
R with metallic objects, e.g. coins or metal
film
R inside metallic objects, e.g. a metal case
This can affect the key's functionality.
Vehicles with KEYLESS-GO start function: do not keep the key on the parcel shelf or in
the boot. Otherwise, the key may not be
detected, e.g. when starting the engine using
the Start/Stop button. 90
KeyOpening and closing
Page 94 of 489

A check which periodically establishes a radio
connection between the vehicle and the key
determines whether a valid key is in the vehi- cle. This occurs, for example:
R when starting the engine
R whilst driving
R when the external door handles are
touched
R during convenience closing Key functions
:
& Locks the vehicle
; F Opens/closes the boot lid
= % Unlocks the vehicle
X To unlock centrally: press button=.
If you do not open the vehicle within
approximately 40 second s of unlocking:
R the vehicle is locked again
R protection against theft is reactivated.
X To lock centrally: press button:.
The key centrally locks/unlocks:
R the doors
R the boot lid
R the fuel filler flap
When unlocking, the turn signals flash once.
When locking, they flash three times.
You can also set an audible signal to confirm
that the vehicle has been locked. The audible signal can be activated and deactivated via
COMAND Online or Audio 20 (see the sepa-
rate operating instructions). When the locator lighting is activated via
COMAND Online or Audio 20, it lights up
when it is dark after the vehicle is unlocked
with the remote control (see the separate
operating instructions).
X To open the boot lid automatically from
outside the vehicle: press and hold but-
ton ;until the boot lid opens.
X To open the boot lid automatically from
outside the vehicle: if the key is located in
the immediate vicinity of the vehicle: press
the F button on the key.
You can release the button as soon as the
boot lid starts to close. KEYLESS-GO
General notes Bear in mind that the engine can be started by
any of the vehicle occupants if there is a key
in the vehicle.
Locking and unlocking centrally You can start, lock or unlock the vehicle using
KEYLESS-GO. To do this, you only need carry
the key with you. You can combine the KEY-
LESS-GO functions with the functions of a
conventional key. Unlock the vehicle by using KEYLESS-GO, for instance, and lock it using
the & button on the key.
The driver's door and the door at which the
handle is used, must both be closed. The key
must be outside the vehicle. When locking or unlocking with KEYLESS-GO, the distance
between the key and the corresponding door
handle must not be greater than 1 m.
A check which periodically establishes a radio
connection between the vehicle and the key
determines whether a valid key is in the vehi- cle. This occurs, for example:
R when starting the engine
R whilst driving Key
91Opening and closing Z
Page 107 of 489
erwise, the sensors may not function cor-
rectly.
R HANDS-FREE ACCESS does not function
when the engine is started.
R If a KEYLESS-GO key is within the rear
detection range of KEYLESS-GO, HANDS-
FREE ACCESS could be triggered. The boot
lid could thus be opened or closed unin-
tentionally, for example, if you:
- set down or lift up an object behind the
vehicle
- polish the rear of the vehicle
Do not carry the KEYLESS-GO key about
your person in such situations. This will
prevent the unintentional opening/closing
of the boot.
R Dirt caused by road salt around sensors :
may restrict functionality.
R Using HANDS-FREE ACCESS with a pros-
thetic leg may restrict functionality.
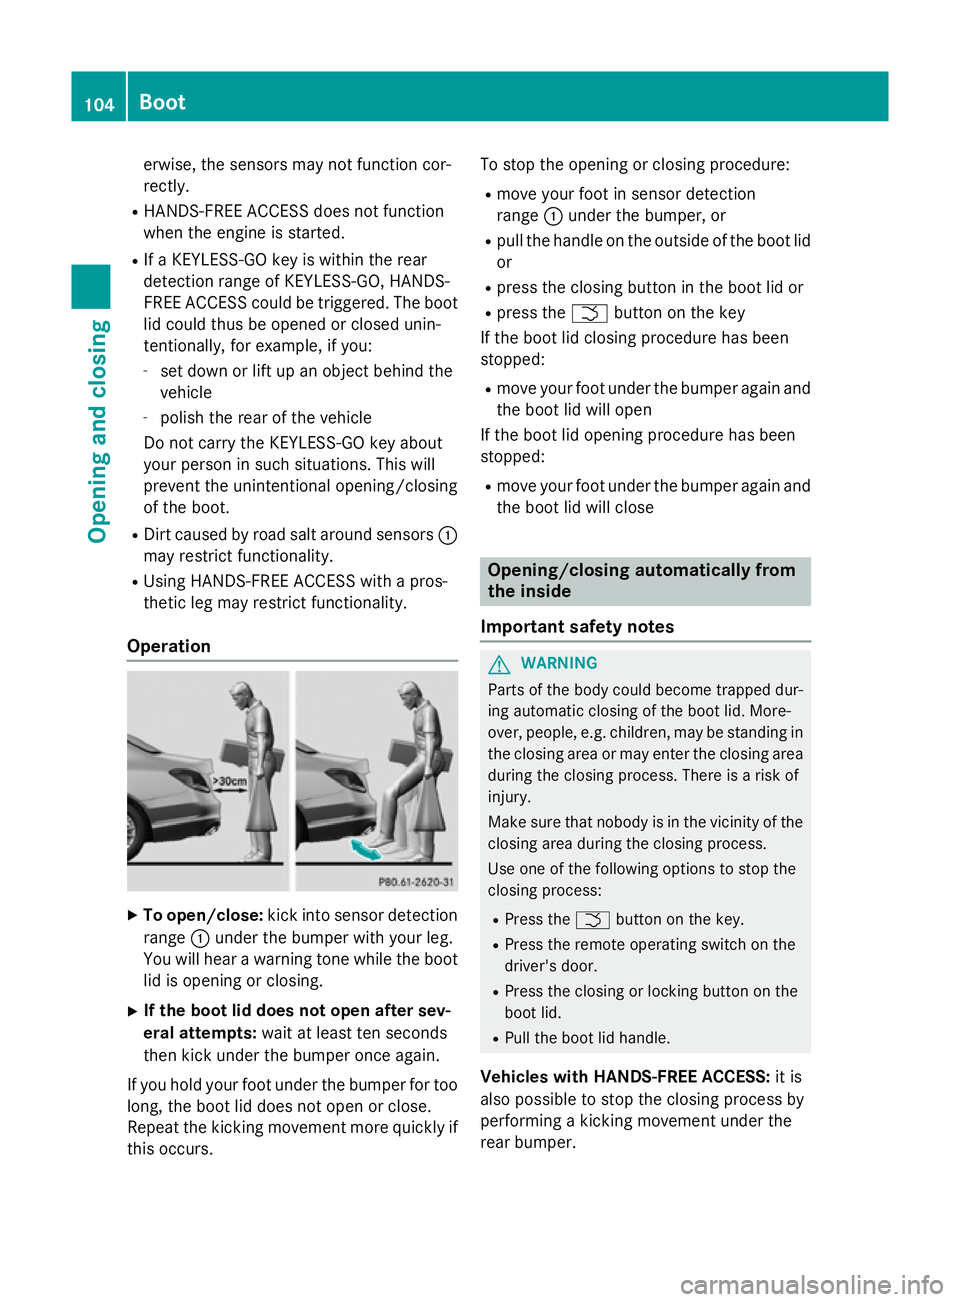
Operation X
To open/close: kick into sensor detection
range :under the bumper with your leg.
You will hear a warning tone while the boot lid is opening or closing.
X If the boot lid does not open after sev-
eral attempts: wait at least ten seconds
then kick under the bumper once again.
If you hold your foot under the bumper for too
long, the boot lid does not open or close.
Repeat the kicking movement more quickly if this occurs. To stop the opening or closing procedure:
R move your foot in sensor detection
range :under the bumper, or
R pull the handle on the outside of the boot lid
or
R press the closing button in the boot lid or
R press the Fbutton on the key
If the boot lid closing procedure has been
stopped:
R move your foot under the bumper again and
the boot lid will open
If the boot lid opening procedure has been
stopped:
R move your foot under the bumper again and
the boot lid will close Opening/closing automatically from
the inside
Important safety notes G
WARNING
Parts of the body could become trapped dur-
ing automatic closing of the boot lid. More-
over, people, e.g. children, may be standing in the closing area or may enter the closing area
during the closing process. There is a risk of
injury.
Make sure that nobody is in the vicinity of the closing area during the closing process.
Use one of the following options to stop the
closing process:
R Press the Fbutton on the key.
R Press the remote operating switch on the
driver's door.
R Press the closing or locking button on the
boot lid.
R Pull the boot lid handle.
Vehicles with HANDS-FREE ACCESS: it is
also possible to stop the closing process by
performing a kicking movement under the
rear bumper. 104
BootOpening and closing
Page 174 of 489
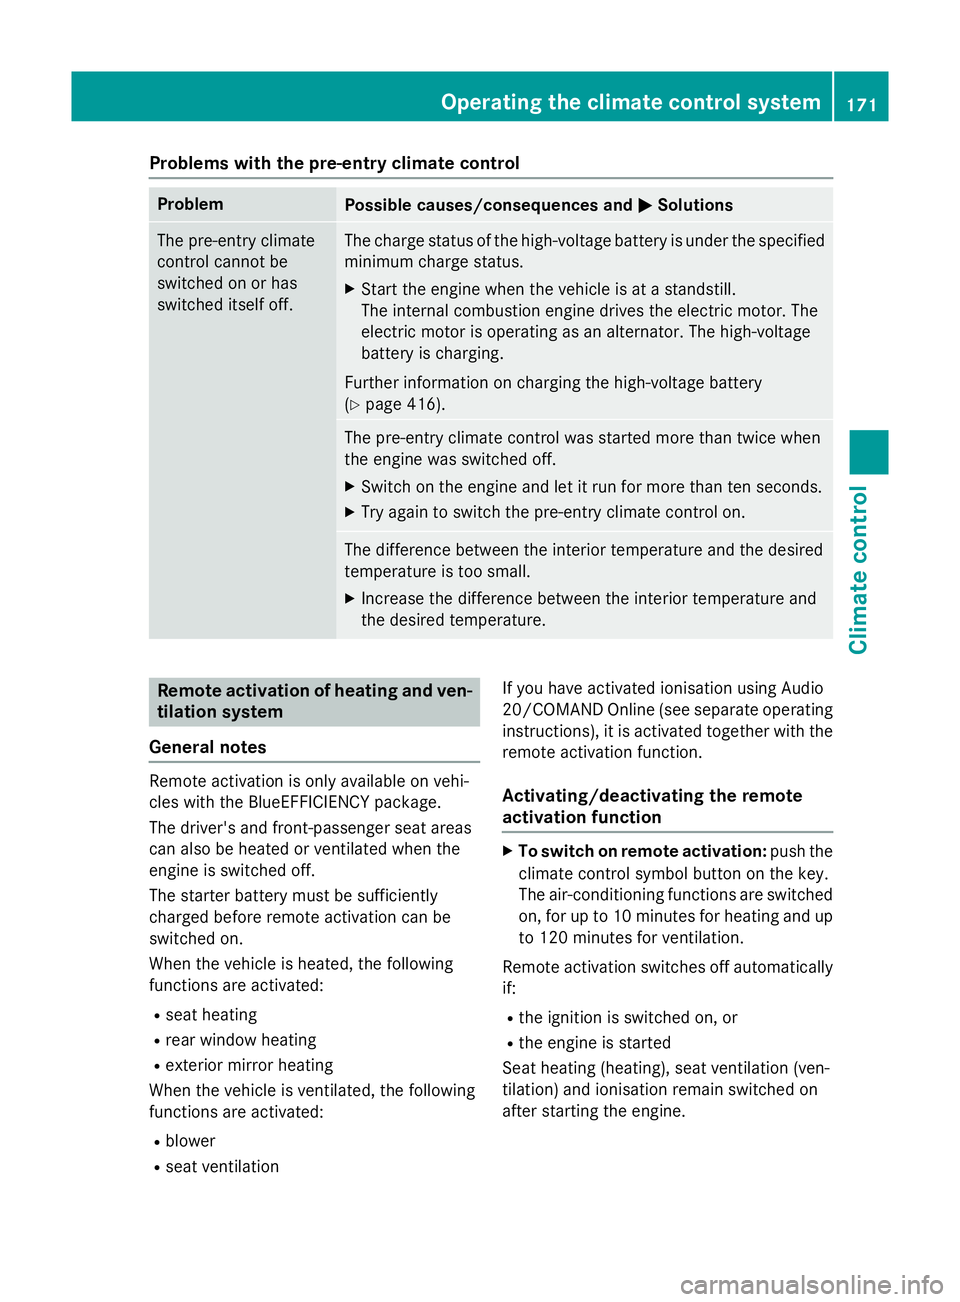
Problems with the pre-entry climate control
Problem
Possible causes/consequences and
M
MSolutions The pre-entry climate
control cannot be
switched on or has
switched itself off. The charge status of the high-voltage battery is under the specified
minimum charge status.
X Start the engine when the vehicle is at a standstill.
The internal combustion engine drives the electric motor. The
electric motor is operating as an alternator. The high-voltage
battery is charging.
Further information on charging the high-voltage battery
(Y page 416). The pre-entry climate control was started more than twice when
the engine was switched off.
X Switch on the engine and let it run for more than ten seconds.
X Try again to switch the pre-entry climate control on. The difference between the interior temperature and the desired
temperature is too small.
X Increase the difference between the interior temperature and
the desired temperature. Remote activation of heating and ven-
tilation system
General notes Remote activation is only available on vehi-
cles with the BlueEFFICIENCY package.
The driver's and front-passenger seat areas
can also be heated or ventilated when the
engine is switched off.
The starter battery must be sufficiently
charged before remote activation can be
switched on.
When the vehicle is heated, the following
functions are activated:
R seat heating
R rear window heating
R exterior mirror heating
When the vehicle is ventilated, the following
functions are activated:
R blower
R seat ventilation If you have activated ionisation using Audio
20/COMAND Online (see separate operating
instructions), it is activated together with the
remote activation function.
Activating/deactivating the remote
activation function X
To switch on remote activation: push the
climate control symbol button on the key.
The air-conditioning functions are switched on, for up to 10 minutes for heating and up
to 120 minutes for ventilation.
Remote activation switches off automatically if:
R the ignition is switched on, or
R the engine is started
Seat heating (heating), seat ventilation (ven-
tilation) and ionisation remain switched on
after starting the engine. Operating the climate control system
171Climate control Z
Page 175 of 489
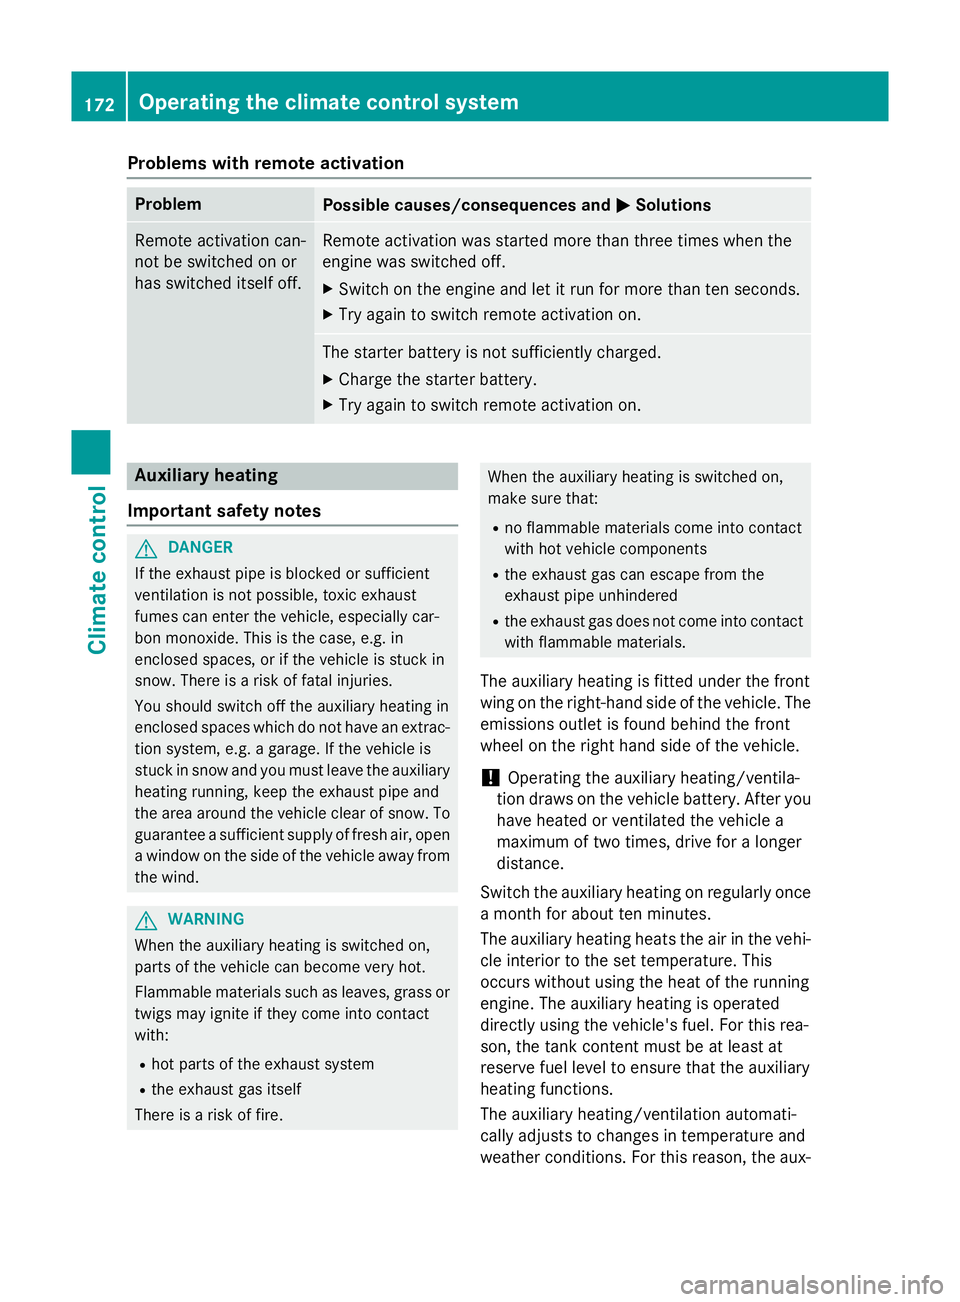
Problems with remote activation
Problem
Possible causes/consequences and
M
MSolutions Remote activation can-
not be switched on or
has switched itself off. Remote activation was started more than three times when the
engine was switched off.
X Switch on the engine and let it run for more than ten seconds.
X Try again to switch remote activation on. The starter battery is not sufficiently charged.
X Charge the starter battery.
X Try again to switch remote activation on. Auxiliary heating
Important safety notes G
DANGER
If the exhaust pipe is blocked or sufficient
ventilation is not possible, toxic exhaust
fumes can enter the vehicle, especially car-
bon monoxide. This is the case, e.g. in
enclosed spaces, or if the vehicle is stuck in
snow. There is a risk of fatal injuries.
You should switch off the auxiliary heating in
enclosed spaces which do not have an extrac- tion system, e.g. a garage. If the vehicle is
stuck in snow and you must leave the auxiliary
heating running, keep the exhaust pipe and
the area around the vehicle clear of snow. To guarantee a sufficient supply of fresh air, open
a window on the side of the vehicle away from the wind. G
WARNING
When the auxiliary heating is switched on,
parts of the vehicle can become very hot.
Flammable materials such as leaves, grass or twigs may ignite if they come into contact
with:
R hot parts of the exhaust system
R the exhaust gas itself
There is a risk of fire. When the auxiliary heating is switched on,
make sure that:
R no flammable materials come into contact
with hot vehicle components
R the exhaust gas can escape from the
exhaust pipe unhindered
R the exhaust gas does not come into contact
with flammable materials.
The auxiliary heating is fitted under the front
wing on the right-hand side of the vehicle. The emissions outlet is found behind the front
wheel on the right hand side of the vehicle.
! Operating the auxiliary heating/ventila-
tion draws on the vehicle battery. After you
have heated or ventilated the vehicle a
maximum of two times, drive for a longer
distance.
Switch the auxiliary heating on regularly once a month for about ten minutes.
The auxiliary heating heats the air in the vehi-
cle interior to the set temperature. This
occurs without using the heat of the running
engine. The auxiliary heating is operated
directly using the vehicle's fuel. For this rea-
son, the tank content must be at least at
reserve fuel level to ensure that the auxiliary
heating functions.
The auxiliary heating/ventilation automati-
cally adjusts to changes in temperature and
weather conditions. For this reason, the aux- 172
Operating the climate control systemClimate control
Page 178 of 489
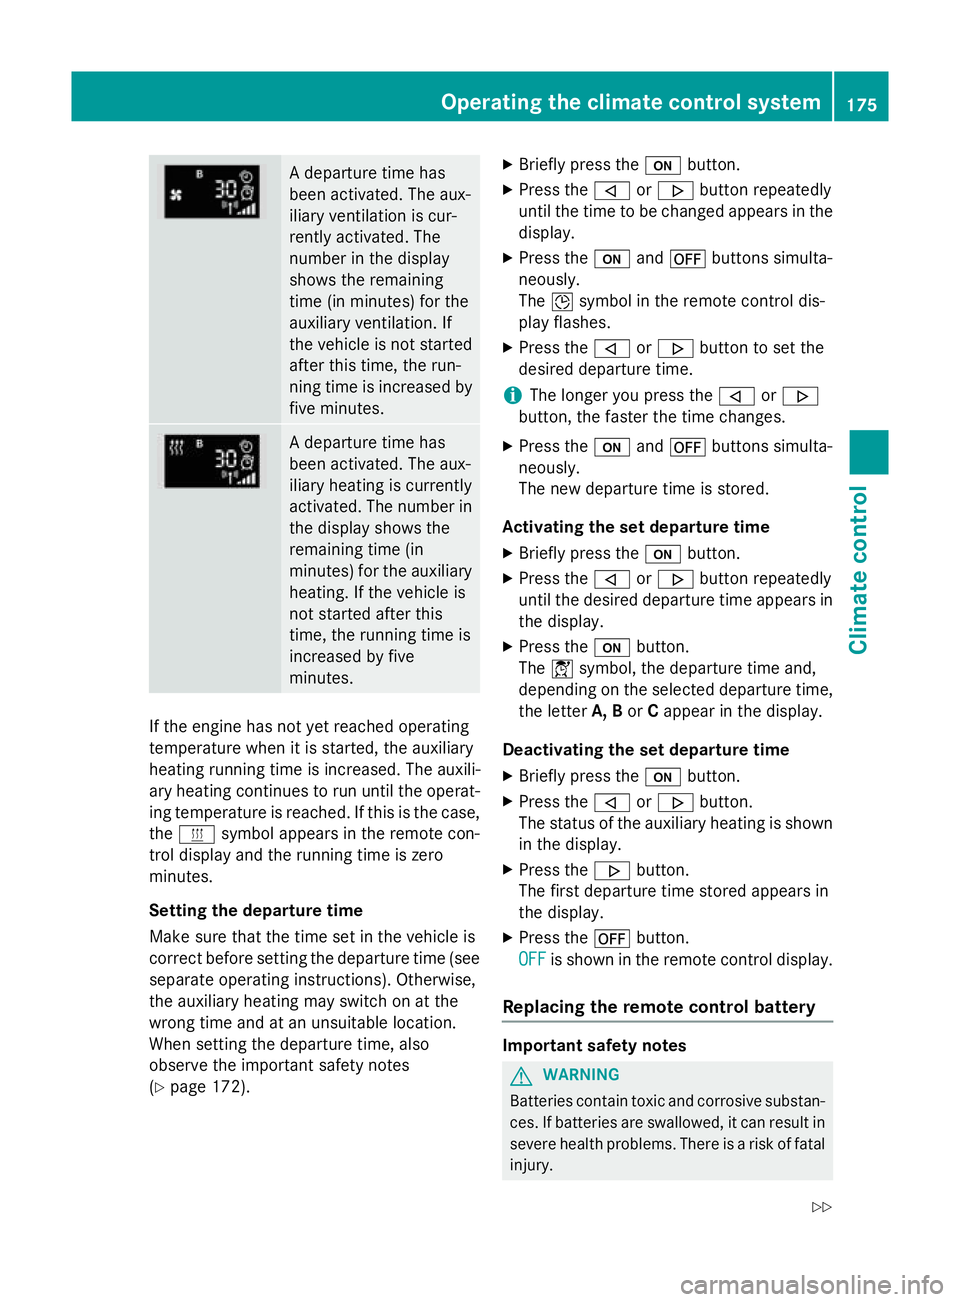
A departure time has
been activated. The aux-
iliary ventilation is cur-
rently activated. The
number in the display
shows the remaining
time (in minutes) for the
auxiliary ventilation. If
the vehicle is not started
after this time, the run-
ning time is increased by
five minutes. A departure time has
been activated. The aux-
iliary heating is currently
activated. The number in
the display shows the
remaining time (in
minutes) for the auxiliary heating. If the vehicle is
not started after this
time, the running time is
increased by five
minutes. If the engine has not yet reached operating
temperature when it is started, the auxiliary
heating running time is increased. The auxili-
ary heating continues to run until the operat- ing temperature is reached. If this is the case,
the y symbol appears in the remote con-
trol display and the running time is zero
minutes.
Setting the departure time
Make sure that the time set in the vehicle is
correct before setting the departure time (see separate operating instructions). Otherwise,
the auxiliary heating may switch on at the
wrong time and at an unsuitable location.
When setting the departure time, also
observe the important safety notes
(Y page 172). X
Briefly press the ubutton.
X Press the ,or. button repeatedly
until the time to be changed appears in the display.
X Press the uand^ buttons simulta-
neously.
The Îsymbol in the remote control dis-
play flashes.
X Press the ,or. button to set the
desired departure time.
i The longer you press the
,or.
button, the faster the time changes.
X Press the uand^ buttons simulta-
neously.
The new departure time is stored.
Activating the set departure time X Briefly press the ubutton.
X Press the ,or. button repeatedly
until the desired departure time appears in the display.
X Press the ubutton.
The Ísymbol, the departure time and,
depending on the selected departure time, the letter A, BorCappear in the display.
Deactivating the set departure time
X Briefly press the ubutton.
X Press the ,or. button.
The status of the auxiliary heating is shown in the display.
X Press the .button.
The first departure time stored appears in
the display.
X Press the ^button.
OFF
OFF is shown in the remote control display.
Replacing the remote control battery Important safety notes
G
WARNING
Batteries contain toxic and corrosive substan- ces. If batteries are swallowed, it can result in
severe health problems. There is a risk of fatal injury. Operating the climate control system
175Climate control
Z
Page 180 of 489
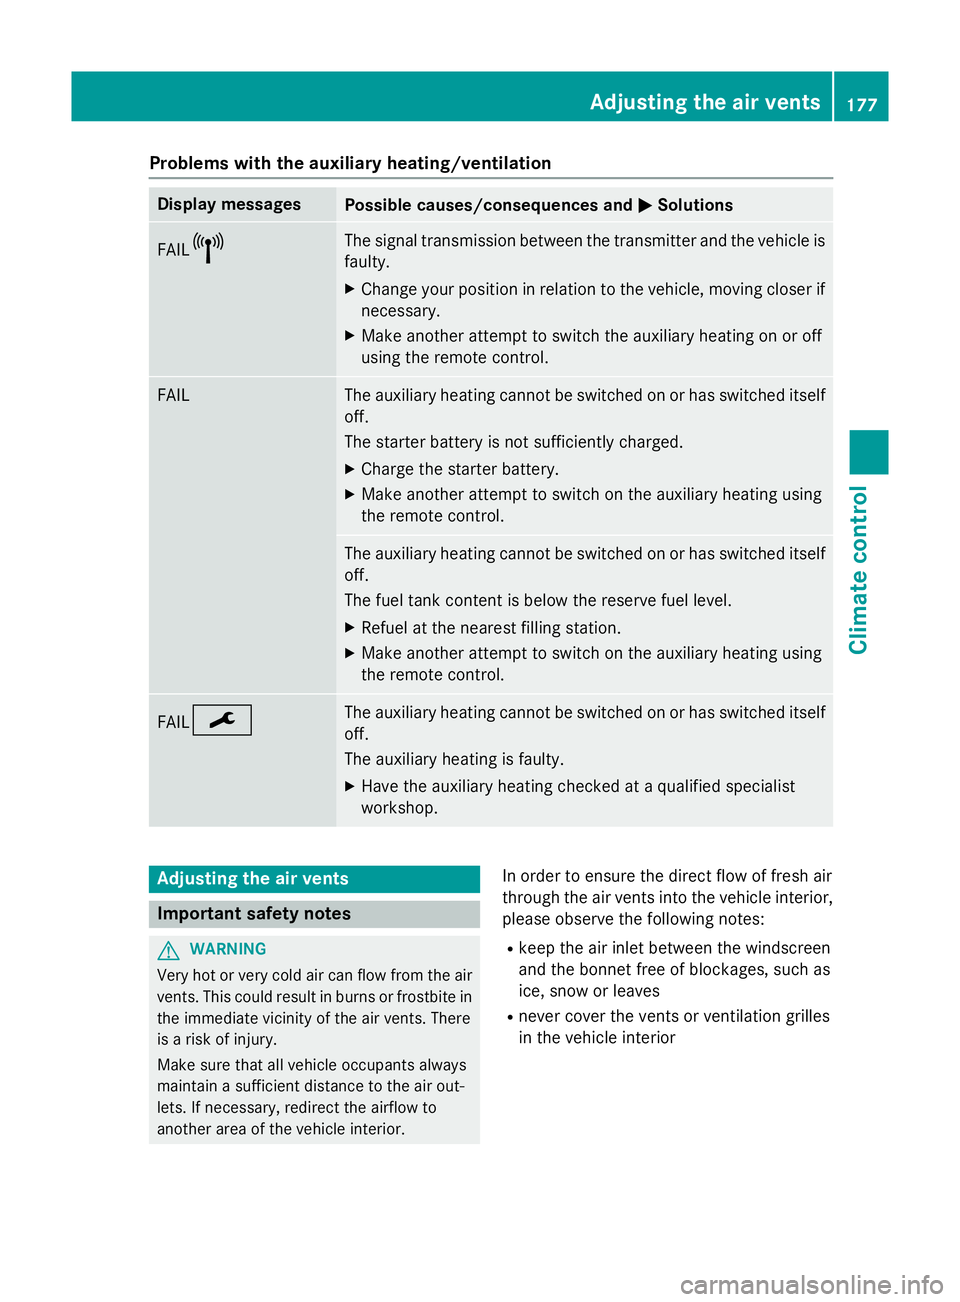
Problems with the auxiliary heating/ventilation
Display messages
Possible causes/consequences and
M
MSolutions FAIL¨ The signal transmission between the transmitter and the vehicle is
faulty.
X Change your position in relation to the vehicle, moving closer if
necessary.
X Make another attempt to switch the auxiliary heating on or off
using the remote control. FAIL The auxiliary heating cannot be switched on or has switched itself
off.
The starter battery is not sufficiently charged.
X Charge the starter battery.
X Make another attempt to switch on the auxiliary heating using
the remote control. The auxiliary heating cannot be switched on or has switched itself
off.
The fuel tank content is below the reserve fuel level.
X Refuel at the nearest filling station.
X Make another attempt to switch on the auxiliary heating using
the remote control. FAIL¯ The auxiliary heating cannot be switched on or has switched itself
off.
The auxiliary heating is faulty.
X Have the auxiliary heating checked at a qualified specialist
workshop. Adjusting the air vents
Important safety notes
G
WARNING
Very hot or very cold air can flow from the air vents. This could result in burns or frostbite in the immediate vicinity of the air vents. There
is a risk of injury.
Make sure that all vehicle occupants always
maintain a sufficient distance to the air out-
lets. If necessary, redirect the airflow to
another area of the vehicle interior. In order to ensure the direct flow of fresh air
through the air vents into the vehicle interior,
please observe the following notes:
R keep the air inlet between the windscreen
and the bonnet free of blockages, such as
ice, snow or leaves
R never cover the vents or ventilation grilles
in the vehicle interior Adjusting the air vents
177Climate control Z
Page 185 of 489
If you lock the vehicle with the key's remote
control or with KEYLESS-GO, after a short
time:
R you will not be able to switch on the ignition
with the Start/Stop button
R you will not be able to start the engine with
the Start/Stop button until the vehicle is
unlocked again
If you lock the vehicle centrally using the but-
ton on the front door (Y page 97), you can
continue to start the engine with the Start/
Stop button.
The engine can be switched off while the vehi-
cle is in motion by pressing and holding the
Start/Stop button for three seconds. This
function operates independently of the ECO
start/stop automatic engine switch-off func-
tion.
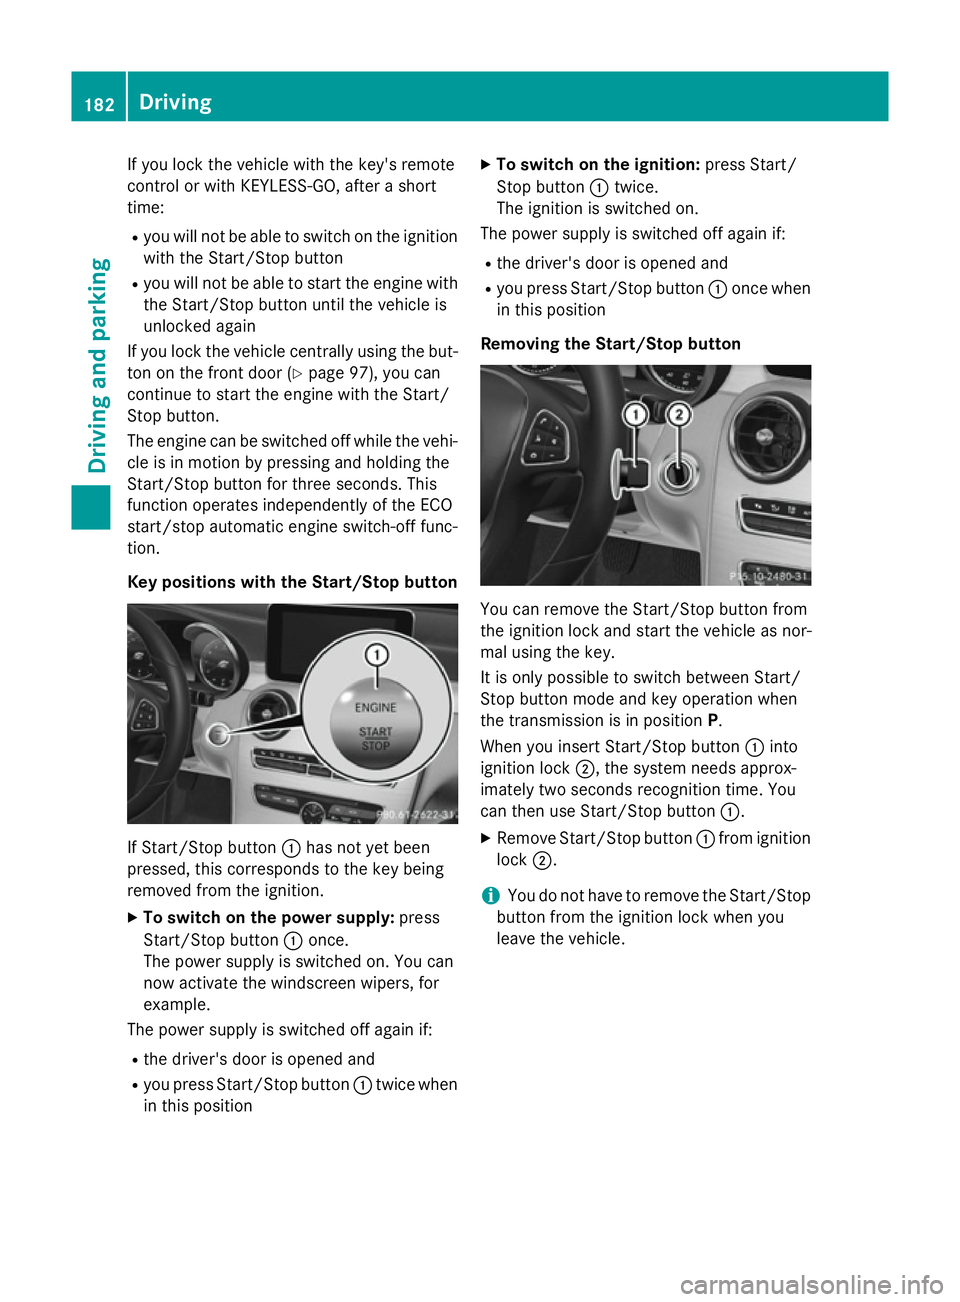
Key positions with the Start/Stop button If Start/Stop button
:has not yet been
pressed, this corresponds to the key being
removed from the ignition.
X To switch on the power supply: press
Start/Stop button :once.
The power supply is switched on. You can
now activate the windscreen wipers, for
example.
The power supply is switched off again if:
R the driver's door is opened and
R you press Start/Stop button :twice when
in this position X
To switch on the ignition: press Start/
Stop button :twice.
The ignition is switched on.
The power supply is switched off again if:
R the driver's door is opened and
R you press Start/Stop button :once when
in this position
Removing the Start/Stop button You can remove the Start/Stop button from
the ignition lock and start the vehicle as nor-
mal using the key.
It is only possible to switch between Start/
Stop button mode and key operation when
the transmission is in position P.
When you insert Start/Stop button :into
ignition lock ;, the system needs approx-
imately two seconds recognition time. You
can then use Start/Stop button :.
X Remove Start/Stop button :from ignition
lock ;.
i You do not have to remove the Start/Stop
button from the ignition lock when you
leave the vehicle. 182
DrivingDriving and parking