page 300 MERCEDES-BENZ C-Class SEDAN 2012 W204 Owner's Manual
[x] Cancel search | Manufacturer: MERCEDES-BENZ, Model Year: 2012, Model line: C-Class SEDAN, Model: MERCEDES-BENZ C-Class SEDAN 2012 W204Pages: 356, PDF Size: 13.49 MB
Page 138 of 356
Useful information
i This Operator's Manual describes all
models and all standard and optional
equipment of your vehicle available at the
time of publication of the Operator's
Manual. Country-specific differences are
possible. Please note that your vehicle may
not be equipped with all features
described. This also applies to safety-
related systems and functions.
i Please read the information on qualified
specialist workshops ( Y page 24).
Breaking-in notes
The first 1000 miles (1500 km)
The more you look after the engine when it is
new, the more satisfied you will be with its
performance in the future.
R Drive at varying vehicle speeds and engine
speeds for the first 1000 miles (1500 km)
for this reason.
R Avoid overstraining the vehicle during this
period, e.g. driving at full throttle.
R Change gear in good time, at the latest
when the tachometer needle is 2
/ 3 of the
way to the red area in the tachometer
display.
R If possible, drive in drive program E (in AMG
vehicles in drive program C) for the first
1000 miles (1500 km).
R Do not manually shift to a lower gear to
brake the vehicle.
R If possible, do not depress the accelerator
pedal past the point of resistance
(kickdown).
R Only select shift ranges 3, 2 or 1 when
driving slowly, e.g. in mountainous terrain.
After 1000 miles (1500 km), you can increase
the engine speed gradually and bring the
vehicle up to full speed.
Additional breaking-in notes for AMG
vehicles:
R do not drive faster than 85 mph
(140 km/h) in the first 1000 miles
(1500 km).
R only allow the engine to reach a maximum
engine speed of 4500 rpm briefly.
R change gear in good time.
i You should also observe these notes on
running in if the engine or parts of the drive
train on your vehicle have been replaced.
i Always observe the respective speed
restrictions.
AMG vehicles with rear axle locking
differential
Your vehicle is equipped with a self-locking
differential on the rear axle. For better
protection of the differential on the rear axle,
carry out an oil change after a breaking-in
phase of 2000 miles (3000 km). This oil
change extends the service life of the
differential. Have the oil change carried out
at a qualified specialist workshop. Mercedes-
Benz recommends that you use an authorized
Mercedes-Benz Center for this purpose.
Driving
Important safety notes
GWARNING
Make sure absolutely no objects are
obstructing the pedals' range of movement.
Keep the driver's footwell clear of all
obstacles. If there are any floormats or
carpets in the footwell, make sure the pedals
still have sufficient clearance.
During sudden driving or braking maneuvers
the objects could get caught between the
pedals. You could then no longer brake or
accelerate. This could lead to accidents and
injury.
136DrivingDriving and parking
Page 153 of 356
C 300 and C 300 Sport with automatic
transmission: you can tell a flexible fuel
vehicle by the label inside the fuel filler flap.
You can find more information under "Fuel"
( Y page 347), or by contacting an
authorized Mercedes-Benz Service Center
or visiting http://www.mbusa.com (USA
only).
Refueling
Fuel filler flap
The fuel filler flap is unlocked or locked
automatically when you open or close the
vehicle with the SmartKey or using KEYLESS-
GO.
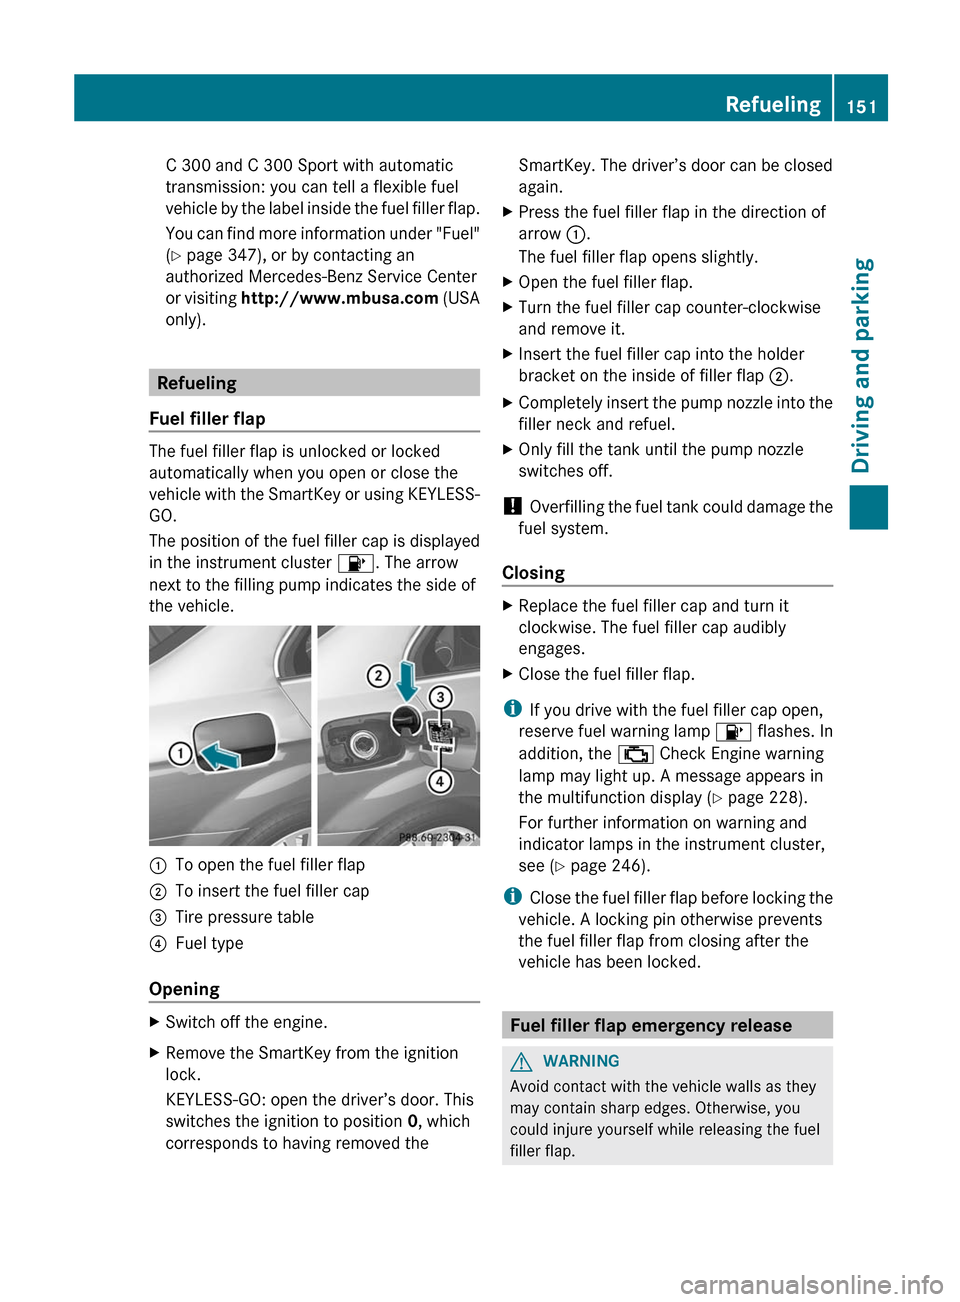
The position of the fuel filler cap is displayed
in the instrument cluster 8. The arrow
next to the filling pump indicates the side of
the vehicle.
:To open the fuel filler flap;To insert the fuel filler cap=Tire pressure table?Fuel type
Opening
XSwitch off the engine.XRemove the SmartKey from the ignition
lock.
KEYLESS-GO: open the driver’s door. This
switches the ignition to position 0, which
corresponds to having removed theSmartKey. The driver’s door can be closed
again.XPress the fuel filler flap in the direction of
arrow :.
The fuel filler flap opens slightly.XOpen the fuel filler flap.XTurn the fuel filler cap counter-clockwise
and remove it.XInsert the fuel filler cap into the holder
bracket on the inside of filler flap ;.XCompletely insert the pump nozzle into the
filler neck and refuel.XOnly fill the tank until the pump nozzle
switches off.
! Overfilling the fuel tank could damage the
fuel system.
Closing
XReplace the fuel filler cap and turn it
clockwise. The fuel filler cap audibly
engages.XClose the fuel filler flap.
i If you drive with the fuel filler cap open,
reserve fuel warning lamp 8 flashes. In
addition, the ; Check Engine warning
lamp may light up. A message appears in
the multifunction display ( Y page 228).
For further information on warning and
indicator lamps in the instrument cluster,
see ( Y page 246).
i Close the fuel filler flap before locking the
vehicle. A locking pin otherwise prevents
the fuel filler flap from closing after the
vehicle has been locked.
Fuel filler flap emergency release
GWARNING
Avoid contact with the vehicle walls as they
may contain sharp edges. Otherwise, you
could injure yourself while releasing the fuel
filler flap.
Refueling151Driving and parkingZ
Page 302 of 356
Mercedes-Benz recommends that you do not
carry out work on batteries yourself, e.g.
removing or charging. Always have this work
performed at a qualified specialist workshop,
e.g. an authorized Mercedes-Benz Center.
i If the power supply has been interrupted,
e.g. if the battery has been reconnected,
you must carry out the following tasks:
R set the clock; see the separate operating
instructions.
R reset the function for automatically
folding the exterior mirrors in/out by
folding the mirrors out once
( Y page 102) 23
Charging the battery
GWARNING
Never charge a battery still installed in the
vehicle unless a battery charger unit approved
by Mercedes-Benz is being used. Gases may
escape during charging and cause explosions
that may result in paint damage, corrosion or
personal injury.
A battery charger unit specially adapted for
Mercedes-Benz vehicles and tested and
approved by Mercedes-Benz is available as an
accessory. It permits the charging of the
battery in its installed position. Contact an
authorized Mercedes-Benz Center for further
information and availability.
Charge the battery in accordance with the
separate instructions for the battery charger.
GWARNING
There is a risk of acid burns during the
charging process due to the gases which
escape from the battery. Do not lean over the
battery during the charging process.
GWARNING
Battery acid is caustic. Avoid contact with the
skin, eyes or clothing.
! Only charge the installed battery with a
battery charger which has been tested and
approved by Mercedes-Benz. These battery
chargers allow the battery to be charged
while still installed.
! Only use battery chargers with a
maximum charging voltage of 14.8 V.
! Only charge the battery using the jump-
starting connection point.
The jump-starting connection point is in the
engine compartment ( Y page 301).XOpen the hood ( Y page 278).XConnect the battery charger to the positive
terminal and earth point in the same order
as when connecting the donor battery in
the jump-starting procedure
( Y page 301).XRead the battery charger's operating
instructions before charging the battery.23 This function is only available in vehicles for Canada.300BatteryBreakdown assistance
Page 331 of 356

Example:
The load bearing index 91 is equivalent to a
maximum load of 1356 lbs (615 kg) that the
tire can carry. For further information on the
maximum tire load in kilograms and pounds,
see ( Y page 325).
For further information on the load bearing
index, see Load index ( Y page 330).
Speed rating: speed rating B specifies the
approved maximum speed of the tire.GWARNING
Even when permitted by law, never operate a
vehicle at speeds greater than the maximum
speed rating of the tires.
Exceeding the maximum speed for which tires
are rated can lead to sudden tire failure,
causing loss of vehicle control and possibly
resulting in an accident and/or serious
personal injury and possible death, for you
and for others.
Regardless of the speed rating always
observe the speed limits. Drive carefully and
adapt your driving style to the traffic
conditions.
Summer tiresIndexSpeed ratingQUp to 100 mph (160 km/h)RUp to 106 mph (170 km/h)SUp to 112 mph (180 km/h)TUp to 118 mph (190 km/h)HUp to 130 mph (210 km/h)VUp to 149 mph (240 km/h)WUp to 168 mph (270 km/h)YUp to 186 mph (300 km/h)ZR...YUp to 186 mph (300 km/h)Summer tiresIndexSpeed ratingZR...(..Y)Above 186 mph (300 km/h)ZRAbove 149 mph (240 km/h)
R Optionally, tires with a maximum speed of
over 149 mph (240 km/h) may have "ZR"
in the size description depending on the
manufacturer (e.g. 245/40 ZR 18).
The service specifications consist of load
bearing index A and speed rating B.
R If the size description of your tire includes
"ZR" and there are no service
specifications, ask the tire manufacturer in
order to find out the maximum speed.
If a service specification is available, the
maximum speed is limited according to the
speed rating in the service specification.
Example: 245/40 ZR 18 97 Y. In this
example, "97 Y" is the service specification.
The letter "Y" represents the speed rating
and the maximum speed of the tire is
limited to 186 mph (300 km/h).
R Every tire that has a maximum speed above
186 mph (300 km/h) must have "ZR" in the
size description and the service
specification must be given in brackets.
Example: 275/40 ZR 18 (99 Y). The speed
rating "(Y)" shows that the maximum speed
of the tire is above 186 mph (300 km/h).
Ask the tire manufacturer to find out the
maximum speed.
All-weather tires and winter tiresIndexSpeed ratingQ M+S 26Up to 100 mph (160 km/h)T M+S26Up to 118 mph (190 km/h)H M+S 26Up to 130 mph (210 km/h)V M+S26Up to 149 mph (240 km/h)26
Or M+S i for winter tires.Tire labeling329Wheels and tiresZ
Page 336 of 356

Traction
Traction is the result of friction between the
tires and the road surface.
Treadwear indicators
Narrow bars (tread wear bars) that are
distributed over the tire tread. If the tire tread
is level with the bars, the wear limit of 1
/ 16 in
(1.6 mm) has been reached.
Occupant distribution
The distribution of occupants in a vehicle at
their designated seating positions.
Total load limit
Rated cargo and luggage load plus
68 kilograms (150 lbs) times the vehicle's
designated seating capacity.
Changing a wheel
Flat tire
The "Breakdown assistance" section
( Y page 293) contains information and notes
on how to deal with a flat tire. It also provides
instructions on changing a wheel or mounting
the spare wheel/emergency spare wheel.
Interchanging the wheels
GWARNING
Rotate front and rear wheels only if the tires
are of the same dimension.
If your vehicle is equipped with mixed-size
tires (different tire dimensions front vs. rear),
tire rotation is not possible.
GWARNING
Have the tightening torque checked after
changing a wheel. Wheels could become
loose if not tightened with a torque of
96 lb-ft (130 Nm).
Only use genuine Mercedes-Benz wheel bolts
specified for your vehicle's rims.
The wear patterns on the front and rear tires
differ, depending on the operating conditions.
Rotate the wheels before a clear wear pattern
has formed on the tires. Front tires typically
wear more on the shoulders and the rear tires
in the center.
If your vehicle's tire configuration allows, you
can rotate the wheels according to the
intervals in the tire manufacturer's warranty
book in your vehicle documents. If this is not
available, the tires should then be replaced
every 3000 to 6000 miles
( 5000 to 10,000 km), or earlier if the tire wear
requires this. Do not change the direction of
wheel rotation.
Clean the contact surfaces of the wheel and
the brake disc thoroughly every time a wheel
is interchanged. Check the tire pressures.
Information on changing a wheel and
mounting the spare wheel ( Y page 293).
! On vehicles equipped with a tire pressure
monitor, electronic components are
located in the wheel.
Tire-mounting tools should not be used
near the valve. This could damage the
electronic components.
Always have the tires changed at a qualified
specialist workshop, e.g. an authorized
Mercedes-Benz Center.
Direction of rotation
Tires with a specified direction of rotation
have additional benefits, e.g. if there is a risk
of hydroplaning. You will only gain these
benefits if the correct direction of rotation is
maintained.
An arrow on the sidewall of the tire indicates
its correct direction of rotation.
334Changing a wheelWheels and tires
Page 344 of 356

Useful information
i This Operator's Manual describes all
models and all standard and optional
equipment of your vehicle available at the
time of publication of the Operator's
Manual. Country-specific differences are
possible. Please note that your vehicle may
not be equipped with all features
described. This also applies to safety-
related systems and functions.
i Please read the information on qualified
specialist workshops ( Y page 24).
Notes on technical data
i The data stated here specifically refers to
a vehicle with standard equipment. Consult
an authorized Mercedes-Benz Center for
the data for all vehicle variants and trim
levels.
Genuine Mercedes-Benz parts
All Mercedes-Benz Centers maintain a supply
of genuine Mercedes-Benz parts for
necessary service and repair work. In
addition, strategically located parts delivery
centers provide for quick and reliable parts
service.
There are more than 300,000 different
genuine Mercedes-Benz parts available for
Mercedes-Benz models.
Genuine Mercedes-Benz parts are subject to
strict quality control. Each part has been
specially developed, manufactured or
selected for Mercedes-Benz vehicles and
fine-tuned for them.
Therefore, only genuine Mercedes-Benz parts
should be used.
GWARNING
Driving safety may be impaired if non-
approved parts, tires and wheels or safety-
relevant accessories are used.
This could lead to malfunctions in safety-
relevant systems, e.g. the brake system. This
could cause you to lose control of your vehicle
and cause an accident.
For this reason, Mercedes-Benz recommends
that you use genuine Mercedes-Benz parts or
parts of equal quality. Only use tires, wheels
and accessories that have been specifically
approved for your vehicle.
! Air bags and Emergency Tensioning
Devices, as well as control units and
sensors for these restraint systems may be
installed in the following areas of your
vehicle:
R doors
R door pillars
R door sills
R seats
R dashboard
R instrument cluster
R center console
Do not install accessories such as audio
systems in these areas. Do not carry out
repairs or welding. You could impair the
operating efficiency of the restraint
systems.
Have aftermarket accessories installed at
a qualified specialist workshop. Mercedes-
Benz recommends that you use an
authorized Mercedes-Benz Center for this
purpose.
HEnvironmental note
Daimler AG also supplies reconditioned major
assemblies and parts which are of the same
quality as new parts. They are covered by the
same Limited Warranty entitlements as new
parts.
Always specify the vehicle identification
number (VIN) ( Y page 343) and the engine
342Genuine Mercedes-Benz partsTechnical data
Page 348 of 356

Capacities
Missing values were not available at time of going to print.ModelCapacityFuel, coolant,
lubricants, etc.Engine oil and
filterC 2505.8 US qt (5.5 l)Approved engine
oilsC 250 4MATIC 31
C 300 4MATIC7.4 US qt (7.0 l)C 350
C 350 4MATIC 31C 63 AMG329.0 US qt (8.5 l)Cooling systemC 250Approximately 7.6 US qt
(7.2 l)MB 325.0 or
MB 326.0
antifreeze/
corrosion inhibitorC 250 4MATIC 31
C 300 4MATICApproximately 8.9 US qt
(8.4 l)C 350
C 350 4MATIC 31C 63 AMGApproximately 12.4 US qt
(11.7 l)Tank capacityC 25015.6 US gal (59.0 l)Premium-grade
unleaded gasoline
(at least 91 octane,
average value
between 96 RON/
86 MON)All models except
C 25017.4 US gal (66.0 l)ReserveAll models except
AMG vehiclesApproximately 2.1 US gal
(8.0 l)C 63 AMGApproximately 3.7 US gal
(14.0 l)Windshield/
headlamp
cleaning
systemC 250
C 350
C 350 4MATIC 31
C 63 AMG3.7 US qt (3.5 l)MB windshield
washer
concentrate 33
( Y page 351)
Mixing ratio for
washer fluid
( Y page 351)C 250 4MATIC 31
C 300 4MATIC6.3 US qt (6.0 l)31 Canada only.
32 Including external oil cooler.
33 Mixed with water or premixed washer fluid with antifreeze protection.346Service products and capacitiesTechnical data