hood open MERCEDES-BENZ C-Class SEDAN 2013 W204 Owner's Manual
[x] Cancel search | Manufacturer: MERCEDES-BENZ, Model Year: 2013, Model line: C-Class SEDAN, Model: MERCEDES-BENZ C-Class SEDAN 2013 W204Pages: 358, PDF Size: 4.85 MB
Page 13 of 358
Installing/removing (rear)
................99
Luxury .............................................. 98
see NECK-PRO head restraints/
NECK-PRO luxury head restraints
Heating
see Climate control
High-beam headlamps
Changing bulbs .............................. 118
Display message ............................ 225
Switching Adaptive Highbeam
Assist on/off ................................. 114
Switching on/off ........................... 113
Hill start assist .................................. 144
HOLD function Deactivating ................................... 177
Display message ............................ 231
Function/notes ............................. 176
Hood
Closing .......................................... .284
Display message ............................ 239
Important safety notes ..................283
Opening ......................................... 284
Hydroplaning ..................................... 164I
Ignition lock see Key positions
Immobilizer .......................................... 71
Indicator lamps see Warning and indicator lamps
Instrument cluster
Overview .......................................... 31
Settings ......................................... 209
Warning and indicator lamps ...........32
Instrument cluster lighting ..............198
Interior lighting ................................. 115
Automatic control ..........................116
Delayed switch-off (on-board
computer) ...................................... 210
Emergency lighting ........................116
Manual control ............................... 116
Overview ........................................ 115
Reading lamp ................................. 115 J
Jack Storage location ............................ 296
Using ............................................. 335
Jump starting (engine) ......................302 K
KEYLESS-GO Convenience closing feature ............87
Display message ............................ 240
Locking ............................................ 75
Start/Stop button .......................... 142
Starting the engine ........................143
Unlocking ......................................... 75
Keyp ositions
KEYLESS-GO .................................. 142
SmartKey ....................................... 141
Kickdown
Driving tips .................................... 150
Manual drive program ....................154
Knee bag .............................................. 44 L
Lamps see Warning and indicator lamps
Lane Keeping Assist
Activating/deactivating .................208
Display message ............................ 231
Function/informatio n.................... 188
Lane Tracking package .....................186
Lap time (RACETIMER) ......................213
LATCH-type (ISOFIX) child seat
anchors ................................................ 61
Light function ,active
Display message ............................ 226
Lighting
Ligh tswitc h................................... 110
Lights
Activating/deactivating the
interio rlighting delayed switch-off .210
Active light function .......................113
Automatic headlamp mode ............111
Cornering light function .................114
Display message ............................ 224
Driving abroad ............................... 110
Fog lamps ...................................... 111 Index
11
Page 32 of 358
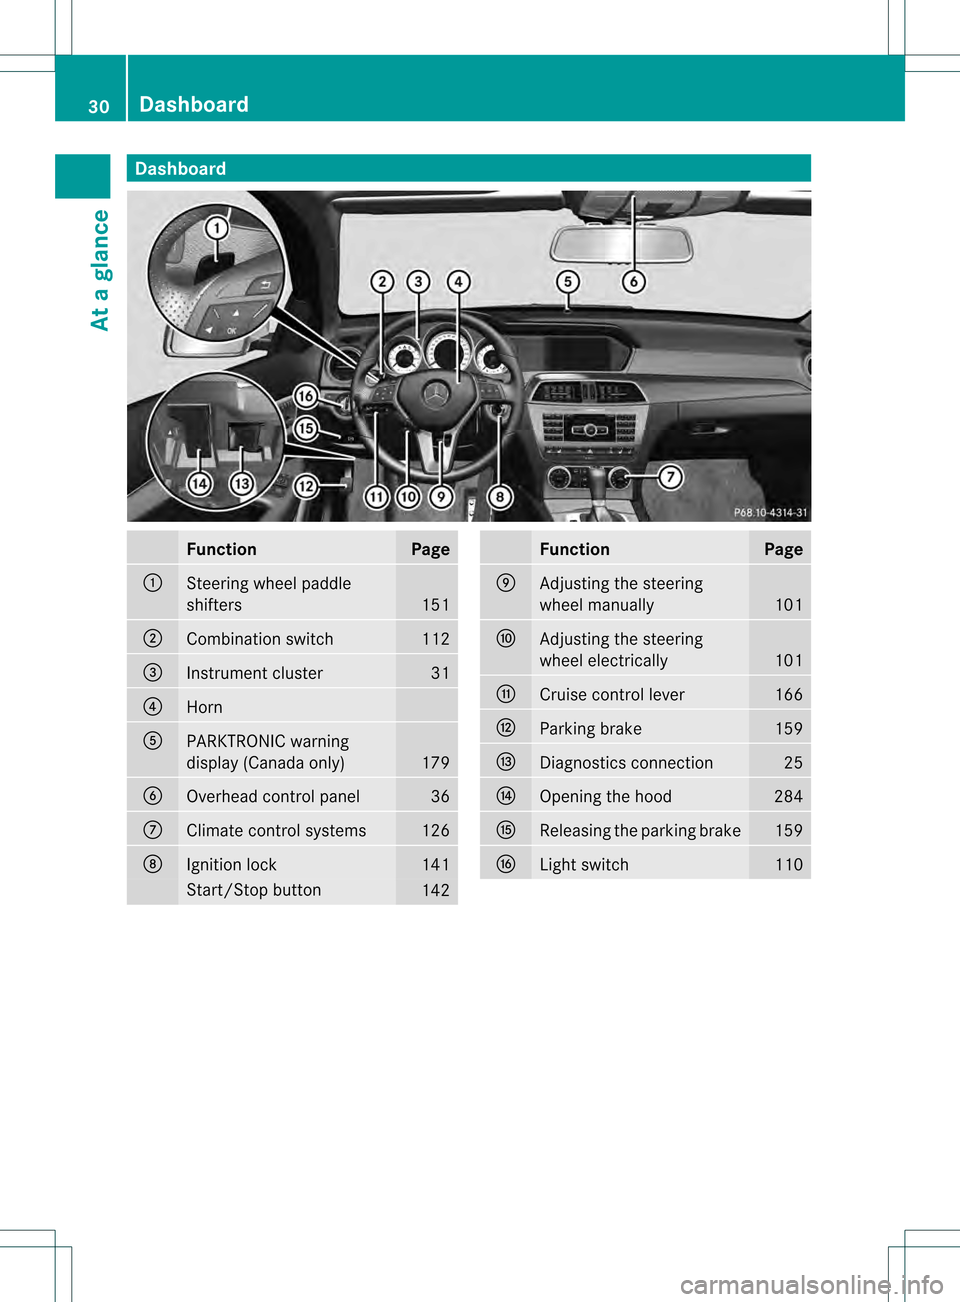
Dashboard
Function Page
0002
Steering wheel paddle
shifters
151
0003
Combination switch 112
0022
Instrument cluster 31
0021
Horn
001F
PARKTRONIC warning
display (Canada only)
179
0020
Overhead control panel 36
0012
Climate control systems 126
0013
Ignition lock 141
Start/Stop button
142 Function Page
0014
Adjusting the steering
wheel manually 101
0015
Adjusting the steering
wheel electrically 101
0016
Cruise control lever 166
0018
Parking brake 159
0019
Diagnostics connection 25
001A
Opening the hood 284
001B
Releasing the parking brake 159
001D
Light switch 11030
Dashboa
rdAt a glance
Page 73 of 358
In particular, the detection of obstacles can
be impaired if:
R dirt on the sensors or anything else
covering the sensors
R snow or heavy rain
R interference by other radars ources
R there are strong radar reflections, for
example in parking garages
R a narrow vehicle traveling in front, e.g. a
motorbike
R a vehicle traveling in front on a different line
relative to the center of your vehicle G
WARNING
PRE-SAFE ®
Brake does not react:
R to people or animals
R to oncoming vehicles
R to crossing traffic
R when cornering
As a result, PRE-SAFE ®
Brake may neither
give warnings nor intervene in all critical
situations. There is a risk of an accident.
Always pay careful attention to the traffic
situation and be ready to brake.
In order to maintain an appropriate distance
from the vehicle in front and thus prevent a
collision, you must apply the brakes yourself.
X To activate/deactivate: activate or
deactivate PRE-SAFE ®
Brake in the on-
board computer (Y page 207).
When PRE-SAFE ®
Brake is activated, the
0001 symbol appears in the multifunction
display as long as the HOLD function is
deactivated (Y page 176).
On vehicles with Parking Guidance, the
0001 symbol is displayed when position P
is engaged or you are driving faster than
22 mph (35 km/h).
Following damage to the front end of the
vehicle, have the configuration and operation
of the radar sensors checked at a qualified
specialist workshop. This also applies to collisions at low speeds where there is no
visible damage to the front of the vehicle. Theft deterrent locking system
Immobilizer
The immobilizer prevents your vehicle from
being started without the correct SmartKey.
When leaving the vehicle, always take the
SmartKey with you and lock the vehicle. The
engine can be started by anyone with a valid
SmartKey that is left inside the vehicle.
X To activate with the SmartKey: remove
the SmartKey from the ignition lock.
X To activate with KEYLESS-GO: switch the
ignition off and open the driver's door.
X To deactivate: switch on the ignition.
i The immobilizer is always deactivated
when you start the engine.
In the event that the engine cannot be
started when the starter battery is fully
charged, the immobilizer may be faulty.
Contact an authorized Mercedes-Benz
Center or call 1-800-FOR-MERCedes (in the
USA) or 1-800-387-0100 (in Canada). ATA (anti-theft alarm system)
Av isual and audible alarm is triggered if the
alarm system is armed and you open:
R a door
R the vehicle with the mechanical key
R the trunk lid
R the hood
The alarm is not switched off, even if you
close the open door that triggered it, for
example. Theft deterrent locking system
71Safety Z
Page 120 of 358

Changing the front bulbs
Low-bea mheadlamps (halogen
headlamps) G
WARNING
These bulbs are pressurized.
They can explode when being changed if:
R they are still hot
R they hit an object when being removed
R they are dropped
There is a risk of injury.
You should wear eye protection and clean
gloves when you are changin gabulb. If
necessary, have bulbs changed at a qualified
specialist workshop. X
Switch off the lights.
X Open the hood.
X Turn housing cover 0002counter-clockwise
and pull it out.
X Turn bulb holder 0003counter-clockwise and
pull it out.
X Take the bulb out of bulb holder 0003.
X Inser tthe new bulb into bulb holder 0003.
X Insert bulb holder 0003into the lamp and turn
it clockwise.
X Align housing cover 0002and turn it
clockwise until it engages. High-beam headlamps (halogen
headlamps) G
WARNING
These bulbs are pressurized.
They can explode when being changed if:
R they are still hot
R they hit an object when being removed
R they are dropped
There is a risk of injury.
You should wear eye protection and clean
gloves when you are changing a bulb. If
necessary, have bulbs changed at a qualified
specialist workshop. X
Switch off the lights.
X Open the hood.
X Turn housing cover 0002counter-clockwise
and pull it out.
X Turn bulb holder 0003counter-clockwise and
pull it out.
X Take the bulb out of bulb holder 0003.
X Insert the new bulb into bulb holder 0003.
X Insert bulb holder 0003into the lamp and turn
it clockwise.
X Align housing cover 0002and turn it
clockwise until it engages. 118
Replacing bulbsLights and windshield wipers
Page 121 of 358

Parking lamps/standing lamps
(halogen headlamps)
X
Switch off the lights.
X Open the hood.
X Turn housing cover 0002counter-clockwise
and pull it out.
X Pull out bulb holder 0003.
X Take the bulb out of bulb holder 0003.
X Insert the new bulb into bulb holder 0003.
X Insert bulb holder 0003.
X Align housing cover 0002and turn it
clockwise until it engages.
Cornering light function (Bi-Xenon
headlamps) G
WARNING
These bulbs are pressurized.
They can explode when being changed if:
R they are still hot
R they hit an object when being removed
R they are dropped
There is a risk of injury.
You should wear eye protection and clean
gloves when you are changing a bulb. If
necessary, have bulbs changed at a qualified
specialist workshop. X
Switch off the lights.
X Open the hood.
X Turn housing cover 0002counter-clockwise
and pull it out.
X Turn bulb holder 0003counter-clockwise and
pull it out.
X Take the bulb out of bulb holder 0003.
X Insert the new bulb into bulb holder 0003.
X Insert bulb holder 0003into the lamp and turn
it clockwise.
X Align housing cover 0002and turn it
clockwise until it engages. Changing the rear bulbs
Opening and closing the side trim
panels You must open the side trim panel in the trunk
and remove the first-aid kit before you can
change the bulbs in the tail lamps.
Right-hand side trim panel Replacing bulbs
119Lights and windshieldw ipers Z
Page 123 of 358

Windshield wipers
Switching the windshield wipers on/
off
! Do not operate the windshield wipers
whe nthe windshield is dry, as this could
damage the wiper blades. Moreover, dust
that has collected on the windshield can
scratch the glass if wiping takes place when
the windshield is dry.
! If the windshield wipers leave smears on
the windshield after the vehicle has been
washed in an automatic car wash, wax or
other residues may be the reason for this.
Cleant he windshield using washer fluid
after washing the vehicle in an automatic
car wash. Combination switch
0005
0008 Windshield wiper off
0006 0001 Intermittent wipe, low 5
0007 0002 Intermittent wipe, high 6
000B 0016 Continuous wipe, slow
000C 0010 Continuous wipe, fast
0020 0005 Single wipe/0006 To wipe the
windshield using washer fluid
X Switch on the ignition.
X Turn the combination switch to the
corresponding position.
! Intermittent wiping with rain sensor: due
to optical influences and the windshield
becoming dirty in dry weather conditions, the windshield wipers may be activated
inadvertently. This could then damage the
windshield wiper blades or scratch the
windshield.
For this reason, you should always switch
off the windshield wipers in dry weather.
In the 0001or0002 position, the appropriate
wiping frequency is set automatically
according to the intensity of the rain. In
the 0002 position, the rain sensor is more
sensitive than in the 0001position, causing
the windshield wipers to wipe more
frequently.
If the wiper blades are worn, the windshield
will no longer be wiped properly. This could
prevent you from observing the traffic
conditions. Replace the wiper blades twice a
year, ideally in spring and fall. Replacing the wiper blades
Important safety notes G
WARNING
If the windshield wipers begin to move while
you are changing the wiper blades, you could
be trapped by the wiper arm. There is a risk
of injury.
Always switch off the windshield wipers and
ignition before changing the wiper blades.
! Never open the hood if a windshield wiper
arm has been folded away from the
windshield.
Never fold a windshield wiper arm without
a wiper blade back onto the windshield.
Hold the windshield wiper arm firmly when
you change the wiper blade. If you release
the windshield wiper arm without a wiper
blade and it falls onto the windshield, the
windshield may be damaged by the force of
the impact.
5 Rain sensor set to low sensitivity.
6 Rain sensor set to high sensitivity. Windshield wipers
121Lights and windshield wipers Z
Page 139 of 358

X
Turn the SmartKey to position 0in the
ignition lock (Y page 141) or remove it.
X To activate: press the0002button.
The indicator lamp in the 0002button lights
up.
i If the residual heat function is activated,
the windows may fog up on the inside.
X To deactivate: press the0002button.
The indicator lamp in the 0002button goes
out.
i Residual heat is deactivated
automatically:
R after approximately 30 minutes
R when the ignition is switched on
R if the battery voltage drops
R when the auxiliary heating is activated Setting the air vents
Important safety notes
G
WARNING
Very hot or very cold air can flow from the air
vents. This could result in burns or frostbite in
the immediate vicinity of the air vents. There
is a risk of injury.
Make sure that all vehicle occupants always
maintain a sufficient distance to the air
outlets. If necessary, redirect the airflow to
another area of the vehicle interior.
In order to ensure the direct flow of fresh air
through the air vents into the vehicle interior,
please observe the following notes:
R keep the air inlet between the windshield
and the hood free of blockages, such as ice,
snow or leaves.
R never cover the air vents or air intake grilles
in the vehicle interior.
i For virtually draft-free ventilation, adjust
the sliders of the air vents to the center
position. Setting the center air vents
0002
Center air vent, left
0003 Center air vent, right
0022 Center vent thumbwheel, right
0021 Center vent thumbwheel, left
X To open/close: turn thumbwheels 0022
and 0021up or down. Setting the side air vents
0002
Side window defroster vent
0003 Side air vent
0022 Control for side air vent
X To open/close: turn thumbwheel 0022to the
left or right. Setting the glove box air vent
When automatic climate control is activated,
the glove box can be ventilated, for instance
to cool its contents. The level of airflow Setting the air vents
137Climate control Z
Page 173 of 358
Stopping
G
WARNING
When leaving the vehicle, even if it is braked
only by DISTRONIC PLUS, it could roll away if:
R there is a malfunction in the system or in
the voltage supply.
R DISTRONIC PLUS has been deactivated
with the cruise control lever, e.g. by a
vehicle occupant or from outside the
vehicle.
R the electrical system in the engine
compartment, the battery or the fuses have
been tampered with.
R the battery is disconnected.
R the accelerator pedal has been depressed,
e.g. by a vehicle occupant.
There is a risk of an accident.
If you wish to exit the vehicle, always turn off
DISTRONIC PLUS and secure the vehicle
against rolling away.
Deactivating DISTRONIC PLUS
(Y page 173).
If DISTRONIC PLUS detects that the vehicle
in front is stopping, it brakes your vehicle until
it is stationary.
Once your vehicle is stationary, it remains
stationary and you do not need to depress the
brake.
i Depending on the specified minimum
distance, your vehicle will come to a
standstill at a sufficient distance behind the
vehicle in front.T he specified minimum
distance is set using the control on the
cruise control lever.
You will see a warning message in the
multifunction display if DISTRONIC PLUS is
activated and:
R the driver's door is open and the driver's
seat belt is unfastened.
R the engine is switched off.
R the hood is opened.
Shift to 'P' X
Shift the transmission to position Pto
prevent the vehicle from rolling away.
DISTRONIC PLUS is deactivated. The
warning message in the multifunction
display disappears.
The horn will also sound at regular intervals if
DISTRONIC PLUS is activated and you:
R switch the engine off, open the driver's
door and remove your seat belt
R open the hood
The sounding of the horn alerts you to the fact
that the vehicle has been parked while
DISTRONIC PLUS is still activated. The sound
becomes louder if you attempt to lock the
vehicle. The vehicle is not locked until
DISTRONIC PLUS is deactivated.
i If the engine has been switched off, it
cannot be started again until DISTRONIC
PLUS has been deactivated.
If DISTRONIC PLUS is activated and a
malfunction occurs in the system or if there
is a disruption in the power supply, the
Brake Immediately message is shown in
the multifunction display. Depress the brake
firmly immediately until the warning message
disappears from the multifunction display or
shift the transmission to position P.
DISTRONIC PLUS is then deactivated.
Setting aspeed X
Press the cruise control lever up 0002for a
highe rspeed or down 0003for a lower speed.
X To adjust the set speed in 1 mph
increments (1 km/h increments): briefly
press the cruise control lever up 0002or
down 0003to the pressure point.
Every time the cruise control lever is
pressed up 0002or down 0003the last speed
stored is increased or reduced.
X To adjust the set speed in 5 mph
increments (10 km/h increments):
briefly press the cruise control lever Driving systems
171Driving and parking Z
Page 179 of 358
Activation conditions
You can activate the HOLD function if:
R
the vehicle is stationary
R the engine is running or if it has been
automatically switched off by the ECO
start/stop function
R the driver's door is closed or your seat belt
is fastened
R the parking brake is released
R the hood is closed
R the transmission is in position D,Ror N
R DISTRONIC PLUS is deactivated
Activating the HOLD function X
Make sure that the activation conditions
are met.
X Depress the brake pedal.
X Quickly depress the brake pedal further
until 0001 appears in the multifunction
display.
The HOLD function is activated. You can
release the brake pedal.
i If depressing the brake pedal the first
time does not activate the HOLD function,
wait briefly and then try again.
Deactivating the HOLD function The HOLD function is deactivated
automatically if:
R
you accelerate and the transmission is in
position Dor R
R the transmission is in position P.
R you depress the brake pedal again with a
certain amoun tofpressure until 0001
disappears from the multifunction display
R you activate DISTRONIC PLUS
You will see a warning message in the
multifunction display if the HOLD function is
activated and: R
the driver's door is open and the driver's
seat belti s unfastened.
R the engine is switched off, unless it is
automatically switched off by the ECO
start/stop function.
R the hood is opened.
Shift to 'P' X
Shift the transmission to position Pto
prevent the vehicle from rolling away.
The HOLD function is deactivated. The
warning message in the multifunction
display disappears.
The horn will also sound at regulari ntervals if
the HOLD function is activated and you:
R switch the engine off, open the driver's
door and remove your sea tbelt
R open the hood
The sounding of the horn alerts you to the fact
that the vehicle has been parked while the
HOLD function is still activated. If you attempt
to lock the vehicle, the tone becomes louder.
The vehicle is not locked until the HOLD
function is deactivated.
i If the engine has been switched off, it
cannot be started again until the HOLD
function has been deactivated.
If there is a malfunction in the system or
power supply while the HOLD function is
activated, the Brake Immediately message
is shown in the multifunction display.
Immediately depress the brake firmly until
the warning message in the multifunction
display goes out.
You can also shift the transmission to position
P. This deactivates the HOLD function. RACE START
Important safety notes i
Observe the safety notes for the SPORT
handling mode (Y page 68).
RACE START is intended solely for activation
on dedicated race circuits. Always adapt your Driving systems
177Driving and parking Z
Page 200 of 358
Useful information
i This Operator's Manual describes all
models and all standard and optional
equipment of your vehicle available at the
time of publication of the Operator's
Manual. Country-specific differences are
possible. Please note that your vehicle may
not be equipped with all features
described. This also applies to safety-
related systems and functions.
i Read the information on qualified
specialist workshops: (Y page 25).Important safety notes
G
WARNING
If you operate information systems and
communication equipment integrated in the
vehicle while driving, you will be distracted
from traffic conditions. You could also lose
control of the vehicle. There is a risk of an
accident.
Only operate the equipment when the traffic
situatio npermits .Ifyou are not sure that this
is possible, park the vehicle paying attention
to traffic conditions and operate the
equipment when the vehicle is stationary. G
WARNING
If the instrument cluster has failed or
malfunctioned, you may not recognize
function restrictions in systems relevant to
safety. The operating safety of your vehicle
may be impaired. There is a risk of an
accident.
Drive on carefully. Have the vehicle checked
at a qualified specialist workshop
immediately.
You must observe the legal requirements for
the country in which you are currently driving
when operating the on-board computer.
The on-board computer only shows messages
or warnings from certain systems in the multifunction display
.You should therefore
make sure your vehicle is operating safely at
all times. Otherwise, a vehicle that is not
operating safely may cause an accident.
For an overview, see the instrument panel
illustration (Y page 31). Displays and operation
Instrument cluster lighting
The lighting in the instrument cluster, in the
displays and the controls in the vehicle
interior can be adjusted using the brightness
control knob.
The brightness control knob is located on the
bottom left of the instrument cluster
(Y page 31).
X Turn the brightness control knob clockwise
or counter-clockwise.
If the light switch is set to 0004,0014or
000B, the brightness is dependent upon
the brightness of the ambient light.
i The light sensor in the instrument cluster
automatically controls the brightness of
the multifunction display.
In daylight, the displays in the instrument
cluster are not illuminated. Coolant temperature display
G
WARNING
Opening the hood when the engine is
overheated or when there is a fire in the
engine compartment could expose you to hot
gases or other service products. There is a
risk of injury.
Let an overheated engine cool down before
opening the hood. If there is a fire in the
engine compartment, keep the hood closed
and contact the fire department.
The coolant temperature gauge is in the
instrument cluster on the left-hand side. 198
Displays and operationOn-board computer and displays