Operator MERCEDES-BENZ C-Class SEDAN 2015 W205 Owner's Guide
[x] Cancel search | Manufacturer: MERCEDES-BENZ, Model Year: 2015, Model line: C-Class SEDAN, Model: MERCEDES-BENZ C-Class SEDAN 2015 W205Pages: 406, PDF Size: 7.62 MB
Page 188 of 406
Change into a lower gear in good time on long
and steep downhill gradients. This is espe-
cially important if the vehicle is laden. By
doing so, you will make use of the braking
effect of the engine. This relieves the load on
the brake system and prevents the brakes
from overheating and wearing too quickly.
If DISTRONIC PLUS detects that there is a risk of a collision, you will be warned visually and
acoustically. DISTRONIC PLUS cannot pre-
vent a collision without your intervention. An
intermittent warning tone will then sound and the distance warning lamp will light up in the
instrument cluster. Brake immediately in
order to increase the distance to the vehicle
in front or take evasive action provided it is
safe to do so.
DISTRONIC PLUS operates in range between 0 mph (0 km/h) and 120 mph (200 km/h).
Do not use DISTRONIC PLUS while driving onroads with steep gradients.
As DISTRONIC PLUS transmits radar waves, it
can resemble the radar detectors of the
responsible authorities. You can refer to the
relevant chapter in the Operator's Manual if
questions are asked about this.
i USA only: This device has been approved
by the FCC as a "Vehicular Radar System".
The radar sensor is intended for use in an
automotive radar system only. Removal,
tampering, or altering of the device will void
any warranties, and is not permitted by the
FCC. Do not tamper with, alter, or use in
any non-approved way.
Any unauthorized modification to this
device could void the user's authority to
operate the equipment.
i Canada only: This device complies with
RSS-210 of Industry Canada. Operation is
subject to the following two conditions:
1. This device may not cause harmful inter-
ference, and
2. this device must accept any interference received, including interference that may
cause undesired operation of the device. Removal, tampering, or altering of the
device will void any warranties, and is not
permitted. Do not tamper with, alter, or use
in any non-approved way.
Any unauthorized modification to this
device could void the user's authority to
operate the equipment.
Important safety notes G
WARNING
DISTRONIC PLUS does not react to:
R people or animals
R stationary obstacles on the road, e.g. stop-
ped or parked vehicles
R oncoming and crossing traffic
As a result, DISTRONIC PLUS may neither give
warnings nor intervene in such situations.
There is a risk of an accident.
Always pay careful attention to the traffic sit- uation and be ready to brake. G
WARNING
DISTRONIC PLUS cannot always clearly iden- tify other road users and complex traffic sit-
uations.
In such cases, DISTRONIC PLUS may:
R give an unnecessary warning and then
brake the vehicle
R neither give a warning nor intervene
R accelerate or brake unexpectedly
There is a risk of an accident.
Continue to drive carefully and be ready to
brake, in particular when warned to do so by
DISTRONIC PLUS. G
WARNING
DISTRONIC PLUS brakes your vehicle with up to 50 %of the maximum possible deceleration.
If this braking force is insufficient, DISTRONIC
PLUS warns you visually and audibly. There is a risk of an accident.
In such cases, apply the brakes yourself and
try to take evasive action. 186
Driving systemsDriving and parking
Page 210 of 406
Activating/deactivating the rear view
camera X
To activate: make sure that the SmartKey
is in position 2in the ignition lock.
X Make sure that the Activation by R
Activation by R
gear
gear function is selected in Audio 20/
COMAND; see the Digital Operator's Man-
ual.
X Engage reverse gear.
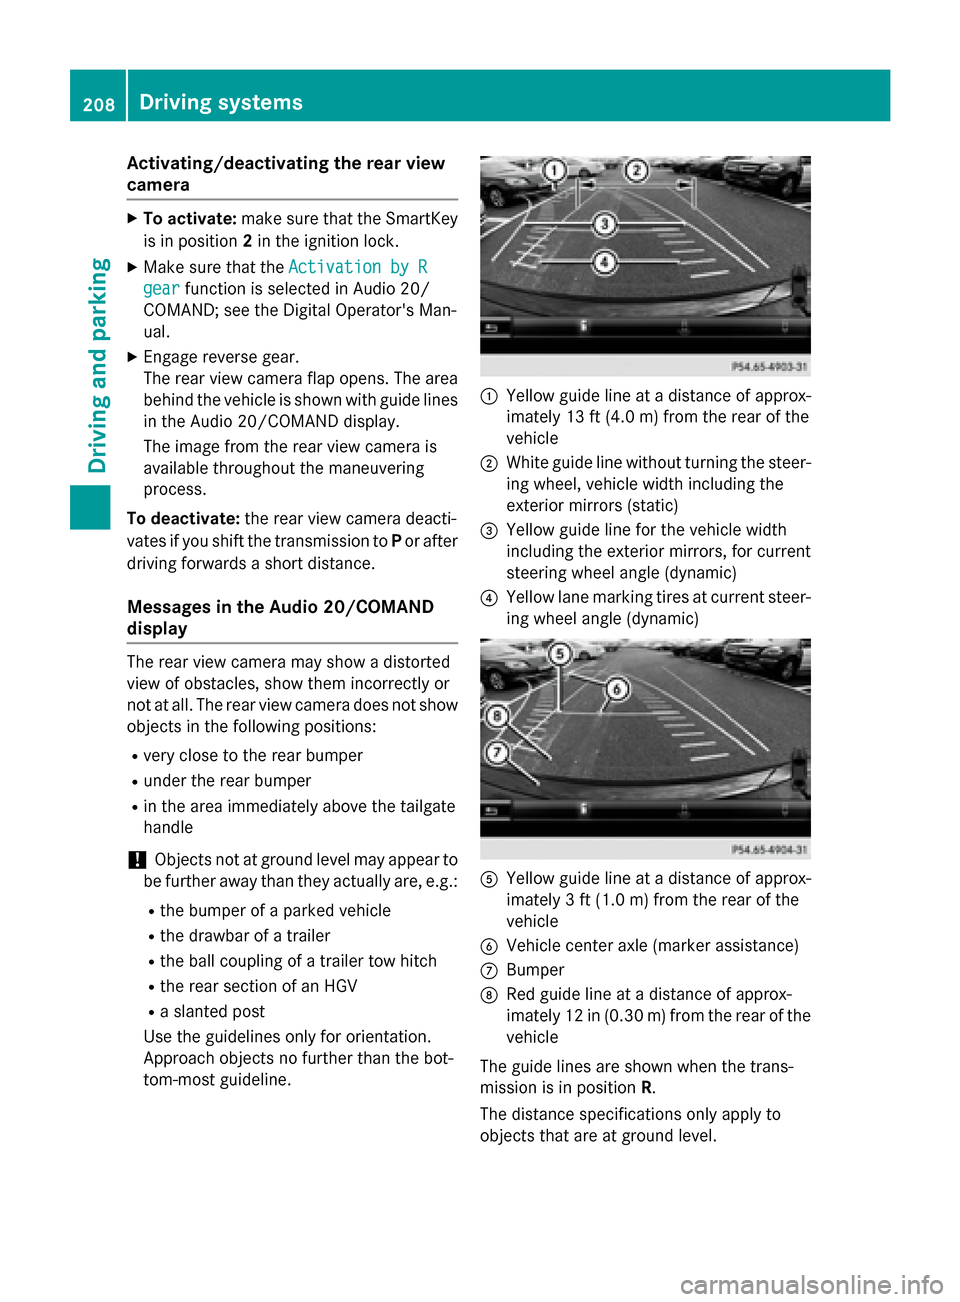
The rear view camera flap opens. The area
behind the vehicle is shown with guide lines
in the Audio 20/COMAND display.
The image from the rear view camera is
available throughout the maneuvering
process.
To deactivate: the rear view camera deacti-
vates if you shift the transmission to Por after
driving forwards a short distance.
Messages in the Audio 20/COMAND
display The rear view camera may show a distorted
view of obstacles, show them incorrectly or
not at all. The rear view camera does not show
objects in the following positions:
R very close to the rear bumper
R under the rear bumper
R in the area immediately above the tailgate
handle
! Objects not at ground level may appear to
be further away than they actually are, e.g.:
R the bumper of a parked vehicle
R the drawbar of a trailer
R the ball coupling of a trailer tow hitch
R the rear section of an HGV
R a slanted post
Use the guidelines only for orientation.
Approach objects no further than the bot-
tom-most guideline. 0043
Yellow guide line at a distance of approx-
imately 13 ft (4.0 m) from the rear of the
vehicle
0044 White guide line without turning the steer-
ing wheel, vehicle width including the
exterior mirrors (static)
0087 Yellow guide line for the vehicle width
including the exterior mirrors, for current
steering wheel angle (dynamic)
0085 Yellow lane marking tires at current steer-
ing wheel angle (dynamic) 0083
Yellow guide line at a distance of approx-
imately 3 ft (1.0m) from the rear of the
vehicle
0084 Vehicle center axle (marker assistance)
006B Bumper
006C Red guide line at a distance of approx-
imately 12 in (0.30 m) fromthe rear of the
vehicle
The guide lines are shown when the trans-
mission is in position R.
The distance specifications only apply to
objects that are at ground level. 208
Driving systemsDriving an
d parking
Page 214 of 406
R
if the area is lit by fluorescent bulbs or LED
lighting (the display may flicker)
R if the camera lenses fog up, e.g. when driv-
ing into a heated garage in winter, causing
a rapid change in temperature
R if the camera lenses are dirty or covered
R if the vehicle components in which the
cameras are installed are damaged. In this event, have the camera position and setting
checked at a qualified specialist workshop.
Do not use the 360° camera in this case. You
can otherwise injure others or cause damage to objects or the vehicle.
Guide lines are always shown at road level.
The camera in the rear area is protected by
means of a flap. This flap opens when the
360° camera is activated. Observe the notes on cleaning (Y page 335). For technical rea-
sons, the flap may remain open briefly after
the 360° camera has been deactivated.
Activation conditions The 360° camera image can be displayed if:
R COMAND/Audio 20 is switched on, see the
Digital Operator's Manual
R the 360° Camera
360° Camera function is switched on
i If the 360° camera is activated at speeds
above 19 mph (30 km/h)a warning mes-
sage appears.
The warning message disappears if:
R the vehicle's speed falls below 19 mph
(30 km/ h). The 360° camera is then acti-
vated.
R the message is confirmed with the 0038
button. Activating the 360° camera using the
function button X
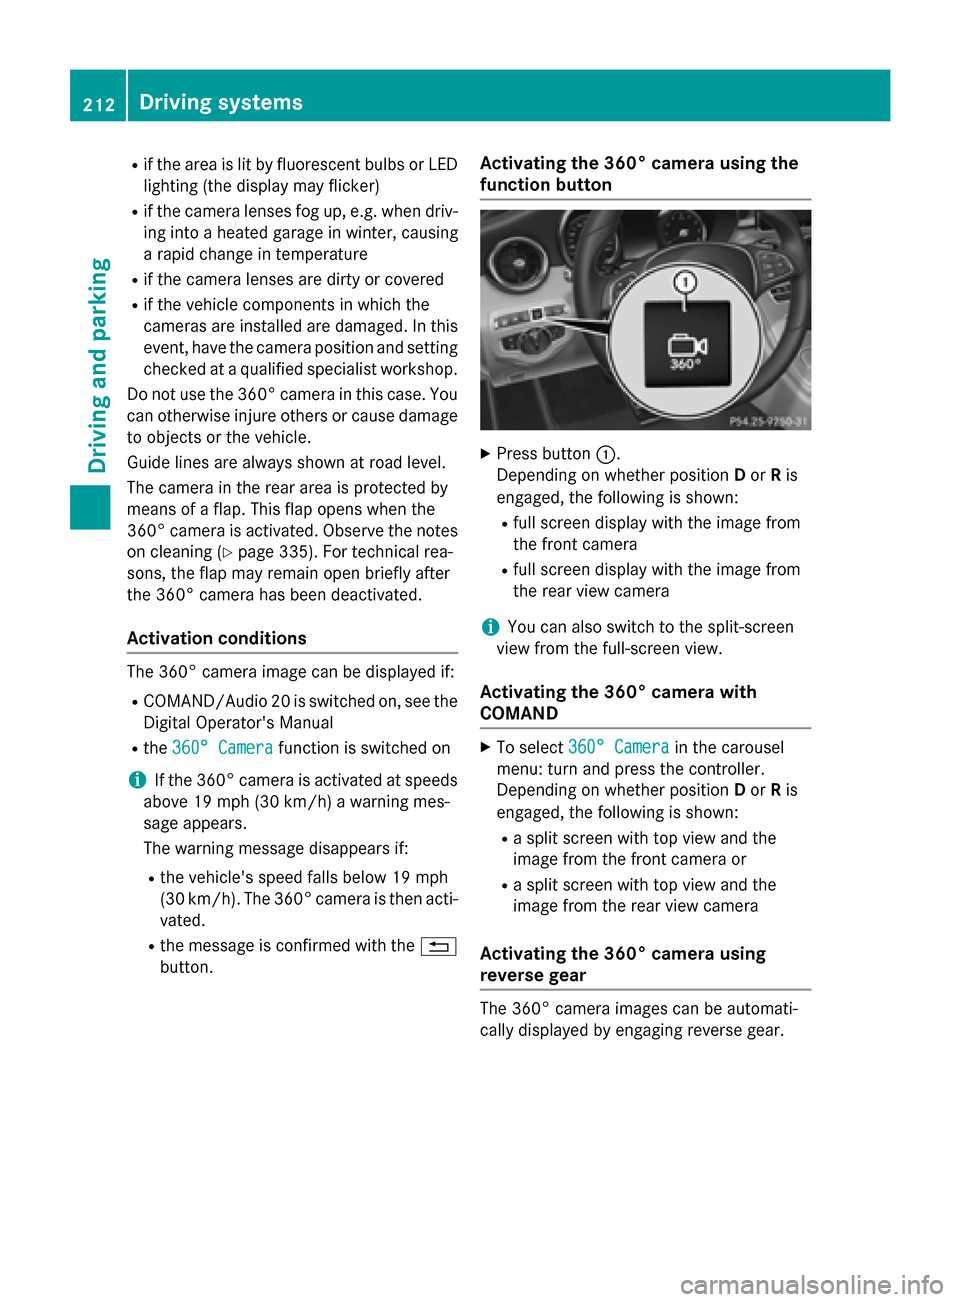
Press button 0043.
Depending on whether position Dor Ris
engaged, the following is shown:
R full screen display with the image from
the front camera
R full screen display with the image from
the rear view camera
i You can also switch to the split-screen
view from the full-screen view.
Activating the 360° camera with
COMAND X
To select 360° Camera 360° Camera in the carousel
menu: turn and press the controller.
Depending on whether position Dor Ris
engaged, the following is shown:
R a split screen with top view and the
image from the front camera or
R a split screen with top view and the
image from the rear view camera
Activating the 360° camera using
reverse gear The 360° camera images can be automati-
cally displayed by engaging reverse gear.212
Driving systemsDriving and parking
Page 215 of 406
X
Make sure that the SmartKey is in position
2 in the ignition lock.
X Make sure that the Activation by R
Activation by R
gear
gear function is selected in COMAND, see
the Digital Operator's Manual.
X To show the 360° camera image: engage
reverse gear.
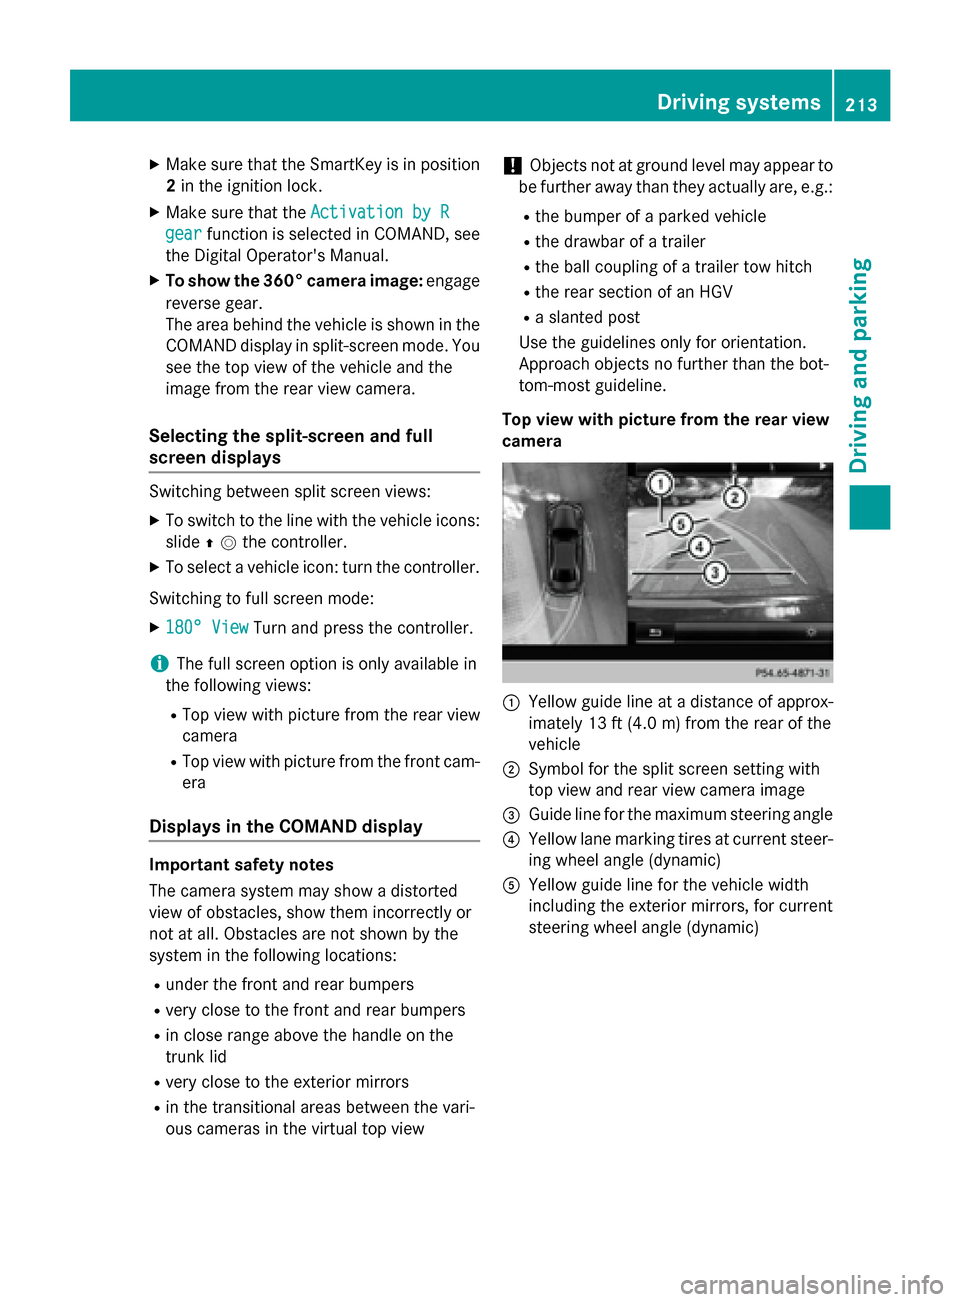
The area behind the vehicle is shown in the
COMAND display in split-screen mode. You see the top view of the vehicle and the
image from the rear view camera.
Selecting the split-screen and full
screen displays Switching between split screen views:
X To switch to the line with the vehicle icons:
slide 00970052the controller.
X To select a vehicle icon: turn the controller.
Switching to full screen mode:
X 180° View 180° View Turn and press the controller.
i The full screen option is only available in
the following views:
R Top view with picture from the rear view
camera
R Top view with picture from the front cam-
era
Displays in the COMAND display Important safety notes
The camera system may show a distorted
view of obstacles, show them incorrectly or
not at all. Obstacles are not shown by the
system in the following locations:
R under the front and rear bumpers
R very close to the front and rear bumpers
R in close range above the handle on the
trunk lid
R very close to the exterior mirrors
R in the transitional areas between the vari-
ous cameras in the virtual top view !
Objects not at ground level may appear to
be further away than they actually are, e.g.:
R the bumper of a parked vehicle
R the drawbar of a trailer
R the ball coupling of a trailer tow hitch
R the rear section of an HGV
R a slanted post
Use the guidelines only for orientation.
Approach objects no further than the bot-
tom-most guideline.
Top view with picture from the rear view
camera 0043
Yellow guide line at a distance of approx-
imately 13 ft (4.0 m) from the rear of the
vehicle
0044 Symbol for the split screen setting with
top view and rear view camera image
0087 Guide line for the maximum steering angle
0085 Yellow lane marking tires at current steer-
ing wheel angle (dynamic)
0083 Yellow guide line for the vehicle width
including the exterior mirrors, for current
steering wheel angle (dynamic) Driving systems
213Driving and parking Z
Page 232 of 406
Useful information
i This Operator's Manual describes all
models and all standard and optional equip- ment of your vehicle available at the time of
publication of the Operator's Manual.
Country-specific differences are possible.
Please note that your vehicle may not be
equipped with all features described. This
also applies to safety-related systems and
functions.
i Read the information on qualified special-
ist workshops (Y page 26). Important safety notes
G
WARNING
If you operate information systems and com-
munication equipment integrated in the vehi- cle while driving, you will be distracted from
traffic conditions. You could also lose control of the vehicle. There is a risk of an accident.
Only operate the equipment when the traffic
situation permits. If you are not sure that this
is possible, park the vehicle paying attention
to traffic conditions and operate the equip-
ment when the vehicle is stationary.
You must observe the legal requirements for
the country in which you are currently driving when operating the on-board computer. G
WARNING
If the instrument cluster has failed or mal-
functioned, you may not recognize function
restrictions in systems relevant to safety. The operating safety of your vehicle may be
impaired. There is a risk of an accident.
Drive on carefully. Have the vehicle checked
at a qualified specialist workshop immedi-
ately.
The on-board computer only shows messages
or warnings from certain systems in the mul- tifunction display. You should therefore make
sure your vehicle is operating safely at all times. Otherwise, a vehicle that is not oper-
ating safely may cause an accident.
If the operating safety of your vehicle is
impaired, park the vehicle safely as soon as
possible. Contact a qualified specialist work-
shop.
For an overview, see the instrument panel
illustration (Y
page 33). Displays and operation
Instrument cluster lighting
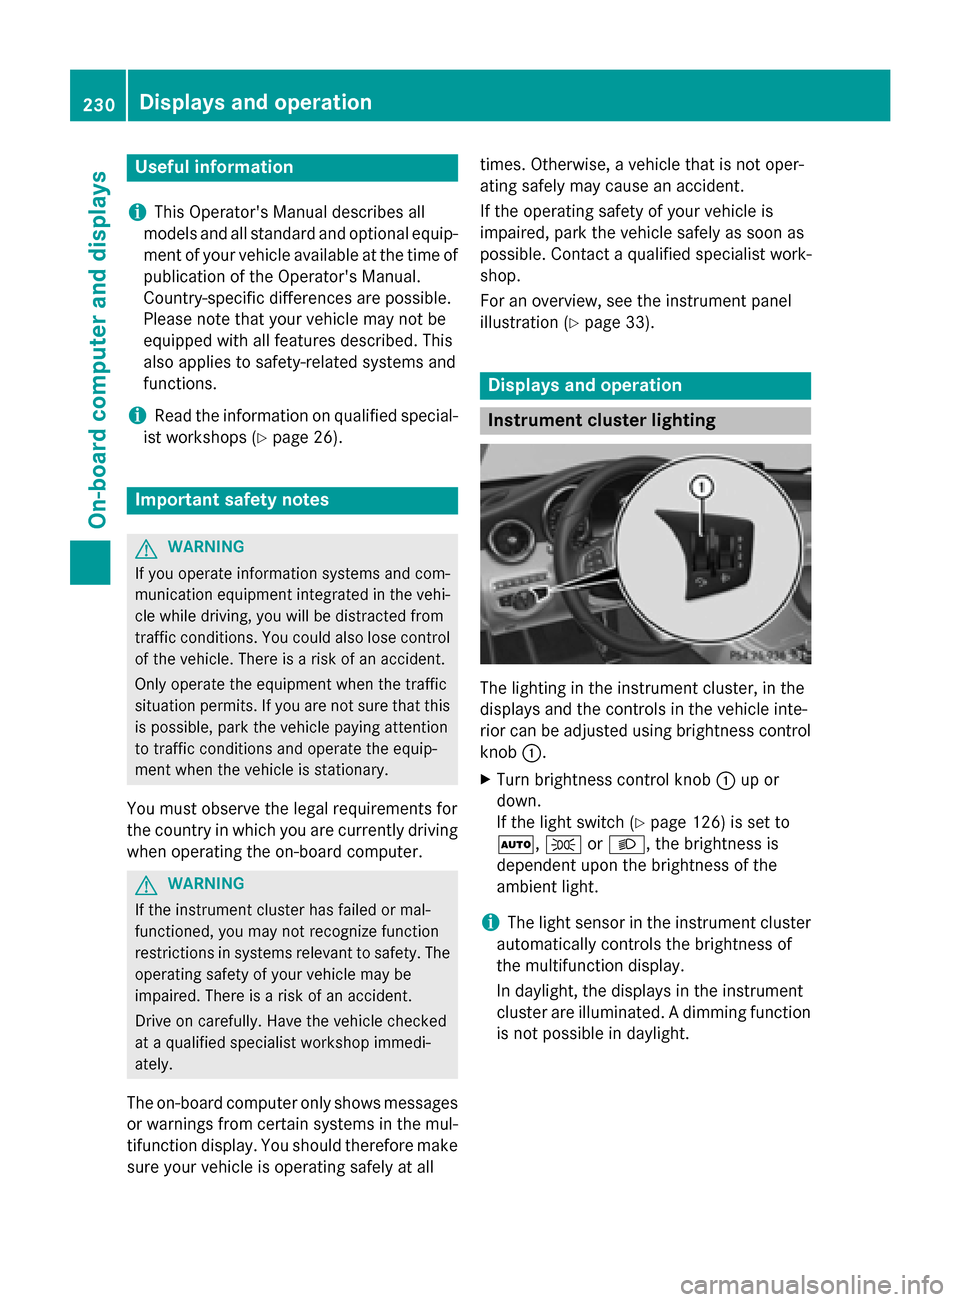
The lighting in the instrument cluster, in the
displays and the controls in the vehicle inte-
rior can be adjusted using brightness control
knob 0043.
X Turn brightness control knob 0043up or
down.
If the light switch (Y page 126) is set to
0058, 0060or0058, the brightness is
dependent upon the brightness of the
ambient light.
i The light sensor in the instrument cluster
automatically controls the brightness of
the multifunction display.
In daylight, the displays in the instrument
cluster are illuminated. A dimming function
is not possible in daylight. 230
Displays and operationOn-board computer and displays
Page 252 of 406
Display messages
Introduction
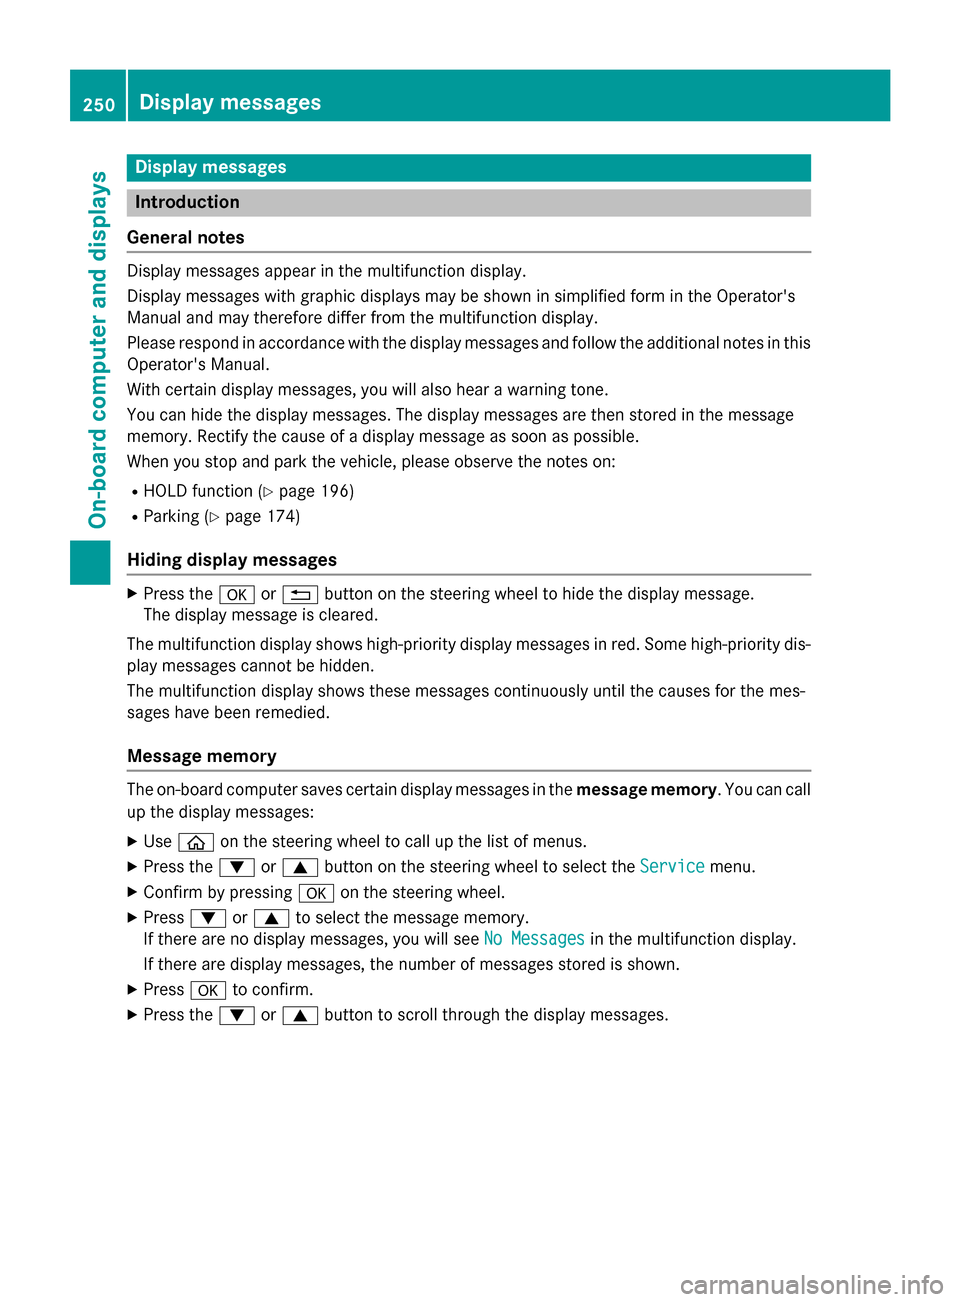
General notes Display messages appear in the multifunction display.
Display messages with graphic displays may be shown in simplified form in the Operator's
Manual and may therefore differ from the multifunction display.
Please respond in accordance with the display messages and follow the additional notes in this Operator's Manual.
With certain display messages, you will also hear a warning tone.
You can hide the display messages. The display messages are then stored in the message
memory. Rectify the cause of a display message as soon as possible.
When you stop and park the vehicle, please observe the notes on:
R HOLD function (Y page 196)
R Parking (Y page 174)
Hiding display messages X
Press the 0076or0038 button on the steering wheel to hide the display message.
The display message is cleared.
The multifunction display shows high-priority display messages in red. Some high-priority dis- play messages cannot be hidden.
The multifunction display shows these messages continuously until the causes for the mes-
sages have been remedied.
Message memory The on-board computer saves certain display messages in the
message memory. You can call
up the display messages:
X Use 00E2 on the steering wheel to call up the list of menus.
X Press the 0064or0063 button on the steering wheel to select the Service Servicemenu.
X Confirm by pressing 0076on the steering wheel.
X Press 0064or0063 to select the message memory.
If there are no display messages, you will see No Messages
No Messages in the multifunction display.
If there are display messages, the number of messages stored is shown.
X Press 0076to confirm.
X Press the 0064or0063 button to scroll through the display messages. 250
Display
messagesOn-board computer and displays
Page 253 of 406
Safety systems
Display messages
Possible causes/consequences and
0050
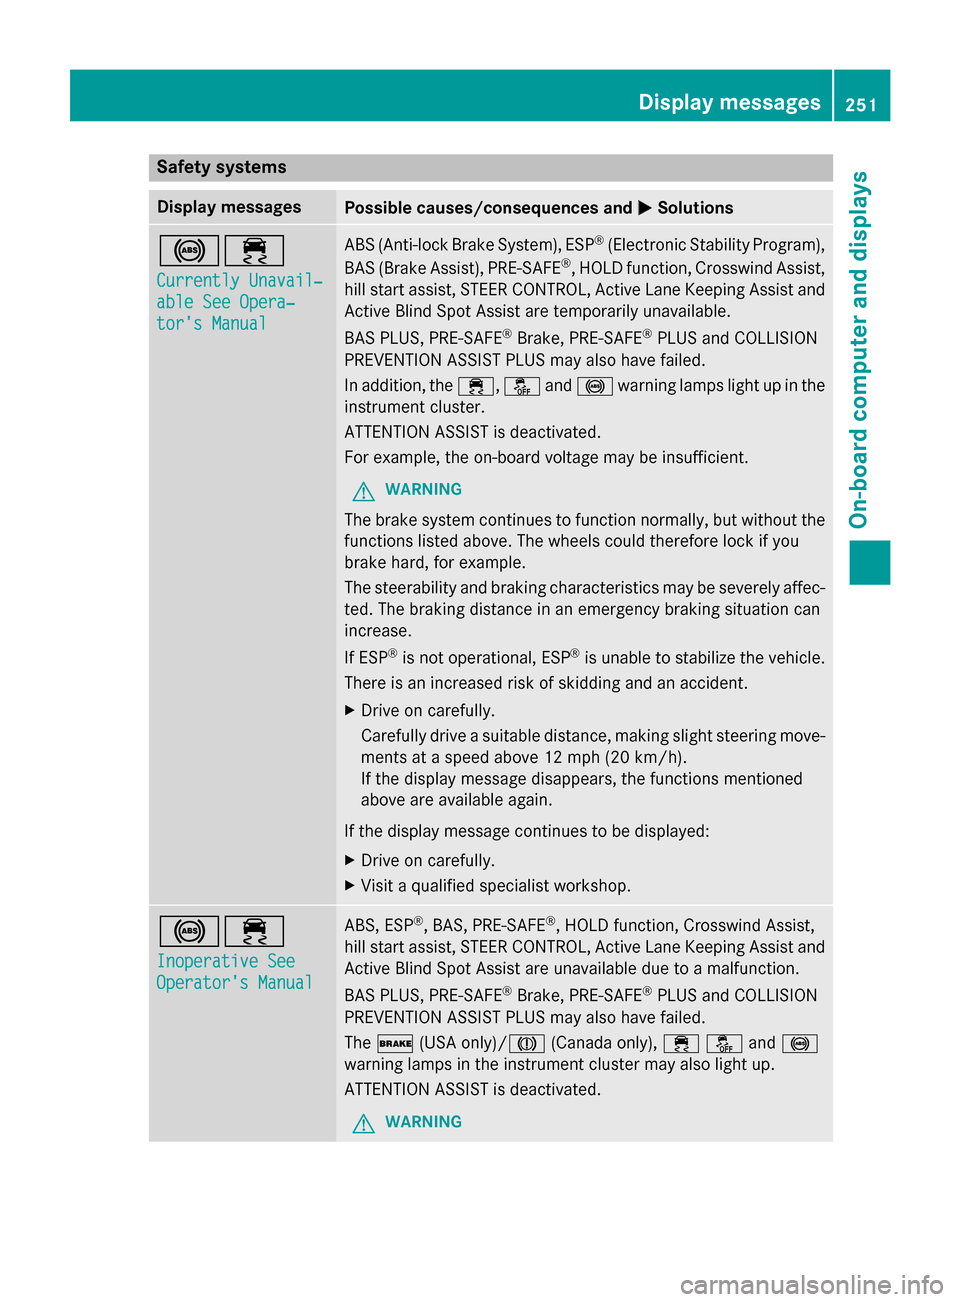
0050Solutions 002500E5
Currently Unavail‐ Currently Unavail‐
able See Opera‐ able See Opera‐
tor's Manual tor's Manual ABS (Anti-lock Brake System), ESP
®
(Electronic Stability Program),
BAS (Brake Assist), PRE‑ SAFE®
, HOLD function, Crosswind Assist,
hill start assist, STEER CONTROL, Active Lane Keeping Assist and
Active Blind Spot Assist are temporarily unavailable.
BAS PLUS, PRE‑ SAFE®
Brake, PRE‑SAFE ®
PLUS and COLLISION
PREVENTION ASSIST PLUS may also have failed.
In addition, the 00E5,00BBand0025 warning lamps light up in the
instrument cluster.
ATTENTION ASSIST is deactivated.
For example, the on-board voltage may be insufficient.
G WARNING
The brake system continues to function normally, but without the functions listed above. The wheels could therefore lock if you
brake hard, for example.
The steerability and braking characteristics may be severely affec-ted. The braking distance in an emergency braking situation can
increase.
If ESP ®
is not operational, ESP ®
is unable to stabilize the vehicle.
There is an increased risk of skidding and an accident.
X Drive on carefully.
Carefully drive a suitable distance, making slight steering move-
ments at a speed above 12 mph (20 km/h).
If the display message disappears, the functions mentioned
above are available again.
If the display message continues to be displayed: X Drive on carefully.
X Visit a qualified specialist workshop. 002500E5
Inoperative See Inoperative See
Operator's Manual Operator's Manual ABS, ESP
®
, BAS, PRE‑SAFE ®
, HOLD function, Crosswind Assist,
hill start assist, STEER CONTROL, Active Lane Keeping Assist and Active Blind Spot Assist are unavailable due to a malfunction.
BAS PLUS, PRE‑SAFE ®
Brake, PRE‑SAFE ®
PLUS and COLLISION
PREVENTION ASSIST PLUS may also have failed.
The 0027 (USA only)/004D (Canada only),00E500BBand 0025
warning lamps in the instrument cluster may also light up.
ATTENTION ASSIST is deactivated.
G WARNING Display messages
251On-board computer and displays Z
Page 254 of 406
Display messages
Possible causes/consequences and
0050
0050Solutions The brake system continues to function normally, but without the
functions listed above. The wheels could therefore lock if you
brake hard, for example.
The steerability and braking characteristics may be severely affec- ted. The braking distance in an emergency braking situation can
increase.
If ESP ®
is not operational, ESP ®
is unable to stabilize the vehicle.
There is an increased risk of skidding and an accident.
X Drive on carefully.
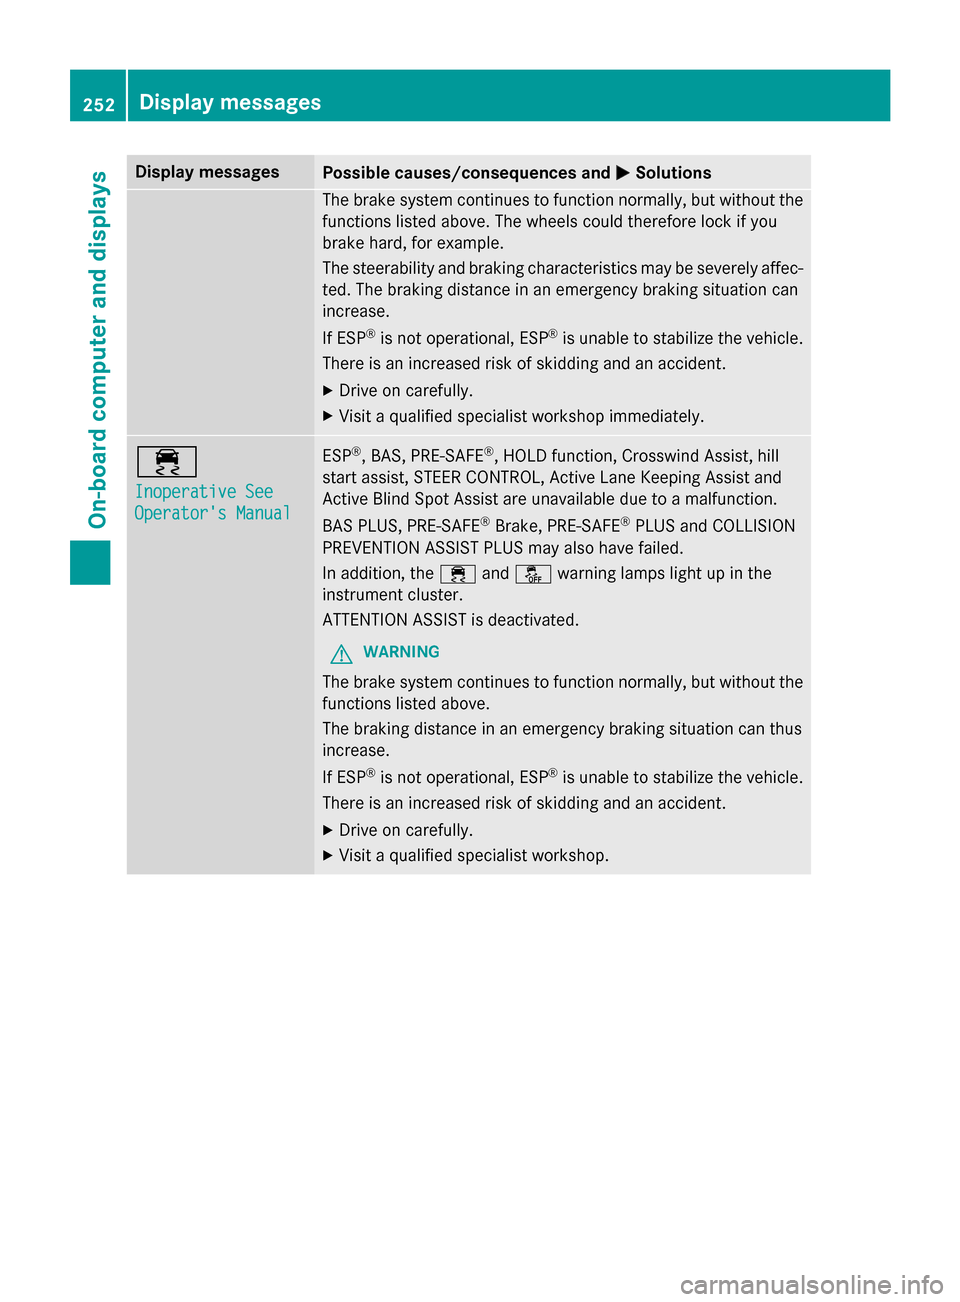
X Visit a qualified specialist workshop immediately. 00E5
Inoperative See Inoperative See
Operator's Manual Operator's Manual ESP
®
, BAS, PRE ‑SAFE®
, HOLD function, Crosswind Assist, hill
start assist, STEER CONTROL, Active Lane Keeping Assist and
Active Blind Spot Assist are unavailable due to a malfunction.
BAS PLUS, PRE‑ SAFE®
Brake, PRE ‑SAFE®
PLUS and COLLISION
PREVENTION ASSIST PLUS may also have failed.
In addition, the 00E5and00BB warning lamps light up in the
instrument cluster.
ATTENTION ASSIST is deactivated.
G WARNING
The brake system continues to function normally, but without the functions listed above.
The braking distance in an emergency braking situation can thus
increase.
If ESP ®
is not operational, ESP ®
is unable to stabilize the vehicle.
There is an increased risk of skidding and an accident.
X Drive on carefully.
X Visit a qualified specialist workshop. 252
Display
messagesOn-board computer and displays
Page 256 of 406
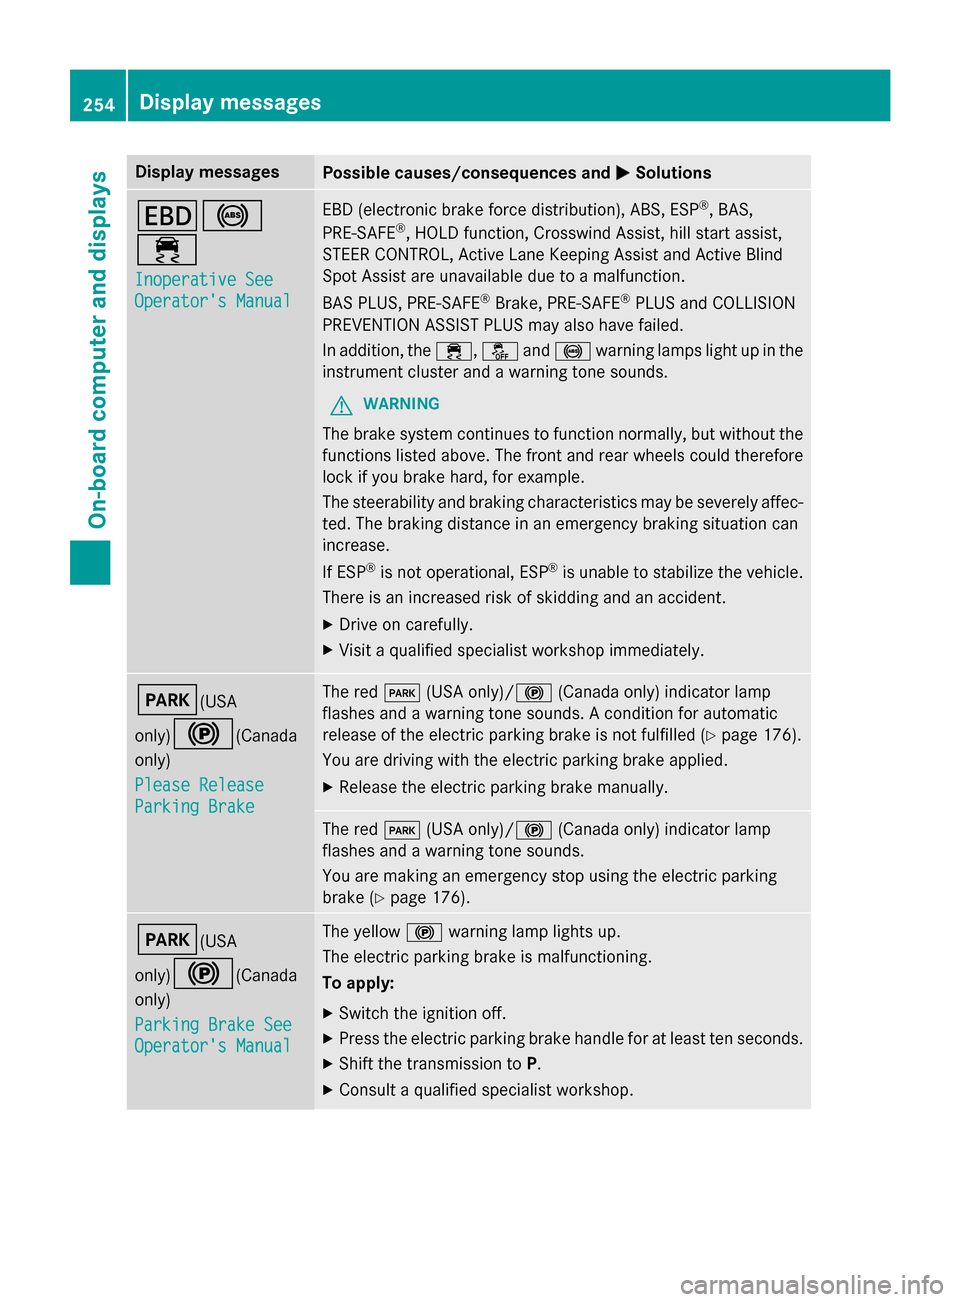
Display messages
Possible causes/consequences and
0050
0050Solutions 007A0025
00E5
Inoperative See Inoperative See
Operator's Manual Operator's Manual EBD (electronic brake force distribution), ABS, ESP
®
, BAS,
PRE ‑SAFE ®
, HOLD function, Crosswind Assist, hill start assist,
STEER CONTROL, Active Lane Keeping Assist and Active Blind
Spot Assist are unavailable due to a malfunction.
BAS PLUS, PRE‑SAFE ®
Brake, PRE ‑SAFE®
PLUS and COLLISION
PREVENTION ASSIST PLUS may also have failed.
In addition, the 00E5,00BBand0025 warning lamps light up in the
instrument cluster and a warning tone sounds.
G WARNING
The brake system continues to function normally, but without the functions listed above. The front and rear wheels could therefore
lock if you brake hard, for example.
The steerability and braking characteristics may be severely affec- ted. The braking distance in an emergency braking situation can
increase.
If ESP ®
is not operational, ESP ®
is unable to stabilize the vehicle.
There is an increased risk of skidding and an accident.
X Drive on carefully.
X Visit a qualified specialist workshop immediately. 0049(USA
only)0024
(Canada
only)
Please Release Please Release
Parking Brake Parking Brake The red
0049(USA only)/0024 (Canada only) indicator lamp
flashes and a warning tone sounds. A condition for automatic
release of the electric parking brake is not fulfilled (Y page 176).
You are driving with the electric parking brake applied.
X Release the electric parking brake manually. The red
0049(USA only)/0024 (Canada only) indicator lamp
flashes and a warning tone sounds.
You are making an emergency stop using the electric parking
brake (Y page 176). 0049(USA
only)0024
(Canada
only)
Parking Brake See Parking Brake See
Operator's Manual Operator's Manual The yellow
0024warning lamp lights up.
The electric parking brake is malfunctioning.
To apply:
X Switch the ignition off.
X Press the electric parking brake handle for at least ten seconds.
X Shift the transmission to P.
X Consult a qualified specialist workshop. 254
Display
messagesOn-board computer and displays
Page 261 of 406
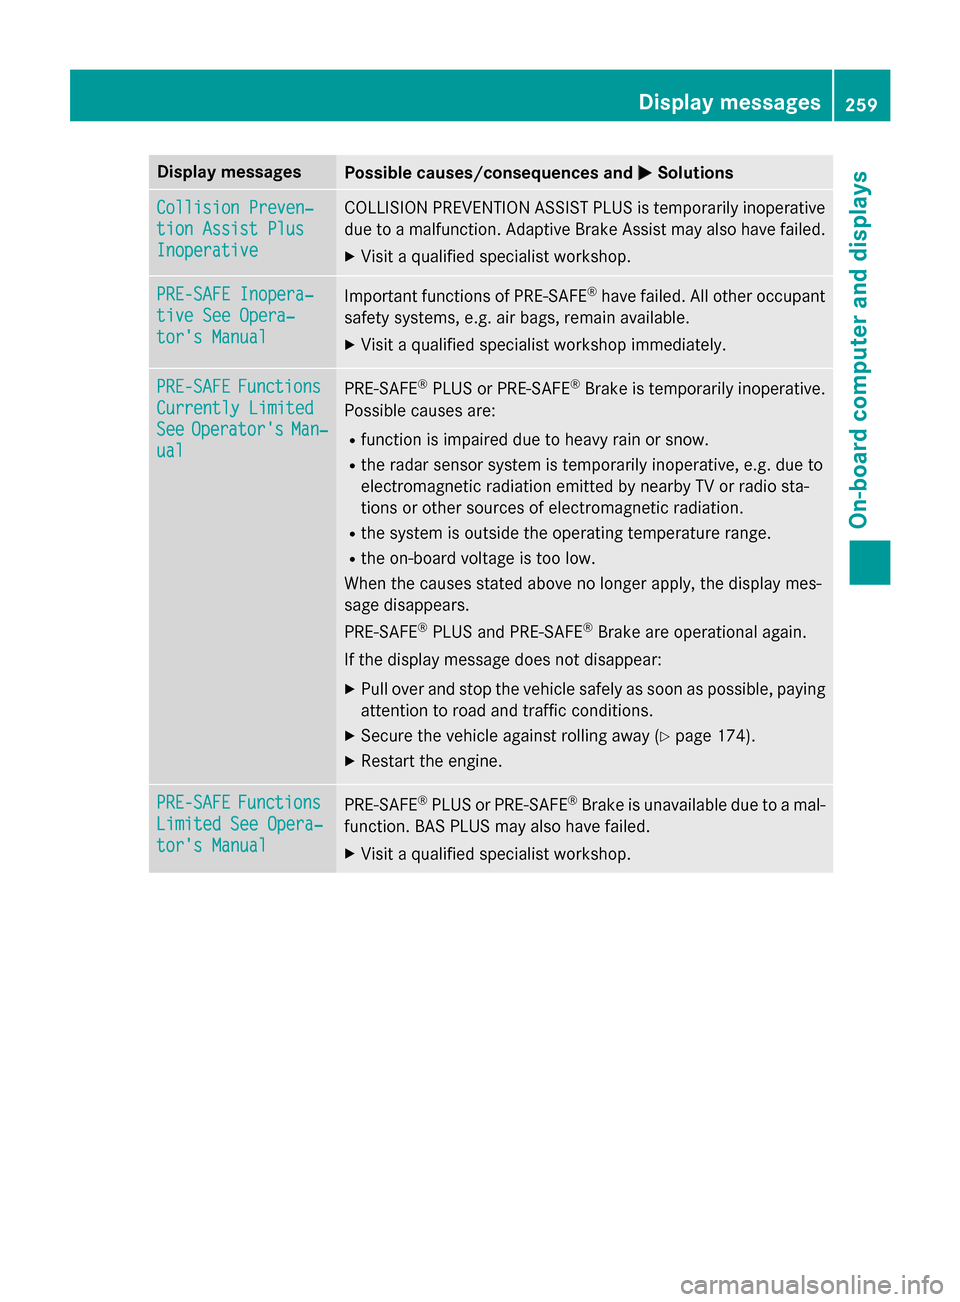
Display messages
Possible causes/consequences and
0050
0050Solutions Collision Preven‐
Collision Preven‐
tion Assist Plus tion Assist Plus
Inoperative Inoperative COLLISION PREVENTION ASSIST PLUS is temporarily inoperative
due to a malfunction. Adaptive Brake Assist may also have failed.
X Visit a qualified specialist workshop. PRE-SAFE Inopera‐
PRE-SAFE Inopera‐
tive See Opera‐ tive See Opera‐
tor's Manual tor's Manual
Important functions of PRE-SAFE
®
have failed. All other occupant
safety systems, e.g. air bags, remain available.
X Visit a qualified specialist workshop immediately. PRE-SAFE
PRE-SAFE
Functions
Functions
Currently Limited
Currently Limited
See See Operator's
Operator's Man‐
Man‐
ual
ual PRE
‑SAFE ®
PLUS or PRE ‑SAFE®
Brake is temporarily inoperative.
Possible causes are:
R function is impaired due to heavy rain or snow.
R the radar sensor system is temporarily inoperative, e.g. due to
electromagnetic radiation emitted by nearby TV or radio sta-
tions or other sources of electromagnetic radiation.
R the system is outside the operating temperature range.
R the on-board voltage is too low.
When the causes stated above no longer apply, the display mes-
sage disappears.
PRE ‑SAFE ®
PLUS and PRE ‑SAFE®
Brake are operational again.
If the display message does not disappear:
X Pull over and stop the vehicle safely as soon as possible, paying
attention to road and traffic conditions.
X Secure the vehicle against rolling away (Y page 174).
X Restart the engine. PRE-SAFE PRE-SAFE
Functions
Functions
Limited See Opera‐
Limited See Opera‐
tor's Manual tor's Manual PRE
‑SAFE ®
PLUS or PRE‑ SAFE®
Brake is unavailable due to a mal-
function. BAS PLUS may also have failed.
X Visit a qualified specialist workshop. Display
messages
259On-board computer and displays Z