ignition MERCEDES-BENZ C-Class SEDAN 2015 W205 Owner's Manual
[x] Cancel search | Manufacturer: MERCEDES-BENZ, Model Year: 2015, Model line: C-Class SEDAN, Model: MERCEDES-BENZ C-Class SEDAN 2015 W205Pages: 406, PDF Size: 7.62 MB
Page 13 of 406
Fuel tank
Capacity ........................................ 398
Problem (malfunction) .................. .174
Fuses
Allocation chart ............................ .356
Before changing ............................ .354
Dashboard fuse box ....................... 355
Fuse box in the engine compart-
ment .............................................. 355
Fuse box in the front-passenger
footwell .......................................... 355
Fuse box in the trunk ..................... 356
Important safety notes .................. 354 G
Garage door opener Clearing the memory ..................... 321
General notes ................................ 318
Important safety notes .................. 319
Opening/closing the garage door .. 321
Programming (button in the rear-
view mirror) ................................... 319
Gasoline ............................................. 398
Genuine parts ...................................... 22
Glove box .......................................... .299 H
Handbrake see Parking brake
HANDS-FREE ACCESS .......................... 93
Hazard warning lamps ......................127
Headlamps Cleaning system (notes) ................ 402
Fogging up ..................................... 128
see Automatic headlamp mode
Head restraints
Adjusting ....................................... 111
Adjusting (electrically) ................... 112
Adjusting (manually) ..................... .111
Adjusting (rear) .............................. 112
Installing/removing (rear) .............. 112
Head-up display
Adjusting the brightness ................ 247
Function/notes ............................ .233
Important safety notes .................. 233
Setting the position ....................... 247 Storing settings (memory func-
tion) ............................................... 121
Switching on or off ......................... 234
Switching the display on/off ......... 246
Heating
see Climate control
High beam flasher .............................126
High-beam headlamps Adaptive Highbeam Assist ............. 127
Changing bulbs .............................. 132
Display message ............................ 265
Switching on/off ........................... 126
Hill start assist .................................. 160
HOLD function Activating ....................................... 197
Deactivating ................................... 197
Display message ............................ 274
Function/notes ............................ .196
Hood
Closing .......................................... .325
Display message ............................ 281
Important safety notes .................. 324
Opening ......................................... 324
Horn ...................................................... 32
Hydroplaning ..................................... 182 I
Ignition lock see Key positions
Immobilizer .......................................... 76
Indicator and warning lamps COLLISION PREVENTION ASSIST
PLUS .............................................. 293
Indicator lamps
see Warning and indicator lamps
Indicators
see Turn signals
Insect protection on the radiator .... 325
Instrument cluster Overview .......................................... 33
Warning and indicator lamps ........... 34
Instrument cluster lighting .............. 230
Interior lighting Control .......................................... .129
Emergency lighting ........................ 130 Index
11
Page 19 of 406
Side marker lamp (display mes-
sage)
................................................... 266
Side windows Cleaning ......................................... 333
Convenience closing feature ............ 99
Convenience opening feature ..........98
Important safety information ........... 97
Opening/closing .............................. 98
Problem (malfunction) ................... 101
Resetting .........................................99
Sliding sunroof
Opening/closing ............................1 02
Resetting ....................................... 103
see Panorama roof with power
tilt/sliding panel
SmartKey
Changing the battery ....................... 84
Changing the programming ............. 82
Checking the battery ....................... 84
Convenience closing feature ............ 99
Convenience opening feature .......... 98
Display message ............................ 282
Door central locking/unlocking ....... 81
Important safety notes .................... 80
KEYLESS-GO start function .............. 82
Loss ................................................. 85
Mechanical key ................................ 83
Overview .......................................... 80
Positions (ignition lock) ................. 157
Problem (malfunction) ..................... 85
Starting the engine ........................ 159
Snow chains ...................................... 361
Sockets Center console .............................. 310
General notes ................................ 310
Rear compartment ......................... 310
Specialist workshop ............................ 26
Special seat belt retractor .................. 60
Speed, controlling see Cruise control
Speedometer
Activating/deactivating the addi-
tional speedometer ........................ 248
Digital ............................................ 237
In the Instrument cluster ................. 33 Segments ...................................... 231
Selecting the unit of measure-
ment .............................................. 248
see Instrument cluster
Standing lamps
Display message ............................ 266
Switching on/off ........................... 126
Start/Stop button
Starting the engine ........................ 159
Start/stop function
see ECO start/stop function
Starting (engine) ................................ 159
STEER CONTROL .................................. 76
Steering Warning lamps ............................... 295
Steering (display message) .............. 281
Steering Assist and Stop&Go Pilot
(DISTRONIC PLUS) Display message ............................ 276
Steering assistant STEER CON-
TROL
see STEER CONTROL
Steering wheel
Adjusting (electrically) ................... 116
Adjusting (manually) ...................... 115
Button overview ............................... 35
Buttons (on-board computer) ......... 231
Cleaning ......................................... 336
EASY ENTRY/EXIT feature ............. 116
Important safety notes .................. 115
Paddle shifters ............................... 169
Storing settings (memory func-
tion) ............................................... 121
Steering wheel paddle shifters ........ 169
Stowage areas ................................... 298
Stowage compartments Armrest (under) ............................. 300
Center console .............................. 299
Cup holders ................................... 306
Door ............................................... 300
Eyeglasses compartment ............... 299
Glove box ....................................... 299
Important safety information ......... 298
Map pockets .................................. 300
Rear ............................................... 300
Stowage net ................................... 300
Stowage net ....................................... 300 Index
17
Page 34 of 406
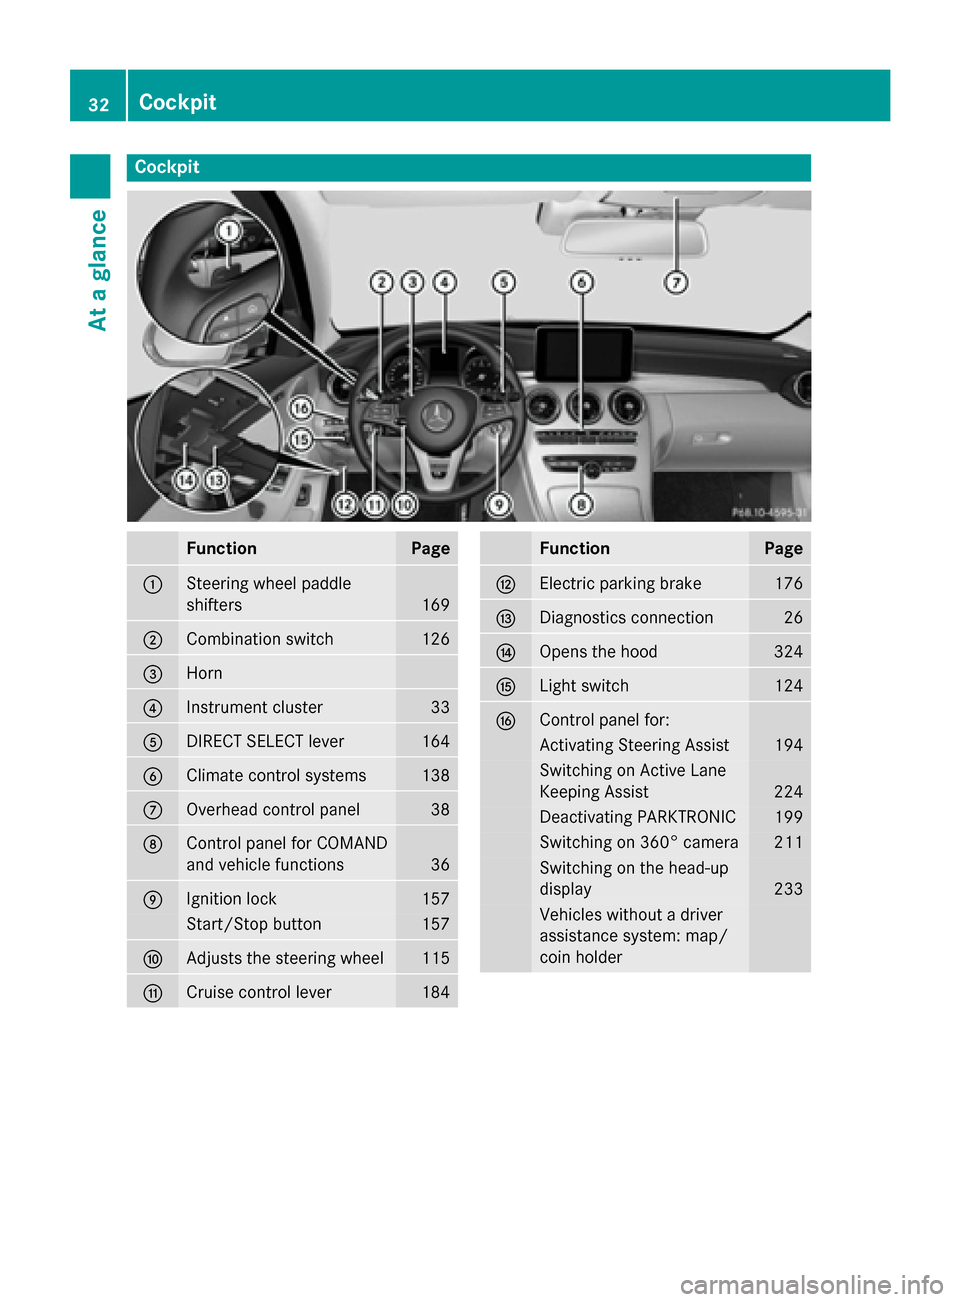
Cockpit
Function Page
0043
Steering wheel paddle
shifters
169
0044
Combination switch 126
0087
Horn
0085
Instrument cluster 33
0083
DIRECT SELECT lever 164
0084
Climate control systems 138
006B
Overhead control panel 38
006C
Control panel for COMAND
and vehicle functions
36
006D
Ignition lock 157
Start/Stop button 157
006E
Adjusts the steering wheel 115
006F
Cruise control lever 184 Function Page
0070
Electric parking brake 176
0071
Diagnostics connection 26
0072
Opens the hood 324
0073
Light switch 124
0074
Control panel for:
Activating Steering Assist 194
Switching on Active Lane
Keeping Assist 224
Deactivating PARKTRONIC 199
Switching on 360° camera 211
Switching on the head-up
display
233
Vehicles without a driver
assistance system: map/
coin holder32
CockpitAt a glance
Page 44 of 406
Useful information
i This Operator's Manual describes all
models and all standard and optional equip- ment of your vehicle available at the time of
publication of the Operator's Manual.
Country-specific differences are possible.
Please note that your vehicle may not be
equipped with all features described. This
also applies to safety-related systems and
functions.
i Read the information on qualified special-
ist workshops (Y page 26). Panic alarm
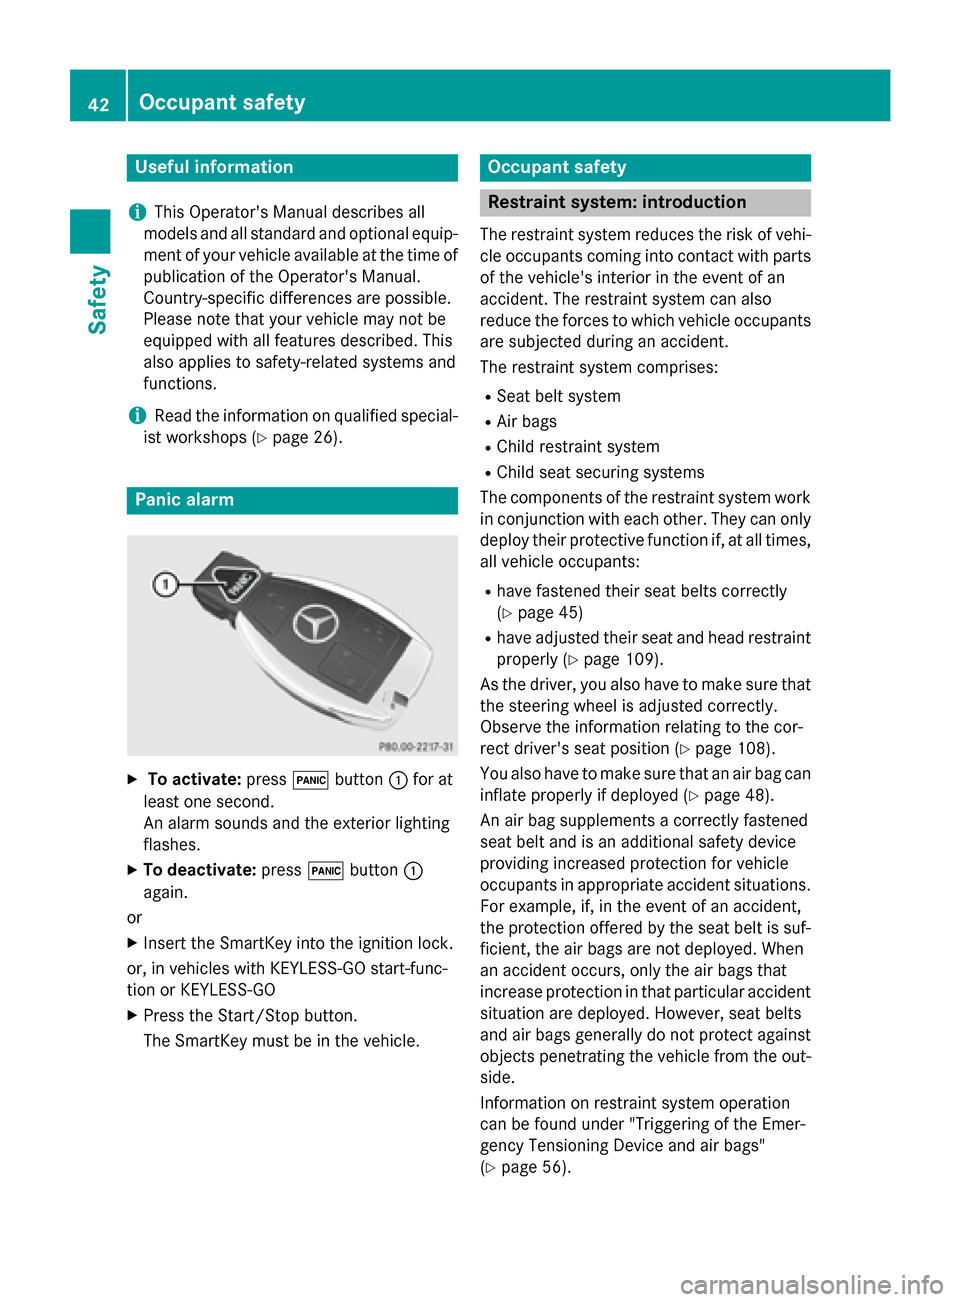
X
To activate: press0033button 0043for at
least one second.
An alarm sounds and the exterior lighting
flashes.
X To deactivate: press0033button 0043
again.
or
X Insert the SmartKey into the ignition lock.
or, in vehicles with KEYLESS-GO start-func-
tion or KEYLESS ‑GO
X Press the Start/Stop button.
The SmartKey must be in the vehicle. Occupant safety
Restraint system: introduction
The restraint system reduces the risk of vehi-
cle occupants coming into contact with parts of the vehicle's interior in the event of an
accident. The restraint system can also
reduce the forces to which vehicle occupants
are subjected during an accident.
The restraint system comprises:
R Seat belt system
R Air bags
R Child restraint system
R Child seat securing systems
The components of the restraint system work
in conjunction with each other. They can only deploy their protective function if, at all times,
all vehicle occupants:
R have fastened their seat belts correctly
(Y page 45)
R have adjusted their seat and head restraint
properly (Y page 109).
As the driver, you also have to make sure that
the steering wheel is adjusted correctly.
Observe the information relating to the cor-
rect driver's seat position (Y page 108).
You also have to make sure that an air bag can inflate properly if deployed (Y page 48).
An air bag supplements a correctly fastened
seat belt and is an additional safety device
providing increased protection for vehicle
occupants in appropriate accident situations.
For example, if, in the event of an accident,
the protection offered by the seat belt is suf-
ficient, the air bags are not deployed. When
an accident occurs, only the air bags that
increase protection in that particular accident
situation are deployed. However, seat belts
and air bags generally do not protect against objects penetrating the vehicle from the out-
side.
Information on restraint system operation
can be found under "Triggering of the Emer-
gency Tensioning Device and air bags"
(Y page 56). 42
Occupant safetySafety
Page 45 of 406
For more information about children traveling
with you in the vehicle and on child restraint
systems, see "Children in the vehicle"
(Y page 59). Important safety notes
G
WARNING
Modifications to the restraint system may
cause it to no longer work as intended. The
restraint system may then not perform its
intended protective function and may fail in an accident or trigger unexpectedly, for example.
This poses an increased risk of injury or even fatal injury.
Never modify parts of the restraint system.
Never tamper with the wiring, the electronic
components or their software.
If it is necessary to modify an air bag system to
accommodate a person with disabilities, con- tact an authorized Mercedes-Benz Center for
details. USA only: for further information con- tact our Customer Assistance Center at
1-800-FOR-MERCede s (1‑800‑367 ‑6372). Restraint system warning lamp
The functions of the restraint system are
checked after the ignition is switched on and
at regular intervals while the engine is run-
ning. Therefore, malfunctions can be detec-
ted in good time.
The 0075 restraint system warning lamp in
the instrument cluster lights up when the igni- tion is switched on. It goes out no later than afew seconds after the engine is started. The
components of the restraint system are in
operational readiness.
A malfunction has occurred if the 0075
restraint system warning lamp:
R does not light up after the ignition is
switched on
R does not go out after a few seconds with
the engine running
R lights up again while the engine is running G
WARNING
If restraint system is malfunctioning, restraint system components may be triggered unin-
tentionally or might not be triggered at all in
the event of an accident with a high rate of
vehicle deceleration. This can affect the Emer- gency Tensioning Device or air bag, for exam-
ple. This poses an increased risk of injury or
even fatal injury.
Have the restraint system checked and
repaired in a qualified specialist workshop as
soon as possible. PASSENGER AIR BAG indicator lamp
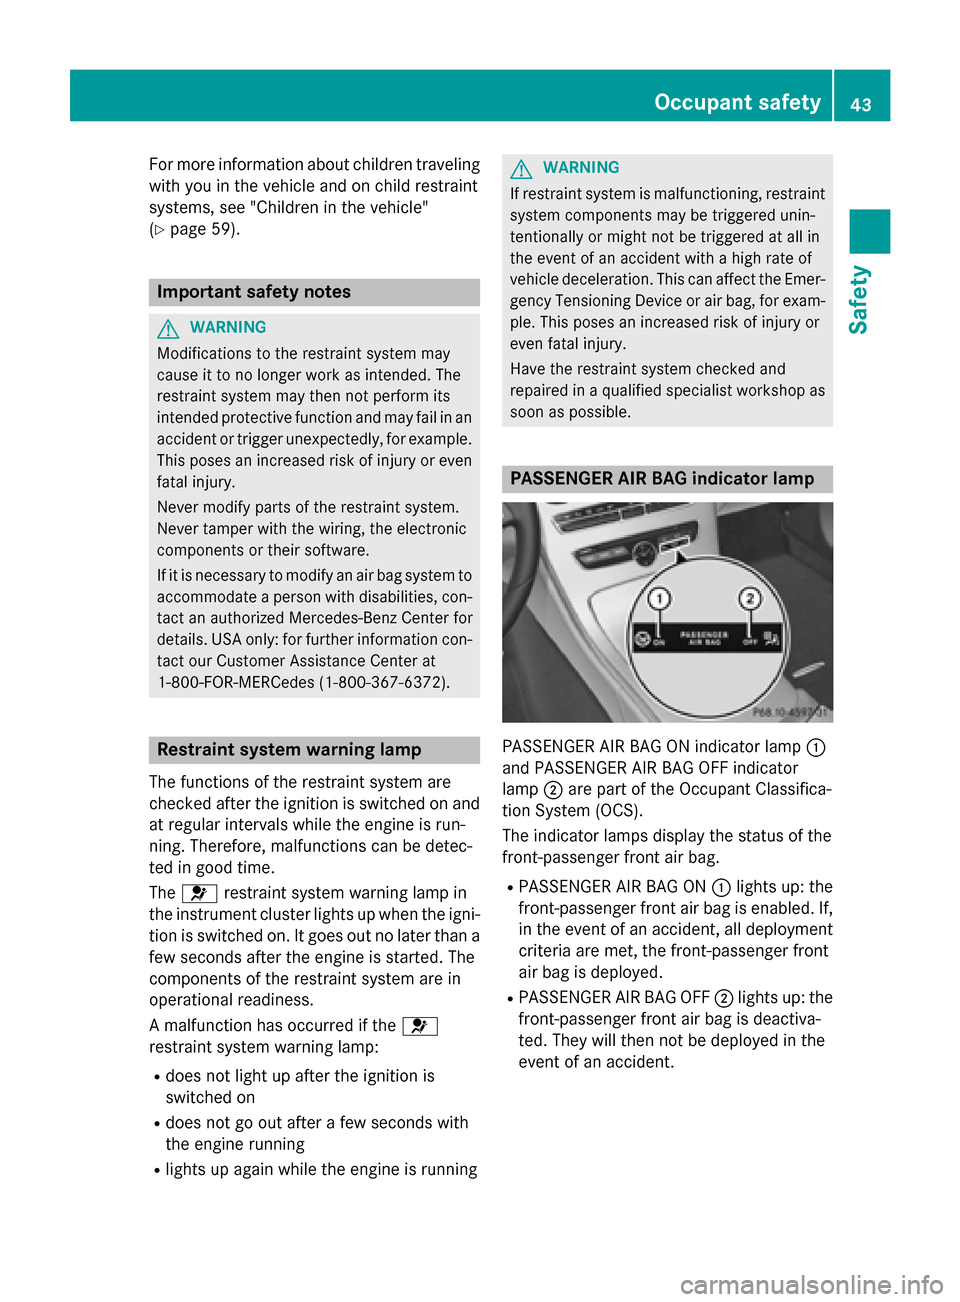
PASSENGER AIR BAG ON indicator lamp
0043
and PASSENGER AIR BAG OFF indicator
lamp 0044are part of the Occupant Classifica-
tion System (OCS).
The indicator lamps display the status of the
front-passenger front air bag.
R PASSENGER AIR BAG ON 0043lights up: the
front-passenger front air bag is enabled. If,
in the event of an accident, all deployment
criteria are met, the front-passenger front
air bag is deployed.
R PASSENGER AIR BAG OFF 0044lights up: the
front-passenger front air bag is deactiva-
ted. They will then not be deployed in the
event of an accident. Occupant safety
43Safety Z
Page 49 of 406
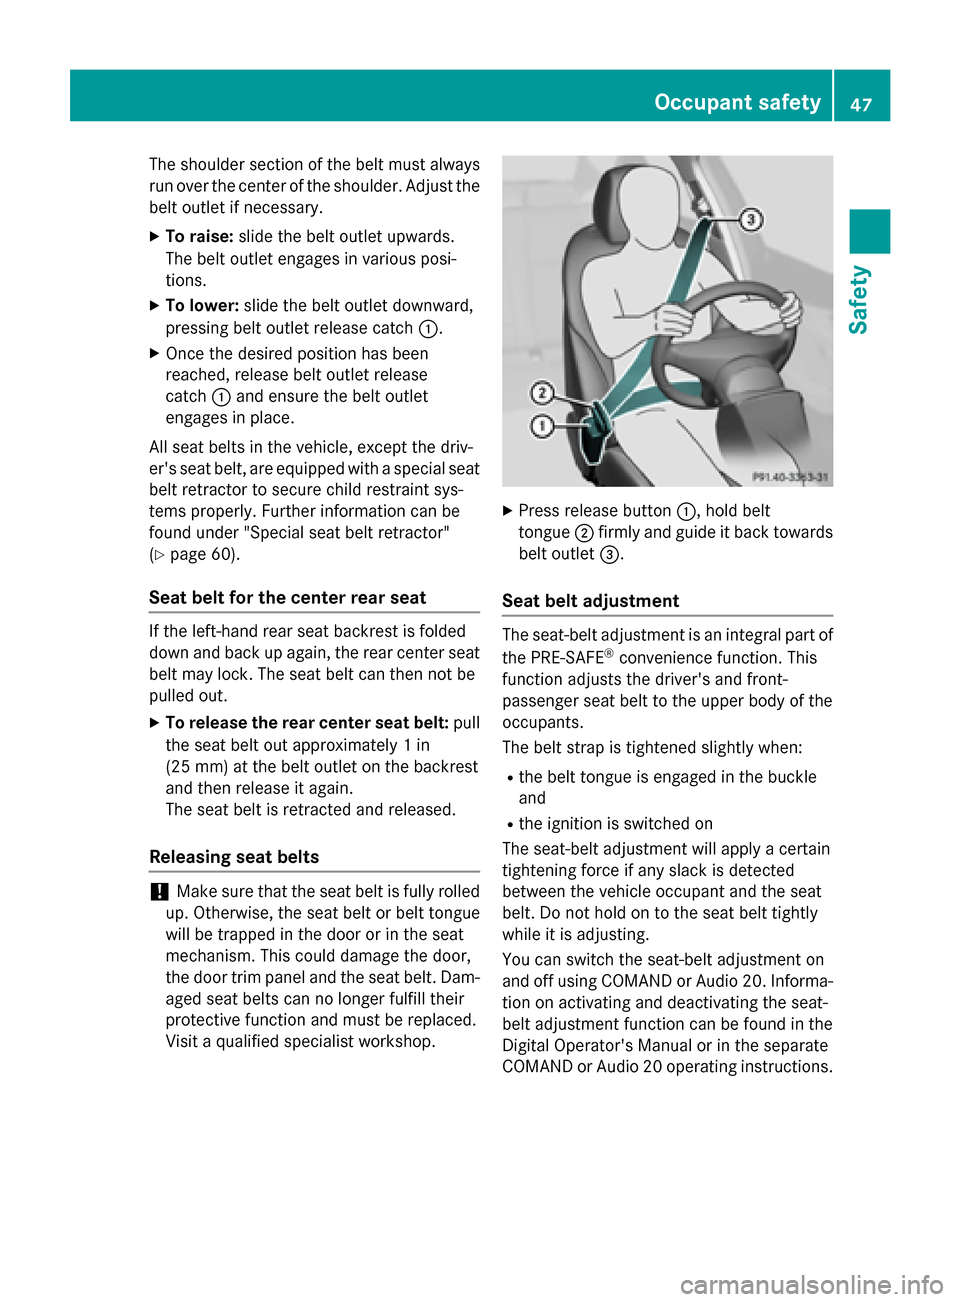
The shoulder section of the belt must always
run over the center of the shoulder. Adjust the
belt outlet if necessary.
X To raise: slide the belt outlet upwards.
The belt outlet engages in various posi-
tions.
X To lower: slide the belt outlet downward,
pressing belt outlet release catch 0043.
X Once the desired position has been
reached, release belt outlet release
catch 0043and ensure the belt outlet
engages in place.
All seat belts in the vehicle, except the driv-
er's seat belt, are equipped with a special seat belt retractor to secure child restraint sys-
tems properly. Further information can be
found under "Special seat belt retractor"
(Y page 60).
Seat belt for the center rear seat If the left-hand rear seat backrest is folded
down and back up again, the rear center seat
belt may lock. The seat belt can then not be
pulled out.
X To release the rear center seat belt: pull
the seat belt out approximately 1 in
(25 mm) at the belt outlet on the backrest
and then release it again.
The seat belt is retracted and released.
Releasing seat belts !
Make sure that the seat belt is fully rolled
up. Otherwise, the seat belt or belt tongue
will be trapped in the door or in the seat
mechanism. This could damage the door,
the door trim panel and the seat belt. Dam- aged seat belts can no longer fulfill their
protective function and must be replaced.
Visit a qualified specialist workshop. X
Press release button 0043, hold belt
tongue 0044firmly and guide it back towards
belt outlet 0087.
Seat belt adjustment The seat-belt adjustment is an integral part of
the PRE-SAFE ®
convenience function. This
function adjusts the driver's and front-
passenger seat belt to the upper body of the
occupants.
The belt strap is tightened slightly when:
R the belt tongue is engaged in the buckle
and
R the ignition is switched on
The seat-belt adjustment will apply a certain
tightening force if any slack is detected
between the vehicle occupant and the seat
belt. Do not hold on to the seat belt tightly
while it is adjusting.
You can switch the seat-belt adjustment on
and off using COMAND or Audio 20. Informa- tion on activating and deactivating the seat-
belt adjustment function can be found in the
Digital Operator's Manual or in the separate
COMAND or Audio 20 operating instructions. Occupant safety
47Safety Z
Page 54 of 406
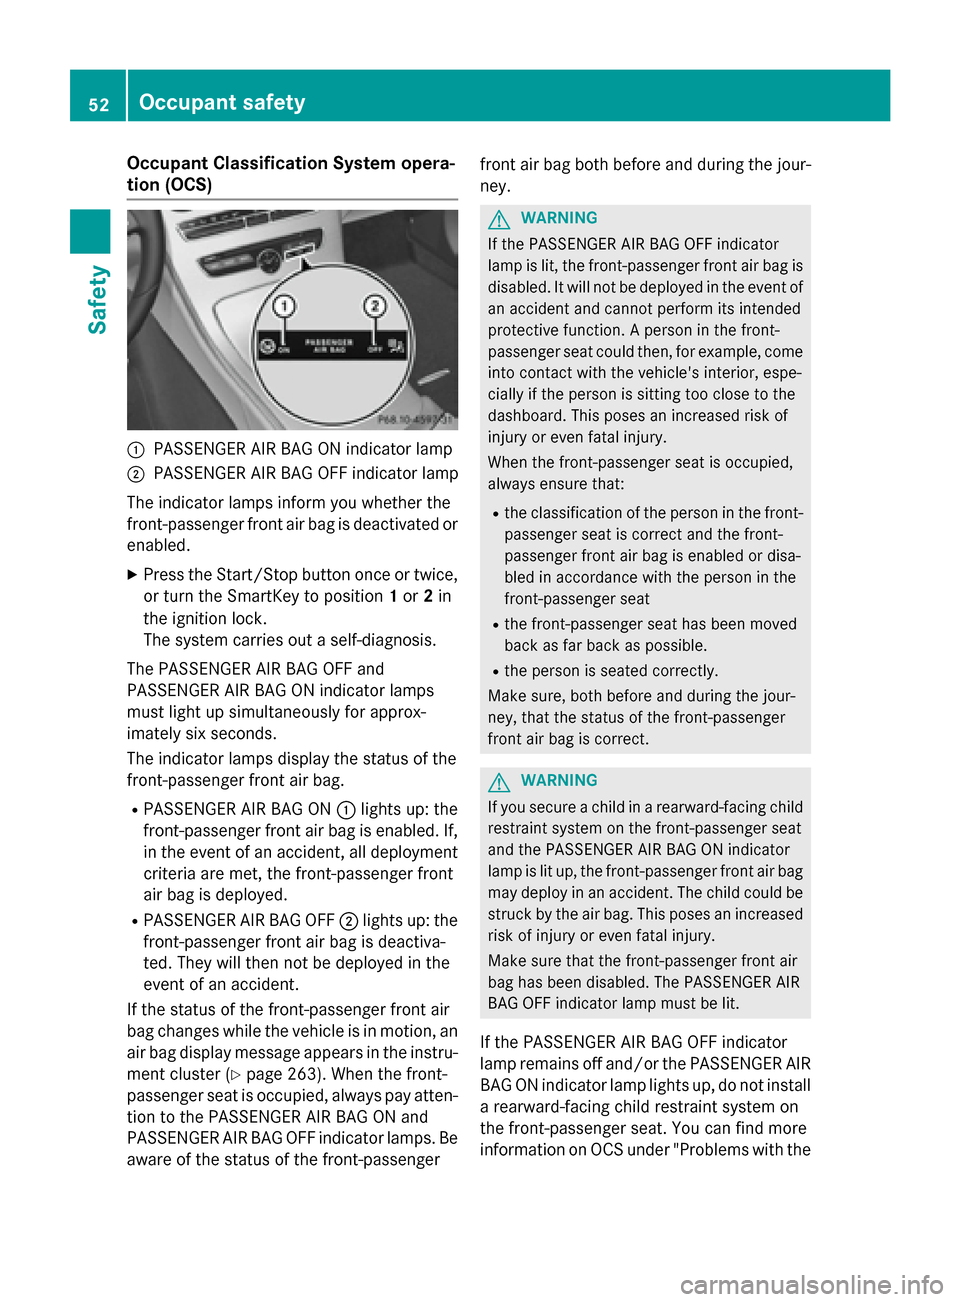
Occupant Classification System opera-
tion (OCS) 0043
PASSENGER AIR BAG ON indicator lamp
0044 PASSENGER AIR BAG OFF indicator lamp
The indicator lamps inform you whether the
front-passenger front air bag is deactivated or enabled.
X Press the Start/Stop button once or twice,
or turn the SmartKey to position 1or 2in
the ignition lock.
The system carries out a self-diagnosis.
The PASSENGER AIR BAG OFF and
PASSENGER AIR BAG ON indicator lamps
must light up simultaneously for approx-
imately six seconds.
The indicator lamps display the status of the
front-passenger front air bag.
R PASSENGER AIR BAG ON 0043lights up: the
front-passenger front air bag is enabled. If,
in the event of an accident, all deployment
criteria are met, the front-passenger front
air bag is deployed.
R PASSENGER AIR BAG OFF 0044lights up: the
front-passenger front air bag is deactiva-
ted. They will then not be deployed in the
event of an accident.
If the status of the front-passenger front air
bag changes while the vehicle is in motion, an
air bag display message appears in the instru-
ment cluster (Y page 263). When the front-
passenger seat is occupied, always pay atten-
tion to the PASSENGER AIR BAG ON and
PASSENGER AIR BAG OFF indicator lamps. Be aware of the status of the front-passenger front air bag both before and during the jour-
ney. G
WARNING
If the PASSENGER AIR BAG OFF indicator
lamp is lit, the front-passenger front air bag is disabled. It will not be deployed in the event of
an accident and cannot perform its intended
protective function. A person in the front-
passenger seat could then, for example, come
into contact with the vehicle's interior, espe-
cially if the person is sitting too close to the
dashboard. This poses an increased risk of
injury or even fatal injury.
When the front-passenger seat is occupied,
always ensure that:
R the classification of the person in the front-
passenger seat is correct and the front-
passenger front air bag is enabled or disa-
bled in accordance with the person in the
front-passenger seat
R the front-passenger seat has been moved
back as far back as possible.
R the person is seated correctly.
Make sure, both before and during the jour-
ney, that the status of the front-passenger
front air bag is correct. G
WARNING
If you secure a child in a rearward-facing child
restraint system on the front-passenger seat
and the PASSENGER AIR BAG ON indicator
lamp is lit up, the front-passenger front air bag may deploy in an accident. The child could be
struck by the air bag. This poses an increased risk of injury or even fatal injury.
Make sure that the front-passenger front air
bag has been disabled. The PASSENGER AIR
BAG OFF indicator lamp must be lit.
If the PASSENGER AIR BAG OFF indicator
lamp remains off and/or the PASSENGER AIR BAG ON indicator lamp lights up, do not install
a rearward-facing child restraint system on
the front-passenger seat. You can find more
information on OCS under "Problems with the 52
Occupant safetySafety
Page 58 of 406
Deployment of Emergency Tensioning
Devices and air bags
Important safety notes G
WARNING
The air bag parts are hot after an air bag has
been deployed. There is a risk of injury.
Do not touch the air bag parts. Have a
deployed air bag replaced at a qualified spe-
cialist workshop as soon as possible. G
WARNING
A deployed air bag no longer offers any pro-
tection and cannot provide the intended pro-
tection in an accident. There is an increased
risk of injury.
Have the vehicle towed to a qualified special- ist workshop in order to have a deployed air
bag replaced.
It is important for your safety and that of your
passenger to have deployed air bags replaced and to have any malfunctioning air bags
repaired. This will help to make sure the air
bags continue to perform their protective
function for the vehicle occupants in the
event of a crash. G
WARNING
Pyrotechnic Emergency Tensioning Devices
that have been deployed are no longer opera- tional and are unable to perform their inten-
ded protective function. This poses an
increased risk of injury or even fatal injury.
Therefore, have pyrotechnic Emergency Ten-
sioning Devices which have been triggered
immediately replaced at a qualified specialist workshop.
An electric motor is used by PRE-SAFE ®
to
trigger the tightening of the seat belt in haz-
ardous situations. This procedure is reversi-
ble.
If Emergency Tensioning Devices or air bags
are deployed, you will hear a bang, and a small amount of powder may also be released. The
0075 restraint system warning lamp lights up. Only in rare cases will the bang affect your
hearing. The powder that is released gener-
ally does not constitute a health hazard, but it may cause short-term breathing difficulties in
people with asthma or other respiratory prob-
lems. To avoid this, you may wish to get out of
the vehicle or open the windows as soon as it is safe to do so.
Air bags and pyrotechnic Emergency Tension-
ing Devices (ETDs) contain perchlorate mate-
rial, which may require special handling and
regard for the environment. National guide-
lines must be observed during disposal. In
California, see www.dtsc.ca.gov/
HazardousWaste/Perchlorate/
index.cfm .
Method of operation During the first stage of a collision, the
restraint system control unit evaluates impor-
tant physical data relating to vehicle deceler-
ation or acceleration, such as:
R duration
R direction
R intensity
Based on the evaluation of this data, the
restraint system control unit deploys the
Emergency Tensioning Devices during a fron- tal or rear collision.
An Emergency Tensioning Device can only be
deployed, if:
R the ignition is switched on
R the components of the restraint system are
operational; see "Restraint system warning lamp" (Y page 43)
R the belt tongue is engaged in the buckle on
the respective front-passenger seat
The Emergency Tensioning Devices in the
rear compartment are deployed independ-
ently of the lock status of the seat belts. 56
Occupant safetySafety
Page 68 of 406
den steering or braking, thereby injuring vehi-
cle occupants. There is a risk of an accident
and injury.
Never leave animals unattended in the vehi-
cle. Always secure animals properly during
the journey, e.g. use a suitable animal trans-
port box. Driving safety systems
Overview of driving safety systems
In this section, you will find information about
the following driving safety systems:
R ABS ( Anti-lock BrakingSystem)
(Y page 66)
R BAS (Brake AssistSystem) (Y page 67)
R BAS PLUS with Cross-Traffic Assist ( Brake
Assist System PLUS with Cross-Traffic
Assist) (Y page 67)
R COLLISION PREVENTION ASSIST PLUS
(distance warning function and adaptive
Brake Assist) (Y page 69)
R ESP ®
(Electronic StabilityProgram)
(Y page 71)
R EBD ( Electronic Brake force Distribution)
(Y page 73)
R ADAPTIVE BRAKE (Y page 74)
R PRE-SAFE ®
Brake (Y page 74)
R STEER CONTROL (Y page 76)Important safety notes
If you fail to adapt your driving style or
become distracted, the driving safety sys-
tems can neither reduce the risk of accident
nor override the laws of physics. Driving
safety systems are merely aids designed to
assist driving. You are responsible for the dis-
tance to the vehicle in front, for vehicle speed and for braking in good time. Always adapt
your driving style to suit the prevailing road,
weather and traffic conditions and maintain a safe distance from the vehicle in front. Drive
carefully.
The driving safety systems described only
work as effectively as possible when there is
adequate contact between the tires and the
road surface. Please pay special attention to
the notes on tires, recommended minimum
tire tread depths, etc. (Y page 358).
In wintry driving conditions, always use winter
tires (M+S tires) and if necessary, snow
chains. Only in this way will the driving safety systems described in this section work as
effectively as possible. ABS (Anti-lock Braking System)
General information ABS regulates brake pressure in such a way
that the wheels do not lock when you brake.
This allows you to continue steering the vehi- cle when braking.
The 0025 ABS warning lamp in the instrument
cluster lights up when the ignition is switched on. It goes out when the engine is running.
Important safety notes i
Observe the "Important safety notes" sec-
tion (Y page 66). G
WARNING
If ABS is faulty, the wheels could lock when
braking. The steerability and braking charac-
teristics may be severely impaired. Addition-
ally, further driving safety systems are deac-
tivated. There is an increased danger of skid- ding and accidents.
Drive on carefully. Have ABS checked imme-
diately at a qualified specialist workshop.
When ABS is malfunctioning, other systems,
including driving safety systems, will also
become inoperative. Observe the information on the ABS warning lamp (Y page 286) and
display messages which may be shown in the
instrument cluster (Y page 251).66
Driving safety systemsSafety
Page 74 of 406
ETS/4ETS (Electronic Traction System)
i
Observe the "Important safety notes" sec-
tion (Y page 66).
ETS traction control is part of ESP ®
. On vehi-
cles with 4MATIC, 4ETS is part of ESP ®
.
Traction control brakes the drive wheels indi-
vidually if they spin. This enables you to pull
away and accelerate on slippery surfaces, for
example if the road surface is slippery on one side. In addition, more drive torque is trans-
ferred to the wheel or wheels with traction.
Traction control remains active, even if you
deactivate ESP ®
.
Important safety notes i
Observe the "Important safety notes" sec-
tion (Y page 66). G
WARNING
If ESP ®
is malfunctioning, ESP ®
is unable to
stabilize the vehicle. Additionally, further driv- ing safety systems are deactivated. This
increases the risk of skidding and an accident.
Drive on carefully. Have ESP ®
checked at a
qualified specialist workshop.
! If you test the parking brake using a brake
dynamometer, switch the ignition off.
Application of the brakes by ESP ®
may oth-
erwise destroy the brake system.
When towing the vehicle with the rear axle
raised, observe the notes on ESP ®
(Y page 353).
ESP ®
is deactivated if the warning lamp 00BB
in the instrument cluster lights up and:
R the vehicle is moving
R the ECO start/stop function is activated
If the 00E5 warning lamp lights up continu-
ously, ESP ®
is not available due to a malfunc-
tion.
Observe the information on warning lamps
(Y page 288) and display messages which
may be shown in the instrument cluster
(Y page 251). Only use wheels with the recommended tire
sizes. Only then will ESP
®
function properly.
Characteristics of ESP ® General information
If the
00E5 ESP warning lamp goes out before
beginning the journey, ESP ®
is automatically
active.
If ESP ®
intervenes, the 00E5ESP®
warning
lamp flashes in the instrument cluster.
If ESP ®
intervenes:
X Do not deactivate ESP ®
under any circum-
stances.
X Only depress the accelerator pedal as far as
necessary when pulling away.
X Adapt your driving style to suit the prevail-
ing road and weather conditions.
ECO start/stop function
The ECO start/stop function switches the
engine off automatically when the vehicle
stops moving. The engine starts automati-
cally when the driver wants to pull away again. ESP ®
remains in its previously selected sta-
tus. Example: if ESP®
was deactivated before
the engine was switched off, ESP ®
remains
deactivated when the engine is switched on
again.
Deactivating/activating ESP ® Important safety notes
i Observe the "Important safety notes" sec-
tion (Y page 66).
You can select between the following states
of ESP ®
:
R ESP ®
is activated.
R ESP ®
is deactivated. G
WARNING
If you deactivate ESP ®
, ESP ®
no longer sta-
bilizes the vehicle. There is an increased risk
of skidding and an accident. 72
Driving safety systemsSafety