dynamic select MERCEDES-BENZ C-Class SEDAN 2016 W205 User Guide
[x] Cancel search | Manufacturer: MERCEDES-BENZ, Model Year: 2016, Model line: C-Class SEDAN, Model: MERCEDES-BENZ C-Class SEDAN 2016 W205Pages: 398, PDF Size: 9.57 MB
Page 191 of 398
front will then not be maintained. You will be
driving at the speed you determine by the
position of the accelerator pedal.
You can also activate DISTRONIC PLUS when
stationary. The lowest speed that can be set is
20 mph (30 km/h).
XBriefly pull the cruise control lever towards
you ?, up :or down ;.
DISTRONIC PLUS is selected.
Activating at the current speed/last
stored speed
GWARNING
If you call up the stored speed and it differs
from the current speed, the vehicle acceler-
ates or decelerates. If you do not know the
stored speed, the vehicle could accelerate or brake unexpectedly. There is a risk of an acci-
dent.
Pay attention to the road and traffic condi-
tions before calling up the stored speed. If you
do not know the stored speed, store the
desired speed again.
XBriefly pull the cruise control lever towards
you ?.
XRemove your foot from the accelerator pedal.
DISTRONIC PLUS is activated. The first time it
is activated, the current speed is stored. Oth-
erwise, it sets the vehicle cruise speed to the
previously stored value.
Driving with DISTRONIC PLUS
Pulling away and driving
XIf you want to pull away with DISTRONIC
PLUS: remove your foot from the brake pedal.
XBriefly pull the cruise control lever towards
you?.
or
XAccelerate briefly.
Your vehicle pulls away and adapts its speed
to that of the vehicle in front. If no vehicle is
detected in front, your vehicle accelerates to the set speed.
The vehicle can also pull away when it is facing
an unidentified obstacle or is driving on a differ-
ent line from another vehicle. The vehicle then
brakes automatically. If there is no vehicle in front, DISTRONIC PLUS
operates in the same way as cruise control.
If DISTRONIC PLUS detects that the vehicle in
front has slowed down, it brakes your vehicle. In
this way, the distance you have selected is main-
tained.
If DISTRONIC PLUS detects a faster-moving
vehicle in front, it increases the driving speed.
However, the vehicle is only accelerated up to
the speed you have stored.
Selecting the drive program
DISTRONIC PLUS supports a sporty driving style
when you have selected the
Sor S+ driving pro-
gram (
Ypage 159). Acceleration behind the
vehicle in front or to the set speed is then notice-
ably more dynamic. If you have selected the Cor
E driving program, the vehicle accelerates more
gently. This setting is recommended in stop-
and-start traffic.
Changing lanes
If you change to the passing lane, DISTRONIC
PLUS supports you when:
Ryou are driving faster than 45 mph (70 km/h)
Ryou switch on the appropriate turn signal
RDISTRONIC PLUS does not detect a danger of
collision
If these conditions are fulfilled, your vehicle is
accelerated. Acceleration will be interrupted if
changing lanes takes too long or if the distance
betw
een your vehicle and the vehicle in front
becomes too small.
iWhen you change lanes, DISTRONIC PLUS
monitors the left lane on left-hand-drive vehi-
cles or the right lane on right-hand-drive vehi-
cles.
Stopping
GWARNING
When leaving the vehicle, even if it is braked
only by DISTRONIC PLUS, it could roll away if:
Rthere is a malfunction in the system or in
the voltage supply.
RDISTRONIC PLUS has been deactivated
with the cruise control lever, e.g. by a vehi-
cle occupant or from outside the vehicle.
Driving systems189
Driving and parking
Z
Page 200 of 398
The damping is tuned individually to each wheel
and depends on:
Ryour driving style, e.g. sporty
Rthe road surface condition, e.g. bumps
Ryour individual selection of Sport, Sport + or
Comfort
The suspension setting is adjusted using the
corresponding button in the center console.
iThe mode can also be set using the
DYNAMIC SELECT switch (Ypage 154).
This is only possible if:
Rusing the AMG adaptive sport suspension
system button on the center console, and
Rusing the DYNAMIC SELECT switch, the
same mode is selected for the chassis. This
is the case, for example, when both are set
to Comfort mode.
Each time you start the engine with the ignition
key or the Start/Stop button, Comfort mode is
activated. For further information about starting
the engine, see (
Ypage 148).
Sport mode
The firmer setting of the suspension tuning in
Sport mode ensures even better contact with
the road. Select this mode when employing a
sporty driving style, e.g. on winding country
roads.
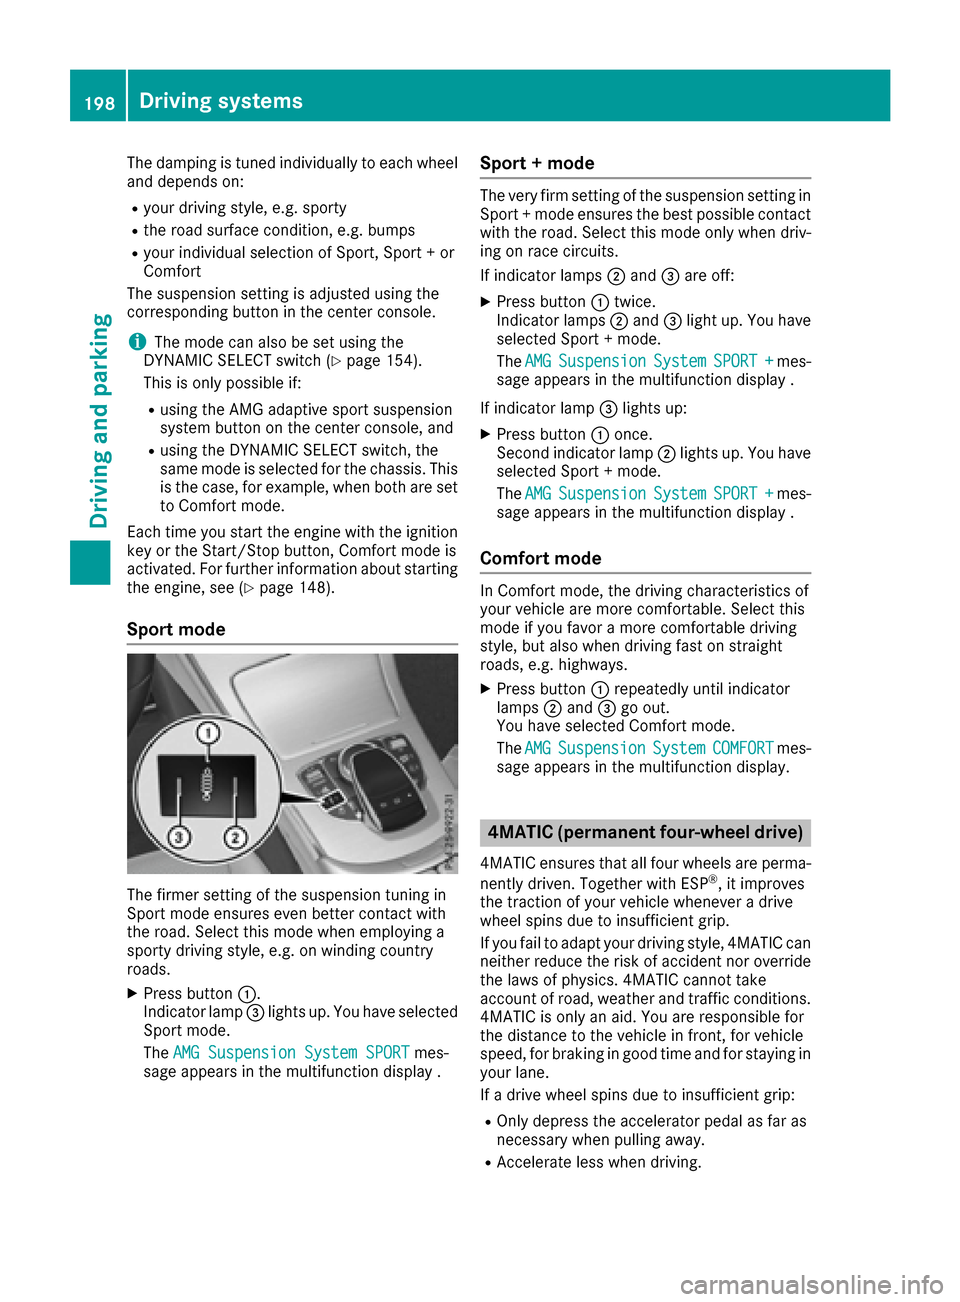
XPress button :.
Indicator lamp =lights up. You have selected
Sport mode.
The AMG Suspension System SPORT
mes-
sage appears in the multifunction display .
Sport + mode
The very firm setting of the suspension setting in
Sport + mode ensures the best possible contact
with the road. Select this mode only when driv-
ing on race circuits.
If indicator lamps ;and =are off:
XPress button :twice.
Indicator lamps ;and =light up. You have
selected Sport + mode.
The AMG
SuspensionSystemSPORT +mes-
sage appears in the multifunction display .
If indicator lamp =lights up:
XPress button :once.
Second indicator lamp ;lights up. You have
selected Sport + mode.
The AMG
SuspensionSystemSPORT +mes-
sage appears in the multifunction display .
Comfort mode
In Comfort mode, the driving characteristics of
your vehicle are more comfortable. Select this
mode if you favor a more comfortable driving
style, but also when driving fast on straight
roads, e.g. highways.
XPress button :repeatedly until indicator
lamps ;and =go out.
You have selected Comfort mode.
The AMG
SuspensionSystemCOMFORTmes-
sage appears in the multifunction display.
4MATIC (permanent four-wheel drive)
4MATIC ensures that all four wheels are perma-
nently driven. Together with ESP®, it improves
the traction of your vehicle whenever a drive
wheel spins due to insufficient grip.
If you fail to adapt your driving style, 4MATIC can
neither reduce the risk of accident nor override the laws of physics. 4MATIC cannot take
account of road, weather and traffic conditions.
4MATIC is only an aid. You are responsible for
the distance to the vehicle in front, for vehicle
speed, for braking in good time and for staying in
your lane.
If a drive wheel spins due to insufficient grip:
ROnly depress the accelerator pedal as far as
necessary when pulling away.
RAccelerate less when driving.
198Driving systems
Driving and parking
Page 209 of 398
Rif the camera lens is dirty or obstructed
Observe the notes on cleaning
(
Ypage 339)
Rif the rear of your vehicle is damaged. In this
event, have the camera position and setting
checked at a qualified specialist workshop
The field of vision and other functions of the rear
view camera may be restricted due to additional
accessories on the rear of the vehicle (e.g.
license plate holder, bicycle rack).
iThe rear view camera is protected from rain-
drops and dust by means of a flap. When the
rear view camera is activated, this flap opens.
The flap closes again when:
Ryou have finished the maneuvering process
Ryou switch off the engine
Ryou open the trunk
Observe the notes on cleaning (
Ypage 339).
For technical reasons, the flap may remain
open briefly after the rear view camera has
been deactivated.
Activating/deactivating the rear view
camera
XTo activate: make sure that the SmartKey is
in position 2in the ignition lock.
XMake sure that the Activation by R gearfunction is selected in the multimedia system
(see the separate operating instructions).
XEngage reverse gear.
The rear view camera flap opens. The multi-
media system shows the area behind the vehi-
cle with guide lines.
The image from the rear view camera is avail-
able throughout the maneuvering process.
To deactivate: the rear view camera deacti-
vates if you shift the transmission to Por after
driving forwards a short distance.
Multimedia display
The rear view camera may show a distorted view
of obstacles, show them incorrectly or not at all.
The rear view camera does not show objects in
the following positions:
Rvery close to the rear bumper
Runder the rear bumper
Rin close range above the handle on the trunk
lid
!Objects not at ground level may appear to
be further away than they actually are, e.g.:
Rthe bumper of a parked vehicle
Rthe drawbar of a trailer
Rthe ball coupling of a trailer tow hitch
Rthe rear section of an HGV
Ra slanted post
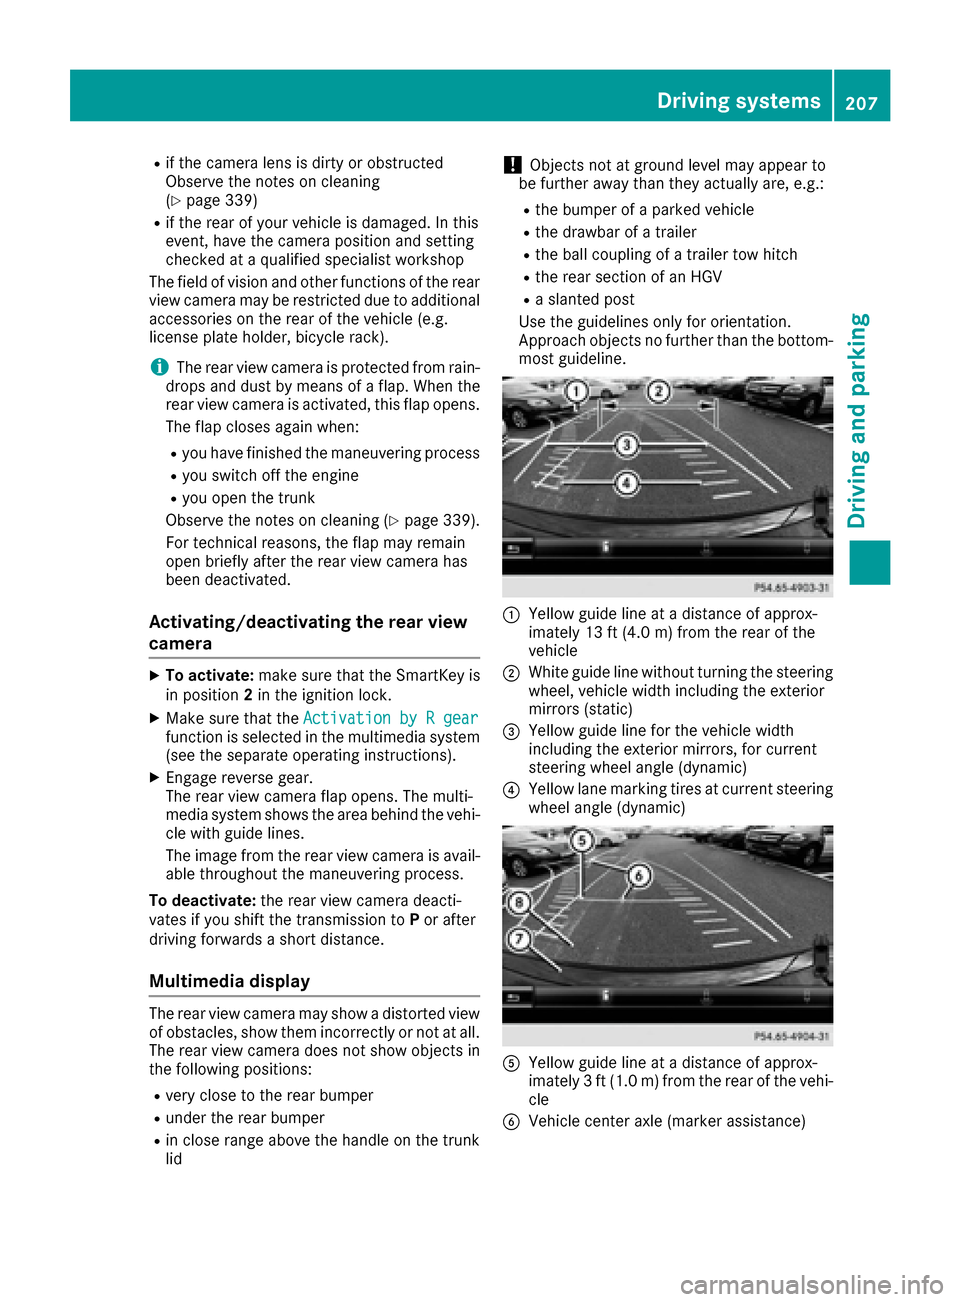
Use the guidelines only for orientation.
Approach objects no further than the bottom-
most guideline.
:Yellow guide line at a distance of approx-
imately 13 ft (4.0 m) from the rear of the
vehicle
;White guide line without turning the steering
wheel, vehicle width including the exterior
mirrors (static)
=Yellow guide line for the vehicle width
including the exterior mirrors, for current
steering wheel angle (dynamic)
?Yellow lane marking tires at current steering
wheel angle (dynamic)
AYellow guide line at a distance of approx-
imately 3 ft (1.0 m) from the rear of the vehi-
cle
BVehicle center axle (marker assistance)
Driving systems207
Driving and parking
Z
Page 214 of 398
XMake sure that the SmartKey is in position2
in the ignition lock.
XMake sure that the Activation by R gearfunction is selected in the multimedia system
(see the Digital Operator's Manual).
XTo show the 360° camera image: engage
reverse gear.
The multimedia system shows the area
behind the vehicle in split-screen mode. You
see the top view of the vehicle and the image
from the rear view camera.
Selecting the split-screen view or full
screen mode
Switching between split screen views:
XTo switch to the line with the vehicle icons:
slide 5the controller.
XTo select a vehicle icon: turn the controller.
Switching to full screen mode:
X180° ViewTurn and press the controller.
iThe full screen option is only available in the
following views:
RTop view with picture from the rear view
camera
RTop view with picture from the front camera
Multimedia display
Important safety notes
The camera system may show a distorted view
of obstacles, show them incorrectly or not at all.
Obstacles are not shown by the system in the
following locations:
Runder the front and rear bumpers
Rvery close to the front and rear bumpers
Rin close range above the handle on the trunk
lid
Rvery close to the exterior mirrors
Rin the transitional areas between the various
cameras in the virtual top view
!Objects not at ground level may appear to
be further away than they actually are, e.g.:
Rthe bumper of a parked vehicle
Rthe drawbar of a trailer
Rthe ball coupling of a trailer tow hitch
Rthe rear section of an HGV
Ra slanted post
Use the guidelines only for orientation.
Approach objects no further than the bottom-
most guideline.
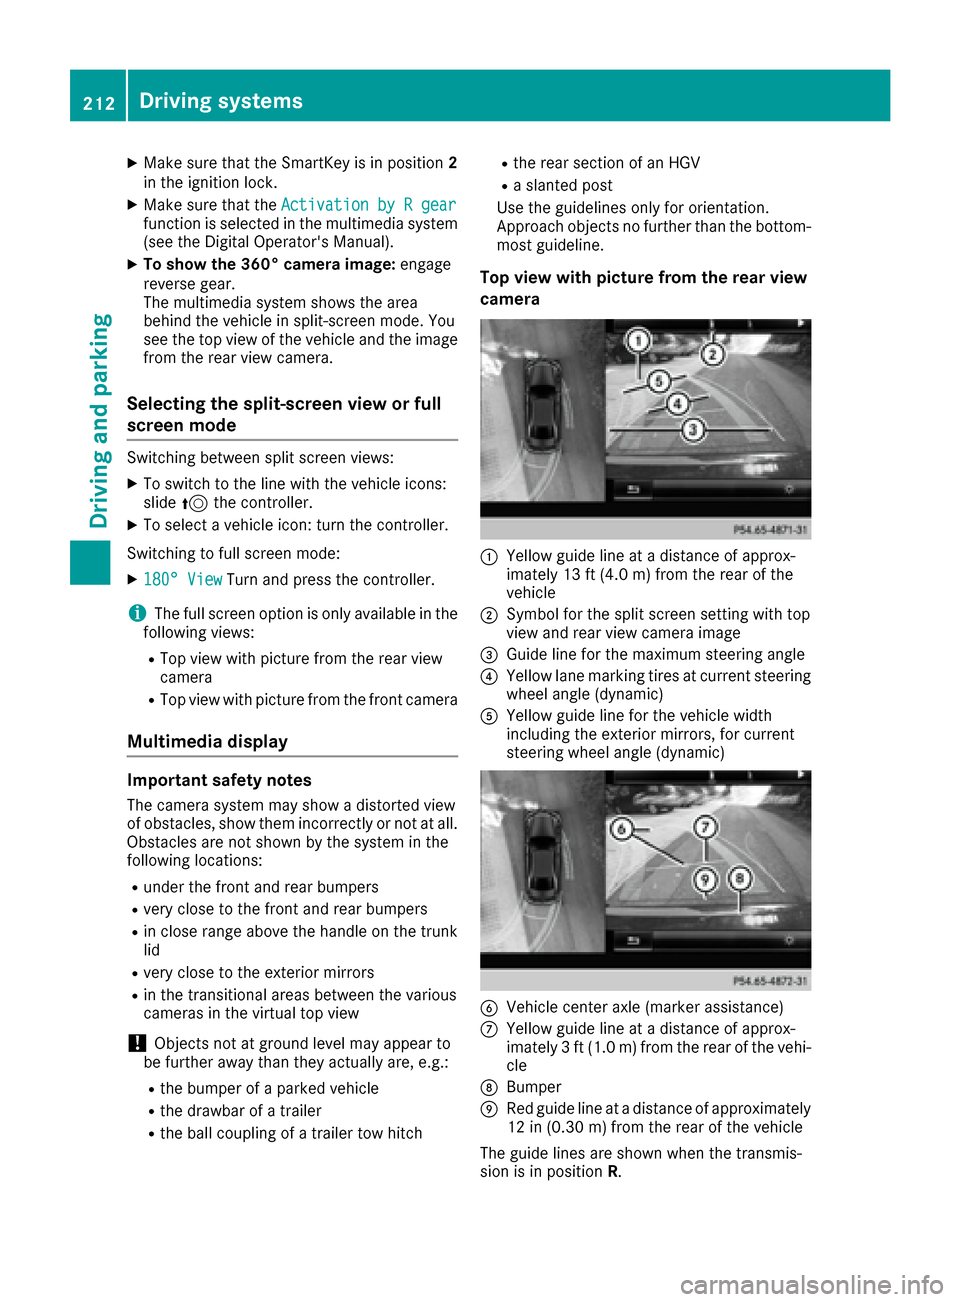
Top view with picture from the rear view
camera
:Yellow guide line at a distance of approx-
imately 13 ft (4.0 m) from the rear of the
vehicle
;Symbol for the split screen setting with top
view and rear view camera image
=Guide line for the maximum steering angle
?Yellow lane marking tires at current steering
wheel angle (dynamic)
AYellow guide line for the vehicle width
including the exterior mirrors, for current
steering wheel angle (dynamic)
BVehicle center axle (marker assistance)
CYellow guide line at a distance of approx-
imately 3 ft (1.0 m) from the rear of the vehi-
cle
DBumper
ERed guide line at a distance of approximately
12 in (0.30 m) from the rear of the vehicle
The guide lines are shown when the transmis-
sion is in position R.
212Driving systems
Driving and parking
Page 215 of 398
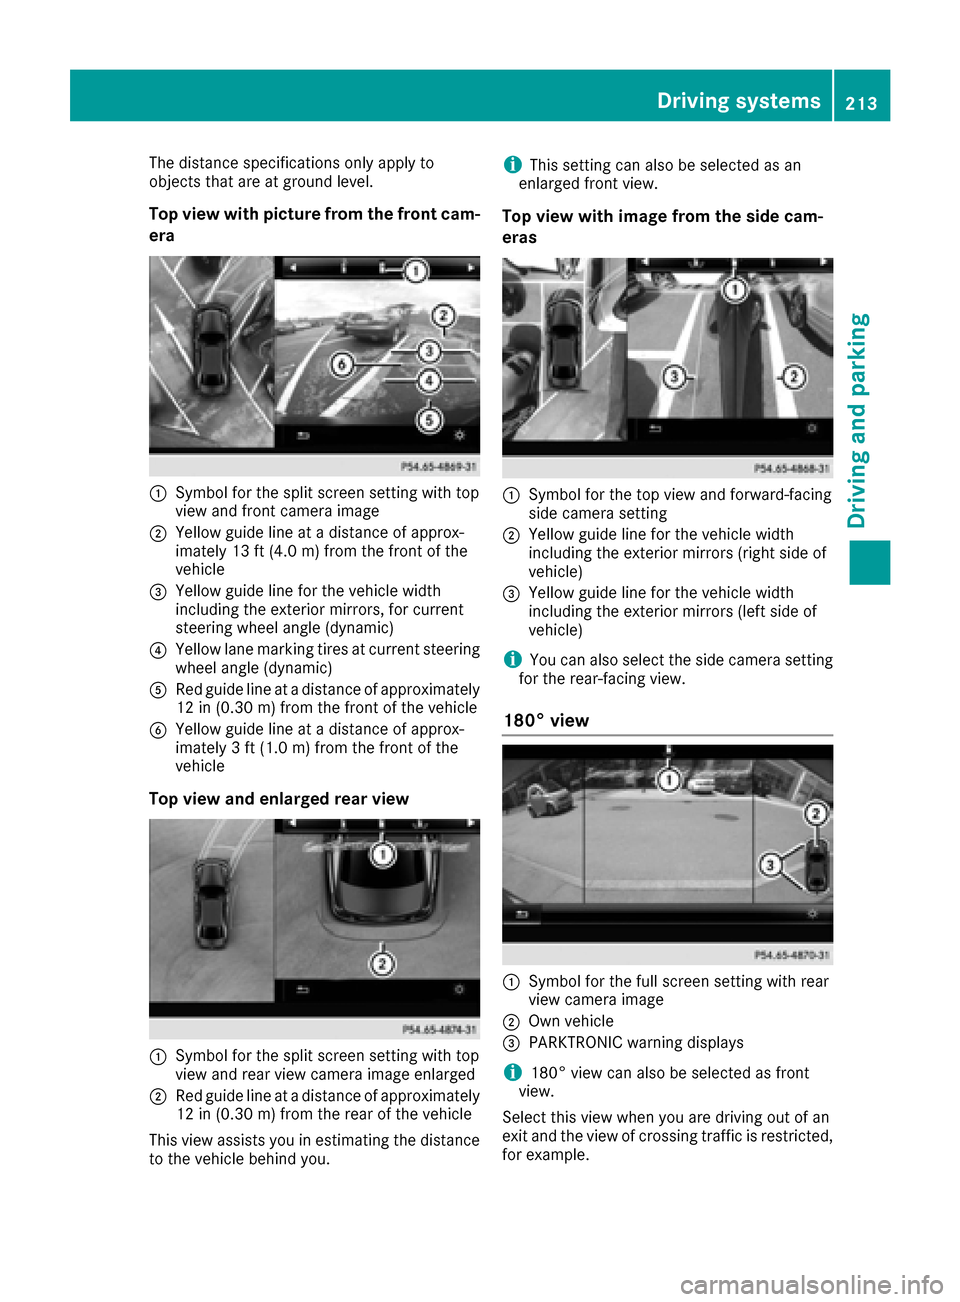
The distance specifications only apply to
objects that are at ground level.
Top view with picture from the front cam-
era
:Symbol for the split screen setting with top
view and front camera image
;Yellow guide line at a distance of approx-
imately 13 ft (4.0 m) from the front of the
vehicle
=Yellow guide line for the vehicle width
including the exterior mirrors, for current
steering wheel angle (dynamic)
?Yellow lane marking tires at current steering
wheel angle (dynamic)
ARed guide line at a distance of approximately
12 in (0.30 m) from the front of the vehicle
BYellow guide line at a distance of approx-
imately 3 ft (1.0 m) from the front of the
vehicle
Top view and enlarged rear view
:Symbol for the split screen setting with top
view and rear view camera image enlarged
;Red guide line at a distance of approximately
12 in (0.30 m)from the rear of the vehicle
This view assists you in estimating the distance
to the vehicle behind you.
iThis setting can also be selected as an
enlarged front view.
Top view with image from the side cam-
eras
:Symbol for the top view and forward-facing
side camera setting
;Yellow guide line for the vehicle width
including the exterior mirrors (right side of
vehicle)
=Yellow guide line for the vehicle width
including the exterior mirrors (left side of
vehicle)
iYou can also select the side camera setting
for the rear-facing view.
180° view
:Symbol for the full screen setting with rear
view camera image
;Own vehicle
=PARKTRONIC warning displays
i180° view can also be selected as front
view.
Select this view when you are driving out of an
exit and the view of crossing traffic is restricted,
for example.
Driving systems213
Driving and parking
Z
Page 231 of 398
XReleaseth ebrak epedal .
XCarefully depress th eaccelerato rpedal .
Fo rfurther information on pullin gaway
(
Ypage 149).
Driving
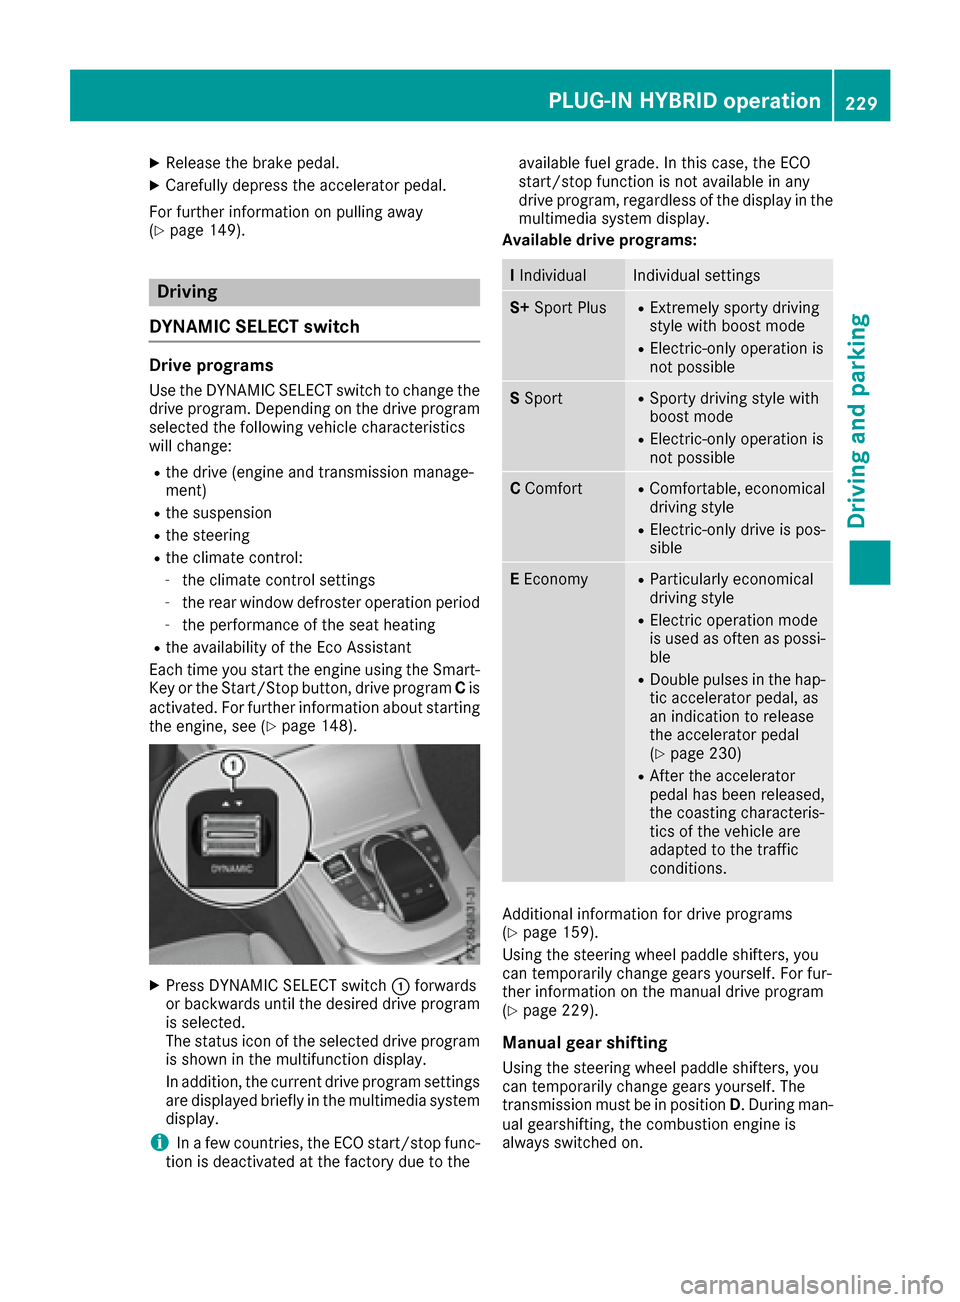
DYNAMIC SELECT switch
Dri veprogram s
Use theDYNAMIC SELECT switch to chang eth e
driv eprogram .Dependin gon th edriv eprogram
selected th efollowin gvehicl echaracteristics
will change:
Rth edriv e(engin eand transmission manage-
ment)
Rth esuspension
Rth esteering
Rth eclimat econtrol :
-theclimat econtrol setting s
-therear window defroste roperation period
-th eperformance of th eseat heating
Rth eavailabilit yof th eEc oAssistant
Eac htime you start th eengin eusin gth eSmart -
Key or th eStart/Sto pbutton, driv eprogram Cis
activated. Fo rfurther information about starting
th eengine, see (
Ypage 148).
XPress DYNAMIC SELECT switch :forwards
or backwards until th edesired driv eprogram
is selected.
The status ico nof th eselected driv eprogram
is shown in th emultifunction display.
In addition ,th ecurren tdriv eprogram setting s
are displayed briefly in th emultimedia system
display.
iIn afew countries, th eECO start/sto pfunc-
tion is deactivated at th efactory due to th eavailable fuel grade. In this case, th
eECO
start/sto pfunction is no tavailable in any
driv eprogram ,regardless of th edisplay in th e
multimedia system display.
Available drive programs:
I IndividualIndividual setting s
S+Sport PlusRExtremely sport ydriving
style wit hboos tmod e
RElectric-only operation is
notpossibl e
SSportRSport ydriving style wit h
boos tmod e
RElectric-only operation is
notpossibl e
CComfortRComfortable, economical
driving style
RElectric-only driv eis pos -
sibl e
EEconomyRParticularly economical
driving style
RElectric operation mod e
is used as often as possi-
ble
RDouble pulse sin th ehap-
ti c accelerato rpedal ,as
an indication to release
th eaccelerato rpedal
(
Ypage 230)
RAfte rth eaccelerato r
pedal has been released,
th ecoasting characteris -
tics of th evehicl eare
adapted to th etraffic
conditions.
Additional information for driv eprogram s
(Ypage 159).
Using th esteering whee lpaddl eshifters, you
can temporarily chang egear syourself .Fo rfur -
ther information on th emanual driv eprogram
(
Ypage 229).
Manua lgear shi fting
Using th esteering whee lpaddl eshifters, you
can temporarily chang egear syourself .The
transmission mus tbe in position D.During man -
ual gearshifting ,th ecombustion engin eis
always switched on .
PLUG‑IN HYBRID operation229
Driving and parking
Z
Page 306 of 398
iThe current status of the cooling function is
displayed in the climate control bar: A/C ON
– activated, A/C OFF – deactivated.
iDeactivating the cooling with air dehumidi-
fication function reduces fuel consumption.
Synchronizing the climate control set-
tings
Use OSync(synchronization) to select the cli-
mate control setting for all zones together Oor
separately ª.
XCall up the climate control menu
(Ypage 302).
XSlide6the controller repeatedly until the
bottom bar is activated.
XTo select OSync: turn and press the con-
troller.
XSwitch the synchronization function on Oor
off ª.
For further information on synchronizing climate
control settings, see (
Ypage 135).
Navigation mode
Important safety notes
GWARNING
If you operate information systems and com-
munication equipment integrated in the vehi-
cle while driving, you will be distracted from
traffic conditions. You could also lose control
of the vehicle. There is a risk of an accident.
Only operate the equipment when the traffic
situation permits. If you are not sure that this
is possible, park the vehicle paying attention
to traffic conditions and operate the equip-
ment when the vehicle is stationary.
You must observe the legal requirements for the
country in which you are currently driving when
operating the navigation system.
General notes
Among other things, correct functioning of the
navigation system depends on GPS reception. In
certain situations, GPS reception may be
impaired, there may be interference or there
may be no reception at all, e.g. in tunnels or
parking garages. Audio 20 is equipped with MARGIN
®MAP PILOT
(see the manufacturer's operating instructions).
The Garmin
®MAP PILOT operating instructions
are stored on the SD memory card as a PDF file.
The SD card box contains a quick guide.
The following descriptions apply to navigation
with COMAND. Further information can be
found in the Digital Operator's Manual.
Selecting a route type and route options
Multimedia system:
XSelect NaviQNavigation.
The map shows the vehicle's current position.
XSlide 6the controller.
XSelect OptionsQRoute Settings.
Notes for route types:
REco Route
RDynamic Traffic Route
Traffic reports on the route for the route guid-
ance are taken into account.
RCalculate Alternative Routes
Different routes are being calculated. Instead
of Startselect the Continuemenu item.
Notes for route options:
RUse Toll Roads
The route calculation includes roads which
require you to pay a usage fee (toll).
RUse Vignette Roads(not available in all
countries)
The route calculation includes roads which
require you to pay a time-based fee (vignette).
A vignette allows temporary use of the route
network, e. g. 10 days or 1 year.
RUse Carpool Lanes(only available in the
USA)
Prerequisite: your vehicle meets the access
conditions for carpool lanes.
Carpool lanes will be included if the carpool
lanes option is activated.
Entering an address
Multimedia system:
XSelect NaviQNavigation.
The map shows the vehicle's current position.
XSlide 6the controller.
XSelect DestinationQAddress Entry.
304Operating system
Multimedia system