wipers MERCEDES-BENZ C-Class SEDAN 2016 W205 User Guide
[x] Cancel search | Manufacturer: MERCEDES-BENZ, Model Year: 2016, Model line: C-Class SEDAN, Model: MERCEDES-BENZ C-Class SEDAN 2016 W205Pages: 398, PDF Size: 9.57 MB
Page 129 of 398

Installing the wiper blades
XInsert the new wiper bladeinto thewiperarm
in the direction of arrow :.
XSlidecatch ;inthe direction of arrow =
unt il it engages inthe locking position with a
noticeable click.
XMake sure that the wiper blade isseated cor-
rectly.
XFold the wiperarm back onto the windshield.
XRemove protective film:of the service ind i-
cator on the tip of the wiper blade.
If the color of the service indicator changes from
blac k to yellow, the wiper bladesshouldbe
replace d.
iThe duration of the color change varies
depending on the terms of use.
Windshield wipers127
Lights and windshield wipers
Z
Page 130 of 398
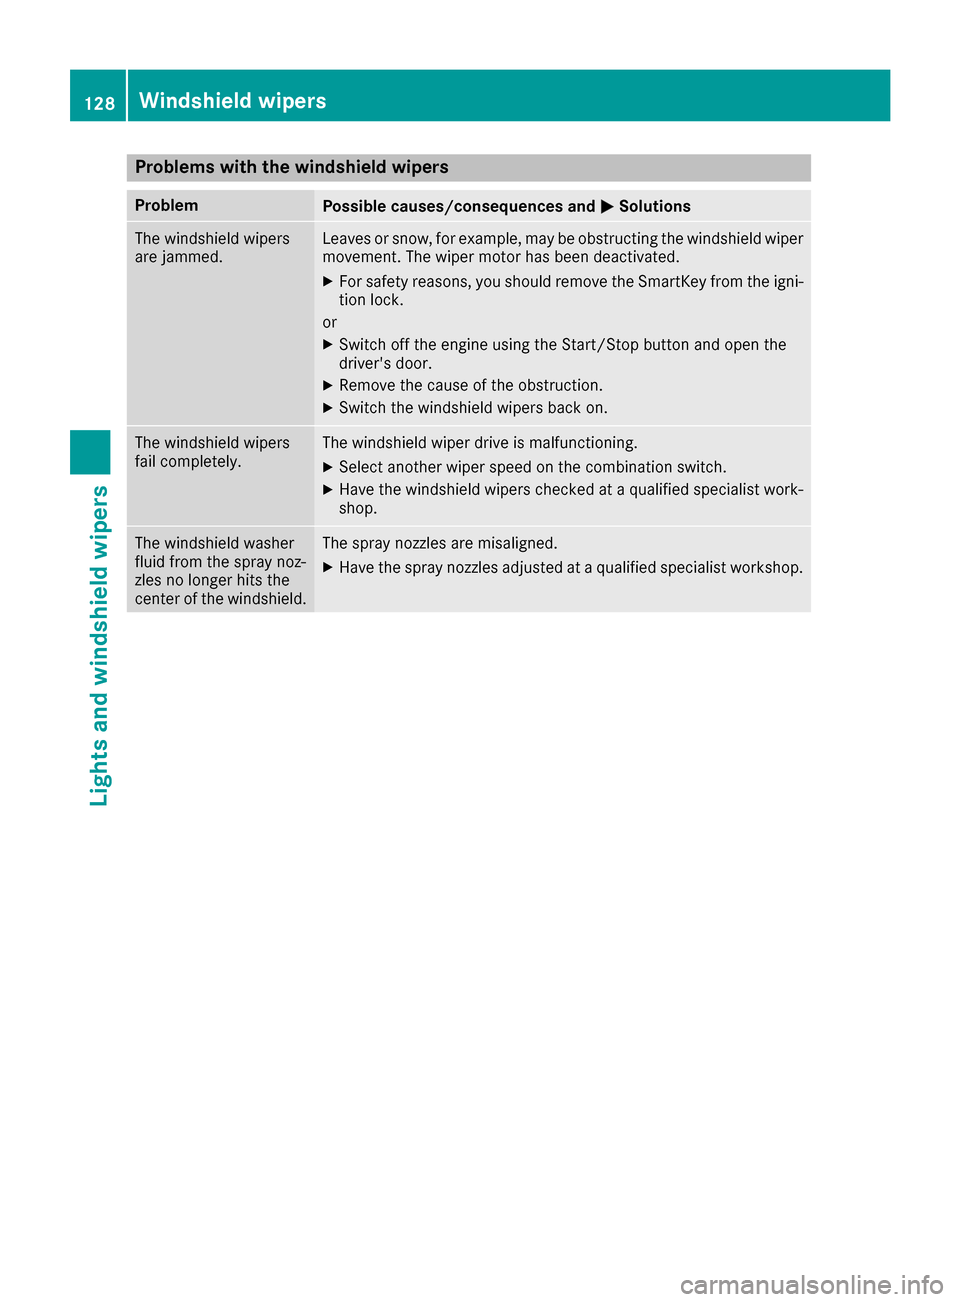
Problems with the windshield wipers
ProblemPossible causes/consequences andMSolutions
The windshield wipers
are jammed.Leaves or snow, for example, may be obstructing the windshield wiper
movement. The wiper motor has been deactivated.
XFor safety reasons, you should remove the SmartKey from the igni-
tion lock.
or
XSwitch off the engine using the Start/Stop button and open the
driver's door.
XRemove the cause of the obstruction.
XSwitch the windshield wipers back on.
The windshield wipers
fail completely.The windshield wiper drive is malfunctioning.
XSelect another wiper speed on the combination switch.
XHave the windshield wipers checked at a qualified specialist work-
shop.
The windshield washer
fluid from the spray noz-
zles no longer hits the
center of the windshield.The spray nozzles are misaligned.
XHave the spray nozzles adjusted at a qualified specialist workshop.
128Windshield wipers
Lights and windshield wipers
Page 138 of 398

Defrosting thewindows
Windows fogged up on th einside
XActivat eth e"Coolin gwit hair dehumidifica-
tion "function wit hth e¿ rocker switch .
XSwitchon automatic mode usin gth eÃ
rocker switch .
XIf thewindows continue to fo gup, activat eth e
"Windshield defrosting" function usin gth e
¬ rocker switch .
iYou should only selec tthis setting until th e
windshield is clear again .
Windows fogged up on th eoutsid e
XActivat eth ewindshield wipers .
XSwitchon automatic mode usin gth eÃ
rocker switch .
iIf you clean th ewindows regularly, they do
no tfo gup so quickly.
Rea rwindow defroster
General notes
The rea rwindow defroster has ahig hcurren t
draw. You should therefore switch it of fas soo n
as th erea rwindow is clear .Otherwise ,th erea r
window defroster switches of fautomatically
after severa lminutes.
If th ebattery voltage is to olow, th erea rwindow
defroster may switch off.
Switchin gon/of f
XTurnth eSmartKey to position 2in th eignition
loc k (Ypage 146).
XPress th e¤ rocker switch up or down .
The indicator lamp abov eth e¤ rocker
switch lights up or goe sout .
136Operating the climate control systems
Climate control
Page 148 of 398
GWARNING
If you switch off the ignition while driving,
safety-relevant functions are only available
with limitations, or not at all. This could affect, for example, the power steering and the brake
boosting effect. You will require considerably
more effort to steer and brake. There is a risk
of an accident.
Do not switch off the ignition while driving.
GWARNING
If the parking brake has not been fully
released when driving, the parking brake can:
Roverheat and cause a fire
Rlose its hold function.
There is a risk of fire and an accident. Release
the parking brake fully before driving off.
!Do not warm up the engine with the vehicle
stationary. Drive off immediately. Avoid high
engine speeds and driving at full throttle until
the engine has reached its operating temper-
ature.
Only shift the automatic transmission to the
desired drive position when the vehicle is sta-
tionary.
Where possible, avoid spinning the drive
wheels when pulling away on slippery roads.
You could otherwise damage the drive train.
!Mercedes-AMG vehicles: at low engine oil
temperatures below 68 ‡ (+20 †), the max-
imum engine speed is restricted in order to
protect the engine. To protect the engine and
maintain smooth engine operation, avoid driv-
ing at full throttle when the engine is cold.
Observe the important safety notes for PLUG-IN
HYBRID vehicles (
Ypage 44).
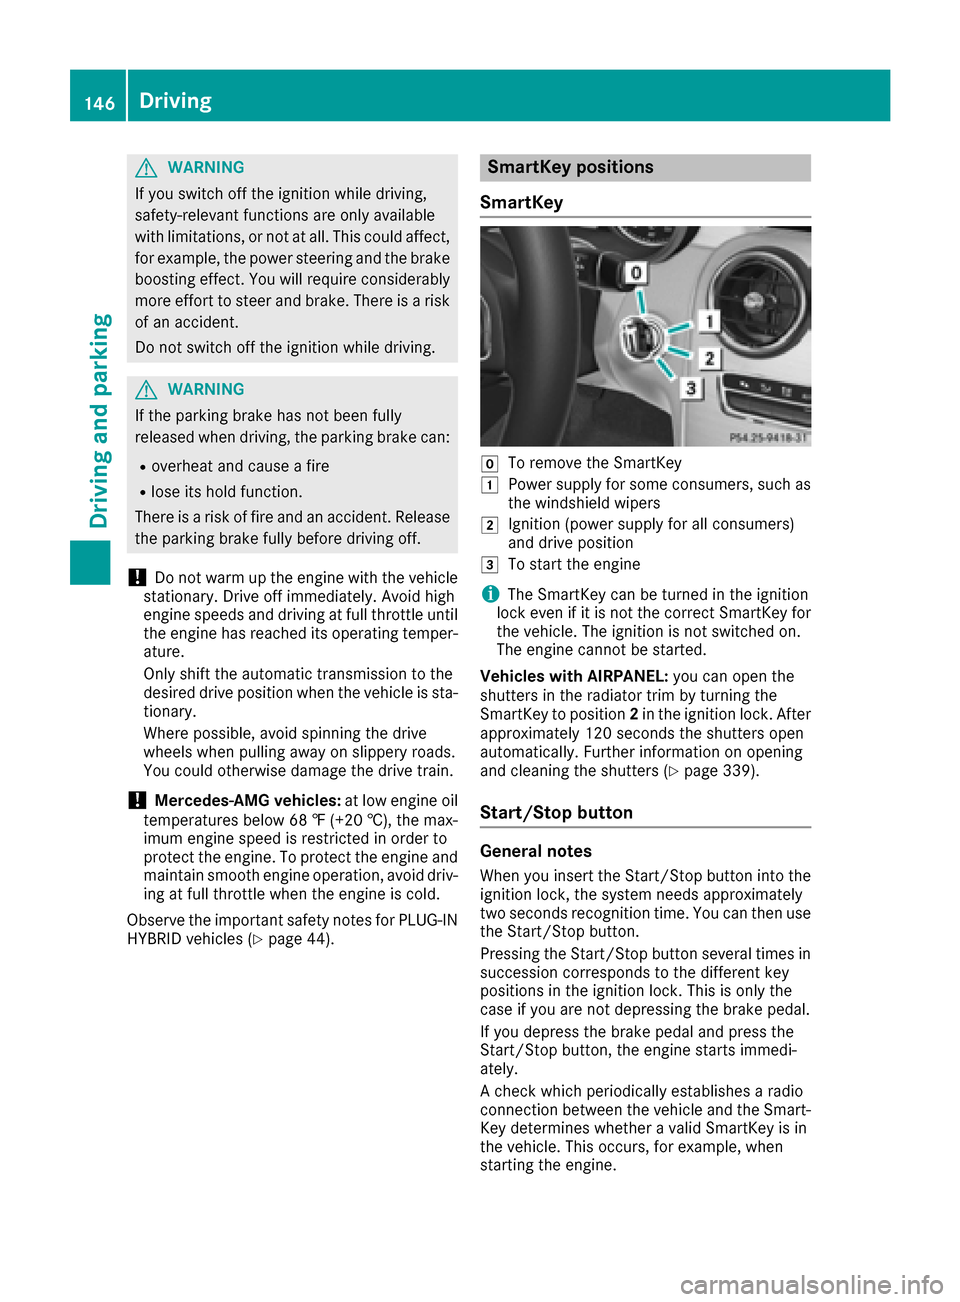
SmartKey positions
SmartKey
gTo remove the SmartKey
1Power supply for some consumers, such as
the windshield wipers
2Ignition (power supply for all consumers)
and drive position
3To start the engine
iThe SmartKey can be turned in the ignition
lock even if it is not the correct SmartKey for
the vehicle. The ignition is not switched on.
The engine cannot be started.
Vehicles with AIRPANEL: you can open the
shutters in the radiator trim by turning the
SmartKey to position 2in the ignition lock. After
approximately 120 seconds the shutters open
automatically. Further information on opening
and cleaning the shutters (
Ypage 339).
Start/Stop button
General notes
When you insert the Start/Stop button into the
ignition lock, the system needs approximately
two seconds recognition time. You can then use
the Start/Stop button.
Pressing the Start/Stop button several times in
succession corresponds to the different key
positions in the ignition lock. This is only the
case if you are not depressing the brake pedal.
If you depress the brake pedal and press the
Start/Stop button, the engine starts immedi-
ately.
A check which periodically establishes a radio
connection between the vehicle and the Smart-
Key determines whether a valid SmartKey is in
the vehicle. This occurs, for example, when
starting the engine.
146Driving
Driving and parking
Page 149 of 398
To start the vehicle without actively using the
SmartKey:
Rthe Start/Stop button must be inserted in the
ignition lock.
Rthe SmartKey must be in the vehicle.
Rthe vehicle must not be locked with the
SmartKey or KEYLESS-GO (Ypage 82).
Do not keep the SmartKey:
Rwith electronic devices, e.g. a mobile phone
or another SmartKey.
Rwith metallic objects, e.g. coins or metal foil.
Rinside metallic objects, e.g. a metal case.
This can affect the functionality of the Smart-
Key.
If you lock the vehicle with the SmartKey's
remote control or with KEYLESS-GO, after a
short time:
Ryou will not be able to switch on the ignition
with the Start/Stop button.
Ryou will not be able to start the engine with the
Start/Stop button until the vehicle is
unlocked again.
If you lock the vehicle centrally using the button
on the front door (
Ypage 88), you can continue
to start the engine with the Start/Stop button.
The engine can be switched off while the vehicle
is in motion by pressing and holding the Start/
Stop button for three seconds. This function
operates independently of the ECO start/stop
automatic engine switch-off function.
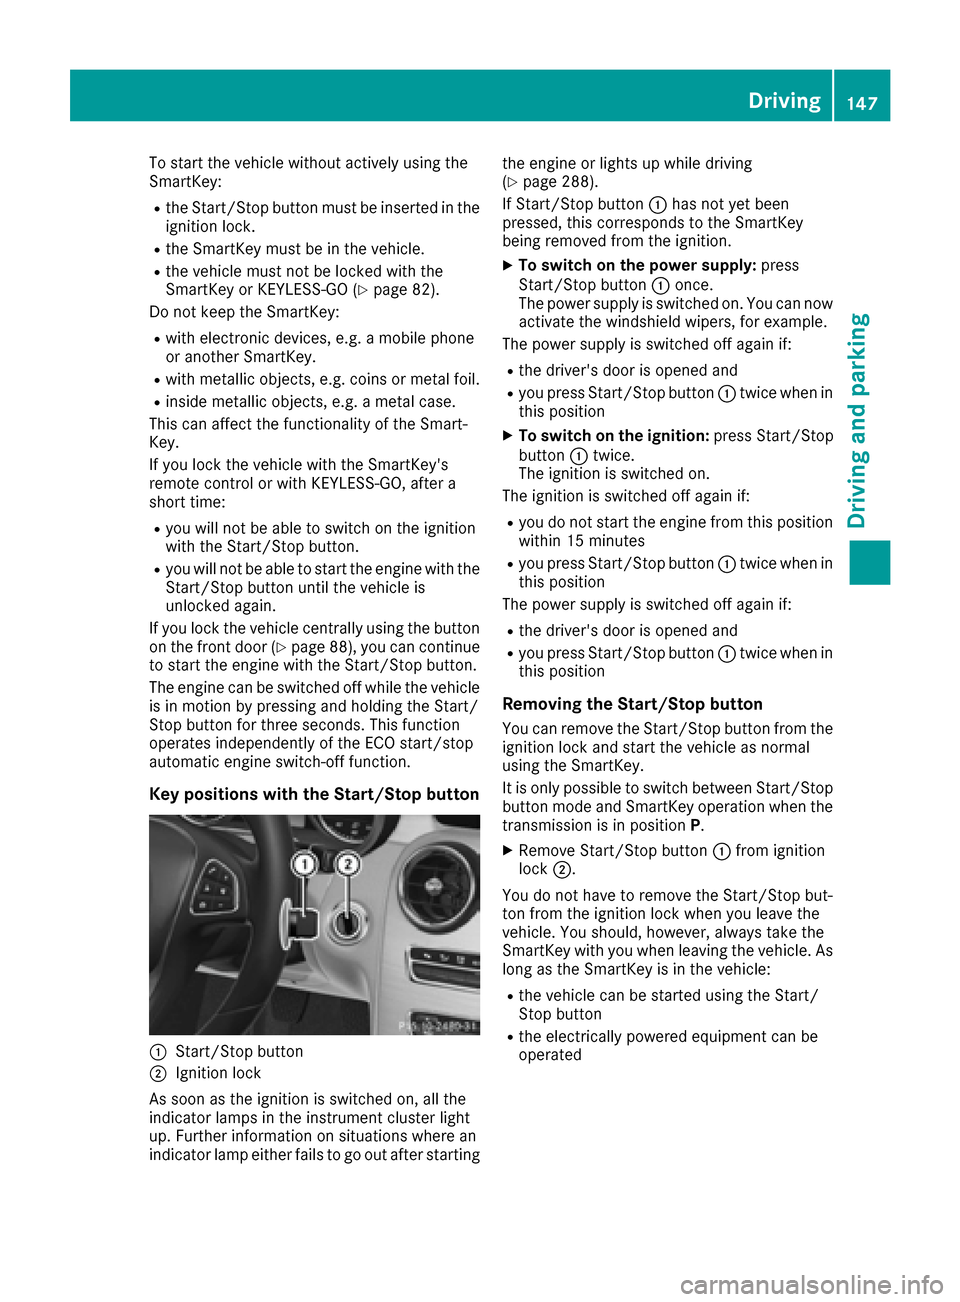
Key positions with the Start/Stop button
:Start/Stop button
;Ignition lock
As soon as the ignition is switched on, all the
indicator lamps in the instrument cluster light
up. Further information on situations where an
indicator lamp either fails to go out after starting the engine or lights up while driving
(
Ypage 288).
If Start/Stop button :has not yet been
pressed, this corresponds to the SmartKey
being removed from the ignition.
XTo switch on the power supply: press
Start/Stop button :once.
The power supply is switched on. You can now activate the windshield wipers, for example.
The power supply is switched off again if:
Rthe driver's door is opened and
Ryou press Start/Stop button :twice when in
this position
XTo switch on the ignition: press Start/Stop
button :twice.
The ignition is switched on.
The ignition is switched off again if:
Ryou do not start the engine from this position
within 15 minutes
Ryou press Start/Stop button :twice when in
this position
The power supply is switched off again if:
Rthe driver's door is opened and
Ryou press Start/Stop button :twice when in
this position
Removing the Start/Stop button
You can remove the Start/Stop button from the
ignition lock and start the vehicle as normal
using the SmartKey.
It is only possible to switch between Start/Stop
button mode and SmartKey operation when the
transmission is in position P.
XRemove Start/Stop button :from ignition
lock ;.
You do not have to remove the Start/Stop but-
ton from the ignition lock when you leave the
vehicle. You should, however, always take the
SmartKey with you when leaving the vehicle. As
long as the SmartKey is in the vehicle:
Rthe vehicle can be started using the Start/
Stop button
Rthe electrically powered equipment can be
operated
Driving147
Driving and parking
Z
Page 332 of 398
Engine compartment
Hood
Important safety notes
GWARNING
If the hood is unlatched, it may open up when the vehicle is in motion and block your view.
There is a risk of an accident.
Never unlatch the hood while driving. Before
every trip, ensure that the hood is locked.
GWARNING
When opening and closing the hood, it may
suddenly fall into the closed position. There is a risk of injury to persons within range of
movement of the hood.
Open and close the hood only when no one is
within its range of movement.
GWARNING
Opening the hood when the engine is over-
heated or when there is a fire in the engine
compartment could expose you to hot gases
or other service products. There is a risk of
injury.
Let an overheated engine cool down before
opening the hood. If there is a fire in the
engine compartment, keep the hood closed
and contact the fire department.
GWARNING
The engine compartment contains moving
components. Certain components, such as
the radiator fan, may continue to run or start
again suddenly when the ignition is off. There is a risk of injury.
If you need to do any work inside the engine
compartment:
Rswitch off the ignition
Rnever reach into the area where there is a
risk of danger from moving components,
such as the fan rotation area
Rremove jewelry and watches
Rkeep items of clothing and hair, for exam-
ple, away from moving parts
GWARNING
The ignition system and the fuel injection sys-
tem work under high voltage. If you touch
components which are under voltage, you
could get an electric shock. There is a risk of
injury.
Never touch components of the ignition sys-
tem or fuel injection system when the ignition
is switched on.
Opening the hood
GWARNING
Certain components in the engine compart-
ment, such as the engine, radiator and parts
of the exhaust system, can become very hot.
Working in the engine compartment poses a
risk of injury.
Where possible, let the engine cool down and touch only the components described in the
following.
GWARNING
When the hood is open and the windshield
wipers are set in motion, you can be injured by
the wiper linkage. There is a risk of injury.
Always switch off the windshield wipers and
the ignition before opening the hood.
!Make sure that the windshield wipers are
not folded away from the windshield. You
could otherwise damage the windshield wip-
ers or the hood.
330Engine compartment
Maintenance and care
Page 333 of 398
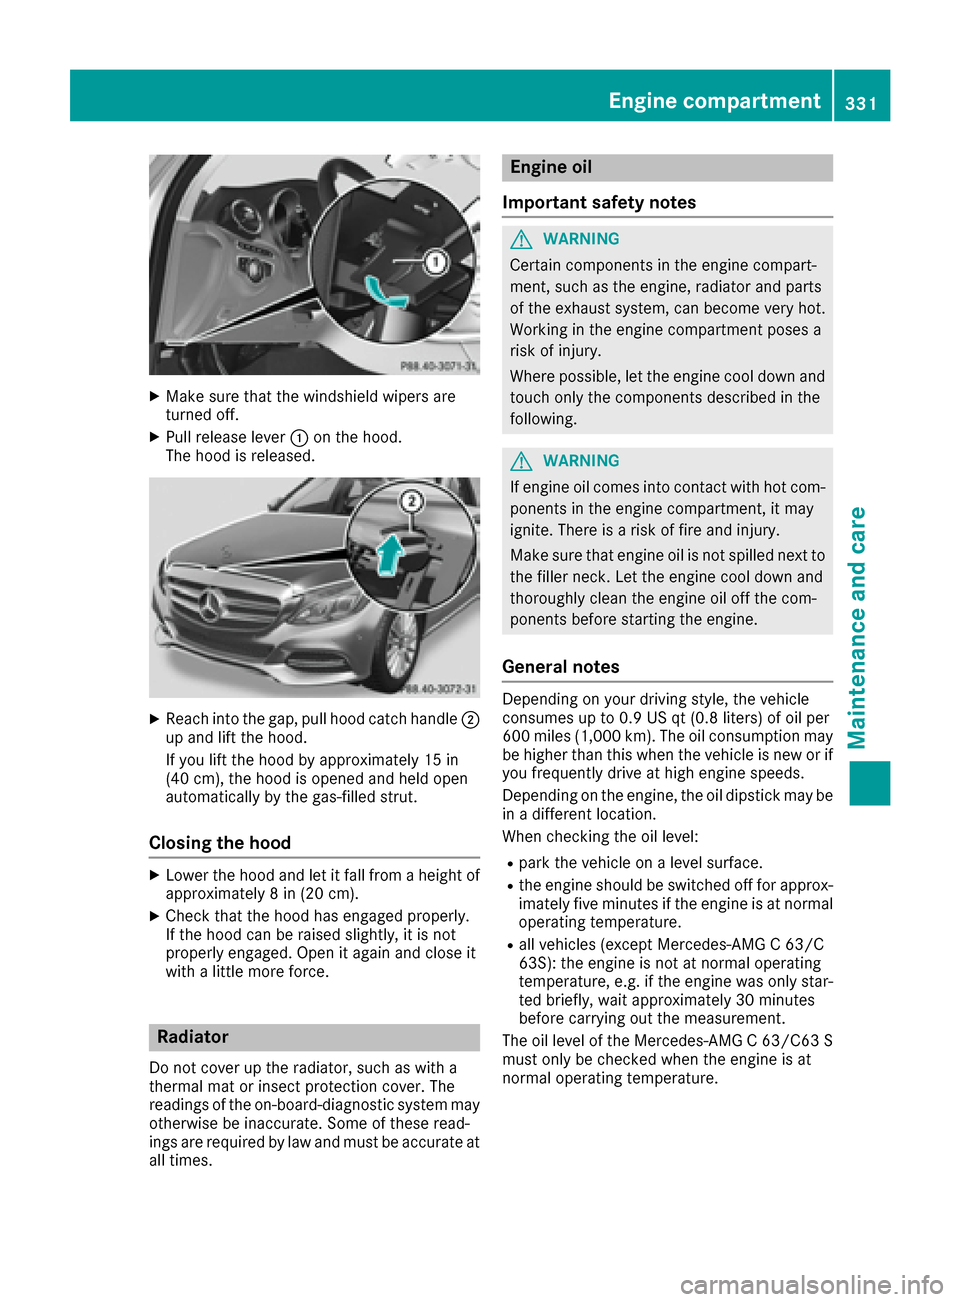
XMake sure that the windshield wipers are
turned off.
XPull release lever:on the hood.
The hood is released.
XReach into the gap, pull hood catch handle ;
up and lift the hood.
If you lift the hood by approximately 15 in
(40 cm), the hood is opened and held open
automatically by the gas-filled strut.
Closing the hood
XLower the hood and let it fall from a height of
approximately 8 in (20 cm).
XCheck that the hood has engaged properly.
If the hood can be raised slightly, it is not
properly engaged. Open it again and close it
with a little more force.
Radiator
Do not cover up the radiator, such as with a
thermal mat or insect protection cover. The
readings of the on-board-diagnostic system may
otherwise be inaccurate. Some of these read-
ings are required by law and must be accurate at
all times.
Engine oil
Important safety notes
GWARNING
Certain components in the engine compart-
ment, such as the engine, radiator and parts
of the exhaust system, can become very hot.
Working in the engine compartment poses a
risk of injury.
Where possible, let the engine cool down and touch only the components described in the
following.
GWARNING
If engine oil comes into contact with hot com- ponents in the engine compartment, it may
ignite. There is a risk of fire and injury.
Make sure that engine oil is not spilled next to
the filler neck. Let the engine cool down and
thoroughly clean the engine oil off the com-
ponents before starting the engine.
General notes
Depending on your driving style, the vehicle
consumes up to 0.9 US qt (0.8 liters) of oil per
600 miles (1,000 km). The oil consumption may
be higher than this when the vehicle is new or if
you frequently drive at high engine speeds.
Depending on the engine, the oil dipstick may be
in a different location.
When checking the oil level:
Rpark the vehicle on a level surface.
Rthe engine should be switched off for approx-
imately five minutes if the engine is at normal
operating temperature.
Rall vehicles (except Mercedes-AMG C 63/C
63S): the engine is not at normal operating
temperature, e.g. if the engine was only star-
ted briefly, wait approximately 30 minutes
before carrying out the measurement.
The oil level of the Mercedes-AMG C 63/C63 S
must only be checked when the engine is at
normal operating temperature.
Engine compartment331
Maintenance and care
Z
Page 340 of 398
Cleaning the vehicle parts
Cleaning the wheels
GWARNING
The water jet from a circular jet nozzle (dirt
blasters) can cause invisible exterior damage
to the tires or chassis components. Compo-
nents damaged in this way may fail unexpect-
edly. There is a risk of an accident.
Do not use power washers with circular jet
nozzles to clean the vehicle. Have damaged
tires or chassis components replaced imme-
diately.
!Do not use acidic wheel cleaning products
to remove brake dust. This could damage
wheel bolts and brake components.
!Do not park the vehicle for an extended
period straight after cleaning it, particularly
after having cleaned the wheels with wheel
cleaner. Wheel cleaners could cause
increased corrosion of the brake discs and
brake pads/linings. For this reason, you
should drive for a few minutes after cleaning.
Braking heats the brake discs and the brake
pads/linings, thus drying them. The vehicle
can then be parked.
Cleaning the windows
GWARNING
You could become trapped by the windshield wipers if they start moving while cleaning the
windshield or wiper blades. There is a risk of
injury.
Always switch off the windshield wipers and
the ignition before cleaning the windshield or
wiper blades.
!Do not use dry cloths, abrasive products,
solvents or cleaning agents containing sol-
vents to clean the inside of the windows. Do
not touch the insides of the windows with
hard objects, e.g. an ice scraper or ring. There
is otherwise a risk of damaging the windows.
!Clean the water drainage channels of the
windshield and the rear window at regular
intervals. Deposits such as leaves, petals and pollen may under certain circumstances pre- vent water from draining away. This can lead
to corrosion damage and damage to elec-
tronic components.
XClean the inside and outside of the windows
with a damp cloth and a cleaning product that
is recommended and approved by Mercedes-
Benz.
Cleaning wiper blades
GWARNING
You could become trapped by the windshield wipers if they start moving while cleaning the
windshield or wiper blades. There is a risk of
injury.
Always switch off the windshield wipers and
the ignition before cleaning the windshield or
wiper blades.
!Do not pull the wiper blade. Otherwise, the
wiper blade could be damaged.
!Do not clean wiper blades too often and do
not rub them too hard. Otherwise, the graph-
ite coating could be damaged. This could
cause wiper noise.
!Hold the wiper arm securely when folding
back. The windshield could be damaged if the
wiper arm smacks against it suddenly.
XFold the windshield wiper arms away from the
windshield (Ypage 126).
XCarefully clean the wiper blades with a damp
cloth.
XFold the windshield wiper arms back again
before switching on the ignition.
Cleaning the exterior lighting
!Only use cleaning agents or cleaning cloths
which are suitable for plastic light lenses.
Unsuitable cleaning agents or cleaning cloths
could scratch or damage the plastic light len- ses.
XClean the plastic lenses of the exterior light-
ing using a wet sponge and a mild cleaning
agent, e.g. Mercedes-Benz car shampoo or
cleaning cloths.
338Care
Maintenance and care
Page 360 of 398

XOpen the driver's door.
XTo open:pull out cover :slightly at the bot-
tom in the direction of arrow =.
XFold cover:outwards in the direction of
arrow ;.
XTo close: fold in cover :until it engages.
Fuse box in the front-passenger foot-
well
XOpen the front-passenger door.
XTo open: fold cover :out towards the rear
and remove it.
XTo close: clip in cover :at the rear.
XFold cover :forwards until it engages.
Fuse box in the engine compartment
GWARNING
When the hood is open and the windshield
wipers are set in motion, you can be injured by
the wiper linkage. There is a risk of injury.
Always switch off the windshield wipers and
the ignition before opening the hood.
XOpen the hood (Ypage 330).
XTo open: press safety clips :on the cover
together.
XRemove fuse box cover ;upwards.
XUse a dry cloth to remove any moisture from
the fuse box.
XLoosen screws =, fold up fuse box lid ?and
remove it.
XTo close: check whether the seal is posi-
tioned correctly in the lid ?.
XInsert lid?into the bracket at the rear of the
fuse box.
XFold down lid ?of the fuse box and tighten
screws =.
XInsert cover ;on both sides and engage
safety clips :.
XClose the hood.
358Fuses
Breakdown assistance