stop start MERCEDES-BENZ C-Class SEDAN 2016 W205 Service Manual
[x] Cancel search | Manufacturer: MERCEDES-BENZ, Model Year: 2016, Model line: C-Class SEDAN, Model: MERCEDES-BENZ C-Class SEDAN 2016 W205Pages: 398, PDF Size: 9.57 MB
Page 161 of 398
reduces load change reactions and is conducive
to a sporty driving style. The sound generated by
the double-clutch function depends on the drive
program selected.
Kickdown
Use kickdown for maximum acceleration.
XDepress the accelerator pedal beyond the
pressure point.
The automatic transmission shifts to a lower
gear depending on the engine speed.
XEase off the accelerator pedal once the
desired speed is reached.
The automatic transmission shifts back up.
Rocking the vehicle free
Rocking the vehicle free by shifting back and
forth between transmission positionsDand R
can help to free a vehicle that has become stuck
in mud or snow.
The vehicle's engine management restricts
switching between transmission positions D
and Rto speeds up to a maximum of 5 mph
(9 km/h).
To shift back and forth between transmission
positions Dand R, move the DIRECT SELECT
lever up and down past the point of resistance.
Gliding mode (Mercedes-AMG vehicles)
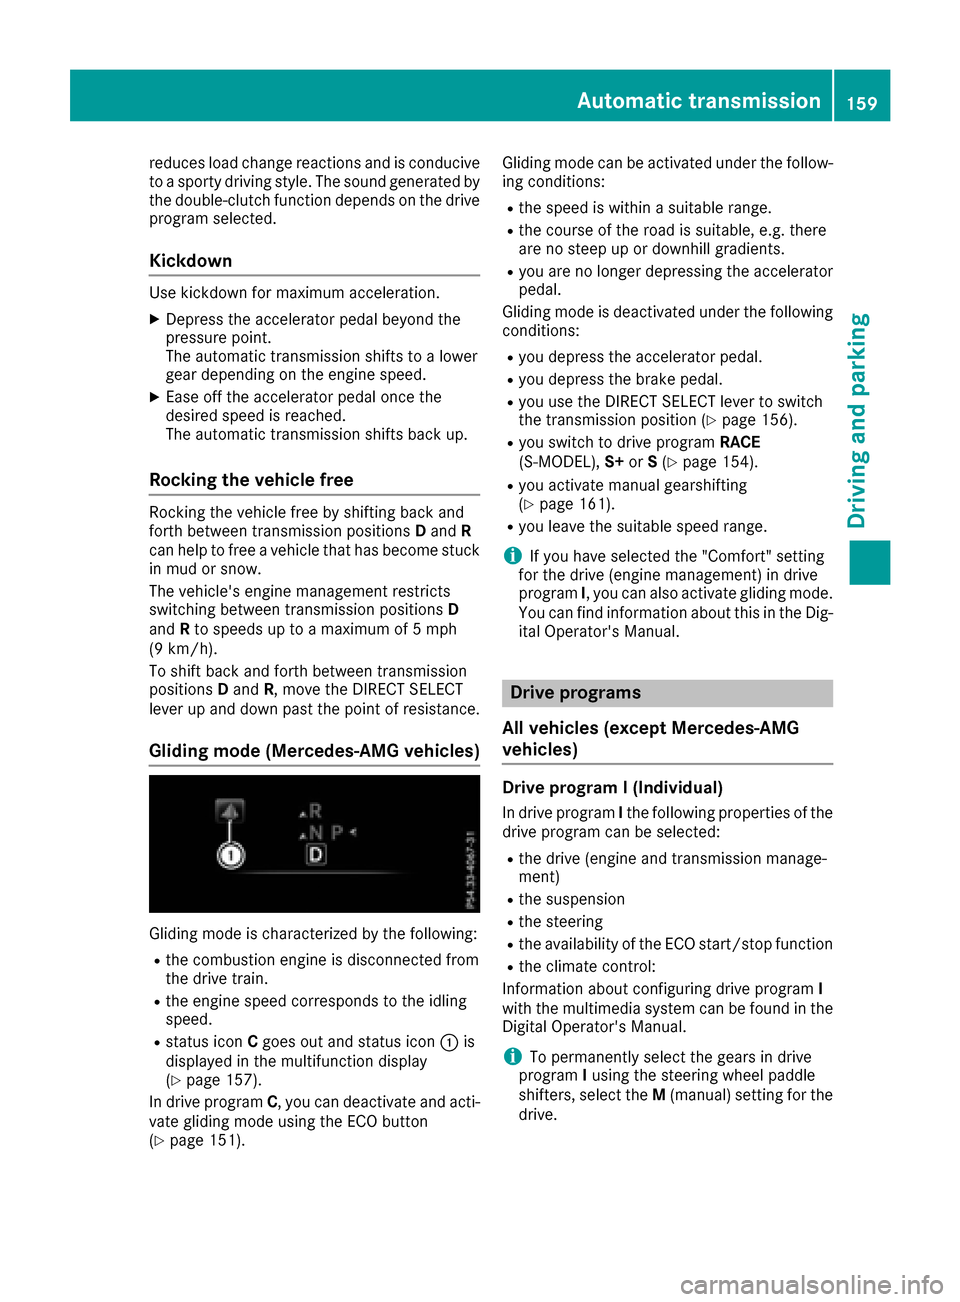
Gliding mode is characterized by the following:
Rthe combustion engine is disconnected from
the drive train.
Rthe engine speed corresponds to the idling
speed.
Rstatus icon Cgoes out and status icon :is
displayed in the multifunction display
(
Ypage 157).
In drive program C, you can deactivate and acti-
vate gliding mode using the ECO button
(
Ypage 151). Gliding mode can be activated under the follow-
ing conditions:
Rthe speed is within a suitable range.
Rthe course of the road is suitable, e.g. there
are no steep up or downhill gradients.
Ryou are no longer depressing the accelerator
pedal.
Gliding mode is deactivated under the following conditions:
Ryou depress the accelerator pedal.
Ryou depress the brake pedal.
Ryou use the DIRECT SELECT lever to switch
the transmission position (Ypage 156).
Ryou switch to drive program RACE
(S‑MODEL), S+orS(Ypage 154).
Ryou activate manual gearshifting
(Ypage 161).
Ryou leave the suitable speed range.
iIf you have selected the "Comfort" setting
for the drive (engine management) in drive
program I, you can also activate gliding mode.
You can find information about this in the Dig-
ital Operator's Manual.
Drive programs
All vehicles (except Mercedes-AMG
vehicles)
Drive program I (Individual)
In drive program Ithe following properties of the
drive program can be selected:
Rthe drive (engine and transmission manage-
ment)
Rthe suspension
Rthe steering
Rthe availability of the ECO start/stop function
Rthe climate control:
Information about configuring drive program I
with the multimedia system can be found in the
Digital Operator's Manual.
iTo permanently select the gears in drive
program Iusing the steering wheel paddle
shifters, select the M(manual) setting for the
drive.
Automatic transmission159
Driving and parking
Z
Page 163 of 398
Rthe suspension exhibits particularly stiff
springing and damping settings (vehicles withAIRMATIC).
Rgliding mode is not available.
Rthe ECO start/stop function is not available.
Drive program S+ (Sport Plus)
Drive program S+is characterized by the fol-
lowing:
Rthe vehicle exhibits particularly sporty driving
characteristics.
Rthe vehicle pulling away in first gear.
Rthe automatic transmission shifting up later.
the fuel consumption possibly being higher as
a result of the later automatic transmission
shift points.
Rthe suspension exhibits particularly stiff
springing and damping settings (vehicles with AIRMATIC).
Rgliding mode is not available.
Rthe ECO start/stop function is not available.
Drive program S (Sport)
Drive program Sis characterized by the follow-
ing:
Rthe vehicle exhibits sporty driving character-
istics.
Rthe vehicle pulling away in first gear.
Rthe automatic transmission shifting up later.
the fuel consumption possibly being higher as
a result of the later automatic transmission
shift points.
Rthe suspension exhibits hard springing and
damping settings (vehicles with AIRMATIC).
Rgliding mode is not available.
Rthe ECO start/stop function is not available.
Drive program C (Comfort)
Drive program Cis characterized by the follow-
ing:
Rthe vehicle delivers comfortable, economical
handling characteristics.
Rthe vehicle pulling away more gently in
forward and reverse gears, unless the accel-
erator pedal is depressed fully.
Rthe vehicle having improved driving stability,
for example on slippery road surfaces.
Roptimal fuel consumption resulting from the
automatic transmission shifting up sooner. The vehicle is driven in the low engine speed
range and the wheels are less likely to spin.
Rgliding mode is available.
Rthe ECO start/stop function is available.
Drive program I (Individual)
In drive program
Ithe following properties of the
drive program can be selected:
Rthe drive (engine management)
Rthe transmission management
RESP®(Ypage 73)
Rthe suspension
Ractivation of the exhaust flap
Information about configuring drive program I
with the multimedia system can be found in the
Digital Operator's Manual.
iTo permanently select the gears in drive
program Iusing the steeri ng wheel paddles,
select the M(manual) setting for the trans-
mission.
Manual gear shifting
General notes
You can change gear yourself using the steering wheel paddle shifters. The transmission must be
in position D.
Depending on which paddle shifter is pulled, the
automatic transmission immediately shifts into
the next gear down or up, if permitted.
Mercedes-AMG vehicles: to use manual shift-
ing, you have two options:
Rtemporary setting
Rpermanent setting
If you activate manual gearshifting, the multi-
function display will show the current gear
instead of transmission position D.
If manual gearshifting is deactivated, the gears
will be selected automatically.
Automatic transmission161
Driving an d parking
Z
Page 166 of 398
Problems with the transmission
ProblemPossible causes/consequences andMSolutions
The transmission has
problems shifting gear.The transmission is losing oil.
XHave the transmission checked at a qualified specialist workshop
immediately.
The acceleration ability
is deteriorating.
The transmission no lon-
ger changes gear.The transmission is in emergency mode.
It is only possible to shift intosecondgear and reverse gear.
XStop the vehicle.
XShift the transmission to position P.
XSwitch off the engine.
XWait at least ten seconds before restarting the engine.
XShift the transmission to positionDor R.
If D is selected, the transmission shifts into secondgear; ifRis
selected, the transmission shifts into reverse gear.
XHave the transmission checked at a qualified specialist workshop
immediately.
Problems with PLUG-IN HYBRID operation (Ypage 233).
Transfer case
This section is only valid for vehicles with 4-
wheel drive (4MATIC). Power is always trans-
mitted to both axles.
!Performance tests may only be carried out
on a 2-axle dynamometer. The brake system
or transfer case could otherwise be damaged. Contact a qualified specialist workshop for a
performance test.
!Since ESP®engages automatically, the igni-
tion must be switched off (the SmartKey or
Start/Stop button must be in position 0or 1)
if:
Rthe electric parking brake is being tested
on a brake dynamometer
Rthe vehicle is being towed with only one
axle raised (not permitted for vehicles with
4MATIC).
The brake system could otherwise be dam-
aged.
!Vehicles with 4MATIC must not be towed
with either the front or the rear axle raised, as doing so will damage the transmission.
Refueling
Important safety notes
GWARNING
Fuel is highly flammable. If you handle fuel
incorrectly, there is a risk of fire and explo-
sion.
You must avoid fire, open flames, creating
sparks and smoking. Switch off the engine
and, if applicable, the auxiliary heating before refueling.
GWARNING
Fuel is poisonous and hazardous to health.
There is a risk of injury.
You must make sure that fuel does not come into contact with your skin, eyes or clothing
and that it is not swallowed. Do not inhale fuel
vapors. Keep fuel away from children.
164Refueling
Driving and parking
Page 175 of 398
Indicator
lamp
Lights up
orangeA charging break for the high-
voltage battery is taking
place.
The indicator lamp goes out
after approximately
90 seconds.
Lights up
greenThe high-voltage battery is
fully charged.
The indicator lamp goes out
after approximately
90 seconds.
iIf the indicator lamp is off, lock or unlock the
vehicle. The indicator lamp then displays the
current status of the charging process again.
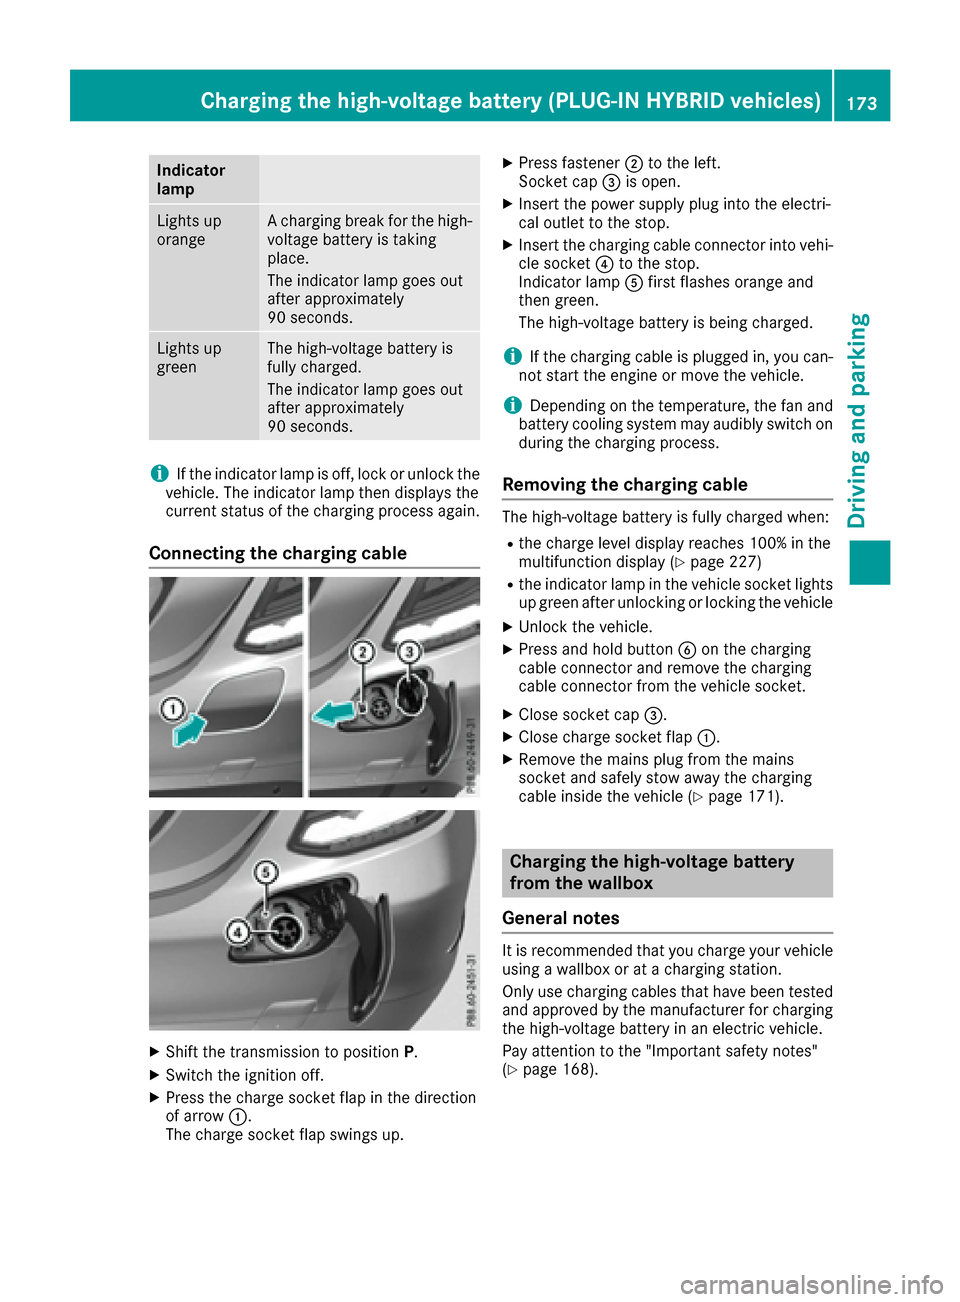
Connecting the charging cable
XShift the transmission to position P.
XSwitch the ignition off.
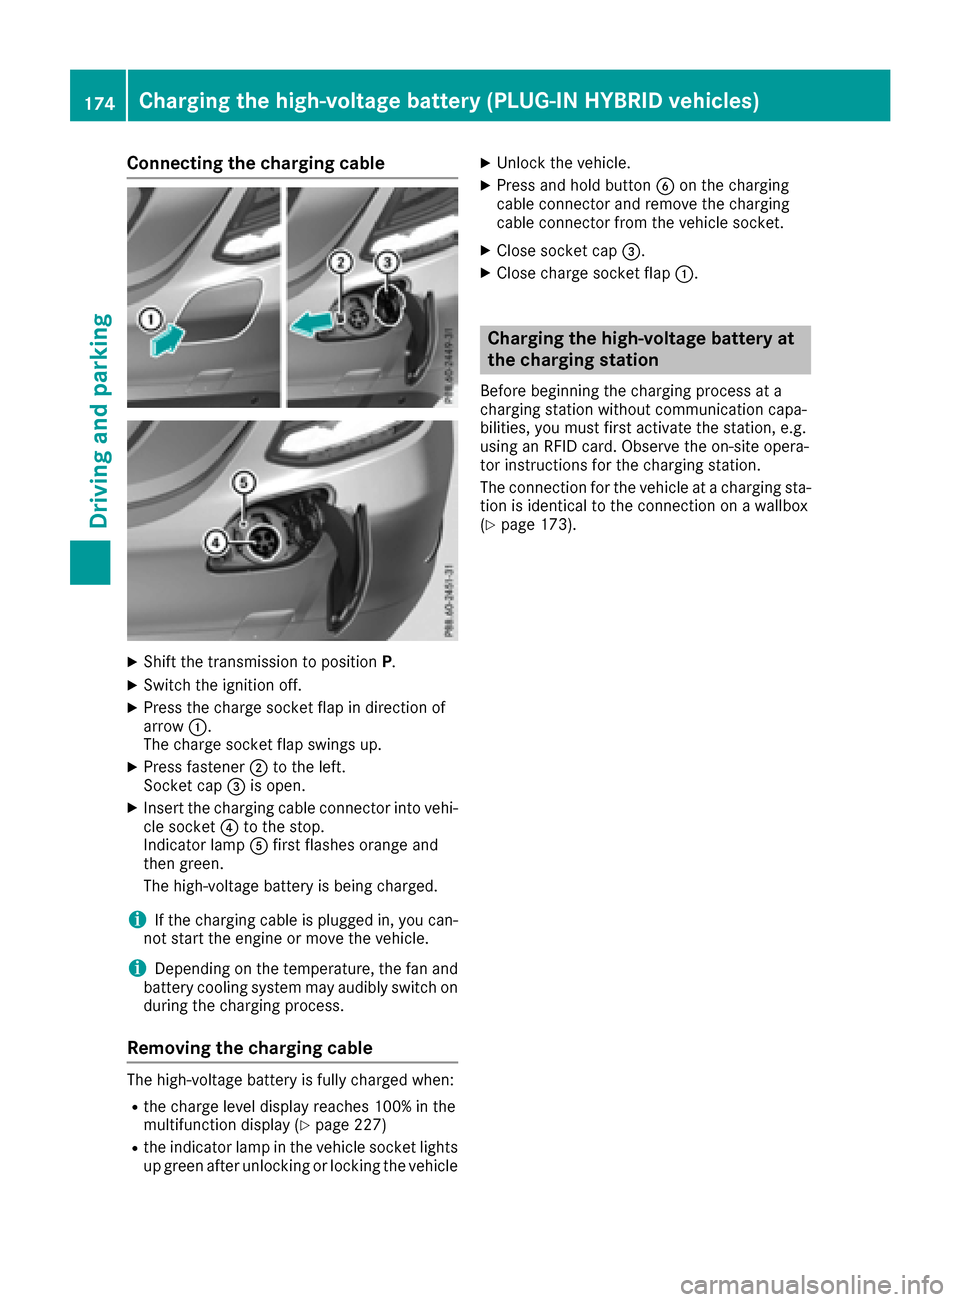
XPress the charge socket flap in the direction
of arrow:.
The charge socket flap swings up.
XPress fastener ;to the left.
Socket cap =is open.
XInsert the power supply plug into the electri-
cal outlet to the stop.
XInsert the charging cable connector into vehi-
cle socket ?to the stop.
Indicator lamp Afirst flashes orange and
then green.
The high-voltage battery is being charged.
iIf the charging cable is plugged in, you can-
not start the engine or move the vehicle.
iDepending on the temperature, the fan and
battery cooling system may audibly switch on
during the charging process.
Removing the charging cable
The high-voltage battery is fully charged when:
Rthe charge level display reaches 100% in the
multifunction display (Ypage 227)
Rthe indicator lamp in the vehicle socket lights up green after unlocking or locking the vehicle
XUnlock the vehicle.
XPress and hold button Bon the charging
cable connector and remove the charging
cable connector from the vehicle socket.
XClose socket cap =.
XClose charge socket flap :.
XRemove the mains plug from the mains
socket and safely stow away the charging
cable inside the vehicle (
Ypage 171).
Charging the high-voltage battery
from the wallbox
General notes
It is recommended that you charge your vehicle
using a wallbox or at a charging station.
Only use charging cables that have been tested
and approved by the manufacturer for charging
the high-voltage battery in an electric vehicle.
Pay attention to the "Important safety notes"
(
Ypage 168).
Charging the high-voltage battery (PLUG-IN HYBRID vehicles)173
Driving and parking
Z
Page 176 of 398
Connecting the charging cable
XShift the transmission to positionP.
XSwitch the ignition off.
XPress the charge socket flap in direction of
arrow:.
The charge socket flap swings up.
XPress fastener ;to the left.
Socket cap =is open.
XInsert the charging cable connector into vehi-
cle socket ?to the stop.
Indicator lamp Afirst flashes orange and
then green.
The high-voltage battery is being charged.
iIf the charging cable is plugged in, you can-
not start the engine or move the vehicle.
iDepending on the temperature, the fan and
battery cooling system may audibly switch on
during the charging process.
Removing the charging cable
The high-voltage battery is fully charged when:
Rthe charge level display reaches 100% in the
multifunction display (Ypage 227)
Rthe indicator lamp in the vehicle socket lights up green after unlocking or locking the vehicle
XUnlock the vehicle.
XPress and hold button Bon the charging
cable connector and remove the charging
cable connector from the vehicle socket.
XClose socket cap =.
XClose charge socket flap :.
Charging the high-voltage battery at
the charging station
Before beginning the charging process at a
charging station without communication capa-
bilities, you must first activate the station, e.g.
using an RFID card. Observe the on-site opera-
tor instructions for the charging station.
The connection for the vehicle at a charging sta-
tion is identical to the connection on a wallbox
(
Ypage 173).
174Charging the high-voltage battery (PLUG-IN HYBRID vehicles)
Driving and parking
Page 179 of 398
Parking
Important safety notes
GWARNING
Flammable material such as leaves, grass or
twigs may ignite if they come into contact with
hot parts of the exhaust system or exhaust
gas flow. There is a risk of fire.
Park the vehicle so that no flammable mate-
rials come into contact with parts of the vehi-
cle which are hot. Take particular care not to
park on dry grassland or harvested grain
fields.
GWARNING
If you leave children unsupervised in the vehi-
cle, they could set it in motion by, for example:
Rrelease the parking brake.
Rshift the automatic transmission out of the
parking position P.
Rstart the engine.
In addition, they may operate vehicle equip-
ment and become trapped. There is a risk of
an accident and injury.
When leaving the vehicle, always take the
SmartKey with you and lock the vehicle. Never
leave children unsupervised in the vehicle.
!Always secure the vehicle correctly against
rolling away. Otherwise, the vehicle or its driv-
etrain could be damaged.
To ensure that the vehicle is secured against
rolling away unintentionally:
Rthe electric parking brake must be applied.
Rthe transmission must be in position Pand the
SmartKey must be removed from the ignition
lock.
Rthe front wheels must be turned towards the
curb on steep uphill or downhill gradients.
Rthe empty vehicle must be secured at the
front axle with a wheel chock or similar, for
example, on uphill or downhill gradients.
Ra laden vehicle must also be secured at the
rear axle with a wheel chock or similar, for
example, on uphill or downhill gradients.
Switching off the engine
Important safety notes
GWARNING
The automatic transmission switches to neu-
tral position Nwhen you switch off the engine.
The vehicle may roll away. There is a risk of an
accident.
After switching off the engine, always switch
to parking position P. Prevent the parked vehi-
cle from rolling away by applying the parking
brake.
Vehicles with automatic transmission
XApply the electric parking brake.
XShift the transmission to position P.
XWith the SmartKey:turn the SmartKey to
position 0in the ignition lock and remove it.
The immobilizer is activated.
XWith the Start/Stop button: press the
Start/Stop button (Ypage 146).
The engine stops and all the indicator lamps in
the instrument cluster go out.
When the driver's door is closed, this corre-
sponds to SmartKey position 1. When the
driver's door is open, this corresponds to
SmartKey position 0: "SmartKey removed".
If you switch the engine off with the transmis-
sion in position Ror D, the automatic transmis-
sion shifts to Nautomatically.
With the SmartKey: if you then open the driv-
er's door or the front-passenger door or remove the SmartKey from the ignition, the automatic
transmission shifts to Pautomatically.
With the Start/Stop button: if you then open
the driver's door or the front-passenger door,
the automatic transmission shifts to Pautomat-
ically.
If you want the automatic transmission to
remain in neutral N, e.g. when having the vehicle
cleaned in an automatic car wash with a towing system:
XVehicles with the Start-Stop button:
remove the Start-Stop button from the igni-
tion lock.
XInsert the SmartKey into the ignition lock.
XAll vehicles: switch the ignition on.
Parking177
Driving and parking
Z
Page 180 of 398
XDepress the brake pedal and keep it
depressed.
XShift to neutralN.
XRelease the brake pedal.
XRelease the electric parking brake.
XSwitch off the ignition and leave the SmartKey
in the ignition lock.
The engine can be switched off in an emergency
while the vehicle is in motion by pressing and
holding the Start/Stop button for three sec-
onds. This function operates independently of
the ECO start/stop automatic engine switch-off
function.
Electric parking brake
General notes
GWARNING
If you leave children unsupervised in the vehi-
cle, they could set it in motion by, for example:
Rrelease the parking brake.
Rshift the automatic transmission out of the
parking position P.
Rstart the engine.
In addition, they may operate vehicle equip-
ment and become trapped. There is a risk of
an accident and injury.
When leaving the vehicle, always take the
SmartKey with you and lock the vehicle. Never
leave children unsupervised in the vehicle.
The function of the electric parking brake is
dependent on the on-board voltage. If the on-
board voltage is low or there is a malfunction in
the system, it may not be possible to apply the
released parking brake.
XIf this is the case, only park the vehicle on
level ground and secure it to prevent it rolling
away.
XShift the automatic transmission to position
P .
It may not be possible to release an applied
parking brake if the on-board voltage is low or
there is a malfunction in the system. Contact a
qualified specialist workshop.
The electric parking brake performs a function
test at regular intervals while the engine is switched off. The sounds that
can b
e heard while
this is occurring are normal.
Applying or releasing manually
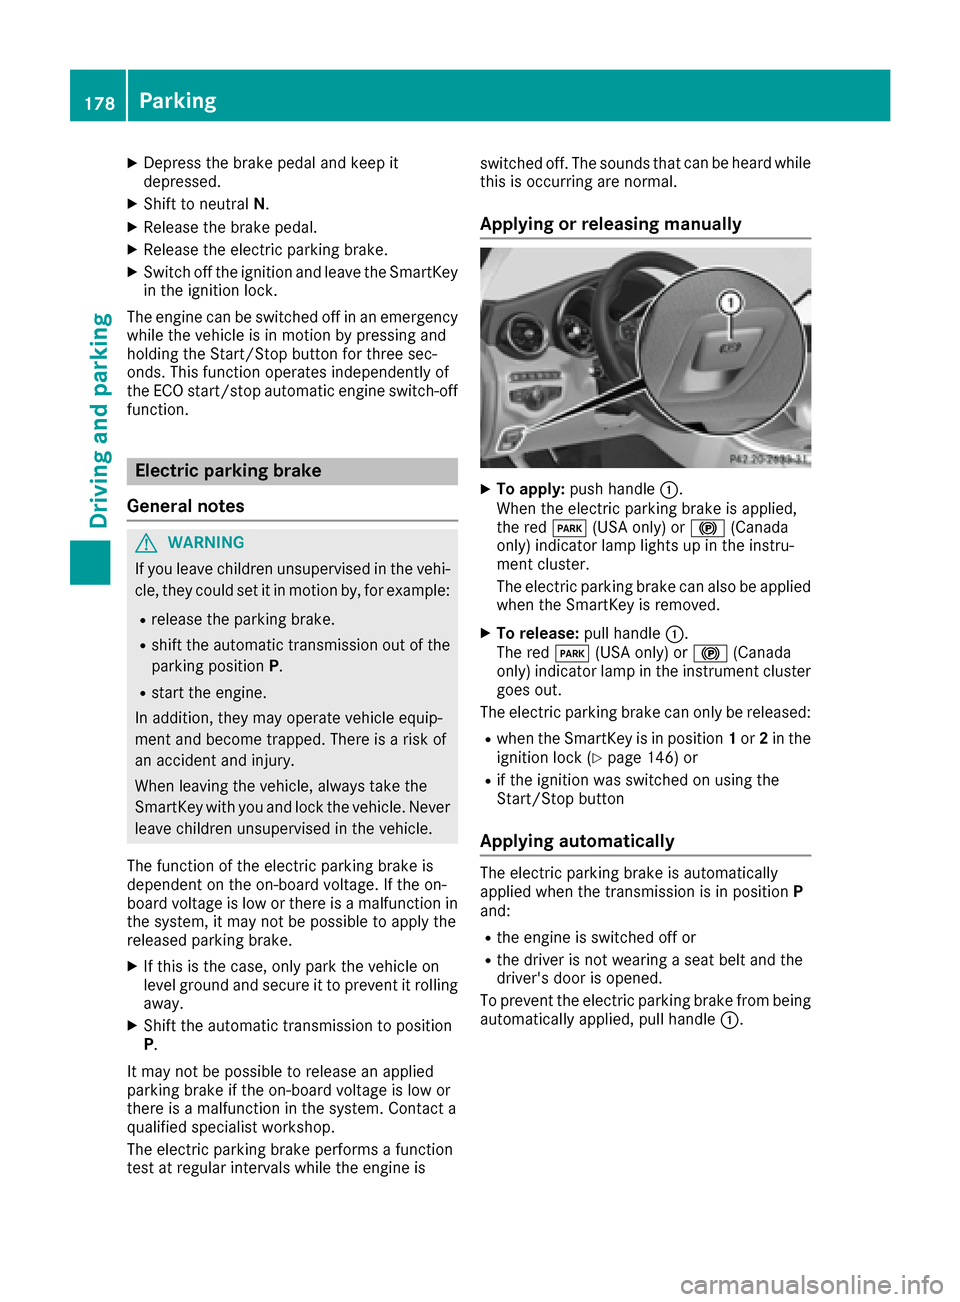
XTo apply: push handle :.
When the electric parking brake is applied,
the red F(USA only) or !(Canada
only) indicator lamp lights up in the instru-
ment cluster.
The electric parking brake can also be applied
when the SmartKey is removed.
XTo release: pull handle:.
The red F(USA only) or !(Canada
only) indicator lamp in the instrument cluster
goes out.
The electric parking brake can only be released:
Rwhen the SmartKey is in position 1or 2in the
ignition lock (Ypage 146) or
Rif the ignition was switched on using the
Start/Stop button
Applying automatically
The electric parking brake is automatically
applied when the transmission is in position P
and:
Rthe engine is switched off or
Rthe driver is not wearing a seat belt and the
driver's door is opened.
To prevent the electric parking brake from being
automatically applied, pull handle :.
178Parking
Driving and parking
Page 181 of 398
The electric parking brake is also engaged auto-
matically if:
RDISTRONIC PLUS brings the vehicle to a
standstill or
Rthe HOLD function is keeping the vehicle sta-
tionary
RActive Parking Assist is keeping the vehicle
stationary
In addition, at least one of the following condi-
tions must be fulfilled:
Rthe engine is switched off
Rthe driver is not wearing a seat belt and the
driver's door is opened
Rthere is a system malfunction
Rthe power supply is insufficient
Rthe vehicle is stationary for a lengthy period
The red F(USA only) or !(Canada only)
indicator lamp in the instrument cluster goes
out.
The electric parking brake is not automatically
engaged if the engine is switched off by the ECO
start/stop function.
Releasing automatically
Your vehicle's electric parking brake is auto-
matically released if all of the following condi-
tions are met:
Rthe engine is running.
Rthe transmission is in position Dor R.
Rthe seat belt has been fastened.
Ryou depress the accelerator pedal.
If the transmission is in position R, the trunk lid
must be closed.
If your seat belt is not fastened, the following
conditions must be fulfilled to automatically
release the electric parking brake:
Rthe driver's door is closed.
Ryou have shifted out of transmission position
P or you have previously driven faster than
2 mph (3 km/h).
Ensure that you do not depress the accelerator
pedal unintentionally. Otherwise the parking
brake will be released and the vehicle will start
to move.
Emergency braking
The vehicle can also be braked during an emer-
gency by using the electric parking brake.
XWhile driving, push handle :of the electric
parking brake (Ypage 178).
The vehicle is braked as long as you keep
handle :of the electric parking brake
depressed. The longer electric parking brake
handle :is depressed, the greater the brak-
ing force.
During braking:
Ra warning tone sounds
Rthe Please Release Parking Brakemes-
sage appears
Rthe red F(USA only) or !(Canada
only) indicator lamp in the instrument cluster
flashes
When the vehicle has been braked to a stand-
still, the electric parking brake is engaged.
Parking the vehicle for a long period
If you leave the vehicle parked for longer than
four weeks, the battery may be damaged by
exhaustive discharging.
If you leave the vehicle parked for longer than six
weeks, the vehicle may suffer damage as a
result of lack of use.
XVisit a qualified specialist workshop and seek
advice.
iYou can obtain information about trickle
chargers from a qualified specialist work-
shop.
PLUG-IN HYBRID vehicles: observe the impor-
tant safety notes for the high-voltage battery
(
Ypage 349).
Driving tips
General driving tips
Important safety notes
GWARNING
If you switch off the ignition while driving,
safety-relevant functions are only available
with limitations, or not at all. This could affect,
Driving tips179
Driving and parking
Z
Page 182 of 398
for example, the power steering and the brakeboosting effect. You will require considerably
more effort to steer and brake. There is a risk
of an accident.
Do not switch off the ignition while driving.
GWARNING
If you operate mobile communication equip-
ment while driving, you will be distracted from traffic conditions. You could also lose control
of the vehicle. There is a risk of an accident.
Only operate this equipment when the vehicle
is stationary.
Observe the legal requirements for the country
in which you are driving. Some jurisdictions pro-
hibit the driver from using a mobile phone while
driving a vehicle.
If you make a call while driving, always use
hands-free mode. Only operate the telephone
when the traffic situation permits. If you are
unsure, pull over to a safe location and stop
before operating the telephone.
Bear in mind that at a speed of only 30 mph
(approximately 50 km/h), the vehicle covers a
distance of 44 ft (approximately 14 m)per sec-
ond.
Drive sensibly – save fuel
Observe the following tips to save fuel:
XThe tires should always be inflated to the rec-
ommended tire pressure.
XRemove unnecessary loads.
XRemove roof racks when they are not needed.
XWarm up the engine at low engine speeds.
XAvoid frequent acceleration or braking.
XHave all maintenance work carried out as
indicated by the service intervals in the Main-
tenance Booklet or by the service interval dis-
play.
Fuel consumption also increases when driving in cold weather, in stop-start traffic and in hilly ter-
rain.
Drinking and driving
GWARNING
Drinking and driving and/or taking drugs and driving are very dangerous combinations.
Even a small amount of alcohol or drugs can
affect your reflexes, perceptions and judg-
ment.
The possibility of a serious or even fatal acci-
dent is greatly increased when you drink or
take drugs and drive.
Do not drink or take drugs and drive or allow
anyone to drive who has been drinking or tak-
ing drugs.
Emission control
GWARNING
Combustion engines emit poisonous exhaust
gases such as carbon monoxide. Inhaling
these exhaust gases leads to poisoning. There
is a risk of fatal injury. Therefore never leave
the engine running in enclosed spaces with-
out sufficient ventilation.
Certain engine systems are designed to keep
the level of poisonous components in exhaust
fumes within legal limits.
These systems only work at peak efficiency if
they are serviced exactly in accordance with the
manufacturer's specifications. Always have
work on the engine carried out at a qualified
specialist workshop. Mercedes-Benz recom-
mends that you use an authorized Mercedes-
Benz Center for this purpose. In particular, work
relevant to safety or on safety-related systems
must be carried out at a qualified specialist
workshop.
The engine settings must not be changed under any circumstances. Furthermore, all specific
service work must be carried out at regular
intervals and in accordance with the Mercedes-
Benz service requirements. Details can be found in the Maintenance Booklet.
ECO display
The ECO display shows you how economical
your driving style is. The ECO display assists you
in achieving the most economical driving style
180Driving tips
Driving and parking
Page 184 of 398
In addition to driving style, the actual consump-
tion is affected by other factors, such as:
Rload
Rtire pressure
Rcold start
Rchoice of route
Relectrical consumers switched on
These factors are not included in the ECO dis-
play.
An economical driving style specially requires
driving at moderate engine speeds.
Achieving a higher value in the categories
"Acceleration" and "Constant":
Robserve the gearshift recommendations.
Rdrive in drive program E.
On long journeys at a constant speed, e.g. on the
highway, only the outer area for "constant" will
change.
The ECO display summarizes the driving style
from the start of the journey to its completion.
Therefore, there are more marked changes in
the outer areas at the start of a journey. On lon-
ger journeys, there are fewer changes. For more
marked changes, perform a manual rest
(
Ypage 241).
For further information on the ECO display, see
(
Ypage 240).
Braking
Important safety notes
GWARNING
If you shift down on a slippery road surface in an attempt to increase the engine's braking
effect, the drive wheels could lose their grip.
There is an increased danger of skidding and
accidents.
Do not shift down for additional engine brak-
ing on a slippery road surface.
Downhill gradients
!On long and steep gradients, you must
reduce the load on the brakes by shifting early
to a lower gear. This allows you to take
advantage of the engine braking effect and
helps avoid overheating and excessive wear
of the brakes. When you take advantage of the engine brak-
ing effect, a drive wheel may not turn for some
time, e.g. on a slippery road surface. This
could cause damage to the drive train. This
type of damage is not covered by the
Mercedes-Benz warranty.
Heavy and light loads
GWARNING
If you rest your foot on the brake pedal while
driving, the braking system can overheat. This increases the stopping distance and can even
cause the braking system to fail. There is a
risk of an accident.
Never use the brake pedal as a footrest. Never
depress the brake pedal and the accelerator
pedal at the same time.
!Depressing the brake pedal constantly
results in excessive and premature wear to
the brake pads.
If the brakes have been subjected to a heavy
load, do not stop the vehicle immediately. Drive
on for a short while. This allows the airflow to
cool the brakes more quickly.
Wet roads
If you have driven for a long time in heavy rain
without braking, there may be a delayed reac-
tion from the brakes when braking for the first
time. This may also occur after the vehicle has
been washed or driven through deep water.
You have to depress the brake pedal more
firmly. Maintain a greater distance from the
vehicle in front.
After driving on a wet road or having the vehicle
washed, brake firmly while paying attention to
the traffic conditions. This will warm up the
brake discs, thereby drying them more quickly
and protecting them against corrosion.
Limited braking performance on salt-
treated roads
If you drive on salted roads, a layer of salt resi-
due may form on the brake discs and brake
pads. This can result in a significantly longer
braking distance.
182Driving tips
Driving and parking