Auto stop MERCEDES-BENZ C-Class SEDAN 2016 W205 Repair Manual
[x] Cancel search | Manufacturer: MERCEDES-BENZ, Model Year: 2016, Model line: C-Class SEDAN, Model: MERCEDES-BENZ C-Class SEDAN 2016 W205Pages: 398, PDF Size: 9.57 MB
Page 284 of 398
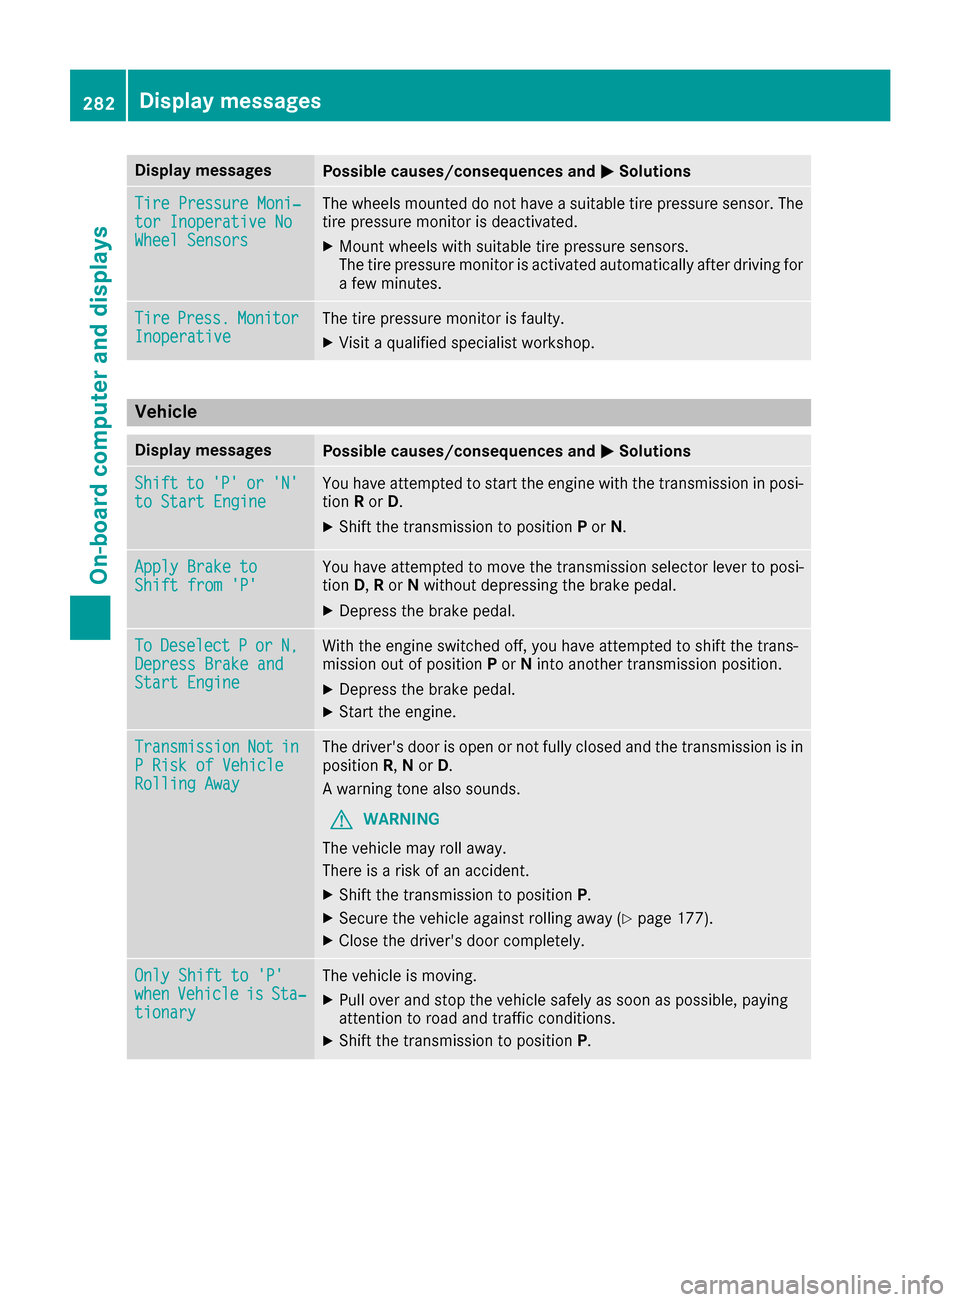
Display messagesPossible causes/consequences andMSolutions
TirePressure Moni‐tor Inoperative NoWheel Sensor s
The wheels mounte ddo no thav e a suitable tire pressur esensor .The
tire pressur emonitor is deactivated.
XMoun twheels wit hsuitable tire pressur esensors.
The tire pressur emonitor is activated automatically after drivin gfor
a few minutes.
Tir ePress.Monito rInoperativeThe tire pressur emonitor is faulty.
XVisit aqualified specialist workshop .
Vehicle
Display messagesPossible causes/consequences and MSolutions
Shiftto'P'or'N'to Start EngineYou haveattempte dto start th eengin ewit hth etransmission in posi-
tion Ror D.
XShift th etransmission to position Por N.
Apply Brake toShift fro m'P'You hav eattempte dto mov eth etransmission selector lever to posi-
tion D,Ror Nwithout depressing th ebrak epedal .
XDepress th ebrak epedal .
ToDeselectPorN,Depres sBrake andStart Engine
Wit hth eengin eswitched off ,you hav eattempte dto shift th etrans -
mission out of position Por Nint oanother transmission position .
XDepress thebrak epedal .
XStart th eengine.
TransmissionNotinP Ris kof Vehicl eRollingAwa y
The driver's door is open or no tfull yclosed and th etransmission is in
position R,N or D.
A warning tone also sounds.
GWARNIN G
The vehicl emay rol laway.
There is aris kof an accident.
XShift th etransmission to position P.
XSecureth evehicl eagainst rollin gaway (Ypage 177).
XCloseth edriver's door completely.
Onl yShift to 'P'whe nVehicl eisSta‐tionar y
The vehicl eis moving .
XPull overand stop th evehicl esafely as soo nas possible, payin g
attention to roa dand traffic conditions.
XShift th etransmission to position P.
282Display messages
On-board computer and displays
Page 285 of 398
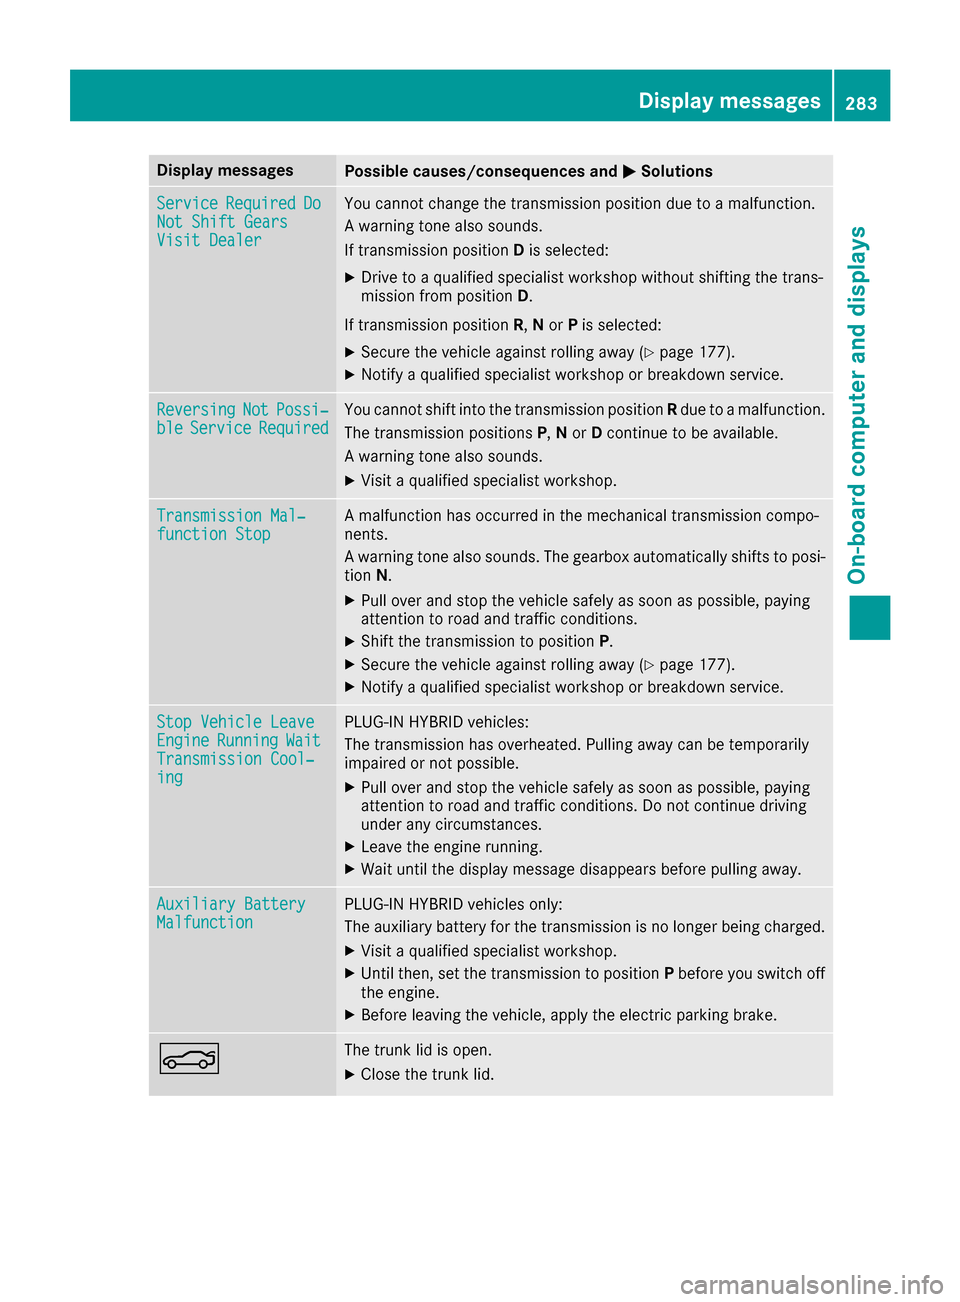
Display messagesPossible causes/consequences andMSolutions
ServiceRequiredDoNot Shift GearsVisit Dealer
You canno tchang eth etransmission position due to amalfunction .
A warning tone also sounds.
If transmission position Dis selected:
XDrive to aqualified specialist workshop without shifting th etrans -
mission from position D.
If transmission position R,N or Pis selected:
XSecur eth evehicl eagainst rollin gaway (Ypage 177).
XNotify aqualified specialist workshop or breakdown service.
ReversingNotPossi‐bleServic eRequiredYou canno tshift int oth etransmission position Rdue to amalfunction .
The transmission position sP,N or Dcontinu eto be available.
A warning tone also sounds.
XVisit aqualified specialist workshop .
Transmission Mal‐function StopAmalfunction has occurred in th emechanical transmission compo -
nents.
A warning tone also sounds. The gearbox automatically shift sto posi-
tion N.
XPull ove rand stop th evehicl esafely as soo nas possible, payin g
attention to roa dand traffic conditions.
XShift th etransmission to position P.
XSecureth evehicl eagainst rollin gaway (Ypage 177).
XNotify aqualified specialist workshop or breakdown service.
Sto pVehicl eLeaveEngineRunnin gWaitTransmission Cool‐ing
PLUG-I NHYBRID vehicles:
The transmission has overheated. Pullin gaway can be temporarily
impaire dor no tpossible.
XPull ove rand stop th evehicl esafely as soo nas possible, payin g
attention to roa dand traffic conditions. Do no tcontinu edrivin g
under any circumstances.
XLeav eth eengin erunning.
XWait until th edisplay message disappear sbefore pullin gaway.
Auxiliary Batter yMalfunctionPLUG-INHYBRID vehicles only:
The auxiliary battery for th etransmission is no longer bein gcharged.
XVisit aqualified specialist workshop .
XUntilthen ,set th etransmission to position Pbefore you switch off
th eengine.
XBefor eleaving th evehicle, apply th eelectric parking brake.
NThe trunk lid is open .
XCloseth etrunk lid.
Display messages28 3
On-board computer and displays
Z
Page 291 of 398
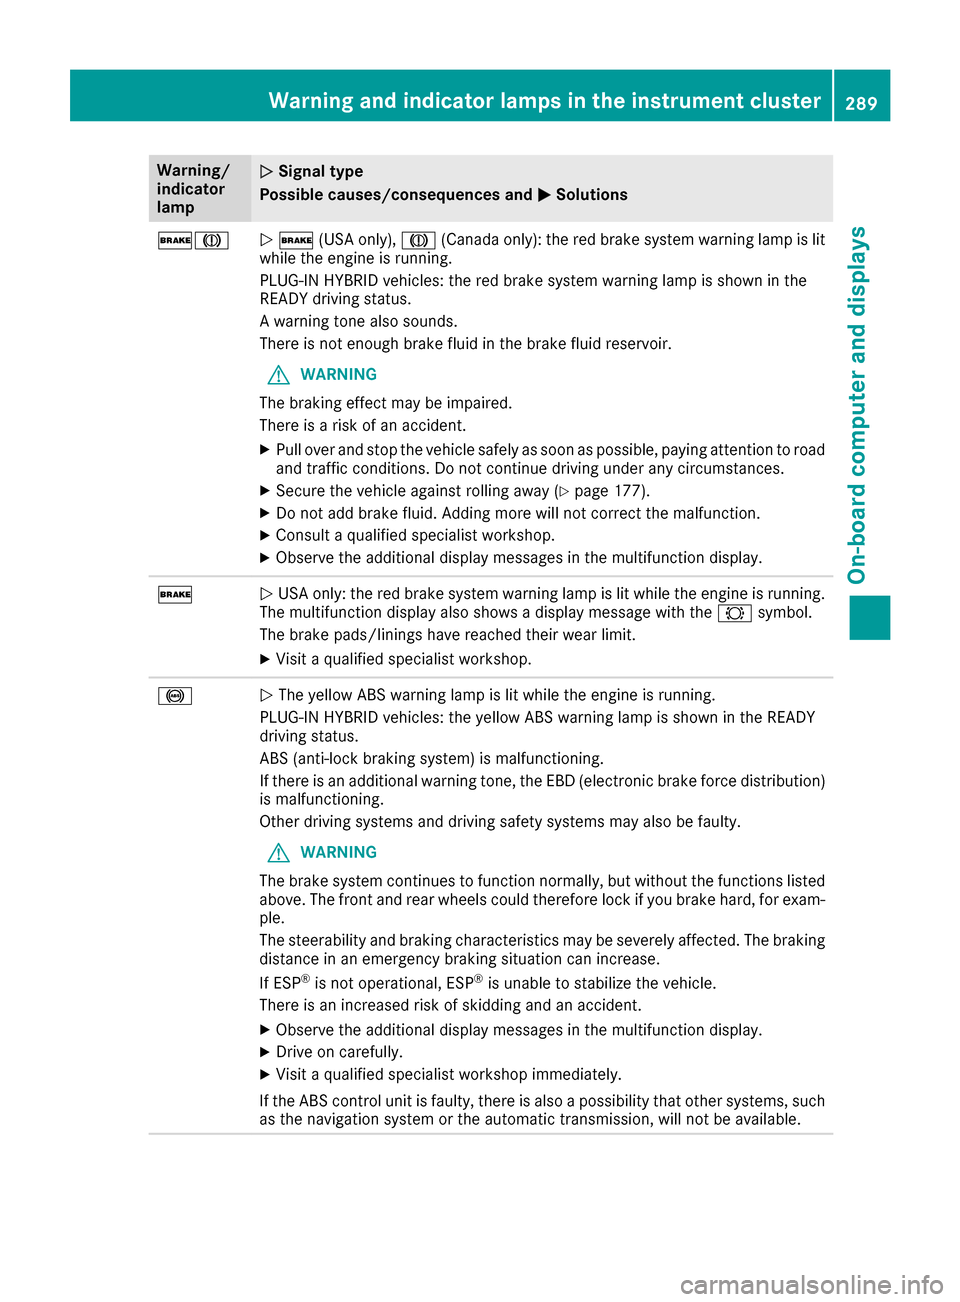
Warning/
indicator
lampNSignal type
Possible causes/consequences and M
Solutions
$JN$ (USA only), J(Canada only): the red brake system warning lamp is lit
while the engine is running.
PLUG-IN HYBRID vehicles: the red brake system warning lamp is shown in the
READY driving status.
A warning tone also sounds.
There is not enough brake fluid in the brake fluid reservoir.
GWARNING
The braking effect may be impaired.
There is a risk of an accident.
XPull over and stop the vehicle safely as soon as possible, paying attention to road
and traffic conditions. Do not continue driving under any circumstances.
XSecure the vehicle against rolling away (Ypage 177).
XDo not add brake fluid. Adding more will not correct the malfunction.
XConsult a qualified specialist workshop.
XObserve the additional display messages in the multifunction display.
$N USA only: the red brake system warning lamp is lit while the engine is running.
The multifunction display also shows a display message with the #symbol.
The brake pads/linings have reached their wear limit.
XVisit a qualified specialist workshop.
!N The yellow ABS warning lamp is lit while the engine is running.
PLUG-IN HYBRID vehicles: the yellow ABS warning lamp is shown in the READY
driving status.
ABS (anti-lock braking system) is malfunctioning.
If there is an additional warning tone, the EBD (electronic brake force distribution)
is malfunctioning.
Other driving systems and driving safety systems may also be faulty.
GWARNING
The brake system continues to function normally, but without the functions listed
above. The front and rear wheels could therefore lock if you brake hard, for exam-
ple.
The steerability and braking characteristics may be severely affected. The braking
distance in an emergency braking situation can increase.
If ESP
®is not operational, ESP®is unable to stabilize the vehicle.
There is an increased risk of skidding and an accident.
XObserve the additional display messages in the multifunction display.
XDrive on carefully.
XVisit a qualified specialist workshop immediately.
If the ABS control unit is faulty, there is also a possibility that other systems, such
as the navigation system or the automatic transmission, will not be available.
Warning and indicator lamps in the instrument cluster289
On-board computer and displays
Z
Page 316 of 398
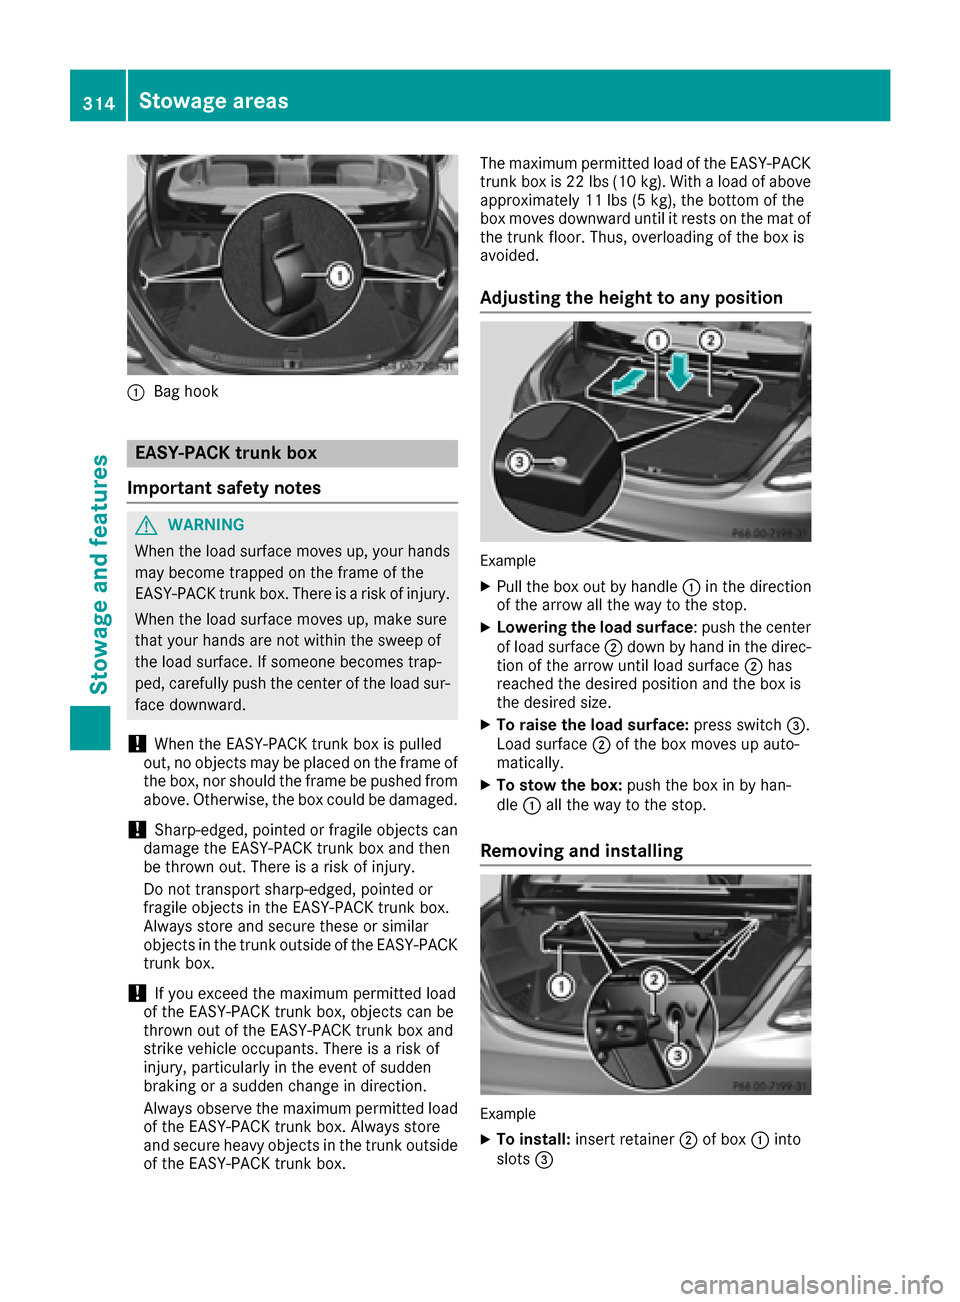
:Bag hook
EASY-PACK trunk box
Important safety notes
GWARNING
When the load surface moves up, your hands may become trapped on the frame of the
EASY-PACK trunk box. There is a risk of injury.
When the load surface moves up, make sure
that your hands are not within the sweep of
the load surface. If someone becomes trap-
ped, carefully push the center of the load sur-
face downward.
!When the EASY-PACK trunk box is pulled
out, no objects may be placed on the frame of
the box, nor should the frame be pushed from
above. Otherwise, the box could be damaged.
!Sharp-edged, pointed or fragile objects can
damage the EASY-PACK trunk box and then
be thrown out. There is a risk of injury.
Do not transport sharp-edged, pointed or
fragile objects in the EASY-PACK trunk box.
Always store and secure these or similar
objects in the trunk outside of the EASY-PACK
trunk box.
!If you exceed the maximum permitted load
of the EASY-PACK trunk box, objects can be
thrown out of the EASY-PACK trunk box and
strike vehicle occupants. There is a risk of
injury, particularly in the event of sudden
braking or a sudden change in direction.
Always observe the maximum permitted load
of the EASY-PACK trunk box. Always store
and secure heavy objects in the trunk outside
of the EASY-PACK trunk box. The maximum permitted load of the EASY-PACK
trunk box is 22 lb
s(10 kg). With a load of above
approximately 11 lbs (5 kg), the bottom of the
box moves downward until it rests on the mat of
the tru
nk floor. Thus, overloading of the box is
avoided.
Adjusting the height to any position
Example
XPull the box out by handle :in the direction
of the arrow all the way to the stop.
XLowering the load surface: push the center
of load surface ;down by hand in the direc-
tion of the arrow until load surface ;has
reached the desired position and the box is
the desired size.
XTo raise the load surface: press switch=.
Load surface ;of the box moves up auto-
matically.
XTo stow the box: push the box in by han-
dle :all the way to the stop.
Removing and installing
Example
XTo install: insert retainer ;of box :into
slots =
314Stowage areas
Stowage and features
Page 328 of 398
Information on Roadside Assistance
(Ypage 29).
Downloading routes
Downloading routes allows you to transfer and
save predefined routes in the navigation sys-
tem.
A route can be prepared and sent by either a
customer service representative or under "Own-
ers Online" at http://www.mbusa.com.
Each route can include up to four way points.
Once a route has been received by the naviga-
tion system, you will see theExternal
routeICON_POI_Category Name_1 has beensaved to "Previous destinations".Would you like to start navigation?message on the multimedia system display.
The route is saved.
XTo start route guidance:selectYes.
An overview of the route is shown in the dis-
play.
If you select No
, the saved route can be called
up later in the navigation menu.
XSelect Start.
Starting route guidance.
Downloaded and saved routes can be called up
again.
You can find further information in the separate
multimedia system operating instructions.
Speed alert
You can define the upper speed limit, which
must not be exceeded by the vehicle.
If this selected speed is exceeded by the vehicle,
a message will be sent to the Customer Assis-
tance Center. The Customer Assistance Center
then forwards this information to you.
You can select the way in which you receive this
information beforehand. Possible options
include text message, e-mail or an automated
call.
The data you receive contains the following
information:
Rthe location where the speed limit was excee-
ded
Rthe time at which the speed limit was excee-
ded
Rthe selected speed limit which was exceeded
Geo fencing
Geo fencing allows you to select areas which the
vehicle should not enter or leave. You will be
informed if the vehicle crosses the boundaries
of the selected areas. You can select the way in
which you receive this information beforehand.
Possible options include text message, e-mail or an automated call.
The area can be determined as either a circle or
a polygon with a maximum of ten corners. You
can specify up to ten areas simultaneously. Dif-
ferent settings are possible for each area.
These settings can be called up under "Owners
Online" at http://www.mbusa.com.
Alternatively, you can trigger an MB Info call and
inform the customer service representative that
you wish to activate geo fencing.
Currently inactive areas can be activated by text
message.
Triggering the vehicle alarm
With this function, you can trigger the vehicle's
panic alarm via text message. An alarm sounds
and the exterior lighting flashes. Depending on
the setting, the panic alarm lasts five or ten sec-onds. Afterwards, the alarm switches off.
Garage door opener
General notes
The HomeLink®garage door opener integrated
in the rear-view mirror allows you to operate up
to three different door and gate systems.
Use the integrated garage door opener only on
garage doors that:
Rhave safety stop and reverse features and
Rmeet current U.S. federal safety standards
Once programed, the integrated garage door
opener in the rear-view mirror will assume the
function of the garage door system's remote
control. Please also read the operating instruc-
tions for the garage door system.
When programming a garage door opener, park
the vehicle outside the garage. Do not run the
engine while programming.
Certain garage door drives are incompatible
with the integrated garage door opener. If you
have difficulty programing the integrated garage
326Features
Stowage and features
Page 338 of 398
when the engine is switched off or at very
low speeds. Otherwise, when in transmis-
sion positionDor Rthe automatic trans-
mission will automatically switch to park
position Pand block the wheels.
ROperating with the Start/Stop button:
Do not open the driver's door when the
engine is switched off or at very low
speeds. Otherwise, when in transmission
position Dor Rthe automatic transmission
will automatically switch to park position P
and block the wheels.
Observe the following to make sure that the
automatic transmission stays in position Nneu-
tral:
Operating with the SmartKey and Start/Stop
button:
XMake sure that the ignition is switched on.
XMake sure that the vehicle is stationary.
XDepress and hold the brake pedal.
Operating with the Start/Stop button only:
XEngage park position P.
XRelease the brake pedal.
XRemove Start/Stop button from ignition lock
(Ypage 146).
XInsert the SmartKey into the ignition lock.
XSwitch on the ignition.
XDepress and hold the brake pedal.
Operating with the SmartKey and Start/Stop
button:
XShift to neutral N.
XRelease the brake pedal.
XRelease the electric parking brake, if neces-
sary.
XSwitch off the ignition and leave the SmartKey
in the ignition lock.
You can wash the vehicle in an automatic car
wash from the very start.
If the vehicle is very dirty, pre- wash it bef
ore
cleaning it in an automatic car wash.
After using an automatic car wash, wipe off wax
from the windshield and the wiper blades. This
will prevent smears and reduce wiping noises
caused by residue on the windshield.
Washing by hand
In some countries, washing by hand is only
allowed at specially equipped washing bays.
Observe the legal requirements in each country.
XDo not use hot water and do not wash the
vehicle in direct sunlight.
XUse a soft sponge to clean.
XUse a mild cleaning agent, such as a car
shampoo approved by Mercedes-Benz.
XThoroughly hose down the vehicle with a gen-
tle jet of water.
XDo not point the water jet directly towards the
air inlet.
XUse plenty of water and rinse out the sponge
frequently.
XRinse the vehicle with clean water and dry
thoroughly with a chamois.
XDo not let the cleaning agent dry on the paint- work.
Carefully remove all deposits of road salt as
soon as possible when driving in winter.
Power washers
GWARNING
The water jet from a circular jet nozzle (dirt
blasters) can cause invisible exterior damage
to the tires or chassis components. Compo-
nents damaged in this way may fail unexpect-
edly. There is a risk of an accident.
Do not use power washers with circular jet
nozzles to clean the vehicle. Have damaged
tires or chassis components replaced imme-
diately.
!Always maintain a distance of at least
11.8 in (30 cm) between the vehicle and the
power washer nozzle. Information about the
correct distance is available from the equip-
ment manufacturer.
Move the power washer nozzle around when
cleaning your vehicle.
Do not aim directly at any of the following:
Rtires
Rdoor gaps, roof gaps, joints, etc.
Relectrical components
Rbattery
Rconnectors
336Care
Maintenance and care
Page 359 of 398
Vehicles with 4MATIC may either be towed away
with both axles on the ground or be loaded up
and transported.
If the vehicle's transmission, front, or rear axle is
damaged, have the vehicle transported on a
truck or trailer.
In the event of damage to the electrical sys-
tem:if the battery is defective, the automatic
transmission will be locked in position P. To shift
the automatic transmission to position N, you
must provide power to the vehicle's electrical
system in the same way as when jump-starting
(
Ypage 352).
Have the vehicle transported on a transporter or
trailer.
Tow-starting (emergency engine
starting)
!
Vehicles with automatic transmission must
not be tow-started. You could otherwise dam-
age the automatic transmission.
iYou can find information on "Jump-starting"
under (Ypage 352).
Fuses
Important safety notes
GWARNING
If you manipulate or bridge a faulty fuse or if
you replace it with a fuse with a higher amper- age, the electric cables could be overloaded.
This could result in a fire. There is a risk of an
accident and injury.
Always replace faulty fuses with the specified
new fuses having the correct amperage.
Blown fuses must be replaced with fuses of the
same rating, which you can recognize by the
color and value. The fuse ratings are listed in the
fuse allocation chart.
The fuse allocation chart is on the fuse box in the
trunk (
Ypage 357).
If a newly inserted fuse also blows, have the
cause traced and rectified at a qualified special-
ist workshop, e.g. an authorized Mercedes-Benz Center.
!Only use fuses that have been approved for
Mercedes-Benz vehicles and which have the
correct fuse rating for the system concerned.
Otherwise, components or systems could be
damaged.
!Make sure that no moisture can enter the
fuse box when the cover is open.
!When closing the cover, make sure that it is
lying correctly on the fuse box. Moisture seep-
ing in or dirt could otherwise impair the oper-
ation of the fuses.
The fuses in your vehicle serve to close down
faulty circuits. If a fuse blows, all the compo-
nents on the circuit and their functions stop
operating.
Before changing a fuse
Observe the important safety notes
(Ypage 357)
XSecure the vehicle against rolling away
(Ypage 177).
XSwitch off the engine.
XSwitch off all electrical consumers.
XRemove the SmartKey from the ignition lock.
or, in vehicles with KEYLESS-GO start-function
or KEYLESS‑GO
XOpen the driver's door.
The on-board electronics now have status 0.
This is the same as the SmartKey having been
removed.
The driver’s door can be closed again.
All indicator lamps in the instrument cluster
must be off.
The fuses are located in various fuse boxes:
RFuse box on the driver's side of the dashboard
RFuse box in the front-passenger footwell
RFuse box in the engine compartment on the
driver's side
RFuse box under the trunk floor on the right-
hand side of the vehicle, when viewed in the
direction of travel
Dashboard fuse box
!
Do not use a pointed object such as a screw-
driver to open the cover in the dashboard. You
could damage the dashboard or the cover.
Fuses357
Breakdown assistance
Z