control panel switches MERCEDES-BENZ C-Class SEDAN 2016 W205 Owner's Manual
[x] Cancel search | Manufacturer: MERCEDES-BENZ, Model Year: 2016, Model line: C-Class SEDAN, Model: MERCEDES-BENZ C-Class SEDAN 2016 W205Pages: 398, PDF Size: 9.57 MB
Page 44 of 398
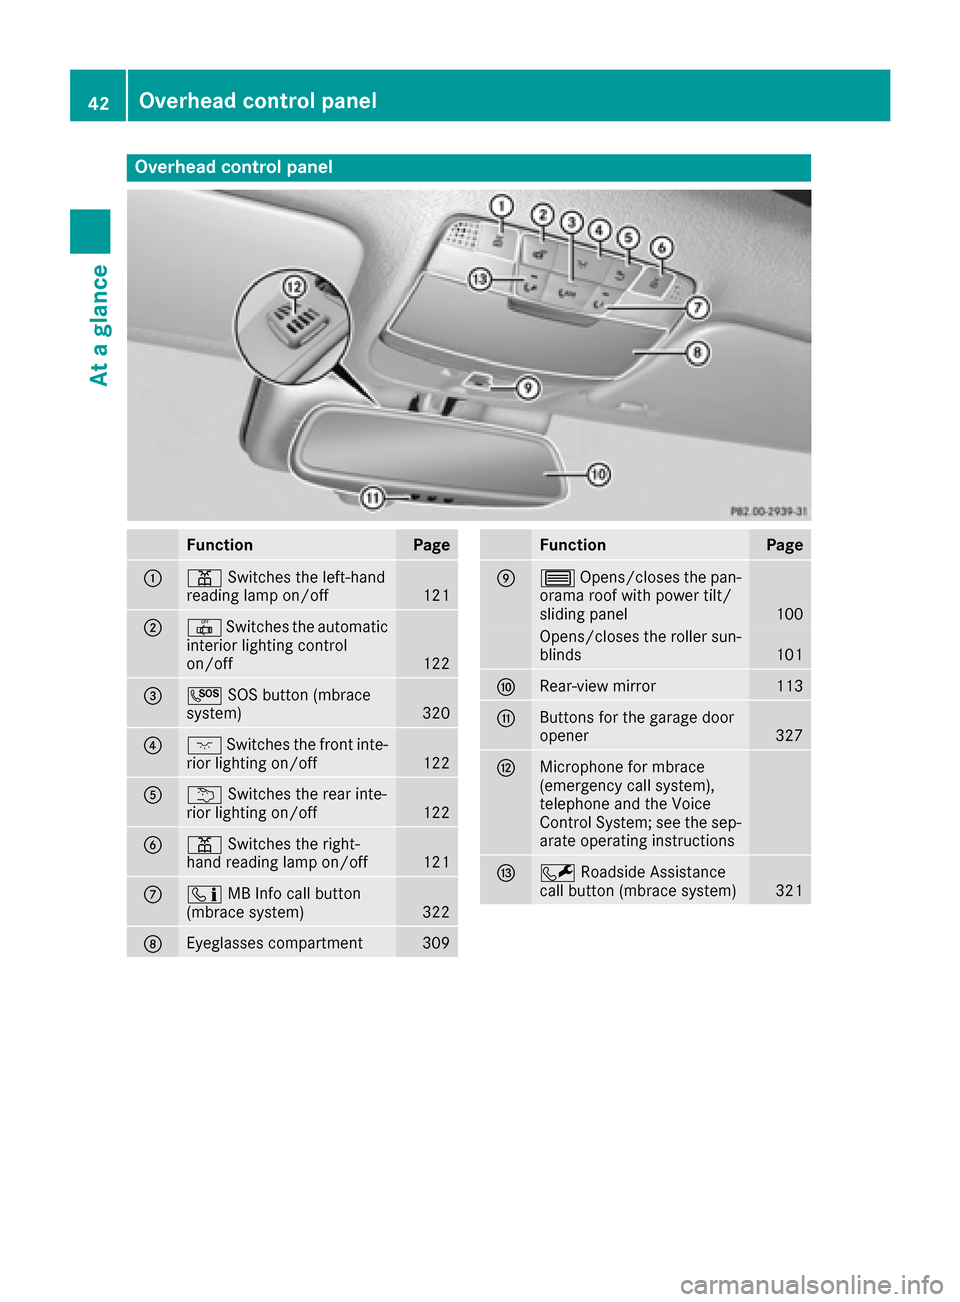
Overhead control panel
FunctionPage
:pSwitches the left-hand
reading lamp on/off121
;| Switches the automatic
interior lighting control
on/off
122
=G SOS button (mbrace
system)320
?c Switches the front inte-
rior lighting on/off122
Au Switches the rear inte-
rior lighting on/off122
Bp Switches the right-
hand reading lamp on/off121
Cï MB Info call button
(mbrace system)322
DEyeglasses compartment309
FunctionPage
E3 Opens/closes the pan-
orama roof with power tilt/
sliding panel
100
Opens/closes the roller sun-
blinds101
FRear-view mirror113
GButtons for the garage door
opener327
HMicrophone for mbrace
(emergency call system),
telephone and the Voice
Control System; see the sep-
arate operating instructions
IF Roadside Assistance
call button (mbrace system)321
42Overhead control panel
At a glance
Page 122 of 398
XTo indicate briefly:press the combination
switch briefly to the pressure point in the
direction of arrow ;or?.
The corresponding turn signal flashes three
times.
XTo indicate: press the combination switch
beyond the pressure point in the direction of
arrow ;or?.
XTo switch on the high-beam headlamps:
turn the light switch to LorÃ.
XPress the combination switch beyond the
pressure point in the direction of arrow :.
In the Ãposition, the high-beam head-
lamps are only switched on when it is dark and
the engine is running.
The blue Kindicator lamp in the instru-
ment cluster lights up when the high-beam
headlamps are switched on.
XTo switch off the high-beam headlamps:
move the combination switch back to its nor-
mal position.
The blue Kindicator lamp in the instru-
ment cluster goes out.
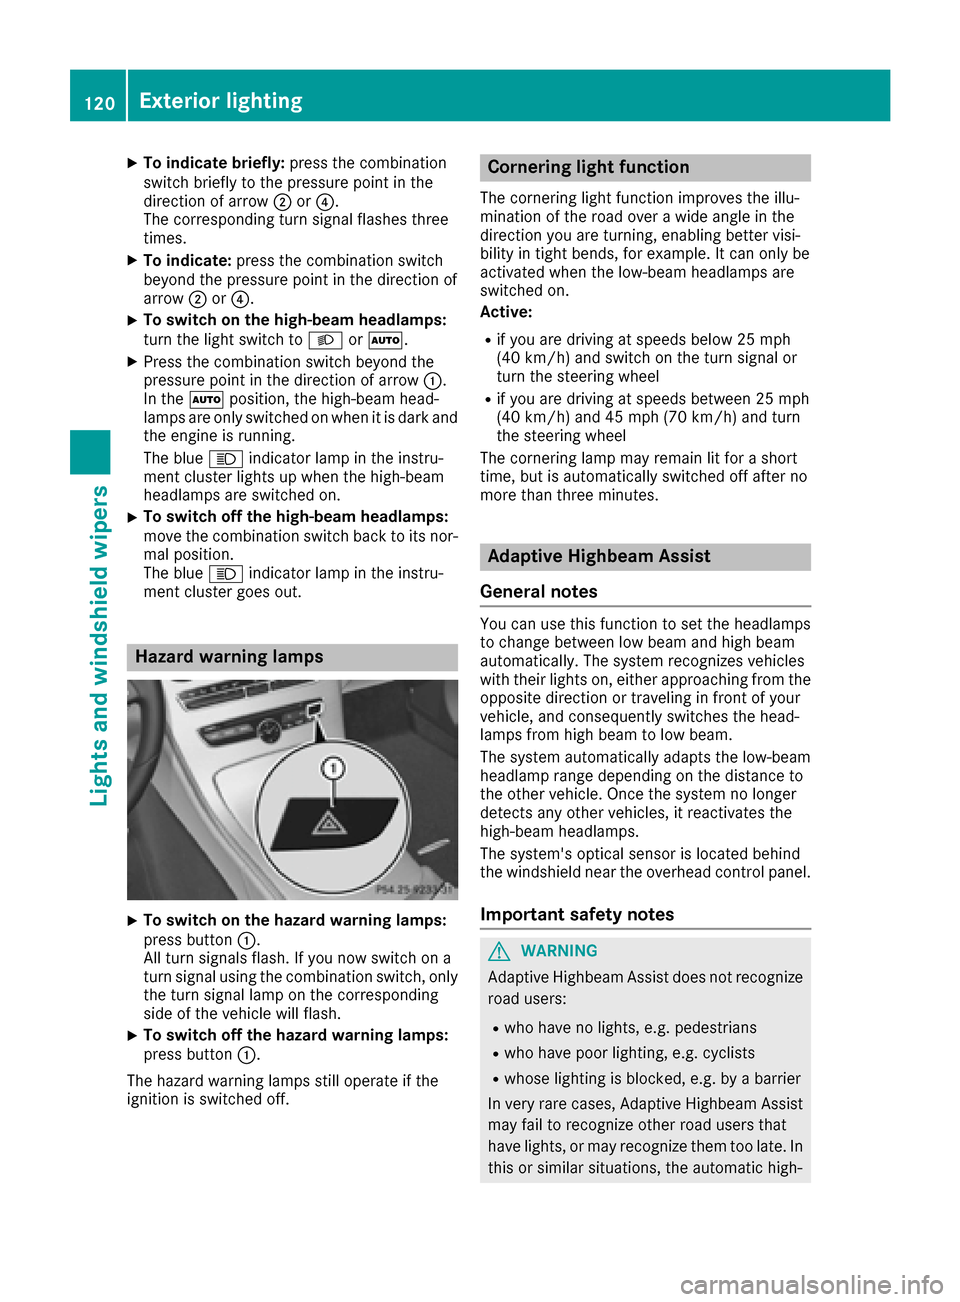
Hazard warning lamps
XTo switch on the hazard warning lamps:
press button :.
All turn signals flash. If you now switch on a
turn signal using the combination switch, only
the turn signal lamp on the corresponding
side of the vehicle will flash.
XTo switch off the hazard warning lamps:
press button :.
The hazard warning lamps still operate if the
ignition is switched off.
Cornering light function
The cornering light function improves the illu-
mination of the road over a wide angle in the
direction you are turning, enabling better visi-
bility in tight bends, for example. It can only be
activated when the low-beam headlamps are
switched on.
Active:
Rif you are driving at speeds below 25 mph
(40 km/h) and switch on the turn signal or
turn the steering wheel
Rif you are driving at speeds between 25 mph
(40 km/h) and 45 mph (70 km/h) and turn
the steering wheel
The cornering lamp may remain lit for a short
time, but is automatically switched off after no
more than three minutes.
Adaptive Highbeam Assist
General notes
You can use this function to set the headlamps
to change between low beam and high beam
automatically. The system recognizes vehicles
with their lights on, either approaching from the
opposite direction or traveling in front of your
vehicle, and consequently switches the head-
lamps from high beam to low beam.
The system automatically adapts the low-beam
headlamp range depending on the distance to
the other vehicle. Once the system no longer
detects any other vehicles, it reactivates the
high-beam headlamps.
The system's optical sensor is located behind
the windshield near the overhead control panel.
Important safety notes
GWARNING
Adaptive Highbeam Assist does not recognize
road users:
Rwho have no lights, e.g. pedestrians
Rwho have poor lighting, e.g. cyclists
Rwhose lighting is blocked, e.g. by a barrier
In very rare cases, Adaptive Highbeam Assist
may fail to recognize other road users that
have lights, or may recognize them too late. In this or similar situations, the automatic high-
120Exterior lighting
Lights and windshield wiper s
Page 124 of 398
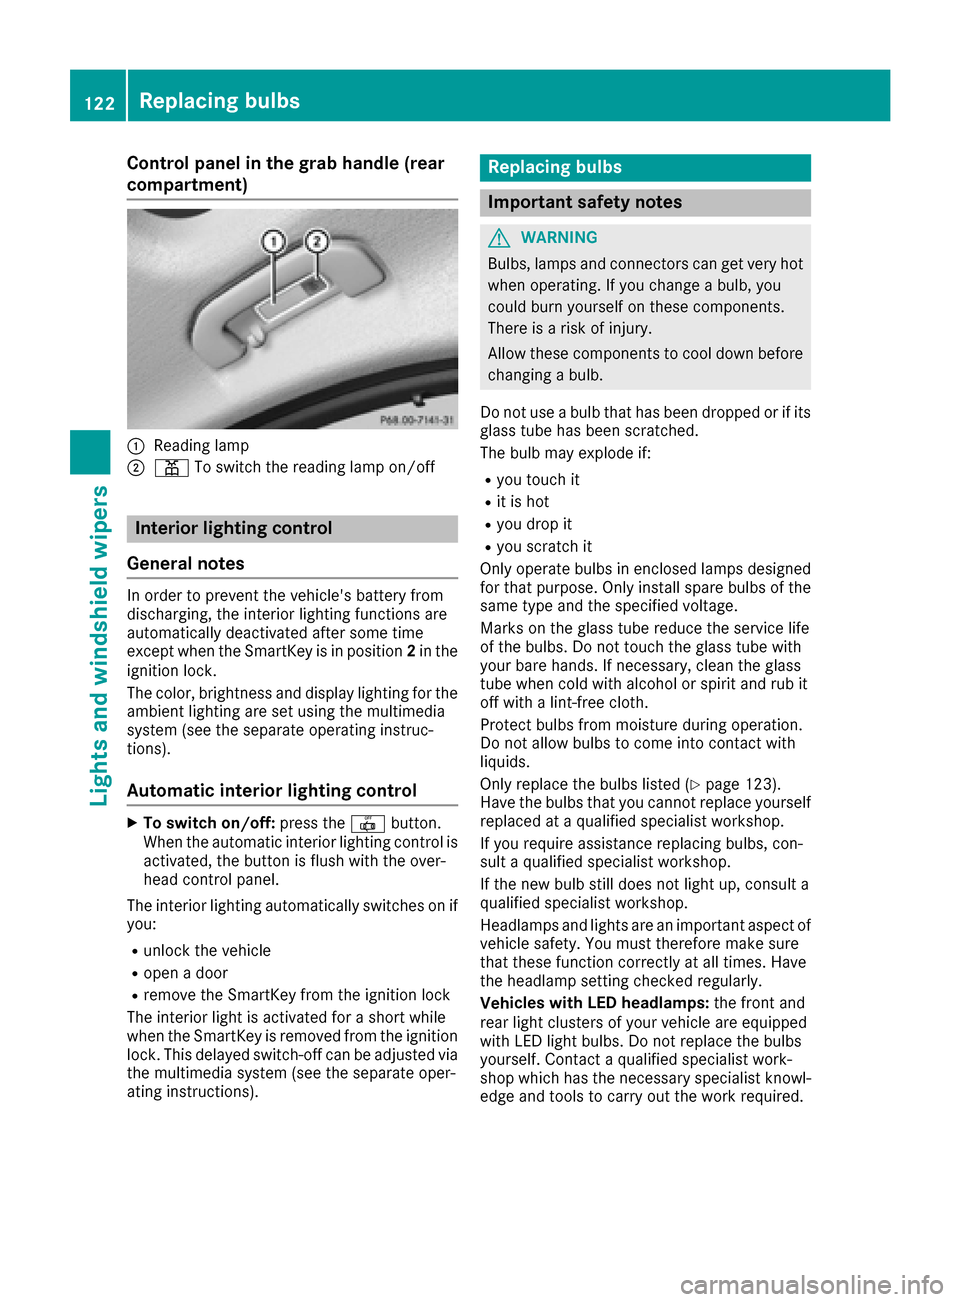
Control panel in the grab handle (rear
compartment)
:Reading lamp
;pTo switch the reading lamp on/off
Interior lighting control
General notes
In order to prevent the vehicle's battery from
discharging, the interior lighting functions are
automatically deactivated after some time
except when the SmartKey is in position 2in the
ignition lock.
The color, brightness and display lighting for the
ambient lighting are set using the multimedia
system (see the separate operating instruc-
tions).
Automatic interior lighting control
XTo switch on/off: press the|button.
When the automatic interior lighting control is
activated, the button is flush with the over-
head control panel.
The interior lighting automatically switches on if
you:
Runlock the vehicle
Ropen a door
Rremove the SmartKey from the ignition lock
The interior light is activated for a short while
when the SmartKey is removed from the ignition
lock. This delayed switch-off can be adjusted via
the multimedia system (see the separate oper-
ating instructions).
Replacing bulbs
Important safety notes
GWARNING
Bulbs, lamps and connectors can get very hot
when operating. If you change a bulb, you
could burn yourself on these components.
There is a risk of injury.
Allow these components to cool down before
changing a bulb.
Do not use a bulb that has been dropped or if its
glass tube has been scratched.
The bulb may explode if:
Ryou touch it
Rit is hot
Ryou drop it
Ryou scratch it
Only operate bulbs in enclosed lamps designed
for that purpose. Only install spare bulbs of the same type and the specified voltage.
Marks on the glass tube reduce the service life
of the bulbs. Do not touch the glass tube with
your bare hands. If necessary, clean the glass
tube when cold with alcohol or spirit and rub it
off with a lint-free cloth.
Protect bulbs from moisture during operation.
Do not allow bulbs to come into contact with
liquids.
Only replace the bulbs listed (
Ypage 123).
Have the bulbs that you cannot replace yourself
replaced at a qualified specialist workshop.
If you require assistance replacing bulbs, con-
sult a qualified specialist workshop.
If the new bulb still does not light up, consult a
qualified specialist workshop.
Headlamps and lights are an important aspect of
vehicle safety. You must therefore make sure
that these function correctly at all times. Have
the headlamp setting checked regularly.
Veh icles wit
h LED headlamps:
the front and
rear light clusters of your vehicle are equipped
with LED light bulbs. Do not replace the bulbs
yourself. Contact a qualified specialist work-
shop which has the necessary specialist knowl-
edge and tools to carry out the work required.
122Replacing bulbs
Lights and windshield wipers
Page 132 of 398
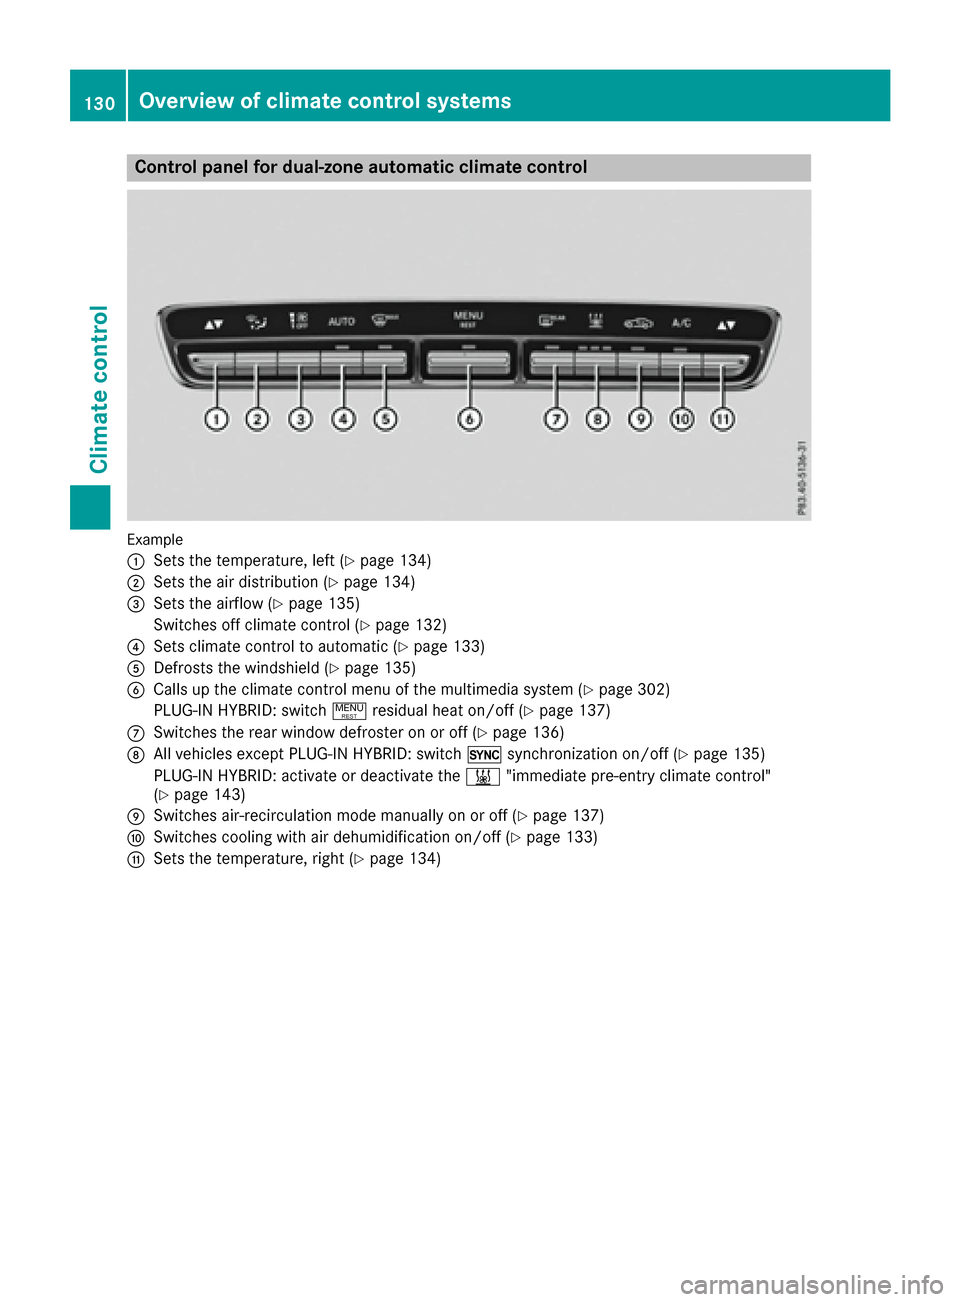
Control panel for dual-zone automatic climate control
Example
:
Sets the temperature, left (Ypage 134)
;Sets the air distribution (Ypage 134)
=Sets the airflow (Ypage 135)
Switches off climate control (
Ypage 132)
?Sets climate control to automatic (Ypage 133)
ADefrosts the windshield (Ypage 135)
BCalls up the climate control menu of the multimedia system (Ypage 302)
PLUG-IN HYBRID: switch !residual heat on/off (
Ypage 137)
CSwitches the rear window defroster on or off (Ypage 136)
DAll vehicles except PLUG‑ IN HYBRID: switch0synchronization on/off (Ypage 135)
PLUG-IN HYBRID: activate or deactivate the &"immediate pre-entry climate control"
(
Ypage 143)
ESwitches air-recirculation mode manually on or off (Ypage 137)
FSwitches cooling with air dehumidification on/off (Ypage 133)
GSets the temperature, right (Ypage 134)
130Overview of climate control systems
Climate control
Page 133 of 398
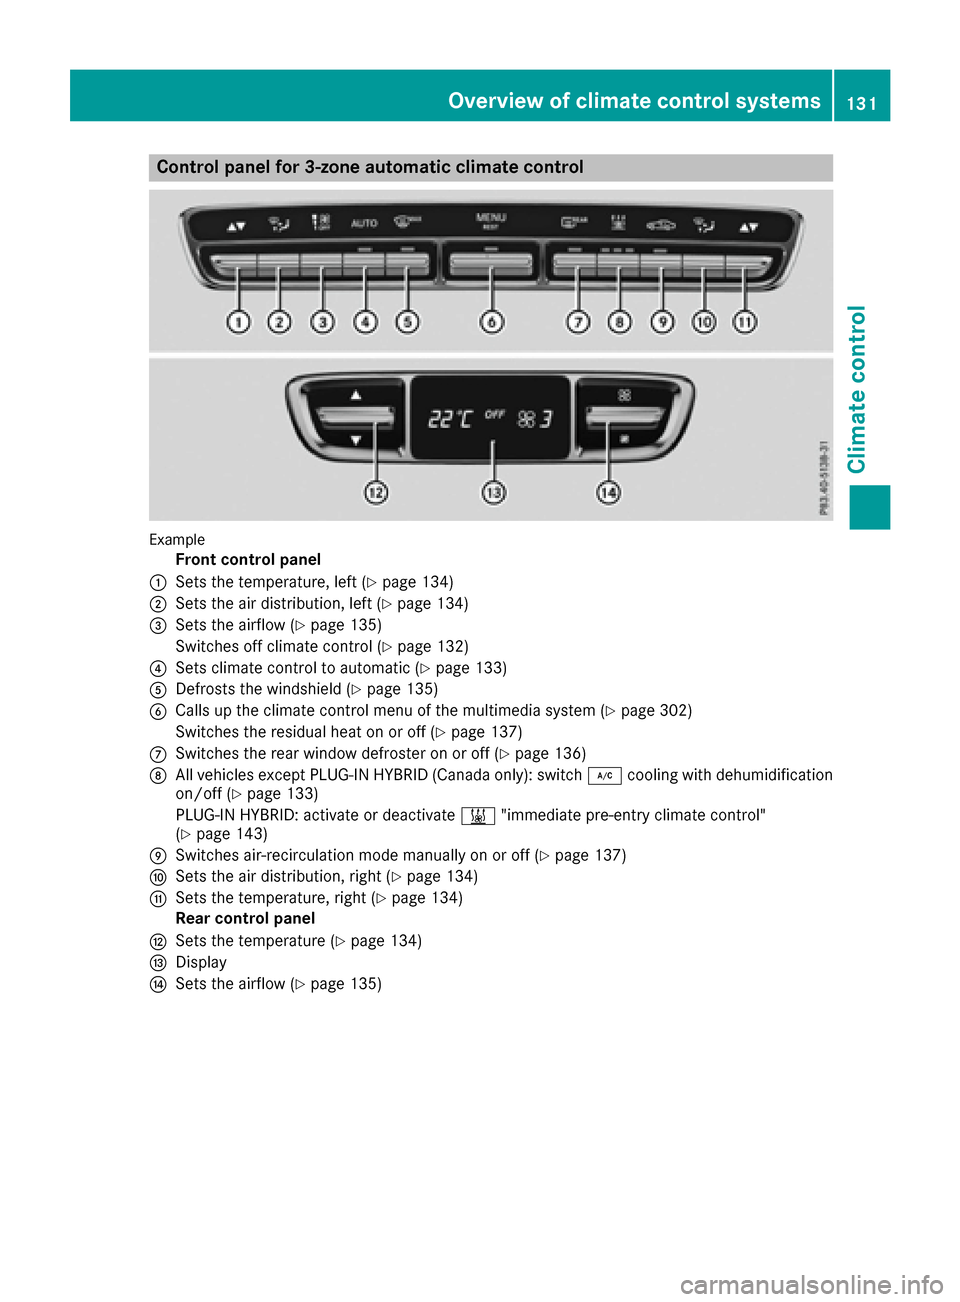
Control panel for 3-zone automatic climate control
Example
Front control panel
:Sets the temperature, left (Ypage 134)
;Sets the air distribution, left (Ypage 134)
=Sets the airflow (Ypage 135)
Switches off climate control (
Ypage 132)
?Sets climate control to automatic (Ypage 133)
ADefrosts the windshield (Ypage 135)
BCalls up the climate control menu of the multimedia system (Ypage 302)
Switches the residual heat on or off (
Ypage 137)
CSwitches the rear window defroster on or off (Ypage 136)
DAll vehicles except PLUG‑ IN HYBRID (Canada only): switch ¿cooling with dehumidification
on/off (Ypage 133)
PLUG-IN HYBRID: activate or deactivate &"immediate pre-entry climate control"
(
Ypage 143)
ESwitches air-recirculation mode manually on or off (Ypage 137)
FSets the air distribution, right (Ypage 134)
GSets the temperature, right (Ypage 134)
Rear control panel
HSets the temperature (Ypage 134)
IDisplay
JSets the airflow (Ypage 135)
Overview of climate control systems131
Climate control
Page 136 of 398
above theÃrocker switch goes out. The
function which has not been changed manually,
however, continues to be controlled automati-
cally. When the manually set function switches
back to automatic mode, the indicator lamp
above the Ãrocker switch lights up again.
Adjusting the climate mode settings
This function is only available with dual-zone
automatic climate control on vehicles for Can-
ada.
In automatic mode you can select the following
airflow settings for the driver's and front-
passenger areas:
FOCUS high airflow, slightly cooler setting
MEDIUM medium airflow, standard setting
DIFFUSEl ow airflow, slightly warmer and draft-
free setting
XTo set: set the climate mode using the mul-
timedia system (Ypage 303).
Setting the temperature
Dual-zone automatic climate control
Dual-zone automatic climate control: the tem-
perature for the driver's and front-passenger
side can be set individually.
XTurn the SmartKey to position 2in the ignition
lock (Ypage 146).
XTo increase or reduce: press thew
rocker switch up or down.
Only change the temperature setting in small
increments. Start at 72 ‡ (22 †).
3-zone automatic climate control
General notes
You can select different temperature settings
for the driver's and front-passenger sides as well as for the rear compartment.
Setting the temperature in the front com-
partment using the front control panel
XTurn the SmartKey to position 2in the ignition
lock (Ypage 146).
XTo increase or reduce: press thew
rocker switch up or down. Only change the temperature setting in small
increments. Start at 72 ‡ (22 †).
Setting the temperature in the rear com-
partment using the rear control panel
XTurn the SmartKey to position
2in the ignition
lock (Ypage 146).
XTo increase or reduce: press the upper or
lower section of the wrocker switch on
the rear control panel (
Ypage 131).
Only change the temperature setting in small
increments. Start at 72 ‡ (22 †).
The set temperature appears on the rear-
compartment display.
Setting the air distribution
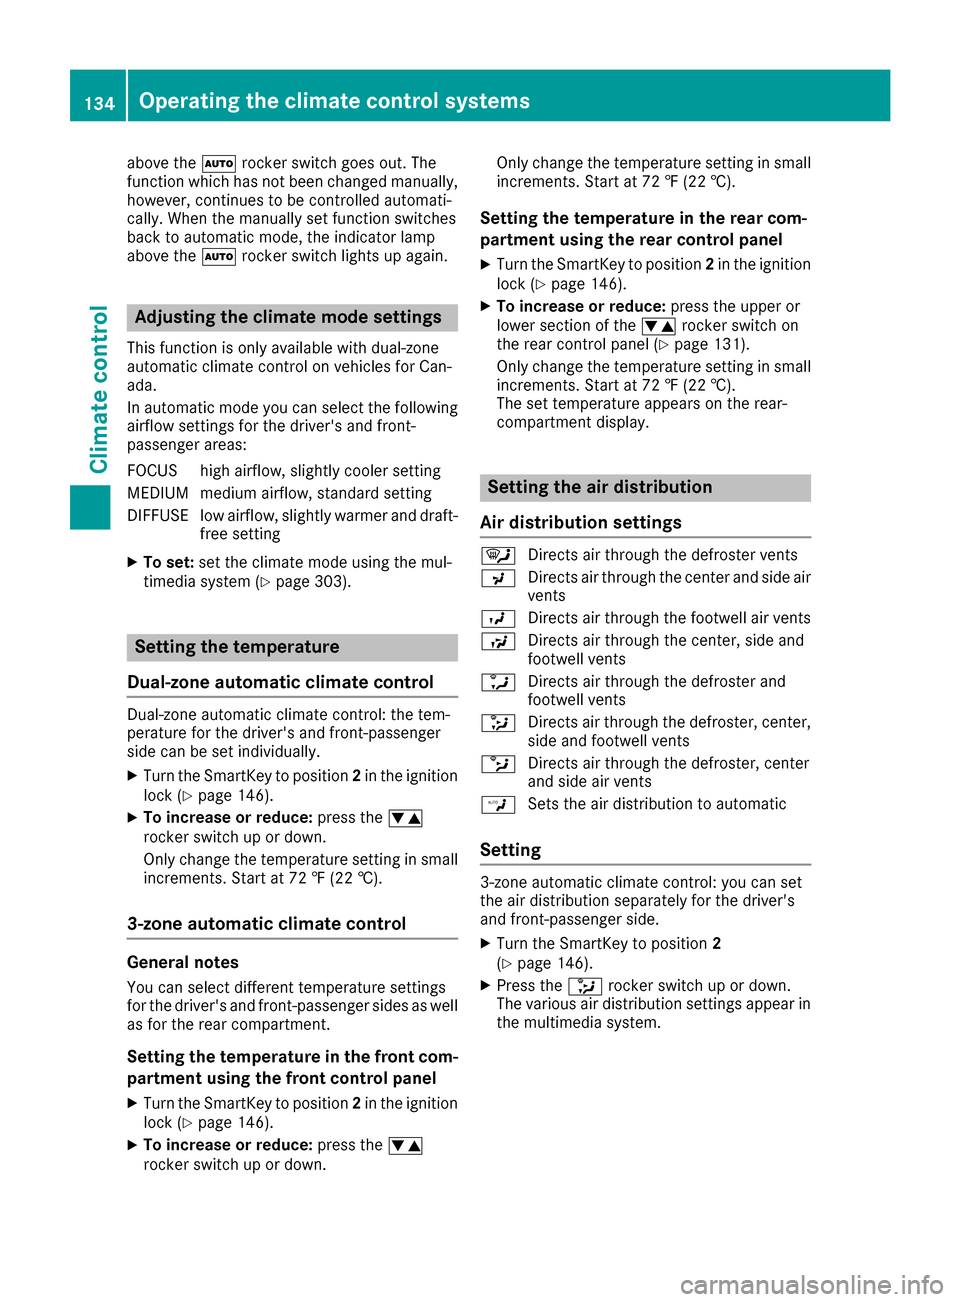
Air distribution settings
¯ Directs air through the defroster vents
P Directs air through the center and side air
vents
O Directs air through the footwell air vents
S Directs air through the center, side and
footwell vents
a Directs air through the defroster and
footwell vents
_ Directs air through the defroster, center,
side and footwell vents
b Directs air through the defroster, center
and side air vents
W Sets the air distribution to automatic
Setting
3-zone automatic climate control: you can set
the air distribution separately for the driver's
and front-passenger side.
XTurn the SmartKey to position 2
(Ypage 146).
XPress the _rocker switch up or down.
The various air distribution settings appear in
the multimedia system.
134Operating the climate control systems
Climate control
Page 137 of 398
Setting the airflow
Adjusting the front-compartment air-
flow
XTurn the SmartKey to position 2in the ignition
lock (Ypage 146).
XTo increase or reduce: press theH
rocker switch up or down.
Setting the rear compartment airflow
using the rear control panel
It is only possible to set the airflow using the rear
control panel on vehicles with 3-zone automatic climate control. You can set the airflow sepa-
rately for the front and rear compartment.
XTurn the SmartKey to position 2in the ignition
lock (Ypage 146).
XTo increase or reduce: press the upper or
lower section of the KorI rocker
switch on the rear control panel.
The selected airflow level appears in the rear
display.
Activating or deactivating the syn-
chronization function
General notes
The "Synchronization" function is only available
with dual-zone automatic climate control and 3-
zone automatic climate control.
Climate control can be set centrally using the
synchronization function. The temperature set-
ting is adopted for the front-passenger side. For
3-zone automatic climate control, the tempera- ture setting is adopted for the front-passenger
side and rear compartment.
Activating/deactivating
Dual-zone automatic climate control
XPress the upper or lower section of the 0
rocker switch.
The indicator lamp above the 0rocker
switch lights up or goes out.
The synchronization function deactivates if the
settings for the front-passenger side are
changed.
3-zone automatic climate control
XActivate or deactivate the "Synchronization"
function using the multimedia system
(
Ypage 304).
The synchronization function is deactivated:
Rif the settings for the front-passenger side are
changed
Rif the settings for the rear compartment are
changed
Defrosting the windshield
General notes
You can use this function to defrost the wind-
shield or to clear a fogged up windshield or front
side windows on the inside.
Switch off the "Windshield defrosting" function
as soon as the windshield is clear again.
Switching the "Windshield defrosting"
function on or off
XTurn the SmartKey to position 2in the ignition
lock (Ypage 146).
XTo activate: press the¬rocker switch on
the front control unit up or down.
The indicator lamp above the ¬rocker
switch lights up. The current climate control
settings are deactivated.
The climate control system switches to the
following functions:
Rhigh airflow
Rhigh temperature
Rair distribution to the windshield and front
side windows
Rair-recirculation mode off
iIf necessary, the "Cooling with air dehumid-
ification" function is activated. In this case,
the indicator lamp above the ¿rocker
switch remains switched off.
XTo switch off: press the¬rocker switch
up or down.
The indicator lamp above the ¬rocker
switch goes out. The previously selected set-
tings are restored. Air-recirculation mode
remains deactivated.
Operating the climate control systems135
Climate control
Page 238 of 398
The segments between the speed of the vehi-
cle in front and the stored speed light up.
Tachometer
!
Do not drive in the overrevving range, as this
could damage the engine.
The red band in the tachometer indicates the
engine's overrevving range.
The fuel supply is interrupted to protect the
engine when the red band is reached.
Outside temperature display
You should pay special attention to road condi-
tions when temperatures are around freezing
point.
Bear in mind that the outside temperature dis-
play indicates the temperature measured and
does not record the road temperature.
The outside temperature display is in the multi- function display (
Ypage 237).
Changes in the outside temperature are dis-
played after a short delay.
Coolant temperature display
GWARNING
Opening the hood when the engine is over-
heated or when there is a fire in the engine
compartment could expose you to hot gases
or other service products. There is a risk of
injury.
Let an overheated engine cool down before
opening the hood. If there is a fire in the
engine compartment, keep the hood closed
and contact the fire department.
!A display message is shown if the coolant
temperature is too high.
If the coolant temperature is over 248 ‡
(120 †), do not continue driving. The engine
will otherwise be damaged.
All vehicles except PLUG-IN HYBRID vehicles:
the coolant temperature display is in the lower
section of the tachometer (
Ypage 36). PLUG-IN HYBRID vehicles: the multifunction dis-
play shows the coolant temperature in the
Coolant
submenu (Ypage 246).
Under normal operating conditions and with the
specified coolant level, the coolant temperature may rise to 248 ‡ (120 †).
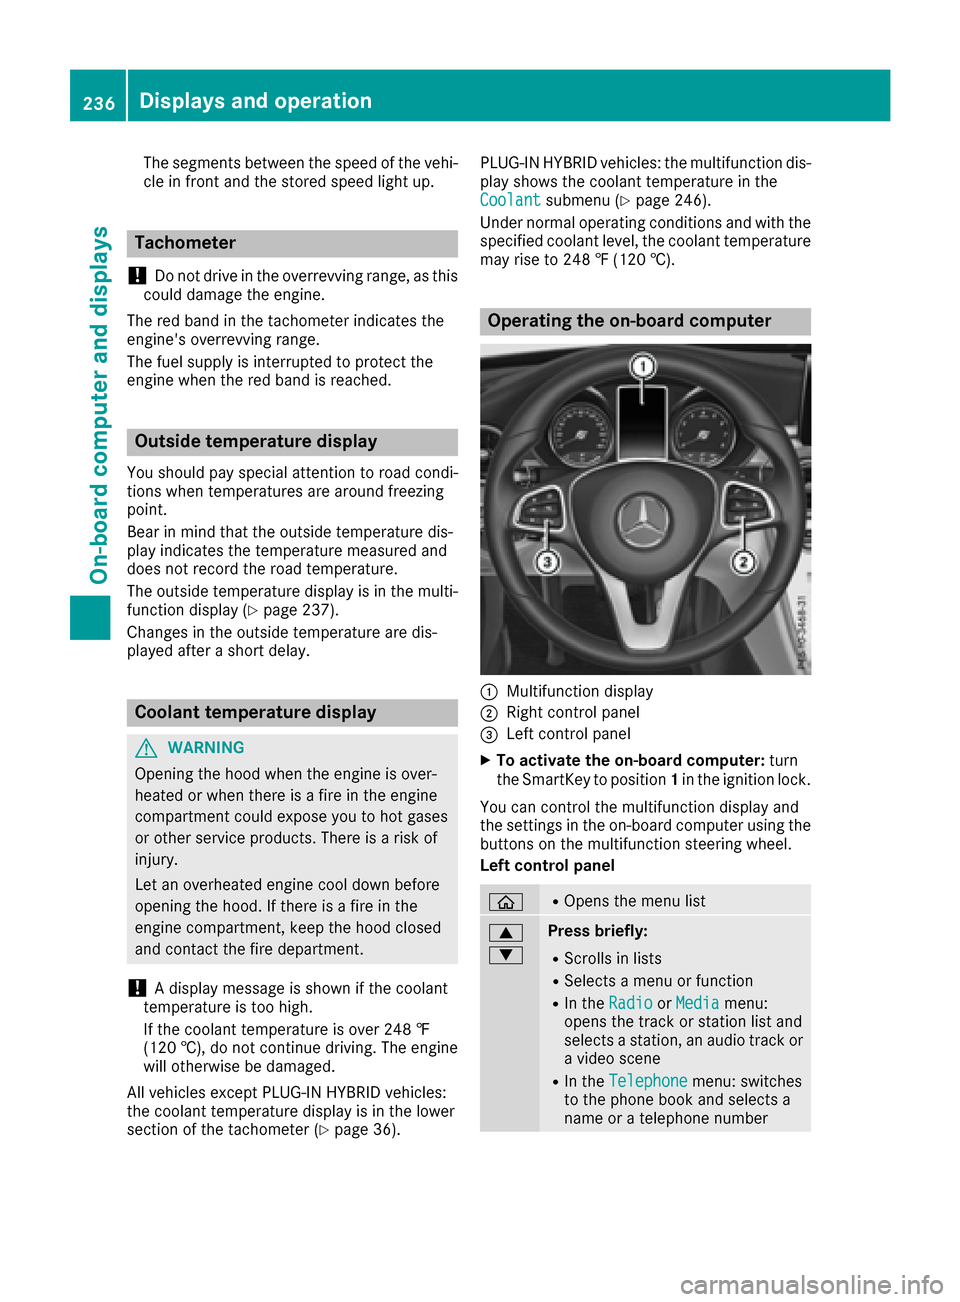
Operating the on-board computer
:Multifunction display
;Right control panel
=Left control panel
XTo activate the on-board computer: turn
the SmartKey to position 1in the ignition lock.
You can control the multifunction display and
the settings in the on-board computer using the
buttons on the multifunction steering wheel.
Left control panel
òROpens the menu list
9
:Press briefly:
RScrolls in lists
RSelects a menu or function
RIn the RadioorMediamenu:
opens the track or station list and
selects a station, an audio track or
a video scene
RIn the Telephonemenu: switches
to the phone book and selects a
name or a telephone number
236Displays and operation
On-board computer and displays
Page 239 of 398
9
:Press and hold:
RScrolls quickly through all lists
RIn theRadioorMediamenu:
selects a station, audio track or
video scene using rapid scrolling
RIn the Telephonemenu: starts
rapid scrolling if the phone book is
open
aRIn all menus: confirms the selected
entry in the list
RIn the RadioorMediamenu:
opens the list of available radio
sources or media
RIn the Telephonemenu: switches
to the phone book and starts dial-
ing the selected number
ñRVehicles with Audio 20:
Switches off voice-operated con-
trol for navigation (see manufac-
turer's operating instructions)
RVehicles with COMAND:
Switches off the Voice Control
System (see the separate operat-
ing instructions)
%Press briefly:
RBack
RIn the RadioorMediamenu: dese-
lects the track or station list or list
of available radio sources or media
RHides display messages
RExits the telephone book/redial
memory
%Press and hold:
RCalls up the standard display in the
Tripmenu
Right control panel
~RRejects or ends a call
RExits the telephone book/redial
memory
6RMakes or accepts a call
RSwitches to the redial memory
W
XRAdjusts the volume
8RMute
óRVehicles with Audio 20:
Switches on voice-operated con-
trol for navigation (see manufac-
turer's operating instructions)
RVehicles with COMAND:
Switches on the Voice Control Sys-
tem (see the separate operating
instructions)
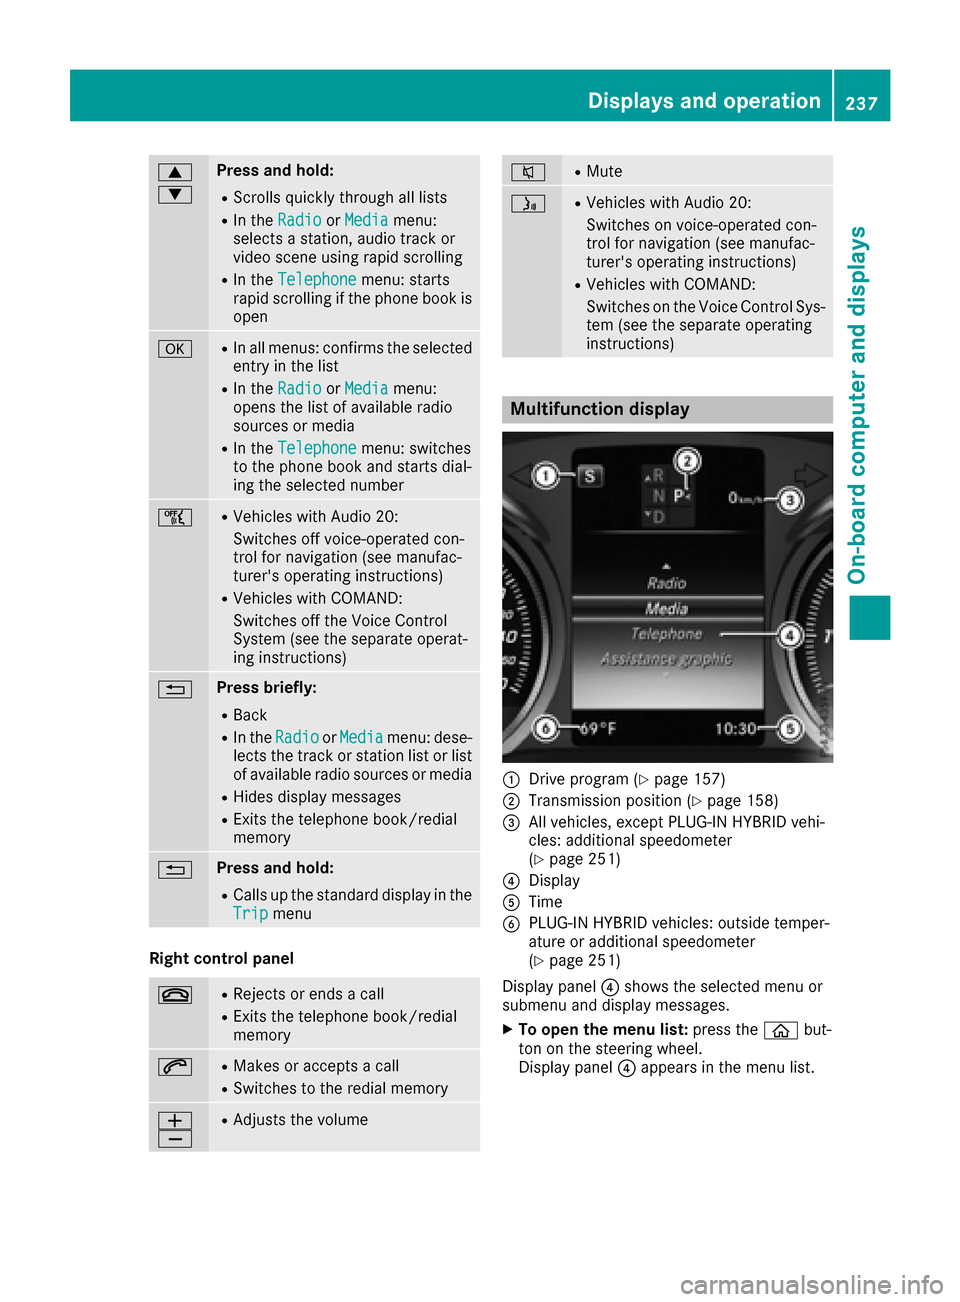
Multifunction display
:Drive program (Ypage 157)
;Transmission position (Ypage 158)
=All vehicles, except PLUG-IN HYBRID vehi-
cles: additional speedometer
(
Ypage 251)
?Display
ATime
BPLUG-IN HYBRID vehicles: outside temper-
ature or additional speedometer
(
Ypage 251)
Display panel ?shows the selected menu or
submenu and display messages.
XTo open the menu list: press theòbut-
ton on the steering wheel.
Display panel ?appears in the menu list.
Displays and operation237
On-board computer and displays
Z