pet MERCEDES-BENZ C-Class SEDAN 2016 W205 Owner's Manual
[x] Cancel search | Manufacturer: MERCEDES-BENZ, Model Year: 2016, Model line: C-Class SEDAN, Model: MERCEDES-BENZ C-Class SEDAN 2016 W205Pages: 398, PDF Size: 9.57 MB
Page 7 of 398
Battery (SmartKey)Checking .......................................... 84
Important safety notes .................... 84
Replacing ......................................... 84
Battery (vehicle)
Charging ........................................ 350
Display message ............................ 269
Important safety notes .................. 347
Jump starting ................................. 352
Belt
see Seat belts
Blind Spot Assist
Activating/deactivating (on-
board computer) ............................ 248
Display message ............................ 276
Notes/function .............................. 216
see Active Blind Spot Assist
Bluetooth
®
Connecting another mobile
phone ............................................ 306
Searching for a mobile phone ........ 306
see also Digital Operator's Man-
ual .................................................. 298
Telephony ...................................... 305
Box (trunk) ......................................... 314
Brake Assist
see BAS (Brake Assist System)
Brake fluid
Display message ............................ 261
Notes ............................................. 392
Brake force distribution
see EBD (electronic brake force
distribution)
Brake pedal
Pedal resistance/pedal travel .......... 45
Brakes
ABS .................................................. 68
Adaptive Brake Assist ...................... 72
BAS .................................................. 68
BAS PLUS with Cross-Traffic
Assist ............................................... 69
Brake fluid (notes) ......................... 392
Display message ............................ 256
EBD .................................................. 76
High-performance brake system .... 183
Hill start assist ............................... 150
HOLD function ............................... 194
Important safety notes .................. 182 Maintenance .................................. 183
Parking brake ................................ 178
RBS warning lamp .......................... 288
Recuperative Brake System ............. 45
Riding tips ...................................... 182
Warning lamp ................................. 288
Breakdown
Where will I find...? ........................ 342
see Flat tire
see Towing away
Brightness control (instrument
cluster lighting) ................................... 35
Buttons on the steering wheel ......... 236
C
California
Important notice for retail cus-
tomers and lessees .......................... 28
Calling up a malfunction
see Display messages
Calling up the climate control bar
Multimedia system ........................ 302
Calling up the climate control
menu
Multimedia system ........................ 302
Car
see Vehicle
Care
360° camera ................................. 339
AIRPANEL ...................................... 339
Car wash ........................................ 335
Carpets .......................................... 341
Display ........................................... 340
Exhaust pipe .................................. 340
Exterior lights ................................ 338
Gear or selector lever .................... 340
General notes ................................ 335
Interior ........................................... 340
Matte finish ................................... 337
Paint .............................................. 337
Plastic trim .................................... 340
Power washer ................................ 336
Rear view camera .......................... 339
Roof lining ...................................... 341
Seat belt ........................................ 341
Seat cover ..................................... 341
Sensors ......................................... 339
Index5
Page 16 of 398
DISTRONIC PLUS ........................... 186
DISTRONIC PLUS with Steering
Assist and Stop&Go Pilot ............... 192
General notes ................................ 185
Lane Keeping Assist ...................... 218
PARKTRONIC ................................. 199
PRE-SAFE
®(anticipatory occu-
pant protection) ............................... 60
PRE-SAFE
®PLUS (anticipatory
occupant protection PLUS) .............. 61
Rear view camera .......................... 206
Traffic Sign Assist .......................... 215
Message memory (on-board com-
puter) .................................................. 255
Messages
see Display messages
see Warning and indicator lamps
Mirror turn signal
Cleaning ......................................... 339
Mirrors
see Exterior mirrors
see Rear-view mirror
see Vanity mirror (in the sun visor)
Mobile phone
Connecting (Bluetooth
®inter-
face) .............................................. 305
Connecting another mobile
phone ............................................ 306
Frequencies ................................... 386
Installation .....................................3 86
Menu (on-board computer) ............ 245
Transmission output (maximum) .... 386
Modifying the programming
(SmartKey) ...........................................8 3
MOExtended tires .............................. 343
Mounting wheels
Lowering the vehicle ...................... 384
Mounting a new wheel ................... 383
Preparing the vehicle .....................3 80
Raising the vehicle ......................... 381
Removing a wheel .......................... 383
Securing the vehicle against roll-
ing away ........................................ 380
MP3
Operation ....................................... 244
see also Digital Operator's Man-
ual..................................................2
98Multifunc
tion display
Function/notes .............................2 37
Permanent display ......................... 251
Multifunction steering wheel
Operating the on-board computer .. 236
Overview .......................................... 38
Multimedia system
Switching on and off ......................2 99
Music files
see also Digital Operator's Man-
ual ..................................................2 98
N
Navigation
Menu (on-board computer) ............ 241
see also Digital Operator's Man-
ual ..................................................2 98
Notes on breaking-in a new vehi-
cle ....................................................... 145
O
Occupant Classification System
(OCS)
Conditions ....................................... 54
Faults ............................................... 58
Operation ......................................... 54
System self-test ............................... 56
Occupant safety
Air bags ...........................................5 1
Automatic measures after an acci-
dent ................................................. 61
Children in the vehicle ..................... 62
Important safety notes .................... 46
Introduction to the restraint sys-
tem .................................................. 46
Occupant Classification System
(OCS) ............................................... 54
PASSENGER AIR BAG indicator
lamps ............................................... 47
Pets in the vehicle ........................... 67
PRE-SAFE
®(anticipatory occu-
pant protection) ............................... 60
PRE-SAFE
®PLUS (anticipatory
occupant protection PLUS) .............. 61
Restraint system warning lamp ........ 46
Seat belt .......................................... 48
14Index
Page 18 of 398
Parking lampsSwitching on/off ........................... 119
PARKTRONIC
Deactivating/activating ................. 201
Driving system ...............................1 99
Function/notes .............................1 99
Important safety notes .................. 199
Problem (malfunction) ................... 202
Range of the sensors ..................... 199
Warning display ............................. 200
PASSENGER AIR BAG
Display message ............................ 265
Indicator lamps ................................ 47
Problems (malfunction) .................. 265
Perfume atomizer
Operating ....................................... 138
Problem (malfunction) ................... 140
Setting the perfume intensity
(multimedia system) ...................... 303
Vial ................................................ 138
Pets in the vehicle ............................... 67
Phone book
see also Digital Operator's Man-
ual .................................................. 298
Plastic trim (cleaning instruc-
tions) .................................................. 340
PLUG-IN HYBRID operating
Electrical energy generated ........... 228
PLUG-IN HYBRID operation
Automatic engine start (ECO
start/stop function) ....................... 232
Automatic engine switch-off (ECO
start/stop function) ....................... 231
Charge level of the high-voltage
battery ........................................... 227
Displaying the total range and
electric range ................................. 228
Driving tips .................................... 230
DYNAMIC SELECT switch .............. 229
ECO start/stop function ................ 231
Electric motor (power display) ....... 225
Electrical energy generated
(Audio 20) ...................................... 228
Electrical energy generated
(COMAND) ..................................... 228
Energy flow display ........................ 227
Fuel consumption .......................... 228
Fuel consumption (Audio 20) ......... 228 Fuel consumption (COMAND) ........ 228
General notes ................................ 224
Haptic accelerator pedal ................ 230
High-voltage battery (condition of
cha
rge) .......................................... 227
HY
BRID menu ................................ 248
Important safety notes .................. 225
Instrument cluster (power dis-
play) ............................................... 225
Noiseless start ............................... 228
Operating (on-board computer) ..... 227
Operating mode ............................. 226
Overrun mode ................................ 232
Parking .......................................... 232
Power display (electric motor) ....... 225
Problems with SRS (supplemental
restraint system) ............................ 234
Problems with the combustion
engine ............................................ 233
Problems with the hybrid drive
system ........................................... 234
Problems with the Recuperative
Brake System ................................ 233
Pulling away ................................... 228
READY display ............................... 228
Recuperative Brake System ........... 225
Resetting the values (Audio 20) ..... 228
Resetting the values (COMAND) .... 228
Route-based operating strategy ..... 232
Shifting manually ........................... 229
Starting .......................................... 228
When the vehicle is stationary ....... 230
Power washers .................................. 336
Power windows
see Side windows
Pre-entry climate control (via
SmartKey)
Problems (malfunctions) ................ 142
Pre-entry climate control at depar-
ture time
General notes ................................ 142
Pre-entry climate control at time of
departure
Setting departure time ................... 143
Pre-entry climate control via key
General notes ................................ 141
16Index
Page 20 of 398
Refuelingprocess (PLUG-IN
HYBRID vehicles) .......................... .165
see Fuel
Remote control
Garage door opener ....................... 326
Programming (garage door
opener) .......................................... 327
Replacing bulbs
Important safety notes .................. 122
Overview of bulb types .................. 123
Removing/replacing the cover
(front wheel arch) .......................... 123
Reporting safety defects .................... 32
Rescue card ......................................... 32
Reserve (fuel tank)
see Fuel
Reserve fuel
Display message ............................ 271
Warning lamp ................................. 293
Residual heat (climate control) ........ 137
Restraint system
Display message ............................ 263
Introduction ..................................... 46
Warning lamp ................................. 292
Warning lamp (function) ................... 46
Reversing feature
Panorama sliding sunroof ................ 99
Roller sunblinds ............................. 101
Side windows ................................... 95
Sliding sunroof ................................. 99
Trunk lid ........................................... 90
Reversing lamps (display mes-
sage) ................................................... 267
Roadside Assistance (breakdown) .... 29
Roller sunblind
Panorama roof with power tilt/
sliding panel .................................. 101
Rear side windows ......................... 317
Rear window .................................. 318
Roof carrier ........................................ 315
Roof lining and carpets (cleaning
guidelines) ......................................... 341
Roof load (maximum) ........................ 394
Route guidance
see also Digital Operator's Man-
ual .................................................. 298S
SafetyChildren in the vehicle ..................... 62
Hybrid drive system ......................... 44
see Occupant safety
see Operating safety
Safety notes
Hybrid vehicles ................................ 44
Safety system
see Driving safety systems
SD memory card
Ejecting .......................................... 307
Inserting ........................................ 307
Inserting/removing ........................ 307
see also Digital Operator's Man-
ual .................................................. 298
Selecting ........................................ 244
Search & Send
see also Digital Operator's Man-
ual .................................................. 298
Seat belts
Adjusting the driver's and front-
passenger seat belt ......................... 51
Adjusting the height ......................... 50
center rear-compartment seat ......... 50
Cleaning ......................................... 341
Correct usage .................................. 49
Fastening ......................................... 50
Important safety guidelines ............. 48
Introduction ..................................... 48
Releasing ......................................... 50
Warning lamp ................................. 287
Warning lamp (function) ................... 51
Seats
Adjusting (electrically) ................... 106
Adjusting (Performance Seat) ........ 108
Adjusting the 4-way lumbar sup-
port ................................................ 108
Adjusting the head restraint .......... 106
Calling up a stored setting (mem-
ory function) .................................. 117
Cleaning the cover ......................... 341
Correct driver's seat position ........ 104
Important safety notes .................. 104
Seat heating .................................. 108
Seat heating problem .................... 110
18Index
Page 69 of 398
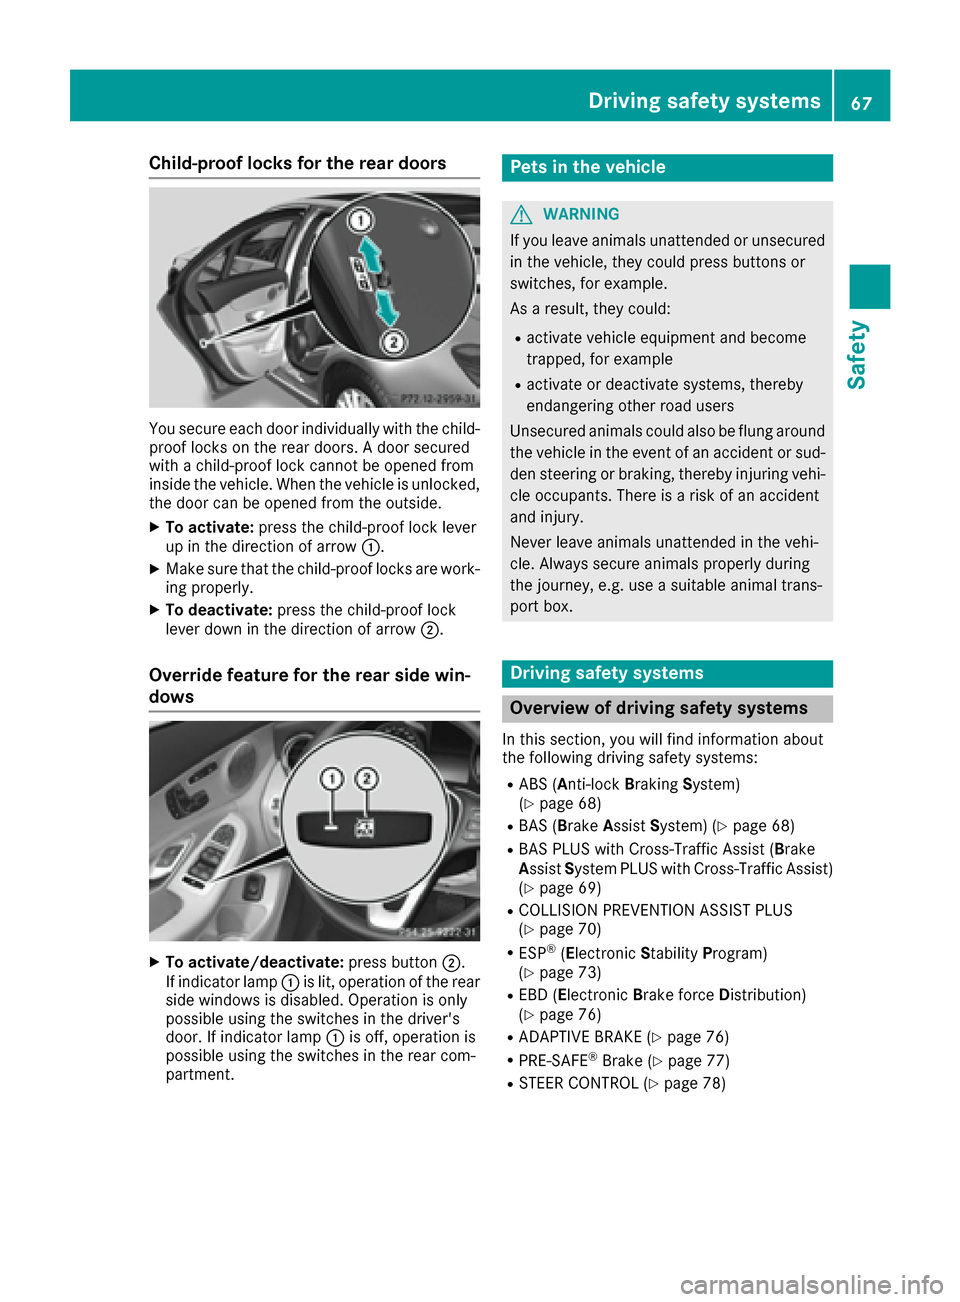
Child-proof locks for the rear doors
You secure each door individually with the child-
proof locks on the rear doors. A door secured
with a child-proof lock cannot be opened from
inside the vehicle. When the vehicle is unlocked,
the door can be opened from the outside.
XTo activate:press the child-proof lock lever
up in the direction of arrow :.
XMake sure that the child-proof locks are work-
ing properly.
XTo deactivate:press the child-proof lock
lever down in the direction of arrow ;.
Override feature for the rear side win-
dows
XTo activate/deactivate:press button;.
If indicator lamp :is lit, operation of the rear
side windows is disabled. Operation is only
possible using the switches in the driver's
door. If indicator lamp :is off, operation is
possible using the switches in the rear com-
partment.
Pets in the vehicle
GWARNING
If you leave animals unattended or unsecured
in the vehicle, they could press buttons or
switches, for example.
As a result, they could:
Ractivate vehicle equipment and become
trapped, for example
Ractivate or deactivate systems, thereby
endangering other road users
Unsecured animals could also be flung around
the vehicle in the event of an accident or sud-
den steering or braking, thereby injuring vehi-
cle occupants. There is a risk of an accident
and injury.
Never leave animals unattended in the vehi-
cle. Always secure animals properly during
the journey, e.g. use a suitable animal trans-
port box.
Driving safety systems
Overview of driving safety systems
In this section, you will find information about
the following driving safety systems:
RABS (Anti-lock Braking System)
(Ypage 68)
RBAS (B rakeAssist System) (Ypage 68)
RBAS PLUS with Cross-Traffic Assist ( Brake
Assist System PLUS with Cross-Traffic Assist)
(
Ypage 69)
RCOLLISION PREVENTION ASSIST PLUS
(Ypage 70)
RESP®( Electronic StabilityProgram)
(Ypage 73)
REBD (Electronic Brake force Distribution)
(Ypage 76)
RADAPTIVE BRAKE (Ypage 76)
RPRE-SAFE®Brake (Ypage 77)
RSTEER CONTROL (Ypage 78)
Driving safety systems67
Safety
Z
Page 315 of 398
XAdjust the head restraints if necessary
(Ypage 107).
XMove the driver's or front-passenger seat
back if necessary.
You should always engage the rear seat backr-
ests if you do not need the through-loading fea-
ture. This will prevent unauthorized access to
the trunk from the vehicle interior.
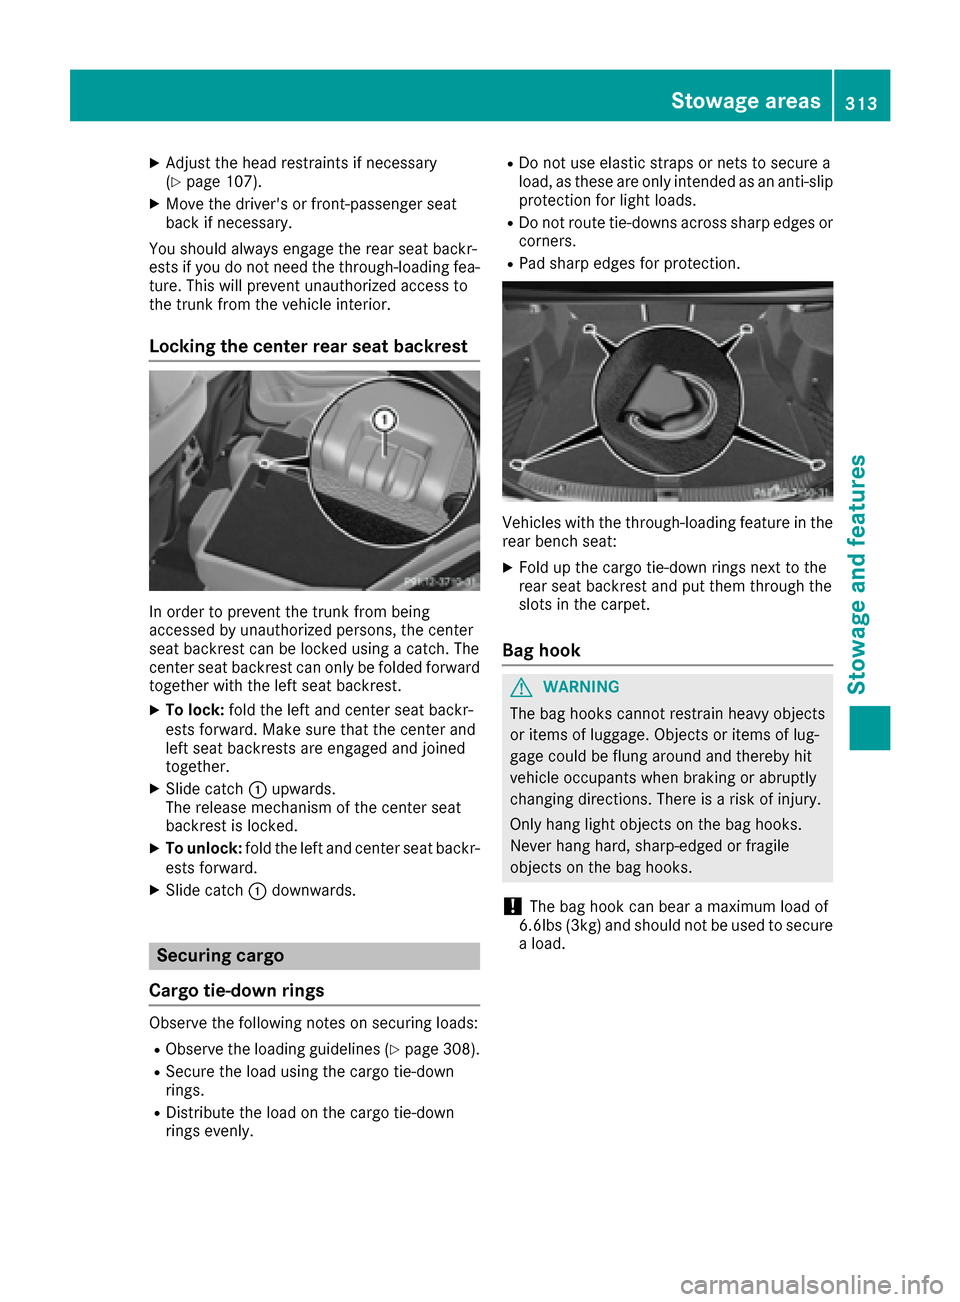
Locking the center rear seat backrest
In order to prevent the trunk from being
accessed by unauthorized persons, the center
seat backrest can be locked using a catch. The
center seat backrest can only be folded forward
together with the left seat backrest.
XTo lock: fold the left and center seat backr-
ests forward. Make sure that the center and
left seat backrests are engaged and joined
together.
XSlide catch :upwards.
The release mechanism of the center seat
backrest is locked.
XTo unlock: fold the left and center seat backr-
ests forward.
XSlide catch :downwards.
Securing cargo
Cargo tie-down rings
Observe the following notes on securing loads:
RObserve the loading guidelines (Ypage 308).
RSecure the load using the cargo tie-down
rings.
RDistribute the load on the cargo tie-down
rings evenly.
RDo not use elastic straps or nets to secure a
load, as these are only intended as an anti-slip protection for light loads.
RDo not route tie-downs across sharp edges orcorners.
RPad sharp edges for protection.
Vehicles with the through-loading feature in the
rear bench seat:
XFold up the cargo tie-down rings next to the
rear seat backrest and put them through the
slots in the carpet.
Bag hook
GWARNING
The bag hooks cannot restrain heavy objects
or items of luggage. Objects or items of lug-
gage could be flung around and thereby hit
vehicle occupants when braking or abruptly
changing directions. There is a risk of injury.
Only hang light objects on the bag hooks.
Never hang hard, sharp-edged or fragile
objects on the bag hooks.
!The bag hook can bear a maximum load of
6.6lbs (3kg) and should not be used to secure
a load.
Stowage areas313
Stowag ean d features
Z
Page 339 of 398
Rlights
Rseals
Rtrim
Rventilation slots
Damaged seals or electrical components can
lead to leaks or failures.
!If the SmartKey is within the rear detection
range of KEYLESS-GO, the following situa-
tions, for example, could lead to the uninten-
tional opening of the trunk:
Rusing a car wash
Rusing a power washer
Make sure that the SmartKey is at least 10 ft
(3 m) away from the vehicle.
!Edition 1 special model: parts of your vehi-
cle are covered with a decorative foil. Main-
tain a distance of at least 70 cm between the foil-wrapped parts of the vehicle and the noz-
zle of the high pressure cleaner.
Information about the correct distance is
available from the equipment manufacturer.
Move the power washer nozzle around when
cleaning your vehicle.
Cleaning the paintwork
!Do not affix:
Rstickers
Rfilms
Rmagnetic plates or similar items
to painted surfaces. You could otherwise
damage the paintwork.
Scratches, corrosive deposits, areas affected by corrosion and damage caused by inadequate
care cannot always be completely repaired. In
such cases, visit a qualified specialist workshop.
XRemove dirt immediately, where possible,
while avoiding rubbing too hard.
XSoak insect remains with insect remover and
rinse off the treated areas afterwards.
XSoak bird droppings with water and rinse off
the treated areas afterwards.
XRemove coolant, brake fluid, tree resin, oils,
fuels and greases by rubbing gently with a
cloth soaked in petroleum ether or lighter
fluid.
XUse tar remover to remove tar stains.
XUse silicone remover to remove wax. If water no longer forms "beads" on the paint
surface, use the paint care products recommen-
ded and approved by Mercedes-Benz. This is the
case approximately every three to five months,
depending on the climate conditions and the
care product used.
If dirt has penetrated the paint surface or if the
paint has become dull, the paint cleaner recom-
mended and approved by Mercedes-Benz
should be used.
Do not use these care products in the sun or on
the hood while the hood is hot.
XUse a suitable touch-up stick, e.g. MB Touch-
Up Stick, to repair slight damage to the paint-
work quickly and provisionally.
Matte finish care
!Never polish the vehicle or the light alloy
wheels. Polishing causes the finish to shine.
!The following may cause the paint to
become shiny and thus reduce the matte
effect:
Rstrong rubbing of the paintwork with
unsuitable materials
Rfrequent use of automatic car washes
Rwashing the vehicle in direct sunlight
!Never use paint cleaner, buffing or polishing
products, or gloss preserver, e.g. wax. These
products are only suitable for high-gloss sur-
faces. Their use on vehicles with matte finish
leads to considerable surface damage (shiny,
mottled areas).
Always have paintwork repairs carried out at a
qualified specialist workshop.
!Do not use wash programs with a hot wax
treatment under any circumstances.
Observe these notes if your vehicle has a clear
matte finish. This will help you to avoid damage
to the paintwork due to incorrect treatment.
These notes also apply to light alloy wheels with a clear matte finish.
The vehicle should preferably be washed by
hand using a soft sponge, car shampoo and
plenty of water.
Use only insect remover and car shampoo from
the range of approved Mercedes-Benz care
products.
Care337
Maintenance and care
Z
Page 340 of 398
Cleaning the vehicle parts
Cleaning the wheels
GWARNING
The water jet from a circular jet nozzle (dirt
blasters) can cause invisible exterior damage
to the tires or chassis components. Compo-
nents damaged in this way may fail unexpect-
edly. There is a risk of an accident.
Do not use power washers with circular jet
nozzles to clean the vehicle. Have damaged
tires or chassis components replaced imme-
diately.
!Do not use acidic wheel cleaning products
to remove brake dust. This could damage
wheel bolts and brake components.
!Do not park the vehicle for an extended
period straight after cleaning it, particularly
after having cleaned the wheels with wheel
cleaner. Wheel cleaners could cause
increased corrosion of the brake discs and
brake pads/linings. For this reason, you
should drive for a few minutes after cleaning.
Braking heats the brake discs and the brake
pads/linings, thus drying them. The vehicle
can then be parked.
Cleaning the windows
GWARNING
You could become trapped by the windshield wipers if they start moving while cleaning the
windshield or wiper blades. There is a risk of
injury.
Always switch off the windshield wipers and
the ignition before cleaning the windshield or
wiper blades.
!Do not use dry cloths, abrasive products,
solvents or cleaning agents containing sol-
vents to clean the inside of the windows. Do
not touch the insides of the windows with
hard objects, e.g. an ice scraper or ring. There
is otherwise a risk of damaging the windows.
!Clean the water drainage channels of the
windshield and the rear window at regular
intervals. Deposits such as leaves, petals and pollen may under certain circumstances pre- vent water from draining away. This can lead
to corrosion damage and damage to elec-
tronic components.
XClean the inside and outside of the windows
with a damp cloth and a cleaning product that
is recommended and approved by Mercedes-
Benz.
Cleaning wiper blades
GWARNING
You could become trapped by the windshield wipers if they start moving while cleaning the
windshield or wiper blades. There is a risk of
injury.
Always switch off the windshield wipers and
the ignition before cleaning the windshield or
wiper blades.
!Do not pull the wiper blade. Otherwise, the
wiper blade could be damaged.
!Do not clean wiper blades too often and do
not rub them too hard. Otherwise, the graph-
ite coating could be damaged. This could
cause wiper noise.
!Hold the wiper arm securely when folding
back. The windshield could be damaged if the
wiper arm smacks against it suddenly.
XFold the windshield wiper arms away from the
windshield (Ypage 126).
XCarefully clean the wiper blades with a damp
cloth.
XFold the windshield wiper arms back again
before switching on the ignition.
Cleaning the exterior lighting
!Only use cleaning agents or cleaning cloths
which are suitable for plastic light lenses.
Unsuitable cleaning agents or cleaning cloths
could scratch or damage the plastic light len- ses.
XClean the plastic lenses of the exterior light-
ing using a wet sponge and a mild cleaning
agent, e.g. Mercedes-Benz car shampoo or
cleaning cloths.
338Care
Maintenance and care
Page 343 of 398
or waxes. There is otherwise a risk of damag-
ing the surface.
!Do not use chrome polish on trim pieces.
The trim pieces have a chrome look but are
mostly made of anodized aluminum and can
lose their shine if chrome polish is used. Use
a damp, lint-free cloth instead when cleaning
the trim pieces.
If the chrome-plated trim pieces are very
dirty, you can use a chrome polish. If you are unsure as to whether the trim pieces are
chrome-plated or not, consult an authorized
Mercedes-Benz Center.
XWipe the wooden trim and trim pieces with a
damp, lint-free cloth, e.g. a microfiber cloth.
XTrim elements with piano black finish:
clean with a soft, damp cloth and a commer-
cially available soap solution.
XHeavy soiling: use care and cleaning prod-
ucts recommended and approved by
Mercedes-Benz.
Cleaning the seat covers
General notes
!Do not use a microfiber cloth to clean covers
made out of real leather, artificial leather or
DINAMICA. If used often, these can damage
the cover.
Note that regular care is essential to ensure that
the appearance and comfort of the covers is
retained over time.
Genuine leather seat covers
!To retain the natural appearance of the
leather, observe the following cleaning
instructions:
RClean genuine leather covers carefully with a damp cloth and then wipe the covers
down with a dry cloth.
RMake sure that the leather does not
become soaked. It may otherwise become
rough and cracked.
ROnly use leather care agents that have
been tested and approved by Mercedes-
Benz. You can obtain these from a qualified
specialist workshop.
Leather is a natural product.
It exhibits natural surface characteristics, for
example:
Rdifferences in the texture
Rmarks caused by growth and injury
Rslight nuances of color
These are characteristics of leather and not
material defects.
Seat covers of other materials
!Observe the following when cleaning:
Rclean artificial leather covers with a cloth
moistened with a solution containing 1%
detergent (e.g. dish washing liquid).
Rclean cloth covers with a microfiber cloth
moistened with a solution containing 1%
detergent (e.g. dish washing liquid). Rub
carefully and always wipe entire seat sec-
tions to avoid leaving visible lines. Leave
the seat to dry afterwards. Cleaning results
depend on the type of dirt and how long it
has been there.
Rclean DINAMICA covers with a damp cloth.
Make sure that you wipe entire seat sec-
tions to avoid leaving visible lines.
Cleaning the seat belts
GWARNING
Seat belts can become severely weakened if
bleached or dyed. This could cause the seat
belts to tear or fail, for instance, in the event of an accident. This poses an increased risk of
injury or fatal injury.
Never bleach or dye the seat belts.
!Do not clean the seat belts using chemical
cleaning agents. Do not dry the seat belts by
heating at temperatures above 176 ‡(80 †)
or in direct sunlight.
XUse clean, lukewarm water and soap solution.
Cleaning the headliner and carpets
XHeadliner: if it is very dirty, use a soft brush or
dry shampoo.
XCarpets: use the carpet and textile cleaning
agents recommended and approved by
Mercedes-Benz.
Care341
Maintenance and care
Z
Page 350 of 398
ESP®(Electronic Stability Program). The oper-
ating safety of your vehicle may be restricted.
You could lose control of the vehicle, for
example:
Rwhen braking
Rin the event of abrupt steering maneuvers
and/or when the vehicle's speed is not
adapted to the road conditions
There is a risk of an accident.
In the event of a short circuit or a similar inci-
dent, contact a qualified specialist workshop
immediately. Do not drive any further. You
should have all work involving the battery car- ried out at a qualified specialist workshop.
For further information about ABS and ESP
®,
see (Ypage 68) and (Ypage 73).
All vehicles except vehicles with a lithium-
ion battery:
GWARNING
Electrostatic build-up can lead to the creation of sparks, which could ignite the highly explo-
sive gases of a battery. There is a risk of an
explosion.
Before handling the battery, touch the vehicle
body to remove any existing electrostatic
build-up.
The highly flammable gas mixture forms when
charging the battery as well as when jump-start-
ing.
Always make sure that neither you nor the bat-
tery is electrostatically charged. A build-up of
electrostatic charge can be caused, for exam-
ple:
Rby wearing clothing made from synthetic
fibers
Rdue to friction between clothing and seats
Rif you push or pull the battery across the car-
pet or other synthetic materials
Rif you wipe the battery with a cloth
GWARNING
During the charging process, a battery produ-
ces hydrogen gas. If a short circuit occurs or
sparks are created, the hydrogen gas can
ignite. There is a risk of an explosion.
RMake sure that the positive terminal of a
connected battery does not come into con-
tact with vehicle parts.
RNever place metal objects or tools on a bat- tery.
RIt is important that you observe the descri-
bed order of the battery terminals when
connecting and disconnecting a battery.
RWhen jump-starting, make sure that the
battery poles with identical polarity are
connected.
RIt is particularly important to observe the
described order when connecting and dis-
connecting the jumper cables.
RNever connect or disconnect the battery
terminals while the engine is running.
GWARNING
Battery acid is caustic. There is a risk of injury.
Avoid contact with skin, eyes or clothing. Do
not inhale any battery gases. Do not lean over
the battery. Keep children away from batter-
ies. Wash away battery acid immediately with
plenty of clean water and seek medical atten-
tion.
All vehicles:
HEnvironmental note
Batteries contain dangerous
substances. It is against the
law to dispose of them with
the household rubbish. They
must be collected separately and recycled to protect the
environment.
Dispose of batteries in an
environmentally friendly
manner. Take discharged
batteries to a qualified spe-
cialist workshop or a special
collection point for used bat-
teries.
!Have the battery checked regularly at a
qualified specialist workshop.
348Battery (vehicle)
Breakdown assistance