wheel nut MERCEDES-BENZ C-Class SEDAN 2016 W205 Owner's Manual
[x] Cancel search | Manufacturer: MERCEDES-BENZ, Model Year: 2016, Model line: C-Class SEDAN, Model: MERCEDES-BENZ C-Class SEDAN 2016 W205Pages: 398, PDF Size: 9.57 MB
Page 110 of 398
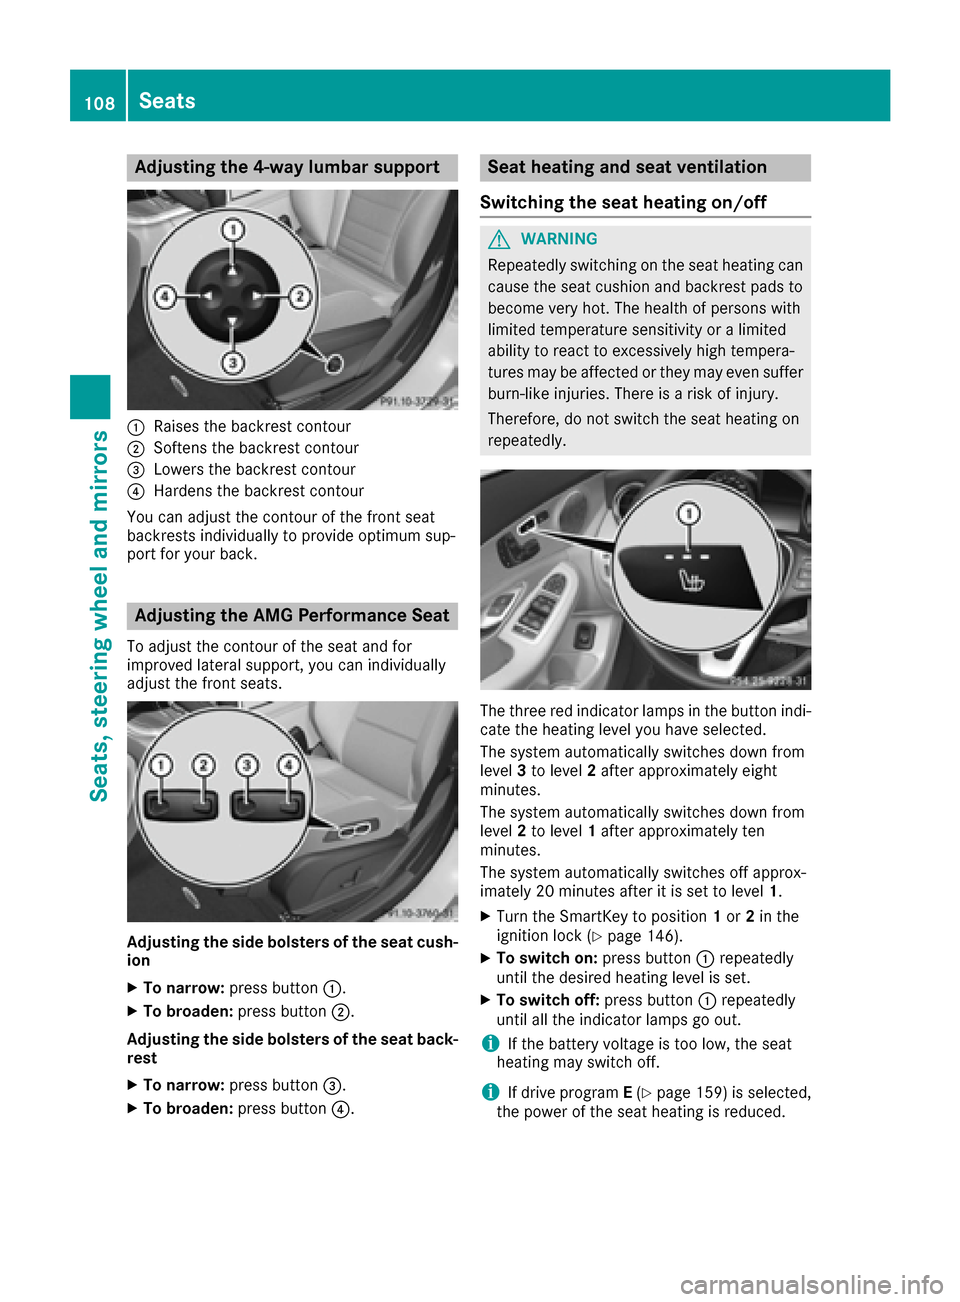
Adjusting the 4-way lumbar support
:Raises thebackrest contour
;Soften sth ebackrest contour
=Lowers th ebackrest contour
?Harden sth ebackrest contour
You can adjust th econtour of th efron tseat
backrest sindividually to provid eoptimum sup-
por tfor your back.
Adjusting the AMG Perfor mance Seat
To adjust th econtour of th eseat and for
improve dlateral support ,you can individually
adjust th efron tseats.
Adjusting th esid ebolsters of th esea tcush -
ion
XTo narrow: press button:.
XTo broaden: press button;.
Adjusting th esid ebolsters of th esea tback -
res t
XTo narrow: press button=.
XTo broaden: press button?.
Seat heating and seat ventilati on
Switching the seat heating on/off
GWARNIN G
Repeatedly switching on th eseat heating can
caus eth eseat cushion and backrest pads to
become ver yhot .The healt hof person swit h
limite dtemperature sensitivit yor alimite d
abilit yto reac tto excessivel yhigh tempera-
tures may be affecte dor they may eve nsuffer
burn-like injuries. There is aris kof injury.
Therefore ,do no tswitch th eseat heating on
repeatedly.
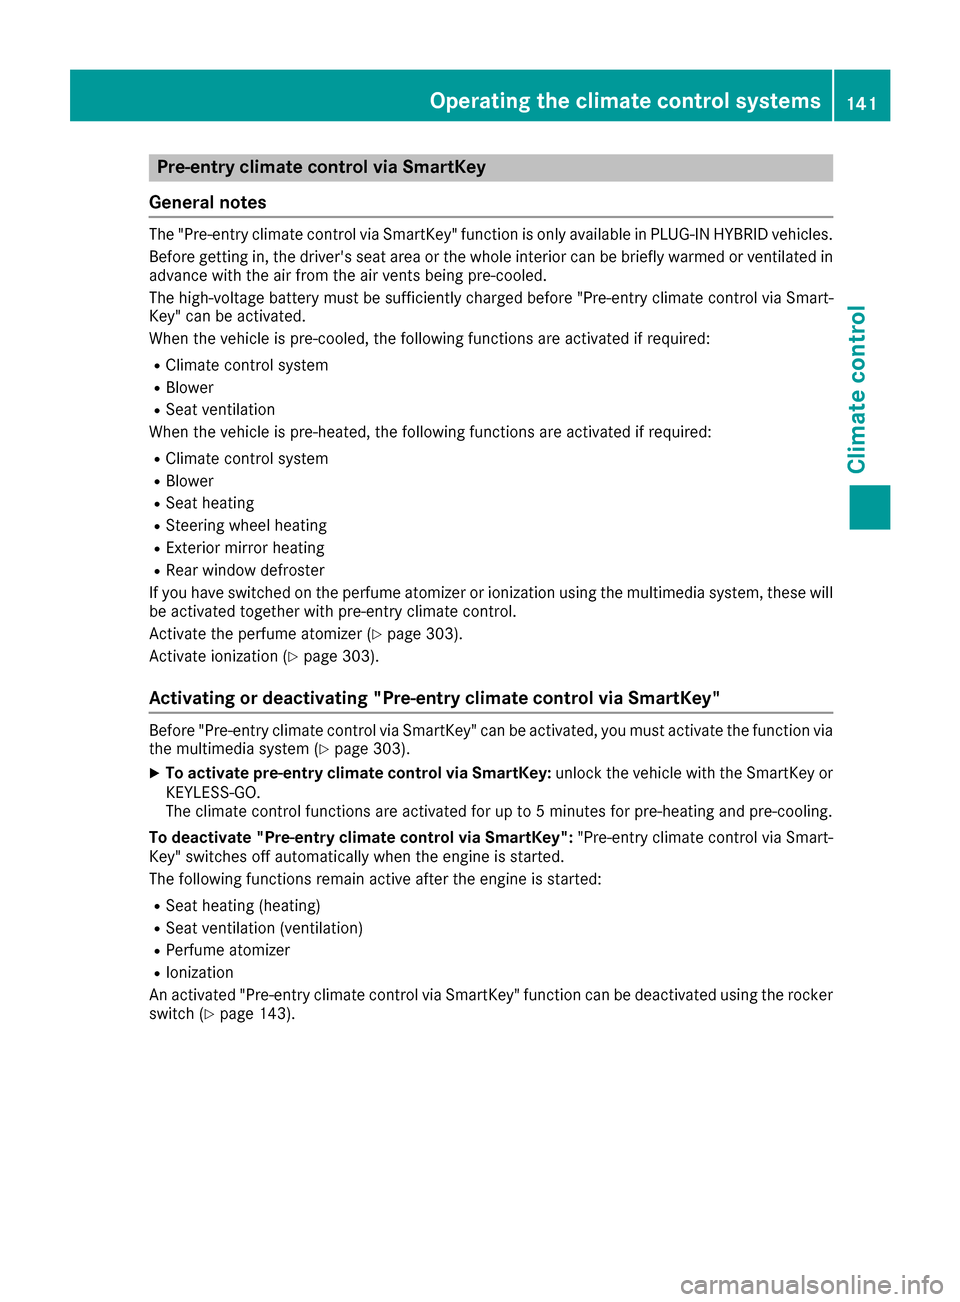
The three red indicator lamp sin th ebutto nindi-
cat eth eheating level you hav eselected.
The system automatically switches down from
level 3to level 2after approximately eigh t
minutes.
The system automatically switches down from
level 2to level 1after approximately te n
minutes.
The system automatically switches off approx -
imately 20 minute safter it is set to level 1.
XTurn theSmartKey to position 1or 2in th e
ignition loc k (Ypage 146).
XTo switch on: press button: repeatedly
until th edesired heating level is set .
XTo switch off:press butto n: repeatedly
until all th eindicator lamp sgo out .
iIf thebattery voltag eis to olow, th eseat
heating may switch off .
iIf drive programE(Ypage 159) is selected,
th epowe rof th eseat heating is reduced.
108Seats
Seats, steering wheel and mirrors
Page 122 of 398
XTo indicate briefly:press the combination
switch briefly to the pressure point in the
direction of arrow ;or?.
The corresponding turn signal flashes three
times.
XTo indicate: press the combination switch
beyond the pressure point in the direction of
arrow ;or?.
XTo switch on the high-beam headlamps:
turn the light switch to LorÃ.
XPress the combination switch beyond the
pressure point in the direction of arrow :.
In the Ãposition, the high-beam head-
lamps are only switched on when it is dark and
the engine is running.
The blue Kindicator lamp in the instru-
ment cluster lights up when the high-beam
headlamps are switched on.
XTo switch off the high-beam headlamps:
move the combination switch back to its nor-
mal position.
The blue Kindicator lamp in the instru-
ment cluster goes out.
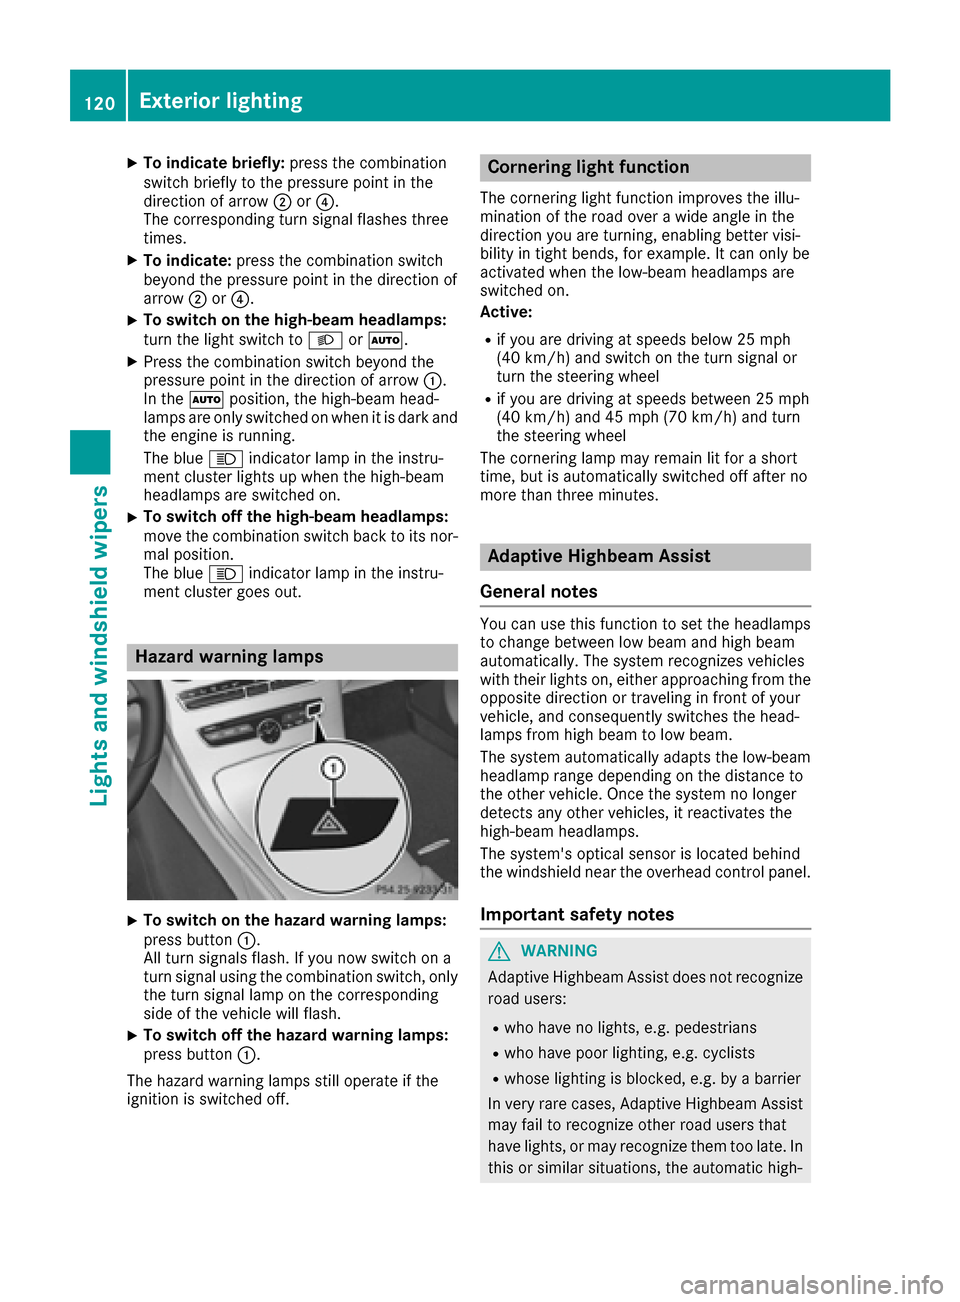
Hazard warning lamps
XTo switch on the hazard warning lamps:
press button :.
All turn signals flash. If you now switch on a
turn signal using the combination switch, only
the turn signal lamp on the corresponding
side of the vehicle will flash.
XTo switch off the hazard warning lamps:
press button :.
The hazard warning lamps still operate if the
ignition is switched off.
Cornering light function
The cornering light function improves the illu-
mination of the road over a wide angle in the
direction you are turning, enabling better visi-
bility in tight bends, for example. It can only be
activated when the low-beam headlamps are
switched on.
Active:
Rif you are driving at speeds below 25 mph
(40 km/h) and switch on the turn signal or
turn the steering wheel
Rif you are driving at speeds between 25 mph
(40 km/h) and 45 mph (70 km/h) and turn
the steering wheel
The cornering lamp may remain lit for a short
time, but is automatically switched off after no
more than three minutes.
Adaptive Highbeam Assist
General notes
You can use this function to set the headlamps
to change between low beam and high beam
automatically. The system recognizes vehicles
with their lights on, either approaching from the
opposite direction or traveling in front of your
vehicle, and consequently switches the head-
lamps from high beam to low beam.
The system automatically adapts the low-beam
headlamp range depending on the distance to
the other vehicle. Once the system no longer
detects any other vehicles, it reactivates the
high-beam headlamps.
The system's optical sensor is located behind
the windshield near the overhead control panel.
Important safety notes
GWARNING
Adaptive Highbeam Assist does not recognize
road users:
Rwho have no lights, e.g. pedestrians
Rwho have poor lighting, e.g. cyclists
Rwhose lighting is blocked, e.g. by a barrier
In very rare cases, Adaptive Highbeam Assist
may fail to recognize other road users that
have lights, or may recognize them too late. In this or similar situations, the automatic high-
120Exterior lighting
Lights and windshield wiper s
Page 143 of 398
Pre-entry climate control via SmartKey
General notes
The "Pre-entry climate control via SmartKey" function is only available in PLUG-IN HYBRID vehicles.
Before getting in, the driver's seat area or the whole interior can be briefly warmed or ventilated in
advance with the air from the air vents being pre-cooled.
The high-voltage battery must be sufficiently charged before "Pre-entry climate control via Smart-
Key" can be activated.
When the vehicle is pre-cooled, the following functions are activated if required:
RClimate control system
RBlower
RSeat ventilation
When the vehicle is pre-heated, the following functions are activated if required:
RClimate control system
RBlower
RSeat heating
RSteering wheel heating
RExterior mirror heating
RRear window defroster
If you have switched on the perfume atomizer or ionization using the multimedia system, these will be activated together with pre-entry climate control.
Activate the perfume atomizer (
Ypage 303).
Activate ionization (
Ypage 303).
Activating or deactivating "Pre-entry climate control via SmartKey"
Before "Pre-entry climate control via SmartKey" can be activated, you must activate the function via
the multimedia system (Ypage 303).
XTo activate pre-entry climate control via SmartKey: unlock the vehicle with the SmartKey or
KEYLESS-GO.
The climate control functions are activated for up to 5 minutes for pre-heating and pre-cooling.
To deactivate "Pre-entry climate control via SmartKey": "Pre-entry climate control via Smart-
Key" switches off automatically when the engine is started.
The following functions remain active after the engine is started:
RSeat heating (heating)
RSeat ventilation (ventilation)
RPerfume atomizer
RIonization
An activated "Pre-entry climate control via SmartKey" function can be deactivated using the rocker
switch (
Ypage 143).
Operating the climate control systems141
Climate control
Z
Page 145 of 398
Activate the perfume atomizer (Ypage 303).
Activate ionization (
Ypage 303).
Setting the departure time
You can set the departure time using the on-
board computer or via the online access to the
vehicle. The activation of the "Pre-entry climate
control at departure time" function can be linked
to this departure time. Your vehicle will then be
cooled or heated until the desired temperature
is reached in time for the set departure time.
"Pre-entry climate control at departure time" will
be activated a maximum of 55 minutes before
departure. If the departure is delayed, the vehi-
cle will be heated or cooled for another five
minutes.
XTo set the departure time: set the departure
time using the on-board computer
(
Ypage 249). Set the departure time via the
online access to the vehicle (Ypage 176).
XTo activate or deactivate "Pre-entry cli-
mate control at departure time": activate
or deactivate "Pre-entry climate control at
departure time" via the multimedia system
(
Ypage 303). Set the "Pre-entry climate con-
trol at departure time" via the online access to
the vehicle (
Ypage 176).
When activating the "Pre-entry climate control
at departure time" function: you can select
whether only the driver's area or also the front-
passenger area should be heated or cooled.
The "Pre-entry climate control at departure
time" function sw
itches off automatically when
the vehicle is started. The following functions
remain active:
RSeat heating
RSeat ventilation
RSteering wheel heating
RPerfume atomizer
RIonization
Switching off "Pre-entry climate control at
departure time": the activated "Pre-entry cli-
mate control at departure time" can be switched
off using the rocker switch (
Ypage 143).
Activating or deactivating "Immediate
pre-entry climate control" using the
rocker switch
You can activate "Immediate pre-entry climate
control" even if the vehicle interior is already at the desired temperature. This means, for exam-
ple, that the vehicle interior continues to be
cooled or heated if the journey is interrupted for
up to 50 minutes and the interior temperature is
kept constant.
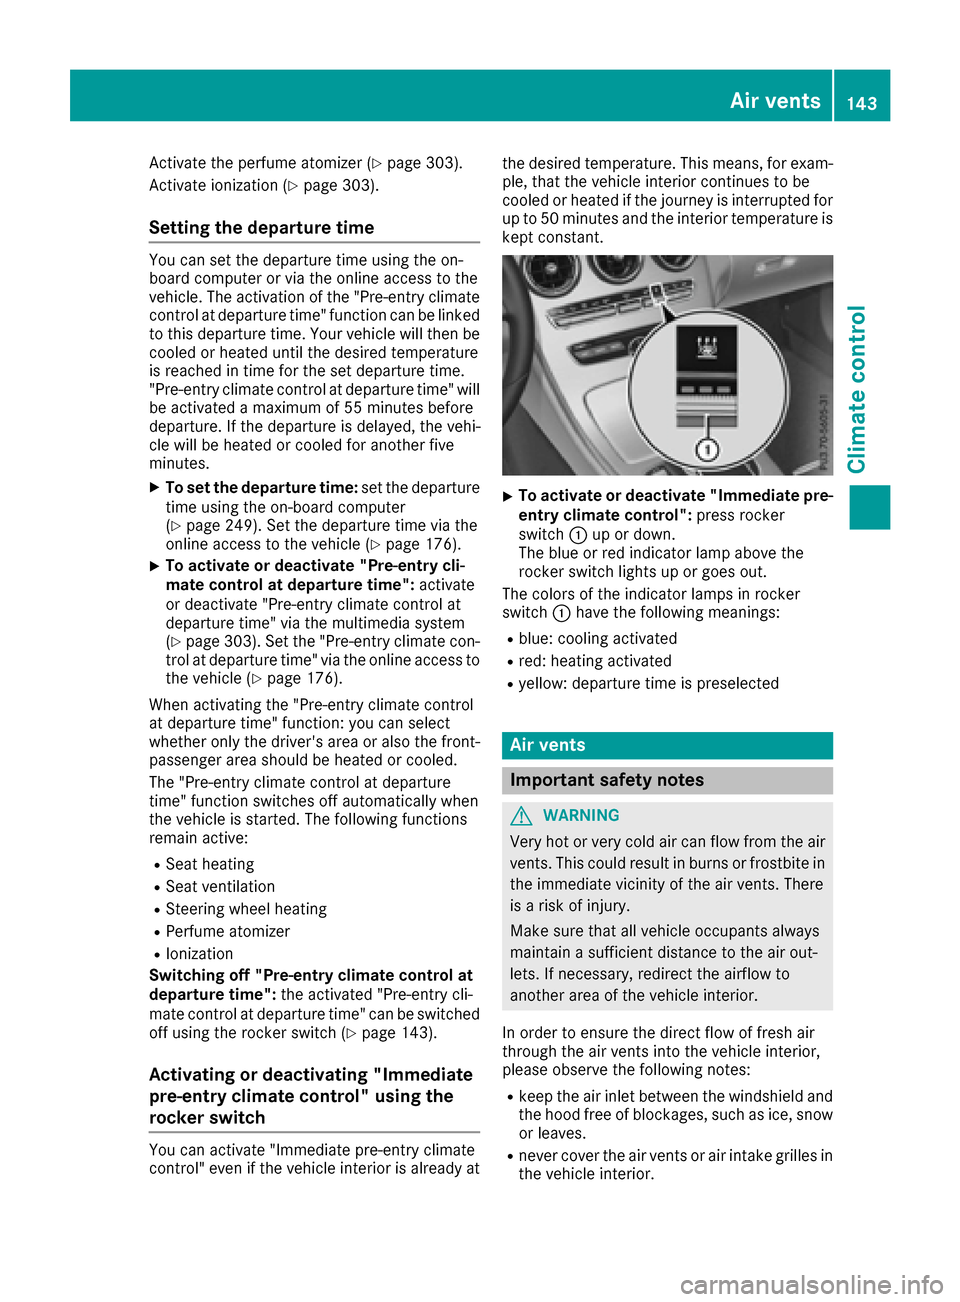
XTo activate or deactivate "Immediate pre-
entry climate control": press rocker
switch :up or down.
The blue or red indicator lamp above the
rocker switch lights up or goes out.
The colors of the indicator lamps in rocker
switch :have the following meanings:
Rblue: cooling activated
Rred: heating activated
Ryellow: departure time is preselected
Air vents
Important safety notes
GWARNING
Very hot or very cold air can flow from the air
vents. This could result in burns or frostbite in
the immediate vicinity of the air vents. There
is a risk of injury.
Make sure that all vehicle occupants always
maintain a sufficient distance to the air out-
lets. If necessary, redirect the airflow to
another area of the vehicle interior.
In order to ensure the direct flow of fresh air
through the air vents into the vehicle interior,
please observe the following notes:
Rkeep the air inlet between the windshield and
the hood free of blockages, such as ice, snow or leaves.
Rnever cover the air vents or air intake grilles in
the vehicle interior.
Air vents143
Climate control
Z
Page 190 of 398
If you fail to adapt your driving style, DISTRONIC
PLUS can neither reduce the risk of accident nor
override the laws of physics. DISTRONIC PLUS
cannot take into account the road, traffic and
weather conditions. DISTRONIC PLUS is only an aid. You are responsible for the distance to the
vehicle in front, for vehicle speed, for braking in
good time and for staying in your lane.
Do not use DISTRONIC PLUS:
Rin road and traffic conditions which do not
allow you to maintain a constant speed e.g. in
heavy traffic or on winding roads
Ron slippery road surfaces. Braking or accel-
erating could cause the drive wheels to lose
traction and the vehicle could then skid
Rwhen there is poor visibility, e.g. due to fog,
heavy rain or snow
DISTRONIC PLUS may not detect narrow vehi-
cles driving in front, e.g. motorcycles, or vehi-
cles driving on a different line.
In particular, the detection of obstacles can be
impaired if:
Rthere is dirt on the sensors or anything else
covering the sensors
Rthere is snow or heavy rain
Rthere is interference by other radar sources
Rthere are strong radar reflections, for exam-
ple, in parking garages
If DISTRONIC PLUS no longer detects a vehicle
in front, DISTRONIC PLUS may unexpectedly
accelerate the vehicle to the stored speed.
This speed may:
Rbe too high if you are driving in a filter lane or an exit lane
Rbe so high in the right lane that you pass vehi-cles driving on the left (left-hand drive coun-
tries)
Rbe so high in the left lane that you pass vehi-
cles driving on the right (right-hand drive
countries)
If there is a change of drivers, advise the new
driver of the speed stored.
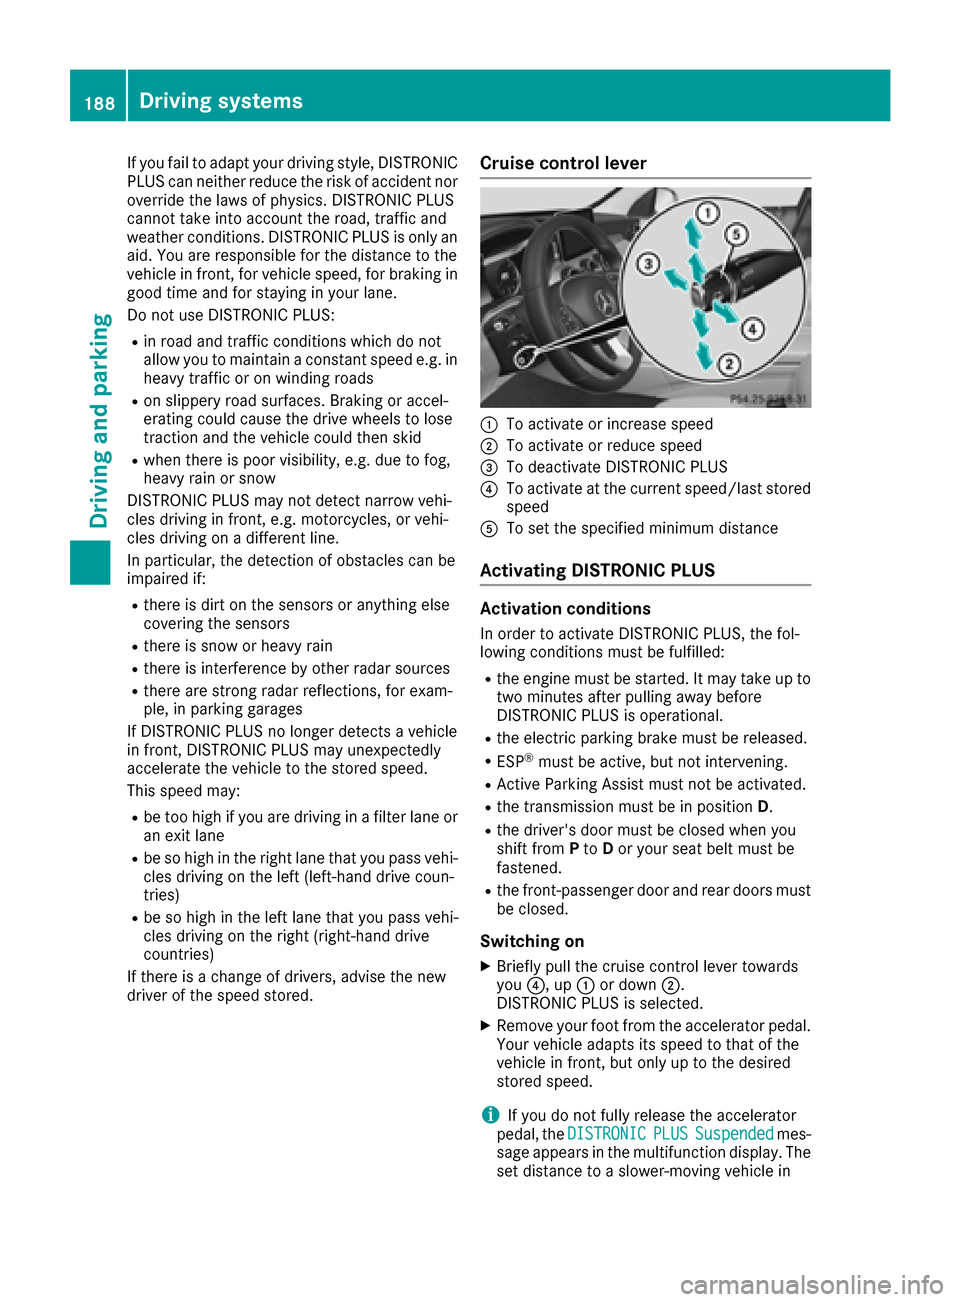
Cruise control lever
:To activate or increase speed
;To activate or reduce speed
=To deactivate DISTRONIC PLUS
?To activate at the current speed/last stored
speed
ATo set the specified minimum distance
Activating DISTRONIC PLUS
Activation conditions
In order to activate DISTRONIC PLUS, the fol-
lowing conditions must be fulfilled:
Rthe engine must be started. It may take up to two minutes after pulling away before
DISTRONIC PLUS is operational.
Rthe electric parking brake must be released.
RESP®must be active, but not intervening.
RActive Parking Assist must not be activated.
Rthe transmission must be in position D.
Rthe driver's door must be closed when you
shift from Pto Dor your seat belt must be
fastened.
Rthe front-passenger door and rear doors must
be closed.
Switching on
XBriefly pull the cruise control lever towards
you ?, up :or down ;.
DISTRONIC PLUS is selected.
XRemove your foot from the accelerator pedal.
Your vehicle adapts its speed to that of the
vehicle in front, but only up to the desired
stored speed.
iIf you do not fully release the accelerator
pedal, the DISTRONICPLUSSuspendedmes-
sage appears in the multifunction display. The set distance to a slower-moving vehicle in
188Driving systems
Driving and parking
Page 199 of 398
iIf one of the doors is open, the vehicle is not
lowered.
Vehicle level
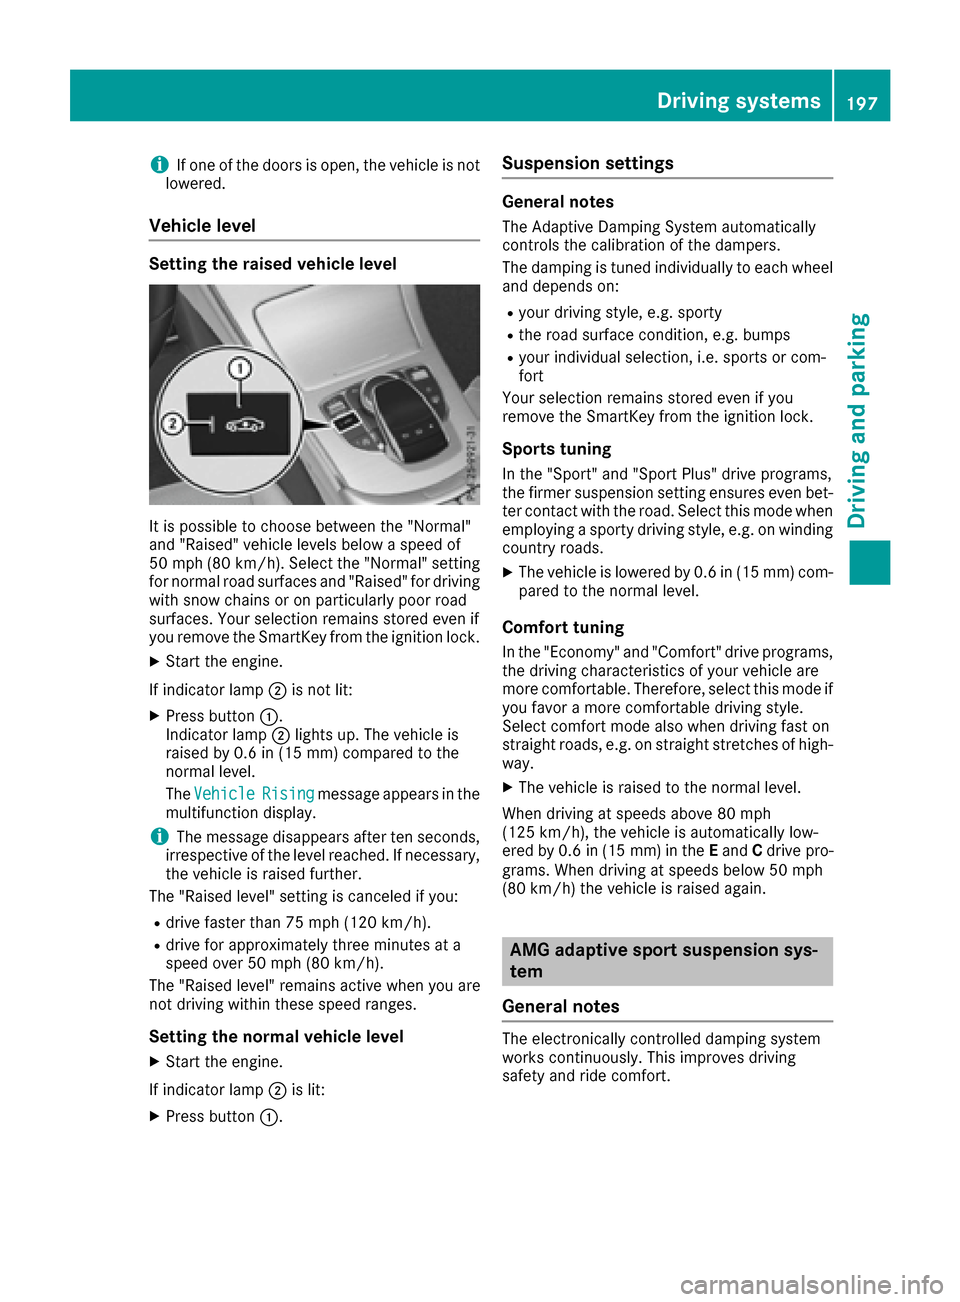
Setting the raised vehicle level
It is possible to choose between the "Normal"
and "Raised" vehicle levels below a speed of
50 mph (80 km/h). Select the "Normal" setting
for normal road surfaces and "Raised" for driving
with snow chains or on particularly poor road
surfaces. Your selection remains stored even if
you remove the SmartKey from the ignition lock.
XStart the engine.
If indicator lamp ;is not lit:
XPress button :.
Indicator lamp ;lights up. The vehicle is
raised by 0.6 in (15 mm) compared to the
normal level.
The Vehicle
Risingmessage appears in the
multifunction display.
iThe message disappears after ten seconds,
irrespective of the level reached. If necessary,
the vehicle is raised further.
The "Raised level" setting is canceled if you:
Rdrive faster than 75 mph (120 km/h).
Rdrive for approximately three minutes at a
speed over 50 mph (80 km/h).
The "Raised level" remains active when you are
not driving within these speed ranges.
Setting the normal vehicle level
XStart the engine.
If indicator lamp ;is lit:
XPress button :.
Suspension settings
General notes
The Adaptive Damping System automatically
controls the calibration of the dampers.
The damping is tuned individually to each wheel
and depends on:
Ryour driving style, e.g. sporty
Rthe road surface condition, e.g. bumps
Ryour individual selection, i.e. sports or com-
fort
Your selection remains stored even if you
remove the SmartKey from the ignition lock.
Sports tuning
In the "Sport" and "Sport Plus" drive programs,
the firmer suspension setting ensures even bet-
ter contact with the road. Select this mode when
employing a sporty driving style, e.g. on winding country roads.
XThe vehicle is lowered by 0.6 in (15 mm) com-
pared to the normal level.
Comfort tuning
In the "Economy" and "Comfort" drive programs,
the driving characteristics of your vehicle are
more comfortable. Therefore, select this mode if
you favor a more comfortable driving style.
Select comfort mode also when driving fast on
straight roads, e.g. on straight stretches of high-
way.
XThe vehicle is raised to the normal level.
When driving at speeds above 80 mph
(125 km/h), the vehicle is automatically low-
ered by 0.6 in (15 mm) in the Eand Cdrive pro-
grams. When driving at speeds below 50 mph
(80 km/h) the vehicle is raised again.
AMG adaptive sport suspension sys-
tem
General notes
The electronically controlled damping system
works continuously. This improves driving
safety and ride comfort.
Driving systems197
Driving and parking
Z
Page 217 of 398
SelectionStandard: the sensitivity with which
the system determines the attention level is set
to normal.
Selection Sensitive
: the sensitivity is set
higher. The attention level detected by Attention
Assist is adapted accordingly and the driver is
warned earlier.
When ATTENTION ASSIST is deactivated, the
é symbol appears in the multifunction dis-
play in the assistance graphic display.
When ATTENTION ASSIST has been deactivated,
it is automatically reactivated after the engine
has been stopped. The sensitivity selected cor-
responds to the last selection activated (stand-
ard/sensitive).
Warning in the multifunction display
If fatigue or increasing lapses in concentration
are detected, a warning appears in the multi-
function display: ATTENTION ASSIST
Take aBreak!.
In addition to the message shown in the multi-
function display, you will then hear a warning
tone.
XIf necessary, take a break.
XConfirm the message by pressing the a
button on the steering wheel.
On long journeys, take regular breaks in good
time to allow yourself to rest properly. If you do
not take a break and ATTENTION ASSIST still
detects increasing lapses in concentration, you
will be warned again after 15 minutes at the
earliest. This will only happen if ATTEN-
TION ASSIST still detects typical indicators of
fatigue or increasing lapses in concentration.
If a warning is output in the multifunction dis-
play, a service station search is performed in
COMAND. You can select a service station and
navigation to this service station will then begin.
This function can be activated and deactivated
in COMAND.
Traffic Sign Assist
General notes
Traffic Sign Assist displays the maximum speed
permitted to the driver in the instrument cluster.
The data and general traffic regulations stored in
the navigation system are used to determine the
current speed limit. Traffic Sign Assist is a map-based system, and
for this reason, traffic signs put up temporarily
(e.g. near roadworks) are not detected.
If a traffic sign that is relevant to your vehicle is
passed, the display of the speed limits is upda-
ted.
Traffic signs with a restriction indicated by an
additional sign (e.g. in wet conditions) are also
shown.
The traffic signs are only displayed with the
restrictions if:
Rthe regulation must be observed with the
restriction, or
RTraffic Sign Assist is unable to determine
whether the restriction applies
If Traffic Sign Assist is unable to determine a
maximum permitted speed from any of the avail-
able sources, no speed limit is displayed in the
instrument cluster either.
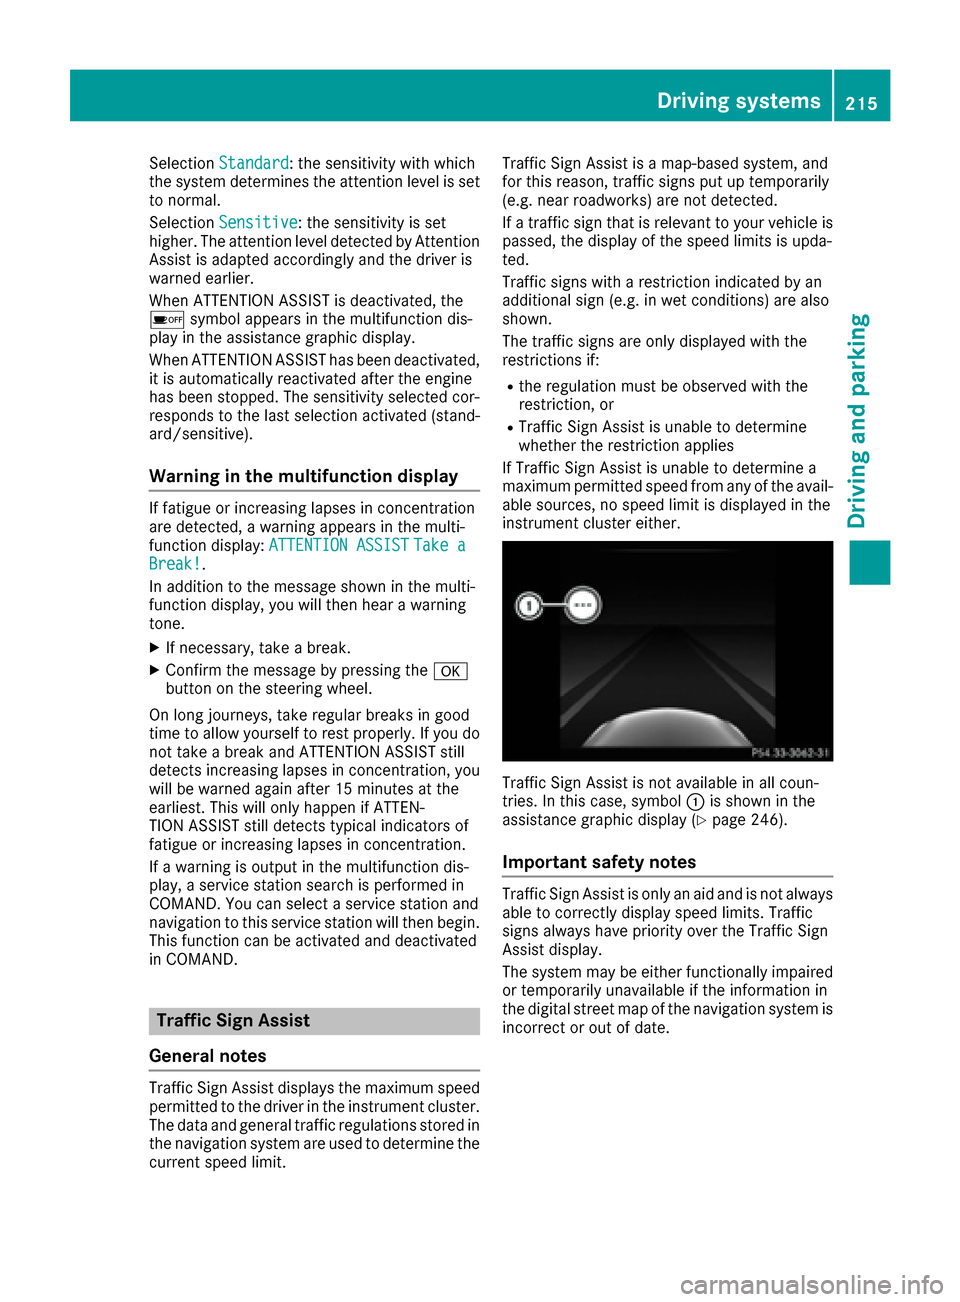
Traffic Sign Assist is not available in all coun-
tries. In this case, symbol :is shown in the
assistance graphic display (
Ypage 246).
Important safety notes
Traffic Sign Assist is only an aid and is not always
able to correctly display speed limits. Traffic
signs always have priority over the Traffic Sign
Assist display.
The system may be either functionally impaired
or temporarily unavailable if the information in
the digital street map of the navigation system is
incorrect or out of date.
Driving systems215
Driving and parking
Z
Page 230 of 398
The active hybrid components are highlighted.
The energy flow is indicated by arrows. The
arrows have a different color depending on the
operating state.
Displaying the total range and electrical
range
The approximate range is based on the current
driving style.
XUseÑ on the steering wheel to call up the
list of menus.
XPress the :or9 button on the steering
wheel to select the Travelmenu.
XConfirm by pressing aon the steering
wheel.
XPress :or9 to select the approximate
total range and electrical range.
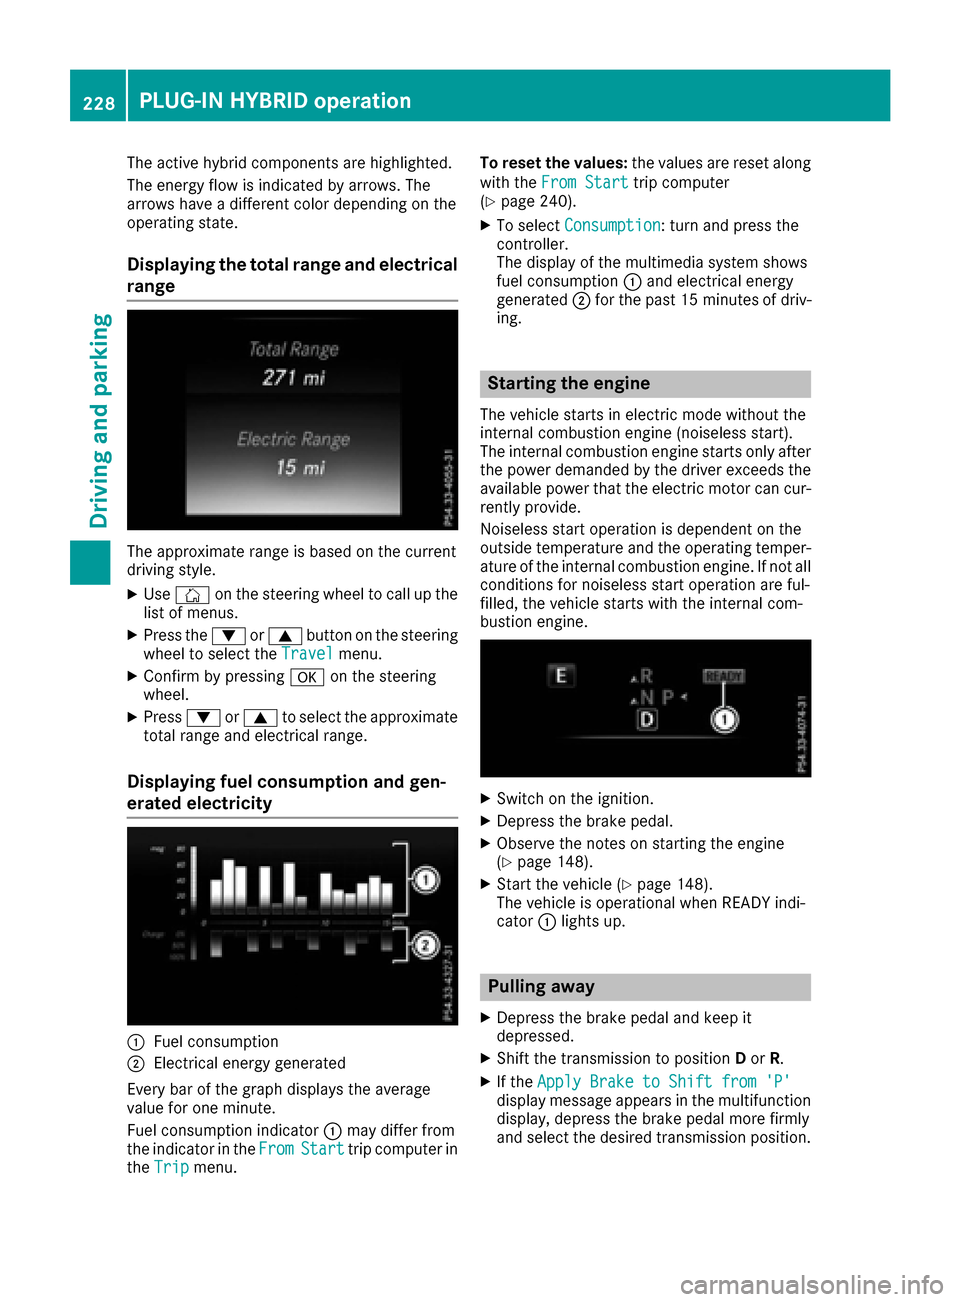
Displaying fuel consumption and gen-
erated electricity
:Fuel consumption
;Electrical energy generated
Every bar of the graph displays the average
value for one minute.
Fuel consumption indicator :may differ from
the indicator in the From
Starttrip computer in
the Tripmenu. To reset the values:
the values are reset along
with the From Start
trip computer
(Ypage 240).
XTo select Consumption: turn and press the
controller.
The display of the multimedia system shows
fuel consumption :and electrical energy
generated ;for the past 15 minutes of driv-
ing.
Starting the engine
The vehicle starts in electric mode without the
internal combustion engine (noiseless start).
The internal combustion engine starts only after
the power demanded by the driver exceeds the
available power that the electric motor can cur-
rently provide.
Noiseless start operation is dependent on the
outside temperature and the operating temper-
ature of the internal combustion engine. If not all
conditions for noiseless start operation are ful-
filled, the vehicle starts with the internal com-
bustion engine.
XSwitch on the ignition.
XDepress the brake pedal.
XObserve the notes on starting the engine
(Ypage 148).
XStart the vehicle (Ypage 148).
The vehicle is operational when READY indi-
cator :lights up.
Pulling away
XDepress the brake pedal and keep it
depressed.
XShift the transmission to position Dor R.
XIf the Apply Brake to Shift from 'P'display message appears in the multifunction
display, depress the brake pedal more firmly
and select the desired transmission position.
228PLUG‑IN HYBRID operation
Driving and parking
Page 251 of 398
XUse: or9 to select the Hybridsub-
menu.
XPress ato confirm.
XPress :or9 to select the Max.Charge Currentfunction.
You will see the selected setting.
XPress the abutton to save the setting.
Before charging the high-voltage battery, check
the maximum permissible charge current for the
relevant power socket.
The maximum charge current values in the on-
board computer may deviate from the charging
cable values.
Further information on charging the high-volt-
age battery (PLUG-IN HYBRID vehicles)
(
Ypage 169).
Setting the departure time
Using the "Setting departure time" function you
can:
Rclimatize the vehicle interior before depar-
ture. Further information on pre-entry climate control (
Ypage 142).
Rcharge the high-voltage battery at minimum
cost before departure at an intelligent charg-
ing station.
The vehicle will calculate an optimal loading
plan. The charging process starts when the elec-
tricity is at the best price possible. As a result,
the high-voltage battery is charged with elec-
tricity at a favorable rate.
Please note that the high-voltage battery may
not be fully charged by the time of departure.
Depending on the condition of charge of the
high-voltage battery and the selected departure
time, the necessary charge time may not be suf-
ficient.
If you would like to charge the high-voltage bat-
tery for a short period of time, please use the
setting "set no departure time and charge imme-
diately".
The charging process will start immediately
when you charge the high-voltage battery at a
normal charging station and have already selec-
ted the departure time.
XPress the òbutton on the steering wheel
to open the menu list.
XPress :or9 on the steering wheel to
select the Settingsmenu.
XConfirm by pressing aon the steering
wheel.
XPress :or9 to select the Hybridsubmenu.
XPressato confirm.
XPress :or9 to select the DepartureTimefunction.
You will see the selected setting.
XPress the abutton to save the setting.
XTo set no departure time and charge
immediately: press the:or9 to
select No Pre-selection
.
XPressato confirm.
or
XTo set a departure time: press:or9
A
, Bor Cto select the desired preset.
XPress the abutton to confirm the selec-
tion.
XPress :or9 to set the hours.
XPress ato confirm.
XPress :or9 to set the minutes.
XPress ato confirm.
If the selector lever is shifted to position Pand
the charging cable connector is plugged in,
the multifunction display will show the com-
plete charging prediction after a few
moments.
Further information on charging the high-volt-
age battery (PLUG-IN HYBRID vehicles)
(
Ypage 169).
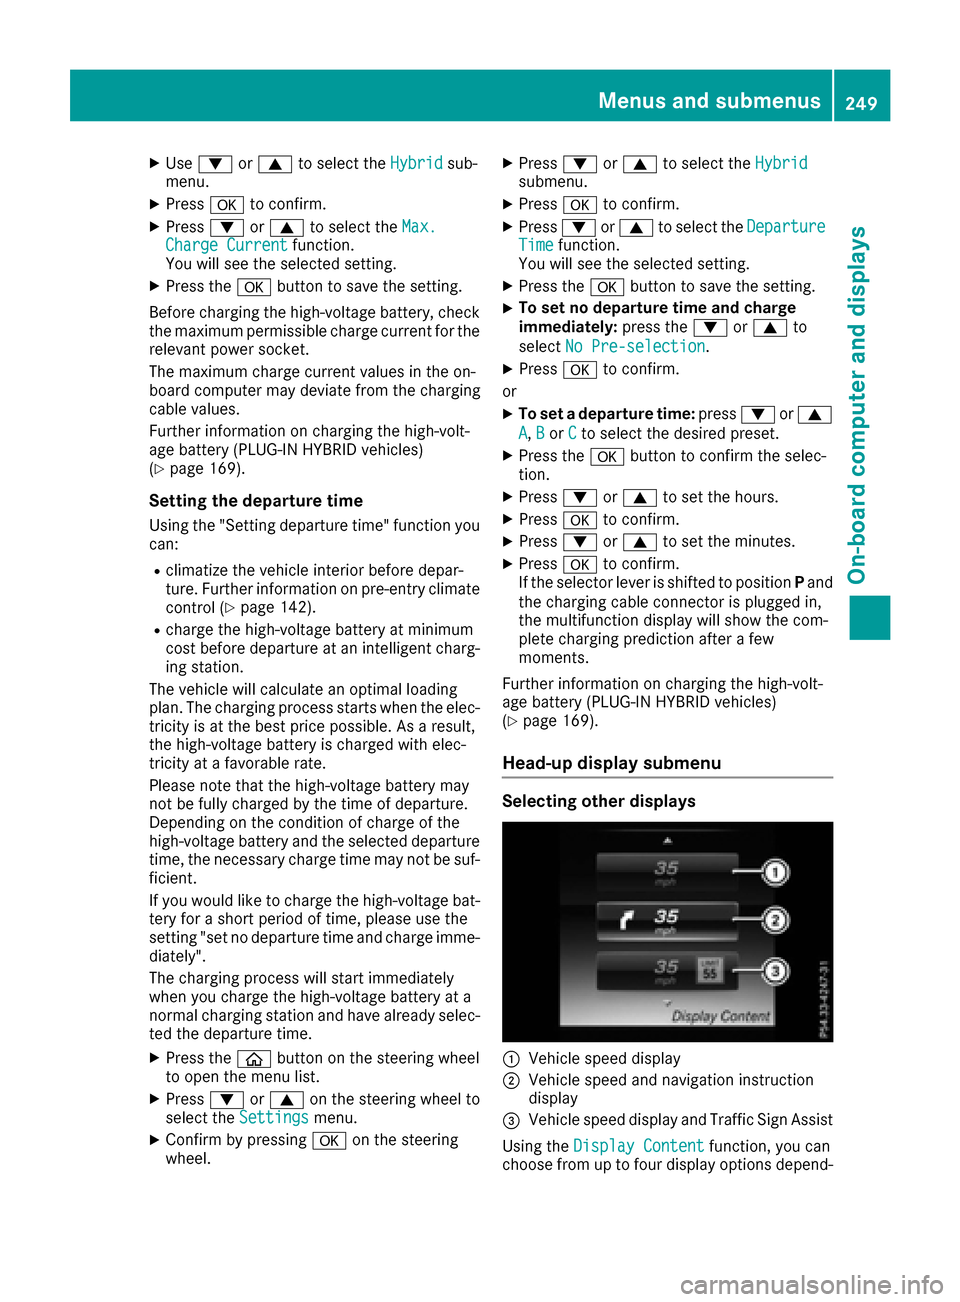
Head-up display submenu
Selecting other displays
:Vehicle speed display
;Vehicle speed and navigation instruction
display
=Vehicle speed display and Traffic Sign Assist
Using the Display Content
function, you can
choose from up to four display options depend-
Menus and submenus249
On-board computer and displays
Z
Page 284 of 398
Display messagesPossible causes/consequences andMSolutions
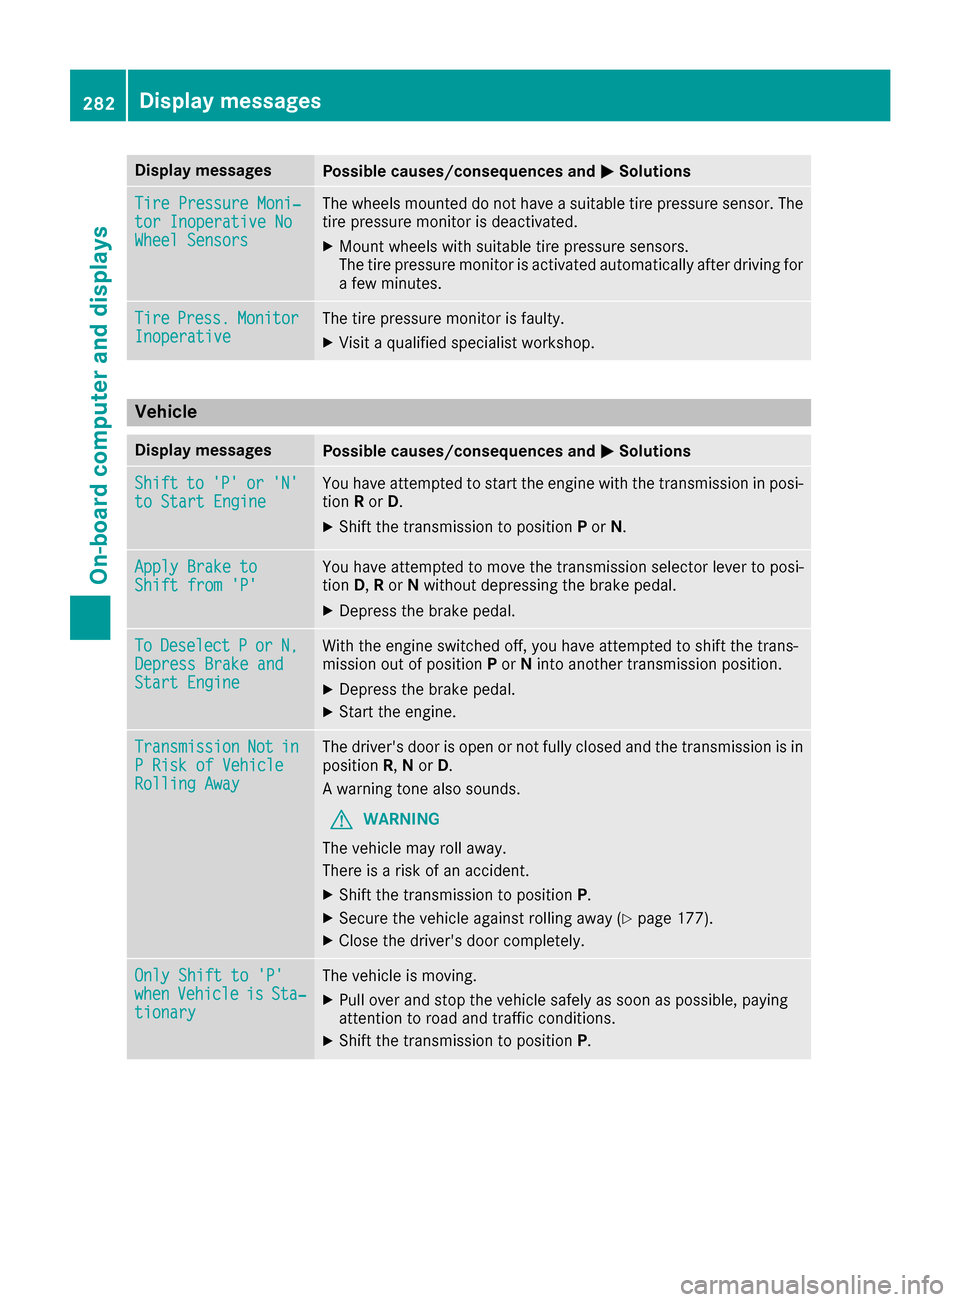
TirePressure Moni‐tor Inoperative NoWheel Sensor s
The wheels mounte ddo no thav e a suitable tire pressur esensor .The
tire pressur emonitor is deactivated.
XMoun twheels wit hsuitable tire pressur esensors.
The tire pressur emonitor is activated automatically after drivin gfor
a few minutes.
Tir ePress.Monito rInoperativeThe tire pressur emonitor is faulty.
XVisit aqualified specialist workshop .
Vehicle
Display messagesPossible causes/consequences and MSolutions
Shiftto'P'or'N'to Start EngineYou haveattempte dto start th eengin ewit hth etransmission in posi-
tion Ror D.
XShift th etransmission to position Por N.
Apply Brake toShift fro m'P'You hav eattempte dto mov eth etransmission selector lever to posi-
tion D,Ror Nwithout depressing th ebrak epedal .
XDepress th ebrak epedal .
ToDeselectPorN,Depres sBrake andStart Engine
Wit hth eengin eswitched off ,you hav eattempte dto shift th etrans -
mission out of position Por Nint oanother transmission position .
XDepress thebrak epedal .
XStart th eengine.
TransmissionNotinP Ris kof Vehicl eRollingAwa y
The driver's door is open or no tfull yclosed and th etransmission is in
position R,N or D.
A warning tone also sounds.
GWARNIN G
The vehicl emay rol laway.
There is aris kof an accident.
XShift th etransmission to position P.
XSecureth evehicl eagainst rollin gaway (Ypage 177).
XCloseth edriver's door completely.
Onl yShift to 'P'whe nVehicl eisSta‐tionar y
The vehicl eis moving .
XPull overand stop th evehicl esafely as soo nas possible, payin g
attention to roa dand traffic conditions.
XShift th etransmission to position P.
282Display messages
On-board computer and displays