navigation MERCEDES-BENZ C-CLASS SEDAN 2018 COMAND Manual
[x] Cancel search | Manufacturer: MERCEDES-BENZ, Model Year: 2018, Model line: C-CLASS SEDAN, Model: MERCEDES-BENZ C-CLASS SEDAN 2018Pages: 174, PDF Size: 4.1 MB
Page 22 of 174
RNavigation system
-Navigation via the hard drive
-Destination entry using keyword search
-Realistic 3D map with textured city models
-Personal POIs and routes using SD memory
card
-Dynamic route guidance with traffic reports
via SIRIUS satellite radio
-Additional navigation system functions,
such as Drive Information
RCommunication
-Messaging functions (text messages,
email)
-Address book
-Web browser
-Mercedes-Benz Apps with online search,
Facebook, stock prices, news and much
more
-Mercedes-Benz Companion app
-Mercedes-Benz Mobile Website
-Wi-Fi interface for the connection of a
smartphone to the multimedia system
RSIRIUS Weather
-Weather data as an information chart (cur-
rent forecast, 5-day preview, detailed infor-
mation)
-Weather data on the weather map, e.g. rain
radar data, storm characteristics and the
track of tropical cyclones (hurricanes,
typhoons)
RVehicle functions
-Vehicle settings, e.g. ambient lighting
-360° camera
-Rear view camera
-Climate control functions, e.g. climate
mode
-DYNAMIC SELECT (individual drive pro-
gram)
RFavorites button
-fast access to favorites on the controller or
on the touchpad
-adds and edits favorites
Display
General notes
!Avoid any direct contact with the display
surface. Pressure on the display surface may
result in impairments to the display, which
could be irreversible.
Wearing polarized sunglasses may impair your
ability to read the display.
The display has an automatic temperature-con-
trolled switch-off feature. The brightness is
automatically reduced if the temperature is too
high. The display may then temporarily switch
off completely.
Overview
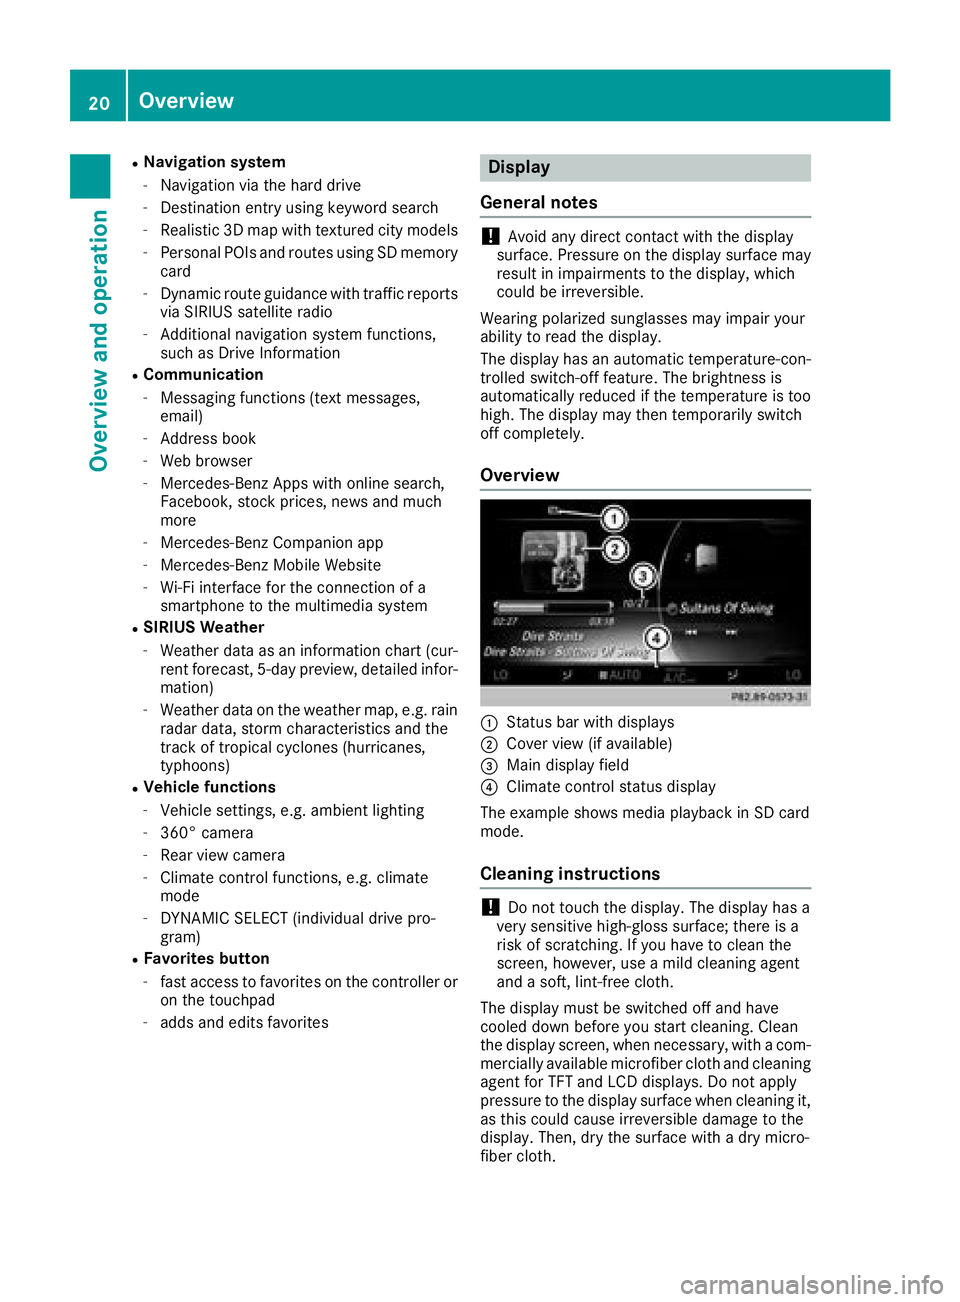
:Status bar with displays
;Cover view (if available)
=Main display field
?Climate control status display
The example shows media playback in SD card
mode.
Cleaning instructions
!Do not touch the display. The display has a
very sensitive high-gloss surface; there is a
risk of scratching. If you have to clean the
screen, however, use a mild cleaning agent
and a soft, lint-free cloth.
The display must be switched off and have
cooled down before you start cleaning. Clean
the display screen, when necessary, with a com-
mercially available microfiber cloth and cleaning
agent for TFT and LCD displays. Do not apply
pressure to the display surface when cleaning it,
as this could cause irreversible damage to the
display. Then, dry the surface with a dry micro-
fiber cloth.
20Overview
Overview and operation
Page 23 of 174
Avoid using alcoholic thinners, gasoline or abra-
sive cleaning agents. These could damage the
display surface.
Buttons and controller
Overview
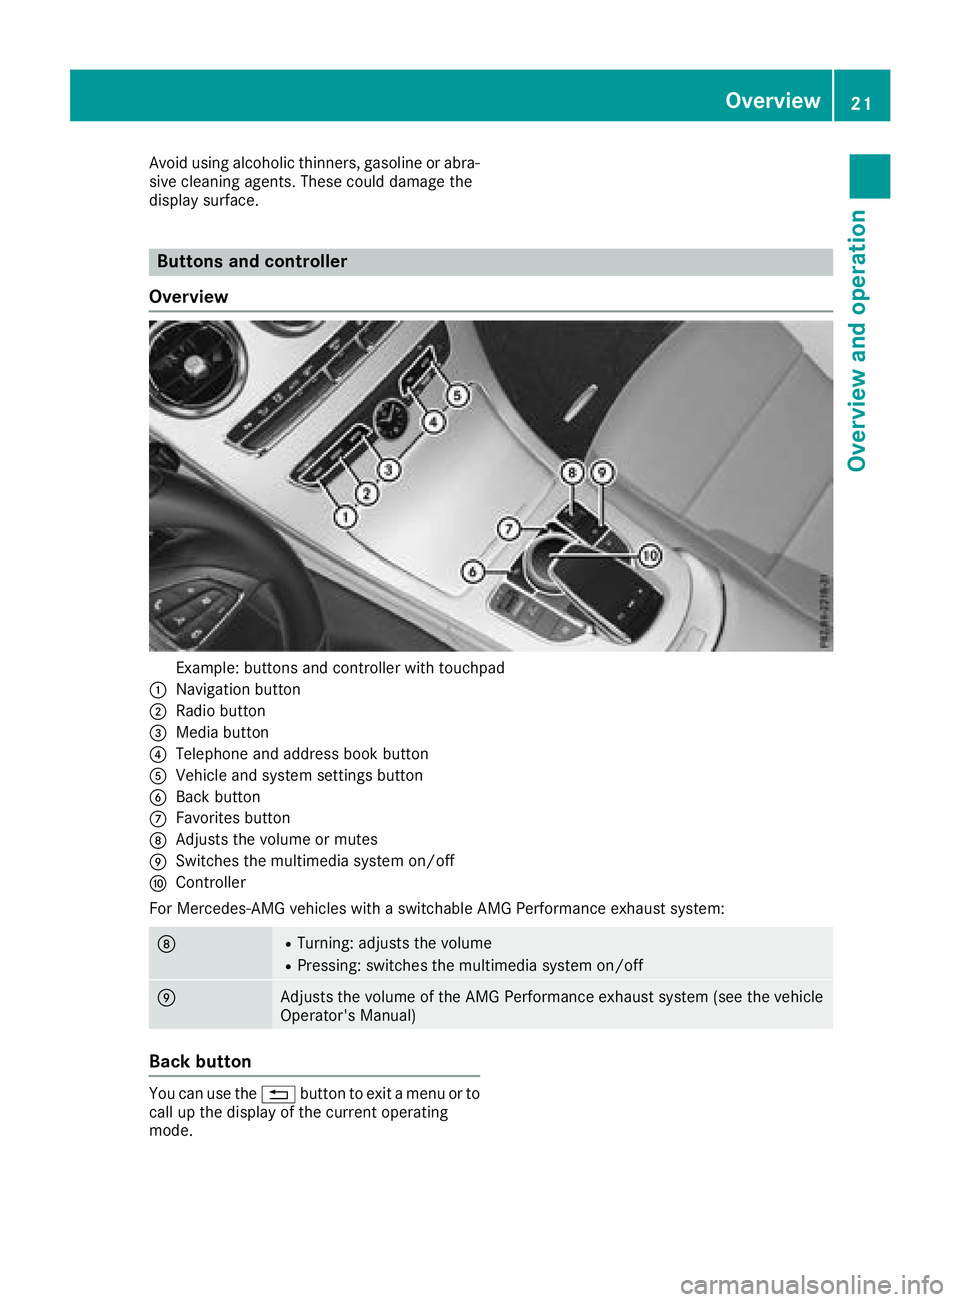
Example: buttons and controller with touchpad
:Navigation button
;Radio button
=Media button
?Telephone and address book button
AVehicle and system settings button
BBack button
CFavorites button
DAdjusts the volume or mutes
ESwitches the multimedia system on/off
FController
For Mercedes-AMG vehicles with a switchable AMG Performance exhaust system:
DRTurning: adjusts the volume
RPressing: switches the multimedia system on/off
EAdjusts the volume of the AMG Performance exhaust system (see the vehicle
Operator's Manual)
Back button
You can use the %button to exit a menu or to
call up the display of the current operating
mode.
Overview21
Overview and operation
Page 25 of 174
aRIn all menus: confirms the selected
entry in the list
RIn theRadio/Mediamenu: opens
the list of available radio sources
and media
RIn the Telephonemenu: switches
to the phone book and starts dial-
ing the selected number
ñSwitches off the Voice Control Sys-
tem (see the separate operating
instructions)
%Press briefly:
RBack
RIn the Radio/Mediamenu: dese-
lects the track, station list or list of
available radio sources and media
RHides display messages
RExits the telephone book/redial
memory
%Press and hold:
RCalls up the standard display in the
Tripmenu
Right control panel
~RRejects or ends a call
RExits the telephone book/redial
memory
6RMakes or accepts a call
RSwitches to the redial memory
W
XRAdjusts the volume
8RMute
óSwitches on the Voice Control Sys-
tem (see the separate operating
instructions)
Touchpad
Touchpad overview
!
Do not use any sharp objects on the touch-
pad. This could damage the touchpad.
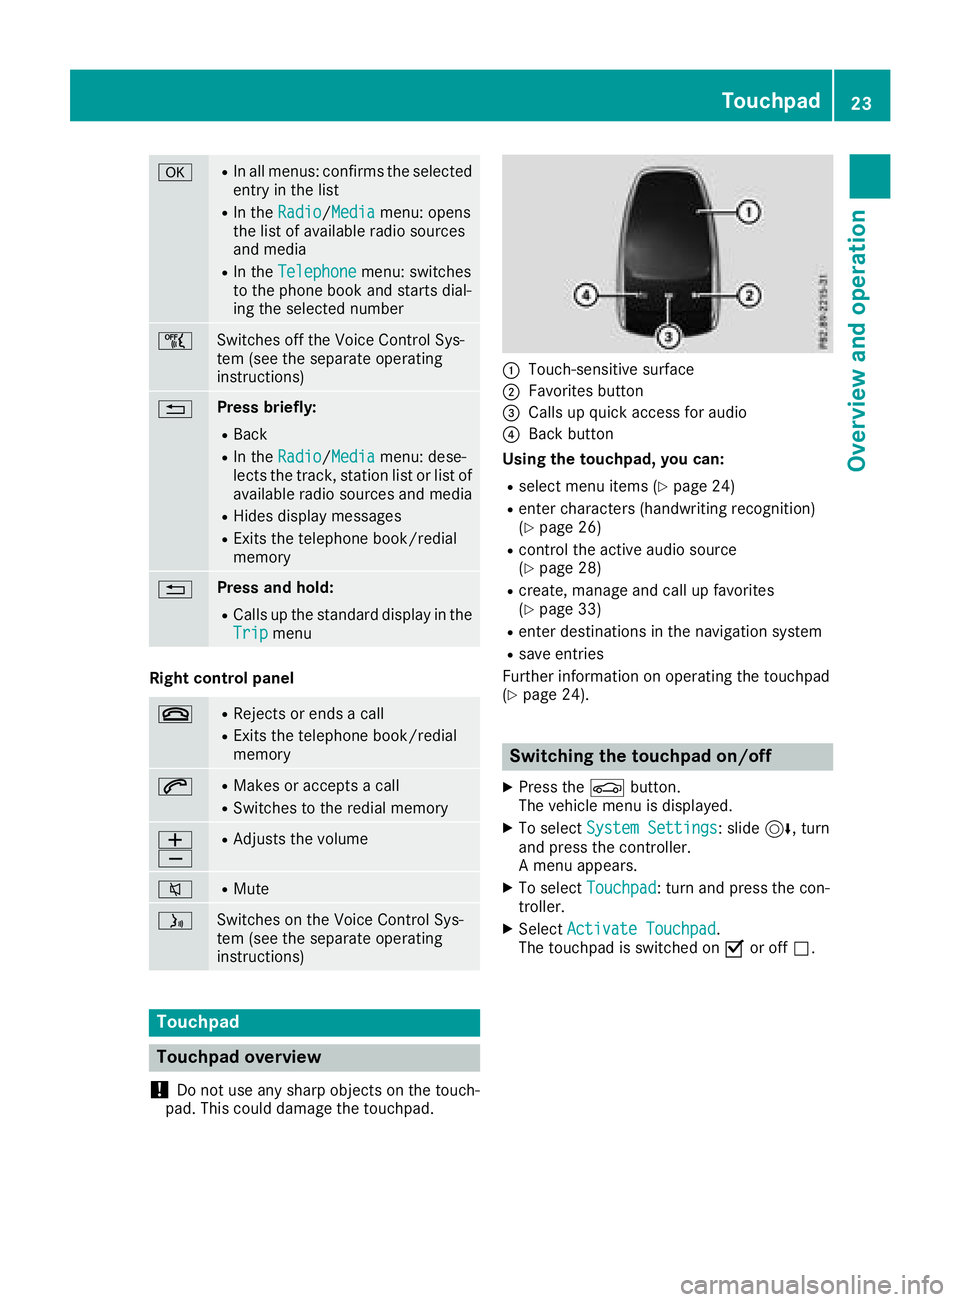
:Touch-sensitive surface
;Favorites button
=Calls up quick access for audio
?Back button
Using the touchpad, you can:
Rselect menu items (Ypage 24)
Renter characters (handwriting recognition)
(Ypage 26)
Rcontrol the active audio source
(Ypage 28)
Rcreate, manage and call up favorites
(Ypage 33)
Renter destinations in the navigation system
Rsave entries
Further information on operating the touchpad
(
Ypage 24).
Switching the touchpad on/off
XPress the Øbutton.
The vehicle menu is displayed.
XTo select System Settings: slide6, turn
and press the controller.
A menu appears.
XTo select Touchpad: turn and press the con-
troller.
XSelect Activate Touchpad.
The touchpad is switched on Oor off ª.
Touchpad23
Overview and operation
Page 30 of 174
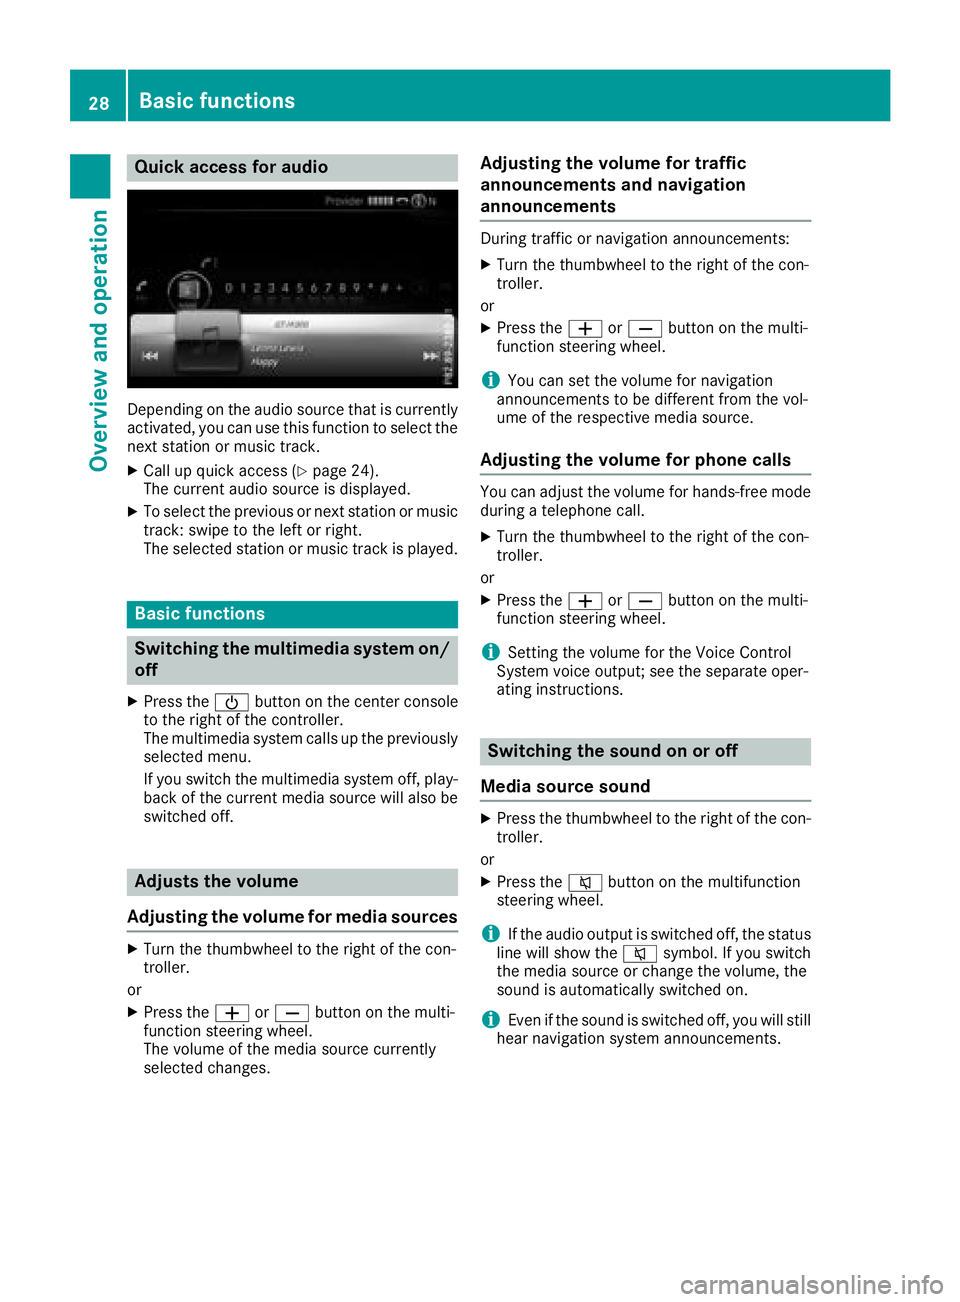
Quick access for audio
Depending on the audio source that is currently
activated, you can use this function to select the
next station or music track.
XCall up quick access (Ypage 24).
The current audio source is displayed.
XTo select the previous or next station or music
track: swipe to the left or right.
The selected station or music track is played.
Basic functions
Switching the multimedia system on/
off
XPress the Übutton on the center console
to the right of the controller.
The multimedia system calls up the previously
selected menu.
If you switch the multimedia system off, play- back of the current media source will also be
switched off.
Adjusts the volume
Adjusting the volume for media sources
XTurn the thumbwheel to the right of the con-
troller.
or
XPress the WorX button on the multi-
function steering wheel.
The volume of the media source currently
selected changes.
Adjusting the volume for traffic
announcements and navigation
announcements
During traffic or navigation announcements:
XTurn the thumbwheel to the right of the con-
troller.
or
XPress the WorX button on the multi-
function steering wheel.
iYou can set the volume for navigation
announcements to be different from the vol-
ume of the respective media source.
Adjusting the volume for phone calls
You can adjust the volume for hands-free mode
during a telephone call.
XTurn the thumbwheel to the right of the con-
troller.
or
XPress the WorX button on the multi-
function steering wheel.
iSetting the volume for the Voice Control
System voice output; see the separate oper-
ating instructions.
Switching the sound on or off
Media source sound
XPress the thumbwheel to the right of the con-
troller.
or
XPress the 8button on the multifunction
steering wheel.
iIf the audio output is switched off, the status
line will show the 8symbol. If you switch
the media source or change the volume, the
sound is automatically switched on.
iEven if the sound is switched off, you will still
hear navigation system announcements.
28Basic functions
Overview and operation
Page 31 of 174
Switching navigation announcements
off and on again
XTo switch off navigation announcements:
press the thumbwheel to the right of the con-
troller during the announcement.
TheSpoken driving recommendations
have been deactivated.message
appears.
XTo switch navigation announcements on
again: switch the multimedia system off and
then on again (
Ypage 28).
or
XStart a new route calculation (Ypage 59).
or
XWhile route guidance is active, show the
menu and select +(Ypage 74).
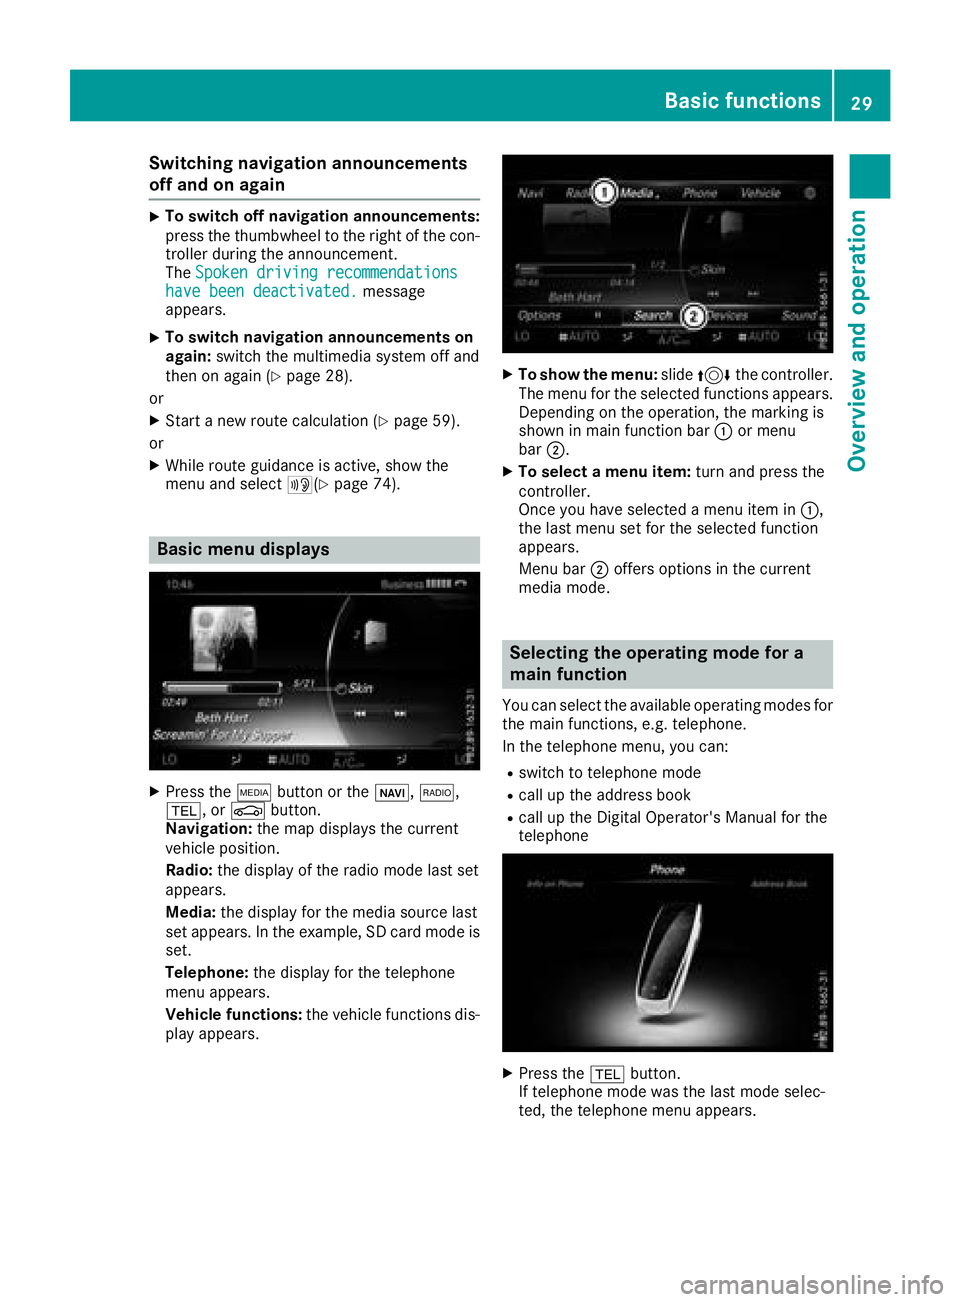
Basic menu displays
XPress theÕbutton or the ß,$,
%, or Øbutton.
Navigation: the map displays the current
vehicle position.
Radio: the display of the radio mode last set
appears.
Media: the display for the media source last
set appears. In the example, SD card mode is
set.
Telephone: the display for the telephone
menu appears.
Vehicle functions: the vehicle functions dis-
play appears.
XTo show the menu: slide4 the controller.
The menu for the selected functions appears.
Depending on the operation, the marking is
shown in main function bar :or menu
bar ;.
XTo select a menu item: turn and press the
controller.
Once you have selected a menu item in :,
the last menu set for the selected function
appears.
Menu bar ;offers options in the current
media mode.
Selecting the operating mode for a
main function
You can select the available operating modes for
the main functions, e.g. telephone.
In the telephone menu, you can:
Rswitch to telephone mode
Rcall up the address book
Rcall up the Digital Operator's Manual for the
telephone
XPress the %button.
If telephone mode was the last mode selec-
ted, the telephone menu appears.
Basic functions29
Overview and operation
Page 33 of 174

R&
Cancels input
RS
Inserts a paragraph
Ry
Uses a text template
Character entry (navigation)
Character entry options
You can enter characters using the controller or
the touch pad.With the controller, you enter
characters using a character bar. To enter using the touch pad,draw the character inthe entry
fiel d.The multimed iasystem supports th isusing
a handwrit ing recognition function.
Entering characters using the charac-
ter bar
:Characters STUTenteredbythe user
(orange)
;Characters automatically added bythe mul-
tim edia system EBÜLL
=Switches to keyword search
?Characters not currently availab le
ACurrently selected character
BCharacters currently available
CCharacter bar
The example shows theaddr ess entry
(
Ypage 57).
XTo enter a cha racter: turn,slide6or5
and press the controller.
Selected character :isentered inthe upper
lin e. The multimedia systemaddsthe missing
characters and shows the entry that best
matches the current input. The characters are availab
leB or not ?,
depending on the characters already entered and the data stored in the digital map.
The Gsymbol indicates that an entry exists
more than once.
XTo delete a cha racter: slide6and turn the
controller, then press it after selecting %.
XTo delete an entire entry:slide 6and turn
the controller, then after selecting %press
and hold down the controller until the entire
entry isdeleted.
XTo switch tokey word search: slide6and
turn the controller, then press it after select-
ing =(
Ypage 59).
XTo confi rman entry :slide 6and turn the
controller, then press it after selecting¬.
or
XSlid e5 the controller repeatedly until the
character bar disappears.
The location selection list appears. The selec-
ted entry is highlighted.
:Cursor
;Entry line
The example shows the character entry when
you save a destination as a nav igablecontact in
the addr ess book (
Ypage 58).
XTo select an input line: slide6and turn
the controller, then press itafter selecting 4
or 5.
or
XSlid e5 the controller repeatedly until the
character bar disappears.
XTurn and press the controller.
XTo move the cursor: select the input line.
XSlide6 and turn the controller, then press it
after selecting 2or3.
Character entry (navigation)31
Overview and operation
Page 34 of 174
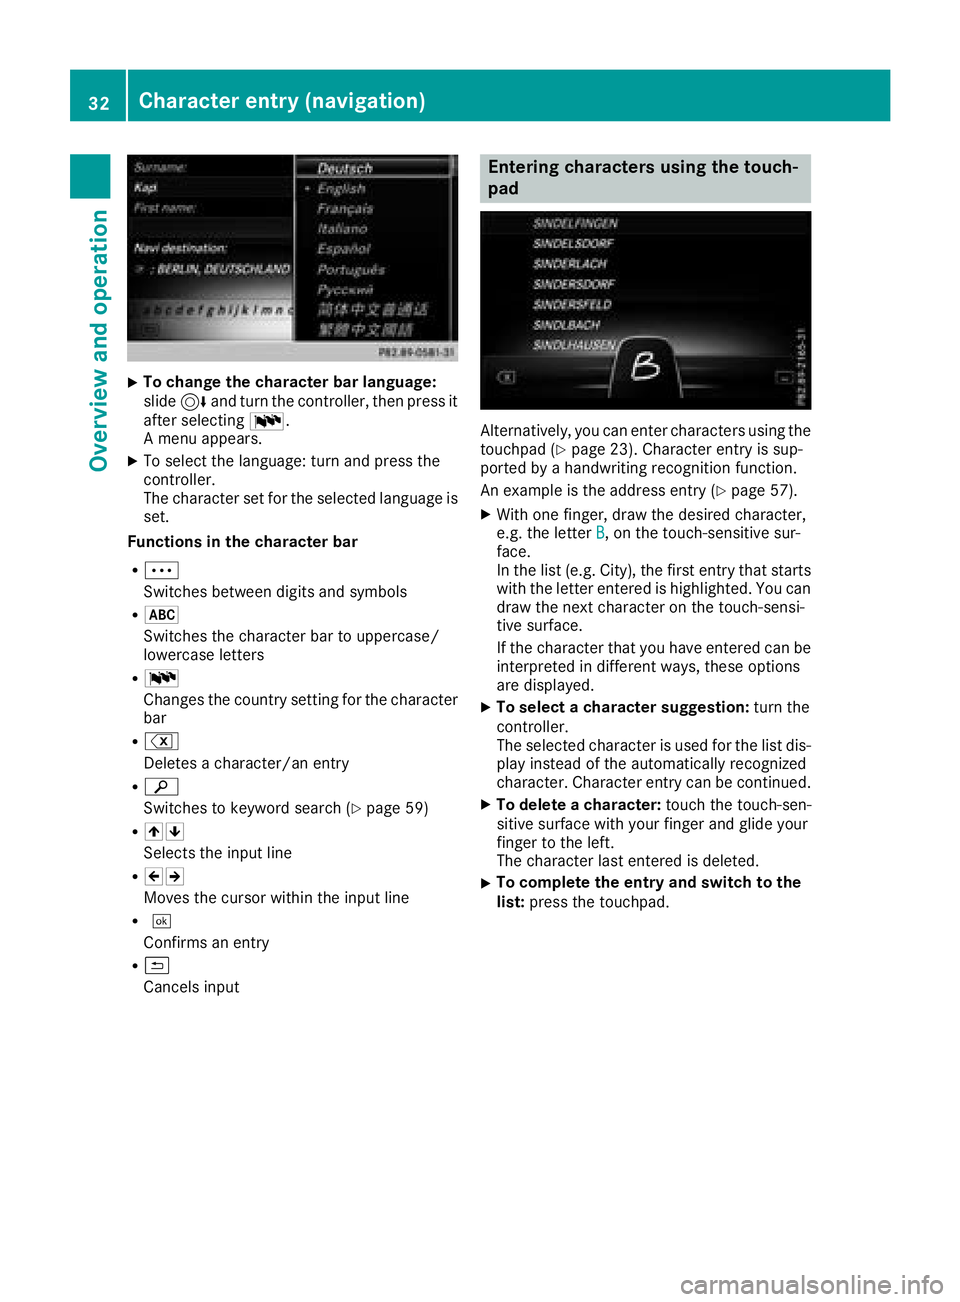
XTo change the character bar language:
slide6and turn the controller, then press it
after selecting B.
A menu appears.
XTo select the language: turn and press the
controller.
The character set for the selected language is set.
Functions in the character bar
RÄ
Switches between digits and symbols
R*
Switches the character bar to uppercase/
lowercase letters
RB
Changes the country setting for the character
bar
R%
Deletes a character/an entry
Rè
Switches to keyword search (
Ypage 59)
R45
Selects the input line
R23
Moves the cursor within the input line
R¬
Confirms an entry
R&
Cancels input
Entering characters using the touch-
pad
Alternatively, you can enter characters using the
touchpad (Ypage 23). Character entry is sup-
ported by a handwriting recognition function.
An example is the address entry (
Ypage 57).
XWith one finger, draw the desired character,
e.g. the letter B, on the touch-sensitive sur-
face.
In the list (e.g. City), the first entry that starts
with the letter entered is highlighted. You can
draw the next character on the touch-sensi-
tive surface.
If the character that you have entered can be
interpreted in different ways, these options
are displayed.
XTo select a character suggestion: turn the
controller.
The selected character is used for the list dis-
play instead of the automatically recognized
character. Character entry can be continued.
XTo delete a character: touch the touch-sen-
sitive surface with your finger and glide your
finger to the left.
The character last entered is deleted.
XTo complete the entry and switch to the
list: press the touchpad.
32Character entry (navigation)
Overview and operation
Page 38 of 174
Switching the display on/off
Switching off the display
XPress theØbutton.
or
XPress Vehiclein the main function bar.
The vehicle menu is displayed.
XTo select Display Off: slide6, turn and
press the controller.
The display goes out.
XTo switch the display on again: press the
controller.
Time settings
General information
The multimedia system can automatically set
the time and date.
The following navigation system functions
require the time, time zone and summer/stand-
ard time to be set correctly in order to work
properly:
Rroute guidance on routes with time-depend-
ent traffic guidance
Rcalculation of expected time of arrival
Switching automatic time on and off
The Automatic Time Settingsfunction is
used to activate or deactivate the automatic
setting of the time and date. This function is
activated when the vehicle leaves the factory.
XPress the Øbutton.
or
XPress Vehiclein the main function bar.
The vehicle menu is displayed.
XTo switch to the menu bar: slide 6the con-
troller.
XTo select Time: turn and press the controller.
A menu appears.
XTo switch AutomaticTimeSettingsonO
or off ª: turn and press the controller.
Setting the time zone
To set the time zone, the Automatic TimeSettingsfunction must be activated.
XPress theØbutton.
or
XPress Vehiclein the main function bar.
The vehicle menu is displayed.
XTo switch to the menu bar: slide 6the con-
troller.
XTo select Time: turn and press the controller.
A menu appears.
XTo select Time Zone:: turn and press the
controller.
A list of countries appears. The #dot indi-
cates the current setting.
XTo select the country in which you are
currently driving: turn and press the con-
troller.
The country is accepted.
A time zone list may also be displayed,
depending on the country selected.
XTo select the desired time zone: turn and
press the controller.
The time zone is accepted.
A list of available options for setting summer
time appears (
Ypage 36).
Setting summer and standard time
Using the Daylight Saving Timefunction,
you can set the automatic changeover to sum-
mer time or switch the summer time settings on and off. The changeover to summer time advan-
ces the time by one hour.
The Daylight
SavingTimefunction or Auto‐maticoption is not available in all countries.
XPress theØbutton.
or
XPress Vehiclein the main function bar.
The vehicle menu is displayed.
XTo switch to the menu bar: slide 6the con-
troller.
XTo select Time: turn and press the controller.
A menu appears.
XTo select Daylight Saving Time: turn and
press the controller.
A list of available options for setting summer
time appears.
XTo select Automatic,Onor Off: turn and
press the controller.
36Time settings
System settings
Page 42 of 174
XSelectChange SSID.
A dialog for entering the SSID appears.
XEnter the new SSID.
XSelect ¬.
XPress the controller.
From now on, when establishing a connec-
tion, the vehicle will be shown with the new
SSID both on the device to be connected and
in the Connect
UsingSecurityKeymenu.
iDevice connections established using the
previous SSID will no longer work after the
SSID is changed. You have to reconnect these
devices (
Ypage 38).
Bluetooth®settings
General information about Blue-
tooth®
Bluetooth®-capable devices, e. g. mobile
phones, need to comply with a certain profile in
order to be connected to the multimedia sys-
tem. Every Bluetooth
®device has its own spe-
cific Bluetooth®name.
Bluetooth®technology is a standard for short-
range wireless data transmissions up to approx-
imately 10 m.
Yo u can use Bluetooth
®to connect your mobile
phone to the multimedia system, for example:
Ruse the hands-free system
Restablish an Internet connection
Rlisten to music using Bluetooth®Audio
Rexchange vCards
Bluetooth®is a registered trademark of Blue-
tooth Special Interest Group (SIG) Inc.
Activating/deactivating Bluetooth®
X
Press the Øbutton.
or
XPress Vehiclein the main function bar.
The vehicle menu is displayed.
XTo switch to the menu bar: slide 6the con-
troller.
XTo select System Settings: turn and press
the controller.
A menu appears.
XTo activate Oor deactivate ªActivateBluetooth: turn and press the controller.
Automatic volume adjustment
General information
With the AutomaticVolumeAdjustmentfunc-
tion, the volumes of different audio sources are
adjusted for each other, to compensate for rel-
ative differences in volume.
For example: changing from a relatively quiet to
a relatively loud radio station. The volume for
both stations sounds the same. Manual read-
justment of the volume is not required.
The Automatic Volume Adjustment
function
is deactivated ªwhen the vehicle leaves the
factory. Using this function, the dynamic range
of the music is slightly reduced. To make the
most of the audiophile sound quality, it is rec-
ommended to leave it off.
Switching the automatic volume
adjustment on/off
XPress the Øbutton.
or
XPress Vehiclein the main function bar.
The vehicle menu is displayed.
XTo switch to the menu bar: slide 6the con-
troller.
XTo select System Settings: turn and press
the controller.
A menu appears.
XTo select Automatic Volume Adjustment:
turn and press the controller.
Switch the Automatic Volume Adjustment
function on Oor off ª.
Setting the system language
General information
This function allows you to determine the lan-
guage for the menu displays and the navigation
40Setting the system language
System settings
Page 43 of 174
messages. The selected language affects the
characters available for entry.
iThe navigation announcements are not
available in all languages. If a language is not
available, the navigation announcements will
be in English.
iWhen you set the system language, the lan-
guage of the Voice Control System will
change accordingly. If it is not supported by
the Voice Control System, English will be
selected.
Setting the system language
XPress the Øbutton.
or
XPress Vehiclein the main function bar.
The vehicle menu is displayed.
XTo switch to the menu bar: slide 6the con-
troller.
XTo select System Settings: turn and press
the controller.
A menu appears.
XTo select Language: turn and press the con-
troller.
The list of languages appears. The #dot indi-
cates the current setting.
XSelect the desired language.
The multimedia system loads the selected
language and sets it.
Calling up and editing the Favorites
function
The Favorites function can, depending on the
vehicle equipment, be called up as follows:
Rvia the System Settingsmenu
Rvia the Favorites button on the controller
(Ypage 21)
Rvia the Favorites button on the touchpad
(Ypage 23)
Calling up the Favorites function via the sys-
tem menu
XPress the Øbutton.
or
XPress Vehiclein the main function bar.
The vehicle menu is displayed.
XTo switch to the menu bar: slide 6the con-
troller.
XTo select System Settings: turn and press
the controller.
A menu appears.
XTo select Favorite Functions: press the
controller.
The favorites are displayed.
XTo select the desired function, e.g. Phone‐book: turn and press the controller.
Calling up the Favorites function via the
controller or touchpad
XPress the Favorites button on the controller or touchpad.
The menu for setting favorites appears.
XTo select the desired function, e.g. Phone‐book: turn and press the controller.
Exiting the Favorites function
XPress the Favorites button again.
or
XPress the %button.
Further information on favorites (
Ypage 33).
Importing/exporting data
General notes
!
Never remove the stick or card when writing
data to the USB stick or the memory card. You
may otherwise lose data.
Using this function you can do the following with
your personal data:
Rtransfer your data from one multimedia sys-
tem to another multimedia system
The transfer may be limited or not possible,
depending on the vehicle's equipment.
Rmake a backup copy of your personal data
(export data) and load it again (import data)
Rprotect your data from unwanted export by
activating a pin prompt (presetting: deactiva- ted ª)
You can either use an SD card or a USB storage
device (e.g. a USB stick) as temporary storage.
You can obtain further information on data
import and export from an authorized
Mercedes-Benz Center.
Importing/exporting data41
System settings
Z