headlamp MERCEDES-BENZ C230 KOMPRESSOR COUPE 2002 CL203 Owner's Manual
[x] Cancel search | Manufacturer: MERCEDES-BENZ, Model Year: 2002, Model line: C230 KOMPRESSOR COUPE, Model: MERCEDES-BENZ C230 KOMPRESSOR COUPE 2002 CL203Pages: 399
Page 5 of 399

2 Contents
Multifunction steering wheel,
multifunction display ............... 102
Trip and main odometer and
sub menu.................................... 106
Audio systems ................................ 108
Radio ............................................ 108
CD player ..................................... 109
Cassette player ........................... 110
Telephone ......................................... 111
Navigation system ........................... 116
Trip computer ................................. 117
Malfunction/warning
message memory ....................... 119
Individual settings......................... 121
Setting the audio volume.............. 136
Coolant temperature gauge .......... 137
Flexible service system (FSS) ...... 138
Engine oil level indicator .............. 141
Engine oil consumption ................ 142
Exterior lamp switch ..................... 143
Headlamp mode ............................. 144Night security illumination ......... 146
Locator lighting .......................... 147
Headlamp cleaning system .......... 147
Combination switch ...................... 148
Hazard warning flasher switch .... 151
Climate control .............................. 152
Automatic climate control............ 160
Front center console storage
compartment ventilation .......... 171
Rear passenger compartment
adjustable air outlets ............... 172
Operation Audio and
telephone ................................... 173
Operating safety ............................ 173
Operating and display elements .. 174
Button and soft key operation ...... 176
Component malfunctions ............. 195
Power windows .............................. 197
Sunshade for panorama
sliding/pop-up roof .................. 199
Panorama sliding/pop-up roof .... 200
Interior lighting ............................. 203
Sun visors ....................................... 205
Vanity mirrors................................ 205Interior............................................. 206
Storage compartments
and armrests ..............................206
Glove box ..................................... 207
Cup holder ...................................... 210
Ashtrays .......................................... 211
Lighter ............................................. 213
Parcel net in front passenger
footwell ....................................... 214
Split folding rear seat bench ........ 215
Luggage cover – removal
and installation ......................... 217
Loading instructions (vehicle
with enlarged cargo area) ........ 218
Cellular telephone ......................... 219
Telephone, general ........................ 220
Garage door opener ....................... 221
DrivingControl and operation of
radio transmitters ..................... 226
The first 1 000 miles
(1 500 km) ................................. 227
Page 7 of 399

4 Contents
LIGHTING SYSTEM .................... 300
LIGHT SENSOR........................... 302
DOOR............................................ 302
TRUNK OPEN ............................. 303
HOOD ........................................... 303
TELEPHONE – FUNCTION........ 304
TELE AID ..................................... 304
WASHER FLUID.......................... 305
RESTRAINT SYSTEM ................. 306
KEY ............................................... 306
FUEL RESERVE .......................... 307
UNDERVOLTAGE ........................ 307
STEERING WHEEL ADJUST. ..... 308
Practical hintsFirst aid kit...................................... 310
Stowing things in the vehicle ...... 311
Fuses ................................................ 311
Hood ................................................. 315
Automatic transmission
fluid level ................................... 317
Adding engine oil........................... 318
Coolant level ................................... 319Adding coolant ............................ 319
Windshield and headlamp
washer system .......................... 320
Spare wheel, storage
compartment ............................. 321
Vehicle tools and air pump .......... 322
Vehicle jack .................................... 323
Wheels ............................................ 324
Tire replacement........................ 324
Rotating wheels ......................... 325
Spare wheel .................................... 326
Changing wheels ........................... 327
Inflating the collapsible
spare tire ..................................... 333
Storing spare wheel in
wheel well ................................... 334
Tire inflation pressure ................. 335
Battery............................................. 336
Jump starting.................................. 338
Towing the vehicle ........................ 341
Transmission selector lever,
manually unlocking .................. 344
Exterior lamps ............................... 345
Replacing bulbs ......................... 345Changing batteries in the
electronic main key .................. 351
Synchronizing remote
control .......................................... 353
Emergency engine shut-down ..... 353
Fuel filler flap, manual release ... 354
Replacing wiper blade insert ....... 356
Roof rack ......................................... 357
Vehicle careCleaning and care of
the vehicle.................................. 360
Power washer.............................. 361
Tar stains ..................................... 361
Paintwork, painted body
components ................................. 361
Engine cleaning.......................... 362
Vehicle washing ......................... 362
Ornamental moldings................ 363
Headlamps, taillamps,
turn signal lenses ...................... 363
Window cleaning........................ 363
Wiper blade ................................. 363
Page 26 of 399
23 Instruments and controls
Te ch n i c a l
data Instruments
and controlsOperation DrivingInstrument
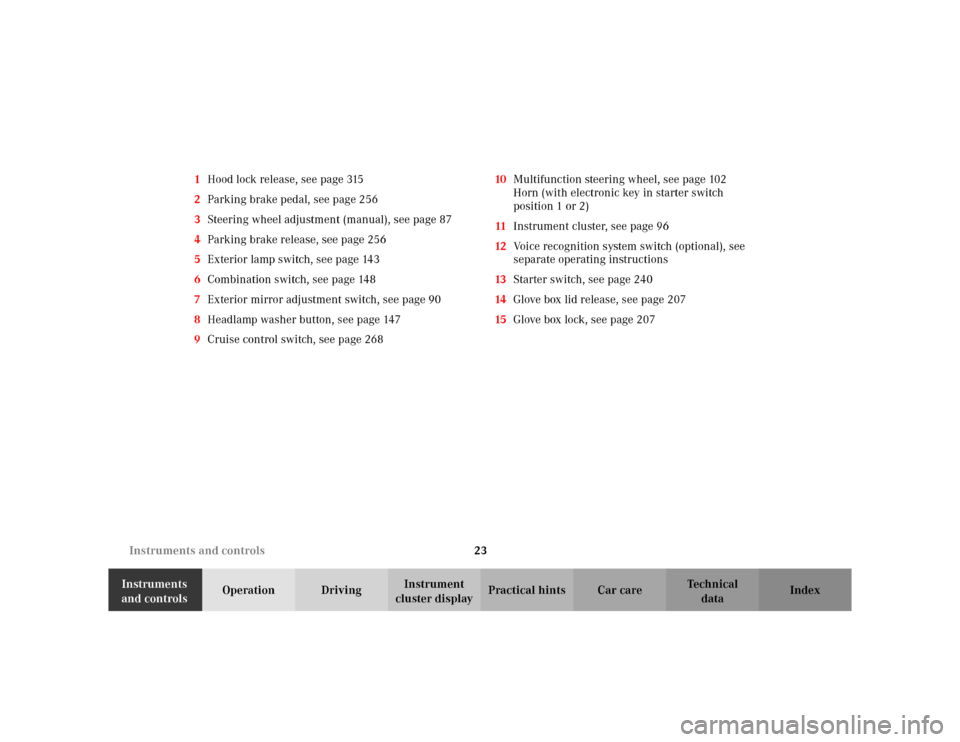
cluster displayPractical hints Car care Index 1Hood lock release, see page 315
2Parking brake pedal, see page 256
3Steering wheel adjustment (manual), see page 87
4Parking brake release, see page 256
5Exterior lamp switch, see page 143
6Combination switch, see page 148
7Exterior mirror adjustment switch, see page 90
8Headlamp washer button, see page 147
9Cruise control switch, see page 26810Multifunction steering wheel, see page 102
Horn (with electronic key in starter switch
position 1 or 2)
11Instrument cluster, see page 96
12Voice recognition system switch (optional), see
separate operating instructions
13Starter switch, see page 240
14Glove box lid release, see page 207
15Glove box lock, see page 207
Page 30 of 399
27 Contents - Operation
Te ch n i c a l
data Instruments
and controlsOperationDrivingInstrument
cluster displayPractical hints Car care Index Individual settings......................... 121
Setting the audio volume.............. 136
Coolant temperature gauge .......... 137
Flexible service system (FSS) ...... 138
Engine oil level indicator .............. 141
Engine oil consumption ................ 142
Exterior lamp switch ..................... 143
Headlamp mode ............................. 144
Night security illumination.......... 146
Locator lighting .......................... 147
Headlamp cleaning system .......... 147
Combination switch....................... 148
Hazard warning flasher switch ... 151
Climate control ............................... 152
Automatic climate control ............ 160Front center console storage
compartment ventilation .......... 171
Rear passenger compartment
adjustable air outlets ............... 172
Operation Audio and
telephone ................................... 173
Operating safety ............................ 173
Operating and display elements .. 174
Button and soft key operation ...... 176
Component malfunctions ............. 195
Power windows .............................. 197
Sunshade for panorama
sliding/pop-up roof .................. 199
Panorama sliding/pop-up roof .... 200
Interior lighting ............................. 203
Sun visors ....................................... 205
Vanity mirrors................................ 205
Interior ............................................ 206Storage compartments
and armrests ..............................206
Glove box ..................................... 207
Cup holder ...................................... 210
Ashtrays .......................................... 211
Lighter ............................................. 213
Parcel net in front passenger
footwell ....................................... 214
Split folding rear seat bench ........ 215
Luggage cover – removal
and installation ......................... 217
Loading instructions (vehicle
with enlarged cargo area) ........ 218
Cellular telephone ......................... 219
Telephone, general ........................ 220
Garage door opener ....................... 221
Page 126 of 399
123 Multifunction steering wheel, multifunction display
Te ch n i c a l
data Instruments
and controlsOperationDrivingInstrument
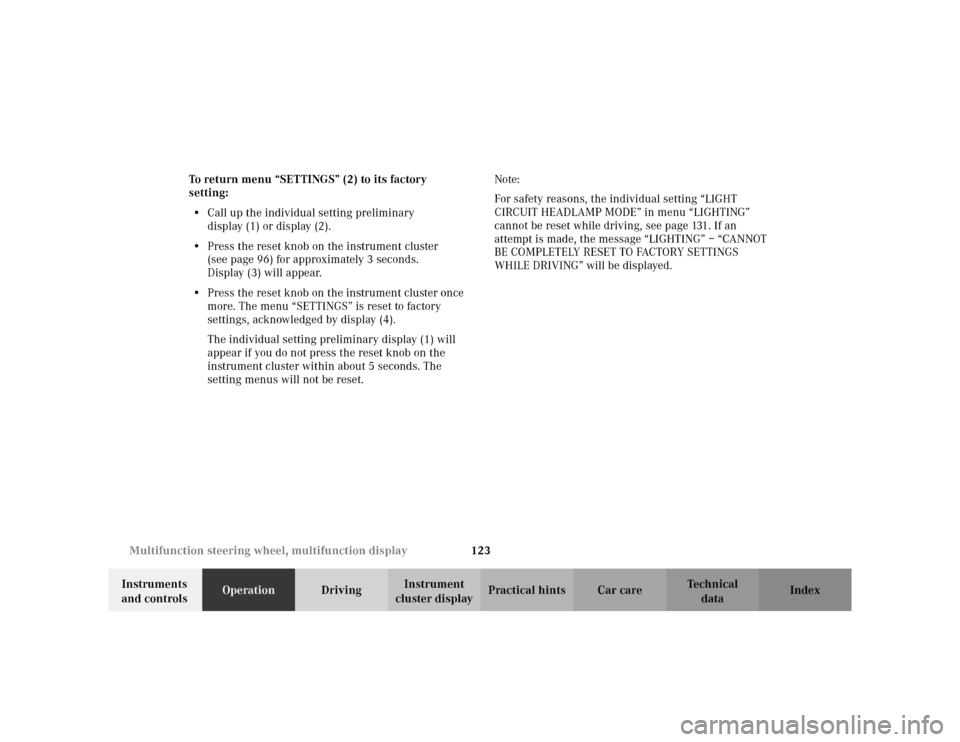
cluster displayPractical hints Car care Index To return menu “SETTINGS” (2) to its factory
setting:
•Call up the individual setting preliminary
display (1) or display (2).
•Press the reset knob on the instrument cluster
(see page 96) for approximately 3 seconds.
Display (3) will appear.
•Press the reset knob on the instrument cluster once
more. The menu “SETTINGS” is reset to factory
settings, acknowledged by display (4).
The individual setting preliminary display (1) will
appear if you do not press the reset knob on the
instrument cluster within about 5 seconds. The
setting menus will not be reset.Note:
For safety reasons, the individual setting “LIGHT
CIRCUIT HEADLAMP MODE” in menu “LIGHTING”
cannot be reset while driving, see page 131. If an
attempt is made, the message “LIGHTING” – “CANNOT
BE COMPLETELY RESET TO FACTORY SETTINGS
WHILE DRIVING” will be displayed.
Page 132 of 399
129 Multifunction steering wheel, multifunction display
Te ch n i c a l
data Instruments
and controlsOperationDrivingInstrument
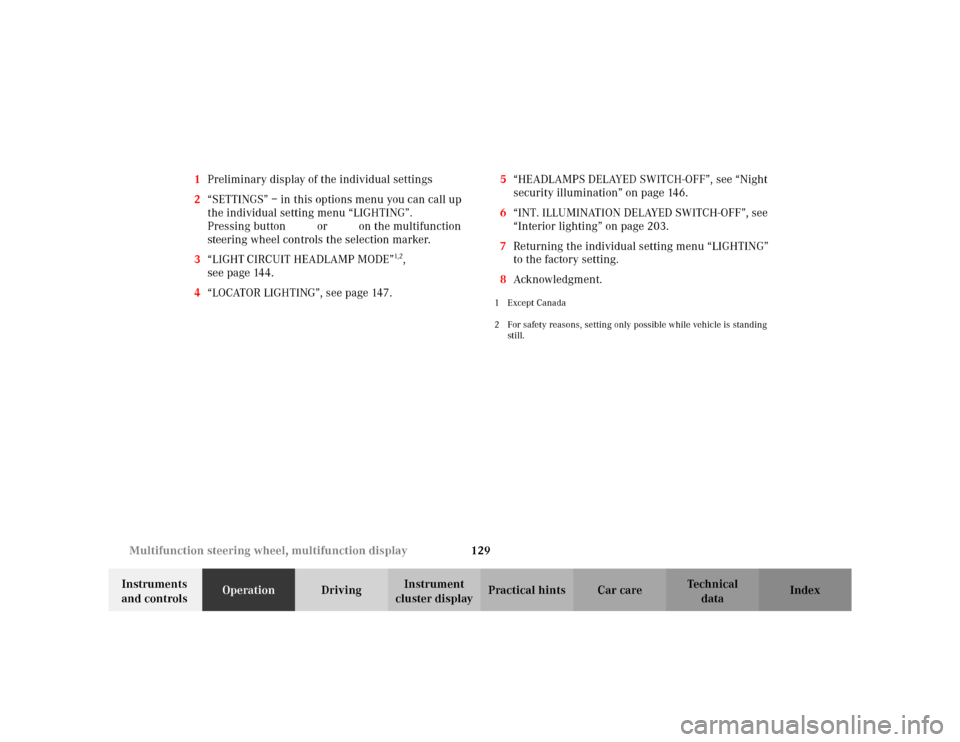
cluster displayPractical hints Car care Index 1Preliminary display of the individual settings
2“SETTINGS” – in this options menu you can call up
the individual setting menu “LIGHTING”.
Pressing buttonæ orç on the multifunction
steering wheel controls the selection marker.
3“LIGHT CIRCUIT HEADLAMP MODE”
1,2,
seepage144.
4“LOCATOR LIGHTING”, see page 147.5“HEADLAMPS DELAYED SWITCH-OFF”, see “Night
security illumination” on page 146.
6“INT. ILLUMINATION DELAYED SWITCH-OFF”, see
“Interior lighting” on page 203.
7Returning the individual setting menu “LIGHTING”
to the factory setting.
8Acknowledgment.
1Except Canada
2 For safety reasons, setting only possible while vehicle is standing
still.
Page 134 of 399
131 Multifunction steering wheel, multifunction display
Te ch n i c a l
data Instruments
and controlsOperationDrivingInstrument
cluster displayPractical hints Car care Index To return menu “LIGHTING” (3 to 6) to its factory
setting:
•Call up menu (3 to 6).
•Press the reset knob on the instrument cluster (see
page 96) in the instrument cluster for approximately
3 seconds. Display (7) will appear.
•Press the reset knob on the instrument cluster once
more. The individual setting menu “LIGHTING” is
reset to factory settings, acknowledged by
display (8).
The individual setting display “SETTINGS” (2) will
appear if you do not press the reset knob on the
instrument cluster within about 5 seconds. The
setting menus will not be reset.Note:
For safety reasons, the individual setting “LIGHT
CIRCUIT HEADLAMP MODE” in menu “LIGHTING”
cannot be reset while driving. If an attempt is made, the
message “LIGHTING” – “CANNOT BE COMPLETELY
RESET TO FACTORY SETTINGS WHILE DRIVING” will
be displayed.
Page 146 of 399
143 Exterior lamp switch
Te ch n i c a l
data Instruments
and controlsOperationDrivingInstrument
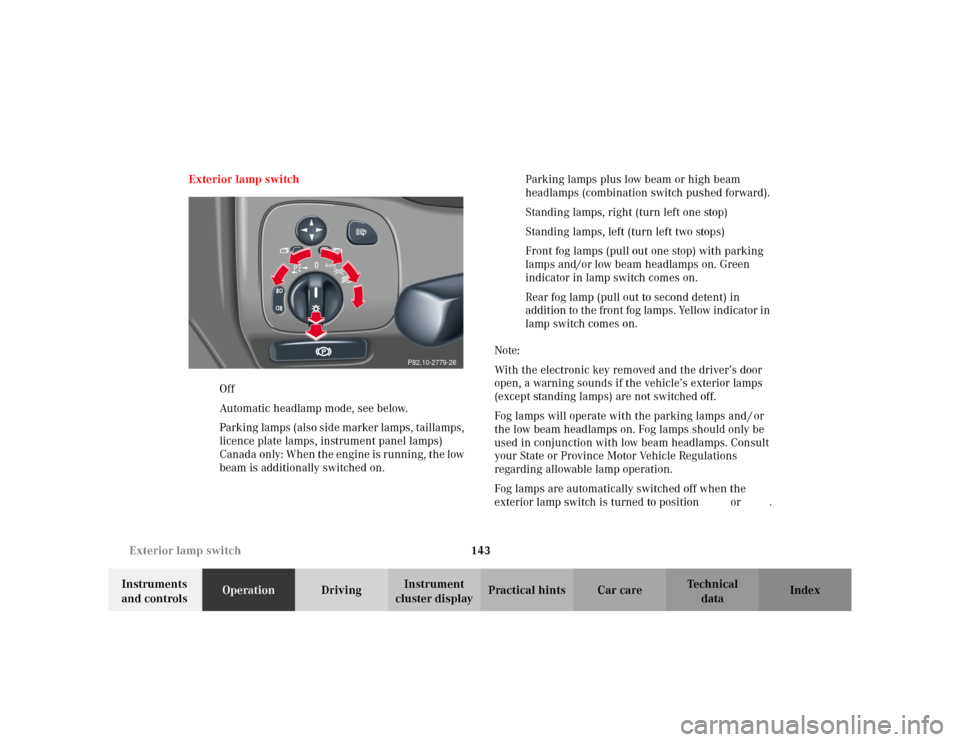
cluster displayPractical hints Car care Index Exterior lamp switch
MOff
UAutomatic headlamp mode, see below.
CParking lamps (also side marker lamps, taillamps,
licence plate lamps, instrument panel lamps)
Canada only: When the engine is running, the low
beam is additionally switched on.BParking lamps plus low beam or high beam
headlamps (combination switch pushed forward).
ˆStanding lamps, right (turn left one stop)
‚Standing lamps, left (turn left two stops)
‡Front fog lamps (pull out one stop) with parking
lamps and/or low beam headlamps on. Green
indicator in lamp switch comes on.
†Rear fog lamp (pull out to second detent) in
addition to the front fog lamps. Yellow indicator in
lamp switch comes on.
Note:
With the electronic key removed and the driver’s door
open, a warning sounds if the vehicle’s exterior lamps
(except standing lamps) are not switched off.
Fog lamps will operate with the parking lamps and / or
the low beam headlamps on. Fog lamps should only be
used in conjunction with low beam headlamps. Consult
your State or Province Motor Vehicle Regulations
regarding allowable lamp operation.
Fog lamps are automatically switched off when the
exterior lamp switch is turned to position M or U.
P82.10-2779-26
Page 147 of 399
144 Exterior lamp switch
Te ch n i c a l
data Instruments
and controlsOperationDrivingInstrument
cluster displayPractical hints Car care Index
Headlamp mode
Manual headlamp mode
The low beam headlamps and parking lamps can be
switched on and off with the exterior lamp switch. For
exterior lamp switch, see above.
Note:
With the daytime running lamp mode activated and the
engine running, the low beam headlamps cannot be
switched off manually.Automatic headlamp mode
Turn exterior lamp switch to positionU.
•Electronic key in starter switch position 1:
The parking lamps switch on and off automatically
depending on the brightness of the ambient light.
•Electronic key in starter switch position 2 and the
engine running:
The low beam headlamps and parking lamps are
switched on and off automatically depending on the
brightness of the ambient light.
The low beam headlamps and parking lamps can
still be switched on and off manually using the
exterior lamp switch.
Note:
With the daytime running lamp mode activated, the low
beam headlamps cannot be switched off manually.
The headlamps will not be automatically switched on
under foggy conditions.
Front fog lamps and rear fog lamp cannot be switched
on manually with exterior lamp switch in positionU.
To activate the fog lamps turn exterior switch to
positionB.
Wa r n i n g !
The driver is responsible for the operation of the
vehicle’s lights at all times. The automatic
headlamp feature is only an aid to the driver.
Switch on the vehicle lights by hand when driving
or traffic conditions require you to do so.
Page 148 of 399
145 Exterior lamp switch
Te ch n i c a l
data Instruments
and controlsOperationDrivingInstrument
cluster displayPractical hints Car care Index Daytime running lamp mode
Turn exterior lamp switch to positionM orU.
When the engine is running, the low beam headlamps
are automatically switched on. In low ambient light
conditions the parking lamps will also switch on.
•Canada only:
When shifting from a driving position to
position “N” or “P”, the low beam switches off
(3 minutes delay).
For nighttime driving the exterior lamp switch
should be turned to position B to permit
activation of the high beam headlamps.•USA only:
The high beam headlamps can also be activated
when driving with the daytime running lamp mode
activated and exterior lamp switch in positionM.
To activate the daytime running lamp mode, see the
individual setting menu “LIGHTING” – “LIGHT
CIRCUIT HEADLAMP MODE” on page 128.
Note:
See page 143 for notes on the exterior lamp switch.